This guide describes how to set up personalized content to enhance how users interact with your portal application.
Personalized content can include content or images targeted to specific users or audiences. For example, you can create dynamic images or links that are personalized for each user. You could dynamically guide users through a process (such as signing up for employee benefits or shopping online) that takes them to different places based on their personal preferences or characteristics.
You can even record the path users take through your portal to gauge the effectiveness of the portal, its design, or your process flows. This Behavior Tracking provides information that can validate your strategies or help you make improvements.
Developers use Workshop for WebLogic to set up Personalization features, such as Campaigns, Content Selectors, Placeholders, and User Segments. Developers can also create rules for Personalization and events for Behavior Tracking. Portal administrators use the WebLogic Portal Administration Console to modify Campaigns, Content Selectors, Placeholders, and User Segments to fit the needs of the portal's audience.
Developing Interaction Management features often involves setting up related pieces. For example, if you want to target users with personalized content in a Campaign, you have to add content to BEA's Virtual Content Repository, create Placeholders that display the content, set up properties (such as User Profile or session properties) that are used to define the conditions under which users will be targeted with Campaign content, and finally, create the Campaign.
This chapter describes the tools you can use to create Interaction Management features and the logic that drives the tools. Each tool uses a rules engine to match users with appropriate content.
Using Interaction Management Tools
You can use the following tools to create and maintain Interaction Management features in the portal life cycle:
BEA Workshop for WebLogic Platform - Developers create the following items:
User Segments, Property Sets, Content Selectors, Placeholders, Campaigns and Behavior Tracking - Create these Personalization features and then use Java Server Page (JSP) tags or controls to enable the feature in a Page Flow or JSP.
JSP Tags - Use JSP tags to display personalized content to users. For example, Campaigns show web content using a JSP tag called a Placeholder: <ph:placeholder name="myPlaceholder1"/>. You can add JSP Placeholder tags (identified by the name attribute) anywhere in your portal's JSPs. For more information on Java classes, see the Javadoc
Java Controls - Use Java controls (predefined Java functionality) in your Page Flows and Web Services to display personalized content. For example, you can use the Rules Executor control to help determine a user's path through a Page Flow based on specific conditions, such as User Profile values or session properties. For more information on controls, see the Controls Javadoc.
Java API - Developers can also utilize a full API to programmatically develop Interaction Management functionality.
WebLogic Portal Administration Console - Portal Administrators can modify values and some properties for User Segments, Property Sets, Content Selectors, Placeholders, and Campaigns. They can also change the target audience that will see Personalization features, or modify Campaign dates. Administrators can use the Administration Console to test the new features you have developed and adjust the target audience. If you need to modify or fine tune any of them, you can use Workshop for WebLogic to return to the Development phase and make changes. You must redeploy your portal application to see the changes in the Staging environment.
Understanding the Features
Workshop for WebLogic provides the following features to help you deliver personalized content:
Property Sets - A Property Set Editor lets developers define User Profile properties, request properties, session properties, and custom events to create conditions that uniquely identify users. For example, you can create a NewHire property to target new users with benefit enrollment information. An Employee property set could have an attribute (or property) called NewHire, as well as HireDate.
User Segments - User Segments help you dynamically categorize users based on conditions or criteria that define the target visitor. For example, you can define conditions that dynamically identify gender, occupation, movie fans, or pet lovers.
Content Selectors - A Content Selector targets users with personalized web content from BEA's Virtual Content Repository. For example, you can display a list of recommended movies to users identified as movie fans.
Campaigns - Campaigns let you target specific users with a single piece of personalized content, automatically send them a predefined e-mail, or provide a discount in a commerce application. Campaigns run for a limited time and drive online behavior and Personalization to achieve a specific business goal.
Placeholders - Campaigns use Placeholders to display personalized content on a portal page. A Placeholder is a predefined location in a JSP that displays a single piece of web content retrieved from the BEA Virtual Content Repository. A Placeholder uses queries to retrieve and display content, and can rotate the content to display something different on each browser refresh. Campaigns are targeted to Placeholders.
Events and Behavior Tracking - Events let you create actions that happen in a user's interaction with your portal, or respond to actions that occur. Events, such as a user clicking a button or registering in your portal, can trigger a Campaign. You could generate an event when a user logs in or logs out. You can also use a Campaign to respond in real time to an event. For example, if a user clicks an image, an event is generated. You would know which image is clicked and you can display other information in another portlet. For example, you clicked a camera image and camera accessories display in another portlet.
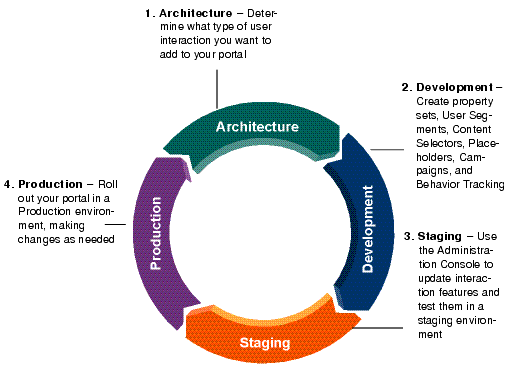
The tasks in this guide are organized according to the portal life cycle. The portal life cycle contains four phases: Architecture, Development, Staging, and Production. Adding Personalization and user interaction to your portal is an important part of the portal life cycle. For more information about the portal life cycle, see the WebLogic Portal Overview.
Figure 1-1 shows which Interaction Management tasks occur in each phase.
Figure 1-1 Interaction Management Tasks in the Four Phases of the Portal Life Cycle
Architecture
In the Architecture phase, you plan the type of interaction that your portal users will experience. Architects decide who to target, what type of personalized content users will see, how often the content changes, and how to update the content. For more information about the portal life cycle, see the WebLogic Portal Overview.
The following chapters provide guidance on Architecture tasks:
Planning an Interaction Strategy describes when to use different types of Personalization and explains the relationships between the Interaction Management features.
Setting up Content describes the properties you can add to content items in BEA's Virtual Content Repository that support Interaction Management functionality.
Development
In the Development phase, developers use Workshop for WebLogic to create user property sets and properties, User Segments, Placeholders, Content Selectors, Campaigns, and Behavior Tracking to add Personalization without custom coding. Developers can also work directly with the Java API to add Personalization.
Personalization features allow you to target users with personalized web content, display a single piece of web content retrieved from the BEA Virtual Content Repository, automatically send a user a predefined e-mail, or provide a discount in a commerce application. Developers can also categorize users based on specific characteristics or criteria and then target those User Segments.
Tools: Workshop for WebLogic and the Java API.
The following chapters provide instructions on Development tasks:
Creating a Property Set provides instructions on how to set up conditions that drive Interaction Management and the choices you need to make.
Creating a User Segment describes how to dynamically group users based on conditions you define.
Creating a Content Selector describes Content Selectors and how to use them to display multiple personalized content items from the virtual content repository.
Creating a Placeholder describes Placeholders and how to use them to display single content items from the Virtual Content Repository. This chapter describes how to use Placeholders by themselves to display non-personalized content and how to use them with Campaigns to display personalized content.
Building a Campaign provides the setup steps and things to consider when building a Campaign.
Setting Up Events and Behavior Tracking describes the event framework and when to use predefined Behavior Tracking events. The chapter also discusses when and how to create regular events and custom events for Behavior Tracking, and how to use events in a Campaign.
Creating Advanced Personalization with Rules explains how to customize rules to create advanced Personalization. This type of Personalization can help you do things like control each user's path through a Page Flow or use runtime information to determine conditional logic.
Staging
In the Staging phase, portal administrators use a browser to test the Content Selectors, Placeholders, Campaigns, and so on that developers created in the Development phase. If any of the functionality needs to change, you can use the Administration Console to make changes, or return to the Development phase and use Workshop for WebLogic and make changes. Developers can also utilize the Java API. Developers must redeploy the portal application to see the changes in the Staging environment. The Development phase and the Staging phase often occur simultaneously.
Tools: Administration Console.
The following chapters provide instructions on Staging tasks:
Managing a Campaign gives instructions on making changes to a Campaign, including the start or stop date and modifying the query user name.
Production
After developers test the portal application in the Staging phase, portal administrators use the Production phase to fine-tune the live production environment. For example, in the Production phase, administrators could use the Administration Console to modify Placeholders, Content Selectors, or Campaigns. They can change a Campaign's effective dates, update web content, modify the discount offered in a catalog, or add a new User Segment to attract a different audience.
If you need to change any of these features, developers can use Workshop for WebLogic to return to the Development phase and make changes. Developers must redeploy the portal application to see the changes in the Staging and Production environments.
Tools: Administration Console.
See Part IV: Production for guidance on Production tasks.
Getting Started
If you are new to portal development, see the WebLogic Portal Overview for more information about the portal life cycle.