 Understanding PeopleSoft Order Management Pricing
This chapter provides an overview of sales order pricing and margin adjustments and discusses how to:
Establish prerequisites for margin adjustments.
Create margin adjustments during sales order entry.
Understanding PeopleSoft Order Management PricingThis section discusses:
How pricing occurs on the sales order.
Margin adjustments.
Pricing can occur at many levels in PeopleSoft Order Management. For simple scenarios, use the standard discount or buying agreement to drive pricing. You can set up complex rules and formulas using PeopleSoft Enterprise Pricer. From the order, you can make additional adjustments to margins.
See Also
PeopleSoft Enterprise Pricer 9.0 PeopleBook
 How Pricing Occurs on the Sales Order
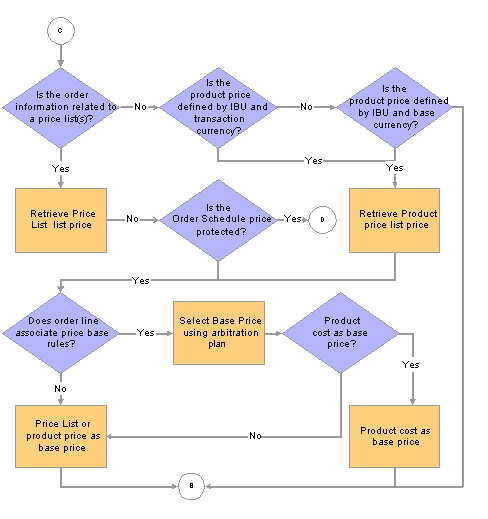
Here is an example of how pricing is determined on a sales order in PeopleSoft Order Management.
During sales order entry, the arbitration ID is defaulted to the sales order or buying agreement from the sold to customer, the pricing customer group associated with the sold to customer, or the arbitration plan marked as the default for the transaction being priced. When the CSR creates or modifies a sales order or quote, PeopleSoft Enterprise Pricer is called.
The list price is retrieved based on the price list lookup option defined for the sales order transaction in PeopleSoft Enterprise Pricer:
Price lists associated with price list fields defined for the pricing transaction. The system selects the first active list price in the defined priority order if “lookup in priority order” is defined for the transaction.
The best (lowest) price for price lists associated with price list fields is selected if “consider all prices” is defined for the transaction.
The base price established for the product is selected if the system finds no price defined in the price lists. This is always the default.
Note. The Order Management transactions (sales order, quote, and buying agreement) are delivered with the list price lookup option “consider all prices”.
PeopleSoft Enterprise Pricer then retrieves any price rule conditions that match the transaction and applies the price formulas to the base price. The applicable price rules and formulas are applied in the order as defined by the arbitration plan. The pricing engine returns an audit list of the price rules and adjustments which are applied to the transaction at pricing time. These price adjustment audits are saved with the order line/schedule.
When a buying agreement line is created, you can optionally enter an arbitration plan ID as the exclusive pricing ID. If an arbitration plan is entered, the system calls PeopleSoft Enterprise Pricer. The net unit price returned from the pricing engine is used as the net price on the buying agreement line. When the sales order or quote is priced with a buying agreement line assigned to it, the price comes directly from the buying agreement line.
Note. When you enable the Allow Adjustments to Buying Agreement Price option, you can change the price on the sales order even if it is a buying agreement price.
The Applicable to Buying Agreement option on the Price Rules, Formulas page enables you to create price rules that specifically apply to buying agreement prices.
The Price and Availability component enables you to price a transaction without actually creating the sales order or quote. You can enter the same information as on the sales order or quote. You can select a base price from the Inventory business unit base price or let the system automatically select a base (list) price from the price lists. The system then applies all price rule formula adjustments. As in sales order processing, PeopleSoft Enterprise Pricer returns an audit list of the price rules and formulas that are applied at pricing time.
Batch pricing for the sales order or quote works the same way as the online pricing of the sales order or quote. Depending on how you have set up your online pricing installation options, pricing during order entry will occur in the background or when you save or select the price order button from the order entry or the shipment schedules page.
Note. The entire sales order or quote is priced every time a line or schedule is priced. This means new adjustments that may apply to previously entered lines will occur with every change or newly entered line.
The diagrams illustrate how pricing occurs on the sales order.

Pricing the sales order (1 of 3)
Pricing the sales order (2 of 3)
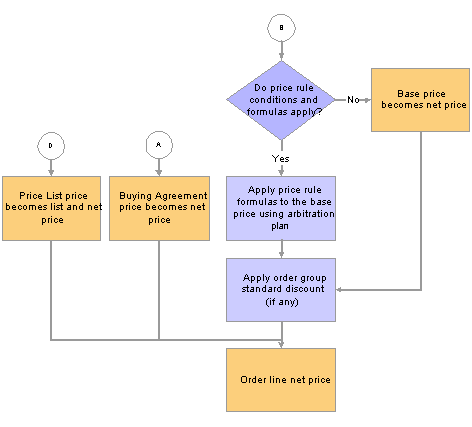
Pricing the sales order (3 of 3)
Margin AdjustmentsThe CSR can quickly and easily manipulate the sales order or the quotation to meet specific prices, and achieve specific margins, in order to secure additional customer business, as well as meet overall budgetary margin goals. Margin adjustments can be done online for individual orders or using a process to access a range of orders, customers, and products. PeopleSoft Enterprise Pricer performs the initial pricing for the order.
The ability to adjust margins on the sales order is controlled by a setting on the Order Entry Feature page. Since it is such a powerful feature, you control the ability to adjust margins using Feature Function security. You may decide to let all of your CSRs view the margin adjustment information, but only allow certain CSRs the ability to change the margin on the sales order or even refine it further by only letting them make adjustments on the Order Entry Form.
The products that can be updated using margin manipulation are controlled by a setting on the Product Options page. You can add a value for an alternate cost adjustment factor in cases where you want to add additional costs to the unit cost. These options are available on the Product Options and Product Group Table page. You can additionally set up exceptions to the alternate cost by Inventory or Order Management Business Unit for pricing product groups.
The defaulting order to determine the Alternate Cost Adjustment Factor is:
Product value.
Product group value.
Inventory Business Unit or the Order Management Business Unit from the Product Group Exception List from the product group.
Note. If there are two conflicting override values, the higher of the two values will be used. For example, you may have the Order Management Business Unit adjustment factor as 20 percent and the Inventory Business Unit as 18 percent. The system would use the Order Management Business Unit value in this example.
You also determine if you want adjustments made to the product or product group. The Pricing Option field controls whether you can change the price of the product or product group. The options are:
KVI: (known value item): Designated products or groups of products where the selling price cannot be reduced or increased.
NDP: (non-discountable product): Designated products or groups of products where the selling price cannot be decreased, but can be increased.
Regular: Prevents the setting from overriding or being applied to a product. For product groups, indicates that the product group is neither NDP nor KVI.
Note. The system will retrieve the product value first. If none exists, it will then retrieve the product group value for the default pricing group, if there is any associated with the product.
Changing Margins on the Sales Order
If your CSR can change margins on the sales order based on their Feature Function security settings, they can change the net unit price at the these levels: line, schedule, order (part or entire), section, and using a worksheet process for a range or orders. Sections enable you to group logical order lines and schedules together in order to make changes to the price. The worksheet enables you to change the prices for the entire order. The CSR can use the worksheet to try various price changes to achieve the desired result that the customer is looking for.
Changing the prices using margin manipulation is a powerful tool. These adjustment types can be used from the line, schedule, worksheet, or process:
Adjust cost for price — cost plus pricing.
Adjust extended amount — adjust the total amount for the line.
Calculate a new net unit price— change list price ID and net unit price.
Adjust margin amount — adjust margin by amount.
Adjust margin percent — adjust margin by percent.
Adjust net unit price — override net unit price.
Set price protect only — set price protection. This option is not available from the line.
The actual margin adjustments can be made using three methods at every level — line, schedule, worksheet, or process:
Replacing the price or margin.
Using a formula to calculate the price or margin.
Using the Adjustment Type, Adjust By, and Adjustment Amount to specify the adjustments.
See Margin Adjustments.
If the products have a minimum selling price or minimum or maximum margins set up, the CSR will receive a warning message if these setting are violated by the changes. Depending on your hold processing parameters, the lines may also go on hold.
The new price information will display on the Line Pricing Data and Schedule Pricing Data pages along with the unit and alternate cost information.
Adjusting the margins will change the price and requires a reason code. You can set a default value at the Order Management Business Unit on the Order Management Setup Page or the user preferences pages for quotes and orders.
Adjusting Margins with Claimbacks
If the sales order line or schedule is associated with a claimback, the margins will take into consideration the value of the Margin Impact field on the claimback:
Primary Only - The margin calculation for the "normal" unit cost will be updated to subtract the computed claimback amount from the unit cost to increase the margin percent.
Secondary Only - The margin calculation for the secondary “alternate” unit cost will be updated to subtract the computed claimback amount from the secondary unit cost to increase the margin percent.
Both - The margin calculations for both the primary unit cost and the secondary unit cost will be updated to subtract the computed claimback amount from the unit cost to increase the margin percent.
Neither - The claimback amount will not have an impact on either the primary or secondary unit cost margin calculations.
A UOM conversion may need to be performed to determine the correct claimback amount to apply to the margin calculation if the claimback contract UOM is different that the selling UOM.
Using Formulas in Price Adjustments
Depending on your business scenario, you may do price adjustments using formulas. The system recognizes these symbols for formulas:
|
Symbol |
Description |
|
A, MARGIN AMOUNT, or AMOUNT |
Gross profit (margin amount) |
|
M, MARGIN PERCENT, or PERCENT |
Gross profit margin (margin percent) |
|
L or LIST |
List price as defined by the default price list |
|
C or COST |
Cost as defined by the Cost Base |
|
N or NET UNIT PRICE |
Net Unit Price as previously calculated or displayed in the worksheet |
|
T or TOTAL |
Total Price |
The formulas use these operators:
|
Symbol |
Meaning |
|
+ |
Addition |
|
- |
Subtraction |
|
X, x, or * |
Multiplication |
|
/ |
Division |
|
= |
Equals |
You can also use value indicators to qualify the value:
|
Symbol |
Meaning |
|
$, £, or € |
Amount indicator, (USD, British Pound, Euro) |
|
% |
Percentage indicator (this is the default if no other indicator is used) |
Note. If there is no equal (=) sign, then "N=" is assumed. If there is no Value Indicator used, then percent is assumed.
Formulas can have only one adjustment type, one operator and one value indicator. If there is no equal (=) sign, then "N=" is assumed for Cost, List Price, and Net Unit Price calculations. If there is no value indicator used, then percent (%) is assumed except for division calculations. The table lists some sample formulas and how the system will interpret them.
|
Formula |
Interpretation |
|
L-5, L-5%, L-%5 |
List price minus 5 percent |
|
C+$.05, C+.05$ |
Cost plus .05 |
|
A*1.10 |
Increase margin amount by 10 percent |
|
M+5, M*1.05, M+5% |
Increase margin percent by 5 percent |
|
T=$45 |
Set total price to equal 45.00 |
|
N=$4.95, N=4.95$ |
Replace price, set net unit price equal to 4.95 |
|
M=45, PERCENT=45 |
Set worksheet margin percent to 45 percent |
Margin Adjustment Scenarios
This section describes the steps to create total price and margin percent adjustments after your customer places an order with your CSR. Make sure that you have set up the prerequisites so your CSR can make margin adjustments.
See Establishing Prerequisites for Margin Adjustments.
In the first scenario, your customer places an order and the total order amount comes to 5800.00 USD. Your customer wants to receive the goods for 5500.00 USD and the CSR makes the change to offer them the requested price since they are an outstanding customer. To create a total price adjustment, complete these steps in the Cost Summary section of the Order Entry Form page after entering products to the order:
Enter a Reason code for the change.
Select Adjust Extended Amount in the Adjustment Type field.
Enter Amount in the Adjust By field.
Enter minus 300.00 USD (-300.00) in the amount field.
Click the Adjust Order Margins button to make the change to the entire order.
Optional. Select the Set Price Protection flag to prevent the items from being further changed.
Save the order.
In the next scenario, the CSR will decrease the margin for a section of the order by 5% after entering the products and assigning them a Section in order to give the customer a better price.
After entering an order, create a section for the products that the customer wants a better price for. Enter the Section on the Margins tab.
In the Sections Total, click the Load Sections button.
Select Adjust Margin Percent in the Adjustment Type field.
Enter Percent in the Adjust By field.
Enter minus 5 percent (-5) in the amount field.
Click the Adjust Section Margins button to make the change to the section.
Save the order.
Note. Remember to check the price protected option and whether the products are NDP or KVI if you do not get the changes you are looking for when making adjustments.
Margin Adjustment Calculations
The formulas in the table illustrate the operation of the Adjustment Type, Adjust By, and Adjustment Amount fields.
|
Adjustment Type |
Adjust By: By Amount |
Adjust By: By Percent |
Adjust By: To Equal |
|
Adjust Cost for Price |
Net Unit Price = Cost + Adjust Amount |
Net Unit Price = Cost * (1 + (Adjust Amount /100)) |
Net Unit Price = Adjust Amount |
|
Adjust Extended Amount (Note 1) |
Extended Amount = Extended Amount + Adjust Amount |
Extended Amount = Extended Amount * (1 + (Adjust Amount /100)) |
Extended Amount = Adjust Amount (Note 2) |
|
Adjust List Price |
Net Unit Price = List Price + Adjust Amount |
Net Unit Price = List Price * (1 + (Adjust Amount /100)) |
Net Unit Price = Adjust Amount |
|
Adjust Margin Amount (Note 1) |
Margin Amount = Margin Amount + Adjust Amount |
Margin Amount = Margin Amount * (1 + (Adjust Amount /100)) |
Margin Amount = Adjust Amount (Note 2) |
|
Adjust Margin Percent (Note 1) |
Margin Percent = Margin Percent + Adjust Amount |
Margin Percent = Margin Percent * (1 + (Adjust Amount /100)) |
Margin Percent = Adjust Amount (Note 2) |
|
Adjust Net Unit Price |
Net Unit Price = Net Unit Price + Adjust Amount |
Net Unit Price = Net Unit Price * (1 + (Adjust Amount /100)) |
Net Unit Price = Adjust Amount (Note 2) |
|
Set Price Protect Only |
(Note 3) |
(Note 3) |
(Note 3) |
Note 1: Adjusting the Margin Amount, Margin Percent, or Extended Amount values will cause the Net Unit Price to be recalculated for each of the order lines or schedules included in the Margin Amount, Margin Percent, or Extended Amount.
Note 2: Selecting the Net Unit Price, Margin Amount, Margin Percent, or Extended Amount fields on the page and directly replacing the value is equivalent to using the “Adjust By: To Equal” technique shown here.
Note 3: Set Price Protect Only will select the Price Protect check box for the targeted rows. It will not adjust any other values.
Establishing Prerequisites for Margin AdjustmentsBefore you can create price adjustments for margins, you need to set up:
On the Order Management Setup page for the Order Management Business Unit, establish a default reason code for price adjustments.
On the Orders — Sales and Orders — Quotes user preferences pages, establish a default reason code for price adjustments for each user to optionally override the setting at the Order Management Business Unit
On the Order Entry Features page for the Order Management Business Unit, select the option for margin adjustments.
Establish feature function security for margin manipulation in the Feature Function Security component.
On the Product Definition — Options page and the Product Groups Table page, establish whether you want the product or product group to use alternate cost and if so, the percent for the alternate cost.
On the Product Attributes by UOM page and Product Group Table page, establish whether you want the product or product group to be adjusted using the pricing option field.
See Also
Setting Up PeopleSoft Order Management Business Units
Establishing Feature Function Security
Defining Sales Order User Preferences
Creating Margin Adjustments During Sales Order EntryThis section provides a common element section and discusses how to:
Adjust margins on the order entry form.
Enter margin adjustments on the worksheet.
Apply mass margin adjustments.
Note. When using the order entry form or the worksheet to make adjustments, extended values are rounded using the decimal precision set for the currency at the system level. The calculation of Net Unit Prices, Margin Amounts, and Margin Percents are affected by the rounding that has occurred for the extended value fields.
Comment Elements for Margin Adjustments
|
Formula and Order Adjustment Formula |
Enter a formula to adjust the net unit price. |
|
Adjustment Type and Adjust By |
Select an Adjustment Type, an Adjust By method, and enter a numerical value in the Adjust Amount field. All Adjustment Types except the Set Price Protect Onlyvalue require a value to be entered in both the Adjust By and Adjust Amount fields. If an Adjustment Type is entered without the corresponding Adjust By and Adjust Amount fields, it is cleared when the page is refreshed. |
|
Adjust Amount |
Enter the amount for the adjustment. |
|
Cost Basis |
If the security enables this option, this field will display. This field will let the CSR choose whether the Net Unit Price Cost basis is Unit Cost or Alternate Unit Cost; the default is Alternate Unit Cost. If this field is changed, the new value will be used for all margin adjustment calculations throughout the sales order until it is changed again. |
|
Reason and Reason Code |
Select a reason code to be associated with this change. All adjustments require a reason code. If there is a business unit default reason code, that value will be the default value for this field and will be used if this field is blank when the worksheet changes are applied to the sales order. |
|
Set Price Protect Flag |
Use to prevent the rows from being changed after the adjustments. |
|
Append to Worksheet |
Click the button to add the data specified in the Select Data field into the worksheet. |
|
Remove from Worksheet |
Click the button to delete the data specified in the Select Data field from the worksheet. |
|
Reload Worksheet |
Use to clear the worksheet and reload the data for the rows previously selected. |
|
Clear Worksheet |
Use to clear all data from the worksheet grid. |
|
New Price List ID and Price List ID |
Select a specific Price List ID to use for margin adjustments that have a List Price basis. Once this field is populated, the new value will be used for all list price margin adjustment calculations until it is changed again. It can be overridden if the CSR selects another value at the section or line level in the worksheet. If the product is not found in the Price List, an error will display in an error column that will appear at the end of the worksheet row. |
|
Equalize Margin Percentages |
If this option is selected, all changed rows in the worksheet will be adjusted to the same margin percent value for adjustments that do not directly change the price. List Price adjustments, Cost Plus adjustments, and Net Unit Price adjustments are examples of adjustments that directly change the price and would not use this feature. |
|
Price Protect All and Price Protect None |
Use to toggle between the price protection options for all of the data in the worksheet. |
|
Margin Amount and New Net Unit Margin Amount |
The existing gross margin amount based on the cost type of either unit or alternate cost. This amount can be change to derive a new net unit price as long as feature function security has been set up for the change. |
|
Margin Percent and New Margin Percent |
The existing gross margin percentage based on the cost type of either unit or alternate cost. This amount can be change to derive a new net unit price as long as feature function security has been set up for the change. |
|
Extended Amount |
This amount can be change to derive a new net unit price as long as feature function security has been set up for the change. |
Pages Used to Enter Margin Adjustments During Sales Order Entry
|
Page Name |
Object Name |
Navigation |
Usage |
|
Order Entry Form |
ORDENT_FORM_LINE |
|
Use to update margins for individual lines, sections, and the entire order. |
|
ORDENT_MARGINS |
|
Use to make adjustments for lines, sections, schedules, and the entire order. |
|
|
RUN_OM_ADJUST |
Order Management, Quotes and Orders, Update Price, Adjust Margins |
Use to adjust margins by product, customer, business unit, and order criteria. |
Adjusting Margins On the Order Entry FormOn the Order Entry Form page, margin information displays on the Margin Tab where you can adjust individual lines and create sections. In the Margin Adjustments section, you can adjust sections in the Section Totals if they exist for the order and adjust the entire order in the Cost Summary section.
Note. You can only access these areas if you are using margin adjustments for the business unit and security has been set up using Feature Function Security.
Margins Tab
Access the Margins tab.
Use this section to make changes to individual lines and create sections.
|
Section |
Enter a name for the rows you want included in the section. |
|
Number of Lines |
View the number of lines in the section. |
|
Price Protect |
Lines that have the option checked, may not be adjusted, but they can be selected for inclusion if the margin adjustment worksheet. If the product is KVI, the Price Protected and margin adjustments options will be unavailable for entry. If pricing is done by a buying agreement, the Price Protected option and margin adjustments options will be unavailable for entry unless the buying agreement price can be changed. |
|
Adjust in worksheet |
Select if you want to do further adjustments using the Margin Adjustment page. If you select lines and access the Margin Adjustments Worksheet page from the Header menu, the lines will be automatically copied into the worksheet. |
|
Calculate |
Click the button to execute the changes to the line. |
Section Totals
Use to make changes to a section. Define the type of adjustment in the Adjustment Parameters group box. Enter the adjustments in the Enter Worksheet Adjustment Values or Formulas group box.
|
Load Sections |
Click the button to add the sections and activate the grid. |
|
Clear Sections |
Click the button to remove sections and deactivate the grid. |
|
Adjust Section Margins |
Click the button to adjust the price of the section. |
Cost Summary
Use this section to make changes to the entire order.
|
Margin Adjustments Worksheet |
Click the link to access the Margin Adjustments Worksheet page to make more complex changes. |
|
Adjust Order Margins |
Click the button to recalculate the margins for the entire order and apply the changes. Since there are several fields that can be used to make adjustments to the net unit price, the system will stop after reaching the first adjustment type and perform the calculation. Here is the order the system selects the calculations:
|
Entering Margin Adjustments on the WorksheetAccess the Margin Adjustments Worksheet page.
Copy Order Data into Worksheet
If you selected the Adjust in Worksheet options on the Margins tab of the Order Entry Form page, the lines will be copied when you enter this page. The section will be collapsed if you used this option or the section option.
|
Select Data |
Use to indicate how you want to get data into the worksheet. Options include: Entire Order: All rows of the order will be copied. Line Range: To add lines, select the From Line Number and To Line Number. Note. If you only enter a value in the From or To field, only one line will be added. Line Selection: Use to specify lines by number. Enter the lines separated by a comma or space in the Line Selection field. Note. The system does not recognize dashes. Product Group: To add by product groups in the order, select the Product Group from the available options. Product ID: To add by product groups in the order, select the Product ID from the available options. Product Selection: Use to specify products by Id number. Enter the product ID separated by a comma or space in the Product Selection field. Note. The system does not recognize dashes and extra spaces will be ignored. Schedule Range: Use to enter schedules for a line. Enter the Line Number for the schedule and the From Schedule Number and To Schedule Number. Note. If you only enter a value in the From or To field, only one schedule will be added. Section: To add a section, select the Section from the available options. |
Adjustment Parameters
Use to enter parameters for the entire worksheet.
Margin Adjustments Worksheet
This section displays the data added into the adjustment worksheet where the user CSR enters the actual change they wish to make to the lines or totals. The margin adjustment worksheet creates a manual price override. There are three calculation levels on this worksheet: line, section, and worksheet. Changes made to the lines are calculated prior to changes made at the section or worksheet level.
This worksheet is independent of the sales order. No changes made in this worksheet will be reflected in the sales order until the Apply Changes or Reset ALL Changes buttons are selected. Changes made in the sales order after this worksheet is populated will not be reflected in this worksheet. To incorporate changes made in the sales order after the worksheet was populated, the CSR must select the Reload Worksheet button.
|
Expand All and Collapse All |
Use to change the display in the grid. |
|
Display |
Select how to display and update the sections. The field only displays if the order has associated schedules. All Schedules: This will hide all Section values and section subtotals similar to the worksheet that contained no Section values. All Sections: This will display all sections and section subtotals in the worksheet. Each Section value in the worksheet: Selecting a Section value will display only the schedules and section subtotals for one section. Worksheet totals are always displayed. |
|
Net Unit Price |
Change this value to directly set a new net unit price. |
|
Price Protect |
By selecting this option, the system will prevent calculations at other levels from further changing this line. When the changes are applied to the sales order, this line will be set to price protected if this option is selected or if the Price Protect when Apply option is selected. Selecting the Price Protect All or “Price Protect None actions will also set or reset this option. |
|
Price Limit |
This column displays only for KVI and NDP products. Otherwise the column is hidden. |
|
Error |
This column displays only if an error is found when they system performs the calculations. |
|
Section |
This row displays the section and is a subtotal for the section if the order has an associated section. Fields displayed are a cross between what is displayed on the line and at the worksheet level and have the same functionality. Changes made to these fields will affect only those schedules with the same Section value. Selecting the Price Protect option will prevent additional changes being made to these schedules from any adjustments at the worksheet level. If selected, this option will also set the price protect flag on the schedules when the Apply Changes button is selected. If all schedules within a section already have the price protect flag selected, this flag will be automatically selected the next time the worksheet is calculated. Selecting the Price Protect All or Price Protect None actions will also set or reset this option. Note. <BLANK> is a special value used for worksheet schedules that have no associated Section value. It’s value can be changed through the Message Catalog (12210, 407). Note. Since there will be no record of which rows were changed in a given worksheet, the use of the Section field as a selection criteria when populating the worksheet initially will allow the CSR to recreate the worksheet at a later time, since the Section value will be retained on the order line. |
|
Worksheet Totals |
Use to make changes to the entire worksheet. |
|
Calculate |
Click the button to update the worksheet rows and then calculate and display new worksheet values throughout the worksheet in the Worksheet Values group box. At this point the CSR can make additional changes and recalculations, including resetting the worksheet to its initial values by selecting the Reset Worksheet button. Since there are several fields that can be used to make adjustments to the net unit price, the system will stop after reaching the first adjustment type and perform the calculation. Here is the order the system selects the calculations:
|
|
Reset |
Selecting this button will cause all values for the row to be reset to their original value or the value as of the last time the Apply Changes button was selected. |
|
Delete Row |
This button will make the fields unavailable for entry. The row will be deleted the next time the worksheet is calculated. |
Worksheet Summary
The group box displays the original and current extended totals for the schedules in the worksheet. Original totals will be updated when the Apply Changes button is selected.
|
Price Protect when Apply Changes |
Select to price protect any changes made to all lines, sections, or schedules after you click the Apply Changes button. |
|
Apply Changes |
Click the button to insert price adjustment rows into the Price Audit table after you are satisfied with the changes. Note. Once change have been applied, in this session or a prior session, the worksheet cannot be reset. Instead, remove the changes by selection the Reset ALL Changes button. |
|
Reset ALL Changes |
Click the button to remove the price adjustment for the Price Audit table, reset price protection for all rows in the worksheet, and cause the order to be repriced at order save. When selecting this button, the CSR will be prompted to confirm this option. |
Applying Mass Margin AdjustmentsAccess the Margin Adjustment page.
At least one product criteria value and at least one order criteria value is required to prevent an unintended mass change process. he Product ID, Product Group, Customer ID, and Customer Group fields are all paired with the appropriate SetID field, and both values must be entered. The Product Selection, Customer Selection, and Order Selection fields are comma or space separated lists. Dashes (ranges) are not supported.
The product ids available will not include miscellaneous charges. Order lines and schedules with price protection, KVI or NDP flags will be selected and copied into the worksheet, but will not be included in the recalculation, as appropriate.
If you enter only one value in the from to fields for orders and order dates, only one value will be returned and both fields will be populated with the same value.
|
Display Instructional Text |
Select this option to display text to help you enter required fields. |
|
Reset Criteria |
Use to clear search criteria. |
|
Transaction Currency |
The field is required before you can append to the worksheet. |
|
Unit Replacement Price |
Enter a value to change the net unit price. Warning! Be careful when you are using this option so you do not change the net unit price for lines unintentionally. |
|
Post Process Options |
Select to also run Hold Checking (OM_HOLD) or Credit Checking (OM_CREDIT) when you click the Run button. |