 Understanding Microsoft Word Integration with Supplier Contract Management
This appendix provides an overview of Microsoft Word integration with Supplier Contract Management and discusses:
XML schema.
Microsoft Word editing access.
Microsoft Word search considerations.
Supported Microsoft Word settings.
Format and style considerations in Microsoft Word.
Character limitations.
Protected areas.
Outline numbering.
Spelling and grammar checks in Microsoft Word.
Document comparison considerations.
Document preview and edit differences.
Locate PeopleSoft document elements from Microsoft Word.
Document table of contents.
Troubleshooting integration issues.
Understanding Microsoft Word Integration with Supplier Contract Management
Microsoft Office Word 2003 integration is a core requirement for using the Supplier Contract Management document authoring system. To effectively use the system, you must have Microsoft Word 2003 to generate and edit Extensible Markup Language (XML) versions of clauses, sections, document configurators, and documents. In addition, the system uses XML integration when checking in documents to the PeopleSoft system that were edited using Microsoft Word 2003.
Note. Make sure you are using the latest service pack of Microsoft Office Word 2003, at least SP1, and that the application is a part of Microsoft Office Professional Edition 2003. The Standard version is not sufficient for editing and maintaining PeopleSoft custom XML tags.
Microsoft Word, supports requirements through an XML schema named Microsoft Word Processing Markup Language (WordML). An XML schema defines the legal building blocks or elements of an XML document. Used with the web, XML provides a standard method for defining and exchanging structured information. An XML document consists primarily of tagged text that imposes a hierarchical, tree-like structure on the document.
The Supplier Contract Management system defines a common custom schema that you use for clauses, sections, configurators, and documents. This custom schema defines XML tag structures within the document content. For example, you can create a clause in PeopleSoft using the Clause Definition page. In the PeopleSoft Internet Architecture page, the clause object consists of fields such as Title, Full Text, and Reference Text. Each clause field has a corresponding XML tag. The content associated with the field is between the start and end of corresponding tag. The beginning and ending tag structure that surrounds the text enables the system to parse or read the XML file. This example illustrates the XML tags for a clause as visible within Microsoft Word.
Note. Typically, custom tags are not visible to most users; however, there might be times when it is useful to view them in a document. Use appropriate Microsoft Word settings to display the XML tag structure within Microsoft Word.
This example from within Microsoft Word 2003 illustrates how clause fields appear with their corresponding custom PeopleSoft XML tags:
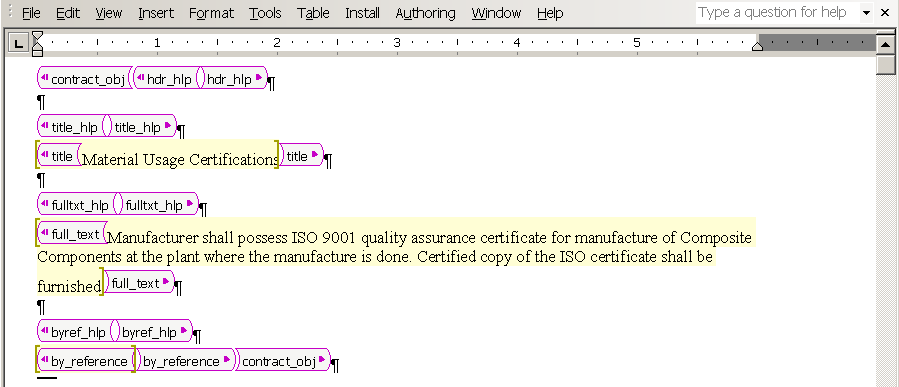
Clause XML example from within Microsoft Word
The next section describes how you produce Microsoft Word clause documents using the PeopleSoft system.
Integration Example
When you create a clause in the system, you open the Clause Definition page as a starting point. This page consists of header information you use to describe and manage the clause's life cycle and contains a set of fields for the content of the clause.
The system stores and manages two types of content. The system stores plain-text content in a system database and it stores rich text format (RTF) content in an XML format in the database. Plain text is a set of characters, tabs, line feeds, and carriage returns. You use plain text on the Clause Definition page and as the starting point for creating a clause and later for searches and comparisons.
Rich-text content consists of an expanded set of special commands to indicate formatting information, such as fonts and margins. You can only enter rich-text content using Microsoft Word. When checking in a document, the system converts the rich text to plain text and stores it in the database. For clauses, the XML version of the rich text is also stored in the database for document generation purposes. For generated documents, the XML version containing rich text is stored on a file server only.
The integration process between Microsoft Word 2003 and Supplier Contract Management when you create a clause is as follows:
Add a clause using the Clause Definition page.
You define clause header information, such as its description, approval type, and notes. You can enter plain text for the clause's title, full text and reference text. If the text is formatted text, you should enter the content using Microsoft Word by selecting the Edit Document button on the page.
Click the Edit Document button.
The system uses the plain text that you entered along with the header information to create a file that contains the XML version of the clause. It stores the clause header information as attributes on the document file, but it is not visible in the document.
Click Open on the File Download page.
The page indicates that the file is to be downloaded to a local computer. When you click the button, the system can open the file in Microsoft Word, which reads the XML file and displays the content. This is the content you entered before editing the document.
Edit the document using Microsoft Word 2003 Professional edition.
Editing is controlled to areas of the document separated by the XML tags. The tags in a clause are protected from editing to prevent the loss of document structure. You should not delete these tags because they are used to identify areas of the clause content during document check in. In addition, all content should be included within the tags. The system ignores any text that you add to a clause outside of the tags during document check in.
Save the edited file to the file system on the local computer. You must do this before checking in the document to the PeopleSoft system. Typically, you should define a local directory where you store all checked out clauses and documents.
Click the Check In button on the Clause Definition page.
The system prompts you to select the file to upload from the file system. During the upload process, the system reads the XML file and parses it and separates the file content into two parts. The first part is plain text that updates the database records in the PeopleSoft system. This content displays on the Clause Definition page.
The second part of the uploaded XML file contains the rich text, styles and lists used in the document. The system stores rich text in an XML format along with Microsoft Word styles.
When you create or preview a document, the system expands the document configurator content. It uses the stored XML strings that correspond to elements in the document configurator to construct the document XML file. The process flow between the PeopleSoft system and Microsoft Word is similar to the clause creation when you generate or preview the document, except that additional XML tags are present in the document XML file. For example, bind variables tags do not appear in a clause, but they do appear in the document file.
In addition, when you preview or generate a document, the system applies the paragraph styles with the outline numbering that you define in the Microsoft Word template as part of setting up the system.
Note. The document check-in process to the PeopleSoft system does not delete any local files from the client machine. You must do this manually.
XML Schema
Schema enables the system to define the structure, content, and semantics for XML documents. Schema is formatted in pure XML form and specifies the elements, their types, and length information that can be in an XML document. Schema generally has the extension of .xsd.
Schema is separate from the Microsoft Word document, so when you open the document, you cannot view schema. To view schema, you can use an XML editor. Viewing schema helps administrators identify how data is stored in XML, such as which custom tags the system used to create the document and the structure of XML.
Note. For clause and document generation, PeopleSoft uses a defined custom schema that describes the tags the system uses for various fields. PeopleSoft delivers this schema, called suppliercontract_schema.xsd in the Winword directory for the tools installation, as a guideline to tag definitions. You do not need to install this schema or make it accessible by client machines because it is not used to enforce integrity or validate custom XML in Microsoft Word.
The system uses schema to define custom elements and attributes that extend the XML structure so that it structures the content in a Microsoft Word document as it is shared between PeopleSoft and Microsoft Word.
This example illustrates how the XML Structure task pane appears within Microsoft Word 2003:
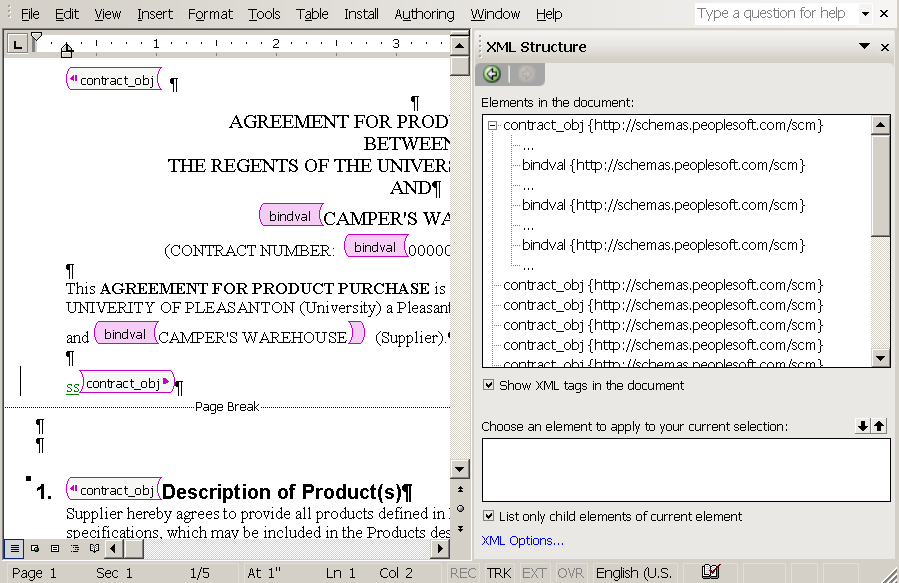
Microsoft Word 2003 custom XML example
Note. Typically, custom tags are not visible to most users; however, there might be times when it is useful to view them in a document. Use appropriate Microsoft Word settings to display the XML tag structure in Microsoft Word.
The following text illustrates how schema appears when opened in a text or XML editor.
<xs:schema targetNamespace="http://schemas.peoplesoft.com/scm" xmlns:xs=     "http://www.w3.org/2001/XMLSchema" xmlns:psft="http://schemas.peoplesoft.com
     /scm"elementFormDefault="qualified">
	<xs:complexType name="bodyContentType" mixed="true">
		<xs:annotation>
			<xs:documentation xml:lang="en">Type used for title and body to include            text and unlimited binds</xs:documentation>
		</xs:annotation>
		<xs:sequence>
			<xs:element name="bindval" minOccurs="0" maxOccurs="unbounded">
				<xs:complexType>
					<xs:simpleContent>
						<xs:extension base="xs:string">
							<xs:attribute name="bindname" type="xs:string"/>
						</xs:extension>
					</xs:simpleContent>
				</xs:complexType>
			</xs:element>
		</xs:sequence>
	</xs:complexType>
	<xs:attributeGroup name="contractAttr">
		<xs:annotation>
			<xs:documentation xml:lang="en">Contains required attributes needed to           communicate with PeopleSoft when document
is uploaded </xs:documentation>
		</xs:annotation>
		<xs:attribute name="cs_binds_exist" type="xs:string" use="optional"/>
		<xs:attribute name="cs_body_type" type="xs:string" use="optional"/>
		<xs:attribute name="cs_clause_lead" type="xs:string" use="optional"/>
		<xs:attribute name="cs_doc_id" type="xs:string" use="optional"/>
		<xs:attribute name="cs_doc_type" type="xs:string" use="optional"/>
		<xs:attribute name="cs_dummy_cd" type="xs:string" use="optional"/>
		<xs:attribute name="cs_keyvalue" type="xs:string" use="optional"/>
		<xs:attribute name="cs_obj_group" type="xs:string" use="optional"/>
		<xs:attribute name="cs_obj_group_type" type="xs:string" use="optional"/>
		<xs:attribute name="cs_object_id" type="xs:string" use="optional"/>
		<xs:attribute name="cs_object_type" type="xs:string" use="optional"/>
		<xs:attribute name="cs_rpt_flg" type="xs:string" use="optional"/>
		<xs:attribute name="cs_rule_flg" type="xs:string" use="optional"/>
		<xs:attribute name="cs_rule_used" type="xs:string" use="optional"/>
		<xs:attribute name="cs_sla_flg" type="xs:string" use="optional"/>
		<xs:attribute name="cs_template_id" type="xs:string" use="optional"/>
		<xs:attribute name="cs_title" type="xs:string" use="optional"/>
		<xs:attribute name="descr60" type="xs:string" use="optional"/>
		<xs:attribute name="effdt" type="xs:date" use="optional"/>
		<xs:attribute name="level_num" type="xs:integer" use="optional"/>
		<xs:attribute name="seq_nbr" type="xs:integer" use="optional"/>
		<xs:attribute name="setid" type="xs:string" use="optional"/>
	</xs:attributeGroup>
	<xs:element name="contract_obj">
		<xs:annotation>
			<xs:documentation xml:lang="en">Main element in the document           element and working document; the hlp elements are
used for           displaying help text to enable data entry for title, full text,           and by reference fields.  By
Reference only applies to Clause           document       element</xs:documentation>
		</xs:annotation>
		<xs:complexType>
			<xs:all>
				<xs:element name="hdr_hlp" minOccurs="0">
					<xs:annotation>
						<xs:documentation>Only show help text on document elements                   e.g. clause, section, and template adhoce
clause                  </xs:documentation>
					</xs:annotation>
				</xs:element>
				<xs:element name="Title_hlp" minOccurs="0">
					<xs:annotation>
						<xs:documentation>Only show help text on document                   elements e.g. clause, section,  and template adhoce
                  clause</xs:documentation>
             </xs:annotation>
						</xs:element>
				<xs:element name="title" type="psft:bodyContentType" minOccurs="0"/>
				<xs:element name="fulltxt_hlp" minOccurs="0">
					<xs:annotation>
						<xs:documentation>Only show help text on document elements                   e.g. clause, section, and template adhoce
clause
					       </xs:documentation>
          </xs:annotation>
			  </xs:element>
				<xs:element name="full_text" type="psft:bodyContentType"/>
				<xs:element name="byref_hlp" minOccurs="0">
					<xs:annotation>
						<xs:documentation>Only show help text on clause object only.             </xs:documentation>
					</xs:annotation>
				</xs:element>
				<xs:element name="by_reference" type="psft:bodyContentType"              minOccurs="0"/>
				<xs:element ref="psft:contract_obj" minOccurs="0"/>
			</xs:all>
			<xs:attributeGroup ref="psft:contractAttr"/>
		</xs:complexType>
	</xs:element>
</xs:schema>
Another set of XML schema provides you the capability to import clauses from a Microsoft Word file. This schema enables you to tag clause information in the document prior to importing the document. The system parses the incoming file and creates a list of clauses and content to create. You need to set up to deliver the schema to client desktops for clause librarians. This includes setting up a location to which you want to download the schema.
Using the XML file, you map data rows from the import source into the application’s clause definition structure. After you add the scmt_clause.xsd schema, the new_clause tag is available for formatting clauses for import. The purpose of the tag is to mark the begin and end of each new clause to be imported from the file. As you structure clauses, you select the text to which you want to attach a new_clause tag. The tag has five elements for structuring clauses:
ID: You can enter an ID for the clause that the system can use to name the clause when it's created in the document authoring system.
Title: The system uses the value you define for this tag as the clause title. You can also use the first string of text in the title to create an ID for the clause using the Import Clauses page.
Full Text: This is the Full Text field for the new clause.
By Reference: All text within this tag is parsed into the By Reference field of the new clause.
See Understanding the Clause Upload Process.
With updates to Microsoft Word 2003, you might need new schema and namespace definitions to properly build previews and contract documents. You might not have the newer schema because the STDTEMPLATE.XML file that was delivered with Supplier Contract Management may have been created with an older version of Microsoft Word 2003 than the version you are currently using. If you are using the STDTEMPLATE.XML file delivered with the system, you should open the file one time using your current version of Microsoft Word 2003, save the file, and upload it. This ensures that the XML schema is rewritten with latest information needed by the system. If you are using your own template file, this is not an issue.
Microsoft Word Editing Access
In some cases, it might be necessary for you to configure Microsoft Windows so that it automatically opens a document for editing in Microsoft Word 2003 rather than opening it with the default Microsoft Word plug-in version in the Microsoft Internet Explorer browser. This is highly recommended for any users who will be editing content. Microsoft Word editing and formatting options may not be always available in the browser-based plug-in.
If possible, you should configure the Microsoft Windows client to launch the native Microsoft Word application for editing clauses and documents instead of using the Microsoft Internet Explorer Word plug-in version. See the Microsoft support web site for information. For example:
http://support.microsoft.com/default.aspx?scid=162059
Note. Files that you download from the PeopleSoft system may have a Read-Only indicator displayed in their banners at the top of the Microsoft Word window along with the name of the file. This might occur if you do not first save the file to a disk as part of the download. This banner does not imply that you cannot edit the file.
See Also
(Optional) Setting Up PeopleSoft Integration Broker and Microsoft Word Configuration Files
Microsoft Word Search Considerations
As part of Supplier Contract Management functionality, you can optionally provide certain users, such as contract specialists, the capability to search from Microsoft Word 2003 for additional clauses in the PeopleSoft clause library. They can perform the search without exiting Microsoft Word or signing on to the PeopleSoft system. This is useful, for example, when you might need to manually select alternate clauses versus using a wizard question and rule to include the clause as part of the generation process. This Microsoft Word integration is accomplished using XML messaging that is partially delivered with the PeopleSoft system. This section discusses:
File configuration for Microsoft Word searches using Research task panes.
Search limitations.
 File Configuration For Microsoft Word Searches Using Research Task Panes
Using the Microsoft Word version that resides on the local system, you can perform searches against a PeopleSoft database for clauses and bind variables. After receiving search results, you can insert clauses or bind variables directly into the Microsoft Word 2003 document that you have open. When you insert the clause or bind using this method, the XML tags identifying it are also included which enables the system to better recognize when you include new content from the library into the document.
The search function used by Microsoft Word 2003 uses synchronous XML messages to integrate with the Supplier Contract Management system. The messages are read by the messaging gateway that processes the searches in the PeopleSoft Supplier Contract Management database. The system returns search results to the Microsoft Word Research task pane. Administrators install the necessary search functions on selected client machines as part of the setup process.
Before you can use the search function, contract or system administrators must configure the search program configuration file prior to using it with Microsoft Word. The configuration file specifies the gateway information to link Microsoft Word and the Supplier Contract Management system.
See Also
(Optional) Setting Up PeopleSoft Integration Broker and Microsoft Word Configuration Files
Search Limitations
The search capability from Microsoft Word 2003 to PeopleSoft does not require a separate sign on to the PeopleSoft system. It uses the default local messaging node and the PeopleSoft user who is defined for that node to run clause and bind variable searches. Therefore, when you enable searching, you enable users to search for any clause or bind variable defined in the database.
While working with documents using Microsoft Word, you can perform searches against PeopleSoft databases. Using search results, you can locate clauses and bind variables that exist in the document authoring system and insert them into the current clause or contract document.
When you search for clauses using an authored document in Microsoft Word, the size of the XML format information can exceed limits on the client side when it's too large. Therefore, the search result is limited by the PeopleSoft system to results with twenty instances.
Note. Even when clauses contain small amounts of text, the system can still send a large amount of hidden formats and styles in addition to the object content.
When the search reaches this limit, the system displays a warning to you within the Microsoft Research task pane that states: '*** Searching on above keyword, resulted in more than 20 matching clauses -- returning only the first 20. Please refine your search criteria to narrow the results. ***'. To resolve this issue, you can search for a more specific string to render fewer than 20 results in the result.
To resolve this situation, you must enter a more refined search text string.
Note. When you insert clauses into documents, it's possible to have situations where a clause and its tags are inserted within another clause's begin and end tags. This will not cause an error or warning and you can still check in the file to the PeopleSoft system. When you check in the document to the PeopleSoft system, the document administrator can use the Document Modification Summary link on the Document Management page to view new clauses that have been inserted as well as changes or deletes to existing clauses.
See Also
Understanding System Setup for Microsoft Word Configuration Files and PeopleSoft Integration Broker
Supported Microsoft Word Settings
Some Microsoft Word settings might include special characters or special XML tags in the document to format the document. For example, the Microsoft Word Smart Tags feature might provide data types for content that might include, dates, addresses, and telephone numbers.
When you type text into a new document or open an existing document, these special characters or tags can become part of the XML that represents the document when you save the document. When the Supplier Contract Management system parses the XML file during the check-in process, errors can result from some special characters, missing content, or other conditions for which the check-in program does not check.
Note. It is important to disable some of the special features, such as Smart Tags in Microsoft Word, specifically when maintaining PeopleSoft-related clause and section content in Microsoft Word. This reduces the chance of XML parsing issues with clauses and sections in the PeopleSoft parser and the document generation process. This is important for the clause library itself so that it can generate documents correctly with properly structured XML.
For more information about the use of these settings, see Microsoft Office Word 2003 Help.
See Also
Troubleshooting Integration Issues
Format and Style Considerations in Microsoft Word
This section discusses:
Styles and formatting.
Templates.
Sample templates.
Formatting application.
Style planning.
Style application.
Microsoft Word paragraph styles and outline numbering in document generation.
Overriding styles.
When to add styles to templates.
Steps for adding styles to templates.
Style examples.
Styles and Formatting
A style helps you format text in a document. Microsoft Word styles exist to help you do both simple and complex formatting. In Microsoft Word, you can apply formatting to a document directly using the functions from toolbars and menus. For example, to format a heading, you could use the Bold button and the Font type and Font Size boxes on the Formatting toolbar. But if you had numerous headings in the document, for each similar heading, you would have to repeat the same functions for each heading to consistently format all the headings in the document. A Microsoft Word style can enable you to define and reuse a set of formatting functions throughout the document.
There are multiple types of styles in Microsoft Word such as paragraph, characters, list, and table.
The Supplier Contract Management system requires that you use Microsoft Word paragraph styles to generate content because a document consists of a series of paragraphs with different numbering and indentation. You define these paragraph styles the Microsoft Word template that is associated with each document configurator you create. By defining and using paragraph styles, you create consistent methods of formatting and numbering content in authored documents. Users of authored documents can also use additional Microsoft Word styles in generated documents.
See Microsoft Help and web sites provide information that pertains to features and functionality of Microsoft products.
Templates
You use a Microsoft Word template file to manage styles and formatting for each document. The template file contains all of the paragraph styles that you can use in a generated document. For example, if you click the New and Blank Document buttons in Microsoft Word, a blank document appears in which you can enter text. This is a file and all of the formatting default values for it are determined by its template, which is a normal.dot file. The .dot file extension is for templates.
The Supplier Contract Management system uses a Microsoft Word template file to manage styles during the generation of the document. The system provides sample templates with the system's sample data to provide you an example of how you can define templates for use with documents.
Note. Supplier Contract Management uses XML for all document content and for the Microsoft Word template. The file extension for the Microsoft Word template is .xml, but the system uses it in a similar manner as the Microsoft Word .dot file. You can use any Microsoft Word template, but you must first save it as an .xml file.
While Supplier Contract Management uses Microsoft Word templates they are not used in the traditional manner. The system does not store text and placeholders in the template. The system uses the Microsoft Word template as a starting point primarily to obtain paragraph styles that control the appearance of document content as the system assembles the document. When you preview a clause, section, or configurator or you generate a document, the system first checks the setup information and locates the actual template file on the file transfer protocol server.
Note. In Supplier Contract Management, Microsoft Word templates are not intended to store content. You use them to define valid paragraph styles to apply when the system generates a document, or when you preview a clause, section, or document configurator. The Microsoft Word template can also contain optional table of contents and header and footer fields that you can apply when the system generates contract documents.
Since the use of Microsoft Word templates in Supplier Contract Management is most likely different from how you currently use templates, you should review the “Defining Default Settings for Document Formats and Options” section before creating and uploading Microsoft Word templates.
See Defining Default Settings for Document Formats and Options.
Sample Templates
The PeopleSoft installation CD provides a sample Microsoft Word 2003 template file. The STDTEMPLATE.XML template contains Microsoft Word paragraph styles and outline numbering that is used in the PeopleSoft sample database. This file is included in the Winword folder in the PeopleSoft installation CD.
Also included in the Winword folder is a STDTEMLATE_MACRO.XML template file that is identical to the STDTEMPLATE.XML template. The only difference between the two templates is that the STDTEMLATE_MACRO.XML template also provides a small set of Microsoft Word macros that are designed to include a button and process so that a Microsoft Word user can launch into the PeopleSoft system and locate a specific clause or document.
The primary macro is called ActivateCheckInURL. This macro simplifies the document check-in process into the PeopleSoft system by providing a “Locate in PeopleSoft” button that you use to launch the PeopleSoft system and go to a specific page for the document for check in. This is especially useful when you are working offline and return after closing the PeopleSoft system.
If you use STDTEMPLATE_MACRO.XML template, make sure that the information technology department defines the Microsoft Word macro as a trusted source. Depending on the security level for end users of Microsoft Word, these macros can run with a warning each time, or they can be disabled if they are not considered trusted sources.
Note. For information about Microsoft Word macros and templates, see Microsoft Word documentation and Microsoft web sites.
Note. The sample databases include the definitional row for the STDTEMPLATE.XML in the Document Template and Styles setup component; however, you need to perform an actual upload of the actual STDTEMPLATE.XML file again to place the template on a specific FTP server.
With updates to Microsoft Word 2003, you might need new schema and namespace definitions to properly build previews and contract documents. You might not have the newer schema because the STDTEMPLATE.XML file that was delivered with Supplier Contract Management may have been created with an older version of Microsoft Word 2003 than the version you are currently using. If you are using the STDTEMPLATE.XML file delivered with the system, you should open the file one time using your current version of Microsoft Word 2003, save the file, and upload it. This ensures that the XML schema is rewritten with latest information needed by the system. If you are using your own template file, this is not an issue.
See Locating PeopleSoft Document Elements from Microsoft Word.
Microsoft Word Templates and Document Generation and Preview
In creating a document, the system uses elements from a Microsoft Word template to apply formatting to the document. To create the document, the system uses an application engine to expand all elements defined for the document configurator. The system assembles XML from each expanded section, rule, or clause in the PeopleSoft database into a Microsoft Word document (.XML format) along with formatting from the Microsoft Word template.
To generate a preview version for a clause, section, or document configurator, and to generate an authored document, the system:
Extracts Microsoft Word template information (schema definitions, fonts, lists, styles, and document properties) from the Microsoft Word template.
Extracts the table of contents and headers and footers from the Microsoft Word template for configurator previews or document generation.
Explodes the clause and section content based on the configurator and any rules within it for document generation.
Creates a Microsoft Word document by assembling each XML version of PeopleSoft document configurator content and simultaneously applies the appropriate paragraph styles that you predefine using the Document Format and Options page.
Formatting Application
When you preview a document, the system uses a Microsoft Word default template file to generate a Microsoft Word document containing the content. You define the default template name on the Document Format and Options page. The default template file must contain a set of paragraph styles required for the preview and generate document function. You also define the paragraph styles for use on the Document Format and Options page. The PeopleSoft installation CD provides a sample Microsoft Word template file STDTEMPLATE.XML that contains Microsoft Word paragraph styles and outline numbering that the PeopleSoft sample database uses.
When you click the Preview Document button for a clause or section, the system extracts the stored XML for each of the document objects stored with the database. During the preview, the system generates text based on the style stored in the database. You download the resulting XML file to the Microsoft Windows file system for viewing using Microsoft Word.
When you preview a document configurator, the system uses the Microsoft Word template that you specify on the document configurator to apply paragraph styles specific to the configurator.
The Create Document button initiates the document generation process. You specify the document configurator as part of the generation process. The configurator contains the Microsoft Word template. The generation process for creating the .XML file is similar to the preview, except during the expansion of the document configurator, the Supplier Contract Management system overrides the numbering and outline level formatting of the document based on the structure of the configurator.
Suppose the configurator has a structure consisting of a section and a clause and the section has two clauses. The standard numbering formatting is set to start with 1 for the first level and 1a for the second level. The document generation expansion process numbers the section text title as 1. without indentation and indents each of the clauses in the section. The system numbers each clause in the section as 1a and 1b. The last clause is also at level one in the document configurator and the system numbers it as 2 and does not indent it.
Note. Typically, you should not edit a document after its generation to change its standard numbering and outline position. You should make these types of changes in the default Microsoft Word template that is stored in the PeopleSoft system. This maintains document generation consistency if you apply the change to all documents that are generated from that configurator.
Note. Setting up and using formats between PeopleSoft and Microsoft Word requires a working knowledge of formats and styles and
how they effect the appearance and use of documents. You should have a complete understanding of Microsoft Word paragraph
styles and formatting prior to creating the clause library. For additional information about Microsoft Word styles and formatting,
see the Microsoft web site. For example:
http://office.microsoft.com/training/training.aspx?AssetID=RC011039261033
Style Planning
Planning how you use Microsoft Word styles in the document creation process is an important task when setting up the Supplier Contract Management application. Microsoft Word styles change the way the that you view and print a document. You should consider styles when you define these functions:
Clause and section previews.
This function enables you to view the document content before you generate the document. The Preview function is available for clauses and sections and uses the Microsoft Word template name defined as a default value on the Document Format and Options page. Microsoft Word styles for previewing documents are simple paragraph styles for clauses and include:
Numbered title and bodies.
Unnumbered titles and bodies.
Numbered bodies.
Document generation.
This function uses a Microsoft Word template to create the complete Microsoft Word document through a document configurator. You define the Microsoft Word template on the Document Configuration Definition page. The Microsoft Word style for document generation might require additional formatting, such as headers, footers, and table of contents.
Multiple Microsoft Word templates might also be required to support the document generation process. Each template should have all of the styles that are in the Microsoft Word template that you use to preview documents.
For example, a simple form contract for renting dormitories at a university might not require a table of contents; where as, contracts for sporting goods at the same university might require a table of contents. In this example, you could create and upload two Microsoft Word templates into the PeopleSoft system. You can then create two document configurators, each referencing a different Microsoft Word template.
Style Application
When possible, ensure that the text you enter into a clause or section document during editing uses the default style of Normal. The PeopleSoft system converts the Normal style to the appropriate Word paragraph styles and outline numbering as defined in the Microsoft Word template and specified on the Document Format and Options page. Using Normal text when possible enables you to better use the clause in a variety of configurators and have the system determine which styles, such as numbering and indentation, to apply for that configurator based on its associated Microsoft Word template.
If you choose not to use the Normal style and instead specify specific styles in the clause or section content, it has an override affect on the generated document. This is described later in this chapter.
Note. The content position in the document configurator manages the numbering and indentation (outline level) during document generation in the PeopleSoft system. However, the paragraph style and any indentation of the outline numbering controls the numbering scheme and indentation of content in the Microsoft Word document that the system generates.
Warning! Use the Normal style when possible in clauses and sections. When you apply a specific style name in a clause or section, even if it is one of those defined in the standard template, the system uses the attributes of those styles defined in the clause versus those defined in the template. This makes it more difficult to keep content in the library consistent over time as you make changes in the templates.
Microsoft Word Paragraph Styles and Outline Numbering in Document Generation
Microsoft Word paragraph styles combined with outline numbering determine the default formatting and numbering scheme for content included in a document configurator. Using paragraph styles provides consistent default formatting and numbering for all content that you select to include in a generated document.
In the Microsoft Word template, you must define all the paragraph styles that the system can use as default document formatting and all paragraph styles that you might use to override during the editing of a clause or section. PeopleSoft provides sample paragraph styles in the STDTEMPLATE.XML template that demonstrate the use of styles. To access, review, and update styles:
Access the Define Document Templates and Styles page.
Open the STDTEMPLATE.XML template by clicking the View button.
The system opens the Microsoft Word document.
View the paragraph style in Microsoft Word.
For example, select Format in the toolbar, and then Styles and Formatting from the list of values.
The Styles and Formatting task pane appears containing Microsoft Word and PeopleSoft paragraph styles (those with a prefix of PS). When you move the mouse pointer over a PeopleSoft style, and right-click the mouse, a list of values appears with options for maintaining the style.
Note. Always refer to Microsoft Help for specific documentation and instructions that pertain to Microsoft products.
See Also
Defining Document Configurators
Overriding Styles
While generally not recommended, you can override default paragraph styles that the PeopleSoft system applies based on the styles defined on the Document Format and Options page. You can select another predefined paragraph style format as you edit a clause or section Microsoft Word document. For example, if you want to add bullets in a clause, you must select a paragraph style that has a bulleted list associated with it in the Microsoft Word template. Then, you apply the new paragraph style to the specific area of the clause content.
When you use an override style that is not defined in the Microsoft Word template, the system saves the style and content in an XML content in the PeopleSoft database. The system uses the new style for preview and document generation processing rather than the paragraph style defined on the Document Format and Options page.
Warning! Using styles that are not defined in the Microsoft Word template can result in a large file size for a clause or section and may exceed the PeopleSoft database long-field size storage capability. This is especially true when you are using International Business Machines DB2 and DB2 Unicode databases. To avoid this issue, use the normal style in the clause or section content when possible.
Note. Always use the Preview Document button to view clause and section formats. The preview mode processes clauses similar to how the system generates a document. The preview process enables the system to expose formatting issues before you generate the document. When previewing a document, you can evaluate which styles were applied during the process. This helps you identify and resolve any formatting issues.
When to Add Styles to Templates
You should add new Microsoft Word styles to the default Microsoft Word template in the system or to Microsoft Word templates used by the document configurator when:
You use the new style to create content.
You can add a new style to the default Microsoft Word template or to a document configurator Microsoft Word template to ensure that the Microsoft Word style is available for use during document generation and if needed for overriding during the editing process of a clause or section. For example, you can make a new style in a template available during clause maintenance that can be used to override a standard style. Then when authors are editing the clause or section, they can select the style in Microsoft Word.
An organization has established document formatting standards.
An organization can define a set of formatting standards for document. You can add the resulting Microsoft Word styles to the Microsoft Word template. Then, through training, authors of generated documents can use the styles correctly. You should also consider the document configurator structure as part of a style standardization project.
Note. Only administrators familiar with Microsoft Word 2003 and the Supplier Contract Management system should make style and template changes.
Steps for Adding Styles to Templates
To locate and add a new Microsoft Word style to a Microsoft Word template:
From within PeopleSoft, open the Document Template and Style page and select the View button for the default Microsoft Word template.
Download the file to the Microsoft Windows file system.
Edit the file.
The document might be blank since Microsoft Word template files do not generally contain content. One exception could be a table of contents formatting tag.
Use the official Microsoft Word documentation to add a new style, and save the resulting file in a .xml format.
Open the Define Document Template and Styles page in the Supplier Contract Management application.
Click the Upload a file link.
The system prompts you to browse for the file within the file system. When you find the file, click the Upload button.
If you are updating the default Microsoft Word template, the name is the same as the existing Microsoft Word template in the system. The system prompts you that the row exists and the template is in use. Since you are updating the template, you should click Yes.
See Also
Defining Document Templates and Styles
Style Examples
This section provides several examples of how you can format documents and displays sample formatting in Microsoft Word.
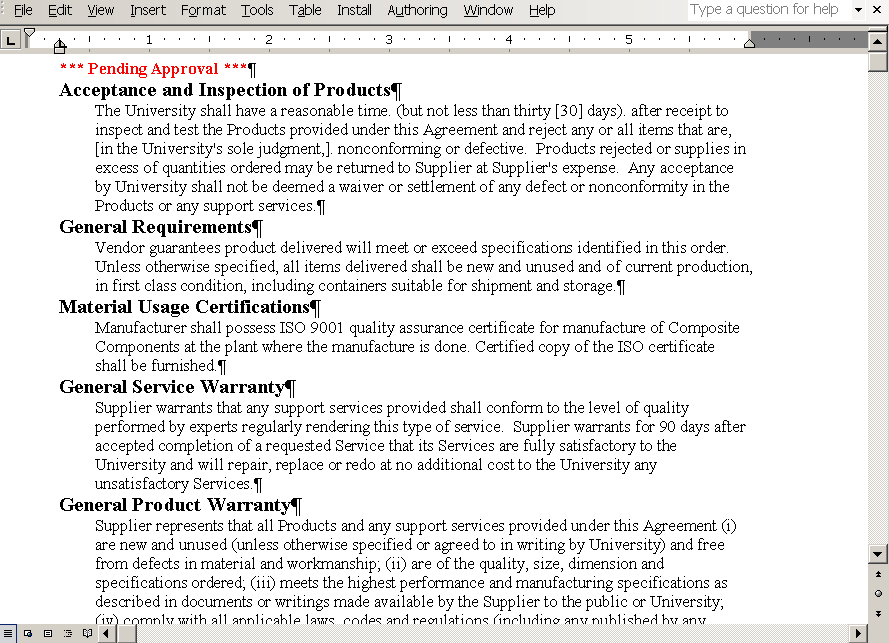
Unnumbered Clauses
To remove numbering from clause, ensure that the Numbered Clause check box on the Clause Definition page is clear. This example illustrates unnumbered clauses that have been included in a section that is going through approval:
Unnumbered clauses document example
The default Microsoft Word style used for the preview document function is controlled by the information entered in the Document Text Styles grid on the Document Format and Options page. In this example, the content includes five clauses incorporated into a section. Each of the clauses has a unnumbered title and a body under the unnumbered title for an unnumbered clause.
The default value for the Microsoft Word style is the value you enter in the Unnumbered Title Style field. You enter the paragraph style for the body in the Microsoft Word style for the Body Style under Unnumbered Title field. Supplier Contract Management provides sample Microsoft Word styles for the PSUnnumHeading and PSBody2 values.
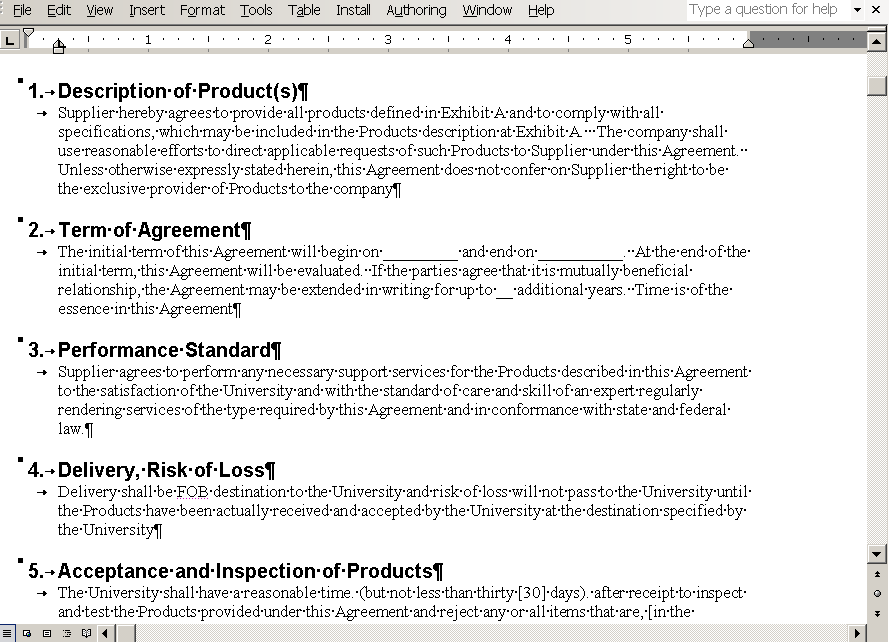
Numbered Clauses
This example illustrates a numbered clause document:
Numbered clauses document example
The default value the system uses for the Microsoft Word style to preview documents is controlled by the information entered in the Document Text Styles grid on the Document Format and Options page. In this example, the content includes five clauses. Each clause has a numbered title and a body under the numbered title for a numbered clause. The default value for the Microsoft Word style is the value you enter in theNumbered Title Style field. You enter the paragraph style for the body in the Microsoft Word style for the Body Style under Numbered Title field. Supplier Contract Management provides sample Microsoft Word styles for the PSNumHeading and PSBody1 values.
Indented Numbered Content
This example illustrates an indented numbered content in a generated document:
Indented numbered content in a document example
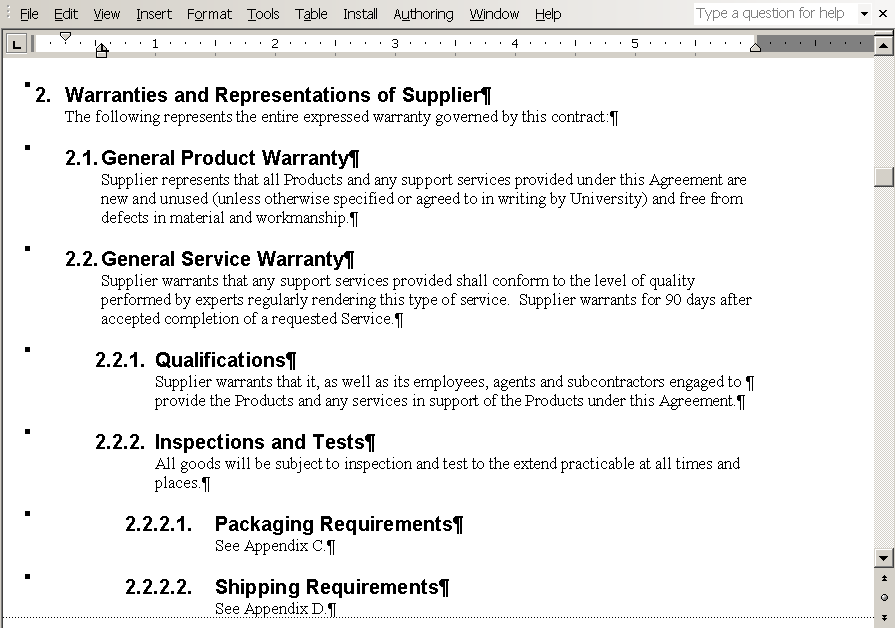
The document configurator controls the numbering and how the content is arranged with respect to the left margin for the generated document. In this example, the Outline Position column in the Content Elements grid sets the numbering for each of the content. The section Warranties and Representations of Supplier, has an outline position value of 2 and the section contains a clause, General Product Warranty, and another section, General Service Warranty. The numbering of content within the first section has an outline position value starting with 2.1. The indentation of each content element follows the outline position value as well.
The Microsoft Word style controls the numbering format. The Numbered Section or the Numbered Clausecheck boxes in each of the content elements controls the numbering in the document.
If the check box for the parent content element is selected, the system also numbers any content element within the parent. In this example, the section, General Service Warranty, would have the numbering checked, the clause, Qualification, would be numbered even if the Numbered Clause check box was not selected.
Character Limitations
Certain special multi-byte characters that you enter, paste, or check in to document authoring PeopleSoft pages can cause translation problems in the system. These problems occur on certain system platforms that are not using a Unicode Standard database and are due to internal storage limitations of the database and requirements of the multi-byte character.
The characters appear normal when you add them to a text field; however, when the system saves the page, the character might display as another font, such as a wing ding font, depending on which platform that you are using that is not using the Unicode Standard database.
Note. If you are not using an Unicode Standard database, you should refrain from using special characters including:
“ and ”: Double quotes with curls.
' : Single quotes with curls.
– : Dashes and hyphens.
(TM): Trademark enclosed in parenthesis; however, superscript trademarks appear normal.
1/2, 1/4: Fractions entered as subscripts.
When the system detects these multi-byte characters from a database that is not a Unicode Standard database, it attempts to replace the value to a reasonable alternative that it can store. When you use any of these characters or create a custom character, you should use the Preview feature for clauses and sections to check the appearance of the characters. This is how they will appear in a generated document.
Note. You must manually review and replace the characters before you use a document configurator to generate the document when having multi-byte character issues.
Protected Areas
When the system initially generates a Microsoft Word document for a clause or section, the system places custom XML tags around the content that is protected. When you edit a clause or section, you can only edit the content. If you delete or alter the tags using Microsoft Word, you risk not being able to map the document elements back to the database record when you check in the content.
When the system generates the actual document, you have the option to protect any bind-resolved values in the document.
Warning! Using the Microsoft Word Protect Document feature for PeopleSoft authored documents should be considered as an administrator-level task. If you remove document protection, it's possible that editors of the document can change the actual bind values from their real transactional or wizard values. See Microsoft Word documentation for information pertaining to protecting documents.
Outline Numbering
As you assemble a document using the document configurator, the system inserts a value for the outline level based on the position of the content in the document configurator. The system assigns this number for each clause as it generates the document. For example, the number 1.1.3 might correspond to outline level three. Then, depending on how you defined the outline level for the paragraph styles in the Microsoft Word template, the indentation within Microsoft Word could affect the width of a tab setting at that outline level. So, a tab at level one could appear as one space, but at level three, might appear as five spaces. This results in an adverse affect in document formatting.
To reduce the possibility of spacing problems in the Microsoft Word document, you should ensure that you can view all formatting marks in the document.
Spelling and Grammar Checks in Microsoft Word
Spelling and grammar issues should be resolved before exiting Microsoft Word and checking in the document. The special character Microsoft Word adds during the spelling and grammar check can cause issues during check in for clauses and sections for the XML related to bind variable names. Since the characters that are used to define a bind variable name can easily result in a spell check in Microsoft Word, any automatic spell checking and grammar checking should be disabled when editing clauses and sections.
To exclude spelling and grammar checking for Microsoft Word documents, make sure you select the appropriate options in Microsoft Word. For example, you might have to clear the Do not check spelling or grammar check box.
Note. See Microsoft documentation for information that pertains to Microsoft features and functionality.
Document Comparison Considerations
The Compare Document function on the Document Management page enables the system to compare the current document with a prior, re-created, or refreshed version of the document. This function uses the Compare Document function in Microsoft Word as a background process, to create a temporary file that you can use to see the differences. You cannot check in this file to PeopleSoft because it may not contain the correct XML structure after a compare is complete.
Any document comparisons you perform with authored documents must have the protection password removed prior to running the comparison process.
See Also
Understanding Document Comparisons and Rendering
Document Preview and Edit Differences
You can preview clauses, sections, and document configurators. Previewing document elements enables you to review the Microsoft Word version of the document element as you build it. The preview process enables the system to expose formatting issues before you generate the document and provides status information about the element.
Microsoft Word documents you generate using the Preview Document button are intended to be read-only documents. You must use the Edit Document button to check out elements, make changes, and check in the elements. You can cancel the document check out. Using the Preview feature, the system does not explode repeat sections and rules because of dependence of transactional contract data. The system also assumes that rules are always true when you are previewing an element.
Another feature for viewing documents is the View Document button available on the Document Management page. This feature enables you to view a document, but does not enable you to check in the document. The actual Microsoft Word file that you view using this feature is not a read-only document.
Locating PeopleSoft Document Elements from Microsoft Word
The STDTEMPLATE_MACRO.xml template delivered with Supplier Contract Management contains an optional macro that you can use to create a Locate in PeopleSoft button in Microsoft Word. You use the button to locate related PeopleSoft pages when you check out clauses and documents.
Note. This feature is only available if you use the delivered sample template containing the macro (STDTEMPLATE_MACRO.xml) or the template with the delivered macro imported in it. The sample macro contained in the template must be digitally signed if you intend to use the Locate in PeopleSoft button. You should remove the macro from the Microsoft Word template in the production environment if you do not intend to use it.
The Locate in PeopleSoft button helps you check in a Microsoft Word document, after you sign out of the PeopleSoft system. When you decide to check in the document, you can use the button in the clause, section, or document to access the sign on page and go directly to the matching PeopleSoft page for the clause, section, or document that you have open. The button saves you time and effort in signing in to the PeopleSoft system, navigating to Supplier Contract Management, then searching for the clause, section, or document, and finally checking in the document.
The Locate in PeopleSoft button contains the key values you need to sign on to the PeopleSoft system and then locate the specific clause, section, or document you want to check in. The button provides you access to the clause, section, or document page, but does not initiate the check-in process. To initiate the check-in process for documents, you must click the Check In button after accessing that element's definition page.
The STDTEMPLATE_MACRO requires that you digitally sign it so that internal and external users can trust the document when they receive it. If you include a macro in the template that is not signed, others receiving the document may receive a warning when they open the document.
Also, depending on another user's Microsoft Word settings, you can automatically disable the macro. Users receive a warning message each time a document with unsigned macro is opened, so you should either sign the macro or remove it from the Microsoft Word template that you upload to the PeopleSoft system and associate with document configurators.
For more information about digitally signing macros, see the Microsoft Office Word documentation.
See Defining Document Templates and Styles.
Document Table of Contents
This example illustrates a document table of contents:
To add a table of contents to a document:
Add the Microsoft Word Table of Contents field code to the Microsoft Word template.
The Microsoft Word template must contain the Microsoft Word Table of Content field code. You must edit the template to include this field code and upload the template into the system using the Define Document Templates and Styles page.
See Microsoft Word Help for information about adding a table of contents.
Select the Include Table of Contents If Available check box on the Document Configurator Definition page.
After you generate the document, select and update the field for the Microsoft Word Table of Contents field code in the document.
This example displays the document configurator contents that produced the previous Microsoft Word table of contents example:
Troubleshooting Integration Issues
This section provides a list of issues for identifying and resolving formatting issues for clause librarians and interested parties. The issues are ones that you might encounter when creating clause libraries, especially if you create libraries by cutting and pasting existing Microsoft Word documents into the library components.
This table describes possible solutions to formatting issues:
|
Clause library formats and previews |
Cannot perform certain Microsoft Word formatting, such as centering a line. |
The Protection feature in Microsoft Word is preventing formatting because protection start and end indicators (brackets) are on the line you are formatting. This can typically happen on the first or last line of text. |
First, attempt to move the text by inserting a blank line at top or bottom of the text next to the protection bracket to move the text away from the protection marker. Then, format the text and delete the blank line. If this does not resolve the issue, use the Microsoft Word Protection feature to stop protection, reformat the document, and start protection again. Warning! Using the Protect Document feature is an administrator-level task. If you remove document protection, it's possible that you can lose changes to documents when they are checked in. See Protected Areas. |
|
Upon checking out a document for editing, you notice that Microsoft Word menus or menu items are missing. |
The Microsoft Windows registry may be set up so that when you use file types of .xml, the system uses the Microsoft Word browser plug-in |
Contact the system administrator to configure Microsoft Windows to launch Microsoft Word for .xml file extensions. For information about customizing the tool bar, use Microsoft Word Help. |
|
|
Column alignment displays correctly when editing a clause; however, when previewing the clause, columns are not aligned. For example, underlines on a signature page might not be aligned. |
Hidden tabs that the system uses with alignments can cause problems when the clause is previewed and assembled with other content. This is due to the outline numbering level at which the clause might appear when previewed with the configurator, or styles applied during preview. For example, the tab symbol can cause different levels of indentation based on the outline level. |
You can use a hidden table in Microsoft Word to fix the alignment of column-orientated information instead of using tabs. You can also use Microsoft Word tables in the document for content that contains tabs. |
|
Category |
Problem |
Possible Cause |
Possible Resolution |
|
Clause library formats and previews |
When editing a clause, it appears correctly, but when previewing the document, there are occasional special characters, such as upside down question marks, small squares, or symbol translation for bullets. |
Certain characters in Microsoft Word require multi-byte data storage due to the internal representation of the character. These can include smart quotes, dashes, a variety of bullet formats, and others. The PeopleSoft system attempts to clear and replace these special characters with nonmulti-byte representations when the database is not configured for multi-byte storage. However, a substitution may not always be available. |
When it's not possible to run in a multi-byte, Unicode Standard environment, you might need to remove special characters when editing the clause document and substitute a different. more common nonmulti-byte character representation. For example, you might need to retype quotes as plain double quotes in the Microsoft Word document instead of using smart quotes. |
|
Cannot edit text, refresh a table of contents or perform other functions in Microsoft Word. |
The Microsoft Word Protection feature is protecting the document. |
For some data elements, such as bind variables, the PeopleSoft system places protection around the bind in the document so that you cannot edit it. This prevents you from changing the document without changing the source value in the transaction system. When this is not the case, you must use the Protection feature in Microsoft Word to stop the protection, make the edits, and restart the protection after you are complete. Warning! Using the Protect Document feature is an administrator-level task. If you remove document protection, it's possible that you can lose changes to documents when they are checked in. See Protected Areas. |
|
Category |
Problem |
Possible Cause |
Possible Resolution |
|
Clause library formats and previews |
When previewing or editing a clause or section, the Microsoft Word formatting is lost and characters are corrupt after cutting and pasting information into the PeopleSoft system from a Microsoft Word document. |
A large amount of text has been cut from a Microsoft Word document and pasted into a PeopleSoft system clause or section page. |
You should not cut and paste clause and section content from Microsoft Word into PeopleSoft pages, because it does not maintain Microsoft Word rich text attributes. You should only cut and paste plain text into PeopleSoft pages. You can cut and paste from current Microsoft Word files to an empty checked out version of a PeopleSoft clause or section to preserve previous Microsoft Word document formatting. |
|
After checking in a Microsoft Word document, the clause body text in the PeopleSoft page plain-text field has incorrect formatting or characters. |
This is typically caused by special formatting or characters used in Microsoft Word prior to checking in the document. |
Most of the time, the plain-text version of most clauses display in a readable format in the PeopleSoft page clause body. However, it depends on the formatting in the Microsoft Word document. As long as clauses or sections appear correctly on their maintenance pages, there should not be a problem. |
|
Category |
Problem |
Possible Cause |
Possible Resolution |
|
Clause library formats and previews |
When previewing a clause, it looks correct, but when you include it in a generated document or preview it from the configurator, the alignment indentation of its content is incorrect. |
Possible causes include:
|
Possible solutions include:
|
|
Category |
Problem |
Possible Cause |
Possible Resolution |
|
Research task pane lookups and bind variables in Microsoft Word. |
The Research task pane does not return results from the search. |
Possible causes include:
|
You use files in the setup directory to set up Microsoft Word integration. The setup utility must be run on the workstation for each user who wants to use the Microsoft Word integration with PeopleSoft Supplier Contract Management. See Understanding System Setup for Microsoft Word Configuration Files and PeopleSoft Integration Broker. |
|
The Research task pane does not insert the clause content into the document after you click the Insert Full Text button. |
If a clause is too large to integrate into the Research task pane, the insert can fail. The system issues a warning if there is potential for failure. If a clause contains a large amount of custom formatting and paragraph styles, it can be too large to include in the search. This might be due to XML representation as well as the visible clause text. |
Attempt to simplify the custom formatting of the clause or divide it into smaller clauses. |
|
Category |
Problem |
Possible Cause |
Possible Resolution |
|
Research task pane lookups and bind variables in Microsoft Word. |
When you type or select valid bind variables from the Research task pane and check in the document, the PeopleSoft system indicates there are validation errors for the bind variable. |
The Microsoft Word auto correction and tracking of grammar features highlight errors in documents that may be visible as you type variable names. The variable is highlighted with a red line underneath it. When a field has this underline beneath it, it typically means that extra values are included in the XML value that you will check in. This makes the bind value invalid. |
Change the spelling and grammar setting so that it is off. Then, delete and retype the bind variables. Verify that there are not any red underlines for the bind variable. Check in the document again. |
|
When inserting clauses from the Research task pane, the system includes the clause within the XML tags of another clause which leaves the clauses nested in the document. |
The system inserts clauses based on where you position the cursor in the document. If the cursor is within the tags of another clause, the system inserts the clause within the existing clauses tags. During processing, the system attempts to identify this issue and logs the newly inserted clause as an add activity versus a change activity for the clause. |
You can avoid the nested clause affect by performing these steps in the Microsoft Word document:
|
|
Category |
Problem |
Possible Cause |
Possible Resolution |
|
Document generation and editing |
The table of contents does not appear when you preview a generated document. |
Possible causes include:
|
Ensure the Include Table of Content If Available is selected on the Document Configurator Definition page and that the Table of Contents field code has been added to the Microsoft Word template. After you generate the document, click the Preview Document button. The Microsoft Word window displays a message at the point when the Table of Contents was inserted in the Microsoft Word template. The messages indicates: Error! No table of contents entries found. To display the table of contents, right click on this message and select Update Field. The system displays the table of contents. |
|
All of the custom PeopleSoft tags are missing from the authored document. |
Possible causes include:
|
View the check-in history for the authored document. Ensure that the person who checked in the document is using the correct Microsoft Word version: Microsoft Office Word 2003 Professional version. The standard version of Microsoft Office Word 2003 should not be used for documents that are checked back into the system because custom tags can be lost. |
|
|
An image placed in a document header displays as a placeholder button and not as an image. |
You are using a version of Microsoft Word 2003 that does not properly display images. You should use version SP1. Note. The current version should be Microsoft Office Word 2003 SP1. The version is a part of Microsoft Office Professional Edition 2003. |
Click the Help option on the Microsoft Word toolbar. Then, clickAbout Microsoft Office Word to display current version of Microsoft Word. If the version is not SP1 or higher, contact the administrator for an updated version of the software. |
|
Category |
Problem |
Possible Cause |
Possible Resolution |
|
Document generation and editing |
Document headers and footers do not display. |
Headers and footers should be added to the Microsoft Word template that the document uses. If the current view in Microsoft Word is set to Normal, the headers and footers might not display. |
Add headers and footers to the Microsoft Word template used by the document configurator. After you preview the generated document, set the View menu to Print Layout to view the headers and footers. |
|
Change tracking and red lining are not working when a document is checked out from the PeopleSoft system. Or, you cannot enable track changes in Microsoft Word. |
The Use Track Changes in Word check box in the Processing Option grid on the Installation Options for Supplier Contract Management is not checked. This check box sets the default value for the Microsoft Word change tracking function. |
Select the Use Track Changes in Word check box on the Installation Options page. Set the document protection in Microsoft Word. Click the Tools option on the toolbar, and then select the Unprotect Document menu option. See Protected Areas. Warning! When you turn off protections, the custom XML tags are no longer protected. Editing the tags can result the system not being able to recognize the content elements in the document. |
|
Category |
Problem |
Possible Cause |
Possible Resolution |
|
Document generation and editing |
When uploading a file, you cannot locate a file that has been checked out, edited, and saved on a remote file server. |
The default location for the Microsoft Windows Save and Save As actions are set from the Save command. The location in which you saved the document is a file server that is not currently available. |
Microsoft Windows sets the default save location to the My Documents or Winword folders. You can establish a default location for the documents. Contact an administrator for help in establishing a default file location and resolving issues with remote file servers. |
|
Additional contract_obj XML tags appear in a document that has been opened using the Preview Document button. The tags appear when the Show XML tags in the document check box has been selected in Microsoft Word, and the tags appear empty. Additional tags might also exists for structures such as repeating clauses and sections. |
During document generation, the system expands the content in the document configurator. During this expansion, it evaluates rules. If a rule evaluates true, the system adds the rule object and referenced content in the rule to the document. If the rule evaluates false, the system still adds the rule element to the document. Similarly, any repeat elements or alternates that are added to the document, the system inserts dummy contract object tags. The objects do not have any content associated with them and only have attributes. |
Authors should be aware of the tags in the document and understand that the tags are only placeholders for the rules, and repeat or alternate clauses. In general, the tags do not cause document issues and should not be edited or deleted. The document appear correctly in the Microsoft Word Print Layout view. |