 Understanding Operation Entry
This chapter provides an overview of operation entry and discusses how to:
Enter operation header information.
Enter operation details.
Enter bulk receipt operations.
Enter tank operations.
Enter barrel operations.
Enter sparkling operations.
Manage additive operations.
Enter administrative operations.
Enter removal operations.
Enter bottling operations.
Enter quality assurance (QA) operations.
Manage spirit operations.
Manage empty vessel operations.
Understanding Operation Entry
Operations are individual activities that together define the blend process. Operations include the activities of receiving bulk material into the system, crushing the bulk material and subjecting it to a variety of treatments, such as moving it into vessels with specific characteristics that are intended to affect the product, and stirring the liquid. You can also mix in additives that change the characteristics of the product, for example by raising the sugar content. As part of the process, you can perform quality tests to monitor the state of the product. At the end of the process, you package the product for sale purposes, for example you bottle the wine that you have produced.
Configured operations can be classified into seven major categories, as the following table illustrates:
|
Operation Category |
Examples |
|
Receiving operations |
Receive wine, receive transferred wine, receive full tank, receive full barrel, receive to tank, decant. |
|
Move operations |
Tank to tank, barrel fill, barrel to barrel, top barrel from tank, top barrel from barrel, barrel empty, crush, drain press, filter/centrifuge. |
|
Add operations |
Tank addition, barrel addition. |
|
In-place operations |
Tank in place, barrel in place, portable tank relocation, barrel relocation, barrel self topping, empty tank in place, empty virtual barrel tanks (VBT) in place. |
|
Administrative operations |
Adjust lot attributes, adjust inventory, VBT maintenance, error correction, declared loss, override composition material type. |
|
QA operations |
Quality assurance. See Managing Quality. |
|
Removal operations |
Ship and transfer bulk material, ship full tank, ship full barrel, bottling, transfer empty tank, transfer empty VBT. |
When you elaborate operations, you must add tanks or VBTs containing one or more barrels to the operation. For additive, in-place, administrative, and QA operations, you need only source vessels (From vessels) because you do not move the bulk material. Receiving, move, and removal operations require From and To vessels as the source and destination vessels of the operation. Vessels include not only tanks and VBTs, but also weigh tags, bills of lading, and bottling vessels.
The bulk material in a vessel is represented by the blend lot. Lots are the mechanism that the system uses to track changes to the bulk material. Operations change the attributes of the blend lot and effectively create new lots. For example, turning grapes into juice changes the material type of the bulk material. Moving bulk material into a barrel may result in style changes as a result of the impact of the barrel style. Mixing additives into the bulk material changes the QA result the next time you perform a test. Thus each operation has a Before and an After lot in relation to each vessel.
If an operation uses more than one vessel, for example in move operation, both the From and the To vessels have their own Before and After lots. If you move a quantity from one vessel to another, the After lot of the From vessel shows a decreased quantity, whereas the After lot of the To vessel shows the increase. The following diagram illustrates the relationship of vessels and lots in move operations:
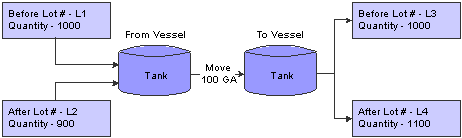
Vessels and lots
The system enables you to move bulk material from one vessel to many, but also from many vessels to one. In addition, you can perform many-to-many movements.
Prerequisite
To create operations, you must first set up configured operations based on preconfigured base operations.
See Setting Up Configured Operations.
Entering Operation Header Information
This section provides an overview of operation header information and discusses how to:
Set processing options for Operation Header (P31B69).
Enter operation header information.
 Understanding Operation Header Information
The operations that the JD Edwards EnterpriseOne Blend Management system uses are based on operation configurations that you have created previously. Every time you enter a new operation, you must select a configured operation as the basis. This configured operation provides default values and controls the type of information that you can enter for the new operation.
The system provides several methods for creating operations. You can add individual blend operations from the Operation Search program (P31B94). You can also create operations for a list of vessels that you select using the Inventory by Vessel View program (P31B81). Finally, you can also create a work order and associate operations with the work order (P31B95).
You enter new operation information in two parts. In the operation header, you specify the configured operation code, the facility for which you create the operation. When you set up configured operations, you can define valid or invalid blend facilities for each configured operation. On the operation header, you also specify the operation workflow status. You must be set up with a valid address book number to be able to enter operation information. If you have implemented operation workflow security, the system validates the address book number in the Creator field against the security definition that you have set up in the Operation Security program (P31B922). If you do not have the appropriate permission for the configured operation, facility, and workflow status, you cannot enter the operation.
See Setting Up Operation Workflow Security.
The system enables you to reschedule operations after you create them and enter instructed start and end dates. To reschedule operations, you must select the Re-Schedule Operations option. The system does not display this option when you add or view an operation, but the option is available when you revise an existing operation. For operations with base operation REC, this option is selected by default. The system reschedules subsequent operations if you select the Re-Schedule Operations option and move the date of the operation forward. the system does not save the check box value.
To go on to operation details, you must save the operation header information. When you click the Continue button, the system saves and locks the header record and launches the Create/Edit Operation Detail program (P31B87).
See Also
Creating Operations from a List of Vessels
Form Used to Enter Operation Header Information
|
Form Name |
FormID |
Navigation |
Usage |
|
W31B69A |
Blend Operations (G31B03), Operation Search Click the Add Blend Operation button on the Search for Operations form. |
Enter operation header information. |
Setting Processing Options for Operation Header (P31B69)
These processing options control default processing for the Operation Header program.
Default
These processing options control default values on the operation header.
|
1. Default Operation Status |
Enter the default workflow status that you want to use when creating new operations. Select the workflow status that you want to use from the Configured Status Search & Select form. |
|
2. Run Calculate Work Order Status (R31B19) |
Enter 1 to direct the system to automatically calculate the work order status when you add a work order. If you leave this processing option blank, the system does not run this batch process automatically. |
|
3. Re-Schedule Operations Flag |
Specify whether you want to select the Re-Schedule Operations option on the operation header by default. |
Versions
These processing options control the versions that the system uses when the program calls other programs. The following table lists the programs in the order that they appear on the Versions tab, along with the default version. If you leave the processing options blank, the system uses this default version. You can define different versions in accordance with business processes.
|
1. Create/Edit Operation Detail (P31B87) |
ZJDE0001 |
|
2. Calculate Work Order Status (R31B19) |
XJDE0001 |
Entering Operation Header Information
Access the Operations Header form.
|
Configured Operation |
Enter the code of the configured operation that you want to use to create an operation. |
|
Operation Status |
Select the workflow status to which you want to set the operation. You must set up operation workflow statuses in the Workflow Status Mapping program (P31B74) to have them available for selection here. You can define multiple workflow statuses for each operation status. For example, you can define workflow statuses, such as Instructed, Scheduled, and Working for operation status Active. You can also set up workflow security for each operation workflow status. |
|
Description |
Enter a description for the operation you are creating. |
|
Winery |
If you set up a default location for the user ID, this field displays the default branch/plant that you set up for the user ID. If you create an operation for a work order, this field displays the facility that you entered for the work order. In either case, you can manually override the facility before saving the operation header information. |
|
Creator |
Displays the address book number of the person who enters the operation. You can override the value. |
|
Work Order Number |
Displays the work order number if the operation results from a work order; otherwise, this field is blank. |
|
Operation Number |
The system generates an operation number when you save the operation header information that you entered. It displays the sequential number based on facility. This value is blank when the operation is at Draft status, and only assigned when the operation is saved at a status greater than Draft. You cannot modify this value. |
General
Select the General tab.
|
Instructed Start Date/Time |
Enter the planned start date and time for the operation. The system provides the current date and time as the default value, but you can override it. If you do not enter a value here, but enter an instructed duration and an instructed end date, the system calculates the instructed start date by subtracting the value in the Instructed Duration field from the value in the Instructed End Date field. |
|
Instructed End Date/Time |
Enter the planned end date and time for the operation. If you do not enter a value here, but enter an instructed duration and an instructed start date, the system calculates the instructed start date by adding the value in the Instructed Duration field to the value in the Instructed Start Date field. |
|
Instructed Duration |
Enter the elapsed time. If you do not enter a value here, the system calculates the time by taking the difference between the value in the Instructed Start Date field and the value in the Instructed End Date field. |
|
Actual Start Date/Time |
Enter the actual start date and time for the operation, or the system enters the date. The system calculates this by subtracting the value in the Actual Duration field from the value in the Actual End Date field. This value is never blank because the system uses this value for sequencing operations with dependencies. |
|
Actual End Date/Time |
Enter the actual end date and time for the operation, or the system enters the date. The system calculates this by adding the value in the Actual Duration field to the value in the Actual Start Date field. |
|
Actual Duration |
Enter the duration, or the system enters the duration. The system calculates the difference between the Actual Start Date and Actual End Date fields. |
|
Duration UOM (duration unit of measure) |
Enter the duration unit of measure that applies to both instructed and actual duration. Values are: Days Hours Minutes Seconds |
|
Re-Schedule Operations |
Select to reschedule operations. This option is available only after you have already entered an operation. You reschedule operations by selecting this option and moving the date of an operation forward. The system recalculates the instructed started dates for subsequent operations. The system does not save the check box value. This option is selected by default for operations with base operation type REC. |
|
Displays the instruction method that you specified for the configured operation. You can override this value by selecting another instruction method. The value in this field governs the From and To field values. This instruction method instructs the volume to move and is only available for movement operations. Use this field in conjunction with the Distribution Method field. Values are: From After: The total quantity remains in the From vessel after the movement is complete. If you select this value, the Instructed After Quantity field in the From Vessel grid is enabled. From Move: The total quantity moves from the From vessel. If you select this value, the Instructed Move Quantity field in the From Vessel grid is enabled. To After: The total quantity increases the volume in the To vessel. If you select this value, the Instructed After Quantity field in the To Vessel grid is enabled. To Move: The total quantity moves into the To vessel. If you select this value, the Instructed Move Quantity field in the To Vessel grid is enabled. |
|
|
Displays the distribution method that you specified for the configured operation. You can override this value by selecting another distribution method. Use this field in conjunction with the Instruction Method field. The distribution method identifies how single movement instructions are distributed among multiple vessels. This field is only available for movement operations. Values are: Equal: When you specify a single quantity for a From or To vessel, the system splits the quantity evenly among the To vessels. To Vessel Capacity: When you specify a single quantity for a From vessel, the system splits the quantity that was moved in proportion to the capacity that is available in the To vessels. Percentage: When you specify a single quantity for a From or To vessel, you can enter a percentage that the system uses to determine the quantity from either the From or To vessels to allocate, and splits the quantity to be moved accordingly. Use the Movement Detail tab to override the percentages. |
|
|
Displays the value that you specified for the configured operation. You can override this value. This value determines whether a vessel’s contents should be measured after the operation is complete. Values are: Do Not Measure: Actual measurements are not required. Final Measure: Report final measure for each vessel. Intermediate Measures: Report intermediate measures after each individual movement within the operation. |
|
|
Perform Survey Measure |
Displays the value that you specified for the configured operation. You can override this value. This value determines whether a vessel’s contents should be measured before the operation begins. |
|
Show Before Measures |
Displays the value that you specified for the configured operation. You can override this value. This value determines whether the operator can see the measurement that is taken before the operation is completed. |
Instructions
Select the Instructions tab.
On this tab, you can enter free-form text about the operation and attach additional information, such as images, OLEs, shortcuts, files, or URLs. Wine-makers, for example, typically use instructions to communicate detailed instructions for performing the operation. The system enters instructions if you created the operation using a template.
Comments
Select the Comments tab.
On this tab, you can enter free-form text about the operation and attach additional information, such as images, OLEs, shortcuts, files, or URLs. Operators typically use comments to communicate historical information about what happened while performing the operation.
Misc.
Select the Misc. (miscellaneous) tab.
The system uses these fields for search and reference purposes. Note that the first category code field contains a hard-coded value and cannot be changed. The first category code is used to define the operation type and icon that is displayed in Operation Trace/Track.
Entering Operation Details
This section provides an overview of operation details and discusses how to:
Set processing options for Create/Edit Operation Detail (P31B87).
Enter operation details.
Calculate move details.
Instruct resources.
Instruct equipment.
Instruct consumables.
Create consumable templates.
Use single vessel entry.
Enter one-to-one moves.
Understanding Operation Details
You can begin to enter operation details after you have committed the operation header information. For ease of use, the system presents the different parts of the Edit Operation Detail form based on the definition of the configured operation and on the processing option settings.
The definition of the configured operation determines the types of information that you can enter. For example, if you enter in-place or administrative operations, the system does not display the To vessel grid. If a configured operation is set up for instructing resources, equipment, and consumables, you can enter this information for the operation you are creating. Otherwise, all or some of these data entry grids do not appear on the form. For example, for portable tank relocations, you can enter resources, but no equipment or consumables. For operations that are defined as QA operations in the base configuration, such as weigh tags and bills of lading, the system displays the Quality information area, and you can enter quality test results.
Note. One of the pieces of information that you can customize for configured operations is the title of the Edit Operation Detail
form. If you define a form title that is specific to the configuration, the system displays this title when you launch the
Edit Operation Detail form.
This implementation guide refers to this form by its generic title because the configuration-specific title is user defined.
Use the processing options to define which areas of the form are displayed by default and which appear collapsed. For example, you can specify that the operation header appears collapsed after you click the Continue button. You can also specify that areas of the Edit Operation Detail form appear collapsed by default even though you can open these areas when needed.
Depending on the type of operation that you are creating, you need to enter From information and possibly To information for the vessels that you use in the operation. Vessel could be tanks, VBTs, bills of lading, weigh tags, or bottling vessels. For example, if you are creating an in-place operation, you only need to enter From information. However, if you are creating move operations, for example a tank-to-tank movement, you need to enter both From and To information.
When you create weigh tag and bill of lading operations, you must specify the material type. To calculate weight-to-volume and volume-to-weight operations correctly, you must specify the material type for the To vessel.
See Specifying Material Types.
As you enter VBTs, the system might resequence the list. To resequence the VBTs, click Customize Grid and create a customized view of the grid.
Note. When you add a vessel in the process of entering an operation, the system reserves the vessel record to you. If you delete
the vessel from the operation, the record remains reserved to you, and no one else can use it for another operation.
This continued record reservation allows for the possibility that you might cancel the deletion of the vessel and use the
same vessel again. If the system had released the record reservation after you deleted the vessel from the operation, another
user would be able to use the vessel, and you would no longer be able to.
After you enter From and To information and instruct the system to calculate each movement, the system:
Sequences and displays each movement in the detail area below the Calculate Move button on the Edit Operation form.
Updates the From/To/Planned/Actuals/Gain/Loss section of the Edit Operation Detail form for each movement that you select in the detail area below the Calculate Move button.
Updates movement totals in the Operation Totals section of the Edit Operation Detail form.
When multiple movements exist, the system calculates totals as aggregates of all movement yields.
Resources are the staff members who operate the equipment that is used in the operation. You can associate staff or work groups with an operation and track the time spent working on the operation.
Instructing equipment enables you to specify the various pieces of equipment that are necessary to complete the operation. You must specify the facility to which the equipment belongs. The system validates that the equipment that you specify is compatible with the way that you have set up equipment (valid equipment versus invalid equipment) for the configured operation. The system also verifies that the equipment that you specify is located in the facility in which the operation is occurring. You can search for equipment by status.
Equipment for an operation can come from any valid facility. You can use one or multiple pieces of equipment for an operation. Use the Equipment Parameter field in the equipment attributes to enter specific comments regarding the use of a piece of equipment that is used in an operation.
Consumables are dry goods that are used by the equipment during its operation. An example of a consumable is a filter. You can add, change, or delete consumable items. Consumables use a fixed quantity. Specify the item, branch, location, lot, quantity, and unit of measure for each consumable that is used in an operation. You can use consumables from different branches, if necessary.
When you instruct equipment on an operation, the Consumables tab displays the consumables that you associated with the equipment in the Create Equipment Attributes program (P31B05).
You can save consumables information that you use frequently in a template format. You can save consumables information as a template when you enter consumables as part of an operation. You can also access the Consumable Templates program (P31B46) from the Blend Facility Setup menu.
Additional Form Options
The following table lists additional options that the Edit Operation form provides:
|
Option |
Activity |
|
Instruct Lot Attributes |
Clicking this link accesses the Instruct Lot Attributes form when you revise lot attributes. |
|
Validate Spec |
If you have set up end-use reservations (EUR) specifications, the system validates the values that you enter for the operation against the specification automatically when you close the operation. You can also click this button to perform the validation. |
|
Spec Details |
Clicking this link accesses the Search For EUR Validation Results form, where you can review validation warnings and errors. |
To further streamline data entry for operations, some base operations are set up to allow single vessel entry. You use single vessel entry to record operations in the system after they have already been performed, also known as after the fact operations. The following base operations are set up for single vessel entry:
|
Operation Category |
Base Operation Code |
Description |
|
Additive |
ADDT |
Tank Addition |
|
ADDB |
Barrel Addition |
|
|
In-place |
TIP |
Tank in Place |
|
BIP |
Barrel in Place |
|
|
TLOC |
Portable Tank Relocation |
|
|
BLOC |
Barrel Relocation |
|
|
BTIP |
Barrel Self Topping |
|
|
QA |
QA |
QA Operation |
|
Admin |
ADJLOT |
Adjust Lot Attributes |
|
ERROR |
Error Correction |
|
|
ADJINV |
Adjust Inventory |
|
|
VBTM |
VBT Maintenance |
|
|
DECLOSS |
Declared Loss |
|
|
COMPMAT |
Composition Material Type |
Note. For in-place operations, you must also set the Simple Vessel Entry processing option. In addition, you can use the Single From Vessel area only when you add an operation. If you want to view or update an existing operation, the system displays the From Vessel grid and the In-Place tab.
One-To-One Move
You can instruct a move with only one To and one From vessel. In this case, the system displays the One to One Move form if the processing option for the version is set for simple vessel entry. The base operation has to allow simple vessel entry. You can use the One-to-One move form only when you add an operation. To revise an existing move operation, you use the standard move detail form.
You can perform one-to-one movements for the following operations:
Tank to tank.
Tank to barrel.
Barrel to barrel.
Top barrel from tank.
Top barrel from barrel.
Barrel to tank.
Tank to container.
Container to tank.
Form Used to Enter Operation Details
|
Form Name |
FormID |
Navigation |
Usage |
|
W31B87A |
Blend Operations (G31B03), Operation Search Click the Add Blend Operation button on the Search for Operations form. Complete the fields on the Operations Header form and click the Continue button. |
Enter operation details. |
|
|
Add Consumable Template |
W31B46D |
Blend Facility Setup (G31B02), Consumable Templates Click the Add button on the View Consumable Templates form. |
Create consumable templates. |
Setting Processing Options for Create/Edit Operation Detail (P31B87)
These processing options control default processing for the Create/Edit Operations program.
General
These processing options control the type of processing that you can perform.
|
1. Run Calculate Work Order Status (R31B19) |
Enter 1 to direct the system to automatically calculate the work order status when you add a work order. If you leave this processing option blank, the system does not run this batch process automatically. |
|
2. Simple Vessel Entry |
Enter 1 to enable simple vessel entry. You can use simple vessel entry only if the following three conditions are met:
If you leave this processing option blank, the system does not enable single vessel entry. |
|
3. Run Generate Barrel Style Definition (R31B34) |
Enter 1 to direct the system to generate barrel style assignments automatically. If you leave this processing option blank, the system does not run this batch process. |
Display
These processing options control how the system displays different areas of the form.
|
1. Operation Header Display |
Enter 1 to collapse the operation header when you launch the Create/Edit Operation Detail program. If you leave this processing option blank, the system displays the operation header. |
|
2. Subform Region 2 Display |
Enter 1 to collapse the form region which holds the From vessel grid when you launch the Create/Edit Operation Detail program. If you leave this processing option blank, the system displays the From vessel grid. |
|
3. Subform Region 3 Display |
Enter 1 to collapse the form region that holds the To vessel grid when you launch the Create/Edit Operation Detail program. If you leave this processing option blank, the system displays the To vessel grid. |
Versions
These processing options control the versions that the system uses when the program calls other programs. The following table lists the programs in the order that they appear on the Versions tab, along with the default version. If you leave the processing options blank, the system uses this default version. You can define different versions in accordance with business processes.
|
1. Calculate Work Order Status (R31B19) |
XJDE0001 |
|
2. Bill of Lading (P31B91) |
ZJDE0001 |
|
3. Bottling Vessel (P31B26) |
ZJDE0001 |
|
4. Generate Barrel Style Definition (R31B34) |
XJDE0001 |
|
5. Inventory by Vessel View (P31B81) |
ZJDE0001 |
|
6. Tank Master (P31B08) |
ZJDE0001 |
|
7. Weigh Tag Detail (P31B77) |
ZJDE0001 |
Entering Operation Details
Access the Edit Operation Detail form.
Access the From and To Vessel area.
Depending on whether you enter a movement or an in-place operation, you complete the following fields only for From vessel or for both From and To vessels.
|
Vessel Number |
Enter the vessel number. Depending on the type of configured operation, this is a tank number, weigh tag number, bill of lading number, bottling number, or VBT number. Note. As you enter VBTs, the system might resequence the list. You can resequence the VBTs in the grid by customizing the grid. |
|
Tank Type |
Displays the tank type, if you have specified a tank number. |
|
Before Blend ID |
Displays the ID that the system assigns to the lot in the vessel. You cannot change Before lot information. |
|
Quantity Before Survey |
Displays the total lot volume before changes caused by survey dip. You cannot override this value. The system does not use this value in subsequent processing. The system calculates this value by subtracting any survey gain from the adjusted volume and by adding any survey loss to the adjusted volume. |
|
Before Lot Quantity |
Displays the quantity of the vessel’s contents before the movement. You cannot change Before lot information. |
|
Instructed After Quantity |
Enter the quantity of bulk material, for example, wine, juice, or must, that you want to remain in the vessel after the operation has been performed. This may differ from the actual resulting quantity. You can complete this field for From vessels only if the Instruction Method field in the operation header information is set to From After. If you set the instruction method to To After, this field appears in the To vessel grid. |
|
Instructed Move Quantity |
Enter the total Move quantity for the vessel. You can complete this field for From vessels only if the Instruction Method field in the operation header information is set to From Move. You can complete this field for To vessels only if the Instruction Method field in the operation header information is set to To Move. If this field is not visible, the Instruction Method field in the operation header is set to a different value. |
|
Instructed Alternate Quantity |
Specify the total After height if the vessel is a tank or total number of barrels if the vessel is a VBT. Use this field in conjunction with the Alternate UOM field. You complete this field for From vessels only if the Instruction Method field in the operation header information is set to From After. You complete this field for To vessels only if the Instruction Method field in the operation header information is set to To After. |
|
Quantity UOM (quantity unit of measure) |
Displays either the facility's Weight or Volume unit of measure. The system enters this unit of measure for From vessels based on the From Material Type UOM field in the configured operation. The system enters this unit of measure for To vessels based on the To Material Type UOM field in the configured operations. You cannot change this value. |
|
Instructed Alternate Qty (instructed alternate quantity |
The instructed volume measurement of material (wine, juice, must) in a tank recorded after an operation takes place. Specify the total After volume that is recorded after the operation is performed if the vessel is a tank or total number of barrels if the vessel is a VBT. Use this field in conjunction with the Alternate UOM field. You complete this field for From vessels only if the Instruction Method field in the operation header information is set to From After. You complete this field for To vessels only if the Instruction Method field in the operation header information is set to To After. If this field is not visible, the Instruction Method field in the operation header is set otherwise. |
|
Alternate UOM (alternate unit of measure) |
Displays either the facility's dimension unit of measure (for tanks) or the number of barrels (for VBTs). You cannot change this value. |
|
Location |
Displays the tank location in the facility if you have specified a tank number. You can override the location if the Change Vessel Location Control field for the base operation is set to accept overrides. |
|
After Blend ID |
Displays the blend ID that corresponds to the After lot for the vessel assignment. The system enters the blend ID from the After lot when you click the Calculate Move button. You cannot override the blend ID in the operations header; you must use the Lot Attributes program to override this value. |
|
Measure Type |
Displays the value from the Tank Master program if the vessel is a tank. This value indicates the type of dip measurement for a dip chart or tank. If the vessel is not a tank, you cannot change this value. Values are: Dry Wet If the tank allows both wet and dry dips, you must select a value. |
|
Predecessor Status and Successor Status |
The system displays the status of the vessel's previous operation and next operation relative to the current operation. For example, if the previous operation is closed, the Predecessor Status field displays the value Closed. If the current operation does not have a subsequent operation, the Successor Status field is blank. These fields are for information only. |
|
View Before Lot and View After Lot |
Click to access the View Wine Lot form to review details about the before and after lot of the operations. |
|
View Vessel Detail |
Click to access the applications that enable you to review and revise vessel information. For bills of lading, this option calls the Bill of Lading program (P31B91). For tanks, the system calls the Tank Master program (P31B08). For bottling vessels, the system calls the Edit Bottling Vessel Details form. You can use this option to review vessel details for closed or canceled operations as well. |
|
Unknown Vessel |
Click to select an unknown vessel as the To vessel of the operation. You can use this option when you do not want to enter a specific vessel yet. The unknown vessel has very few characteristics that might limit its use. Therefore, you can use it as the From vessel for subsequent operations as well. You can rename an unknown vessel by selecting Rename Vessel from the Action drop-down list box to access the Rename Vessel program (P31B67N). You cannot reuse a vessel name that is already used in the system. You can use this option for unknown From and To vessels and for single From vessels. |
|
View VBT Detail |
Click to access the VBT Movement Details form. This option is available for the From vessel if you are entering a single-vessel operation, such as error correction, inventory adjustment, and so on, and if you have set up the configured operation with VBT as the From vessel. You can use this option to review vessel details for closed or canceled operations as well. |
|
Remove VBT Detail |
Click to remove detail information from the VBT. |
|
Reset Prior Values |
If you receive a significant change warning regarding the blend ID, quantity, material type, or wine status of the Before lot of the operation, select this option to override the four prior values with the four current values. When you reset the values, the system also clears the significant change warning. |
Calculating Move Details
Access the Edit Operation Detail form.
Select the Movement Detail tab.
|
From Vessel |
Displays the number of the From Vessel after you calculate the movement. Enter the number of the vessel. |
|
To Vessel |
Displays the number of the To vessel after you calculate the movement. |
|
Move Percent |
Enter the percentage of material to move from one vessel to another. |
|
Planned Move Quantity |
Enter the planned quantity of material to move from one vessel to another. |
|
Actual Move Quantity and Quantity UOM (quantity unit of measure) |
Enter actual quantity to move from one vessel to another. |
|
Override Quantity |
Displays a value that indicates a user has overridden the quantity of a vessel-to-vessel move. |
|
Planned Quantity Volume |
Specify the volume of the planned quantity. |
|
Calculate Move |
Click to update the planned volumes or actual volumes for the From or To vessel depending on what type of operation you are entering. The system also calculates gains and losses and updates movement totals in the Operation Totals section. If the gains or losses exceed the threshold that you set in the winery constants, the system issues an error message when you click this button. You can make adjustments to eliminate the error or enter a reason before you save the operation. The system displays the gain or loss totals and percentages. When multiple movements exist, the system calculates totals as aggregates of all movement yields. |
Instructing Resources
Access the Edit Operation Detail form.
Select the Resources tab
|
Work Group Code |
Associate a work group that you want to perform the work with the operation. |
|
Staff Number |
Associate staff members that you want to perform the work with the operation. |
|
Last Name and First Name |
These fields display the name that is associated with the staff number you entered. |
|
Actual Time and Actual Time UOM (actual time unit of measure) |
Enter the actual time spent completing the operation-related tasks. |
Instructing Equipment
Access the Edit Operation Detail form.
Select the Equipment tab.
|
Equipment Number |
Select the piece of equipment you need to perform the operation. The system retrieves the equipment information from the Equipment Master table (F31B05). |
Instructing Consumables
Access the Edit Operation Detail form.
Select the Consumables tab.
After you have selected the equipment needed for the operation, the system displays the consumables that you have associated with the selected equipment.
Creating Consumable Templates
Access the Add Consumable Template form.
|
Template Name |
Specify the name of the consumable template. |
|
Status |
Specify an active or inactive status for the template. |
|
Consumable Item Number |
Enter the item number for consumable. You can enter multiple consumables per template. |
|
Winery |
You can enter the facility for the consumable item. The system uses this value to validate the location or the lot. |
|
Quantity and UOM unit of measure) |
Enter the required quantity for the consumable. |
|
Location |
Specify the location for the consumable item |
|
Lot Serial Number |
Enter the lot or serial number for the consumable item, if applicable. |
Using Single Vessel Entry
Access the Edit Operation Detail form.
|
Vessel Number/Class |
You must enter an existing vessel number. When you leave this field, the system disables it so that you can no longer change the vessel number. For the vessel class, the system uses the default value from the configured operation, for example, Tank or VBT. When you leave the Vessel Number field, the system automatically populates the Before planned volume and measure. |
|
Before Actual Volume and Before Actual Measure |
Enter the actual Before volume or measure for the vessel. When you leave these fields, the system automatically calculates volume and percentage for survey and operation gains or losses. |
|
After Actual Volume and After Actual Measure |
Enter the actual After volume or measure for the vessel. When you leave these fields, the system automatically calculates volume and percentage for survey and operation gains or losses. |
|
View Before Lot and View After Lot |
Select either of these options to review details on the Before or After lot of the operation on the View Wine Lot Detail form. |
|
View Vessel Detail |
Click to access the Edit Tanks form. You can add and revise tank master records. |
|
VBT Detail (virtual barrel tanks detail) |
Select for VBT operations to access the VBT Movement Details form. On this form, you can rename the VBT, add barrels to the VBT, or delete them. You can also empty barrels. This option is available if you have entered a VBT as the From vessel class for configured operations that are based on any of the following base operations: ADJLOT: Adjust lot. ADJINV: Adjust inventory. ERROR: Error correction. QA: QA operation. COMPMAT: Composition material type. |
|
Advanced Comment |
Select this option for QA operations to access the Advanced Comments form. You can add comments for the QA test. |
|
Remove Vessel |
Select to remove the vessel that you entered for the operation. If you entered a vessel in error, you can only remove it, but not change it. |
Entering One-to-One Moves
Access the Edit Operation Detail form.
Enter the From and To vessel and at least one of the following quantities:
From After Actual.
To After Actual.
Move Quantity.
Entering Bulk Receipt Operations
This section provides an overview of bulk receipt operations and discusses how to:
Set processing options for Bill of Lading (P31B91).
Create bills of lading.
Understanding Bulk Receipt OperationsYou can receive bulk material into facility using two different methods. You can create a weigh tag, or you can receive bulk material using a bill of lading.
Weigh tag receipt operations involve the receipt of a blend lot of grapes from grower blocks to a weigh tag. Weigh tag details are inherited from the block. You can override the weigh tag details.
Weigh tag receipts are grower operations and are set up, entered, and managed through the JD Edwards EnterpriseOne Grower Management system.
See Entering Farms, Blocks, and Harvests, Managing Harvest Receipts.
For the purpose of receiving bulk material from sources within and external to the JD Edwards EnterpriseOne Blend Management system, the system provides a number of base operations that you use to create configured operations. You can create configured receiving operations based on the following base operations:
|
Base Operation Code |
Description |
|
REC |
Receive Wine |
|
R2T |
Receive to Tank |
|
RECTRANS |
Receive transferred wine |
|
RECFULLTNK |
Receive full tank |
|
RECFULLVBT |
Receive full barrel |
For receiving operations, the From vessel class on the base operation is defined as the bill of lading. The bill of lading records the attributes of the material being shipped (primarily the composition details), but may also report the style, accumulated additives, and quality results. The bill of lading document number is generated by the system when the operation is updated to an active status.
You can record survey losses on bill of lading vessels as defined in the configured operation.
External receipt operations involve the receipt of bulk material from a third party that is not managed within the facility. Bulk material, such as juice or wine, is moved from a transport tanker to vessels, such as barrels or tanks. After the receipt operation, a receive-to-tank operation must take place to move the contents of the bill of lading vessel into a tank.
To create a purchase order and receipt for a bill of lading automatically, you set a processing option for the Bill Lading program (P31B91). The system creates the purchase order and receipt when you close the bill of lading operation. The receipt to inventory is linked to the bill of lading.
When the system creates the purchase order, the purchase order is automatically linked to the bill of lading and will always be used for that bill of lading. For example, if an error occurs while the system is creating the receipt, the purchase order remains linked to the bill of lading. The system updates the bill of lading with the purchase and receipt information.
If you use the JD Edwards EnterpriseOne Grower Management system, the purchase order and receipt information provide the link between the bill of lading and a contract. You cannot link a contract directly to a bill of lading.
If you do not want the system to create purchase orders automatically, you can create a purchase order for the bill of lading manually. A receiving bill of lading operation:
Increases blend inventory by the amount received. ERP inventory is decreased for the item that is cross-referenced with the material type on the bill of lading vessel.
Enters the lot details from the bill of lading of the received bulk material.
Records a survey or operational loss that is associated with the To tank.
Uses a user-defined weight factor to calculate liquid volume.
When you receive bulk material, you can receive only one lot per bill of lading. For tracking purposes, you can select an existing, virtual, or imaginary lot as the default for the lot attributes on the bill of lading. You use the Inventory by Vessel View program (P31B81) to create a virtual lot for the bill of lading by copying an existing lot or creating a new virtual lot.
You can enter composition details for the bill of lading only when you first enter the operation. If you want to change composition details for the bill of lading receipt operation later, you cannot make those changes on the Edit Bill of Lading Details form because the Composition grid can no longer be edited. Instead, you can change composition details on the Instruct Lot Attributes form.
To create the bill of lading's After lot by using a copy of an existing lot, you set a processing option for the Bill Lading program (P31B91). If you copy lot attributes to the bill of lading using a virtual lot, you do not enter EUR and composition information for the bill of lading. The system creates a new After lot for the bill of lading and copies the lot details from the virtual lot that you associate with the bill of lading. The virtual lot number appears on the bill of lading header as a reference to the origin of the lot details but serves no other purpose.
This operation involves the movement of a bulk material from a bill of lading to a vessel. Bulk material, such as wine or juice, is moved from a transport tanker to vessels such as barrels or tanks.
A receive bulk material internal operation:
Retains the blend lot details from the bill of lading of the received bulk material.
This operation is used only to get the bulk material from the bill of lading vessel operation into a tank.
Records a survey or operational loss associated with the To Tank.
Uses a user-defined weight factor to calculate liquid volume.
Receive Full Tanks and Barrels
Receiving full tanks or barrels involves the receipt of bulk material in full vessels, such as barrels or portable tanks from another facility, or from a third party within the facility for specialized processing.
A receive full vessels internal operation:
Inherits the blend lot details of the received bulk material.
Increases inventory by the amount received. Inventory is decreased for the item that is cross-referenced with the material type on the bill of lading vessel.
Retains the blend lot details from the bill of lading of the received bulk material from the associated ship operation.
Updates the associated vessel master record so that the vessel is in the new facility.
Once a ship operation is closed, the tank status is updated to Not In Branch in the shipping facility. When the receive operation is closed, the tank status in the receiving facility is updated to Active. ERP inventory is decreased for the item that is cross-referenced with the material type on the bill of lading vessel.
You only use the receive transfer internally (for example, within blend facilities) and in conjunction with a transfer operation. When you use the receive-transfer operation, you do not use a receive-to-tank operation. Additionally, you cannot enter the composition details on the bill of lading; the composition details are inherited from the lot in the transfer operation.
Crush operations move bulk material from a weigh tag created in the JD Edwards EnterpriseOne Grower Management system to a blend tank. The crush process can result in a change of material type. For example, you can take grapes from a weigh tag, crush them, and place the resulting juice in a tank. The following table describes different types of crush operations:
|
Activity |
Description |
|
Direct to tank |
Grapes (usually red or blush) are crushed, and the must (skins, seeds, and juice) is conveyed directly to a tank. |
|
Direct to press |
Grapes (usually white) are crushed and conveyed directly to a press, where the juice is separated from the skins and seeds. |
|
Whole berry |
Grapes are conveyed directly to a tank with minimal crushing, allowing for a specified percent of the cluster to remain mechanically uncrushed. |
|
Crush with culling and sorting |
Fruit is sorted into multiple blend lots and some of the fruit is culled or scrapped. |
Crush operations may be created and included on the same jobs as weigh tags, or they may be assigned to separate jobs. For white grapes, typically, weigh tag, crush, drain, press, and additive operations are all on the same job.
Important! For crush operations to work correctly, you must complete a number of setup steps in JD Edwards EnterpriseOne Grower Management and in JD Edwards EnterpriseOne Blend Management.
You must set up the following information:
Set up weigh tag and crush operations with weight as the unit of measure type for the From material type.
Define the weight unit of measure in the facility constants to match the weight unit of measure on the grower harvest.
Forms Used to Enter Bulk Receipt Operations
|
Form Name |
FormID |
Navigation |
Usage |
|
W31B87A |
Blend Operations (G31B03), Operation Search Click the Add Blend Operation button on the Search For Operations form. Enter operation header information on the Operations Header form and click the Continue button |
Enter bulk receipt operations. |
|
|
W31B91G |
Enter the receipt quantity for the From vessel on the Edit Operation Detail form, and leave the grid line. |
Create bills of lading. |
Setting Processing Options for Bill of Lading (P31B91)
These processing options control default processing for the Bill of Lading program.
General
These processing options control processing for bill of lading entry.
|
1. Create Purchase Order and Receipt |
Specify whether you want the system to create a purchase order and receipt automatically for a bill of lading. Values are: 1: The system disables the fields related to purchase orders and creates the purchase order and receipt when you close the operation. Blank: The system enables the fields related to purchase orders. You must create the purchase order and receipt. |
|
2. Lot Creation Method |
Specify whether to use a copy of a lot, or to use the composition. Values are: Blank: Use composition values. 1: Use lots or virtual lots. The system displays the Add Vessel button and the Default Lot Info tab. |
|
3. Default the "No Blending" Checkbox |
Specify whether the system automatically selects the No Blending check box when you add a bill of lading. Values are: Blank: Do not select the check box. 1: Select the check box. |
Versions
These processing options control the versions that the system uses when the program calls other programs. The following table lists the programs in the order that they appear on the Versions tab, along with the default version. If you leave the processing options blank, the system uses this default version. You can define different versions in accordance with business processes.
|
1. Inventory Vessel View (P31B81) |
ZJDE0001 |
|
2. Purchase Order Entry (P4310) |
ZJDE0001 |
|
3. Receipts (P4312) |
ZJDE0001 |
Creating Bills of Lading
Access the Edit Bill of Lading Details form.
After you enter operation header information and the receipt quantity, the system generates the bill of lading number and launches the Bill of Lading program.
General
Select the General tab.
|
Receiving Winery |
Displays the facility that you entered in the operation header. |
|
Customer |
Displays the address book number of the receiving facility |
|
Hierarchy Level |
Enter the hierarchy level for the geographic area. |
|
EUR Code |
You must enter the EUR for the bulk material that you are receiving. You do not enter an EUR if you are copying an existing lot or entering a bill of lading for spirits. |
|
Block Code |
Enter the block that is the source of the bulk material. This field is required if the processing option to automatically create a purchase order and receipt is set to 1. |
|
Harvest Period |
Enter the harvest period for the bulk material. For wine, you typically enter a year, for example, 2007. This field is required if the processing option to automatically create a purchase order and receipt is set to 1. |
|
Harvest Suffix |
Enter the harvest suffix that helps to uniquely identify the harvest. This field is required if the processing option to automatically create a purchase order and receipt is set to 1. |
|
No Blending |
Select this option if you do not want a blend transaction to occur when the system creates a purchase order and receipt. You can set a processing option to select this option automatically. |
|
Shipping Winery |
If you use the bill of lading to ship bulk material, the field displays the source facility of the material. |
|
Supplier |
If the system automatically creates a purchase order for the bill of lading, you must enter the supplier number. |
|
Material Type |
Displays the From After material type that you set up for the configured operation. |
|
Quantity |
Displays the receipt quantity that you entered for the bill of lading. |
|
Number of Vehicles |
Enter the number of vehicles used for the bill of lading. |
|
Alternate Vessel Number |
Enter an alternate vessel number if you need to track the bill of lading for using a different numbering scheme. |
|
Specific Gravity |
Enter the ratio of either:
|
|
Weight Factor |
Enter the weight factor that the system uses to convert weight to volume. |
|
Source Type |
Select a value from UDC 31B/SR that specifies the source type of the composition. Values are:
For a composition record with a source type of block or harvest, identified by the special handling code in the Source Code UDC table (31B/SR), you can only enter the contribution percentage, harvest suffix, and block code. All other fields are disabled. The harvest record provides default values for variety, appellation, and harvest period. If the block changes, these values change on the composition record, but you cannot change them on the bill of lading. You must enter an error correction operation to make those changes. If you enter a composition record with a source type of purchase order, you must enter the variety, appellation, and harvest period. If you change the source type, the system clears the values for that line and enables or disables the appropriate fields. Note. For a receipt operation, you can enter composition records manually. |
|
Variety Code and Variety Description |
You must specify a variety code for the bulk material receipt. |
|
Appellation Code and Appellation Description |
Enter the appellation of the bulk material for a purchase order. If the source is a block or harvest, these sources provide the default value for the appellation. |
|
Harvest Period |
You must enter the harvest period for the bulk material. |
|
Percentage |
You must enter the percentage that the source contributes to the bill of lading. If you enter more than source of bulk material, specify the percentages that are drawn from the different source. If you only specify one source, it is 100 percent. When you save the operation, the system calculates the percentage total and issues an error message if the percentage is above or below 100. |
|
Block Code |
If you specify block or harvest as a source, enter the block code. The system automatically displays the variety, appellation, composition material type, and source ID that is associated with the block. |
|
Harvest Suffix |
Enter the harvest suffix that helps to uniquely identify the harvest. |
|
Composition Material Type |
Specify an override composition material type. This field is optional. |
|
Growing Area Short Code and Growing Area Description |
Specify the growing area for the bulk material that you are receiving. |
|
Source ID |
Enter an identifier for the source, for example, block information or the purchase order number. |
|
Supplier Number |
If the source type is a purchase order, enter the supplier number. |
|
Add Default Lot |
The system displays this button if you set the processing option for lot creation to copy an existing lot. In this case, the system does not display the composition details grid. Click to access the Inventory by Vessel View program (P31B81), where you can select a virtual or real lot as the default lot for the bill of lading. The default lot number does not become the lot number of the actual After lot. |
Purchase Order
Select the Purchase Order tab.
If you selected the processing option to have purchase orders and receipts created automatically, these fields display information from the purchase order and receipt that the system created. These fields link the bill of lading to the purchase order receipt:
Order number
Company
Order type
Suffix
Line number
Receipt line number
Location and lot number
If the system does not create the purchase order and receipt automatically, you can enter order information manually.
|
View Purchase Orders |
Click to access the Purchase Orders program (P4310). You can manually create a purchase order for the bill of lading. |
Default Lot Info
Access the Default Lot Info tab.
The system displays this tab only if you have set the lot creation method in the processing options to 1.
The fields on this table display the information from the virtual lot that you created in the Inventory by Vessel View program as the default lot for the bill of lading:
Blend ID
Operation ID
Vessel number
Blend lot number
Vessel class
Entering Tank OperationsThis section provides an overview of tank operations and discusses how to:
Enter tank-to-tank movement operations.
Enter tank-in-place operations.
Understanding Tank OperationsSeveral types of tank operations exist that involve the movement of wine or juice as well as in-place operations that you use during the blend process.
Drain and press operations usually follow the crush operation in a rapid succession.
During a drain operation, liquid is drained off (free run) and the material type is changed from must to juice. You can take After measures for the juice, and the unit of measure changes weight to volume, such as liters or gallons. An initial free run operational yield can be calculated at this time.
The volume of drained juice is then moved into a To vessel.
Following the drain operation, the remaining must is pressed. There are two basic types of press operations:
Press Instructed By Equipment
Separate juice or wine from grape pulp and seeds using a piece of equipment called Press. The operator determines the pressure or the operation creator instructs the pressure.
Press Instructed By Bar Pressure
Bar pressure is the measure of pressure that is applied when the press is used, for example, 1/4 bar or 1/2 bar. The pressure is preconfigured.
There are several types of tank-to-tank movement operations:
Blend lots together to achieve a specific mix.
Juice or wine is moved from one tank to another, leaving some material, or lees, behind.
Bulk material is moved from one or more tanks into one or more tanks, a process that can include combining blend lots.
A filter/centrifuge operation is the process of clarifying wine or juice using a piece of equipment, such as a filter or a centrifuge. This operation requires the movement of juice or wine from one or more From vessels to one or more To vessels using filtering equipment. The filter/centrifuge operation can be performed in between most operations
Unknown vessels are created by the system with vessel class T (tank). Unknown vessel numbers are generated using next numbers. They are stored in the Unknown Vessel Master table (F31B103). Unknown vessels have an infinite capacity. You can define an unknown vessel for operations that are in Draft, Planned, or Active status. The preceding operation that fills the unknown vessel has to be at status Active, Actual, or Closed. If both the filling operation and the new operation are in the same work order, the status of the preceding operation can also be Draft or Planned.
After you have replaced an unknown vessel with an actual vessel in an operation, the system performs the following updates:
The operation is removed from the dependency chain of the unknown vessel and added to the dependency chain of the actual tank.
The system recalculates the downstream operations in both dependency chains.
The unknown vessel is not automatically replaced during this process. You can do so manually in the Create/Edit Operation Detail program (P31B87). To replace an unknown vessel with an actual vessel, you can access the Rename Vessels program (P31B67N).
Unknown vessels can be reused as long as they are not closed.
There are several types of tank-in-place operations:
Temperature management, such as heat, chill, and heat exchange, is used to obtain optimum fermentation for fining or to maintain stability.
Caps, for example, pump over, punch down, aerate, and tub and screen, are formed in a red fermentation vessel by the separation of the floating grape skins from the juice. Cap management involves the mixing of the cap and the juice to increase the skin exposure.
Use stabilization, for example, heat, cold, or pasteurize, to ensure that sediment does not drop out of the bulk material if it becomes subjected to unusual heat or cold during the transport, storage process, or in the bottle.
Use equipment such as a propeller or pump to mix juice or wine in a tank.
Tanks, portable vessels, puncheons, casks and bins may need to be moved from one location to another within a facility. Relocation can occur during any operation or as a separate operation.
Validating Tank Capacity
Based on the value in the Fermentation Flag field that you enter in the Material Type Revisions program (P31B04) and the tank capacity information that you enter in the Tank Master program (P31B08), the system validates that volumes that you enter for tank operations against the specified capacity.
When you enter a tank operation with a fermenting material type, the system compares the planned volume with the white fermentation capacity of the tank. If the volume exceeds the capacity, the system issues a warning that the value exceeds the tank's fermentation capacity.
When you enter a tank operation with a non-fermenting material type, the system compares the planned volume with the storage capacity of the tank, If the volume exceeds the capacity, the system issues a warning that the value exceeds the tank's storage capacity.
The system validates the To After and the From After planned volume only if no To After or From After actual values have been entered. As long as the operation is not closed, the system issues only warnings if the capacity is exceeded. When you try to close an operation with tank capacity exceeded, the system issues an error.
When you exceed tank capacity by entering actual values, the system always issues an error. The system does not save the value when you click the Calculate Move button or when you switch between vessel-to-vessel lines. When you use the Speed Actuals Update program (P31B67) to enter actual values, the system does not save the volumes that exceed capacity when you switch between operations. The same rules apply when you enter one-to-one moves and exceed tank capacity.
If you enter in-place tank operations, you also receive warnings for planned volumes that exceed capacity and errors when you try to close an operation or enter actual volumes that exceed capacity.
Form Used to Enter Tank Operations
|
Form Name |
FormID |
Navigation |
Usage |
|
W31B87A |
Blend Operations (G31B03), Operation Search Click the Add Blend Operation button on the Search For Operations form. Enter operation header information on the Operations Header form and click the Continue button. Click the Continue button on the operation header. |
Enter tank operations. |
Entering Tank-to-Tank Movement Operations
Access the Edit Operation Detail form.
Enter the information for the From and To tanks, enter the move quantity, and calculate the move.
Entering Tank-in-Place Operations
Access the Edit Operation Detail form.
Enter the information for the From tank.
Entering Barrel OperationsThis section provides an overview of barrel operations and discusses how to:
Enter barrel move operations.
Enter VBT movement details.
Enter barrel in-place operations.
Understanding Barrel Operations
A VBT is the grouping of barrels to form a single entity that contains a single blend lot for oak operations. A VBT makes it easier to inquire, order and instruct work, record work performed, and finalize work results.
The barrels within a VBT might have similar attributes. Attributes of the individual barrels are accumulated and applied to the blend. The aggregate styles reflect the barrels that are contained in the VBT. For example, a group of five American Oak Barrels and 15 French Oak Barrels have a style of 75 percent French Oak and 25 percent American Oak. The collective attributes of a VBT affect the blend like a tank or other single vessel.
Cellar operations can be conducted for the entire VBT. If an operation is performed on only some of the barrels in the VBT, then these barrels can be separated and a new VBT created. The VBT number and the individual barrel numbers or barrel collection numbers are recorded against the cellar operation. Limited information is recorded against each barrel.
You can create a VBT and apply it at any time in the life of the barrel. A VBT can be created or changed as a separate operation or as part of another operation, for example, a rack and return or a barrel fill.
The creation of a VBT and the addition or removal of barrels from a VBT are typically part of other barrel operations, and are not usually performed as an independent operation. The splitting or merging of VBTs is also generally performed as an independent operation.
VBT Movement Details
You must enter values in the Capacity Type and VBT Type fields in the To Vessel area before you create a new VBT. You can dynamically generate a new VBT if the To Vessel is a VBT.
You can add or remove barrels from the VBT, which increases or reduces the aggregated volume of the VBT and might change the summary attributes. If the barrels that are added to a VBT contain blends, then the two blend lots will be mixed according to the standard blending rules.
When you add a barrel to a VBT, the barrel is by default considered full, but you can empty the barrel as part of an operation. When you empty a barrel that belongs to a VBT, the barrel remains in the VBT with a quantity of zero and a barrel volume status of Empty. When you close an operation, the system updates location and rack for all barrels, including empty barrels. You can update the location and rack for the empty barrel. In this case, the system deletes the barrel from the From VBT details and adds it to the To VBT detail.
When you empty a barrel in an operation, the system displays the empty barrel in the VBT for the After lot. However, if you use the same VBT that includes an empty barrel in a subsequent operation, the system does not copy the empty barrel to the After lot for that VBT and operation.
You can refill empty barrels, but only if they are not associated with a new VBT.
Note. You can view empty barrels using the Barrel Inquiry program (P31B03E) by filtering barrel records on the barrel volume status.
A barrel fill operation is the process by which bulk material is filled to specific barrels. The barrels are filled to capacity (either fermenting or nonfermenting). There are several types of barrel fill operations:
Fill barrels to a specific partial capacity with unfermented juice in order to conduct alcoholic or malolactic fermentation in the barrel. Barrels are filled partially to allow room for fermentation.
Fill barrels to complete capacity with bulk material for aging or storage.
Juice that has finished fermentation in a tank (usually red) is drained from a tank or press by gravity and put into barrels to age.
Barrel-to-barrel operations can include:
The barrel is racked removing the clear bulk material to a temporary tank, leaving the lees in the barrel. The lees are removed from the barrel to another vessel. Barrels in a VBT may change as the bulk material is moved from barrel to barrel, and the total volume decreases when the lees are removed.
The barrel is racked removing the clear bulk material to a temporary tank, leaving the lees in the barrel. The lees are removed from the barrel to another vessel. The bulk material in the temporary tank is returned to the same barrels.
The barrel is racked removing the clear bulk material to a temporary tank, leaving the lees in the barrel. The lees are removed from the barrel to another vessel. The bulk material in the temporary tank is returned to the same barrels.
Split an existing VBT into two or more VBTs, resulting in new blend lots.
Merge two or more VBTs into a single VBT.
Increase the capacity of an existing VBT by adding barrels, resulting in a new blend lot.
A barrel empty operation is the process by which juice or wine is removed from barrels and moved to a tank. Once the barrels are emptied, they can be washed by various treatments. The empty and washed barrels are then either returned to a location as an empty barrel or filled with juice or wine.
There are several types of barrel empty operations:
Barrels are drained by a sump using gravity and emptied.
Barrels are drained by a pump and emptied.
Barrels are moved to a barrel line where they are emptied. This is typically followed immediately by a wash and refill in line.
Top Barrel-to-Barrel and Top Tank-to-Barrel
Wine, for example, slowly evaporates from each barrel. To maintain quality, barrels should not have a head space exposing the wine to oxygen. Topping is used to eliminate the head space. Topping is generally a recurring operation, for example, every 30 days. The performance of a topping generates the due date for the next topping. Topping may affect any attributes of the wine.
There are three basic types of top barrel-from-barrel operations:
The wine used for topping comes from the same VBT as the wine being topped.
Barrel ferment top from barrel
This is typically done in conjunction with a sulfur addition simultaneously to stop fermentation. The addition is done as a separate operation after the topping operation, where the capacity is usually around 85 to 90 percent. A loss is not recorded.
Barrels may be topped with wine from another barrel.
Topping operations can result in a change of material type based on the configured operation. A change in material type can change the capacity type from fermenting to nonfermenting and vice versa. The system searches for material type information in the following order:
Configured operation
Before lot
VBT header
Based on the capacity type, the system recalculates the total volume for the VBT.
When you create a new VBT, the system retrieves the capacity type based on the To After material type that is defined in the configured operation. When you use an existing VBT, the system compares the capacity type of the existing VBT with the capacity type of the From and To After material type. If they are different, the system recalculates the total capacity of the VBT based on the new capacity type and replaces the capacity type of the existing VBT with the new capacity type.
Barrel stirring involves the mixing of wine in a barrel with the lees that may have settled to the bottom of the barrel. Sometimes barrels are topped at the same time as they are stirred. Barrel stirring can be performed using a manual or a powered stirring device. Barrel stirring is generally a recurring operation, for example, every 30 days.
There are two basic types of barrel in-place operations:
The mixing of wine in a barrel with the lees that may have settled to the bottom of the barrel.
Barrel stirring where wine is left on lees and stirred weekly.
Many operations involve the physical movement of a number of barrels from a storage location to a work area where the operation is performed. The barrels are then returned to the same or a different storage location. The locate vessels operation can be an integral part of other operations, or can be performed as an independent operation.
Renaming VBTs
You can rename a VBT by accessing the Rename Vessels program (P31B67N) from the Edit Operation Detail form. You can also rename a VBT by using the Rename VBT button on the VBT Move Details form. You cannot reuse a VBT name that already exists in the system.
Generating Actuals for VBTs
'To enter actual values for a barrel in-place operation, you can use the Generate VBT Actuals option in the Single From Vessel area of the Edit Operation Detail form. You do not need to access the VBT Movement Details form to add actuals, that is, barrels, except in the case of empty VBT in-place operations. In this case, you have to add barrels manually.
If you close a barrel in-place operation without assigning actual values, the system obtains actual values by copying the barrels from the Before lot to the After lot. The previous VBT operation must contain actuals.
To enter actual values for a chain of successive in-place VBT operations, use the Speed Actuals Update program (P31B67).
Forms Used to Enter Barrel Operations
|
Form Name |
FormID |
Navigation |
Usage |
|
W31B87A |
Blend Operations (G31B03), Operation Search Click the Add Blend Operation button on the Search For Operations form. Enter operation header information on the Operations Header form and click the Continue button. |
Enter barrel operations. |
|
|
W31B66A |
On the Edit Operation Detail form, click the VBT Detail button on the Move Details tab. |
Assign barrels to a VBT. Move barrels from one VBT to another. |
|
|
Edit Operation Detail |
W31B87A |
Blend Operations (G31B03), Operation Search Click the Add Blend Operation button on the Search For Operations form. Enter operation header information on the Operations Header form and click the Continue button |
Enter barrel in-place operations |
Entering Barrel Move Operations
Access the Edit Operation Detail form.
Complete the fields in the From vessel grid. If you move bulk material from a tank to a VBT, the vessel fields are displayed as tank fields. If you move bulk material between VBTs, the vessel fields contain VBT-related information.
Select the To vessel grid. The following fields are specific to VBTs. All additional fields in the grid are the same for all vessels.
|
VBT Number |
The system generates a number for the VBT that you are creating. |
|
VBT Type |
Displays the default VBT type that you defined in the facility constants for this facility. |
|
Edit VBT Detail |
This button appears after you calculate move details. Click the button to access the VBT Movement Details form to assign barrels to the VBT and revise VBT Details |
|
Remove VBT Detail |
Click to remove all VBT detail records for the VBT from the VBT Detail table (F31B101), as well as the actual dip values for the operation from the Operation Vessel Dip table (F31B72). You can remove VBT details and in the same session add them again by clicking the Edit VBT Detail button. |
Entering VBT Move Details
Access the VBT Movement Details form.
If you move bulk material from another vessel to a VBT, the system displays only the To VBT area. If you are moving bulk material between VBTs, the system displays both From and To VBT.
Complete the fields on the From and To VBT grids, depending on what type of VBT operation you are entering.
|
Virtual Barrel Tank Number |
Displays the VBT number from the VBT header. |
|
Rename VBT |
Click to enable the Virtual Barrel Tank Number field for data entry. You can change the VBT number. |
|
Before Blend ID |
Displays the value from the Before blend lot. A blend ID is an identifier that groups similar blend lots for practical purposes. The system records the blend ID on vessel labels to identify lots in operations and typically contains information about ownership, variety, location, and year. You cannot change this value. |
|
After Blend ID |
Displays the value from the Before blend lot. You cannot change this value. |
|
Planned After Volume |
Displays the value from the planned quantity of the After blend lot. You cannot change this value on this page. |
|
Planned Actual Volume |
Displays the value from the planned quantity of the After blend lot. The system calculates this value based on the number of barrels and the capacity of each barrel that you enter in the grid. You cannot change this value. |
|
Planned Total Number of Barrels |
Displays the total number of barrels. The system calculates this value by dividing the value in the Planned After Volume field by the capacity of the VBT. You cannot change this value. |
|
Actual Total Number of Barrels |
Displays the total number of barrels. The system calculates this value by summing the total number of barrel records that you enter in the VBT detail grid below. You cannot change this value. Note. The system includes empty barrels in this number only for empty barrel operations. |
|
Capacity Type |
Displays the value from the Capacity Type field in the VBT header. You cannot change this value. |
|
Barrel Type |
Displays the value from the VBT header. You cannot change this value. |
|
Move Selected Barrels |
For barrel-to-barrel moves, click to move the records from the From VBT to the To VBT grid. This decreases the total number of barrels and volume in the From vessel and increases the total number of barrels and volume in the To vessel. |
|
Add Barrels |
Click to access the Barrel Search & Select form. The search on this form is filtered by the barrel type from the VBT header, but you can change the filter. If you retrieve barrels with a different barrel type, the system issues a warning, but you can associate barrels with barrel type that is different from the barrel type on the VBT header. Select the number of barrels that you want to use for the VBT. The system populates the grid in the VBT detail area with the selected barrels. The grid area displays the following information about the barrels:
Note. The Sample Flag and Sample Sequence fields appear only for QA operations. |
Entering Barrel In-Place Operations
Access the Edit Operation Detail form
When you enter barrel in-place operation, the system automatically displays the Single From Vessel area of the form with the vessel and lot information for the From lot. On this form, you can instruct resources, equipment and consumables, and you can enter test and sample information when you are creating a quality assurance operation.
|
View Before Lot and View After Lot |
Select to access the View Wine Lot Detail form to review all the lot information, including quantities and survey results. |
|
Reset Prior Values |
Select to override prior values with the current values from the Before lot . When you reset values, the system clears any Significant Change warnings. |
|
Remove Vessel |
Select to remove the VBT from the operation. |
|
Edit VBT Detail |
Click to access the VBT Movement Details form |
|
Remove VBT Detail |
Click to remove VBT detail information. |
|
Rename Vessel |
Click to access the Rename Vessel form to assign a different name to the VBT. The new name must not exist in the system. |
|
Generate VBT Actuals |
Click to generate actual values for the After lot of the operation. You do not have to access the VBT Movement Details form to add actual values, that is, barrels, to the in-place operation. If the operation uses multiple vessels, some of which already have actual values, the system skips these vessel when assigning actual values. If the VBT operation is empty, you have to add barrels manually. This button is not displayed for empty VBT operations. |
Entering Sparkling Operations
This section provides an overview of sparkling operations, lists prerequisites, and discusses how to enter sparkling operations.
Understanding Sparkling Operations
The JD Edwards EnterpriseOne Blend Management system provides sparkling operations specialized processes and steps in the blend process. For example, you would use sparkling operations when producing champagne.
Sparkling operations require four base operations that use containers. Sparkling operations can also use base operations that are set up for other vessels, but allow a change of vessel class. You use the following base operations for sparkling operations:
T2C (Tank to container)
C2T (Container to tank)
CIP (Container in place)
ADDC (Container addition)
Sparkling operations using containers operate similarly to VBT operations. When you enter sparkling operations, you use a virtual container tank (VCT) for the From or To vessel. The To or From vessel grid reflects the use of containers by displaying VCT Number as the column header in the To or From Vessel grid. The area on the form that displays the results of the move calculation indicates the number of containers that the system calculates for the VCT.
When you enter a tank-to-container operation, you can use the Generate VCT check box to generate a new vessel number if no vessel number exists for the line. After calculating the number of containers that are required to receive the move quantity, you access the VCT Movement Details form to select and associate the containers with the VCT.
When you move bulk material from containers back to tanks, you use the Empty Container Into Tank option on the VCT Movement Details form to remove the bulk material from the containers and fill the designated tank or tanks.
For container-in-place operations, you can use the Single Vessel form. In this case, you access the VCT Movement Details form using the drop-down list menu in Action field. Container in-place operations are used for riddling operation. Riddling is the process of turning bottles to ensure that the sugar and yeast have settled. To add additives to bulk material in a container, you use the Single Vessel form as well.
In addition to the operations discussed so far, you can also perform QA operations and the following administrative operations that are set up to allow an override of the vessel class:
ADJLOT - Adjust lot attributes.
ADJINV - Adjust inventory.
COMPMAT - Composition material type.
DECLOSS - Declared loss.
ERROR - Error correction.
Renaming VCTs
You can rename a VCT by accessing the Rename Vessels program (P31B67N) from the Edit Operation Detail form. You can also rename a VCT by using the Rename VCT button on the VCT Movement Details form. You cannot reuse a VCT name that already exists in the system.
Generating Actuals for VCTs
'To enter actual values for a VCT in-place operation, you can use the Generate VCT Actuals option in the Single From Vessel area of the Edit Operation Detail form. You do not need to access the VCT Movement Details form to add actuals, that is, barrels, except in the case of empty VCT in-place operations. In this case, you have to add barrels manually.
If you close a VCT in-place operation without assigning actual values, the system obtains actual values by copying the containers from the Before lot to the After lot.
Prerequisites
To enter container operations, you must first:
Set up the winery constants for container tracking.
Set up containers.
Set up configured container operations.
Forms Used to Enter Sparkling Operations
|
Form Name |
FormID |
Navigation |
Usage |
|
W31B87A |
Blend Operations (G31B03), Operation Search Click the Add Blend Operation button on the Search For Operations form. Enter operation header information on the Operations Header form and click the Continue button. |
Enter container move operations. |
|
|
W31B66A |
On the Edit Operation Detail form, click the VCT Detail button on the Move Details tab. |
Enter VCT details. |
Entering Sparkling Operations
Access the Edit Operation Detail form.
Complete the fields in the From vessel grid. If you move bulk material from a tank to a VCT, the vessel fields are displayed as tank fields.
Select the To vessel grid. The following fields are specific to VCTs. All additional fields in the grid are the same for all vessels.
|
VCT Number |
The system generates a number for the VCT that you are creating. |
|
VCT Type |
Displays the default VCT type that you defined in the configured operation. This value is used only for tank-to-container operations. |
|
VCT Detail |
This button appears after you calculate move details. Click the button to access the VCT Movement Details form to assign barrels to the VCT. |
|
Remove VCT Detail |
Click to remove all VCT detail records for the VCT from the VBT Detail table (F31B101), as well as the actual dip values for the operation from the Operation Vessel Dip table (F31B72). When you click this button, the system disables the VCT Detail button. To be able to access the VCT Movement Details form again, you must save the operation first and then reenter the operation. |
Entering VCT Details
Access the VCT Movement Details form.
|
Virtual Container Tank Number |
Displays the VCT number from the VCT header. |
|
Rename VCT |
Click to enable the Virtual Container Tank Number field for data entry. You can change the VCT number. |
|
Before Blend ID |
Displays the value from the Before blend lot. A blend ID is an identifier that groups similar blend lots for practical purposes. The system records the blend ID on vessel labels to identify lots in operations and typically contains information about ownership, variety, location, and year. You cannot change this value. |
|
After Blend ID |
Displays the value from the Before blend lot. You cannot change this value. |
|
Planned After Volume |
Displays the value from the planned quantity of the After blend lot. You cannot change this value on this page. |
|
Planned Actual Volume |
Displays the value from the planned quantity of the After blend lot. The system calculates this value based on the number of containers and the capacity of each container that you enter in the grid. You cannot change this value. |
|
Planned Total Number of Containers |
Displays the total number of containers. The system calculates this value by dividing the value in the Planned After Volume field by the capacity of the VCT. You cannot change this value. |
|
Actual Total Number of Containers |
Displays the total number of containers. The system calculates this value by summing the total number of container records that you enter in the VCTT detail grid below. You cannot change this value. |
|
Capacity Type |
Displays the value from the Capacity Type field in the VCT header. You cannot change this value. |
|
Container Type |
Displays the value from the VCT header. You cannot change this value. |
|
Add Containers |
Click to access the Container Search & Select form. The search on this form is filtered by the container type from the VCT header. Select the number of containers that you want to use for the VCT. The system populates the grid in the VCT detail area with the selected containers. If you have set up the container tracking method to be Unique, the system retrieves the selected containers into the VCT Details form and adds additional rows equal to the number of containers. If the container tracking method is Collection, the system displays each selected container in one grid row and indicates the number of containers in the grid row. |
|
Serial Number |
If you use the unique tracking method, you can enter a serial number to identify each container. The system does not validate this number. |
Managing Additive Operations
This section provides an overview of additive operations, lists prerequisites, and discusses how to:
Enter additives.
Create additive templates
Manage additive thresholds.
Understanding Additive OperationsAdditives are dry goods that are added directly to the product during the blend process. Examples might include:
Alcohol
Sulfur
Cultures
Wine-based additions
Fining agents
Sugar
You set up additives as items in the JD Edwards EnterpriseOne Inventory Management system. Item setup includes information such as stocking type, line type, and lot processing information. When setting up item information, you must set up the unit of measure conversions that you need when creating additive operations. For costing purposes, define an item cost for the additive.
See Entering Item Information.
Additives are composed of active and inactive ingredients. Set up a bill of material to list all the ingredients of the additive and to specify whether each ingredient is an active or an inactive ingredient. An additive can have more than one active ingredient. You can only use zero batch bills for additives. When you create additive operations, the system uses the bill of material quantities to calculate the quantity of additives required to produce the specified quantity of bulk material.
See Setting Up Bills of Material.
Additive operations are configured to be in-place operations. When you enter an additive operation, the system displays the single vessel entry form. You must specify the tank or barrel to which you want to add an additive. Specify only one additive per additive operation. Enter the additive information on the Additive tab. You can specify the item number of the additive, the business unit where it is stored, the batch quantity that you want to use, and the lot and location. When you add an additive to an operation, the active ingredients from the bill of material of the additive item are displayed in the detail area.
There are four different methods for adding additives and calculating the additive quantity:
Fixed quantity.
You add a fixed quantity of the additive to the vessel and lot.
Targeted Parts Per Million (PPM).
The system calculates how much additive quantity to add to the vessel or lot based on a targeted concentration of the active ingredient. The concentration is expressed as parts per million (PPM) of an active ingredient: PPM = 1 milligram ÷ 1 liter.
You must select the ingredient to be targeted within the grid, specify the targeted PPM, and click the Calculate button. The system calculates the quantity of the additive that is necessary to meet the targeted PPM.
Rate
The system calculates the total quantity of an additive based on a specified rate. For example, you might want to add 10 grams of an additive every 10 minutes for the duration of the operation (two hours). The system calculates the total additive quantity for the operation to equal 120 grams. Specify the rate quantity and rate interval when using this method.
Flow
The system calculates the total quantity of an additive based on a flow. For example, you might want to add 10 grams of an additive for every 100 gallons in the vessel. If the vessel contains 2000 gallons, the system calculates the amount of additive that you must add during that operation (in this case, 200 grams). Specify the flow quantity and per volume quantity when using this method.
When you create an additive operation, the system stores the active ingredients with the lot as parts per million. The ingredients are copied or added to the lot's existing active ingredients. You can review the existing and new active ingredients added for a lot on the Instructed Attributes form.
The types of information that you must specify when instructing additives include:
Additive identifier.
Additive form (liquid, gas, and so on).
Amount or rate.
Instructions.
Equipment necessary to use the additive.
Limits and other specifications that the system uses for validation.
If you add certain additives in set quantities frequently, you can set up additive templates to simplify data entry. You enter additive information on the Edit Operation Detail form, such as additive item and quantity and then save the information with a template name. After you have set up this template, you can reuse it every time you want to use a specific additive.
Additive Thresholds
You can set up the system to check whether the quantity of active ingredient in an additive exceeds a specified range. You set up this range by defining operational or cumulative thresholds for the additive item when you set up the Item Master and the Item Branch record. You can set up threshold values for the active ingredients on the parent item's bill of material, and the system uses these values to evaluate the extended quantity of the active ingredient that you enter for the operation.
If you set up operational threshold values, the system compares the extended quantity of the active ingredient for the current operation with minimum and maximum threshold value that you defined for the item. If you use cumulative threshold values, the system compares the PPM quantity of the accumulated additive for an operation with the minimum and maximum threshold value. You can use either operational or cumulative thresholds or both.
Depending on the status of an additive operation, the system issues either a warning or an error when the quantity for the active ingredient is outside of the allowed range that you specified for the additive item. The warning or error is generated when you click the Calculate button on the Additive form or when you click Save and Close on the operation header. As long as an operation is still in status Active, the system issues a warning. For operations that are in status Actual or Closed, the system issues an error. In this case, the system displays the Threshold Reason area of the form. You must enter a reason code if you want to make any changes to the operation with the threshold error.
Additive Threshold - Example
The following table illustrates a scenario that would cause the system to issue a warning or an error:
|
Ingredient |
Quantity |
Extended Quantity |
Unit of Measure |
PPM Quantity |
Minimum Operational Threshold |
Maximum Operational Threshold |
|
Sulfur |
1000 |
21000 |
MG |
21.9895 |
10000 |
20000 |
In this scenario the extended quantity exceeds the specified maximum threshold. If the additive operation is active, the system issues an warning. If the operation is actual or closed, the system issues an error.
Prerequisites
Before you can use additives, you must set up:
Item and item branch records for the additive and its components.
Unit of measure conversions for the active ingredient.
A bill of material for the additive, defining the active ingredient.
Forms Used to Manage Additive Operations
|
Form Name |
FormID |
Navigation |
Usage |
|
W31B87A |
Blend Operations (G31B03), Operation Search Click the Add Blend Operation button on the Search for Operations form. Enter operation header information on the Operations Header form and click the Continue button. |
Enter additives. Manage additive thresholds. |
|
|
W31B45D |
Blend Facility Setup (G31B02), Additive Templates Click the Add button on the View Additive Templates form. |
Create additive templates. |
Entering Additives
Access the Edit Operation Detail form.
|
Winery |
Enter the branch/plant for the additive item. |
|
Item Number |
Enter the item number of the additive. You can use additives that are set up in a different branch/plant than the current facility. |
|
Before Blend ID and After Blend ID |
The system displays the blend ID of the Before lot and the blend ID after you calculate the additive operation. |
|
Batch Quantity |
Enter a batch quantity to use to specify a batch bill of material. |
|
Location |
Enter the location from which you want to commit the additive. |
|
Lot/SN |
Enter the lot from which you want to commit the additive quantity if the additive is a lot-controlled item. |
|
Fixed/Target PPM/Rate/Flow |
Select one method for calculating the additive quantity. |
|
Quantity |
Enter a quantity for an additive. This value represents a fixed quantity, PPM, flow, or rate, depending the method that you select. |
|
Calculate |
Click to calculate the extended additive quantity based on the quantity that you entered and the calculation method that you specified. |
|
Total Quantity |
Displays the total quantity of additive to apply to the lot. This value is calculated from the additive quantity based on the selected calculation method |
|
Saved Templates |
Select an additive template to simplify data entry, if you have set up templates with additive items and quantities. |
|
Apply |
Select to use the data from the selected template for the current additive operation. Selecting this option removes existing additive information. |
|
Action |
Select the Save As a Template option if you want to reuse the additive information that you entered as a template. By selecting this option, you access the Add Additive Template form where you create the template. Use the Edit Templates option to access the View Additive Templates form. On this form, you can retrieve existing templates and copy or revise them. You can also access the Add Additive Template form. |
Creating Additive Templates
Access the Add Additive Template form.
|
Template Name |
Enter a name for the template you want to create. |
|
Status |
Assign either an active or an inactive status to the additive template. |
|
Item Number |
Enter the number of the additive parent item. You can enter only one parent item. The system uses the parent item number to retrieve the bill of material, which lists the active and inactive ingredients of the additive. |
|
Winery |
Enter the facility with which the item and its bill of material are associated. You can save the template without facility information, but without it the system does not retrieve the bill of material and therefore does not display the active ingredients. You might want to save the template without facility information if the parent item is used in several facilities. |
|
Quantity |
Enter the quantity of the additive items and specify whether you want to use a fixed quantity, a target of parts per million, a rate, or a flow. |
Managing Additive Thresholds
Access the Edit Operation Detail form.
If you enter an additive quantity outside of the tolerance range that you defined for the active ingredient, the system issue a warning or an error and displays the Threshold Reason area at the bottom of the form.
|
Additive Operational Threshold Reason and Additive Cumulative Threshold Reason |
Enter an explanation as to why the additive quantity is acceptable even though it falls outside of the tolerance range. |
Entering Administrative Operations
This section provides an overview of administrative operations and discusses how to:
Adjust inventory.
Declare loss.
Override the composition material type.
Understanding Administrative OperationsAdministrative operations do not involve actual work in the facility. They are in-place operations and are most frequently used to make changes or to correct errors on blend lot attributes. You can perform administrative operations to:
Adjust lots.
Adjust inventory.
Correct errors.
Declare loss.
Override the composition material type.
You can adjust attributes for multiple blend lots in a single operation. Generally, you change lot attributes and lot summary attributes as part of another operation; however, sometimes you need to change the attributes on a current blend lot when no other treatment is occurring.
An inventory administrative operation is used to adjust the volume of a blend lot.
Error correction operations are the only way to modify lot composition and accumulated additives without performing work against the bulk material.
A declared loss operation records a loss of bulk material that is unusual or extraordinary. It is not a survey or operational loss and does not affect yield or total allowable losses. Causes for a declared loss could be a tanker crash or a warehouse disaster.
The system provides an administrative operation that enables you to override the composition material type for a blend lot. You can specify the new composition material on the operation header. When you close the operation, the system updates the composition material type on the After composition record for the lot.
Form Used to Enter Administrative Operations
|
Form Name |
FormID |
Navigation |
Usage |
|
W31B87A |
Blend Operations (G31B03), Operation Search Click the Add Blend Operation button on the Search for Operations form. Enter operation header information on the Operations Header form and click the Continue button. |
Enter administrative operations. |
|
|
W31B69A |
Blend Operations (G31B03), Operation Search Click the Add Blend Operation button on the Search for Operations form. |
Override the composition material type |
Adjusting Inventory
Access the Edit Operation Detail form.
Enter the actual Before volume or measure if you want the inventory adjustment reported as a survey gain/loss. Enter the actual After volume or measure if you want the inventory adjustment reported as an operation gain/loss.
Declaring Loss
Access the Edit Operation Detail form.
Overriding the Composition Material Type
Access the Operations Header form.
Enter the override composition material type.
Instructing Removal OperationsThis section provides an overview of removal operations, lists a prerequisite, and discusses how to:
Enter shipping operations.
Enter bill of lading details for shipping operations.
Enter transfer operations.
Understanding Removal Operations
For the purpose of shipping and transferring bulk material, the system provides a number of base operations that you use to create configured operations. You can create configured transfer and shipping operations based on the following base operations:
|
Base Operation Code |
Description |
|
SHIP |
Ship wine |
|
TRANS |
Transfer wine |
|
SHIPFULTNK |
Ship full tank |
|
SHIPFULVBT |
Ship full barrel |
The shipping/dispatch operation involves the physical movement of a bulk material lot to a transport tanker for shipment to a third party for specialized processing. Shipments are also used for sales of bulk material. The bill of lading is a document that is generated at the shipping facility and serves as a source document at the receiving facility. A printed bill of lading is a legal document between the shipper and carrier, and is required for the transportation of wine or juice between blend and bottling facilities. The bill of lading records the origin and destination of the shipment, the weight or volume of the shipment, and vehicle attributes, such as registration number and bond number. In addition, the bill of lading records the attributes of the material being shipped (primarily the composition details), but may also report the style, accumulated additives, and quality results.
Note. A bill of lading vessel may contain a bill of lading document number. In the United States, a bill of lading document is a TTB Form 703. In Australia, a bill of lading document is an LIP Declaration Form. The bill of lading number is a state-controlled number, and a record must exist for each consecutive number.
This type of operation is used for external shipping. This operation creates a bill of lading vessel, including the trucking details. Once a bill of lading document number is generated, it cannot be deleted from a bill of lading vessel. The bond serial number is generated only if it is required, and it is generated only if the shipping operation is active. A new bill of lading vessel is created for every ship operation. You cannot reuse a bill of lading.
A shipping/dispatch operation:
Reduces inventory by the amount shipped. ERP inventory is increased for the item that is cross-referenced with the material type on the bill of lading vessel.
Generates a bill of lading to certify the state and composition of the bulk material for shipping.
Records a survey loss associated with the bill of lading, but not an operational loss.
Uses a user-defined weight factor to calculate liquid volume.
The volume dispatched from the shipping facility is the volume that is on the transfer documents. The system validates the volume using one of these methods:
From tank measures
The From Tank Before and After tank measures determine the volume that is moved and entered on the transfer document.
Flow Meter
A flow meter can also be used at some sites. (United States only)
Tanker Gauging
Volumes are measured from tanker gauges. This information is entered on dispatching facility and tanker company consignment notes. (Australia only)
An operation shipping full vessels involves the physical transfer of bulk material in full vessels to another facility , including transfer to a third party for specialized processing, where the third party is managed within the facility. This operation does not require the additional movement from vessels to tankers. You can associate an internal operation for receiving bulk material at the receiving facility, including the preservation of blend lot details. The bulk material being transferred remains property of the shipping facility until received.
These operations are for internal shipment.
A ship full vessel operation has the same characteristics as a shipping/dispatch operation. In addition to these characteristics, a ship full vessel operation:
Updates the associated vessel master record so that vessel is in new facility.
The barrel facility is changed from one facility to another within the master table. The tanks are copied and associated with the new facility. When this record is copied, the tank status in the receiving facility is updated to Waiting for Receipt.
Copies the From vessels from the associated ship operation to the To vessels in the receive operation.
The From Vessels must be of the same material type.
Once a ship operation is closed, the tank status is updated to Not In Branch in the shipping facility. When the receive operation is closed, the tank status in the receiving facility is updated to Active. ERP inventory is increased for the item that is cross-referenced with the material type on the bill of lading vessel.
A transfer bulk material operation involves the physical transfer of bulk material to a transport tanker for shipment to another facility, or to a third party within the facility for specialized processing. This type of operation is only used internally within blend facilities.
Note. To successfully transfer bulk material from one facility to another, both facilities have to be set up with the same unit of measure system. For example, if the shipping facility uses metric units of measure, the receiving facility has to use metric units of measure as well.
This operation creates a bill of lading vessel, including the trucking details. Once a bill of lading document number is generated, it cannot be deleted from a bill of lading vessel. The bond serial number is generated only if it is required, and it is generated when the transfer operation is at an active status. A new bill of lading vessel is created for every transfer operation. You cannot reuse a bill of lading.
A transfer bulk material operation:
Reduces inventory at the shipping facility by the amount shipped.
ERP inventory is increased for the item that is cross-referenced with the material type on the bill of lading vessel.
Generates a bill of lading to certify the state and composition of the bulk material for shipping, as well as trucking details.
Records a survey loss associated with the bill of lading, but not an operational loss.
Uses a user-defined weight factor to calculate liquid volume.
Prerequisite
To ship a full tank, you must define the tank as moveable in the Tank Master program (P31B08).
See Creating a Tank.
Entering Shipping Operations
Access the Edit Operation Detail form.
Enter the tank from which you are shipping bulk material, or the full tank or barrel that you are shipping.
|
Generate BOL (generate bill of lading) |
This option appears for shipping operations. Select this check box to generate a bill of lading. |
Entering Transfer Operations
Access the Edit Operation Detail form.
Enter the tank from which you transfer bulk material and specify the quantity of bulk material that you want to transfer. You must enter the receiving facility. The system generates a bill of lading number, or you can manually enter a bill of lading number.
Instructing Bottling OperationsThis section provides an overview of bottling operations and discusses how to:
Set processing options for Bottling Vessel (P31B26).
Enter bottling operations.
Enter bottling vessel details.
Enter decanting operations.
Enter decant details.
Understanding Bottling Operations
Bottling operations are another type of removal operations and take place at the end of the blend process. Bottling can also be reversed by returning the finished goods to the facility as bulk material.
A bottling operation is the final step of the blend process that records the movement of bulk material to bottles, resulting in transfer of inventory.
A bottling operation removes the bulk material from inventory and adds it to raw materials in the finished goods system, in addition to any transaction required for the finished goods bottling inventory. A bottling operation creates a single end-use reservation (EUR). If multiple EURs are in the From vessels when you are blending their contents for a bottling vessel, a single EUR is created. You can issue the EUR item to a parts list for producing bottled product.
A bottling operation:
Costs the blend lot, accounting for variance to standard cost and gains and losses.
Instructs the To After details.
There can only be one bottling vessel per bottling operation.
Records bottled, sampled, and broken quantities.
Accounts for bulk losses incurred in bottling, such as bottles used as samples and broken bottles to be used for legal reporting.
Incorporates the operational losses in a calculation for a complete lot yield for the blend lot.
Records quality tests to the To After blend lot.
Updates the bottling operation with bottling details associated with the To After blend lot.
You enter the bottling completion quantities either in volumes or using the production unit of measure. You can enter the bottling quantities only on the Movement Details tab on the Edit Operation Detail form. The Edit Bottling Vessel Details form displays both volume and production unit of measures, but only the volume quantities are saved. The volume unit of measure used is set up in the winery constants.
You can also enter the COLA Number (U.S.) or Internal Approval Number (Australia).
The system generates a bottling vessel number during a bottling operation. A decant operation can use only an existing bottling vessel. You can enter only the bottling quantities in the move details. When you click the Vessel Details button, the system disables the quantity fields.
A decant operation involves bottles of finished goods brought back to the facility as a bulk material in a tank because the material is unacceptable, expired, defective, or may simply need to be rebottled.
The decanting process occurs after maturation, such as six months or more The tirage bottles are taken to the transfer line by pallet. Decanting generally has other associated operations such as additives.
There are three types of decants:
Bulk material from bottles from the finished goods bottling line.
This is also known as bottled wine returns. In this instance, the wine is considered to have left the bulk wine system and needs to be returned.
Bulk material from finished goods.
Blends that are being decanted into the same To vessel.
A decant operation:
Stores the following historical details:
Finished goods.
Item number.
Finished goods lot number.
Historical blend lot number.
Bottling operation number.
Historical blend ID number.
Blend lot details.
Identifies the quantity of finished goods to return to inventory.
Decant operations use a bottling vessel that can also have decant details. These details can list specific items that are decremented in inventory.
Increases inventory and inherits blend lot details from the related bottling lot.
Forms Used to Enter Bottling Operations
|
Form Name |
FormID |
Navigation |
Usage |
|
W31B87A |
Blend Operations (G31B03), Operation Search Click the Add Blend Operation button on the Search For Operations form. Enter operation header information on the Operations Header form and click the Continue button. |
Enter bottling operations. Enter decanting operations. |
|
|
W31B26B |
Blend Operations (G31B03), Bottling Vessel |
Search and select bottling vessels. |
|
|
W31B26A |
|
Enter bottling vessel details. |
|
|
W31B26C |
Click the Decant Details link on the Search for Bottling Vessel form or the Edit Bottling Vessel Details form. |
Enter decant details. |
Setting Processing Options for Bottling Vessel (P31B26)
This processing option controls default processing for the Bottling Vessel program.
Version
This processing option controls the version that the system uses when the program calls other programs. The following table lists the programs in the order that they appear on the Versions tab, along with the default version. If you leave the processing options blank, the system uses this default version. You can define different versions in accordance with business processes.
|
1. Work Orders Where Used Version (P13226) |
ZJDE0001 |
Entering Bottling Operations
Access the Edit Operation Detail form.
Entering Bottling Vessel Details
Access the Edit Bottling Vessel Details form.
|
Bottling Reference Number |
Enter the bottling reference number, for example, the COLA number. |
|
EUR Code |
Displays the EUR code that you specified for the bulk material to be bottled. |
|
Work Order Number |
Select the number of the work order that uses the EUR item on its parts list. |
|
Inventory Location |
Enter the storage location from which goods will be moved. |
|
Inventory Lot Number |
Enter a lot number for the EUR item. |
Entering Decanting Operations
Access the Edit Operation Detail form.
Entering Decant Details
Access the Edit Decant Details form.
Enter decant details such as the item number and the location from which you are returning quantity to blend inventory.
Entering QA Operations
This section discusses how to enter QA operations.
Form Used to Enter QA Operations
|
Form Name |
FormID |
Navigation |
Usage |
|
W31B87A |
Blend Operations (G31B03), Operation Search Click the Add Blend Operation button on the Search for Operations form. Complete the required fields on the Operation Header form and click the Continue button. |
Enter QA operations. |
Entering QA Operations
Access the Edit Operation Detail form.
Managing Spirit Operations
This section provides an overview of spirit operations, lists prerequisites, and lists forms used to manage spirit operations.
Understanding Spirit Operations
In contrast to wine, spirits have a much higher alcohol content. Because of their high alcohol content, spirits have legal reporting requirements. The producer is required to track measured, adjusted, and absolute volumes. Spirit volumes are reported as proof gallons in the United States or as litres absolute alcohol (LAL) in Australia. This value is used to calculate taxes and duties on alcohol. Spirits can be blended with each other, but they can also be blended with wine in a process called fortification.
For spirit operations, the system does not provide special base operations. However, you must set up separate configured operations for spirit operations, such as configured tank-to-tank, shipping, receiving, and transfer operations. When you set up configured spirit operations, you must specify a To After material type. For tank-to-tank operations, for example, this setting is important because it indicates whether you are using the operation to move a spirit into a spirit vessel or into a vessel containing wine. You can move spirits into vessels that contain blend lots with a non-spirit material type, and vice versa.
For any operation that involves spirits, you must ensure that the Perform Survey Measure check box on the Operation Header form is selected. The selection for the Perform After Measure field cannot be Do Not Measure.
When you enter a bill of lading for spirits, you must enter an EUR, but you do not have to enter composition information.
Note. You do not specify a To After material type for bill of lading operations involving spirits.
For configured spirit operations that move spirits into a vessel containing wine, you also select the Fortification option. This setting enables the system to retrieve fortification operations for the Fortification report (R31B70).
To perform spirit operations, you must select vessels that are approved for spirits. To approve a tank for spirits, you select the Spirit Approved option when you set up the tank in the Tank Master program (P31B08).
When you select a vessel containing spirits, the Temperature, Temperature Unit of Measure, and Gauging Document Number fields are enabled. You must enter a temperature and unit of measure when you enter actuals for a spirit operation. The system uses the temperature unit of measure that you set up in the facility constants as the default value for the operation.
For in-place operations, the system displays temperatures on the In Place tab for the From vessel containing spirits. For move operations, the system displays temperatures on the Move Details tab for the From and To vessels that contain spirits. When you fortify wine, the system displays temperatures on the Move Detail tab for the From vessel.
If you use single vessel entry, the system displays the temperature, unit of measure, and gauging document number in the Single Before Vessel area of the form as well.
For external receiving operations, you enter the temperature, unit of measure, and gauging document number on the Bill of Lading Details form. You record only one temperature per bill of lading. The system uses the temperature that you enter as the default temperature for the After lot. You can enter the temperature on the bill of lading only for an external receipt of spirits. If you create a receiving operation for a transfer between blend facilities, you cannot enter a temperature. The system automatically displays volumes at standard temperature. For any other bill of lading operations involving spirits, the bill of lading header does not display the temperature, temperature unit of measure, and gauging document number.
You must enter a gauging document number for any To or From vessel that contains a spirit. The system does not generate this number; you must enter it manually before closing an operation. The system stores the gauging document number in the Operation Vessel Assignments table (F31B70).
Because the volume of alcohol fluctuates when the ambient temperature changes, you have to measure and enter the ambient temperature for each spirit operation and vessel. You typically enter temperatures at the same time as actual quantities and dips. You must have entered the ambient temperature when entering actuals for a spirit operation. If you enter an actual dip or move value for a vessel containing spirits, but no temperature, the system issues an error message.
To close an operation that uses a vessel containing a spirit, you must enter actual values for each vessel containing a spirit; otherwise, the system issues an error message. If the From vessel contains a spirit, you must enter an actual From After value. If the To vessel contains a spirit, you must enter an actual To After value. To close a spirit operation, each vessel containing a spirit must have a gauging document number.
The system displays the actual volumes for all volumes at ambient temperature. The only exception is the bill of lading, which displays spirit volumes at standard temperature.
Based on the temperature conversion chart that you set up for a spirit material type, the system calculates volume adjustments for the standard temperature of the type of spirit. The system displays all lot and planned volumes at standard temperature, for example on the Instruct Lot Attributes form and the View Wine Lots form. EUR and compositions calculations are based on the spirit volume after the conversion to standard temperature.
Depending on the setup in the facility constants, the system calculates and displays spirit volume either as alcohol volume or as proof volume on the Instruct Lot Attributes form and the View Wine Lot Details form. The system does not calculate spirit volumes if you did not set up a QA alcohol attribute in the winery constants. If no QA alcohol results exist for an operation and a vessel, the system does not calculate the spirit volume.
To calculate spirit volumes at standard temperatures, the system needs an alcohol percentage to retrieve the correct conversion rate from the temperature conversion chart. The system assumes that the QA alcohol percentage of the From After lot cannot change or be different from the QA alcohol percentage of the From Before lot. Because the QA alcohol percentage of the To After lot is unknown if the To vessel already contains a spirit, the system uses the QA alcohol percentage of the To Before lot to determine which temperature conversion rate to use for calculating the actual volume at standard temperature.
Note. If you enter an ambient temperature that falls above or below the range of temperatures for which you have set up conversions, the system issues an error message because it cannot perform the conversion.
If the To vessel is empty or does not have a QA alcohol attribute, the system uses the QA alcohol percentage of the From Before lot to determine the temperature conversion rate. Normally, the system uses the QA blending rules to determine the QA alcohol percentage of the To After lot. However, because the typical QA alcohol blending rule is AVERG, the system cannot use this blended value to calculate the spirit volume of the To After lot when the To vessel was empty.
Temperature Conversion Rate
To retrieve the correct temperature conversion rate, you must have an alcohol QA result name for the lot that is applicable to the actual value. For To After actuals, the system searches for results first on the To After lot, then the To Before lot, and finally the From Before lot. If the system encounters a For To Before actuals, the system uses the To Before lot. For any From actuals, the system searches the From Before lot for test results.
If the temperature conversion rate is 1.0, the system was not able to locate a QA test result or you did not define the correct QA test result name for the operation.
The system may also retrieve a temperature conversion rate of 1.0 if the value for the actual measure or volume is 0. In this case, the system does not perform a conversion because 0 does not change regardless of what conversion factor might be applied.
Prerequisites
To manage spirit operations, you must:
Define a default value for spirit volumes and enter an alcohol QA attribute value and unit of measure in the winery constants.
Set up spirit material types in the Material Type Master table (F31B04).
Set up temperature conversion charts and attach them to the spirit material types that you use.
Set up tanks as approved for spirits in the Tank Master table (F31B08).
Set up configured operations for spirits.
Select the fortification option for configured operations that are used to add spirit to wine.
Forms Used to Manage Spirit Operations
|
Form Name |
FormID |
Navigation |
Usage |
|
Edit Operation Detail |
W31B87A |
Blend Operations (G31B03), Operation Search Click the Add Blend Operation button on the Search for Operations form. Complete the required fields on the Operation Header form and click the Continue button. |
Enter spirit operations, for example tank-to-tank movements. |
|
Edit Bill of Lading Details |
W31B91G |
Complete the Receipt Quantity field for the From vessel and go to the next line. |
Enter a standard temperature and a gauging document number when you enter a bill of lading for spirits. Enter a gauging document number when you close the operation. Optionally, enter EUR and composition information. |
|
Speed Actuals Update |
W31B67A |
Blend Operations (G31B03), Operation Search Select an operation and select the Speed Actuals option from the Action field. |
Enter actual volumes, measures, and gauging document numbers for spirit After lots. |
Managing Empty Vessel Operations
This section provides an overview of empty vessel operations and discusses how to:
Enter in-place operations with empty vessels.
Enter transfer operations for empty vessels.
Understanding Empty Vessel Operations
The system enables you to perform operations using empty vessels. You can transfer empty tanks or VBTs to another facility or perform an in-place operation on empty vessels for maintenance purposes.
You can perform four types of empty vessel operations:
|
Base Operation |
Description |
|
TRANSMTTNK |
Transfer Empty Tank |
|
TRANSMTVBT |
Transfer Empty VBT |
|
TANKMT |
Empty Tank in Place |
|
VBTMT |
Empty VBT in Place |
For each empty vessel operation, the Empty option on the base operation definition is selected.
Empty vessel operations can have only one From vessel (tank or VBT).
Empty Vessel Transfer
Transferring empty vessels consists of physically moving an empty tank or VBT from one internal facility to another. You can only use this operation within a company, but not to move the vessel to a third-party location.
When you create an empty vessel transfer, you must specify either a VBT or a tank as the From vessel. These vessels must be empty. You cannot use unknown vessels. The system does not create bill of lading vessels during an empty vessel transfer. If the From vessel is a tank, the system verifies whether the tank is defined as moveable in the Tank Master table (F31B08). If that is not the case, you cannot perform an empty vessel transfer using the tank.
When you create an empty vessel transfer, you specify a new location and a receiving facility for the empty vessel. If the From Vessel is a tank and this tank does not exist in the receiving facility, the system creates a new record in the F31B08 table for the tank and facility at a status of N (not in branch). The status of the tank in the shipping facility remains at A (active). When you move the operation to a Closed status, the system changes the status of the tank in the shipping facility to N and the status of the tank in the receiving facility to A. As long as tanks are at status N (not in branch), you cannot use them in another operation. You must close the transfer operation first to be able to use the empty tank in another operation.
For transfers of empty VBTs, you must create a new VBT. You add barrels to the VBT by accessing the VBT Movement Details program (P31B66). You can only use barrels with a volume status of Empty. If you move the transfer operation to a Closed status, the system changes the facility on the barrel master record from the shipping to the receiving facility. You can update locations and racks for the barrels. Once you close the operation, you can associate the barrels with a different VBT.
When you transfer an empty tank or VBT between blend facilities, the system copies the vessel's attributes and style from the shipping to the receiving facility.
You can print a list of the empty vessels that you transfer on the Operation Print report (R31B65A01). The report displays the empty barrels and calculates their total number for the After lots of the operations with empty barrels. The system also calculates the number of full barrels on each After lot.
In-Place Operation with Empty Vessels
You use in-place operations for empty vessels to enable cleaning and maintenance of empty tanks and barrels, for example, repairs or processing of new vessels. The vessels must be empty before you can perform this type of operation. The system uses the setup information from the configured operation to determine what activity you can perform on a specific vessel, but you cannot specify the status in the operation itself. For example, to perform cleaning and maintenance activities on a tank, the tank's status cannot be Out of Commission. If you want to repair a tank, the tank status must be Out of Commission, and you should only be able to move the status to either Decommissioned or Active.
In the case of barrels, for cleaning and maintenance, you must set the barrel's availability code to a status other than Culled. For repairs, the availability code for the barrel must be Culled. For barrel disposal, you can set up the configured operation so that the operation changes the barrel status to Culled.
Note. You cannot use unknown vessels for in-place operations with empty vessels.
Form Used to Manage Empty Vessel Operations
|
Form Name |
FormID |
Navigation |
Usage |
|
Edit Operation Detail form |
W31B87A |
Blend Operations (G31B03), Operation Search Click the Add Blend Operation button on the Search For Operations form. Enter operation header information on the Operations Header form and click the Continue button. |
Enter empty vessel operations. |
Entering In-Place Operations with Empty Vessels
Access the Edit Operation Detail form.
Enter the VBT that you want to identify as an empty vessel for maintenance or other activities for which the vessel has to be empty.
Entering Transfer Operations for Empty Vessels
Access the Edit Operation Detail form.
Enter the empty vessel that you want to transfer and the facility to which you want to transfer the vessel.
|
View VBT Detail |
Select to access the VBT Movement Details form. |
|
Remove VBT Detail |
Select to remove detail information from the VBT. |