 Understanding Grower Contracts
This chapter provides overviews of grower contracts and the relationship among contracts, blocks, and harvests and discusses how to:
Add contracts.
Add grower blocks to contracts.
Add grower harvests to contract blocks.
Understanding Grower Contracts
A contract is an agreement between two or more entities, usually between an agribusiness and a farmer or grower. The contract is the central repository for all terms and conditions of an agreement, as well as for pricing and payment schedules. Negotiating a contract for products occurs at both the regional and corporate level. A product may be contracted with external growers or internally owned farms.
After an agribusiness determines who they will contract with for a product, a contract is created between the entities. The contracts contain information about the plot of land, also referred to as the block, on which the product is grown. For each growing period, a harvest associated with a block. The harvest identifies the product and growing period. Because a contract can span several growing periods, a block might have several harvests associated with it. Typically, the contract manager manages the harvests at the block level because most harvests for a block have similar characteristics such as price. A contract that is associated with a block and harvest is referred to as a grower contract.
A grower contract consists of these three components:
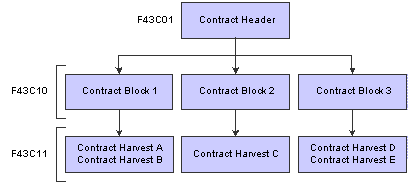
Contract components
The three components are described in this table:
These three components form a hierarchy. The contract header is a parent to the contract block and the contract block is a parent to the contract harvest. Many of the attributes of the parent are passed on to its children so that the information from one level of the hierarchy becomes default information for another.
One component in the hierarchy depends on the existence of another component. You cannot add a contract block without a contract header, nor can you add a harvest block without a contract block.
After you create the contract header, you can add one or more grower blocks to the contract. Similarly, after you create the contract block, you can add one or more grower harvests to the contract. A contract is considered ready to transact against when all three components of the contract are complete.
Before the terms of a contract are reviewed and agreed upon between the interested parties, you can enter the contract in the JD Edwards EnterpriseOne Grower Pricing and Payments system and assign it a draft status. You can create the contract header, block, and harvest with a minimal amount of information or you can create the contract header and later add the block and harvest. The interested parties review the contract and, if necessary, revise the agreement and then sign it. When the agreement or contract is signed, you change the draft status of the contract to active. Throughout the life cycle of the contract, you can closely monitor the details of the contract, including receipts and payments for the contracted items.
Understanding the Relationship Among Contracts, Blocks, and Harvests
A one-for-one relationship exists between these components:
Contract block and grower block.
Contract harvest and grower harvest.
When you add a contract block and contract harvest, the system uses information from the grower block and grower harvest records that were created in the JD Edwards EnterpriseOne Grower Management system.
A contract can have only one header record; however, it can have multiple blocks and harvests. You can add the same block to more than one contract, although this would probably occur only if you renegotiated a contract and wanted to create a new contract and retain the block from the previous contract.
The following table shows the different types of information that appear on a grower contract. As the table indicates, the default values for general information, clauses, and payment schedules are passed from the contract header to the contract block to the contract harvest. The default values for pricing and assessments and donations are passed from the contract block to the contract harvest. You can override the default values, as well as add and update information based on the form that you access:
|
Type of Information |
Contract Header |
Contract Block |
Contract Harvest |
|
General Information |
x |
x |
x |
|
Clauses |
x |
x |
x |
|
Pricing |
x |
x |
|
|
Assessments and Donations |
x |
x |
|
|
Payment Schedule |
x |
x |
x |
|
Action Date |
x |
Adding Contracts
This section provides overviews of contract headers and payment schedules and discusses how to:
Set processing options for Contract Workbench (P43C00).
Add a contract header.
Attach a clause to a contract.
Enter payees and payment schedules.
Enter action dates.
 Understanding Contract Headers
The contract header contains general information about the contract, such as contract name, contracting entity, start and end dates, and terms for renewal. The contract header also includes clauses to attach to the contract, payment terms, and action items and dates that are used to track common tasks or actions that are related to the contract. This information is stored in the Contract Header table (F43C01).
Typically, you will enter a contract header and assign the contract a draft status while the contract is being negotiated. After you enter a start and end date on the contract header, you can change the contract from a draft to an active status. You cannot process any transactions against the contract until it has an active status.
Some of the information that you enter in the contract header is passed on to the contract block, for example, the start and end dates and payment schedule.
Understanding Payment Schedules
You can issue payment for a contract directly to the contracting entity, or you can issue payments to one or multiple payees. For example, you could issue payments for a contract to a manager, grower, and a bank (on behalf of the grower). Additionally, you can assign each payee a different payment term and schedule. The system stores payee information in the following tables:
Contract Payee (F43C20)
Payee Date Schedule (F43C25)
For example, assume that the first payee record on a payment schedule has a due date rule of DEL 30 and is attached to a payment term code with multiple installments. The rule specifies a delivery percent of 30. The first payee record has a distribution percent of 20. The estimated harvest yield for the contract is 100 tons at 500 USD per ton (50,000 USD total).
According to the due date rule, the payee cannot receive payment until at least 30 tons of product have been received. At that time, the payee would receive 10,000 USD (20 percent of 50,000 USD).
Forms Used to Add Contracts
|
Form Name |
FormID |
Navigation |
Usage |
|
Contract Search |
W43C00A |
Grower Pricing and Payments Daily Processing (G40G211), Contract Workbench |
View a list of existing contracts by contract header, block, or harvest. |
|
Add Contract Header |
W43C01A |
On the Contract Search form, click Add Contract. |
Add a contract header. Attach a clause to a contract. Enter pages and payment schedules. Enter action dates. |
|
Header Additional Information |
W43C01C |
On the Add Contract Header form, click Additional Information. |
Enter additional contract address book numbers, contract properties, contract dates, and contract codes. |
Setting Processing Options for Contract Workbench (P43C00)
These processing options control default values that appear in fields on the Contract Search and Add Contract Header forms, as well as specify whether to display certain fields on the Add Contract Header form.
Contract Search
Options
Contract Header
Contract Block
|
1. Display Disallow Over Receipt |
Specify whether to display the Disallow Over Receipt check box on the Contract Block form. Values are: Blank: Display. 1: Do not display. |
|
2. Display an Error or Warning Message when attaching an inactive Grower Block |
Specify whether to display an error or a warning when you attempt to attach an inactive grower block to a contract block. Values are: Blank: Display an error. 1: Display a warning. |
Contract Detail
|
1. Display or Hide Date Fields |
Specify whether to display the date fields on the Contract Harvest form. Values are: Blank: Display. 1: Do not display. |
|
2. Display Disallow Over Receipt |
Specify whether to display the Disallow Over Receipt check box on the Contract Block form. Values are: Blank: Display. 1: Do not display. |
Versions
If you leave any of the following processing options blank, the system uses version ZJDE0001.
|
1. Grower Block Maintenance (P40G02), 2. Grower Harvest Maintenance (P40G03), 2. Grower Harvest Maintenance (P40G03), and 3. Reprice Purchase Orders/Receipts Batch (R45620) |
Specify the version of the program to use. |
Adding a Contract Header
Access the Add Contract Header form.
You can review a summary of contract header information on the Contract Summary Report (R43C10).
See JD Edwards EnterpriseOne Grower Pricing and Payments Reports: A to Z.
General Information
Select the General Information tab.
Note. After you enter values in the fields on this form, click Save and Continue and then select the Clauses tab, the Payment Schedule tab, or Action Dates tab to continue entering contract header information.
Attaching a Clause to a Contract
Access the Add Contract Header form, and select the Clauses tab.
|
Contract Clause |
Enter the name that identifies a special consideration or provision of the contract. A clause can be a quality requirement, penalty clause, and so on. The system stores clauses in the Contract Clauses table (F43C60). |
Note. After you enter values in the fields on this form, click Save and Continue, and then select the Payment Schedule tab or the Action Dates tab to continue entering contract header information.
Entering Payees and Payment Schedules
Access the Add Contract Header form, and select the Payment Schedule tab.
The contract payee information that you enter on the contract header appears on the harvest record.
|
Payment Terms |
Enter a code in this field only if the entire contract amount is to be paid to the address book number in the Contracting Entity field. Otherwise, leave this field blank and assign a payment term code to each payee record in the Contract Payees area of the form. |
Contract Payees
The system pays the contracting entity if no contract payees are on the record.
|
Payee Number |
Enter the address book number of the person or entity that is to receive payment if payment is not to be issued to the contracting entity. You can enter multiple payees if the contract amount is to be distributed among more than one contract payee. If the amount is to be distributed between the contracting entity and another payee, enter each as a contract payee. |
|
Pymt Terms (payment terms) |
Enter the code that specifies the terms of payment for the contract payee. After you assign a payment term code to the contract payee, the system displays the payment schedule for the payee for your review. The payment schedule shows the due date rules for the payment term. You cannot change the payment schedule on the Add Contract Header form, Payment Schedule tab. Instead, you must use the Advanced Payment Terms or Due Date Rule Revisions program. |
|
Distribution Percent |
Enter the percentage of the payment that the payee should receive. The total distribution percent must equal 100, regardless of whether you are paying one or multiple payees. |
|
Assigned |
Select this check box if payment should be issued to an alternate payee, such as a bank, instead of the payee. If you select this check box, you must also assign an alternate payee. |
|
Interest |
Select this check box if this payee should receive interest on past due amounts. This check box is informational only. |
|
Broker |
Select this check box if the payee is a broker. This check box is informational only. |
|
Alternate Payee |
Enter the address book number of the person or entity that is to receive payment on behalf of the payee. If you enter a value in this field, you must also select the Assigned check box. An alternate payee is typically a bank or other financial institution. |
Note. After you enter values in the fields on this form, click Save and Continue, and then select the Action Dates tab to continue entering contract header information.
Entering Action Dates
Access the Add Contract Header form, and select the Action Dates tab.
The Action Date Listing (R43C05) provides a report of action dates and codes. The system stores action dates in the Contract Action Dates table (F43C05).
See JD Edwards EnterpriseOne Grower Pricing and Payments Reports: A to Z.
Action Dates
Adding Grower Blocks to Contracts
This section provides overviews of contract blocks and price adjustment schedules and discusses how to:
Attach an existing grower block to a contract.
Add a price adjustment schedule to a block.
Add an assessment or a donation to a block.
Add a new grower block to a contract.
Understanding Contract Blocks
After you enter a contract header, you can add the contract block that contains information about the grower. You must add at least one contract block to a contract. As long as a contract is not at a terminated status, you can add a block to it.
The contract block is the second component of a contract and exists primarily for you to manage pricing and the detail records for the harvests that are related to the contract. Although the contract block is directly associated with the grower block, the contract block includes attributes from the contract header such as start and end dates and contract terms.
General information, clauses, and payment schedules are passed from the contract header to the contract block. Contract block information is stored in the Contract Block table (F43C10).
To add a block to a contract, you either attach an existing grower block or create a new one when you add the contract, as shown in this diagram:
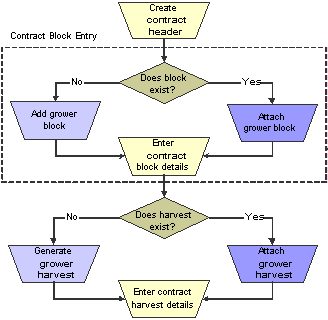
Contract block entry
If you create a new grower block when you add the contract, the system requires that you enter a minimum amount of information. Then, at a later time, you can complete the grower block record in the JD Edwards EnterpriseOne Grower Management system.
The grower block that you add to a contract cannot be at an inactive status. If the grower block is inactive, the system issues either a warning or an error message based on a processing option setting for the Contract Workbench program (P43C00). If the grower block that you add to the contract is at a status other than active or terminated, the system prompts you to make the grower block active.
Understanding Price Adjustment Schedules
You use the JD Edwards EnterpriseOne Advanced Pricing system to create the price adjustment schedules that you add to contract blocks. You add an adjustment schedule to increase or decrease the price that you pay for a product, based on predefined conditions. For example, you might have an adjustment schedule that depends on quality test results. After you receive shipment for the product and perform quality tests, your final settlement amount will include any price adjustments based on this schedule.
You can set a default price adjustment schedule in a processing option for the Contract Workbench program (P43C00). You can change or override the price adjustment schedule on the harvest record and block
Forms Used to Add Blocks to Contracts
|
Form Name |
FormID |
Navigation |
Usage |
|
Contract Search |
W43C00A |
Grower Pricing and Payments Daily Processing (G40G211), Contract Workbench |
View a list of existing contracts by contract header, block, or harvest. |
|
Edit Contract Header |
W43C01A |
On the Contract Search form, find and select a grower contract. |
Locate a grower contract. |
|
Add Contract Block |
W43C10A |
On the Edit Contract Header form, scroll down to the Blocks area of the form and click Attach Block. |
Attach an existing grower block to a contract. |
|
Update Contract Block |
W43C10A |
On the Add Contract Block form, enter the block code, and then click Save and Continue. On the Update Contract Block form, select the Pricing tab. |
Add a price adjustment schedule to a block. Add an assessment or a donation to a contract. |
|
Add/Edit Grower Block |
W40G02B |
On the Add Contract Block form, click Add New Grower Block. |
Add a new grower block to a contract. |
Attaching an Existing Grower Block to a Contract
Access the Add Contract Block form.
When you add a grower block to a contract, the system displays default values from the contract header, as well as default values from the grower block in many of the fields on the form. You can change some of the default values.
|
Block Code |
Enter the unique identifier or name of the grower block. To select from a list of block codes, use the search button to access the Grower Block Search & Select form. |
General Information
Note. To add another grower block to the contract, click Save and Attach. Otherwise, click Save and Continue and scroll down to generate or add a grower harvest record to the block.
Adding a Price Adjustment Schedule to a Block
Access the Update Contract Block form.
Select the Pricing tab.
Note. If a processing option is set in the Contract Workbench program, the system displays a default adjustment schedule on this tab. To remove the schedule and add a new one, click Remove Schedule and continue to the next step.
Click Select Schedule.
On the Adjustment Schedule Search and Select form, select the adjustment schedule.
The system displays the records that are associated with the schedule on the Pricing tab.
Change the effective and expired dates for the record, if applicable.
To revise a record, click the name of the record in the Description column to drill down to the Price Adjustment Detail Revisions form.
Price adjustment schedules are described in another task.
See Working with Schedules and Adjustments.
Adding an Assessment or a Donation to a Contract
Access the Update Contract Block form, and select the Assessments/Donations tab.
You can add an existing standard assessment or donation, or create an assessment or donation to use for this contract only.
Note. Typically, assessments and donations are applicable to the contract harvest record. However, you can assign them to the contract block record so that the assessment or donation is pushed to the contract harvest record.
Assessments/Donations
Adding a New Grower Block to a Contract
Access the Add/Edit Grower Block form.
When you add a new grower block record, the system requires that you enter values in a minimum number of fields. Later, you can enter the details for the record in the JD Edwards EnterpriseOne Grower Management system.
The fields on the Add/Edit Grower Block form are described in another task.
See Creating a Block.
Note. To add another grower block to the contract, click Save and Attach Another. Otherwise, click Save and Continue and scroll down to generate or add a grower harvest to the block.
Adding Grower Harvests to Contract Blocks
This section provides an overview of contract harvests and discusses how to:
Attach an existing grower harvest to a contract block.
Generate new grower harvests for a contract block.
Understanding Contract Harvests
After you enter a contract block, you must add a harvest record to the contract. The harvest record contains information about the growing cycle of the crop for a particular block and the pricing. The contract harvest is the third component of a contract and contains the detail records for the grower harvests. Much as the contract block inherits attributes from the contract header, the contract harvest inherits attributes from the contract block.
General information, clauses, pricing, assessments and donations, and payment schedules are passed from the contract block to the contract harvest. Contract harvest records are stored in the Contract Detail table (F43C11).
To add a harvest to a contract, you either attach an existing grower harvest or generate new harvest records when you add the contract, as shown in this diagram:
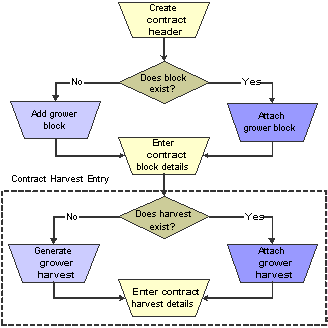
Contract harvest entry
If you generate new harvest records, the system generates records for both the JD Edwards EnterpriseOne Grower Management and Grower Pricing and Payment systems.
You must add at least one harvest record to a block; however, you cannot add the same harvest record to more than one contract. That is, a grower harvest can be associated with only one contract block.
Forms Used to Add Grower Harvests to Contracts Blocks
|
Form Name |
FormID |
Navigation |
Usage |
|
Contract Search |
W43C00A |
Grower Pricing and Payments Daily Processing (G40G211), Contract Workbench |
View a list of existing contracts by contract header, block, or harvest. |
|
Add Contract Header |
W43C01A |
On the Contract Search form, click Add Contract. |
Add a contract header. |
|
Add Contract Block |
W43C10A |
On the Add Contract Header form, scroll down to the Blocks area of the form and click Attach Block. |
Attach an existing grower block to a contract. |
|
Update Contract Block |
W43C10A |
On the Add Contract Block form, enter the block code, and then click Save and Continue. On the Update Contract Block form, select the Pricing tab. |
Add a price adjustment schedule to a block. Add an assessment or a donation to a contract. |
|
Add Contract Harvest |
W43C11A |
On the Update Contract Block form, scroll down to the Contract Harvests area of the form and click Attach Harvest to manually add harvest records to the block. |
Add an existing grower harvest to a contract block. |
Attaching an Existing Grower Harvest to a Contract Block
Access the Add Contract Harvest form.
You can review a detailed report that shows contract header, block, and harvest information on the Contract Detail Report (R43C15).
See JD Edwards EnterpriseOne Grower Pricing and Payments Reports: A to Z.
General Information Tab
Note. To add another harvest, click Save and Attach Another.
To revise the harvest record, click Save and Continue and the system displays the Edit Contract Harvest form. This form is described in another task.
See Revising a Contract Harvest Record.
Generating New Grower Harvests for a Contract Block
On the Add Contract Block form, scroll down and click Generate/Attach Harvest to automatically generate new grower and contract harvest records or attach existing records.
If grower harvest records exist in the JD Edwards EnterpriseOne Grower Management system, the system attaches the existing future harvest records to the contract block.
If grower harvest records do not exist, the system generates grower harvest records in the JD Edwards EnterpriseOne Grower Management system and block harvest records in the JD Edwards EnterpriseOne Grower Pricing and Payment system and attaches the block harvest records to the contract block. The system generates harvests based on:
The maximum number of harvests that are specified in a processing option for Grower Harvest Maintenance (P40G03)
The block renewable end date, if one exists, or the block end date.
The harvest period patterns that you have set up.
If the harvest start and end dates for the patterns in the Harvest Period Patterns program (P40G003) do not cover the date range, the system does not generate harvest records, regardless of the processing option setting or block end date.
Example: Generate New Grower Harvests
For example, assume the contract block has a start date of June 1, 2007 and an end date of May 31, 2010. The block renewable end date is 2015. If you set the processing option to 7, the system will generate harvest records for 2008–2014.
Using the same example with no renewable end date (blank), the system will generate harvest records for 2008–2010.
See Also