5 Setting Up Pay Information
This chapter contains the following topics:
5.1 Understanding Pay Information
Before you can use the system to define the jobs within the organization, you must define pay and job evaluation information. You define pay information to set up the pay ranges or amounts that are associated with each job. You define job evaluation information to define the methods that you use to evaluate jobs. You use job evaluations to determine equitable pay ranges for jobs. You also can set up a cross-reference table by business unit to define default job information for employees in a specific business unit.
5.1.1 Prerequisites
Before you complete the tasks in this chapter:
-
Set up the user-defined codes for jobs.
-
Review the pay range and step information that you have set up in the system options.
5.2 Understanding Employee Compensation
Before you enter employee compensation, you must select an appropriate pay rate source based on the business purpose and organizational structure. The type of compensation information that you must enter for each employee and how the system calculates salaries or hourly rates depends on the pay rate source that you have set up in the system options.
The available pay rate sources include:
-
Pay rate table.
-
Pay grade step table.
-
None (no default pay rate source).
The pay rate source that you select depends on the nature of the work force and the planning and budgeting requirements of the organization. The pay rate source also affects how the system calculates salary and hourly rates for employees.
To understand how the pay rate source affects salary and hourly calculations, you first need to understand how the system identifies the components described in this table:
| Component | Description |
|---|---|
| Salary | The amount of money that the employee earns in one year. |
| Hourly Rate | The amount of money that an employee earns in one hour. |
| Standard Hours per Year | The number of hours per year that an employee works. |
These equations explain how the system calculates a salary and hourly rate:
-
Annual salary divided by standard hours per year equals hourly rate.
-
Hourly rate multiplied by standard hours per year equals annual salary.
5.2.1 Example: Scenario 1 - The Pay Rate Table as the Default Pay Rate Source
When you need to associate pay rates with a specific group of employees, such as members of a union, you can use the pay rate table as the default pay rate source. The pay rate table, as set up in the Union Rates Master Revisions program (P059121), associates job types and steps with union codes. Therefore, specific hourly rates are attached to union codes when you set up hourly rates with job types and steps. The compensation information that you enter in this program is copied to the forms that you use when you hire employees.
The pay rate table is frequently used by the public sector and other industries that are closely linked to unions.
Pay rate tables are useful for positions that are compensated based on a flat rate, rather than a pay range. Pay rates can be used with hourly jobs, for which an employee is paid a set hourly rate regardless of performance or seniority. For use with unions, pay rate ranges usually need to accommodate only seniority adjustments. However, the use of pay rates can include performance adjustments. To recognize performance, you need to set up a pay type, such as bonus pay, or change the employee job type to a job type that is attached to an increased pay rate.
To use the information in the pay rate table when you add an employee record, you complete the Job Type, Job Step, and Union Code fields, and leave the Salary and Hourly Rate fields blank. The system automatically supplies the salary and hourly rate values for the corresponding Job Type, Job Step, and Union Code found on the pay rate table.
On the Basic Compensation form (W0801CMPB), the system supplies a default value for standard hours per year, which you can override, if necessary. Overriding the standard hours per year does not affect an employee hourly rate.
This table illustrates the guidelines for changing the values on the Basic Compensation form:
| Value | Impact |
|---|---|
| Hourly rate | You cannot change the hourly rate for an employee. The system supplies the default hourly rate from the pay rate table. |
| Standard hours per year | When you change the standard hours per year for an employee, the hourly rate does not change.
The system recalculates the annual salary for the employee. |
| Full time equivalents (FTE) | When you change the FTE field for the employee on the Basic Compensation form, you must also remove the value entered for standard hours per year. The system adjusts the employee standard hours per year. The hourly rate remains the same. |
5.2.2 Overriding the Default Pay Rate Source
To override the pay rate table as the default pay rate source when you add an employee record, you must enter either a salary or an hourly rate for the employee and do one of these:
-
Leave the Union Code field blank.
-
Enter a union code that is not included in the pay rate table.
5.2.3 Example: Scenario 2 - The Pay Grade Step Table as the Default Pay Rate Source
To ensure that all of the employees working in a job receive the same rate of pay, and to provide for progression within a pay grade, you can use the Pay Grade Step Table program (P082003) as the pay rate source.
If the chosen pay rate source is the pay grade step table, you must use the Pay Grade Step Table (P082003) and Pay Grades By Class (P082001) programs to set up pay grades and pay grade steps. The compensation information that you provide in these programs is copied to the forms that you use when you hire employees.
Using the Pay Grade Step Table program is convenient for a company whose structure consists of many positions that allow for progressive advancement. Using the Pay Grade Step Table program to enter compensation also saves data entry time and reduces calculation errors and compensation inconsistencies.
In the Pay Grade Step Table program, a pay grade consists of a group of jobs that are equal in pay range. For example, assume all junior accountant positions and junior graphic artists in a company are in pay grade A, and pay grade A represents a pay range of 30,000 to 40,000 USD. Therefore, all junior accountant and junior graphic positions need to be compensated within this pay range.
However, within each pay grade, you set up pay grade steps that represent a specific salary or hourly rate. For example, suppose that pay grade A includes pay steps A1, A2, and A3. Employees in step A1 receive 33,000 USD, employees in step A2 receive 36,000 USD, and employees in step A3 receive 40,000 USD.
Setting up pay grade steps lets you automate the process of entering compensation information for employees. When you enter employee information, the system automatically calculates the employee salary or hourly rate, based on the pay grade step that you enter for the employee.
When you define pay grade steps, you can also save time and reduce calculation errors by having the system automatically calculate the pay rates for a group of steps. You enter a base pay rate that applies to the group of steps, and then you enter a pay rate multiplier for each step. The system automatically calculates the rate for each step by multiplying the base pay rate by each step pay rate multiplier.
You might also prefer to use pay grades without using pay grade steps to calculate compa-ratios for pay grades. Compa-ratios are helpful calculations for management to determine equitable pay increases for employees.
When you hire an employee, do not complete the Job Type or Job Step fields in the Employee Organizational Assignments program (P0801ORG). Instead, complete the Pay Grade and Pay Step fields on the Basic Compensation form (W0801CMPB). The system automatically updates the Basic Compensation form with the appropriate salary, hourly rate, and hours per year from the Pay Grade Step table.
This table illustrates the guidelines for changing the values on the Basic Compensation form:
| Value | Impact |
|---|---|
| Pay grade step | When you change the employee pay grade step, the system replaces the employee hourly rate, salary, and standard hours per year with the corresponding information from the pay grade step table. |
| Hourly rate | You cannot change the hourly rate for an employee. The system supplies the default hourly rate from the table. |
| Standard hours per year | When you change the standard hours per year for an employee, you must also delete the employee salary. The employee hourly rate does not change. The system recalculates the employee salary, based on the new standard hours per year and the hourly rate for the pay grade step. |
| Salary | When you change the employee salary, the hourly rate does not change. The system recalculates the employee standard hours per year, based on the new salary and the hourly rate for the pay grade step. |
| FTE | When you change the FTE for an employee, you must also delete the employee salary and standard hours per year. The system adjusts the employee standard hours per year and salary, based on the pay grade step. |
5.2.4 Overriding the Default Pay Rate Source
To override the pay grade step table as the default pay rate source when you hire an employee, you must enter either a salary or hourly rate for the employee and leave the Pay Grade Step field blank.
5.2.5 Example: Scenario 3 - No Pay Rate Source as the Default Pay Rate Source
If the organization consists of employees whose salaries and hourly rates are based on a pay range rather than specific amounts for a job or pay grade step, you can select not to use a default pay rate source. If you select this option, you will need to enter each salary or hourly rate individually.
This is a good option for companies that do not use predefined rates for all employees in like jobs. This option might also be preferable for an organization with few positions and few job types.
When you add a new employee, you must enter either a salary or an hourly rate on the Basic Compensation form (W0801CMPB). The system provides a default value for standard hours per year, which you can override, if necessary. When you enter a salary for an employee, the system calculates an hourly rate, based on the salary and standard hours per year. Conversely, when you enter an hourly rate, the system calculates the salary.
This table illustrates the guidelines for changing the values on the Basic Compensation form (W0801CMPB):
| Value | Impact |
|---|---|
| Salary | When you change the employee salary, the system recalculates the hourly rate, based on the new salary and the standard hours per year for the employee. |
| Standard hours per year | When you change the standard hours per year for an employee, the system recalculates the hourly rate, based on the new standard hours per year and the existing salary. |
| FTE | When you change the FTE for an employee, the salary and hourly rate calculations are not affected. |
This table illustrates the guidelines for changing the values on the Basic Compensation form (W0801CMPB):
| Value | Impact |
|---|---|
| Hourly rate | When you change the hourly rate for an employee, the standard hours per year are not affected. The system recalculates the annual salary for the employee, based on the new hourly rate and the standard hours per year for the employee. |
| Standard hours per year | When you change the standard hours per year for an employee, the system recalculates the salary, based on the new standard hours per year and the employee hourly rate. |
| FTE | When you change the FTE for an employee, the salary and hourly rate calculations are not affected. |
5.3 Common Fields Used in This Chapter
- Next Pay Grade
-
Enter the next higher pay grade in an employee progression path.
- Next Pay Grade Step
-
Enter the next pay grade step in an employee progression path.
- Pay Class (H/S/P) (Pay Class [hourly/salaried/piecework])
-
Enter a code that specifies how an employee is paid. Valid codes are:
H: Hourly
S: Salaried
P: Piecework
- Std Hrs/Day (standard hours/day)
-
Enter the number of hours that the employee normally works in one day. If you leave this field blank, the default is the standard number of hours per day that you defined in the payroll company constants (company options, in JD Edwards EnterpriseOne).
For example, if, in the payroll company constants (company options), you specified 8 as the standard number of hours per day, but a few employees normally work 7 hours per day, enter 7 in this field for those employees.
5.4 Setting Up Pay Rate Tables
This section provides an overview of pay rate tables and discusses how to set up pay rate tables.
5.4.1 Understanding Pay Rate Tables
You set up pay rate tables to associate pay rates with a specific group of employees. You must set up pay rate tables if you have chosen pay rate table as the pay rate default source in the HRM System Options (Human Resource Management System Options) program (P05001S).
The setup of pay rate information includes:
-
Pay Rate Tables - You set up pay rate tables to associate pay rates with a specific group, such as a union.
-
Union local and job cross references - You set up local and job cross references to cross reference parent unions with local unions.
You set up hourly rates by job type and job step. Any amounts that you enter in the pay rate tables can override rates that you set up in the Employee Master Information table (F060116). As you enter time for various job types and job steps, the system locates the appropriate hourly rate.
As an update to Release 9.1, the system considers the hourly rate as the prevailing wage rate when prevailing wage calculations are performed during pre-payroll or interim payment processing.
The system uses pay rate tables in conjunction with the time entry programs. You must use a processing option in the appropriate time entry program to specify that the system use the pay rate tables.
Setting up pay rate tables enables you to:
-
Make rates specific to a job, business unit, or shift.
-
Define up to five different rates per job type and step.
-
Create workers compensation codes for each job type and step.
-
Define a flat burden factor for each job type and step.
-
Define a recharge billing rate.
You can use Union Rates Master Revisions program (P059121) to set up and revise pay rates tables. The program enables you to set up or revise pay rate tables one at a time or in groups. This task enables you to set up pay rate tables in groups. To set up a single pay rate table, you need to find a record on the Work with Union Rates form, and then select Single Revision from the Row menu.
Setting up pay rate tables updates the Employee Master Information table and the Union Rates File table (F069126).
5.4.2 Form Used to Set Up Pay Rate Tables
5.4.3 Setting Up Pay Rate Tables
Access the Revise Multiple Rcds Union Rates form.
Figure 5-1 Revise Multiple Rcds. Union Rates form
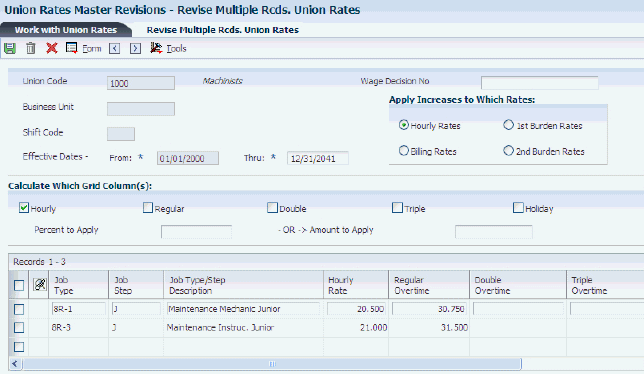
Description of ''Figure 5-1 Revise Multiple Rcds. Union Rates form''
To set up pay rate tables:
-
Complete these fields:
-
Union Code
-
From:
-
Thru:
-
Job Type
-
Job Step
-
Hourly Rate
When you complete only the Hourly Rate field, the system uses the pay type multiplier for the overtime rates.
-
-
Complete these optional fields:
-
Business Unit
-
Shift Code
-
-
Select one of these options to select a group of rates to enter:
-
Hourly Rates
-
Billing Rates
-
1st Burden Rates
-
2nd Burden Rates
The fields that appear in the detail area vary depending on the option that you select.
-
-
To enter hourly overtime rates, complete one or more of these fields:
-
Regular Overtime
-
Double Overtime
-
Triple Overtime
-
Holiday Pay
When you complete only the overtime rate fields, the system does not use the pay type multiplier from Pay Type Revisions.
-
-
To enter billing rates, complete one or more of these fields:
-
Billing Rate
-
Billing Regular
-
Billing Double
-
Billing Triple
-
Billing Holiday
When you enter a value for billing rates, the system does not use the pay type multiplier.
-
-
To enter the first group of recharge burden rates, complete one or more of these fields:
-
Rchg Burden Rate (Recharge Burden Rate)
-
Burden-1 Regular
-
Burden-1 Double
-
Burden-1 Triple
-
Burden-1 Holiday
-
-
To enter the second group of recharge burden rates, complete one or more of these fields:
-
Burden-2 Regular
-
Burden-2 Double
-
Burden-2 Triple
-
Burden-2 Holiday
-
-
Complete these optional fields:
-
Piecework Rate
-
Wrk Comp Code (Workers Compensation Code)
-
Wrk Comp SubClass (Workers Compensation SubClass)
-
Labor Dist. Multiplier (Labor Distribution Multiplier)
-
Labor Dist. Method (Labor Distribution Method)
-
-
Repeat steps 1 through 8 for each record that you want to add to the same union code.
-
When you finish entering records, click OK.
- From:
-
Enter the date on which an address, item, transaction, or table record becomes active. The meaning of this field differs, depending on the program. For example, the effective date can represent:
-
The date on which a change of address becomes effective.
-
The date on which a lease becomes effective.
-
The date on which a price becomes effective.
-
The date on which the currency exchange rate becomes effective.
-
The date on which a tax rate becomes effective.
-
- Thru:
-
Enter the date on which the item, transaction, or table becomes inactive, or through which you want transactions to appear. This field is used generically throughout the system. It could be a lease effective date, a price or cost effective date, a currency effective date, a tax rate effective date, or whatever is appropriate.
- Shift Code
-
Enter a defined code (00/SH) that identifies daily work shifts.
In payroll systems, you can use a shift code to add a percentage or amount to the hourly rate on a timecard.
For payroll and time entry: If an employee always works a shift for which a shift rate differential is applicable, enter that shift code on the employee master record. When you enter the shift on the employee master record, you do not need to enter the code on the timecard when you enter time. If an employee occasionally works a different shift, you enter the shift code on each applicable timecard to override the default value.
5.5 Setting Up Pay Grades
This section provides an overview of pay grades and discusses how to set up pay grades.
5.5.1 Understanding Pay Grades
To create categories for grouping employees according to pay ranges, you can define pay grades for each pay class within the organization. A pay class defines how an employee is paid, such as salaried, hourly, and so on. For example, within the pay class Salaried you can define pay grades 1 through 10. For each of these pay grades, you define a minimum, midpoint, and maximum salary amounts. These amounts define the pay range for the pay grade. For example, the pay range for pay grade 1 might be:
-
Minimum equals 20,000.00 USD
-
Midpoint equals 25,000.00 USD
-
Maximum equals 30,000.00 USD
This means that the annual salary for an employee in pay grade 1 can be any amount between 20,000.00 USD and 30,000.00 USD.
For each pay grade, you can define a separate pay range for each of these factors:
-
Locality
-
Union
-
Effective date
For example, if the organization has three locations in different areas of the country, you might want the pay ranges for employees in the same job to vary according to the location in which the employees work. When you create a pay grade, you can define a separate pay range for each of the three locations. This table illustrates the example:
| Location | Pay Range |
|---|---|
| West Area | Minimum equals 25,000 USD
Midpoint equals 30,000 USD Maximum equals 35,000 USD |
| Midwest Area | Minimum equals 28,000 USD
Midpoint equals 33,000 USD Maximum equals 38,000 USD |
| East Area | Minimum equals 31,000 USD
Midpoint equals 36,000 USD Maximum equals 41,000 USD |
When you define pay grades by class, you create a record of the pay ranges for the organization pay grades. The system uses these pay ranges to calculate compa-ratios for the employees whom you assign to these pay grades. When you enter employee information, either an error or a warning message appears when you enter a rate that is not within the pay range for an employee pay grade. The type of message that appears depends on how you set up the system options.
If you are using pay grade steps, you can define pay grades at the same time that you define pay grade steps. You do not need to define pay grades by class to use the pay grade step table.
The Pay Grades by Class program (P082001) updates the Pay Grade/Salary Range table (F082001).
5.5.2 Form Used to Set Up Pay Grades
| Form Name | FormID | Navigation | Usage |
|---|---|---|---|
| Pay Grades by Pay Class | W082001A | Job Specifications Setup (G05BJ4), Pay Grades by Class | Set up pay grades by pay class. |
5.5.3 Setting Up Pay Grades
Access the Pay Grades by Pay Class form.
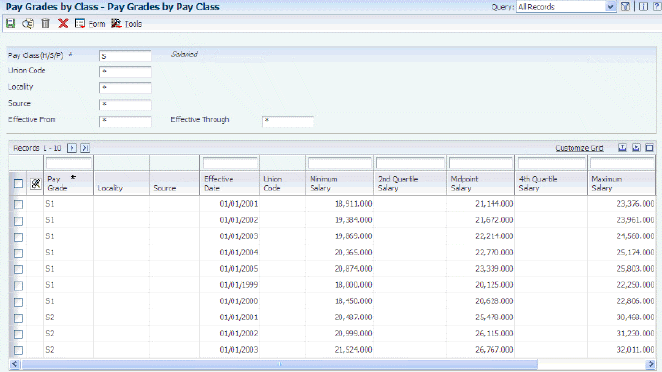
- Minimum Salary
-
Enter the minimum salary or hourly rate allowed within a pay grade.
This field is used to trigger warnings in the Salary and Wage module when an employee salary or rate is lower than the minimum permitted within the pay grade.
- Midpoint Salary
-
Enter the midpoint salary or hourly rate within a pay grade or pay range.
For job IDs with a defined pay grade, this amount is defined in the Pay Grade table (F082001). For job IDs that are evaluated by points, this amount is calculated using a Pay Range Formula table (F08290).
The compa-ratio figure is calculated by dividing an employee salary or rate by the appropriate midpoint.
- Maximum Salary
-
Enter the maximum salary or hourly rate within a pay grade.
This field is used to trigger warnings in the Salary and Wage module when an employee salary or rate is higher than the maximum permitted in the pay grade.
- Source
-
Enter a code that identifies the source of the salary information. This is a defined code (08/SS). To display all pay grades regardless of the source, enter * in this field.
- 2nd Quartile Salary
-
Displays a defined second figure in a pay grade salary range. This field is for display only. It is not used in any of the computations done on this screen.
This field is reserved for future use.
- 4th Quartile Salary
-
Displays a defined fourth figure in a pay grade salary range. This is a display only field. It is not used in any of the computations done on this screen.
This field is reserved for future use.
- Remark
-
A generic field that you use for a remark, description, name, or address.
5.6 Setting Up Pay Grade Steps
This section provides an overview of pay grade steps and discusses how to:
-
Set up pay grade steps individually.
-
Set up pay grade steps using a multiplier.
5.6.1 Understanding Pay Grade Steps
To ensure that all of the employees working in a job receive the same rate of pay, and to establish progression within a pay grade, you can set up pay grade steps. For example, you might have a pay grade A that contains pay steps A1, A2, and A3. Employees in step A1 receive 15.00 USD per hour, employees in step A2 receive 15.50 USD per hour, and employees in step A3 receive 16.00 USD per hour.
Setting up pay grade steps lets you automate the process of tracking pay information for employees. You can set up the system options so that, when you enter employee information, the system automatically calculates the employee salary or hourly rate, based on the pay grade step that you enter for the employee.
When you define pay grade steps, you can save time and reduce calculation errors by having the system automatically calculate the pay rates for a group of steps. You enter a base pay rate that applies to the group of steps, and then you enter a pay rate multiplier for each step. The system automatically calculates the rate for each step by multiplying the base pay rate by each step pay rate multiplier.
When you set up pay grade steps individually, you enter a pay rate for each pay grade step. When you set up pay grade steps using a pay rate multiplier, you enter a base pay rate and apply a pay rate multiplier to each pay grade step.
You can define pay grades at the same time that you define pay grade steps. You do not need to define pay grades by class to use the pay grade step table.
The Pay Grade Step Table program (P082003) updates the Pay Grade/Salary Range table (F082001).
5.6.2 Form Used to Set Up Pay Grade Steps
5.6.3 Setting Up Pay Grade Steps Individually
Access the Pay Grade Step Table form.
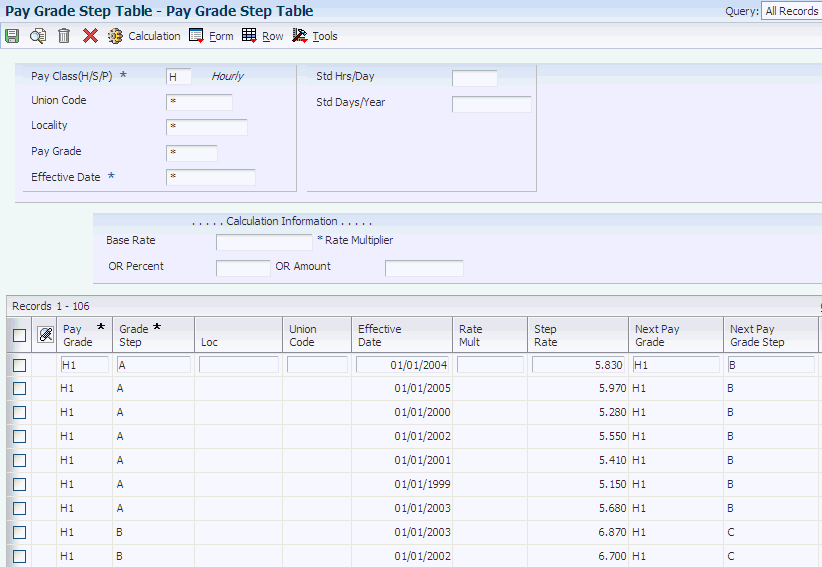
To set up pay grade steps individually:
-
Complete the Pay Class field and click Find.
-
Complete any of these fields to define information that applies to all or most of the pay grade steps that you need to add, and click Find:
-
Union Code
-
Locality
-
Std Hrs/Day (Standard Hours/Day)
-
Std Days/Year (Standard Days/Year)
-
Effective Date
-
-
Move to a blank line in the detail area and complete these fields for each step that you need to set up:
-
Pay Grade
-
Grade Step
-
Step Rate
-
Effective Date
-
-
Complete these optional fields:
-
Next Pay Grade
-
Next Pay Grade Step
-
-
Complete these fields in the detail area to define information for this step that varies from the information that you entered for the pay class:
-
Union Code
-
Loc (Locality)
-
Hrs Day (Hours Day)
-
Days Year
-
-
Click OK.
- Std Days/Year (standard days/year)
-
Enter the number of workdays in a year. The number of standard days per year multiplied by the number of hours per day equals the standard hours per year.
When you set up the human resources constants (System Options, in JD Edwards EnterpriseOne) and you use the pay grade step table as the default source for the pay rate, the system calculates the salary for an employee by multiplying the standard days per year by the employee hourly rate.
- Effective Date
-
Enter the date on which the rate associated with a pay grade step becomes effective.
5.6.4 Setting Up Pay Grade Steps Using a Multiplier
Access the Pay Grade Step Table form.
To set up pay grade steps using a multiplier:
-
Complete the Pay Class (H/S/P) field:
-
Complete any of these fields to define information that applies to all (or most) of the pay grade steps:
-
Union Code
-
Locality
-
Effective Date
-
Std Hrs/Day
-
Std Days/Year
-
-
Complete the Base Rate field:
-
Complete these fields in the detail area for each step that you need to set up:
-
Pay Grade
-
Grade Step
-
Rate Mult
-
-
Complete these optional fields:
-
Next Pay Grade
-
Next Pay Grade Step
-
-
To define information for this step that varies from the information that you entered for the pay class, complete these fields in the detail area:
-
Loc (Locality)
-
Union Code
-
Effective Date
-
Hrs Day
-
Days Year
-
-
Click the Calculate button.
- Effective Date
-
Enter the date on which the rate associated with a pay grade step becomes effective.
- Std Days/Year
-
Enter the number of workdays in a year. The number of standard days per year multiplied by the number of hours per day equals the standard hours per year.
When you set up the human resources constants (System Options, in JD Edwards EnterpriseOne) and you use the pay grade step table as the default source for the pay rate, the system calculates the salary for an employee by multiplying the standard days per year by the employee hourly rate.
- Step Rate
-
A value that specifies the pay rate that is assigned to a pay grade and step. In certain programs, such as the Pay Grade Step Table program (P082003), you can also use a rate multiplier in combination with this value so that the system automatically calculates the pay rate. For example, you can enter a percentage value that the system uses to increase a pay rate.
- Rate Mult
-
This number is multiplied by the Base Rate to calculate a new step rate. This is not a stored field.
5.7 Setting Up Pay Range Formulas
This section provides an overview of pay range formulas and discusses how to set up pay range formulas.
5.7.1 Understanding Pay Range Formulas
When the pay ranges for the organization pay grades are based on variable factors, you can set up pay range formulas that the system uses to automatically calculate pay ranges for each pay grade. These formulas are based on the job evaluation points. In addition, if a job pays more in one region of the country than in another, you can enter a geographic multiplier in the pay range formula. The system calculates different minimums, midpoints, and maximums for the different areas, based on the minimum, midpoint, and maximum multipliers, as well as the geographic multiplier.
To use pay range formulas, you must evaluate the jobs within the organization. You evaluate jobs to determine equitable pay ranges for them.
5.7.2 Form Used to Set Up Pay Range Formulas
5.7.3 Setting Up Pay Range Formulas
Access the Pay Range Formulas form.
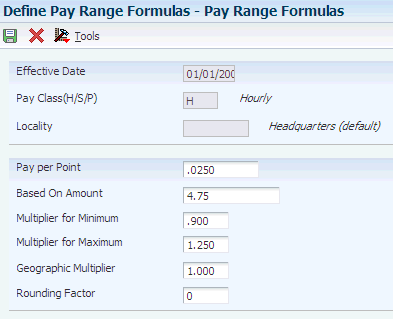
- Pay per Point
-
Enter the amount that is paid for each evaluation point that a job receives. For example, if a job receives 150 evaluation points and the pay per point is 8, then the total pay from points is 1200 of the currency being used.
The system adds this amount to the based on amount to calculate the job pay range midpoint/control point.
- Based On Amount
-
Enter the baseline amount from which salary pay ranges are calculated. Enter debits with a plus sign (+) and credits with a minus sign (-). Enter a credit, for example, as 5000.01-. You can enter decimals, dollar signs, and commas. The system ignores nonsignificant characters.
The Human Resources system uses this field for the Hay Points Evaluation Method. It is the basic salary from which salary ranges are calculated. The amount in this field is added to the pay per point to determine the job pay range midpoint/control point.
- Multiplier for Minimum
-
Enter the number by which a midpoint or control point is multiplied to determine the minimum amount (data item AAQ1) in a pay range formula calculation. This multiplier should be less than 1.00 so that the minimum amount is less than the midpoint.
- Multiplier for Maximum
-
Enter the number by which a midpoint or control point is multiplied to determine the maximum amount (data item AAQ3) in a pay range formula calculation. This multiplier should be greater than 1.00 so that the maximum amount is greater than the midpoint.
- Geographic Multiplier
-
Enter a number that specifies the difference for pay ranges by locality (data item SLOC). The system multiplies this factor by the pay-from-points amount and then adds that product to the base amount (data item BAA). The resulting amount is the midpoint of the pay range.
Note:
The pay from points is the evaluation points of a job multiplied by the pay per point from a formula. - Rounding Factor
-
Enter the increment to which a calculated figure is rounded off. For example, a calculated figure of 24,327 is rounded up to 24,330 if the rounding factor is 10, or down to 24,300 if the rounding factor is 100.
5.8 Defining Job Evaluation Factors
This section provides an overview of job evaluation factors and discusses how to define job evaluation factors.
5.8.1 Understanding Job Evaluation Factors
To determine equitable pay ranges for the jobs within the organization, you can evaluate jobs. Before you can evaluate jobs, you must define evaluation methods. Typical evaluation methods include:
-
Degree (Simple Subjective Point System)
-
Evalucomp
-
Factor comparison
-
Point factor
-
Hay
For each evaluation method, you must define the factors that you use to gauge the scope of each job. Typical evaluation factors include:
-
Problem solving abilities
-
Technical skills
-
Working conditions
-
Leadership qualities
-
Know how
-
Accountability
To enable you to rate and compare jobs, you assign points or degrees to each evaluation factor.
5.8.2 Form Used to Define Job Evaluation Factors
| Form Name | FormID | Navigation | Usage |
|---|---|---|---|
| Evaluation Factors Table Review | W05011B | Job Specifications Setup (G05BJ4), Evaluation Factors Table
On the Work With Evaluation Factors Table form, click Add. |
Define job evaluation factors. |
5.8.3 Defining Job Evaluation Factors
Access the Evaluation Factors Table Review form.
Figure 5-5 Evaluation Factors Table Review form
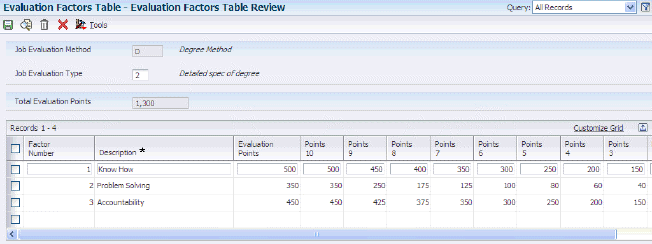
Description of ''Figure 5-5 Evaluation Factors Table Review form''
- Job Evaluation Method
-
Enter a user-defined code (08/EM) that specifies the method or grouping that you use to evaluate the jobs within the organization.
Suggested values are:
Blank: Simple subjective point system
E: Evalucomp method
F: Factor comparison method
P: Point factor method
H: Hay method
- Job Evaluation Type
-
Enter a numeric code that determines whether job information is recorded using degrees or points. Valid codes are:
1: Simple, subjective assignment of job points by each of the 10 defined evaluation factors.
2: Detailed specifications of degree of difficulty or value to each of 10 evaluation factors.
- Factor Number
-
Enter a sequential number that identifies each job evaluation factor. Job evaluation factors should meet these criteria:
-
Each factor must distinguish differences between jobs.
-
Each factor must be common to most of the jobs being rated. A factor should exist in greater to lesser amounts so it is easier to measure factors within a job.
-
Each factor should be assigned the maximum number of points in each of the 10 levels of degree.
-
No factor should overlap any other factor.
-
The factors chosen must be accepted by employees and managers.
-
The number of factors used should be the minimum needed to insure a balance between completeness and simplicity in rating.
-
The factor definitions should clearly and objectively define what is being rated so that all raters interpret the factor in the same way.
-
- Evaluation Points
-
Enter the number of points calculated for a specific job using any job evaluation method. A job is defined as the combination of job type and job step.
You can calculate the points manually and enter them at the Job Master Information level, or you can assign points to each individual factor that has been defined within the evaluation method.
- Points 1
-
Enter the maximum evaluation points allowable within this degree for this factor.