5 Mobile Expense Management
This chapter contains these topics:
5.1 Understanding Mobile Expense Management Functionality
You use the Mobile Expense Management application to enable managers and expense report approvers in your organization to review, approve, and reject expense reports on a mobile device when they are away from the office. Employees can also use this application to enter, edit, and review their own expense reports using their mobile devices.
The Mobile Expense Management application gives users the ability to:
-
Review all expense reports that are currently awaiting their approval.
-
(Release 9.1 Update) View photographs of receipts that are associated with a report.
-
Approve or reject an expense report that is awaiting their approval.
-
Enter comments when rejecting a report.
-
Search for and review old expense reports of subordinate employees.
-
Enter new expense reports.
When entering new expense reports, you can:
-
Enter summary receipt expenses.
-
Enter split receipts by job, business unit, or work order.
-
Add credit card transactions to the report.
-
(Release 9.1 Update) Attach photographs of receipts or other documents to a report.
-
-
Review and edit their own expense reports that are currently at an editable status.
-
Search for and review their own old expense reports.
The Mobile Expense Management application uses the Mobile Expense Management Processing Options program (M09E2011) to identify which version of the Expense Report Review/Entry program (P09E2011) the mobile device uses when processing expense report information. You can set up multiple versions of this program, and assign them to different employees or roles within your organization.
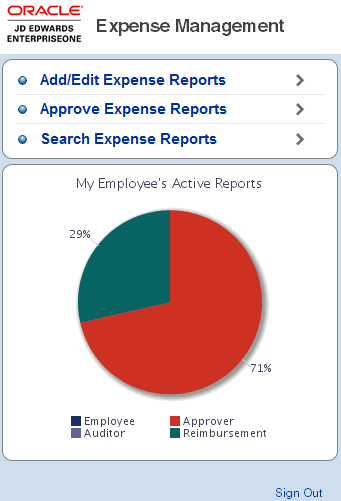
5.1.1 Understanding the Home Screen Charts
When you log into the Mobile Expense Management application on your mobile device, the system displays a chart that graphically identifies the percentage of reports that are at different stages in the expense management process.
When you log into the application, you will see one of these charts:
-
My Employees' Active Reports
The system displays this chart for managers whose employees have reports.
-
My Active Reports
The system displays this chart for non-managers, or for managers whose employees do not have any active reports.
If the manager or the manager's employees currently do not have any reports, the system does not display a chart.
The chart is divided into four possible segments:
-
Employee
This segment includes reports with a status of 199 or lower.
-
Auditor
This segment includes reports with a status of 200 through 299.
-
Approver
This segment includes reports with a status of 300 through 399.
-
Reimbursement
This segment includes reports with a status of 900 through 949.
Reports that have already been reimbursed are not included in the chart. Expense report status codes are listed in UDC table 09E/RS.
5.1.2 Accessing Mobile Expense Management Using the Mobile Menu (Release 9.1 Update)
The Mobile EnterpriseOne Menu application (M0001) is now available as part of the JD Edwards EnterpriseOne mobile solution set. This application enables users to access all JD Edwards EnterpriseOne mobile applications from a single point of entry. This application also enables users to sign in only one time, and access all available mobile applications.
If your organization uses the Mobile EnterpriseOne Menu application to deploy your mobile applications, the user interface of the application will look slightly different than it appears in the screens shown in the following documentation in this chapter. Those differences include:
-
Screen Logo and Banner
The logo and banner at the top of many forms has been updated.
-
Menu Button
Many screens now include the
 (menu) button. This button enables the user to return to the Mobile Solutions screen where they can launch other mobile applications, or sign out of all mobile applications they have accessed.
 -
Signing Out
If you are accessing your application from the Mobile EnterpriseOne Menu application, you will no longer have Sign Out links within each application. Instead, you must return to the Mobile Solutions Home screen by clicking the menu button (described above), and then click the Sign Out link. Using this link logs the user out of all available EnterpriseOne mobile applications.
5.1.3 Understanding Photo Attachments (Release 9.1 Update)
Mobile Expense Management users can now use the camera on their mobile device to take photographs of receipts or other documents, and attach those photos to the expense report. Managers can also view these photos when reviewing and approving expense reports using a mobile device. These features enable users to quickly and easily submit receipts or other documents for the expenses listed on their expense reports, while enabling managers to quickly review and approve the reports.
|
Note: To use the full functionality of the photo attachment feature, the Mobile Expense Management application must be deployed as described here:
Be aware that photo review is available for users in a JAX-WS business service deployment who do not use the JDE Mobile application downloaded from the Google Play store or Apple App Store. Photo capture and attachment is available ONLY when the application is accessed via the downloaded JDE Mobile application and the mobile system is using a JAX-WS deployment. |
|
See: What's New in Release 9.1.2 and About the Deployment of EnterpriseOne 9.1.2 Mobile Applications in the Mobile Applications Installation and Configuration Guide. |
Users can attach photos at the report level, or at the individual expense level, depending on the processing option settings for the Mobile Expense Management program (M09E2011). Whether you enable report-level receipt photos depends on the expense report policies of your organization.
You use the Add Photos button on the Edit Expense Report screen to add photos at the report level, as shown here:
Figure 5-1 Edit Expense Report screen - Add Photos Button
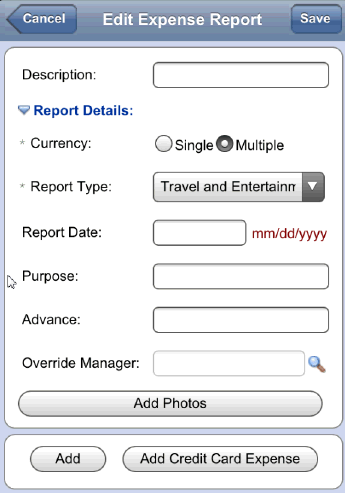
Description of "Figure 5-1 Edit Expense Report screen - Add Photos Button"
Similarly, you use the Add Photos button on the Expense Detail form to add a photo to an individual expense, as shown here:
Figure 5-2 Expense Detail - Add Photos Button
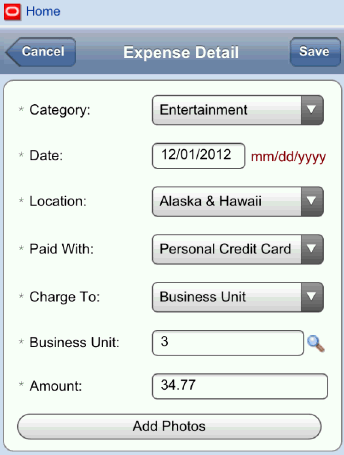
Description of "Figure 5-2 Expense Detail - Add Photos Button"
Users can attach photos to expense reports as they enter the report, or they can retrieve a previously entered report and then attach photos to the report. After you add photos at the report level, the Add Photos button becomes the Report Photos (#) button, displaying the number of photos available at the report level. Similarly, the Add Photos button on the Expense Detail form becomes the Photos (#) button, displaying the number of photos attached to that expense. This image shows an example of the Report Photos (#) button, indicating that there is one report-level photo attached to the report:
Figure 5-3 Edit Expense Report - Report Photos Button
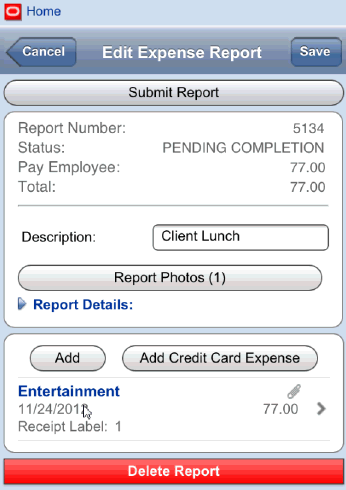
Description of "Figure 5-3 Edit Expense Report - Report Photos Button"
To capture a photo of a receipt or othre document, you use the mobile device's camera. Users can capture and immediately attach a photo using the device camera by tapping the Camera button, or they can select existing photos from the gallery by tapping the Album button, as shown here:
Figure 5-4 Add Photo - Camera and Album Buttons
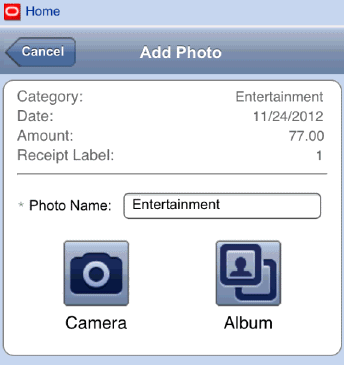
Description of "Figure 5-4 Add Photo - Camera and Album Buttons"
When you add a report-level photo, you can manually name the photo, or the system uses the default name of Photo #, where the number increments with each report-level photo you attach. For example, the default name for the first report-level photo is Photo 1.
When you attach a photo to an expense, you can manually name the photo, or you can let the system assign a default file name. The system uses the expense category as the default file name for expense-level photos. For example, the default name for the photo associated with an entertainment expense is Entertainment.
|
Note: If you are using an iOS-based device, the photos taken from the expense application are stored within the expense report, and not in the photo gallery on the device. When using an Android device, the photos are stored within the report and also in the device's photo gallery.For Android users, once you attach the photos to the expense report, and save the report, you can then delete the photos from the device's gallery. |
When an individual expense item on a report contains receipt photos, the system displays a paper clip icon to notify the user that photos are attached to that expense. In the following example, one or more photo attachments are associated with the expense labeled "Entertainment", which is noted by the paper clip icon displayed above the expense amount:
Figure 5-5 Edit Expense Report - Report Photos Button
Description of "Figure 5-5 Edit Expense Report - Report Photos Button"
After you attach photos to your expense report and submit the report, managers can then review your report, and also view the photos attached to the report. When a manager accesses a report that includes photo attachments, there are several indicators on the Report Details screen that notify the manager that photos are available for their review. First, the Photos (#) button appears on the form if photos are available, indicating the number of photos available. Additionally, a photo icon appears next to each individual expense that includes photo attachments. The following screen shows these indicators:
Figure 5-6 Report Details - Photo Indicators
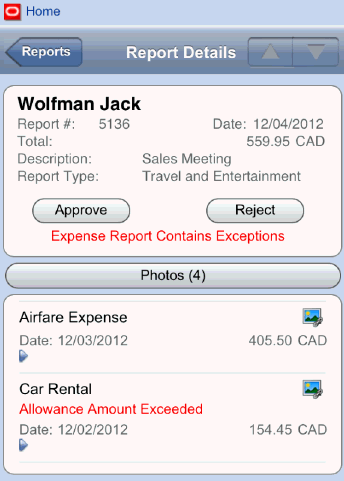
Description of "Figure 5-6 Report Details - Photo Indicators"
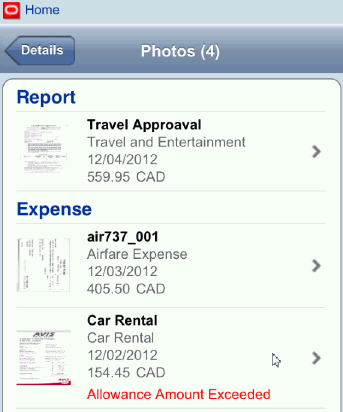
Managers can tap the Photos (#) button to view all photos associated with the report. The system displays the Photos (#) form, and lists report-level photos under the Report heading, and lists the expense-level photos, by expense, under the Expense heading, as shown here:
Managers can also tap the photo icons associated with an individual expense to view just the photos for that expense item. Managers view photos for their subordinates' reports, but cannot delete or edit the photos attached to the report.
5.1.4 Understanding Mobile Expense Data Flows
The Mobile Expense Management application uses business services to pass data between the JD Edwards EnterpriseOne database and the user's mobile device. The following sections describe the data flow for each piece of functionality offered by the Mobile Expense Management application.
|
Note: (Release 9.1 Update)The launch and sign-in portion of the following data flows do not include use of the Mobile EnterpriseOne Menu application, which enables users to sign into all available JD Edwards EnterpriseOne mobile applications with a single sign-in. For information on the Mobile EnterpriseOne Menu data flow, see Chapter 3, "Using the Mobile Menu (Release 9.1 Update)." |
5.1.4.1 Mobile Expense Report Review and Approval Data Flow
Using the Mobile Expense Management application, users can review, approve, and reject expense reports that are currently awaiting their approval. This list describes the flow of data during the expense approval process:
-
The user launches the Mobile Expense Management application from their mobile device and enters their sign on credentials.
Note:
(Release 9.1 Update)If you downloaded the JDE Mobile application from your device's application store in order to use photo attachment functionality, you must enter user name, password, and server location the first time you attempt to log in.
-
The getExpenseManagementEmployeeProfile operation (J09E0002) passes the user ID to the GetMobileVersionForUser business function (B0001400), which retrieves the specified version of the M09E2011 for the signed-on user. Additionally, the GetMobileExpenseProcessingOptions business function (B09E0150) retrieves the appropriate version of the P09E2011, as defined in the retrieved version of the M09E2011. Finally, the GetExpManProcessingOptions business function (B09E130) retrieves the processing option values from the specified version of the P09E2011. These values are used to process expense data for the signed-on user.
(Release 9.1 Update) If the user has installed the update that includes photo attachments, the getExpenseManagementEmployeeProfileV2 is used, which includes information about whether photo attachments are allowed, and where.
-
The user either selects the Approve Expense Reports menu option, or taps the Approver piece of the graphical chart that appears on the Home screen.
-
The ExpenseReportManager published web service (JP09E000) calls the getExpenseManagementEmployeeProfile web service operation (J09E0002), which retrieves the following information from the EnterpriseOne database:
-
The user's address book number from the F0092 table.
-
The user's date format from the F00921 table.
-
The user's language preference from the F00921 table.
-
The user's name from the F0101 table.
-
The user's expense profile from the F20103 table.
-
All F09E109 records for the signed-on users policy.
-
-
The ExpenseReportManager then calls the getExpenseReportsToApprove web service method (J09E0001), which retrieves all of the expense reports that are currently awaiting the approval of the signed-on user.
-
The user can then review header and detail information for each report that is displayed.
(Relase 9.1 Update) The user can also review photos that the employee has attached to the report. The getExpenseReportAttachments method (J09E0008) retrieves any available attachments.
-
After reviewing the report, the user can then reject or approve the report. If rejecting the report, the user can also enter a comment to explain the reason for the rejection.
-
The ExpenseReportManager then calls the approveExpenseReport or rejectExpenseReport web service method (J09E0003), based on whether the user approves or rejects the report.
-
An e-mail or work center message is sent to the employee with the status of their report, and any comments that were entered if the report is rejected.
-
The J09E0003 then calls the Process Expense Reports business function (B09E0074), which locks the record in the Expense Report Header table (F20111).
-
The B09E0074 updates the F20111 with the new status and the user ID of the person updating the record.
-
After the record in the F20111 is updated, it is unlocked, and the report is removed from the list of expense reports awaiting approval on the mobile device.
5.1.4.2 Mobile Expense Report Entry Data Flow
Using the Mobile Expense Management application, users can enter new expense reports for themselves using a mobile device. This list describes the flow of data during the expense entry process:
-
The user launches the Mobile Expense Management application from their mobile device and enters their sign on credentials.
Note:
(Release 9.1 Update)If you downloaded the application from your device's application store, you must enter user name, password, and server location the first time you attempt to log in.
-
The getExpenseManagementEmployeeProfile operation (J09E0002) passes the user ID to the GetMobileVersionForUser business function (B0001400), which retrieves the specified version of the M09E2011 for the signed-on user. Additionally, the GetMobileExpenseProcessingOptions business function (B09E0150) retrieves the appropriate version of the P09E2011, as defined in the retrieved version of the M09E2011. Finally, the GetExpManProcessingOptions business function (B09E130) retrieves the processing option values from the specified version of the P09E2011. These values are used to process expense data for the signed-on user.
(Release 9.1 Update) If the user has installed the update that includes photo attachments, the getExpenseManagementEmployeeProfileV2 is used, which includes information about whether photo attachments are allowed, and where.
-
The user selects the Add/Edit Expense Reports menu option from the Expense Management Home screen.
-
The ExpenseReportManager published web service (JP09E000) calls the getExpenseManagementEmployeeProfile web service operation (J09E0002), which retrieves the following information from the EnterpriseOne database:
-
The user's address book number from the F0092 table.
-
The user's date format from the F00921 table.
-
The user's language preference from the F00921 table.
-
The user's name from the F0101 table.
-
The user's expense profile from the F20103 table.
-
All F09E109 records for the signed-on user's policy.
-
-
The ExpenseReportQueryProcessor web service operation (J09E0001) retrieves all current expense reports at an editable status for the signed-on user, and displays them on the My Expense Reports screen.
-
On the My Expense Reports screen, the user presses the Add button.
-
The user enters header information about the report.
Note:
Depending on processing option settings, the user might have the ability to complete these tasks at the report level:-
Complete the Override Manager field.
The Override Manager field appears in the header of the report only if the processing options of the selected version of the P09E2011 are set to enable the manager to be overridden. If the user searches for a valid value for this field, the lookupAddressBook operation (J0100009) retrieves valid values from the EnterpriseOne database.
-
Attach photos to the report. (Release 9.1 Update)
If the user is allowed to attach photos at the report level, the processExpenseReportAttachment method (J09E0009) adds the photos to the report when the user captures a new photo or selects an existing photo to add to the report.
-
-
The user can then add expense items to the report using one of these options:
-
Press the Add button.
-
Press the Add Credit Card Expense button.
This option appears only if credit card expense functionality is enabled. The getCreditCardTransactions operation (J09E0004) retrieves all available credit card transactions from the EnterpriseOne database.
Be aware that when the user clicks Add or Add Credit Card Expense, the system automatically saves the header data that the user has entered before moving to the next screen.
The processExpenseReportHeader method (J09E0005) inserts, updates, or deletes the expense in the F20111.
-
-
The user enters details about each expense item on the Expense Details form.
If your mobile application is configured to use expense policies, the getExpenseManagementPolicy operation (J09E0007) retrieves any available policy information, based on the detailed information entered by the user.
(Release 9.1 Update) If your mobile application is deployed to utilize photo attachments, and the system has been set up to enable users to attach photos at the expense level, users can attach photos of receipts or other documents to each expense item. Users can attach existing photos from the device's photo gallery, or create new photos using the camera capture option. The processExpenseReportAttachment method (J09E0009) adds the photos to the expense when the user attaches a photo to the expense.
-
While entering expense item details, users can search for valid values for these fields:
-
Business Unit
The lookupBusinessUnits operation (J0000040) retrieves values matching the specified search criteria from the EnterpriseOne database.
-
Work Order
The lookupWorkOrder operation (J4800001) retrieves values matching the specified search criteria from the EnterpriseOne database.
-
Job Cost
The lookupJobCost operation (J5100001) retrieves values matching the specified search criteria from the EnterpriseOne database.
-
Currency Code
Users can select a value from the drop down list. Values in the drop down list are populated by the lookupCurrencyCodes operation (J0000060).
-
-
The user presses Save to add the expense item to the expense report. The processExpenseReportDetail method (J09E0005) is called to insert, update, or delete the expense in the F20112 table in the EnterpriseOne database.
-
The user continues to add expense items to the report. Once all items have been entered, the user presses the Submit Report button.
-
The reserveExpenseReport method (J09E0005) reserves the record in the EnterpriseOne database, and the processExpenseReportHeader and processExpenseReportDetails methods (both J09E0005) commit the expense data to the F20111 and F20112 tables in the EnterpriseOne database. The submitExpenseReport method (J09E0005) initiates the expense workflow process, which changes the status of the report to the next status in the workflow. Finally, the releaseExpenseReport method (J09E0005) releases the record reservation.
5.1.4.3 Mobile Expense Report Edit Data Flow
Using the Mobile Expense Management application, users can edit their existing reports, provided the reports are at an editable status. This list describes the flow of data during the expense report edit process:
-
The user launches the Mobile Expense Management application from their mobile device and enters valid user credentials.
Note:
(Release 9.1 Update)If you downloaded the application from your device's application store, you must enter user name, password, and server location the first time you attempt to log in.
-
The getExpenseManagementEmployeeProfile operation (J09E0002) passes the user ID to the GetMobileVersionForUser business function (B0001400), which retrieves the specified version of the M09E2011 for the signed-on user. Additionally, the GetMobileExpenseProcessingOptions business function (B09E0150) retrieves the appropriate version of the P09E2011, as defined in the retrieved version of the M09E2011. Finally, the GetExpManProcessingOptions business function (B09E130) retrieves the processing option values from the specified version of the P09E2011. These values are used to process expense data for the signed-on user.
-
The user selects the Add/Edit Expense Reports menu option from the Expense Management Home screen.
-
The ExpenseReportManager published web service (JP09E000) calls the getExpenseManagementEmployeeProfile web service operation (J09E0002), which retrieves the following information from the EnterpriseOne database:
-
The user's address book number from the F0092 table.
-
The user's date format from the F00921 table.
-
The user's language preference from the F00921 table.
-
The user's name from the F0101 table.
-
The user's expense profile from the F20103 table.
-
All F09E109 records from the signed-on users's expense policy.
-
-
The ExpenseReportQueryProcessor web service operation (J09E0001) retrieves all current expense reports at an editable status for the signed-on user, and displays them on the My Expense Reports screen.
-
On the My Expense Reports screen, the user selects a report to edit.
-
The reserveExpenseReport method (J09E0006) is called, to reserve the record. This record cannot be edited using the P09E2011 application while the reservation is there.
-
If necessary, the user updates the header information and/or selects expense items to edit. The processExpenseReportHeader method (J09E0005) updates any header record information in the F20111 table in EnterpriseOne.
-
(Release 9.1 Update) If using photo attachment functionality, the user can add photos to, or delete photos from the report or to the individual expenses. The processExpenseReportAttachment method (J09E0009) processes changes related to the photos.
-
The user updates the selected expense item, and then presses Save.
Note:
You cannot edit the value in the Category field. To update this value, you must delete the current record and enter a new record with the correct category. Additionally, you cannot update the rate on a split expense. To change the rate, you must delete the existing expense and enter a new expense. -
After editing all necessary data, the user presses Save on the Edit Expense Report screen. The processExpenseReportDetail (J09E0005) updates the F20112 table in EnterpriseOne.
-
Finally, the releaseExpenseReport method (J09E0005) releases the record reservation.
5.1.4.4 Mobile Expense Report Search Data Flow
-
The user launches the Mobile Expense Management application from their mobile device and enters valid user credentials.
Note:
(Release 9.1 Update)If you downloaded the application from your device's application store, you must enter user name, password, and server location the first time you attempt to log in.
-
The getExpenseManagementEmployeeProfile operation (J09E0002) passes the user ID to the GetMobileVersionForUser business function (B0001400), which retrieves the specified version of the M09E2011 for the signed-on user. Additionally, the GetMobileExpenseProcessingOptions business function (B09E0150) retrieves the appropriate version of the P09E2011, as defined in the retrieved version of the M09E2011. Finally, the GetExpManProcessingOptions business function (B09E0130) retrieves the processing option values from the specified version of the P09E2011. These values are used to process expense data for the signed-on user.
-
The user selects the Search Expense Reports menu option from the Expense Management Home screen.
-
The ExpenseReportManager published web service (JP09E000) calls the getExpenseManagementEmployeeProfile web service operation (J09E0002), which retrieves the following information from the EnterpriseOne database:
-
The user's address book number from the F0092 table.
-
The user's date format from the F00921 table.
-
The user's language preference from the F00921 table.
-
The user's name from the F0101 table.
-
The user's expense profile from the F20103 table.
-
All F09E109 records from the signed-on users's expense policy.
-
-
On the Search Reports screen, the user enters search criteria and then presses Search.
The user can select the My Reports option to search for only their reports. If the user does not select this option, the system returns reports of the user, and the user's subordinate employees that match the search criteria.
-
The system returns a list of reports that meet the search criteria. The user can select a report to review. If the report is awaiting approval by the user, the user can approve or reject the report.
Note:
Users cannot edit an expense report from the search screen, as the results that are returned during the search are read-only. To edit a report, the user must return to the home screen and select the Add/Edit option.
5.1.5 Prerequisite Knowledge and Data Requirements
Before you use the Mobile Expense Management application, Oracle strongly recommends that you have a solid understanding and working knowledge of the JD Edwards EnterpriseOne Expense Management system.
All users of the Mobile Expense Management application must also have a valid employee profile set up in the Expense Management system.
Additionally, if you want managers to approve reports using their mobile devices, you must set up the Expense Management system to enable users to approve expense reports for their employees. Users who want to approve expense reports using their mobile device must also be designated as the manager of subordinate employees. When these subordinate employees enter expense reports, the manager can use the Mobile Expense Management application to review, approve, or reject the reports.
(Release 9.1 Update) If you are using photo attachment functionality, you must be familiar with your mobile device's camera and photo gallery. For additional information about these features, see the documentation provided by your mobile device provider.
|
See Also: These topics in the JD Edwards EnterpriseOne Applications Expense Management Implementation Guide: |
You must set up one or more versions of the Mobile Expense Management Processing Options program (M09E2011). This program contains processing options that you use to define the version of the P09E2011 that is used by the mobile application.
You can set up multiple versions of this program if you want different users to use different versions.
5.1.6 Solution Assumptions and Constraints
Mobile applications are typically intended to be a scaled-down version of a larger application that is available in the base software. Therefore, most mobile applications offer a subset of the functionality that is available in the base software.
This table lists and explains the solution assumptions and constraints associated with mobile expense management functionality:
5.2 Configuring Mobile Expense Management
Configuring the Mobile Expense Management application includes:
-
Setting processing options for the Mobile Expense Management program (M09E2011).
-
Configuring expense category attributes.
-
(Release 9.1 Update) Configuring the application for photo capture and review.
5.2.1 Understanding Processing Options for the Mobile Expense Management Program (M09E2011)
Before you can use the Mobile Expense Management application on a mobile device, you must set the processing options for the Mobile Expense Management program (M09E2011). You use this program to specify which version of the Expense Report Review/Entry program (P09E2011) the mobile device uses when processing expense report information.
After you set up versions of the M09E2011, and enter the appropriate versions of the P09E2011 in the processing options, you must then set up versioning information.
Several processing options on the P09E2011 control how the mobile application processes expense report data, and which fields are displayed on the mobile application. This table lists the processing options on the P09E2011 that are used by the mobile expense management process:
| Processing Option | Description |
|---|---|
| Defaults tab, option 1 (Currency Mode) | Use this option to specify whether users can enter expenses in multiple currencies. If this option is activated, the mobile application displays the Currency field. |
| Defaults tab, option 5 (Default Manager for Approval) | Use this option to specify whether the user can override the approving manager. If this option is activated, the mobile application displays the Override Manager field, and allows the user to select a value other than the default manager. |
| Dates tab, option 1 (Allowable Expense Days) | Use this option to specify the number of days preceding the system date for which you will allow expense reports and expense items to be entered. |
| Policy tab, option 3 (Policy Per Diem Validation) | Use this option to specify whether to use per diem rules. If you activate this option, the system calculates and displays per diem information in the mobile application. |
| Auditor tab, option 4 (Validate for Duplication) | Use this option to specify whether the system validates for duplicate expenses. |
| Auditor tab, option 5 (Number of Days to Use for Validation) | Use this option to specify the number of days to include in the validation process for duplicate expenses. |
| Credit Card Expense tab, option 1 (Credit Card Expenses) | Use this option to specify whether employees can access their credit card transactions so they can add them to the expense report. If you activate this option, the Add Credit Card Expense button appears in the mobile application. |
5.2.1.1 Setting Processing Options for the Mobile Expense Management Program (M09E2011)
You use processing options to define default processing information for a program or feature.
| Processing Option | Description |
|---|---|
| 1. Version | Specify the version of the Expense Entry program (P09E2011) that the mobile application uses to process expense data. |
| (Release 9.1 Update) 2. Indicate Where Photo Attachments Are Allowed | Use this processing option to specify where users can attach photos to an expense report. Values include:
|
5.2.2 Configuring Expense Category Attributes
The Expense Management system provides you with several configurable fields called expense category attributes that you can use to satisfy your business requirements. If you set up and use these fields, and if they contain data in an expense report, the field labels and their associated values are displayed in the detail area of an expense report when viewed through the mobile application.
To ensure that these field labels are not truncated in the mobile application, Oracle suggests that you limit the names of these fields to 26 characters or less.
5.2.3 Configuring Photo Capture and Review (Release 9.1 Update)
In order to use the photo capture and review features available in the Mobile Expense Management Application, users must deploy the application as follows:
-
To enable photo capture and review features:
-
To enable photo review features only:
5.3 Searching for Expense Reports
This section discusses how to search for expense reports on a mobile device.
5.3.1 Searching for Expense Reports
To search for expense reports using a mobile device, complete these steps:
-
Complete the steps to log into the Expense Management Mobile application.
-
From the Home screen, press the Search Expense Reports option.
-
On the Search Reports screen, select the My Reports option to search only for your reports, or leave the option cleared to search for your reports and those of subordinate employees.
-
Complete the following optional fields to define your search criteria, and then press Search:
-
Employee Name
-
Report Number
-
From Date
-
Thru Date
-
Report Status
-
Report Type
Note:
The next time you return to the Search Reports screen during the current session, the values that you last entered in the search fields will be displayed. To clear the values, press the Clear Search Criteria button. When you log out of the mobile application, the search values are cleared, and will not be displayed when you access the Search Reports screen after logging in again. -
-
The system returns a list of reports that meet your search criteria. Select a record to review the report details.
5.4 Approving and Rejecting Expense Reports
This section discusses how to approve and reject expense reports on a mobile device.
5.4.1 Approving and Rejecting Expense Reports
To approve or reject an expense report, complete these steps:
-
Complete the steps to log into the Expense Management Mobile application.
-
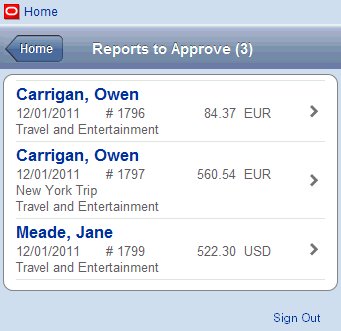
From the Home screen, press the Approve Expense Reports option. Alternatively, you can click the Approver portion of the chart.
Figure 5-8 Expense Management Home Screen
Description of "Figure 5-8 Expense Management Home Screen"
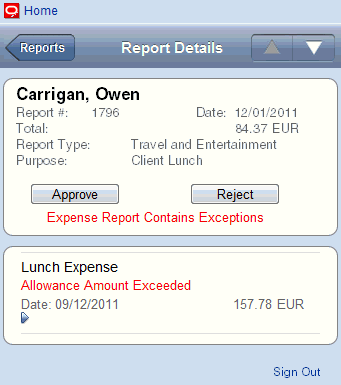
-
On the Reports To Approve screen, the system lists the reports that are awaiting approval. The name of the employee associated with the report appears in bold, followed by the report date, number, total, and title.
-
Tap on a report to review the detail for that report, and to access the screens that enable you to approve or reject the report. Note that you can press anywhere on the record to access the detailed information. Each record is separated by a bar across the screen.
-
On the Expense Report Details screen, review the information in the header of the form. From this screen, you can use the navigation arrows in the navigation bar to scroll through the reports that are currently awaiting approval. You can also review detailed information about the report, approve the report, or reject the report.
Figure 5-10 Expense Report Details - Unexpanded Detail
Description of "Figure 5-10 Expense Report Details - Unexpanded Detail"
-
(Release 9.1 Update) To review photos associated with the report, tap the Photos (#) button. On the View Photos screen, tap each photo you want to review. When you are finished reviewing photos, return to the Report Details screen.
-
To review the detail information associated with each item on the report, tap the record in the detail area. Again, you can tap anywhere on the expense report item detail record to expand the record and view the detail. You can also collapse the detailed information by tapping again on the same area.
Figure 5-11 Expense Report Details - Expanded Detail
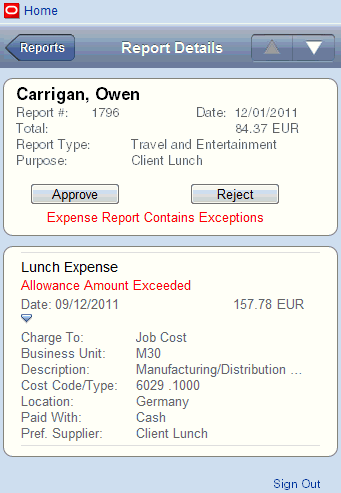
Description of "Figure 5-11 Expense Report Details - Expanded Detail"
-
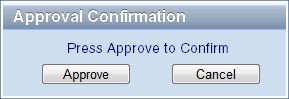
To approve the expense report, press the Approve button, and then press Confirm on the Approval Confirmation screen.
-
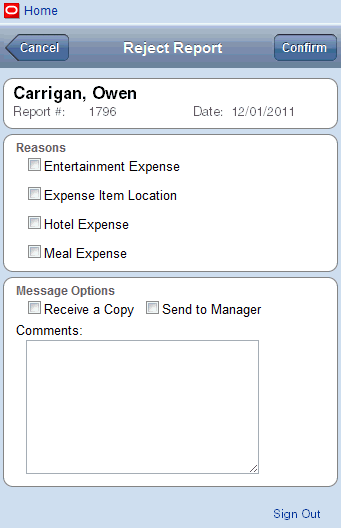
To reject the expense report, press the Reject button.
-
On the Reject Report screen, complete any of these optional tasks, and then press the Confirm button:
-
Select one or more reason codes to explain the reason for rejecting the report.
-
Select the Receive a Copy option to send a copy of the workflow notification E-mail to your inbox.
-
Select the Send To Manager option to send a copy of the workflow notification E-mail to the employee's manager.
-
Enter a comment in the free-form text box.
-
-
After you approve or reject a report, the system returns you to the Report Details screen, displaying the details of the next report in the list. If there are no more reports awaiting approval, the system returns you to the Expense Management Home screen.
5.5 Entering a New Expense Report
This section discusses how to complete these tasks on a mobile device:
-
Enter an expense report.
-
Enter a summary expense.
-
Enter a split expense.
5.5.1 Entering an Expense Report
To enter an expense report using your mobile device, complete these steps:
-
Complete the steps to log into the Expense Management Mobile application.
-
From the Home screen, press the Add/Edit Expense Reports option.
-
On the My Expense Reports screen, press Add.
-
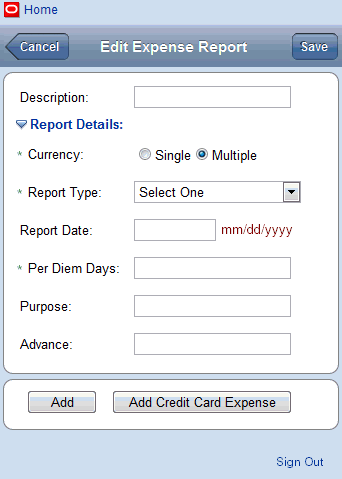
On the Edit Expense Report screen, complete the following fields:
-
Description
-
Currency
The system displays this option only if multicurrency is enabled. To enter a report with multiple currencies, select the Multiple option. To enter a report with a single currency select the Single option.
-
Report Type
-
Report Date
-
Per Diem Days
The system displays this option only if per diem rules are activated.
-
Purpose
-
Advance
-
Override Manager
The system displays this option only if the user has the authority to override the default approving manager.
Figure 5-14 Edit Expense Report - Adding a New Report
Description of "Figure 5-14 Edit Expense Report - Adding a New Report"
-
-
(Release 9.1 Update) To add photos at the report level, complete these steps, and then return to the Edit Expense Report screen to continue. This option is available only if the processing options are set to allow report-level receipts.
-
Tap the Add Photos button.
-
On the Add Photo screen, update the Photo Name field, or leave it as it to accept the default file name.
-
Tap the Camera button to take a photo with your mobile device, or tap the Album button to select an existing photo from your photo gallery.
Follow the instructions provided by your mobile device to use the camera and gallery features.
-
To add another photo, click the Add button, and follow the previously listed instructions.
-
To delete a photo, tap on the photo. On the View Photo screen, tap the Delete Photo button, and then tap the Confirm button. Tap the Photos button to return to the previous screen.
-
When you have finished attaching report-level photos to the report, return to the Edit Expense Report screen by tapping the Report button.
Notice that the Add Photos button is now called Report Photos (#), displaying the number of report-level photos attached to the report.
-
-
To add a credit card expense, press the Add Credit Card Expense button, and complete these steps:
-
On the Credit Card Charges screen, select individual expenses, or press the Select All link.
-
Press Done to add the expenses to the report.
The system brings you to the Expense Detail screen where you can enter additional details about the credit card expense. Skip to step 7 for instructions on entering expense details.
If no credit card transactions are available, the system displays a message that there are no credit card transactions to add.
-
-
To add basic, split, or summary expenses, press Add.
Note:
Additional instructions for adding split and summary expenses are provided in the next sections of this chapter. -
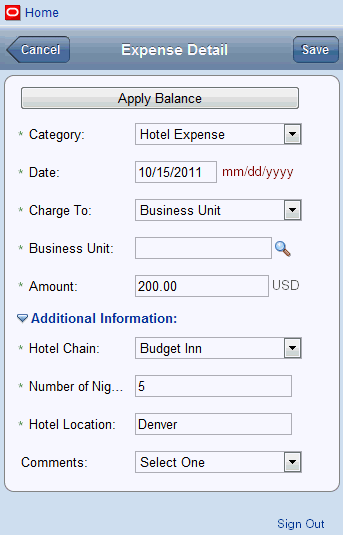
On the Expense Detail screen, complete the following fields, as necessary for your expense item. If you have selected credit card transactions, some fields are prepopulated with values.
-
Category
-
Location
-
Paid With
-
Charge To
-
Business Unit, Cost Code and Cost Type, or Work Order
Note:
The fields that display after the Charge To field are dependent upon the value selected in the Charge To field. For example, if you selected Business Unit in the Charge to field, the system displays the Business Unit field. -
Currency
The system displays this field only if multicurrency is enabled.
-
Amount or Quantity and Rate (depending on type of expense)
Note:
If you are entering a rate type of expense, such as mileage, the Amount field is disabled, and the Rate and Quantity fields are displayed on the screen. The user must enter a quantity. The Rate field is populated with the rate from the policy, which is required if entering rate type expenses in the mobile application. The Rate field is enabled or disabled based on the expense policy setup. -
Fields in the Additional Information section
The list of fields displayed is dependent upon the Category of the expense.
Figure 5-15 Expense Detail - Adding a Basic Expense
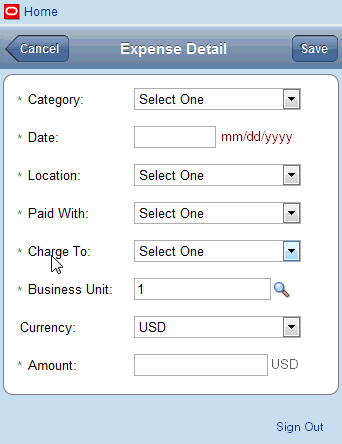
Description of "Figure 5-15 Expense Detail - Adding a Basic Expense"
-
-
(Release 9.1 Update) To attach one or more photos to the expense, tap the Add Photo button on the Expense Detail screen and complete the following steps. This option is available only if the processing options are set to allow expense-level receipts.
-
On the Add Photo screen, update the Photo Name field, or leave it as it to accept the default file name.
-
Tap the Camera button to take a photo with your mobile device, or tap the Album button to select an existing photo from your photo gallery.
Follow the instructions provided by your mobile device to use the camera and gallery features.
-
When you have finished attaching expense-level photos to the report, return to the Expense Detail screen.
-
-
When you are finished entering expense details, press Save.
If you have selected multiple credit card transactions, the system automatically displays the next transaction for you to update. If no more credit card transactions exist, or if you are simply entering a single expense, the system returns you to the Edit Expense Report screen.
Figure 5-16 Edit Expense Report - Review Before Submitting
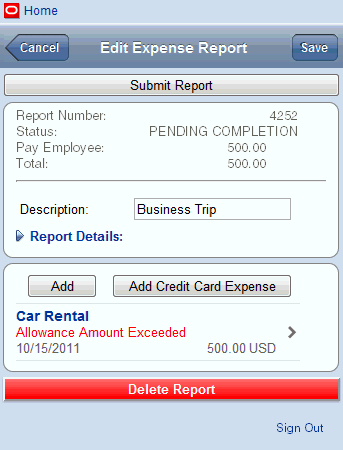
Description of "Figure 5-16 Edit Expense Report - Review Before Submitting"
-
On the Edit Expense Report screen, review all calculated data and messages, and continue adding expenses until you have added all expenses to the report. When you have finished, press Submit Report.
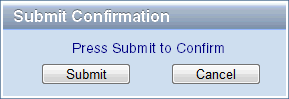
-
On Submit Confirmation, press Submit.
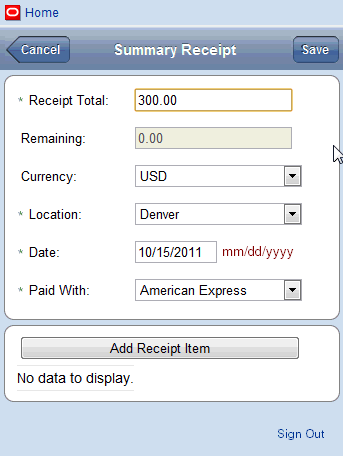
5.5.2 Entering a Summary Expense
You enter summary expenses when you have a single receipt that contains multiple items that you want to expense. For example, you might have a receipt from a hotel that includes the hotel expense, breakfast expenses, and dinner expenses. Because each of these types of expense must be entered separately, but you have only one receipt, you enter a summary expense to record all of the details about each expense on the receipt.
To enter a summary expense using your mobile device, complete these steps:
-
Complete steps 1 through 7 of the previous task, "Entering an Expense Report", so that you are on the Expense Detail screen.
(Release 9.1 Update) See step 9 for information about adding photos.
-
From the Category drop down list, select Summary Receipt.
-
On the Summary Receipt screen, complete these fields:
-
Receipt Total
Enter the full amount of the receipt that you are expensing. For example, if a single receipt includes 100 USD for hotel expense, and 20 USD for lunch expense, and you intend to expense both items, enter 120 in this field.
-
Currency
This option is available only if multicurrency is enabled.
-
Location
This field is populated with the value from the expense report header. You can change this value if necessary.
-
Date
This field is populated with the value from the expense report header. You can change this value if necessary.
-
Paid With
This field is populated with the value from the last expense that was entered. You can change this value if necessary.
-
-
Press Add Receipt Item and complete the expense details, as described in the previous task, "Entering An Expense Report". When you have finished, press Save.
Figure 5-19 Expense Detail - Summary Expense
Description of "Figure 5-19 Expense Detail - Summary Expense"
-
When you add a receipt item to the summary expense, the system updates the Remaining field with the amount of the receipt that has not yet been entered. When adding additional expenses, you can press the Apply Balance button, which applies the remaining amount from the receipt to your current expense item.
Figure 5-20 Summary Receipt - One Item Added
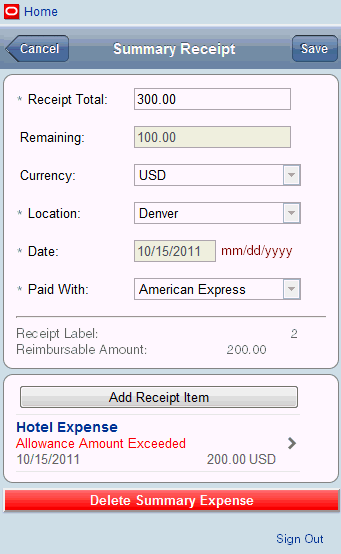
Description of "Figure 5-20 Summary Receipt - One Item Added"
-
Continue adding receipt items until the value in the Remaining field is zero. If the summary receipt is not fully distributed, meaning that the entire amount of the receipt has been accounted for, you cannot submit the expense report.
Figure 5-21 Summary Receipt - Fully Distributed
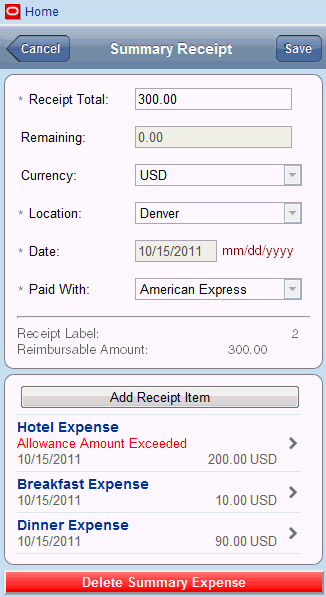
Description of "Figure 5-21 Summary Receipt - Fully Distributed"
-
Press Save to return to the Edit Expense Report screen. Review all calculated values and messages, and then press Submit Report.
Figure 5-22 Edit Expense Report - Summary Receipt Added
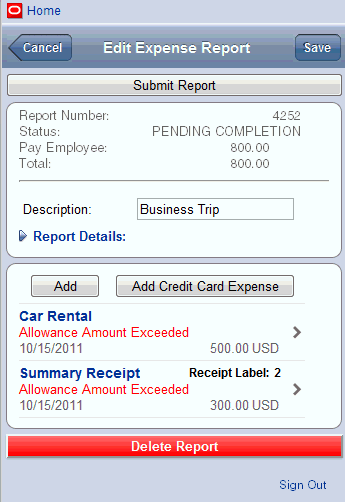
Description of "Figure 5-22 Edit Expense Report - Summary Receipt Added"
-
On Submit Confirmation, press Submit.
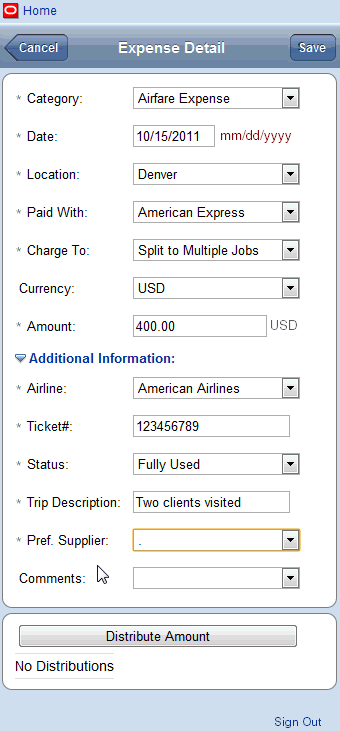
5.5.3 Entering a Split Expense
You enter split expenses when you need to charge parts of an individual expense to different jobs, business units, or work orders. For example, if you purchase an airline ticket to visit two different clients, you might need to charge the single airline expense to two different work orders or jobs.
To enter a split expense using your mobile device, complete these steps:
-
Complete steps 1 through 7 of the task, "Entering an Expense Report", so that you are on the Expense Detail screen.
(Release 9.1 Update) See step 9 for information about adding receipt photos.
-
From the Expense Detail screen, complete all of the fields as described previously, with the exception of the Charge To field.
Note:
In the Amount field, enter the full amount of the expense, before it is split. -
In the Charge To field, select one of these options:
-
Split to Multiple Jobs
-
Split to Multiple Bus. Units
-
Split to Multiple Work Orders
Figure 5-24 Expense Detail - Split Header
Description of "Figure 5-24 Expense Detail - Split Header"
-
-
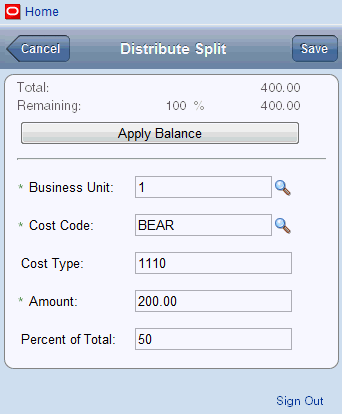
Press the Distribute Amount button.
-
On the Distribute Split screen, complete the fields on the top portion of the screen to specify where the expense is charged to. These fields change depending on the value selected in the Charge To field.
-
Enter the amount to charge to this portion of the expense by completing either the Amount or Percent of Total field, and then click Save.
-
Continue this process until you have full distributed the expense. You cannot submit the report until the expense is fully distributed.
You can use the Apply Balance button to apply the remaining portion of the total expense to the current record.
Figure 5-26 Expense Detail - Split Expense Fully Distributed
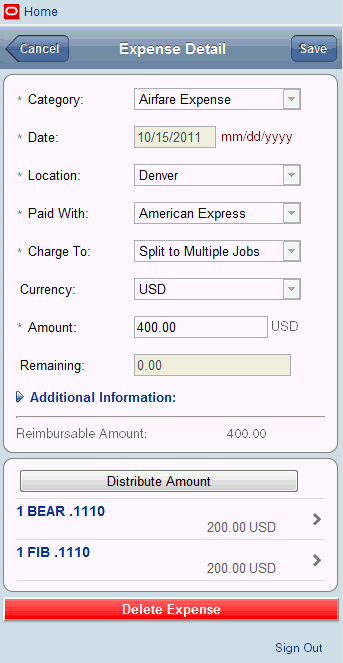
Description of "Figure 5-26 Expense Detail - Split Expense Fully Distributed"
-
Press Save to add the fully distributed split expense to the report.
-
When you return to the Edit Expense Report screen, review all calculated values and messages, and then press Submit Report.
Figure 5-27 Edit Expense Report - Split Expense Added
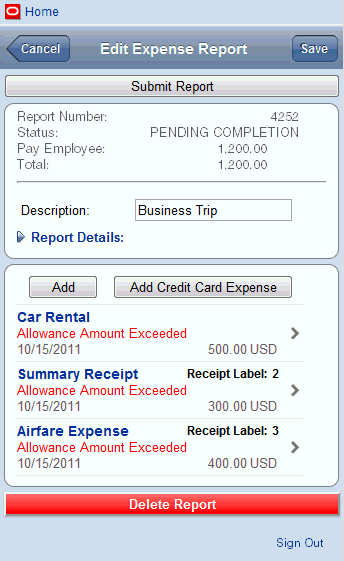
Description of "Figure 5-27 Edit Expense Report - Split Expense Added"
-
On Submit Confirmation, press Submit.
5.6 Editing an Existing Expense Report
To edit an existing report, complete these steps:
-
Complete the steps to log into the Expense Management Mobile application.
-
From the Home screen, press the Add/Edit Expense Reports option.
-
On the My Expense Reports screen, the system displays all reports that are currently at an editable status.
-
Select a report to edit.
-
Make any necessary updates to the report. See the instructions in the previous tasks of this chapter for detailed steps to enter or update expense items or expense header information.
Note:
You cannot change the category of an expense or an expense report. If the category is wrong, you must delete the report or expense item, and enter it again with the correct category. -
(Release 9.1 Update) To delete photo attachments from the report, tap the Photos (#) button to see a list of report-level photos, or select a specific expense, and then tap the Photos (#) button to see expense-level photos. Tap the photo you want to delete, and then tap the Delete Photo button. Tap Confirm to delete the photo, and then return to the previous screen.
-
When you have made all necessary updates to the report, press the Submit Report button, and then press Confirm.