3 Setting Up Localizations for Japan
This chapter contains the following topics:
-
Section 3.3, "Setting Up Tax Amount Rounding Methods for Japan"
-
Section 3.6, "Setting Up the System for Hankin Hante Payments and Drafts for Japan"
3.1 Common Terms Used in This Section
- Gross Amount
-
The total of the taxable amount and the tax amount.
- Round Down
-
The decrease of an amount in which the system uses decimal values to modify the amount. The system uses this concept when it performs soft rounding.
- Round Up
-
The increase of an amount in which the system uses decimal values to modify the amount. The system uses this concept when it performs soft rounding.
Note:
Compare this term to Rounding Up Method. - Rounded Off Amount
-
The difference between the unrounded tax amount and the rounded tax amount.
- Rounding Method
-
A method of rounding in which the system uses the values in the decimal places of the unrounded tax amount to determine whether to increase or decrease the tax amount. If the next decimal place of the unrounded tax amount is less than or equal to 4, the decimal places after the specified decimal place are ignored. If the next decimal place of the unrounded tax amount is greater than or equal to 5, the system adds 1 to the digit preceding the specified decimal and ignores the digits after the specified decimal.
- Rounding Off Method
-
A method of rounding in which the system ignores all of the decimal places of the unrounded tax amount after the specified decimal to produce the final tax amount.
- Rounding Up Method
-
A method of rounding in which the system uses the values in the decimal places of the unrounded tax amount to determine whether to increase the tax amount. If any digits exist after the specified decimal place, the system adds 1 to the digit preceding the specified decimal and ignores the digits after the specified decimal.
Note:
Compare this term to Round Up. - Soft Rounding
-
A function that the system performs to minimize discrepancies in rounded tax amounts when multiple line items exist for a voucher or invoice.
- Tax Amount
-
The amount of tax to pay. This amount is calculated using the tax rate area, tax rate, tax explanation code, and rounding method.
- Taxable Amount
-
The amount on which the tax amount is calculated.
- Unrounded Tax Amount
-
The tax amount after the initial tax calculation, before a rounding method is used to modify the amount.
3.2 Setting Up UDCs for Japan
Setting up Japan-specific UDCs enables you to use Japan-specific functionality. You also set up some base software UDCs with Japan-specific values. This section discusses how to set up UDC for:
-
Accounts receivable transactions.
-
Accounts payable transactions.
-
Bank accounts.
-
Fixed assets
-
Languages.
3.2.1 Setting Up UDCs for Accounts Receivable Transactions for Japan
To use the JD Edwards EnterpriseOne Accounts Receivable system for Japan, set up UDCs for receipts and drafts.
3.2.1.1 Receipt Type - Japan (75/RE)
Set up UDCs to identify each type of receipt that you want to include in the summarized invoices (Kagami) that you print. For example, you can set up codes for these types of receipts:
-
RA - A - Adjustment
-
RC - C - Cash receipts
-
RK - A - Cash receipts - check
-
RO - A - Reversing or void
-
RV - A - Insufficient funds
-
RA - A - Chargeback
-
R1 - D - Draft
3.2.1.2 Draft Status Code (75/PS)
Set up this user defined code to identify the status of Japanese drafts. Set up these codes:
-
#: Selected
-
D: Received
-
G: Remitted
-
P: Paid (discounted drafts)
-
R: Updated (discounted drafts)
3.2.2 Setting Up UDCs for Accounts Payable Transactions for Japan
The JD Edwards EnterpriseOne Accounts Payable system for Japan requires that you set up UDCs for payment instruments and withholding tax.
3.2.2.1 Payment Instruments (00/PY)
To process discounted drafts in Japan, you must define a special payment instrument for discounted drafts. The system uses the special payment instrument with the RD3x automatic accounting instruction (AAI) to create the contingent liability transactions for discounted drafts.
For Japan, set up these values in UDC 00/PY:
-
D - Draft by invoice (AR & AP)
-
Q - Bank transfer - Japan
-
$ - Densai Payment - Japan (Release 9.1 Update)
You must also set up a payment instrument to calculate withholding for Japan.
3.2.2.2 Withholding Tax Category (75/WT)
Set up codes to identify each type of withholding tax category that your company uses. For Japan, set up codes for these withholding tax authority types:
-
Blank: without calculation
-
1: Resident
-
2: Nonresident
-
3: Attorney
3.2.3 Setting Up UDCs for Bank Accounts for Japan
You must set up Japanese-specific UDCs to identify bank transfers for accounts.
3.2.3.1 Bank Transfer Type (75/TT)
Set up UDCs to identify each type of bank transfer that your company uses. For Japan, set up codes for these bank transfer types:
-
Blank: Default.
-
E: Express bank transfer with bank charge.
-
L: Letter bank transfer with bank charge.
-
7: Express bank transfer without bank charge.
-
8: Letter bank transfer without bank charge.
3.2.4 Setting Up UDCs for Fixed Assets for Japan
Before you work with fixed assets for Japan, set up these UDC tables:
3.2.4.1 System 12 Category Code
You must set up a system 12 category code with values to specify whether a record is processed. When you run the Assets acquired on or before March 31 - 2007 program (R75J501) or the Assets acquired on or after April 1 - 2007 program (R75J502), the system:
-
Reads the value in a processing option to identify which category code includes the values used to specify whether a record is processed.
-
Selects asset records that do not have a value of Y in the specified category code field of the F1201 record.
-
Writes a Y to the specified category code field of the F1201 record after it processes the record.
The programs process a record only once; after a record is marked as processed the system does not select it for processing again.
You can set up any UDC table from 12/F1–12/F0 with the values to indicate if a record was processed. UDCs 12/F1–12/F0 correspond to category codes 11–20 in the JD Edwards EnterpriseOne Fixed Assets system.
Set up these values in the category code that you want to use:
| Code | Description |
|---|---|
| (blank) | Not processed |
| Y | Processed |
3.2.4.2 JD Edwards EnterpriseOne Fixed Asset System UDC Tables
The JD Edwards EnterpriseOne Fixed Asset system UDC tables that must be set up before you can calculate depreciation for Japan are:
-
Apportionment Code (12/AC)
-
Computation Method - ITD / Rem (12/DI)
-
Depreciation Method (12/DM)
3.2.4.3 Life Month Group Code (75J/GC)
You set up the Life Month Group Code (75J/GC) UDC table to enable you to group related relationships between existing life months and the life months to which you convert assets. You assign life month group codes to the relationships that you set up in the Set Up for Life Month program (P75J503).
The system uses the life month group code to select the relationship to use when you run the Assets acquired on or before March 31 - 2007 program (R75J501) and the Assets acquired on or after April 1 - 2007 program (R75J502). Because both programs enable you to use the values in this UDC table, consider setting up a different life month group code for each of the programs. If you set up different life month group codes, you can differentiate between the relationships that you set up for assets acquired before or after April 1, 2007.
Examples of codes are:
| Code | Description |
|---|---|
| 001 | Assets acquired on or before March 31, 2007 |
| 002 | Assets acquired on or after April 1, 2007 |
3.2.5 Setting Up UDCs for Languages for Japan
In addition to setting up the standard UDCs for the JD Edwards EnterpriseOne Address Book system, you must set up these Japanese-specific UDCs for language preferences.
3.2.5.1 Language Preference Codes (01/LP)
Language preference codes specify the language for documents such as invoices and statements and reports. Before any translations become effective, a language code must exist at either the system level or in your user preferences.
The language preference codes work in conjunction with vocabulary overrides to select the correct language translation. Examples include:
DU: Dutch
E: English
F: French
For Japan, a 3 is required in the Special Handling Code field of UDC table 01/LP to enable the Secondary Alpha Name field of an address book record to allow Kana names. The 3 in the Special Handling Code field also enables searching the Description field on the Business Unit form.
3.3 Setting Up Tax Amount Rounding Methods for Japan
This section provides overviews of tax amount rounding for transaction processing and tax amount rounding method options, lists common terms, lists a prerequisite, and discusses how to specify the rounding method in Japan.
3.3.1 Understanding Tax Amount Rounding for Transaction Processing In Japan
When you enter transactions for which a tax applies, the system calculates the taxes based on the tax rules, tax rate area, and tax explanation code that you set up. Transactions for which one or more taxes might apply include purchase order, voucher, sales order, and invoice transactions. When you enter a transaction, the system calculates the taxes and then rounds the tax amount.
In Japan, you can now specify the rounding method that the system applies to the tax amount by associating a rounding method to the tax rate area that you use for the transaction.
The standard tax calculation routine (X00TAX) uses the country server and plug-and-play technology to call the new business function (B75J0TAX) to perform the tax rounding. To enable the county server and plug-and-play technology for Japan, the Localization Country Code field in your user profile must be set to JP (Japan).
3.3.1.1 What You Should Know About Tax Rounding in Japan
The solution for rounding tax amounts in Japan is based on these assumptions:
-
The setup for the yen in the JD Edwards EnterpriseOne system includes no decimal places.
-
Rounding of tax amounts is applicable at the line level.
-
When totaling an order, the system uses the rounded tax amounts, so the totaled amount does not include decimal places and the system does not run the rounding routine over the totaled amount.
-
If you set up tax rules in the Tax Rules program (P0022) to perform rounding at the order level for sales order processing, the system applies the rounding method that you specify in the Setup Rounding Options program and then uses soft rounding to determine the final amount.
-
If you process a transaction using foreign currency, the system:
-
Calculates the taxes in the foreign currency.
-
Applies the rounding method that you set up in the Setup Rounding Options program.
-
Multiples the rounded foreign amount by the exchange rate that you set up for currency conversion. The system does not round the converted amount.
-
-
The system uses the tax rounding method that you specify in the Setup Rounding Options program for transaction processing that uses the standard tax calculation routine (X00TAX) only. The X00TAX runs the business function for tax rounding (B75J0TAX) after first accessing the country server and plug and play modules for Japanese localizations.
The system does not use the rounding method that you specify when the system converts amounts from one currency to another.
3.3.2 Understanding Tax Amount Rounding Method Options in Japan
In Japan, you can use the Setup Rounding Options program (P75J504) to associate a rounding method to a tax rate area that the system uses for tax calculations. You set up a record for each of the tax rate areas for which you want to specify the rounding method. You set up a record for each tax rate area by company. You can also set up records for company 00000. The system saves the associations between the company and the tax rate area in the Setup Rounding Options table (F75J504).
When you enter a transaction in a program that includes the tax rate area and that calculates taxes, the system:
-
Uses the tax rate area of the transaction to determine the tax rate to apply.
The tax rate area might be associated with a customer, supplier, or item, or might be manually entered.
-
Using the company and tax rate area from the transaction, accesses the setup from the F75J504 table when the Localization Country Code field in the User Profile Revisions program (P0092) is set to JP (Japan).
If no record exists for the tax rate area and company of the transaction, the system looks for a record for the tax rate area for company 00000. If no record exists for the tax rate area for company 00000, the system writes an error message to the Work Center describing the document number, document type, company, and tax rate area of the transaction for which it was unable to complete the tax calculation.
-
Applies the rounding method specified for the tax rate area.
This table shows the rounding methods that you can associate with a tax rate area:
| Rounding Method | Description | Example 1 | Example 2 |
|---|---|---|---|
| Rounding | The system calculates the tax, then uses the decimal places of the unrounded tax amount to produce the final tax amount.
If the next decimal place of the unrounded tax amount is less than or equal to 4, then the decimal places after the specified decimal place are ignored. If the next decimal place of the unrounded tax amount is greater than or equal to 5, then the system adds 1 to the digit preceding the decimal and ignores the decimal numbers. You specify the decimal places when you set up the currency. Note: This is the rounding method that the system uses if you do not associate a different rounding method to the tax rate area. |
Example 1:
In example 1, the system:
|
Example 2:
In example 2, the system:
|
| Rounding up | The system calculates the tax, then uses the decimal places of the unrounded tax amount to produce the final tax amount.
If any digits exist after the specified decimal place, the system adds 1 to the digit preceding the specified decimal and ignores the decimal numbers. You specify the decimal places when you set up the currency. |
Example 1:
In example 1, the system:
|
Example 2:
In example 2, the system:
|
| Rounding off | The system calculates the tax, then ignores all of the decimal places of the unrounded tax amount after the specified decimal. You specify the decimal places when you set up the currency.
The system does not consider the values of the decimal places. |
Example 1:
In example 1, the system ignores all of the decimal places because:
|
Example 2:
In example 2, the system ignores all of the decimal places because:
|
The setup in the Setup Rounding Options program does not change the tax rate areas or tax rates that you associate with customers, suppliers, or items. The setup changes only the method that the system uses to round the calculated tax amount.
3.3.2.1 Entering Gross Amounts in the Standard Voucher Entry Program (P0411)
The Standard Voucher Entry program enables you to enter the gross amount instead of the taxable amount. When you enter the gross amount, the system calculates the taxable amount and the tax amount. If you use the rounding up or rounding off method for rounding the calculated tax amount, the system might calculate the taxable amount incorrectly when you enter the gross amount. To avoid integrity issues when you enter the gross amount, the system:
-
Rounds down on the taxable amount when you specify to use the round up method to round the tax amount.
-
Rounds up on the taxable amount when you specify to use the round off method to round the tax amount.
3.3.2.2 Soft Rounding for Multiple Line Items
When a voucher or invoice includes more than one line item, the system uses soft rounding to minimize discrepancies that might occur when the rounded amounts for each line are totaled. For example, suppose that you had 10 line items on a voucher, and the taxable amount of each line is 963, and the tax rate is 3.8%. The unrounded tax amount for each line would be 36.59 and the rounded amount, using either the rounding method or the rounding up method, would be 37. If you added the rounded tax amount (37) for each line, the total would be 370. However, if you multiple the total of the taxable amount (9630) by the tax rate of 3.8%, the total is 365.94. In this example, you would pay more tax (370) than if the tax was calculated on the total amount.
To perform soft rounding, the system adds or subtracts the rounded off amount to the unrounded tax amount of the next line. The rounded off amount is the difference between the unrounded tax amount and the rounded tax amount. Then the system uses the rounding method that you specified (round, round up, or round off) to round the total of the rounded off amount from the first line and the unrounded amount of the second line. The system continues to add or subtract the rounded off amount to the unrounded tax amount for each successive line of the voucher or invoice.
For transactions in Japan for which you associate a rounding method to the tax rate area, the system first uses the tax rounding method that you specify in the Setup Rounding Options program and then applies soft rounding.
This table shows an example of how soft rounding works for 10 line items with a taxable amount of 963, a tax rate of 3.8%, and the rounding method for rounding tax amounts:
| Line | Unrounded Tax Amount and Rounded Off Amount from Previous Line | Rounded Tax Amount | Gross Amount |
|---|---|---|---|
| 1 | 36.59 | 37
.41 was added when the amount was rounded, so .41 must be subtracted from the next line. |
963 taxable amount + 37 rounded tax amount = 1000 |
| 2 | 36.59 − .41 = 36.18 | 36
.18 was subtracted when the amount was rounded, so .18 must be added to the next line. |
963 + 36 = 999 |
| 3 | 36.59 + .18 = 36.77 | 37
.23 was added when the amount was rounded, so .23 must be subtracted from the next line. |
963 + 37 = 1000 |
| 4 | 36.59 − .23 = 36.36 | 36
.36 was subtracted when the amount was rounded, so .36 must be added to the next line. |
963 + 36 = 999 |
| 5 | 36.59 + .36 = 36.95 | 37
.05 was added when the amount was rounded, so .05 must be subtracted from the next line. |
963 + 37 = 1000 |
| 6 | 36.59 − .05 = 36.54 | 37
.46 was added when the amount was rounded, so .46 must be subtracted from the next line. |
963 + 37 = 1000 |
| 7 | 36.59 − .46 = 36.13 | 36
.13 was subtracted when the amount was rounded, so .13 must be added to the next line. |
963 + 36 = 999 |
| 8 | 36.59 + .13 = 36.72 | 37
.28 was added when the amount was rounded, so .28 must be subtracted from the next line. |
963 + 37 = 1000 |
| 9 | 36.59 − .28 = 36.31 | 36
.31 was subtracted when the amount was rounded, so .31 must be added to the next line. |
963 + 36 = 999 |
| 10 | 36.59 + .31 = 36.90 | 37 | 963 + 37 = 1000 |
3.3.3 Prerequisite
The localization country code of the user entering the transaction must be set to JP (Japan) in the User Profile Revisions program.
3.3.4 Forms Used to Specify the Rounding Method in Japan
| Form Name | Form ID | Navigation | Usage |
|---|---|---|---|
| Work with Rounding Options | W75J504A | Rounding Setup (G75J04), Setup Rounding Options | Review and select existing records. |
| Rounding Options Revisions | W75J504B | Click Add on the Work with Rounding Options form. | Specify by company the rounding method to use for a tax rate area. |
3.3.5 Specifying a Tax Rate Method
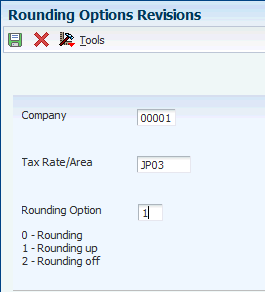
Access the Rounding Options Revisions form.
Figure 3-1 Rounding Options Revision form
Description of ''Figure 3-1 Rounding Options Revision form''
- Company
-
Specify the company for which you set up the record.
If the system does not find a record for the company and tax rate area of a transactions, it looks for a record for the tax rate area for company 00000. If the system does not find that record, it issues an error message in the Work Center.
- Tax Rate Area
-
Specify the tax rate area for which you set up the rounding option.
- Rounding Option
-
Specify the rounding option to use when rounding tax amounts. Values are:
0: Round. If the next decimal place of the unrounded tax amount is less than or equal to 4, then the decimal places after the specified decimal place are ignored. If the next decimal place of the unrounded tax amount is greater than or equal to 5, then the system adds 1 to the digit preceding the specified decimal and drops the digits after the specified decimal.
1: Round up. If any digits exist after the specified decimal place, the system adds 1 to the digit preceding the specified decimal and ignores the digits after the specified decimal.
2: Round off: The system calculates the tax, then drops all of the decimal places of the unrounded tax amount after the specified decimal to produce the final tax amount.
3.4 Setting Up Supplier Information for Japan
This section provides an overview of the additional supplier information required for Japan, lists prerequisites, and discusses how to set up supplier information.
3.4.1 Understanding Supplier Information for Japan
In Japan, in addition to the standard supplier information, you must set up information that is required to process drafts and bank transfers. This additional information includes:
-
Payee address number
-
Bank transfer type
-
Payment term
-
Withholding tax category
-
Draft ratio
| Table | Stored Information |
|---|---|
| Supplier Master (F0401) | Includes supplier information. |
| Address by Date (F0116) | Includes mailing address information. |
| Bank Transit Master (F0030) | Includes bank account information. |
| Japanese A/B Tag Table (F750401) | Includes additional address book information that is maintained by the country server for Japan. |
You can access the additional information for a supplier from the Supplier Master Information form when you add a new supplier to the system or change the information for an existing supplier.
|
Note: (Release 9.1 Update) While setting up the address book record of the supplier for Japan, you must set up the My Number assigned by the government in the Tax ID field. The system prints this number in the My Number column of the Withholding Tax Detail report (R7500100). |
3.4.2 Prerequisites
Before you complete the tasks in this section:
-
Set up payment terms for drafts.
-
Set up values in the Bank Transfer Type (75/TT) UDC table for transfer types.
3.4.3 Form Used to Set Up Supplier Information for Japan
| Form Name | Form ID | Navigation | Usage |
|---|---|---|---|
| Work With Supplier Master | W04012D | Supplier & Voucher Entry (G0411), Supplier Master Information | Select an existing record. |
| Supplier Master Revisions | W04012A | Locate and select an existing record, then click Select. | Access the Japan-specific address book form. |
| Address Book Revision Japan | W01054JPA | Select Regional Info from the Form menu. | Enter the supplier information for Japan. |
3.4.4 Setting Up Supplier Information for Japan
Access the Address Book Revision Japan form.
Figure 3-2 Address Book Revision Japan form
Description of ''Figure 3-2 Address Book Revision Japan form''
- Bank Transfer Type
-
Specify the type of bank transfer. You define bank transfer types in the Bank Transfer Type UDC (75/TT). Values are:
E: Express bank transfer with bank charge.
L: Letter bank transfer with bank charge.
7: Express bank transfer without bank charge.
8: Letter bank transfer without bank charge.
- Payment Terms
-
Enter the code that is used as a default payment term to calculate a maturity date when you create draft payments.
- Withholding Tax Category
-
Enter a tax category code that determines the withholding tax amount charged on professional services.
- Draft Ratio
-
Enter the percentage of the hankin hante payment that is split to a draft payment by Japan's automatic split (hankin hante) process. This number is expressed as a whole decimal. For example, 20 percent would be expressed as .2000.
3.5 Setting Up Withholding Schedules for Japan
Use the Withholding Revisions - Japan program to set up schedules for withholding for suppliers. You set up schedules for the different types of suppliers. For example, you might set up a schedule for a resident supplier and one for a non resident supplier.
This section lists the forms used to set up withholding and discusses how to set up withholding schedules.
3.5.1 Form Used to Set Up Withholding
| Form Name | Form ID | Navigation | Usage |
|---|---|---|---|
| Enter Withholding Information | W75014A | Japanese Localization (G75J), Withholding Revisions - Japan
Click Add on the Withholding Inquiry form. |
Set up withholding schedules. |
3.5.2 Setting Up Withholding Schedules
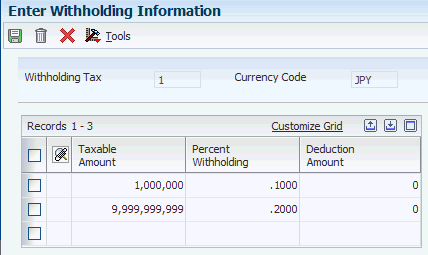
Access the Enter Withholding Information form.
Figure 3-3 Enter Withholding Amount form
Description of ''Figure 3-3 Enter Withholding Amount form''
- Withholding Tax
-
Enter the tax category code that determines the withholding tax amount charged on professional services.
- Currency Code
-
Enter the code that identifies the currency of a transaction.
- Taxable Amount
-
Enter the amount on which taxes are assessed.
- Percent Withholding
-
Enter the rate of withholding tax retained from a payment to a supplier. This number is expressed as a decimal. For example, 20 percent is expressed as .2000.
- Deduction Amount
-
Enter the amount that is deducted before calculating withholding tax on administrative professional services.
3.6 Setting Up the System for Hankin Hante Payments and Drafts for Japan
This section provides overviews of the required setup for hankin hante payments and the stamp tax table, lists prerequisites, and discusses how to:
-
Set up payment split and draft split amounts.
-
Set up the stamp tax table.
3.6.1 Understanding the Required Setup for Hankin Hante Payments
Before you automatically split hankin hante payments into drafts and bank transfer payments, or split drafts into smaller drafts, you must set up the Hankin Hante Split Amounts table (F75J04SA) with the split amounts for bank transfers and drafts. When you access the F75J04SA table using the Hankin Hante Split Amounts program (P75J0411), you select an option to specify whether to set up payment splits or draft splits. When you specify to set up payment splits, you create a list that the system uses to determine the amounts at which to split a hankin hante payment into a draft and a bank transfer. When you specify to set up draft splits, you create a list that the system uses to determine the amounts at which to split draft payments.
You must set up the F75J04SA table with a list of payment splits before you can run the Automatic Payment Split - Hankin Hante program (R75J04PS), and you must set up the F75J04SA table with a list of draft splits before you can run the Automatic Draft Split - Hankin Hante program (R75J04DS). If you do not set up the F75J04SA table with the appropriate lists, the Automatic Payment Split - Hankin Hante and Automatic Draft Split - Hankin Hante reports print an error message, and the programs do not split the payments or drafts.
Generally, you set up payment splits and draft splits once and modify them only when your company changes its hankin hante payment policy.
3.6.2 Understanding the Stamp Tax Table
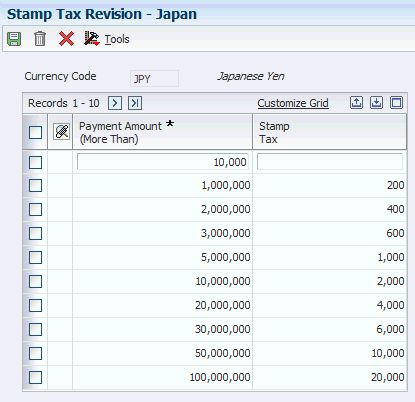
When businesses in Japan issue drafts for payment, they are required to pay a stamp tax. The tax amount depends on the amount of the draft.
To calculate and report on the stamp tax for accounts payable drafts, you must set up and maintain the Stamp Tax - Japan table (F75013) through the Stamp Tax Revision - Japan program (P75013).
|
Note: The Stamp Tax Revisions form is not a multicurrency form. The system recognizes only your company currency for the records in the F75013 table. |
3.6.3 Prerequisites
Before you complete the tasks in this section:
-
Assign the same payment instrument to each supplier for which you want to split payments into drafts and bank transfers.
-
Assign a draft ratio to each supplier.
3.6.4 Forms Used to Set Up Payment Split and Draft Split Amounts and the Stamp Tax Table
| Form Name | Form ID | Navigation | Usage |
|---|---|---|---|
| Set Up Hankin Hante Split Amounts | W75J0411A | Japanese Localization (G75J), Hankin Hante Split Amounts | Select Payments or Drafts.
Select Payments to set up or modify the split amounts that the system uses to determine the levels at which to split Accounts Payable payments into bank transfers and drafts. Select Drafts to set up or modify the split amount that the system uses to determine the levels at which to split drafts into smaller drafts. |
| Stamp Tax Revision - Japan | W75013A | Japanese Localization (G75J), Stamp Tax Revision - Japan | Revise the stamp tax table. |
3.6.5 Setting Up Payment Split and Draft Split Amounts
Access the Set Up Hankin Hante Split Amounts form.
Figure 3-4 Set Up Hankin Hante Split Amounts form

Description of ''Figure 3-4 Set Up Hankin Hante Split Amounts form''
- Payments
-
Select to specify that the split amount is for payments.
- Drafts
-
Select to specify that the split amount is for drafts.
- Split Amount
-
Enter the amount at which the system splits payments or drafts in the Hankin Hante process. The system stores split amounts for payments and drafts in the F75J04SA table.
The Automatic Payment Split - Hankin Hante program (R75J04PS) uses the split amounts to determine the level breaks for creating drafts and bank transfer payments.
When you run the R75J04PS program, the system:
-
Applies the value in the Draft Ratio (data item DRATIO) field that is specified for each payee to the selected AP payments to determine the maximum draft amount.
For example, if the draft ratio is 50 percent, then no more than 50 percent of the total payment can be a draft.
-
Reads the F75J04SA table to determine the highest split amount that is less than or equal to the result of applying the draft ratio to the payment.
For example, if payment split amounts are defined in 100,000 yen increments beginning with 100,000 yen, a payment of 420,000 yen with a 50 percent draft ratio is split into a 200,000 yen draft and a 220,000 bank transfer payment.
The Automatic Draft Split - Hankin Hante program (R75J04DS) uses the split amounts that you set up for drafts to split AP drafts into smaller drafts.
During the automatic draft split process, the original draft is split into two or more smaller drafts using either the split amounts that are identified here, or using a fixed amount. You set a processing option to specify whether the system uses the split amount levels in the F75J04SA table or a fixed amount at which to split a payment. If you use the levels in the F75J04SA table, each split uses the highest draft split amount that is stored in the table that is less than or equal to the remaining amount.
For example, if draft split amounts are defined in 200,000 yen increments beginning with 100,000 yen, a draft of 475,000 yen would be split into three drafts of 300,000 yen, 100,000 yen, and 75,000 yen.
-
3.6.6 Setting Up the Stamp Tax Table
Access the Stamp Tax Revision - Japan form.
Figure 3-5 Stamp Tax Revision - Japan form
Description of ''Figure 3-5 Stamp Tax Revision - Japan form''
- Payment Amount (More Than)
-
Enter the amount of the payment.
- Stamp Tax
-
Enter the amount that is assessed and payable to tax authorities. It is the total of the value-added tax, use, and sales taxes (PST).
3.7 Setting Up Payment Formats for Japan
This section provides overviews of payment formats for Japan, how to set up the system to use the Densai payment format, and how to set up the system to use the Maturity-Designated Payment format or factoring; and discusses how to:
-
Set processing options for the Create A/P Bank Tape - Japan (R04572JP) program.
-
Set processing options for the Print Automatic Payments - Draft Format (R04572N) program.
-
Set processing options for Create Maturity-designated Payment Bank tape – Japan (R04572JF).
-
Set processing options for Maturity-designated Payment bank Transfer Paper – Japan (R04573JF).
3.7.1 Understanding Payment Formats for Japan
JD Edwards EnterpriseOne software provides these payment formats for Japan:
| Format | Description |
|---|---|
| Payment formats | Specify the Create A/P Bank Tape - Japan program (R04572JP) or the Create Maturity-designated Payment Bank tape – Japan program (R04572JF) as the Write program to generate a payment format that is accepted by Japanese banks. |
| Attachments | Specify the Japan Bank Transfer Paper program (R04573JP) or the Maturity-designated Payment bank Transfer Paper – Japan program (R04573JF) as the Attachment program to generate attachments for accounts payable bank transfers for Japan. |
3.7.2 Understanding How to Set Up the System to Use the Densai Payment Format (Release 9.1 Update)
Densai is a new electronic settlement service rolled out by Densai.net in Japan. The electronically recorded monetary claims (ERMC) process provides a method for executing payments between domestic corporations in Japan. Densai.net accepts a wide range of businesses as users. Its users include small, medium-sized, and large enterprises, as well as individual proprietors.
Before you use any payment format, you must complete certain standard setup tasks. To set up the standard software to use the Japanese Densai payment format:
-
Set up the value P04572JD in the Produce Bank File (04/PP) UDC table.
-
Set up the value P04573JD in the Attachments Program – Payments (04/PA) UDC table.
3.7.3 Understanding How to Set Up the System to Use the Maturity-Designated Payment Format or Factoring
The maturity-designated payment format for Japan enables you to generate a bank file that meets the firm-banking format for Japan. If you require different data for a bank file, you must modify the format. You can also use the payment format to support factoring.
Before you use any payment format, you must complete certain standard setup tasks. To set up the standard software to use the Japanese maturity-designated payment format:
-
Set up a payment instrument in the 00/PY UDC table for the Create Maturity-designated Payment Bank tape – Japan program (R04572JF).
-
Set up the Maturity-designated Payment bank Transfer Paper – Japan program (R04573JF) in the Attachments Program – Payments (04/PA) UDC table.
-
Add the Create Maturity-designated Payment Bank tape – Japan program to the Produce Bank File (04/PP) UDC table.
You must add the program ID for the Create Maturity-designated Payment Bank tape – Japan program to this UDC table before you can specify the program as the payment program for in the Payment Instrument Defaults program (P0417). As with all payment formats, you enter the program ID with a leading character of P instead of R. For example, to enter the program ID for the Create Maturity-designated Payment Bank tape – Japan program, enter P0472JF instead of R0472JF.
-
Set up a value for the PDxx AAI to use for the maturity-designated payment format, where xx is the payment instrument that you use for the maturity-designated payment format.
For example, if MD is the payment instrument, set up an AAI for PDMD.
-
Associate the payment instrument and attachment with a version of the print program to use.
Note:
As with other print programs, the Create Maturity-designated Payment Bank tape – Japan program and the Maturity-designated Payment bank Transfer Paper – Japan program exist in the system as batch programs. Batch program IDs begin with R. However, when you enter the program IDs in the Set Up Payment Instrument Defaults form of the Payment Instrument Defaults program (P0417), you enter P as the first letter of the program ID instead of entering R. For example, you would enter P04573JF instead of R04572JF for the payment format.
Depending on whether you or your supplier uses multiple bank accounts, and whether you use automatic payment processing, you might need to set up other standard JD Edwards EnterpriseOne software. Refer to these chapters and sections in the release 9.0 implementation guides:
-
JD Edwards EnterpriseOne Financial Management Application Fundamentals, Setting Up Bank Accounts, Setting Up Bank Account Cross-References.
-
JD Edwards EnterpriseOne Accounts Payable 9.0 Implementation Guide, Entering Supplier Information, Setting Up Multiple Bank Accounts for Suppliers.
-
JD Edwards EnterpriseOne Accounts Payable 9.0 Implementation Guide, Entering Supplier Information, Assigning Payment Instrument and GL Account Relationships.
3.7.3.1 Factoring
Factoring is the sale of a company's receivables to a third party. The third party becomes the recipient of the payments made against the receivables. For example, if your supplier sells receivables to a third party (the factor), you might make your payments to the factor instead of the supplier. To accomplish this in the JD Edwards EnterpriseOne system, you would set up the factor as an alternate payee. As with any alternate payee, you must set up address book records and bank account information for the payee and specify the alternate payee when you process payments.
3.7.4 Setting Processing Options for Create A/P Bank Tape - Japan (R04572JP)
Processing options enable you to specify the default processing for programs and reports.
3.7.4.1 Tape
Use these processing options to specify the default values for the bank tape.
- Device Name
-
Specifies the name of the device.
- Tape Density
-
Specifies the density of the tape to be created, for example, 1600, 6250, and so on.
- Label Name
-
Specifies the Label Name.
- Block Size
-
Specifies the Block Length.
- New Volume
-
Specifies the New Volume name.
3.7.4.2 Tape (more)
- New Owner ID
-
Specifies the new owner ID.
- File Name
-
Specifies the name of a file as it is known to a program.
- Class Code
-
Use this processing option to specify the value to write to the APTA field in the file header. Values are:
0: The program populates the APTA field with 0 (JIS).
1: The program populates the APTA field with 1 (EBCDIC). If you leave the processing option blank, the program uses this value.
3.7.5 Setting Processing Options for Japan Bank Transfer Paper (R04573JP)
Processing options enable you to specify the default processing for programs and reports.
3.7.5.1 Date Selection
- Selection Number
-
Enter 01 to use the Japanese date format. If you leave this processing option blank, the system uses the Western date format.
3.7.6 Setting Processing Options for Create Maturity-designated Payment Bank tape - Japan (R04572JF)
Processing options enable you to specify the default processing for programs and reports.
3.7.6.1 Tape
Use these processing options to specify the default values for the bank tape.
- Device Name
-
Specifies the name of the device.
- Tape Density
-
Specifies the density of the tape to be created, for example, 1600, 6250, and so on.
- Label Name
-
Specifies the Label Name.
- Block Size
-
Specifies the Block Length.
- New Volume
-
Specifies the New Volume name.
3.7.6.2 Tape (more)
- New Owner ID
-
Specifies the new owner ID.
- File Name
-
Specifies the name of a file as it is known to a program.
- Code Section
-
Values are:
0: JIS
Blank or 1: EBCDIC
- Class Code
-
Specify whether the bank file is for test purposes. Values are:
22: Bank file is a test.
Blank or 23: Bank file is for processing.
3.7.7 Setting Processing Options for Maturity-designated Payment bank Transfer Paper – Japan (R04573JF)
Processing options enable you to specify default processing values.
3.7.7.1 Date selection
- Date format
-
Enter 01 to use the Japanese date format. If you leave this processing option blank, the system uses the Western-style date format.
3.8 Setting Up Life Months for Asset Conversion
This section provides an overview of the setup for life months and discusses how to:
-
Create the relationship between life months.
-
Import life month data from a spreadsheet.
3.8.1 Understanding the Setup for Life Months
When you set up user-defined depreciation, you specify the life months for the depreciation method. The life months is a value to express the life of the asset. For example, an asset that has a usable life of 5 years and that you depreciate on a 12-month calendar year would have a life month value of 60. Because of changes in the requirements for how assets are depreciated, you might need to convert the life months for an asset to a new value.
You use the Set Up for Life Month program (P75J503) to set up relationships between current life months and the life months to which you must convert the asset. You also specify the effective date of the relationship. The system saves the setup information to the Setup for Life Month table (F75J503). When you run the Assets acquired on or before March 31 - 2007 program (R75J501) or the Assets acquired on or after April 1 - 2007 program (R75J502), the system accesses the F75J503 table to determine the new value that the system writes to the Life Month field (data item ADLM) in the F1202 table. Alternatively, you can use a processing option in the Assets acquired on or before March 31 - 2007 program or the Assets acquired on or after April 1 - 2007 program to specify the new life month value.
You can set up different relationships between one current life month and numerous life months to which you might convert your assets. You use the Life Month Group Code field to differentiate between the relationships that you set up. You use a processing option in the Assets acquired on or before March 31 - 2007 program and Assets acquired on or after April 1 - 2007 program to specify which life month group code to use, and so specify which relationship to use. The combination of the life month group code and current month must be unique because the system uses those values to select the value of the new life month to write to the Asset Account Balances File table (F1012).
For example, you might enter values in the Set Up for Life Month program as shown in this table:
| Life Month Group Code | Life Month Before | Life Month After |
|---|---|---|
| 001 | 60 | 120 |
| 002 | 60 | 72 |
| 003 | 60 | 48 |
3.8.1.1 Importing Data from a Spreadsheet
You can import the data for the Set Up for Life Month program from a Microsoft Excel© spreadsheet instead of entering the data manually. When you import data:
-
The columns in the spreadsheet must be in the order that the data appears on the forms in the Set Up for Life Month program.
All fields are required. Your spreadsheet must have columns for each of the four fields, and the columns must contain data.
-
The data must be valid values in your JD Edwards EnterpriseOne system.
For example, the data that you import for the Life month group code field must be a valid value in the Life Month Group Code (75J/GS) UDC table, and the date for the Effective Date From field must be in the date format set up in your system.
If your data is not complete or is in an invalid format, you can change it in the Setup for Life Month - Import Assistant form after you import the data, but before save the data. If the data is not valid when you click Continue to save the data, the system displays an error message.
3.8.2 Forms Used to Set Up Life Months
| Form Name | Form ID | Navigation | Usage |
|---|---|---|---|
| Work with Setup for Life Month | W75J503A | Japan Fixed Assets (G75J12), Life Months Relation Setup | Review and select existing records. |
| Add Setup for Life Months | W75J503B | Click Add on the Work with Setup for Life Month form. | Specify the relationship between an existing life month for an asset and the life month to which the asset will be converted.
Note: You can enter only one relationship when you use this form. |
| Setup for Life Month | W75J503C | On the Work with Setup for Life Month form, select Multiple Life Month from the Form menu. | Manually enter multiple life month relationships. |
| Setup for Life Month - Import Assistant | n/a | On the Work with Setup for Life Month form, select Multiple Life Months from the Form menu.
On the Setup for Life Month form, select Import Grid Data from the Tools menu. |
Import data for life months from a spreadsheet. |
3.8.3 Setting Up Effective Dates for Life Months
Access the Add Setup for Life Months form or the Setup for Life Month form.
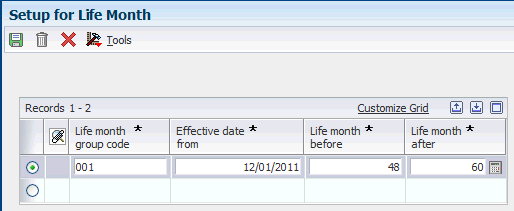
- Life month Group code
-
Enter a value that exists in the Life Month Group Code (75J/GS) UDC table to specify the group to which the relationship between the current and proposed life month exists. The system uses this value to identify which relationship includes the proposed life month that you want the system to write to the F1202 table.
- Effective Date From
-
Specify the date on which the relationship between the life month before and life month after becomes effective.
- Life Month Before
-
Enter the life month that is in effect prior to converting assets from one depreciation schedule to a new schedule.
- Life Month After
-
Enter the life month that the system writes to the F1202 table to replace the existing life month when you run the Assets acquired on or before March 31 - 2007 program or Assets acquired on or after April 1 - 2007 program.
3.8.4 Importing Life Month Data from a Spreadsheet
To import life month data from a spreadsheet:
Figure 3-7 Setup for Life Month - Import Assistant form
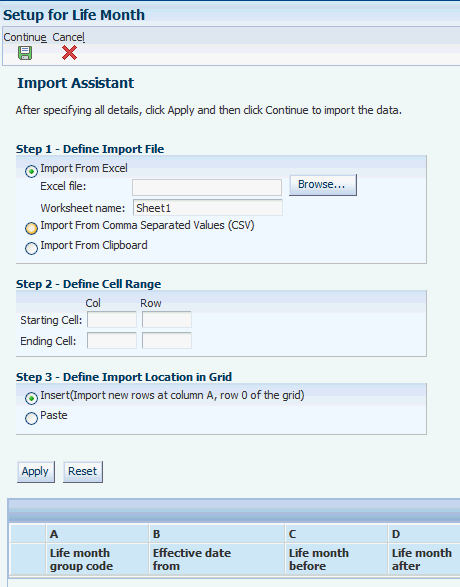
Description of ''Figure 3-7 Setup for Life Month - Import Assistant form''
-
Access the Setup for Life Month - Import Assistant form.
-
Select the Import from Excel option.
-
Use the Browse button to navigate to the spreadsheet, and select the spreadsheet.
-
Complete the fields in the Define Cell Range area to specify the range of cells to import.
-
Click Preview.
The system populates the fields for the life months with the data from the spreadsheet.
-
Review and change the information, if necessary, and then click Continue in the menu bar.
The system returns you to the Setup for Life Month form and completes the fields for the life months.