13 Manage Cases Mobile Application
This chapter discusses these topics:
-
Section 13.2, "Setting Up the Manage Cases Mobile Smartphone Application (M17510E)"
-
Section 13.3, "Using the Manage Cases Mobile Smartphone Application (M17510E)"
|
Important Note: Before using the mobile applications, Oracle strongly recommends that users have a complete understanding of how to use the associated processes and applications in the JD Edwards EnterpriseOne base software.For additional information about the processes and applications associated with the mobile applications discussed in this chapter, see: |
13.1 Manage Cases Mobile Application Overview
You use the Manage Cases mobile application (M17510E) to review your cases and to update cases. You can update the failure description, equipment, and site for a case. You can search for cases from your list of cases and filter cases from your list. You can view photos associated with the case, add new photos to the case, and delete existing photos.
This table lists the applications that are available for reviewing and updating cases:
| Type of Application | Additional Information |
|---|---|
| Base EnterpriseOne application | To review and update cases, use these applications in the JD Edwards EnterpriseOne system:
|
| Smartphone application | Manage Cases (M17510E)
To download the application to your device, search on the following text in the application store:
|
Before using the Manage Cases mobile application, you must set up the processing options for the Manage Cases mobile application (M17510E).
13.1.1 Differences and Limitations: Manage Cases
Mobile applications are intended to be a simplified version of the applications that are available in the base software. In most cases, these applications provide a subset of the functionality available in the base software.
The Manage Cases mobile application uses your login ID to search for cases you enter. After you log in to the smartphone application, your address number is populated in the Assignee filter field, and only your assigned cases are displayed. You can search for specific cases and filter cases from your list.
When you search for cases in the Work With Cases program (P17500), you can specify the search criteria across all cases to which you have access. Therefore, your search results in the mobile application can differ from the search results in the base application.
Barcode Scanning (Release 9.1 Update)
The Manage Cases mobile application (M17510E) is designed to scan data from a barcode and populate the equipment number in the Equipment field. To scan barcode data, you can use the native camera on your device or a third-party handheld Bluetooth-enabled scanning device. To use this functionality, you must create barcodes that represent a single field in the JD Edwards EnterpriseOne system. This application does not accept barcodes that consist of data for multiple fields.
You can generate barcodes using services such as those offered by Barcodes Inc.
|
Note: Oracle is not affiliated with Barcodes, Inc. and does not require or recommend that you use this service to create your barcodes. |
13.2 Setting Up the Manage Cases Mobile Smartphone Application (M17510E)
Before using the Manage Cases mobile smartphone application (M17510E), you must set up the processing option of the application in the JD Edwards EnterpriseOne system. You use the processing option to specify the version of the base application that you want to use.
Before you set up the processing option for the M17510E program, review the processing options for the Work With Case program (P17500). You review these processing options to verify the validity of the options in the specified version when you process case data by using the mobile device.
(Release 9.1 Update) You can use one of the following options to scan barcodes of equipment number:
-
Disable the Bluetooth option in the settings on your device if you want to use the native device camera to scan the barcodes of equipment number.
-
Enable the Bluetooth option if you want to use a Bluetooth-enabled scanning device to scan the barcodes of equipment number.
To scan barcodes using the Bluetooth scanning device, you must configure the scanning device to the mobile device.
13.2.1 Setting Processing Option for the Manage Cases Mobile Smartphone Application (M17510E)
You use processing options to specify default processing information for a program.
13.2.1.1 Versions
- 1. Work With Case (P17500) Version
-
Use this processing option to specify which version of the Work With Case program (P17500) the system uses. To process cases, the Manage Cases smartphone application (M17510E) uses the processing options of the version that you specify. If you leave this processing option blank, the system uses ZJDE0001.
- 2. Case Update (P90CG501) Version
-
Use this processing option to specify which version of the Case Update program (P90CG501) the system uses. To process cases, the Manage Cases smartphone application (M17510E) uses the processing options of the version that you specify. If you leave this processing option blank, the system uses ZJDE0001.
- 3. Equipment Address Location (P1704) Version
-
Use this processing option to specify which version of the Equipment Address Location program (P1704) the system uses. To process cases, the Manage Cases smartphone application (M17510E) uses the processing options of the version that you specify. If you leave this processing option blank, the system uses ZJDE0001.
- 4. User Defined Codes (P0004A) Version
-
Use this processing option to specify which version of the User Defined Codes program (P0004A) the system uses. To process cases, the Manage Cases smartphone application (M17510E) uses the processing options of the version that you specify. If you leave this processing option blank, the system uses ZJDE0001.
- 5. Case Entry (P17501E) Version
-
Use this processing option to specify which version of the Case Entry program (P17501E) the system uses. To process cases, the Manage Cases smartphone application (M17510E) uses the processing options of the version that you specify. If you leave this processing option blank, the system uses ZJDE0001.
13.2.2 Setting Up the Bluetooth Option in the Mobile Device to Scan Barcodes (Release 9.1 Update)
The Manage Cases smartphone application (M17510E) includes the Equipment field in two locations in the application. One is in the filter screen and another is in the Case Detail screen that displays when you select any case. You use the Equipment filter to filter records by equipment number. You can modify the equipment number of a case in the Equipment field that is displayed in the Case Detail screen.
You can populate the Equipment field (in the filter screen as well as in the Case Detail screen of a case) using the following options:
-
Use the keyboard on your mobile device to manually enter the data.
-
Use the camera application on your mobile device to scan the data. To use this option, you must disable the Bluetooth option in your device settings.
-
Use a Bluetooth-enabled scanning device to scan the data. To use this option, you must:
-
Enable the Bluetooth option in your device settings.
-
Configure the third-party scanning device to connect to your mobile device.
Note:
When you enable the Bluetooth option on your device, the system may disable the device's keyboard. -
13.3 Using the Manage Cases Mobile Smartphone Application (M17510E)
The Manage Cases mobile smartphone application enables you to review your cases and update the cases.
Before you can use the application, you must download and install the application from the application store on your device.
13.3.1 Reviewing and Updating Cases By Using a Mobile Smartphone Application
To review and update cases:
-
Open the application by tapping the Manage Case icon on your device, and then log in.
See Chapter 3, "Logging Into Mobile Enterprise Applications"
-
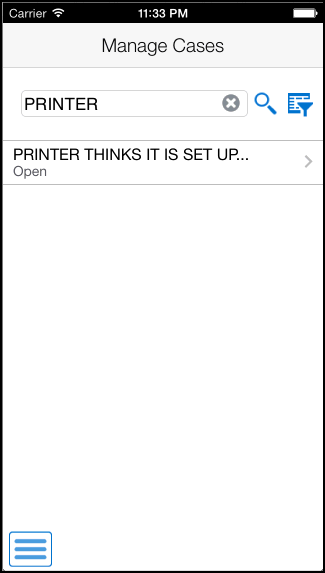
On the Manage Cases screen, review the cases on the list. For each case, the system displays the failure description and case status.
-
To search for a case, tap the Enter Issue Description search field, enter the issue description, and then tap the search icon. The search pulls up all cases that satisfy the search text.
-
To clear the search text that you entered and to go back to the list of cases, tap the clear icon inside the search field.
-
To filter cases, tap the filter icon that is next to the search icon.
- Begin Date
-
Tap the From and To dropdown menus and specify the begin date range that the system uses to search for cases.
- Assignee
-
Your address book number will be populated in this field by default. To search cases for a different assignee, you can use the search icon to search for a value and return it to the Assignee field. You can also manually enter the address book number of an assignee in the field.
- Equipment (Release 9.1 Update)
-
Enter data in the Equipment field using one of these options:
-
Use the keyboard on your mobile device to manually enter the data. Alternately, you can tap the search icon to search for an equipment. In the Equipment search screen, enter a description of the equipment in the Equipment field, and then tap the Search button. The system pulls up all records that satisfy the search text; select a piece of equipment. To discontinue the search and to go back to the Filters screen, tap the Cancel button.
-
Use the camera application on your mobile device to scan the data.
To use this option, tap the QR Code button next to the Equipment field. The system launches the device camera and you can scan the barcode of the equipment.
-
Use a Bluetooth-enabled scanning device to scan the data.
To use this option, tap the Equipment field to activate the scanning device. Then, scan the barcode of the equipment using the scanning device.
Note:
The Equipment field is designed to accept the asset that you identify with an identification symbol in the Fixed Assets Constants program (P001012).See Setting Up Fixed Asset Constants in the JD Edwards EnterpriseOne Applications Fixed Assets Implementation Guide.
For example, if the symbol to identify the serial number is "/" and the serial number is "4CE0460D0G"; then you need to enter "/4CE0460D0G" in the Equipment field to search and select a piece of equipment.
-
- Customer
-
To add a customer to your search criteria, you can use the search icon to search for a value and return it to the Customer field. You can also manually enter the address book number of a customer in the field.
To search for a customer, tap the search icon. In the Address Book search screen, you can use a combination of the customer name and search type to search for a customer. After you specify values for your search, tap the Search button. The system pulls up all records that satisfy the search criteria.
To discontinue the search and to go back to the Filters screen, tap the Cancel button.
To return a value back to the Customer field, tap the customer record from the search result.
- Status
-
Tap the From and To dropdown menus and specify the status range that the system uses to search for cases.
-
In the Filters screen, to continue the search using the specified filter values, tap the Apply button. When you tap the Apply button, the system:
-
Takes you to the list of cases that are displayed based on your filter values.
-
Saves the filter values that you entered. The system displays the saved filter values the next time you open the filter screen.
To discontinue the use of filter values in your search, tap the Cancel button. When you tap the Cancel button, the system:
-
Takes you to the list of cases associated with the last saved filter values, if applicable.
-
Ignores the filter values that you entered, and restores the last saved filter values to the filter fields.
To delete all filter values you specified, and to enter new filter values, tap the Clear button.
-
-
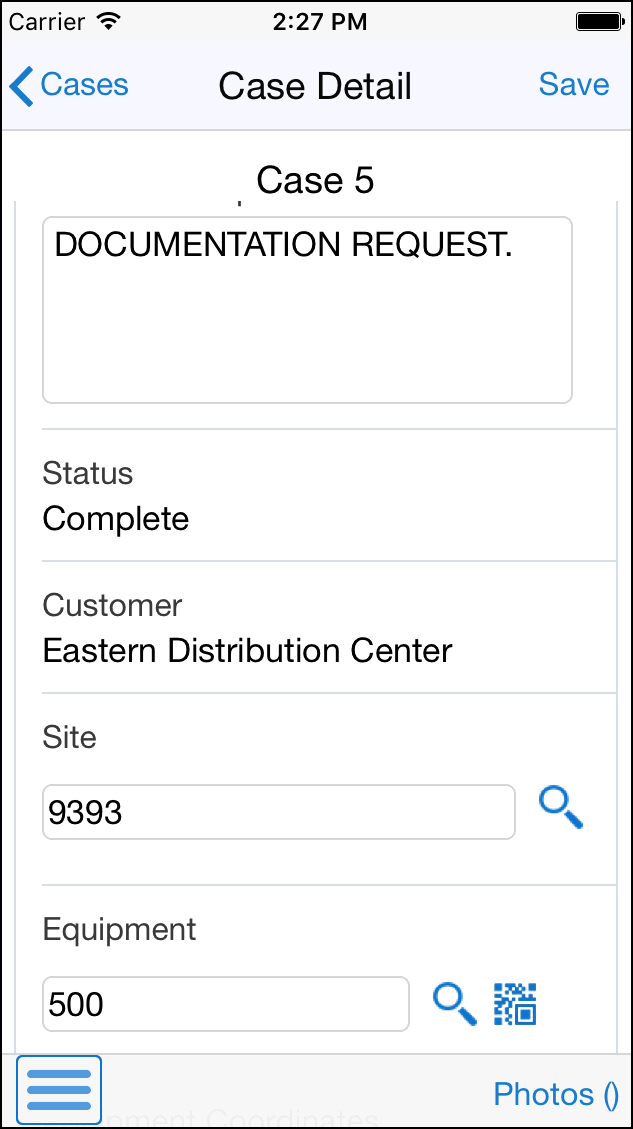
To review and update a case, tap the case from the list.
The system takes you to the Case Detail screen and you can review information about the case.
-
You can update the values in the Failure Description, Site, and Equipment fields. Use the search icon to search for a site and equipment.
You can also use QR Code button next to the Equipment field to scan the barcode of the equipment. See Section 13.3.1, "Enter data in the Equipment field using one of these options:".
-
Tap the Map link in the Equipment Coordinates section to use the device's map feature.
Note:
The system displays the Map link only if the latitude and longitude values are available for the location in the Equipment Master Address Locations program (P1704). -
To cancel your changes and to go back to the Manage Cases screen, tap the Cancel button.
-
To save your changes, tap the Save button.
-
To view photos attached to the case, tap the Photos button. The number displayed on the Photos button represents the total number of photos related to the case.
After you tap the Photos button, the system displays the Photos screen, and the photos attached to the case are displayed as icons.
Note:
If photos are not available for the case, the Photos button will be displayed as the Add Photo button. When you tap the Add Photo button, the system displays the Camera and the Album options on the Case Detail screen. -
To view a photo, tap the photo icon.
You can delete existing photos attached to the case.
-
To add a photo, tap the Add button on the Photos screen. The system displays two options: Album and Camera.
To attach an existing photo from your device's photo gallery to the work order, tap the Album option.
To take a new photo, tap the Camera option to use the device's camera feature.
You can add a description of the photo.
-
After you tap the Save button in the New Photo screen, the system adds the photo to the list of photos, and increments the number of photos available by 1 (One) in the Photos button.
-
To go back to the Manage Cases screen, tap the Cases button.
-
To log out of the application, tap the menu button at the bottom left of the screen, and then tap Logout.