14 Manage Customer Equipment Mobile Applications
This chapter discusses these topics:
-
Section 14.1, "Manage Customer Equipment Mobile Applications Overview"
-
Section 14.2, "Setting Up the Manage Customer Equipment Mobile Application"
-
Section 14.3, "Using the Manage Customer Equipment Mobile Tablet Application"
-
Section 14.4, "Using the Manage Customer Equipment Mobile Smartphone Application"
|
Important Note: Before you use the mobile applications, Oracle strongly recommends that you have a complete understanding of how to use the associated processes and applications in the JD Edwards EnterpriseOne base software.For additional information about the processes and applications associated with the mobile applications discussed in this chapter, see:
|
14.1 Manage Customer Equipment Mobile Applications Overview
The Manage Customer Equipment mobile applications for tablet and smartphone enable you to search for equipment details as a subset of the equipment master information and to add notes. The Manage Customer Equipment applications enable you to see the key equipment information. Examples are:
-
Equipment details
-
Description
-
Site Number
-
Acquired and In Service dates
-
Status
In the mobile applications for Manage Customer Equipment, you can view detailed information, and also update the data in the Equipment Status and Site Number fields. The device updates the equipment status in the Asset Master File (F1201) and Status History File (F1307) tables, and the site number in the F1201 and Equipment Master Location History (F1731) tables.
You can use the Manage Customer Equipment mobile applications to search for equipment that is in proximity to your location or to a reference point. The system displays an interactive map indicating the location of all the equipment within the radius that you specify. You can drill down further to view the details of a piece of equipment.
This table lists the applications that are available to review and update equipment details:
| Type of Application | Additional Information |
|---|---|
| Base EnterpriseOne application | Use these applications in the JD Edwards EnterpriseOne system to review and update customer equipment details:
|
| Tablet application | Manage Customer Equipment (M17060)
To download the tablet application to your tablet device, search on the following text in the application store:
|
| Smartphone application | Manage Customer Equipment (M17061)
To download the smartphone application to your smartphone device, search on the following text in the application store:
|
14.1.1 Differences and Limitations: Equipment Search Results
Mobile applications are intended to be a simplified version of the applications that are available in the base software. In most cases, these applications provide a subset of the functionality available in the base software.
Adding New Notes
When you work with notes for customer equipment, the Manage Customer Equipment mobile application uses the existing text attachments that are read-only. If you add any text to the existing notes, the device appends the new text to the existing text attachments for notes. You cannot change the already existing notes for any equipment.
Searching Equipment Based on Proximity (Release 9.1 Update)
To search for equipment within a specific proximity to your location or another reference point, you use the Location Services functionality available in the Manage Customer Equipment mobile applications.
You can search for equipment based on their proximity to your current location, a specific street address, or a specific equipment's location. You can also specify a specific number of miles or kilometers as the radius for the search. The search is done based upon the coordinates (latitude and longitude) of the reference location and those of your equipment. In order to use your current location as the reference point, you must allow the application to access your location on your device.
Barcode Scanning (Release 9.1 Update)
The Manage Customer Equipment tablet application (M17060) and the Manage Customer Equipment smartphone application (M17061) are designed to scan data from a barcode and populate the equipment number in the Equipment Number field. To scan barcode data, you can use the native camera on your device or a third-party handheld Bluetooth-enabled scanning device. To use this functionality, you must create barcodes that represent a single field in the JD Edwards EnterpriseOne system. This application does not accept barcodes that consist of data for multiple fields.
You can generate barcodes using services such as those offered by Barcodes Inc.
|
Note: Oracle is not affiliated with Barcodes, Inc. and does not require or recommend that you use this service to create your barcodes. |
14.2 Setting Up the Manage Customer Equipment Mobile Application
Before you use the Manage Customer Equipment application, you must set the processing options for the application. If the processing options for the mobile applications are not set to determine which version to use for the Work With Equipment Master program (P1701), then the Equipment mobile applications for tablet and smartphone use the ZJDE0001 version of the Work With Equipment Master program.
To locate equipment in your proximity using the mobile applications, you must specify the latitude and longitude of each piece of equipment in the Work With Equipment Master program (P1701).
|
Note: If you want the system to auto-populate the Latitude and Longitude fields in the Work With Equipment Master program (P1701), you use the pre-built JD Edwards EnterpriseOne Update Equipment Location Internet of Things (IoT) orchestration.See Update Equipment Location in the JD Edwards EnterpriseOne Applications Business Interfaces Implementation Guide |
(Release 9.1 Update) End users of mobile applications can also set up user preferences to search for equipment within a user-defined proximity. These preferences enable users to show or hide equipment within a specific proximity to your location or another reference point.
(Release 9.1 Update) You can use one of the following options to scan barcodes of equipment number:
-
Disable the Bluetooth option in the settings on your device if you want to use the native device camera to scan the barcodes of equipment number.
-
Enable the Bluetooth option if you want to use a Bluetooth-enabled scanning device to scan the barcodes of equipment number.
To scan barcodes using the Bluetooth scanning device, you must configure the scanning device to the mobile device.
14.2.1 Setting Processing Options for the Service Equipment Mobile Tablet Application (M17060)
You use processing options to specify default processing information for a program.
14.2.1.1 Versions
- 1. Equipment Master (P1701) Version
-
Use this processing option to specify the version of the Work With Equipment Master program that you want to run while running the Manage Customer Equipment mobile application for tablet. If you leave it blank, the device uses the ZJDE0001 version.
- 2. Equipment Master Revisions (P1702) Version
-
Use this processing option to specify the version of the Equipment Master Revisions program that you want to run while running the Manage Customer Equipment mobile application for tablet. If you leave it blank, the device uses the ZJDE0001 version.
- 3. Address Book (P01012) Version
-
Use this processing option to specify the version of the Address Book program that you want to run while running the Manage Customer Equipment mobile application for tablet. If you leave it blank, the device uses the ZJDE0001 version.
- 4. Equipment Address Location (P1704) Version
-
Use this processing option to specify the version of the Equipment Address Master Location program that you want to run while running the Manage Customer Equipment mobile application for tablet. If you leave it blank, the device uses the ZJDE0001 version.
- 5. Equipment Detail (P1702E) Version
-
Use this processing option to specify the version of the Equipment Detail program that you want to run while running the Manage Customer Equipment mobile application for tablet. If you leave it blank, the device uses the ZJDE0001 version.
- 6. Equipment PM Backlog (P12071E) Version
-
Use this processing option to specify the version of the PM Backlog program that you want to run while running the Manage Customer Equipment mobile application for tablet. If you leave it blank, the device uses the ZJDE0001 version.
- 7. Equipment Repair History (P48201E) Version
-
Use this processing option to specify the version of the Repair History program that you want to run while running the Manage Customer Equipment mobile application for tablet. If you leave it blank, the device uses the ZJDE0001 version.
- 8. Meter Reading (P12120E) Version
-
Use this processing option to specify the version of the Meter Readings program that you want to run while running the Manage Customer Equipment mobile application for tablet. If you leave it blank, the device uses the ZJDE0001 version.
- 9. Equipment Proximity (P1731P) Version
-
Use this processing option to specify the version of the Equipment Proximity program (P1731P) that you want to use to locate equipment within a user-defined radius. If you leave this processing option blank, the system uses the ZJDE0001 version.
14.2.2 Setting Processing Options for the Service Equipment Mobile Smartphone Application (M17061)
You use processing options to specify default processing information for a program.
14.2.2.1 Versions
- 1. Equipment Master (P1701) Version
-
Use this processing option to specify the version of the Work With Equipment Master program that you want to run while running the Manage Customer Equipment mobile application for smartphone. If you leave it blank, the device uses the ZJDE0001 version.
- 2. Equipment Master Revisions (P1702) Version
-
Use this processing option to specify the version of the Equipment Master Revisions program that you want to run while running the Manage Customer Equipment mobile application for smartphone. If you leave it blank, the device uses the ZJDE0001 version.
- 3. Address Book (P01012) Version
-
Use this processing option to specify the version of the Address Book program that you want to run while running the Manage Customer Equipment mobile application for smartphone. If you leave it blank, the device uses the ZJDE0001 version.
- 4. Equipment Address Location (P1704) Version
-
Use this processing option to specify the version of the Equipment Address Master Location program that you want to run while running the Manage Customer Equipment mobile application for smartphone. If you leave it blank, the device uses the ZJDE0001 version.
- 5. Equipment Detail (P1702E) Version
-
Use this processing option to specify the version of the Equipment Detail program that you want to run while running the Manage Customer Equipment mobile application for smartphone. If you leave it blank, the device uses the ZJDE0001 version.
- 6. Equipment Proximity (P1731P) Version
-
Use this processing option to specify the version of the Equipment Proximity program (P1731P) that you want to use to locate equipment within a user-defined radius. If you leave this processing option blank, the device uses the ZJDE0001 version.
14.2.3 Setting Processing Options for the Equipment Proximity Program (P1731P)
You use processing options to specify default processing information for a program.
14.2.3.1 Default
- Unit of Measure for Distance
-
Use this processing option to specify the unit of measure for the radius within which the system locates the equipment. Values are:
MI: Mile
KM: Kilometer
If you leave this processing option blank, the system uses MI (Mile) as the default unit of measure.
- Proximity
-
Use this processing option to specify the numerical value for the radius within which the system locates the equipment. The center of the radius is always the reference point; the reference point can be your location, or can be user-defined.
The numerical value in this field uses the unit of measure specified in the Unit of Measure for Distance processing option.
If you leave this processing option blank, the system uses 10 as the default proximity.
14.2.3.2 Versions
- 1. Equipment Master Revisions (P1702) Version
-
Use this processing option to specify the version of the Equipment Master Revisions program (P1702) that you want to use to retrieve equipment information. If you leave this processing option blank, the system uses the ZJDE0001 version.
- 2. Equipment Details (P1702E) Version
-
Use this processing option to specify the version of the Equipment Details program (P1702E) that you want to use to retrieve equipment information. If you leave this processing option blank, the system uses the ZJDE0001 version.
- 3. Address Book (P01012) Version
-
Use this processing option to specify the version of the Address Book program (P01012) that you want to use to retrieve the site address of the equipment. If you leave this processing option blank, the system uses the ZJDE0001 version.
- 4. Meter Readings (P12120E) Version
-
Use this processing option to specify the version of the Meter Readings program (P12120E) that you want to use to retrieve meter readings information of the equipment. If you leave this processing option blank, the system uses the ZJDE0001 version.
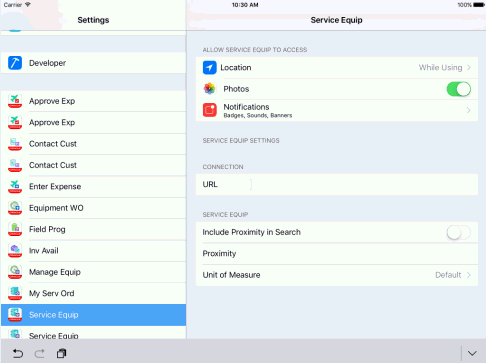
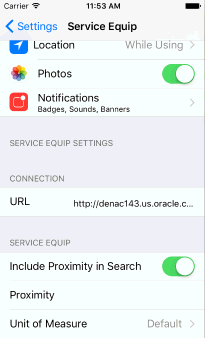
14.2.4 Setting User Preferences for the Manage Customer Equipment Mobile Applications
You set up the user preferences for the Manage Customer Equipment mobile applications to locate equipment within a radius. To set these preferences, access Settings on your mobile device, select the application you want to configure, and set each of these fields:
-
Location: Enable this option to allow the mobile application to access the device's location. If you do not enable this option, you must manually enter the geographical coordinates of your location (or of a different location) to use as the reference point.
-
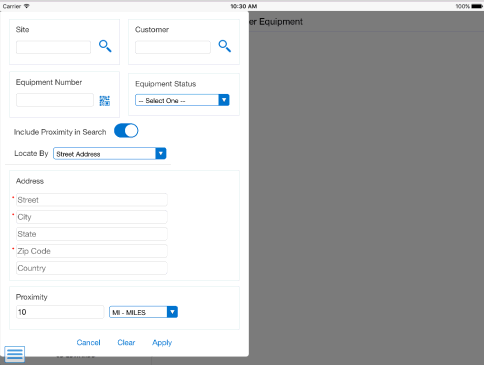
(Release 9.1 Update) Include Proximity in search: You set up user preferences for the Manage Customer Equipment mobile applications to search for equipment located within a radius. To set these preferences, access the Setting screen on your mobile device, and set the Include Proximity in Search option to On (display) or Off (do not display). After you enable the Include Proximity in Search option, you can set the Proximity and Unit of Measure preference fields.
-
Proximity: Enter a numerical value for the radius within which the system locates the equipment. The center of the radius is the reference point; the reference point can be your location, or can be user-defined.
-
Unit of Measure: Specify whether to use Mile or Kilometer for the radius (proximity) within which the system locates the equipment. The default unit of measure is Mile.
Figure 14-1 Setting User Preferences in a Tablet
Description of ''Figure 14-1 Setting User Preferences in a Tablet''
Figure 14-2 Setting User Preferences in a Smartphone
Description of ''Figure 14-2 Setting User Preferences in a Smartphone''
For instructions about accessing the settings on your mobile device, see the user documentation for your device.
|
Note: Entering connection information in the URL field is discussed in a separate task. See Chapter 3, "Logging Into Mobile Enterprise Applications" |
14.2.5 Setting Up the Bluetooth Option in the Mobile Device to Scan Barcodes (Release 9.1 Update)
The Manage Customer Equipment tablet application (M17060) and the Manage Customer Equipment smartphone application (M17061) include the Equipment Number field in the filter screens of the applications. You use the Equipment Number filter to filter records by equipment number.
You can populate the Equipment Number field using the following options:
-
Use the keyboard on your mobile device to manually enter the data.
-
Use the camera application on your mobile device to scan the data. To use this option, you must disable the Bluetooth option in your device settings.
-
Use a Bluetooth-enabled scanning device to scan the data. To use this option, you must:
-
Enable the Bluetooth option in your device settings.
-
Configure the third-party scanning device to connect to your mobile device.
Note:
When you enable the Bluetooth option on your device, the system may disable the device's keyboard. -
14.3 Using the Manage Customer Equipment Mobile Tablet Application
The Manage Customer Equipment tablet application enables you to search the equipment, view details, and update the number and site number of equipment. In addition, the Manage Customer Equipment tablet application also enables you to:
-
View Preventive Maintenance (PM) backlog details.
-
View repair history through equipment work orders.
-
View current meter readings and enter either new readings or net increases for a single piece of equipment. You use meter readings to monitor equipment use and to initiate maintenance tasks.
-
View or add notes pertaining to a piece of equipment.
-
View, add, or delete photos for equipment.
-
Search for equipment within a user-defined proximity (Release 9.1 Update).
Before you can use the Manage Customer Equipment application for tablet, you must download the application from the application store and install it on your tablet device.
14.3.1 Reviewing Equipment Details Using the Manage Customer Equipment Mobile Tablet Application
To review service equipment:
-
Open the application by tapping the Service Equip icon on your device, and log in.
See Chapter 3, "Logging Into Mobile Enterprise Applications"
-
To locate equipment that is in proximity to you (or to a user-defined reference point), tap the Locate Equipment link at the top right of the screen.
For instructions about locating equipment in your proximity, see Section 14.3.2, "Searching for Equipment within a User-Defined Proximity Using the Manage Customer Equipment Mobile Tablet Application (Release 9.1 Update)"
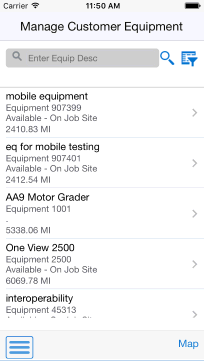
-
From the Manage Customer Equipment home screen, enter the description partially or in whole in the Enter Equip Desc field to narrow the search for a specific piece of equipment. Then, tap the Search button next to the Enter Equip Desc field to search for equipment by description. Alternately, you can leave the Enter Equip Desc field empty and tap the Search button to retrieve all equipment. When you click the Search button, the system displays the details of the first record in the right pane of the Manage Customer Equipment screen.
To clear the description in the Enter Equip Desc field, tap the Clear button.
-
To review details about a specific piece of equipment, tap the equipment from the equipment list.
Figure 14-3 Service Equipment Tablet: Customer Equipment Details
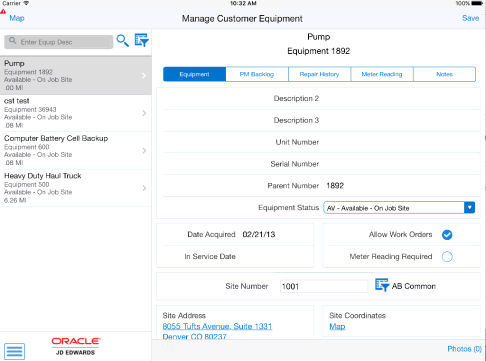
Description of ''Figure 14-3 Service Equipment Tablet: Customer Equipment Details''
-
To search details of a specific piece of equipment by site, customer, status, or by a specific equipment number, tap the Filter button next to the Enter Equip Desc field.
- Site
-
This field retrieves the equipment based on the address book number of the site location.
Enter the address book number in the Site field.
Alternately, tap the Search button next to the Site field, and then tap the Search button on the Address Book Search window. You can also search by entering a description or address book type.
The device displays address book numbers based on your search. Tap the address book number that you want to select.
- Customer
-
This field retrieves the equipment based on the address book number of the customer. Enter a customer in the Customer field.
Alternately, tap the Search button. Enter description for a customer in the Customer field and tap the Search button on the Customer Address window. The device displays address book numbers based on your search. Tap the customer that you want to select.
- Equipment Status
-
This field retrieves the equipment list based on the status assigned to the equipment record. To search for equipment by status, tap the Equipment Status drop-down menu and select a status. The device retrieves the list of equipment with the selected status.
- Equipment Number
-
This field retrieves the equipment list based on the equipment number. To search for equipment by number, tap the Equipment Number field and enter a value for equipment number. The device retrieves the equipment with the specific equipment number.
- Equipment Number (Release 9.1 Update)
-
This field retrieves the equipment list based on the equipment number. Enter data in the Equipment Number field using one of these options:
-
Use the keyboard on your mobile device to manually enter the data. Alternately, you can tap the search and select button to search and select a piece of equipment.
-
Use the camera application on your mobile device to scan the data.
To use this option, tap the QR Code button next to the Equipment Number field. The system launches the device camera and you can scan the barcode of the equipment.
-
Use a Bluetooth-enabled scanning device to scan the data.
To use this option, tap the Equipment Number field to activate the scanning device. Then, scan the barcode of the equipment using the scanning device.
-
Note:
The Equipment Number field is designed to accept the asset that you identify with an identification symbol in the Fixed Assets Constants program (P001012).See Setting Up Fixed Asset Constants in the JD Edwards EnterpriseOne Applications Fixed Assets Implementation Guide.
For example, if the symbol to identify the serial number is "/" and the serial number is "4CE0460D0G"; then you need to enter "/4CE0460D0G" in the Equipment Number field to search and select a piece of equipment.
-
To select a piece of equipment, tap the equipment from the equipment list on the left pane.
-
To update the equipment details, perform these steps:
-
To update the equipment status, tap the Equipment Status drop-down menu on the right side of the screen and select a different status.
-
To update the site number, tap the Site Number field and enter the new site number.
Alternately, tap the Search button. Enter an address book description in the Name field, tap the Search button on the Address Book window, and then tap the site number to update.
-
Tap the Save button.
-
-
Tap the data in the Site Address section of the screen to use the map or navigational features of your device.
-
To view photos for the selected piece of equipment, tap Photos at the bottom of the right pane. The device displays the list of photos for the selected piece of equipment on the Equipment Photos screen, with the first photo from the list displayed on the right pane. Tap the photo that you want to view.
Note:
The number displayed on the Photos button represents the total number of photos related to the piece of equipment. If you add or delete photos from the photo list, this number changes accordingly. -
To delete a photo, tap the photo you want to delete. Tap the Delete button on the Equipment Photos screen.
-
To add photos to the equipment record, tap the Add button on the Equipment Photos screen. The device displays a popup with two options: Album and Camera.
To attach an existing photo from your device's photo gallery, tap the Album option and then select the photo you want to attach. On the New Photo screen, enter a name for the photo and tap the Save button.
To take a new photo, tap the Camera option to use the device's camera feature.
-
Tap the Back button on the Equipment Photos screen to return to the Manage Customer Equipment screen.
-
To review the Preventive Maintenance (PM) backlog details for the selected piece of equipment, tap the PM Backlog tab.
Note that you cannot use the Manage Customer Equipment application to make any changes to the PM backlog details.
-
To review the repair history of the selected piece of equipment, tap the Repair History tab. The device displays all work orders for the piece of equipment.
To narrow the search by work order status, tap the Work Order Status drop-down menu, and then tap a status to select. The device displays work orders with the specified status.
Note that you cannot use the Manage Customer Equipment application to make changes to the repair history of a piece of equipment.
-
To review or update the Meter Reading of the selected equipment, tap the Meter Reading tab.
Enter the new reading and/or the net increase for any of the meters for the piece of equipment, and then tap the Save button.
-
To enter notes and view notes history, tap the Notes tab. Tap the New Notes field to enter new notes. The system appends the new notes to the previous notes that display in the Notes History section.
-
To log out of the application, tap the menu button at the bottom left of the screen, and then tap Logout.
14.3.2 Searching for Equipment within a User-Defined Proximity Using the Manage Customer Equipment Mobile Tablet Application (Release 9.1 Update)
This task outlines the steps to search for equipment within a user-defined proximity to your location or to a reference point by using the Manage Customer Equipment mobile tablet application.
To locate equipment in your proximity:
-
Open the application by tapping the Service Equip icon on your device, and then log in. See Chapter 3, "Logging Into Mobile Enterprise Applications"
-
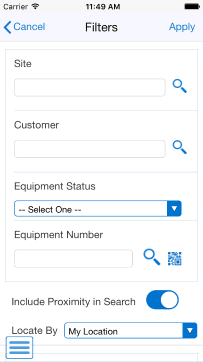
To search for equipment within a user-defined proximity or a reference point, tap the Filter button at the top left of the screen.
-
To filter equipment records by site, customer, or equipment number, enter data in the Site and Equipment Number or Customer fields.
-
To turn on or turn off the Include Proximity in Search option, click the toggle button.
-
To refine your search, tap the Locate By drop-down button.
On the filters screen, the Locate By drop-down menu provides three options: My Location, Street Address, and Site. The system displays the My Location option by default and populates default values in these fields: Proximity, Latitude, and Longitude.
- My Location
-
Select this option from the Locate By drop-down menu to allow the mobile application to access the device's location.
- Street Address
-
Select this option from the Locate By drop-down menu to allow the mobile application to access the device's location based on the equipment's address.
- Proximity
-
The system populates these fields with the values that you have set up in the user preferences for the application. If you have not specified the default values in the preferences, the system populates the values from the processing options for the Equipment Proximity program (P1731P). The system filters equipment that is located within the radius specified in the Proximity field.
To search for equipment using a different radius, tap the Proximity field and enter a new value.
-
In the Filters screen, to continue the search using the specified filter values, tap the Apply button. When you tap the Apply button, the system:
-
Takes you to the list of equipment and the map that is displayed based on the updated proximity, latitude, and longitude filter values.
-
Saves the filter values that you entered. The system displays the saved filter values the next time you open the filter screen.
To discontinue the use of filter values in your search, tap the Cancel button. When you tap the Cancel button, the system takes you to the list of equipment associated with the last saved filter values, if applicable.
To delete all filter values you specified and to enter new filter values, tap the Clear button.
-
-
On the Manage Customer Equipment screen, the system displays a list of equipment and a map link on the top-left corner on the left pane.
-
On the Details screen, to view equipment locations on the map, click the Map link on the top-left corner of the screen.
On the Map screen, the system displays the list of equipment records in the left pane based on the filter values and a map with markers for each equipment location in the right pane.
The location of each piece of equipment on the left pane is indicated on the map by a red marker. This equipment is located within the radius that you have defined in the application preference, or in the Proximity processing option for the Equipment Proximity program (P1731P). The blue marker on the map indicates your location or the reference point.
You can zoom in and zoom out on the map. You can also view the street image of a location by tapping the street view icon (yellow man) on the top-left of the map.
-
To view the details of the equipment, you must select an Equipment record. You can select the equipment records either by tapping the equipment record from the list on the left pane, or by tapping the red marker for the equipment record on the map in the right pane.
When you select the equipment record on the map, the red marker for the equipment record turns to green.
The system displays a blue maker for your location or the reference point, and a red marker for each equipment within the specified filter range.
-
To view the details of the equipment, tap the green marker. The system displays a window that has basic information about the equipment (such as the equipment name and number, equipment location address and geocodes, and the phone number) and a Details link. To access the equipment details screen, tap the Details link.
-
To view the equipment details of a different equipment, tap the equipment record from the list on the left pane. You can also select a different equipment by going back to the home-screen map and selecting the equipment marker on the map.
14.4 Using the Manage Customer Equipment Mobile Smartphone Application
The Manage Customer Equipment smartphone application (M17061) enables you to search equipment, view details, and update the status and site of equipment on a mobile smartphone. In addition, the application enables you to view or add notes pertaining to a piece of equipment, and also to view, add, or delete photos for equipment.
Before you can use the Manage Customer Equipment application for smartphone, you must download and install the application from the application store on your smartphone device.
14.4.1 Reviewing Equipment Details Using the Equipment Mobile Smartphone Application
To review service equipment details:
-
Open the application by tapping the Service Equip icon on your device, and log in.
See Chapter 3, "Logging Into Mobile Enterprise Applications"
-
From the Manage Customer Equipment home screen, enter the description partially or in whole in the Enter Equip Desc field to narrow the search for a specific piece of equipment. Then, tap the Search button next to the Enter Equip Desc field to search for equipment by description. Alternately, you can leave the Enter Equip Desc field empty and tap the Search button to retrieve all equipment.
-
To locate equipment that is in proximity to you (or to a user-defined reference point), tap the Locate Equipment link at the bottom right of the screen.
For instructions about locating equipment within proximity, see Section 14.4.2, "Searching for Equipment within a User-Defined Proximity Using the Manage Customer Equipment Mobile Smartphone Application (Release 9.1 Update)"
-
To search details of a piece of equipment by site, customer, status, or by a specific equipment number, tap the Filter button next to the Enter Equip Desc field.
- Site
-
This field retrieves the equipment based on the address book number of the site location.
Enter the address book number in the Site field.
Alternately, tap the Search button next to the Site field, and then tap the Search button on the Address Book Search window. You can also search by entering a description or address book type.
The device displays address book numbers based on your search. Tap the address book number that you want to select.
- Customer
-
This field retrieves the equipment based on the address book number of the customer. Enter a customer in the Customer field.
Alternately, tap the Search button. Enter description for a customer in the Customer field, tap the S button on the Customer Address window. The device displays address book numbers based on your search. Tap the customer that you want to select.
- Equipment Status
-
This field retrieves the equipment list based on the status assigned to the equipment record. To search for equipment by status, tap the Equipment Status dropdown menu and select a status. The device retrieves the list of equipment with the selected status.
- Equipment Number
-
This field retrieves the equipment list based on the equipment number. To search for equipment by number, tap the Equipment Number field and enter a value for equipment number. The device retrieves the equipment with the specified equipment number.
- Equipment Number (Release 9.1 Update)
-
This field retrieves the equipment list based on the equipment number. Enter data in the Equipment Number field using one of these options:
-
Use the keyboard on your mobile device to manually enter the data. Alternately, you can tap the search and select button to search and select a piece of equipment.
-
Use the camera application on your mobile device to scan the data.
To use this option, tap the QR Code button next to the Equipment Number field. The system launches the device camera and you can scan the barcode of the equipment.
-
Use a Bluetooth-enabled scanning device to scan the data.
To use this option, tap the Equipment Number field to activate the scanning device. Then, scan the barcode of the equipment using the scanning device.
-
Note:
The Equipment Number field is designed to accept the asset that you identify with an identification symbol in the Fixed Assets Constants program (P001012).See Setting Up Fixed Asset Constants in the JD Edwards EnterpriseOne Applications Fixed Assets Implementation Guide.
For example, if the symbol to identify the serial number is "/" and the serial number is "4CE0460D0G"; then you need to enter "/4CE0460D0G" in the Equipment Number field to search and select a piece of equipment.
-
To review details about a specific piece of equipment, tap the equipment from the equipment list.
Figure 14-5 Service Equip: Select Equipment
Description of ''Figure 14-5 Service Equip: Select Equipment''
-
To update the equipment details, perform these steps:
-
To update the equipment status, tap the Equipment Status dropdown menu, and then tap a status to select.
Figure 14-6 Service Equipment Smartphone: Equipment
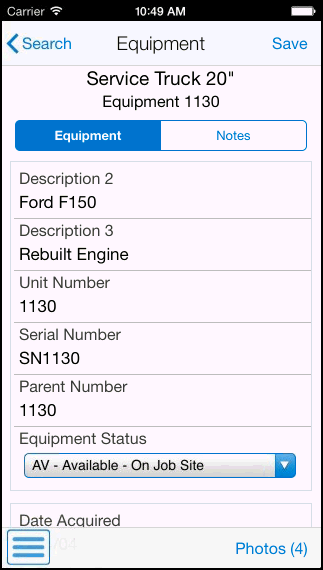
Description of ''Figure 14-6 Service Equipment Smartphone: Equipment''
-
To review the site number, scroll down on the screen. To update the site number, select the current site number and enter the new site number.
Alternately, to update the site number, tap the Search button. Enter a description for location in the Description field, tap the Search button on the Location Search window, and then tap the location to update.
-
Tap the Save button.
-
-
Tap the data in the Site Address section of the screen to use the map or navigational features of your device.
Figure 14-7 Service Equipment Smartphone: Site Coordinates
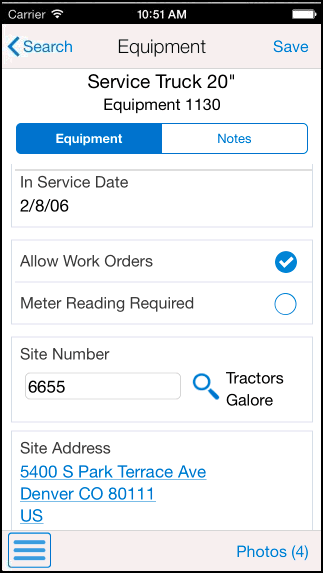
Description of ''Figure 14-7 Service Equipment Smartphone: Site Coordinates''
-
To view photos for the selected piece of equipment, tap the Photos button. The device displays the list of photos for the selected piece of equipment on the Equipment Photos screen.
Note:
The number displayed on the Photos button represents the total number of photos related to the piece of equipment. If you add or delete photos from the photo list, this number changes accordingly. -
To add photos to the equipment record, tap the Add button on the Photos screen. The device displays a popup with two options: Album and Camera.
To attach an existing photo from your device's photo gallery, tap the Album option and then select the photo you want to attach. On the New Photo screen, enter a name for the photo and tap the Save button.
To take a new photo, tap the Camera option to use the device's camera feature.
-
To enlarge the photo, tap the photo twice. To zoom in on the photo, pinch and drag. To zoom out, reverse the drag and pinch motion.
Note:
The zoom feature is not available on Android devices. -
To delete a photo, tap the photo you want to delete. Tap the Delete button on the Photo screen.
Tap the List button to return to the Photos screen.
-
Tap the Back button on the Photos screen to return to the Equipment screen.
-
To view and add notes, tap the Notes tab. Tap the New Notes text area and enter new notes. Tap the Save button. The system appends the new notes to the existing notes and displays them in the Notes History section.
-
To return to the home screen of Manage Customer Equipment, tap the Search button at the top left of the screen.
-
To log out of the application, tap the Menu button at the bottom left of the screen, and then tap Logout.
14.4.2 Searching for Equipment within a User-Defined Proximity Using the Manage Customer Equipment Mobile Smartphone Application (Release 9.1 Update)
This task outlines the steps to search for equipment that is in proximity to your location or to a reference point, by using the Manage Customer Equipment mobile smartphone application.
To locate equipment in your proximity:
-
Open the application by tapping the Service Equip icon on your device, and then log in. See Chapter 3, "Logging Into Mobile Enterprise Applications"
-
To search for equipment within a user-defined proximity or a reference point, tap the Filter button.
-
To filter equipment records by site, customer, or equipment number, enter data in the Site and Equipment Number or Customer fields.
-
To turn on or turn off the Include Proximity in Search option, click the toggle button.
-
To refine your search, tap the Locate By drop-down button.
On the filters screen, the Locate By drop-down menu provides three options: My Location, Street Address, and Site. The system displays the My Location option by default and populates default values in these fields: Proximity, Latitude, and Longitude.
- My Location
-
Select this option from the Locate By drop-down menu to allow the mobile application to access the device's location.
- Street Address
-
Select this option from the Locate By drop-down menu to allow the mobile application to access the device's location based on the equipment's address.
- Proximity
-
The system populates these fields with the values that you have set up in the user preferences for the application. If you have not specified the default values in the preferences, the system populates the values from the processing options for the Equipment Proximity program (P1731P). The system filters equipment that is located within the radius specified in the Proximity field.
To search for equipment using a different radius, tap the Proximity field and enter a new value.
-
In the Filters screen, to continue the search using the specified filter values, tap the Apply button. When you tap the Apply button, the system:
-
Takes you to the list of equipment and the map that is displayed based on the updated proximity, latitude, and longitude filter values.
-
Saves the filter values that you entered. The system displays the saved filter values the next time you open the filter screen.
To discontinue the use of filter values in your search, tap the Cancel button. When you tap the Cancel button, the system takes you to the list of equipment associated with the last saved filter values, if applicable.
To delete all filter values you specified, and to enter new filter values, tap the Clear button.
-
-
On the Manage Customer Equipment screen, the system displays a list of equipment and a map link on the top-left corner.
-
On the Details screen, to view equipment locations on the map, select an equipment record and click the Map link on the top-left corner of the screen.
-
To view the details of the equipment, tap the red marker for the equipment record on the map.
When you select the equipment record on the map, the red marker for the equipment record turns to green.
The system displays a blue maker for your location or the reference point, and a red marker for each equipment within the specified filter range.
-
To view the details of the equipment, tap the green marker. The system displays a window that has basic information about the equipment (such as the equipment name and number, equipment location address and geocodes, and the phone number) and a Details link. To access the equipment details screen, tap the Details link.
-
To view the details of a different equipment record, return to the equipment list, and tap the equipment record from the list. You can also select a different equipment record by going back to the map and selecting the equipment record on the map.
To access the customer details screen, tap the Search link.
-
To log out of the application, tap the Menu button at the bottom-left of the screen, and then tap Logout.