24 Expense Entry Mobile Applications
This chapter discusses these topics:
|
Important Note: Before using the mobile applications, Oracle strongly recommends that users have a complete understanding of how to use the associated processes and applications in the JD Edwards EnterpriseOne base software.The features and functionality available in the Mobile Expense Entry applications are based on the base EnterpriseOne setup of the Expense Management system. Before using these mobile applications, you must be familiar with your organization's expense policies. For additional information about the processes and applications associated with the mobile applications discussed in this chapter, see:
|
24.1 Expense Entry Mobile Applications Overview
You use the Expense Entry mobile enterprise tablet and smartphone applications to enable employees in your organization to enter, review, edit, and submit expense reports on a mobile device when they are away from the office. Managers can also use these applications to review their employees' expense reports.
|
Note: Managers cannot approve expense reports using these applications. To approve expense reports, managers must use the Mobile Expense Approval applications. |
The Expense Entry mobile applications give users the ability to:
-
Enter new expense reports.
When entering new expense reports, you can:
-
Enter summary receipt expenses.
-
Enter split receipts by job cost, business unit, or work order.
-
Add corporate credit card transactions to the report.
-
Attach notes and photos of receipts or other documents to a report.
-
Enter reports that include multiple currencies.
-
-
Review and edit their own expense reports that are currently at an editable status.
-
Search for and review their own old expense reports.
-
Review the expense reports of their direct report employees.
This table lists the applications that are available to enter expense reports:
| Type of Application | Additional Information |
|---|---|
| Base EnterpriseOne Application | Use the Expense Entry application (P09E2011) in the JD Edwards EnterpriseOne system to enter expense reports. |
| Tablet Application | Mobile Expense Entry - Tablet (M09E020)
To download the application to your tablet, search on the following text in the application store:
|
| Smartphone Application | Mobile Expense Entry - Phone (M09E021)
To download the application to your device, search on the following text in the application store:
|
Before using the Expense Entry tablet or smartphone application, you must set the processing options for each application.
24.1.1 Differences and Limitations: Expense Entry Mobile Applications
Mobile applications are intended to be a simplified version of the applications that are available in the base software. In most cases, these applications provide a subset of the functionality available in the base software.
Language Support
Additionally, you should be aware of how a user's language preference can affect the search functionality for business unit and branch/plant records. See Section 1.2.2, "Languages in Mobile Applications"
Additional Fields Tab
When entering an expense report, the Expense Entry mobile applications use the Additional tab to display the additional user-defined fields an organization sets up for expense entry and tracking. User-defined fields can be set up as optional or required, based on the organization's preferences. If any of those fields are required, you cannot save your expense report until you enter valid data in those fields.
The fields that appear on this tab are driven by the selected expense category type. If you change the category type, the fields that display on this tab change. If there are no additional user-defined fields, a message indicating that no additional fields have been set up is displayed on the Additional tab.
24.2 Setting Up the Expense Entry Mobile Applications
This section discusses setting up the Expense Entry mobile applications.
24.2.1 Setting Processing Options for the Mobile Expense Entry - Tablet Program (M09E020)
You use processing options to specify default processing information for a program.
24.2.1.1 Versions
Use the processing options on the Versions tab to specify which program version the mobile application uses when processing expense data.
- 1. Expense Report Review/Entry (P09E2011) Version
-
Use this processing option to specify which version of the P09E2011 program the mobile tablet application uses when processing expense data. Before specifying a version, Oracle recommends that you review the processing options for that version to verify that the options are correct, and that they satisfy the needs of your mobile users. If you leave this option blank, the system uses version ZJDE0001.
- 2. Credit Card Expenses (P09E150) Version
-
Use this processing option to specify which version of the P09E150 program the mobile tablet application uses when processing credit card data in an expense report. Before specifying a version, Oracle recommends that you review the processing options for that version to verify that the options are correct, and that they satisfy the needs of your mobile users. If you leave this option blank, the system uses version ZJDE0001.
- 3. Business Units (P0006) Version
-
Use this processing option to specify which version of the P0006 program the mobile tablet application uses when processing expense data. Before specifying a version, Oracle recommends that you review the processing options for that version to verify that the options are correct, and that they satisfy the needs of your mobile users. If you leave this option blank, the system uses version ZJDE0001.
24.2.2 Setting Processing Options for the Mobile Expense Entry - Phone Program (M09E021)
You use processing options to specify default processing information for a program.
24.2.2.1 Versions
Use the processing options on the Versions tab to specify which program version the mobile application uses when processing expense data.
- 1. Expense Report Review/Entry (P09E2011) Version
-
Use this processing option to specify which version of the P09E2011 program the mobile smartphone application uses when processing expense data. Before specifying a version, Oracle recommends that you review the processing options for that version to verify that the options are correct, and that they satisfy the needs of your mobile users. If you leave this option blank, the system uses version ZJDE0001.
- 2. Business Units (P0006) Version
-
Use this processing option to specify which version of the P0006 program the mobile smartphone application uses when processing expense data. Before specifying a version, Oracle recommends that you review the processing options for that version to verify that the options are correct, and that they satisfy the needs of your mobile users. If you leave this option blank, the system uses version ZJDE0001.
24.3 Using the Expense Entry Mobile Tablet Application
The Expense Entry mobile tablet application enables you to:
-
Enter expense reports.
-
Enter summary receipt items on an expense report.
-
Attach credit card transactions to an expense report.
-
Enter split expenses on an expense report.
-
Review, edit, and submit your expense reports.
-
Review your employees' expense reports.
Before you can use the application, you must download and install the application from the application store on your device.
To open the application, tap the Enter Expense icon and log in.
24.3.1 Entering an Expense Report Using the Mobile Expense Entry Tablet Application
When creating an expense report, you must first create the expense report header, and then add an expense to the report. Once you have created an expense report header and you have added an expense, you can then save the report. Though there are many different kinds of expenses that you can add to a report, this task provides instructions for creating an expense report header, adding a basic expense item, and saving the report. For instructions on adding credit card expenses, split receipt expenses, and summary expenses, refer to the additional tasks in this section.
Additionally, if you need information or instructions about what to enter in a specific field when creating an expense report, see Entering Expense Reports in the JD Edwards EnterpriseOne Applications Expense Management Implementation Guide.
To create a basic expense report:
-
Open the application by tapping the Enter Expense icon on your device, and then log in.
See Chapter 3, "Logging Into Mobile Enterprise Applications"
-
The Expense Entry screen displays all of your reports that are currently pending completion in both list and graphic format. Tap the Add button at the top of the list of reports to create a new report.
-
Enter a report description and then select a report type from the drop-down menu.
-
Complete the Per Diem Days field, if applicable. The display of this field is controlled by processing options from the selected version of the P09E2011.
-
Specify whether the report contains expenses in a single currency or multiple currencies.
-
To add a report-level note to the report, tap the Notes tab, enter your note, and then tap Save. Each time you enter a note, you append to the previous notes entered for the report. You cannot edit a note once you save it.
-
Tap the Add Expense button at the top right of the screen.
Note that you must add an expense to the report before you can save the report. If you exit the report before creating and saving an expense, the system does not save the report.
This task describes adding a basic expense item to the report. If you want to add summary expenses, split expenses, or credit card expenses to the report, see the additional tasks in this chapter for instructions.
-
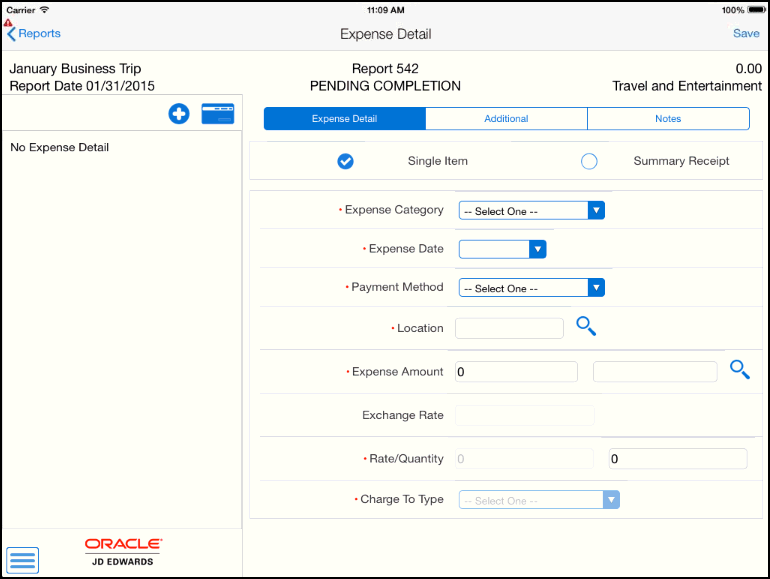
On the Expense Detail tab, select a value from the Expense Category drop-down menu. The remaining fields on the screen are displayed and enabled based on the type of expense category you select.
Complete all remaining required fields on the screen.
-
Note that if you created a multi-currency report, a field is enabled next to the Expense Amount field. This field is for the currency code. If you leave this field blank, the system uses the default currency code, based on your expense system setup. Additionally, when you save the item, the system also calculates and displays the value in the Exchange Rate field. This value is also based on the setup of your expense system.
-
If you are entering an expense that is based on a rate, such as mileage, the system retrieves the rate as it is defined in the P09E108 program. The rate setup from the P09E108 also determines whether the you can edit the rate.
-
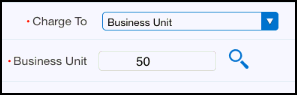
Select a value from the Charge To drop-down menu to specify where the expense should be charged. The value that you select in this field determines which additional fields display at the bottom of the screen. For example, if you select Business Unit, the system displays the Business Unit field to enable you to specify the business unit to which the system will charge the expense.
Note:
You can choose to charge the expense to multiple jobs, business units, or work orders. These are called split receipt expenses. For instructions on entering these expenses, see Section 24.3.2, "Entering a Split Receipt Expense Using the Mobile Expense Entry Tablet Application" -
Tap the Additional tab and complete any required fields, or necessary optional fields, for your expense detail item. The fields that display on this tab are user-defined fields that your organization has set up. Different fields display based on the selected expense category. If your organization does not have any user-defined fields for the selected expense category, the system displays a message notifying you that no additional fields have been set up.
Additionally, if this tab contains required fields, you must complete them before saving your expense. If you attempt to save your expense item, and receive an error that more data is required, verify that you have completed all of the required fields on this tab.
-
To add a note to the expense item, tap the Notes tab and enter a text note.
-
When you have completed the expense entry, tap the Save button at the top right of the screen.
The system updates the total at the top of the screen, saves the expense, creates and displays a receipt label (if your system is set up to use receipt labels), adds the expense to the list on the left side of the screen, and clears the fields on the right side of the screen so that you can enter another expense.
If your Expense Management system is set up to use daily allowances, the system displays errors and warnings if your expenses exceed the daily allowance specified by your organization's expense policy. While the system does allow you to continue by clicking OK and clicking Save again, the errors and warnings are displayed on the expense item.
-
To add photos to the expense item, tap the Menu button at the top right, and then tap Detail Photos. Select an existing photo, or capture a new photo, and then save it. Tap the Back button to return to the report. Note that you cannot attach a photo to an expense item until after you have created and saved the expense item.
-
To enter additional basic expenses, complete steps 8 through 16. To enter other types of expense items to the report, see the additional tasks in this chapter.
When you have entered all of your expenses, tap the Reports button at the top left of the screen to return to the main Expense Entry screen, and then tap Save.
-
To add a report-level photo to the report, tap the menu button at the top right of the screen, and then tap Photos. Select a photo from your image gallery, or capture a photo with your device, and then tap Save.
Note that you cannot attach a photo to the report until after you save the report.
-
To log out of the application, tap the Menu button at the bottom left of the screen, and then tap Logout.
24.3.2 Entering a Split Receipt Expense Using the Mobile Expense Entry Tablet Application
You enter a split receipt expense when you want to charge a portion of a single expense item to multiple accounts. For example, if a project manager is traveling to visit two different job sites, she might want to split the cost of her travel expenses between the two jobs.
To enter a split receipt expense, you must first create a report header. See Section 24.3.1, "Entering an Expense Report Using the Mobile Expense Entry Tablet Application" for instructions.
-
After you have created your report header, tap Add Expense.
-
Complete the required fields, as described in the previous task.
-
From the Charge To Type drop-down menu, select one of the following options to split an expense:
-
Split to Multiple Work Orders
-
Split to Multiple Jobs
-
Split to Multiple Bus. Units
-
-
After you select one of these options, tap the Enter Split Details button.
-
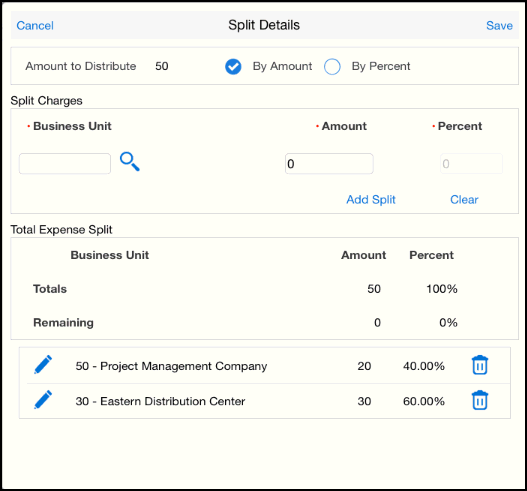
On the Split Details screen, select By Amount or By Percent. The fields in the Split Charges section of the screen are enabled based on your selection.
-
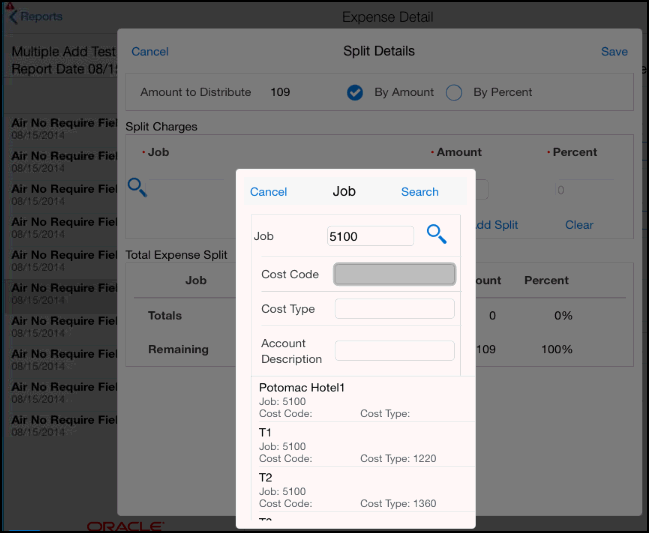
Specify the Business Unit, Work Order or Job, and then specify the corresponding amount or percent to charge to that entity.
Note:
You can use the visual assist to search for a value for Business Unit and Work Order, or you can manually enter the value. However, if you select Job, you must use the visual assist to search for and select a valid value. To select a valid job value from the Job search and select screen, enter the Job number, Cost Code, or Job Type, tap the Search button, and then tap the record you want to use. The system returns you to the Split Details screen with the selected job account details. -
Tap the Add Split button.
-
Review your entry in the Total Expense Split section of the screen. The system displays the remaining amount or percent that you must add before saving. The entire amount of the expense must be accounted for before you can save the split details.
To edit a split charge entry, tap the Edit button to the left of the entry. To delete an entry, tap the Delete button to the right of the entry.
-
Continue to enter split charges until the remaining amount and percent is zero, and then tap Save. The remaining amount must be zero in order to save the split and exit out of the Split Details form.
Note:
Be aware that none of the split charge details are saved until you tap the Save button. Additionally, you must return to the Expense Detail screen and save the expense to add it to the report.Also be aware that if you want to change the charge to type of the split entry, you must first delete existing split details and save the record. Once the amount allocated is zero, you can change the charge to type, and then enter split details for the new type.
-
On the Expense Detail screen, tap Save to add the expense to the report.
When you have entered all of your expenses, tap the Reports button at the top left of the screen to return to the main Expense Entry screen.
-
To log out of the application, tap the Menu button at the bottom left of the screen, and then tap Logout.

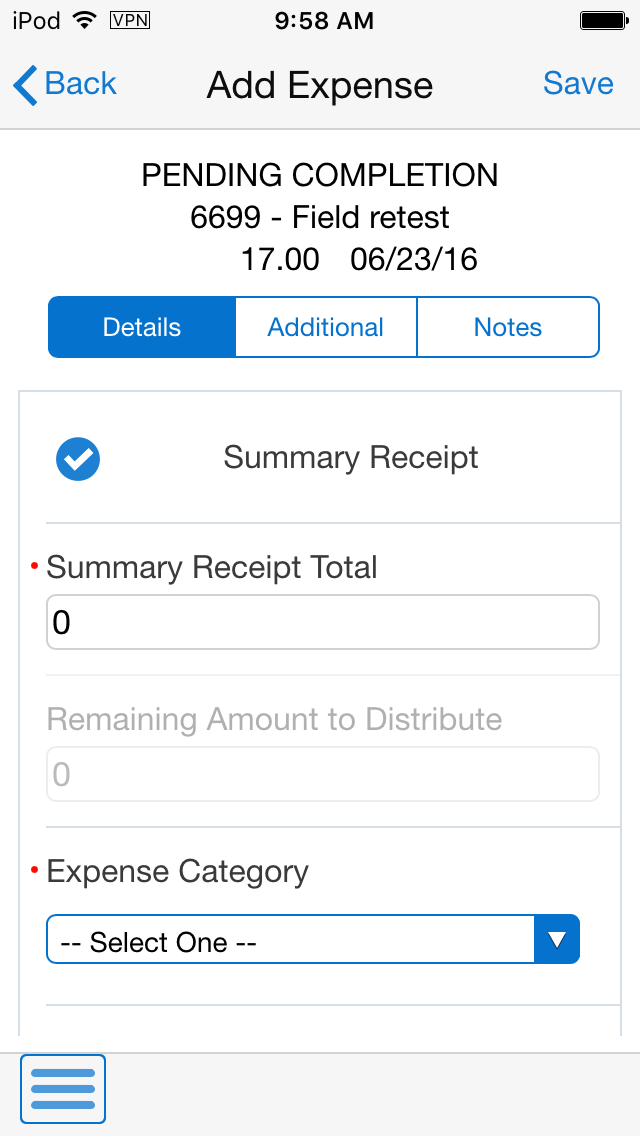
24.3.3 Entering a Summary Expense Using the Mobile Expense Entry Tablet Application
You enter a summary receipt expense when you have multiple expense items on a single receipt. For example, while on a business trip, you might receive a single bill from your hotel that includes charges for your lodging and several meals. You use the summary expense process to enter these types of expenses on an expense report.
To enter a summary receipt expense, you must first create a report header. See Section 24.3.1, "Entering an Expense Report Using the Mobile Expense Entry Tablet Application" for instructions.
-
After you have created your report header, tap Add Expense.
-
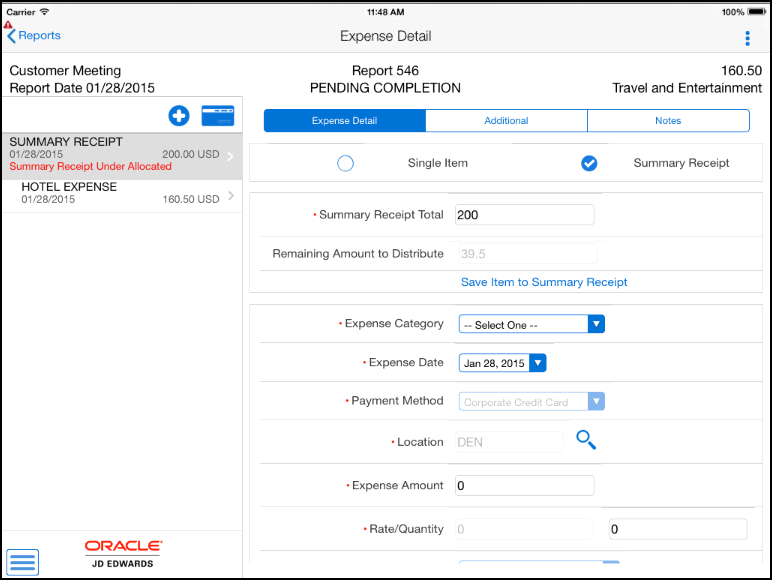
At the top right of the expense entry screen, tap the Summary Receipt option.
-
Enter the total value of the receipt in the Summary Receipt Total field, and then tap Add Item to Summary to enter individual expenses.
-
On the Expense Detail screen, complete all of the necessary fields for the expense item, including any necessary fields on the Additional tab.
To add notes, tap the Notes tab, and enter a note. Be aware that when you enter a note on either the parent or any child item for a summary expense, the note is added to the parent record for the summary receipt, and is viewable from all records associated with that summary expense.
When you have entered all necessary information, return to the Expense Detail tab and tap the Save Item to Summary Receipt button above the expense to add it to the report.
When you save the expense, the system updates the Remaining Amount to Distribute field, telling you how much of the summary receipt is still awaiting distribution. The system also uses the location and payment method from the first expense item you entered as the default values for all remaining expense items associated with that receipt.
-
To add additional items to the summary receipt, tap the Add Item to Summary button, and enter expense items until the Remaining Amount to Distribute value is 0 (zero).
Note:
You can save the report before fully distributing the summary receipt. However, the system displays a warning in the parent summary expense record in the left-hand list telling you that the summary receipt is over or under allocated. Additionally, you cannot submit the report until the summary receipt is fully distributed. -
Tap the Save button at the top right of the screen when you are finished.
-
To return to the main Reports screen, tap the Reports button. To log out of the application, tap the Menu button at the bottom left of the screen, and then tap Logout.
24.3.4 Entering Credit Card Expenses Using the Mobile Expense Entry Tablet Application
If your organization is set up to enable you to automatically include expenses from your credit card(s) on your expense report, you can view and select credit card expenses to add to your expense report.
To enter credit card expenses, you must first create a report header. See Section 24.3.1, "Entering an Expense Report Using the Mobile Expense Entry Tablet Application" for instructions.
-
After you have created your report header, tap Add Expense.
-
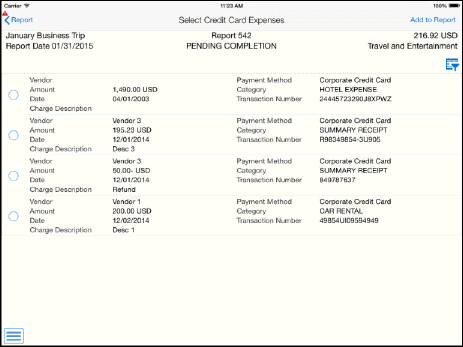
On the Expense Detail screen, tap the Credit Card button at the top of the list.
-
On the Select Credit Card Expenses screen, select the charges that you want to add to your report. You can use filters to limit the records that are displayed on the screen by date or by a payment method.
After selecting the records to include, tap the Add to Report button at the top right of the screen.
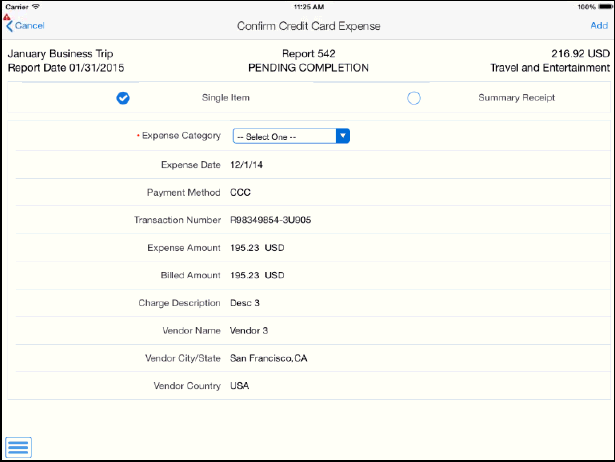
-
The system displays the first selected record on the Confirm Credit Card Expense screen.
-
Select an expense category, specify whether the expense is a single or a summary expense, and then click the Add button at the top right of the screen.
-
Complete all necessary fields to finish entering the expense, including fields on the Additional and Notes tab. At this point, the instructions for entering the expense are the same as those for non-credit card expenses. See the other tasks in this chapter for information.
-
When finished updating the expense item, tap the Done button at the top of the screen. The system adds the expense to the report, and displays the next selected credit card expense. When there are no additional expenses selected, the system returns you to the report header.
Note, if you tap the Cancel button, the system will not add the currently displayed expense to the report, and will display the next selected expense. If no other expenses were selected, the system returns you to the report header.
-
To log out of the application, tap the Menu button at the bottom left of the screen, and then tap Logout.
24.3.5 Reviewing, Editing and Submitting Expense Reports Using the Mobile Expense Entry Tablet Application
To review, edit, or submit an expense report:
-
Open the application by tapping the Enter Expense icon on your device, and then log in.
See Chapter 3, "Logging Into Mobile Enterprise Applications"
-
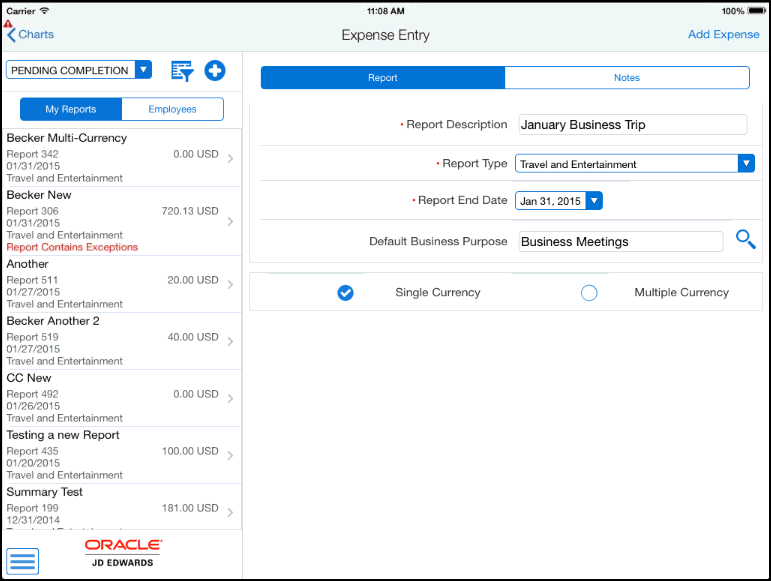
The Expense Entry screen displays all of your reports that are currently pending completion in both list and graphic format.
-
You can refine your list by:
-
Selecting a value from the Report Status drop-down menu.
-
Tapping the Filter button and entering date and report type filter criteria.
-
Tapping a bar or section of one of the charts on the right of the screen.
-
-
To review a report, tap the record in the list on the left side of the screen. The system displays the details of that report on the right side of the screen.
-
Tap the Edit Expense button at the top right to review and edit the expenses associated with the selected report.
-
On the Expense Detail screen, select an expense that you want to review or edit from the list. On the right side of the screen, update the expense, and then tap the Save button at the top right of the screen.
-
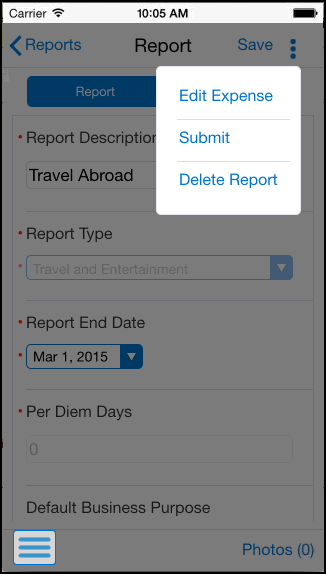
To submit the report for processing, tap the Menu button at the top right of the screen, and then tap Submit. If the report is not at a status where it can be submitted, the system does not display this option. Tap Submit again to submit the report, or tap Cancel if you do not want to submit the report.
Figure 24-10 Submitting an Expense Report

Description of ''Figure 24-10 Submitting an Expense Report''
-
Alternatively, you can delete the report by tapping the Menu button at the top right, and tapping Delete Report. If the report is not at a status where it can be deleted, the system does not display this option. Tap Delete again to delete the report, or tap Cancel if you do not want to delete the report.
-
To log out of the application, tap the Menu button at the bottom left of the screen, and then tap Logout.
24.4 Using the Expense Entry Mobile Smartphone Application
The Expense Entry mobile smartphone application enables you to:
-
Enter basic expense reports.
-
Enter summary receipt items on an expense report.
-
Attach credit card transactions to an expense report.
-
Enter split expenses on an expense report.
-
Review, update, and submit your expense reports.
-
Review your employees' expense reports.
Before you can use the application, you must download and install the application from the application store on your device.
To open the application, tap the Enter Expense icon and log in.
24.4.1 Entering a Basic Expense Report Using the Mobile Expense Entry Smartphone Application
When creating an expense report, you must first create the expense report header, and then add an expense to the report. Once you have created an expense report header and you have added an expense, the application then saves the report. Though there are many different kinds of expenses that you can add to a report, this task provides instructions for creating an expense report header, adding a basic expense item, and saving the report. For instructions on adding credit card expenses, split receipt expenses, and summary expenses, refer to the additional tasks in this section.
Additionally, if you need information or instructions about what to enter in a specific field when creating an expense report, see Entering Expense Reports in the JD Edwards EnterpriseOne Applications Expense Management Implementation Guide.
To create a basic expense report:
-
Open the application by tapping the Enter Expense icon on your device, and then log in.
See Chapter 3, "Logging Into Mobile Enterprise Applications"
-
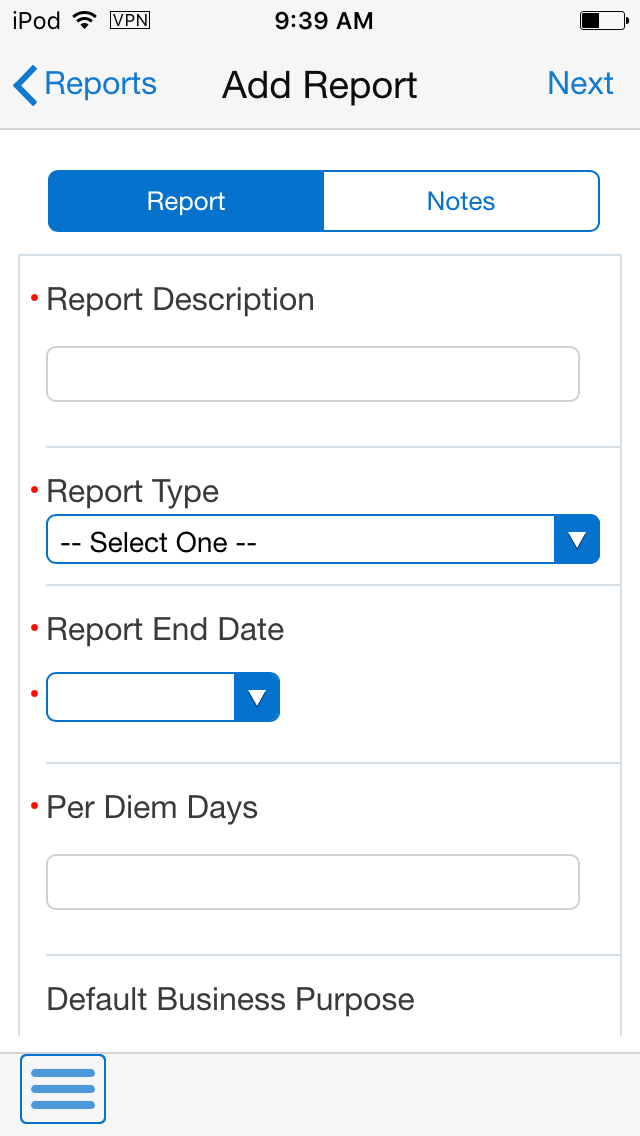
The Expense Entry screen displays all of your reports that are currently pending completion. Tap the Add button at the top right of the screen to create a new report.
-
On the Add Report screen, enter a report description and then select a report type from the drop-down menu.
-
If applicable to your report, complete the Per Diem Days and Manager Override fields. Additionally, enter a date in the Report End Date field.
Note: The display of the Per Diem Days and Manager Override fields are controlled by processing options from the selected version of the P09E2011.
-
Specify whether the report contains expenses in a single currency or multiple currencies.
-
To add a report-level note to the report, tap the Notes tab, enter your note. Each time you enter a note, you append to the previous notes entered for the report. You cannot edit a note once you save it.
Tap the Next button. If there are credit card expenses, then the system displays the credit card expenses automatically in the Transactions screen. If there are no credit card expenses, then the system returns you to the Add Expense screen, where you can add the first expense item to the report.
Note that you must add an expense to the report before the report is saved. If you exit the report before creating and saving an expense, the system does not save the report.
This task describes adding a basic expense item to the report. If you want to add summary expenses, split expenses, or credit card expenses to the report, see the additional tasks in this chapter for instructions.
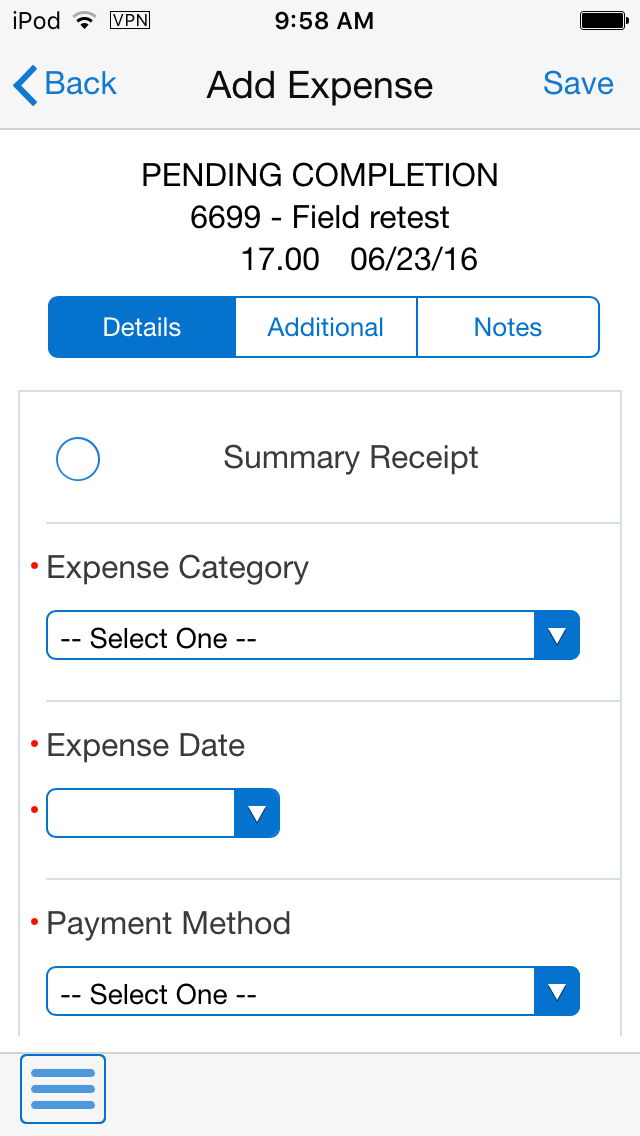
-
On the Details tab, select a value from the Expense Category drop-down menu. The remaining fields on the screen are displayed and enabled based on the type of expense category you select.
Complete all remaining required fields on the screen.
-
Note that if you created a multi-currency report, a field is enabled next to the Expense Amount field. This field is for the currency code. If you leave this field blank, the system uses the default currency code, based on your expense system setup. Additionally, when you save the item, the system also calculates and displays the value in the Exchange Rate field. This value is also based on the setup of your expense system.
-
If you are entering an expense that is based on a rate, such as mileage, the system retrieves the rate as it is defined in the P09E108 program. The rate setup from the P09E108 also determines whether the you can edit the rate.
-
Select a value from the Charge To drop-down menu to specify where the expense should be charged. The value that you select in this field determines which additional fields display at the bottom of the screen. For example, if you select Business Unit, the system displays the Business Unit field to enable you to specify the business unit to which the system will charge the expense.
Note:
You can choose to charge the expense to multiple jobs, business units, or work orders. These are called split receipt expenses. For instructions on entering these expenses, see Section 24.4.2, "Entering a Split Receipt Expense Using the Mobile Expense Entry Smartphone Application" -
Tap the Additional tab and complete any required fields, or necessary optional fields, for your expense detail item. The fields that display on this tab are user-defined fields that your organization has set up. Different fields display based on the selected expense category. If your organization does not have any user-defined fields for the selected expense type, the system displays a message notifying you that no additional fields have been set up.
Additionally, if this tab contains required fields, you must complete them before saving your expense. If you attempt to save your expense item, and receive an error that more data is required, verify that you have completed all of the required fields on this tab.
-
To add a note to the expense item, tap the Notes tab and enter a text note.
-
When you have completed the expense item, tap the Save button at the top right of the screen. The system clears all of the fields on the Add Expense screen so you can easily add another expense detail item to the report.
Note that you must save an expense detail record before you can attach a photo to that expense item. See Section 24.4.5, "Reviewing, Editing, and Submitting Expense Reports Using the Mobile Expense Entry Smartphone Application"
-
To enter additional basic expenses, complete steps 8 through 14. To enter other types of expense items to the report, see the additional tasks in this chapter.
When you have entered all of your expenses, tap the Done button at the top left, and then tap the Back button at the top left of the screen to return to the main Expense Entry screen.
-
To log out of the application, tap the Menu button at the bottom left of the screen, and then tap Logout.
24.4.2 Entering a Split Receipt Expense Using the Mobile Expense Entry Smartphone Application
You enter a split receipt expense when you want to charge a portion of a single expense item to multiple accounts. For example, if a project manager is traveling to visit two different job sites, she might want to split the cost of her travel expenses between the two jobs.
To enter a split receipt expense, you must first create a report header. See Section 24.4.1, "Entering a Basic Expense Report Using the Mobile Expense Entry Smartphone Application"
-
After you have created your report header, tap the Next button.
-
Complete the required fields, as described in the previous task.
-
From the Charge To Type drop-down menu, select one of the following options to split an expense:
-
Split to Multiple Work Orders
-
Split to Multiple Jobs
-
Split to Multiple Bus. Units
-
-
After you select one of these options, tap the Enter Split Details button.
-
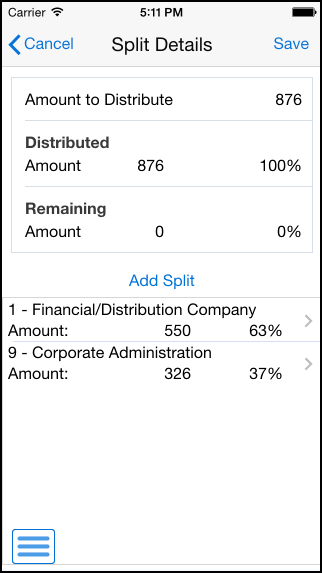
On the Split Details screen, tap the Add Split button.
-
On the Split Charges screen, select By Amount or By Percent. The fields in the Split Charges section of the screen are enabled based on your selection.
-
Specify the Business Unit, Work Order or Job, and then specify the corresponding amount or percent to charge to that entity.
Note:
You can use the visual assist to search for a value for Business Unit and Work Order, or you can manually enter the value. However, if you select Job, you must use the visual assist to search for and select a valid value. To select a valid job value from the Job search and select screen, enter the Job number, Cost Code, or Job Type, tap the Search button, and then tap the record you want to use. The system returns you to the Split Charges screen with the selected job account details. -
Tap the Done button.
-
Review your entry in the Split Details screen. The system displays the remaining amount or percent that you must add before saving. The entire amount of the expense must be distributed before you can save the split details.
To add another split charge, tap the Add Split button again, and complete the steps to add a split charge. Complete these steps until you have fully distributed the expense, and then tap the Save button at the top right of the screen. On the Expense Detail screen, tap Save.
Note:
Be aware that none of the split charge details are saved until you tap the Save button. Additionally, you must return to the Expense Detail screen and save the expense to add it to the report. -
To edit a split charge entry, select the record you want to edit from the Split Details screen, make any necessary changes on the Split Charges screen, and then click Done.
To delete a split charge entry, select the record you want to delete from the Split Details screen. On the Split Charges screen, tap the Delete button at the bottom of the screen.
Note that if you want to change the expense from being a split receipt expense to a regular expense item, you must delete the record, and then add it again as a non-split expense. You cannot change a split expense to a non-split expense once you have saved it.
-
When you have entered all of your expenses, tap the Back button at the top left of the screen to return to the main Expense Entry screen.
-
To log out of the application, tap the Menu button at the bottom left of the screen, and then tap Logout.
24.4.3 Entering a Summary Expense Using the Mobile Expense Entry Smartphone Application (Release 9.1 Update)
You enter a summary receipt expense when you have multiple expense items on a single receipt. For example, while on a business trip, you might receive a single bill from your hotel that includes charges for your lodging and several meals. You use the summary expense process to enter these types of expenses on an expense report.
To enter a summary receipt expense, you must first create a report header. See Section 24.4.1, "Entering a Basic Expense Report Using the Mobile Expense Entry Smartphone Application" for instructions.
-
After you have created your report header, tap the Next button in the Add Report screen.
-
On the Add Expense screen, tap the Summary Receipt option.
-
Enter the total value of the receipt in the Summary Receipt Total field, and then enter individual expenses.
-
On the Add Expense screen, complete all of the necessary fields for the expense item, including any necessary fields on the Additional tab.
To add notes, tap the Notes tab, and enter a note. Be aware that when you enter a note on either the parent or any child item for a summary expense, the note is added to the parent record for the summary receipt and is viewable from all records associated with that summary expense.
When you have entered all necessary information, tap the Save button to add it to the report.
When you save the expense, the system updates the Remaining Amount to Distribute field, showing you how much of the summary receipt is still awaiting distribution. The system also uses the location and payment method from the first expense item that you entered as the default values for all remaining expense items associated with that receipt.
-
To add additional items to the summary receipt, enter expense items until the Remaining Amount to Distribute value is 0 (zero).
Note:
You can save the report before fully distributing the summary receipt. However, the system displays a warning in the parent summary expense record in the Expense Detail screen stating that the summary receipt is over or under allocated. Additionally, you cannot submit the report until the summary receipt is fully distributed. -
Tap the Done button at the top left of the screen when you are finished, the system will return to the Expense Detail screen.
-
To return to the main Reports screen, tap the Reports button. To log out of the application, tap the Menu button at the bottom left of the screen, and then tap Logout.
24.4.4 Entering Credit Card Expenses Using the Mobile Expense Entry Smartphone Application (Release 9.1 Update)
If your organization is set up to enable you to automatically include expenses from your credit cards on your expense report, you can view and select credit card expenses to add to your expense report.
To enter credit card expenses, you must first create a report header. See Section 24.4.1, "Entering a Basic Expense Report Using the Mobile Expense Entry Smartphone Application" for instructions.
-
After you have created your report header, tap the Next button on the Add Report screen.
If there are credit card transactions, then the system automatically takes you to the Transactions screen that shows the credit card transactions.
Note:
You can add credit card expenses either by tapping the Add Credit Card Expense button on the Expense Detail screen or by tapping the Next button on the Add Report screen. -
On the Transactions screen, select the charges that you want to add to your report. You can use filters to limit the records that are displayed on the screen by date or by a payment method.
Tap on the credit card transaction to view details of the transaction in the Detail screen.
After selecting the records to include, tap the Apply button at the top right of the screen.
-
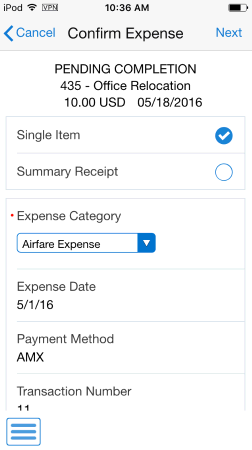
The system displays the first selected record on the Confirm Expense screen.
-
Select an expense category, specify whether the expense is a single expense or a summary expense and then click the Next button at the top right of the screen.
Note that by default the system displays the single item expense.
-
On the Add Expense screen, complete all necessary fields to finish entering the expense on the Details tab, including fields on the Additional and Notes tabs. At this point, the instructions for entering the expense are the same as those for non-credit card expenses. See the other tasks in this chapter for information.
-
When you have finished updating the expense item, tap the Save button at the top of the screen.
The system adds the expense to the report and displays the next selected credit card expense. When there are no additional expenses selected, the system returns you to the Expense Detail screen.
Note that if you tap the Cancel button, the system will not add the currently displayed expense to the report and will display the next selected expense. If no other expenses were selected, the system returns you to the Expense Detail screen.
-
To log out of the application, tap the Menu button at the bottom left of the screen, and then tap Logout.
24.4.5 Reviewing, Editing, and Submitting Expense Reports Using the Mobile Expense Entry Smartphone Application
To review, edit, or submit an expense report:
-
Open the application by tapping the Enter Expense icon on your device, and then log in.
See Chapter 3, "Logging Into Mobile Enterprise Applications"
-
The Expense Entry screen displays all of your reports that are currently pending completion.
-
You can refine your list by:
-
Selecting a value from the Report Status drop-down menu.
-
Tapping the Filter button and entering date and report type filter criteria.
-
-
To review a report, tap the record in the list.
-
To add a photo to the report, tap the Photos button at the bottom right, select or capture a photo, and then tap Save.
-
To edit expense items, on the Report screen, tap the menu button at the top right and then tap Edit Expense.
-
On the Expense Detail screen, select an expense that you want to review or edit from the list.
-
On the Expense screen, update any fields you want to change, and then tap the Save button at the top right of the screen. Additionally, you can attach photos to the expense item by tapping the Photo button at the bottom right of the screen. Capture a new photo or select a photo from your image gallery, and then tap Save.
-
When you have finished updating expense items, tap the Back button to return to the Report screen.
-
To submit the report for processing, tap the Menu button at the top right of the screen, and then tap Submit. If the report is not at a status where it can be submitted, the system does not display this option.
-
Confirm your submission, or tap Cancel if you do not want to submit the report.
-
Alternatively, you can delete the report by tapping the Menu button at the top right, and tapping Delete Report. If the report is not at a status where it can be deleted, the system does not display this option.
-
Confirm your deletion, or tap Cancel if you so not want to delete the report.
-
To log out of the application, tap the Menu button at the bottom left of the screen, and then tap Logout.