| Oracle® Beehive Conferencing Release 2 (2.0.1.8) Part Number E25458-03 |
|
|
PDF · Mobi · ePub |
| Oracle® Beehive Conferencing Release 2 (2.0.1.8) Part Number E25458-03 |
|
|
PDF · Mobi · ePub |
The Oracle Beehive Conferencing Java-based Client is an entirely Web-based and Web-delivered conferencing client. When joining a conference, you will be directed to the Oracle Beehive Conferencing Web Center, which will automatically launch the running conference in the Java-based Client. The automatic launching of the client is based on Oracle's Java Web Start technology. Although you will need to accept and/or allow the application to launch, you do not need to install or manage anything on the desktop.
This chapter includes the following topics:
This section includes the following topics:
What features are included in Oracle Beehive Conferencing Java-based Client?
What are the display enhancements and changes in this release?
What are the other system requirements for Oracle Beehive Conferencing?
This release of Oracle Beehive Conferencing Java-based Client includes the following features:
Full desktop sharing
Application sharing
Shared control of a desktop for team collaboration
Public text chat
Built-in voice chat
Conference recording (including voice, text chat, and presentations)
The Oracle Beehive Conferencing application has been enhanced to improve your conferencing and collaboration experience. While viewing a presentation, you will see a video-style interface with an information toolbar at the top and a conference toolbar at the bottom of your Oracle Beehive Conferencing Viewer Display.
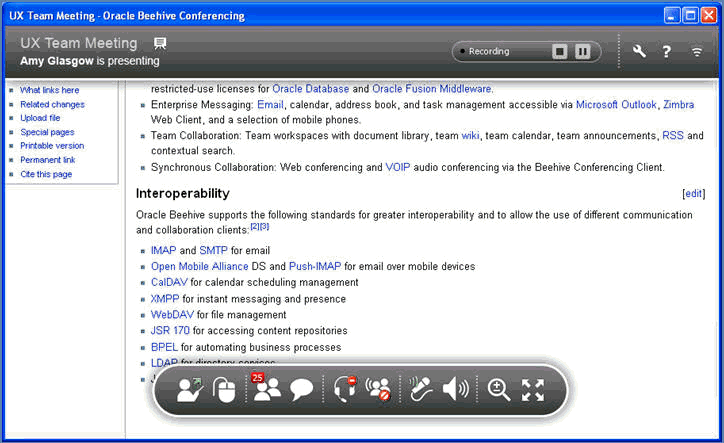
The information toolbar provides information about the conference, your preferences, and your network connection. The conference toolbar enables you to interact with the conference, request privileges, and launch the text chat and attendee list windows.
Both the information toolbar and the conference toolbar auto-hide when the mouse leaves the window or the mouse is inactive for more than a few seconds. Both toolbars reappear again when you move your mouse within the Oracle Beehive Conferencing Viewer Display.
See the section "What are the other system requirements for Oracle Beehive Conferencing?" for more information on the system requirements for the Oracle Beehive Conferencing Java-based Client.
When you host a conference, at any time, you can choose to present your desktop or grant privileges to other attendees to present their desktops. Only one attendee can be granted permission to present at a time. You can also start a voice chat, communicate through the text chat, and record your session for future playback.
Even if you are not the host, you can still present in a running conference. See the section "Participating in Conferences" for information on how you can participate in a conference without being the host.
This section contains the following topics:
How can I open and show other applications while I am presenting?
How do I invite participants (attendees) to a running conference?
Note:
When you present an application through Oracle Beehive Conferencing, you allow other conference participants to see the contents of that application only. When you present your desktop, you allow participants to see your entire computer desktop, including any applications that are running and the contents of those applications (if the applications are maximized for display). Participants can also view your taskbar and system tray when you share your entire desktop. Therefore, be mindful of the applications and content that reside and are active on your desktop, especially during conferences in which you present.In the Conference Toolbar of the Beehive Conferencing Viewer Display, click the Start Presenting icon or in the Oracle Beehive Conferencing Java-based Client window, click Begin Presenting Now.
Once you click Start Presenting, your desktop becomes visible to other attendees and a red outline appears around your desktop window.
Your Oracle Beehive Conferencing Viewer Display disappears and is replaced with the Presenter Console.
To show another application to present:
From your desktop, or Windows Programs menu, open the application you want to present.
In the Oracle Beehive Conferencing Java-based Client window, click Begin Presenting Now.
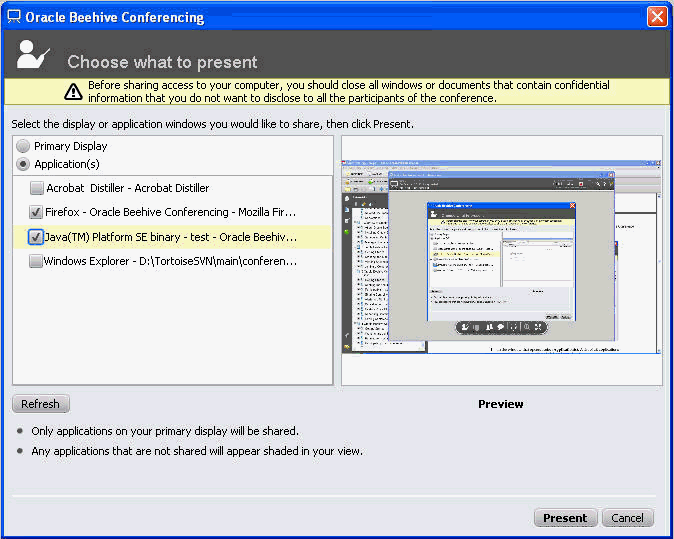
In the window that opens, , select Application(s). A list of all applications currently running is displayed. Select the application you want to present, and click Present. The application or window being presented is outlined in red.
Note:
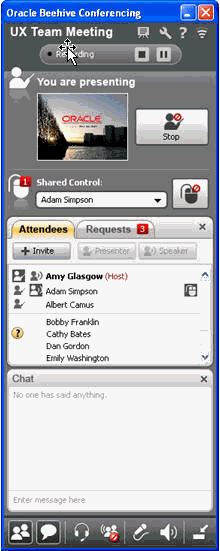
When you present an application through Oracle Beehive Conferencing, you allow other attendees in the conference to see the contents of that application. Therefore, use discretion in what you choose to present and to whom you present it.Depending on whether you are currently presenting or not, there are two ways to see the Attendee List:
If you are currently presenting, the Attendee List may appear in the middle of your Presenter Console. You can toggle on or off the Attendee List by clicking the Attendee List icon in the presenter control toolbar.
If you are not currently presenting, the Attendee List will appear when you click the Attendee List icon from your conference toolbar in the Viewer Window.
The list of invitees are shown below the host's name in alphabetical order. The first set of names are those who have joined and have been granted specific privileges (for example, the right to present and/or speak), followed by the other attendees that have joined, followed at the end (in parentheses) by those who have not joined the conference yet.
When you invite participants (attendees) to your conference, you have the option of selecting workspace participants/groups, or other individuals.
To invite participants (attendees):
Create a conference from Oracle Beehive Conferencing Web Center as described in "How do I create (start) a new conference?".
From the Oracle Beehive Conferencing Viewer Display or the Presenter Console, click the Attendee List button to show the Attendee List.
Click Invite to start adding participants (attendees). Optionally, if you selected to create the conference in a team workspace, the workspace members will automatically be added as participants to the conference. See the section "How do I create (start) a new conference?" for more information.
Note:
You can only invite external participants (attendees) to scheduled conferences created using your time management application but not to an ad-hoc conference created using Oracle Beehive Conferencing Web Center.In the search box, type the names of the individuals (or workspace participants) you want to invite, then click Search. You can narrow your search by typing the first and last name, or as much of the name as you know. Your search will also take less time.
The list of names matching your search appears in the box. Select the attendee, and click Invite.
When finished searching and selecting attendees, click x. Your list of attendees appears in the Attendee List.
Yes. You can copy and paste the conference URL into an e-mail or Instant Messaging window to alert others your conference is in progress.
Note:
Sending the conference link is only necessary for impromptu conferences, or for conferences that were scheduled in either Oracle Beehive Conferencing or the Oracle Beehive Web Conferencing Center.To send the link to a conference in progress:
From Oracle Beehive Conferencing Web Center, click Conference URL.
In the Web page that opens, copy the URL, paste the link into a new e-mail or Instant Messaging window and send to the intended recipients.
Yes, you can grant presenter privileges to any participant at any time during the conference, but as the host, you never completely give total control to any participant. You can only grant privileges if you are the host of the conference.
You can allow someone else to present in any of the following ways:
Respond to a request for presentation rights through a notification
Respond to a request for presentation rights through the Attendee List
If you are not the host, you can request presenter privileges from the conference host. See the section "Can I request to present during the conference?" for more information.
If you are the host, you can give another person presenter privileges through the Attendee List.
From the Oracle Beehive Conferencing Viewer Display or the Presenter Console, click the Attendee List icon to display the Attendee List.
Select the participant from the Attendee List, and click Presenter. The attendee now has presenter rights.
If you are not the host, you can request presenter privileges from the conference host. See the section "Can I request to present during the conference?" for more information.
If you are the host of the conference, you will receive a notification when a participant asks for presentation rights.
To give the person presentation rights from the pop-up alert, click the Allow to Present icon. The requesting participant is notified that presentation privileges have been granted.
When a participant asks for presentation privileges, the Attendee List section of the Oracle Beehive Conferencing Viewer Display or Presenter Console shows a red badge to indicate pending requests. The number on the badge indicates how many requests are pending.
From the Oracle Beehive Conferencing Viewer Display or the Presenter Console, click the Attendee List icon to show the Attendee List.
Click the Requests tab in the Attendee List.
Select the participant from the Attendee List, and click Allow to Present. Alternatively, you can grant presenter rights to all requests by clicking the Grant All button at the top of the window. The participant now has presenter rights.
In the top section of the Presentation Console, click the Stop presenting button. The red outline disappears indicating that your desktop is no longer visible to other attendees. A similar button also appears in the miniaturized console.
If you were sharing control at the time you stop presenting, those privileges are automatically revoked when you stop presenting.
See the section "Can I allow someone else to present?" for more information on how to allow another participant to present.
Yes, you can share control of the presentation at any time during the conference, but as the presenter, you never completely give total control to any participant.
Note:
When you share control with another conference participant, you temporarily grant that participant the ability to operate your computer. Although you can revoke this privilege at any time, use discretion when allowing other conference attendees to share control with you.You can only share control with another participant if you are presenting your desktop at that time. In the Presentation Console, select the participant from the menu under Shared Control. The selected users start sharing control with you.
For more information on the shared control feature, see the section "Sharing Control with Another User."
Click the Stop shared control button in your Presenter Console or in your Quick Access Bar. This immediately revokes shared control privileges from whomever you were sharing with. It does not otherwise affect your presentation, and you can continue to present your screen to all the participants.
Note:
If you stop presenting at any time, you will automatically revoke all shared control privileges you had granted.See the section "How do I stop presenting?" for more information on how to stop presenting. For more information on the shared control feature, see the section "Sharing Control with Another User."
When you are presenting your desktop, you cannot make the Presenter Console disappear altogether. However, you can minimize the Presenter Console to a smaller toolbar, called the Quick Access Bar. To minimize to the Quick Access Bar, you can minimize the Presenter Console window in the normal way, or you can click the minimize button to the bottom right of the Presenter Control toolbar.
The Quick Access Bar provides a small, semi-transparent interface to let you quickly stop your presentation or to stop sharing control. There is also a button to bring you back to the full Presenter Console.
To move the Quick Access Bar to a different location on your screen, click the dashed lines on the right-hand border and drag/move the Quick Access Bar elsewhere on the screen.
This section contains the following topics:
How do I text chat with other attendees during the conference?
Can I scale (resize) the view of the content being presented?
How do I scroll my view to see parts of the presentation not in my viewing window?
In the top information toolbar of the Oracle Beehive Conferencing Viewer Display, the name of the person currently presenting appears next to the conference details. For example, "Joe Smith is presenting". If there is no presenter, the message "No one is presenting" appears.
If another attendee is presenting, the presenter icon appears next to the attendee's name in the Attendee List who is currently presenting.
Yes. As a participant, you can submit a request to present, and begin presenting once the host has granted your request. See the section "Can I allow someone else to present?" for more information on the host's view.
To request to present during a conference:
In the conference toolbar of the Oracle Beehive Conferencing Viewer Display, click the Request to Present icon.
The host is notified of your request. Once the host has granted you presentation rights, you can start presenting by clicking the Start presenting button in your conference toolbar.
Your name is displayed in the information toolbar for all participants, alerting others that you are now presenting. The presenter icon now appears next to your name in the Attendee List.
See the section "How do I start presenting?" for more information on starting to present.
If you have been granted presentation privileges, there are two ways you can take over the presentation and begin presenting your desktop:
If someone is presenting, the Take Over and Present option appears in your conference toolbar. To begin presenting, click Take Over and Present to begin presenting your desktop.
If no one is presenting, a Present Your Primary Display button will appear in the middle of your Oracle Beehive Conferencing Viewer Display. To begin presenting, click the Present Your Primary Display button to begin presenting your desktop.
Your name is displayed in the information toolbar of all the participants, alerting others that you are now presenting. The presenter icon now appears next to your name in the Attendee List.
See the section "How do I start presenting?" for more information on starting to present.
Yes. As a participant, you can request to control the presentation without being the current presenter. However, someone must be presenting their desktop for you to share control.
Go to the conference toolbar of the Oracle Beehive Conferencing Viewer Display and click the Request to Control icon (the mouse icon).
Once the presenter grants you shared control, a pop-up appears alerting you that you have shared control. Only one participant can have shared control at one time.
For more information on the shared control feature, see the section "Sharing Control with Another User."
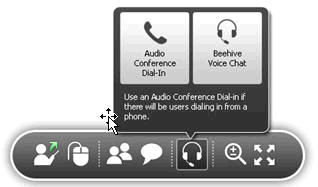
During a voice chat, when you want to speak (so others can hear you), click the Request to Speak icon (the microphone icon) in the conference toolbar of the Oracle Beehive Conferencing Viewer Display. The icon will only appear if the voice chat is running.
See the sections "How do I adjust the volume (or mute) the speaker?" and "How do I adjust the volume (or mute) the microphone?" for more information on how to adjust sound settings.
If you prefer to type your questions or comments during a conference rather than (or in addition to) speaking, you can enter into a live chat discussion. Your text, along with your name and the time, appears visible to all other attendees who have joined the conference.
Open the text chat window by clicking the text chat icon in the conference toolbar.
Begin typing in the bottom box of the Chat window.
Press Enter. Your text appears in the top box of the Chat window.
If the conference has already ended (for example, the host has left the conference before you), you will see a pop-up notifying that the conference has ended. Click OK to exit the application.
If the conference is still running, and you wish to leave the conference, you can do the following depending on the operating system you are using:
To exit the conference, click the x in the top-right corner of the application's window.
At the prompt, click Yes if you want to disconnect from the conference. This will end your Oracle Beehive Conferencing session. To begin a new conference, you will need to sign in again.
In the Mac toolbar, select Oracle Beehive Conferencing and click Exit. Alternatively, you can right-click the Oracle Beehive Conferencing icon in the dock, and select Exit.
At the prompt, click Yes if you want to disconnect from the conference. This will end your Oracle Beehive Conferencing session. To begin a new conference, you will need to sign in again.
To exit the conference, click the x in the top-right corner of the application's window.
At the prompt, click Yes if you want to disconnect from the conference. This will end your Oracle Beehive Conferencing session. To begin a new conference, you will need to sign in again.
Yes. Anyone other than the user currently presenting can change the view/size of the content displayed on their screen.
To scale (resize) the presentation view:
From the conference toolbar in the Beehive Conferencing Viewer Display, hover over the Zoom icon. Hovering over the icon will launch the zooming controls.
Adjust the slider to the desired zoom level. A pop-up in the middle of the Oracle Beehive Conferencing Viewer Display will tell you what the current zoom level is.
To fit the presentation to the size of the Beehive Conferencing window, click the Zoom icon.
The presenter may have a different screen size or resolution than your own display. As a result, not all the contents of their presentation will always fit in your viewing window.
To view the entire presentation:
Zoom the presentation to Fit to View which will automatically resize the presentation view to fit your viewing window. For more information on zooming, see the section "Can I scale (resize) the view of the content being presented?"
Pan the view within the viewing window.
Click the middle of the Oracle Beehive Conferencing Viewer Display. Your mouse pointer changes into a little white hand pointer.
Using the hand pointer, drag the screen in the direction you want to pan. The contents of the presentation within the viewing window will move in that direction.
Yes. As an attendee not currently presenting, you can change to a full screen view of the presentation. From the conference toolbar in the Beehive Conferencing Viewer Display, click the Full Screen icon.
This section contains the following topics:
How do I view other areas of the presentation when sharing control?
How do I interact with the conference controls when sharing control?
Shared control allows a participant who is viewing the presentation to control what is being presented. When a participant is given shared control, the participant has full access to the presenter's desktop.
Note:
Granting control to another conference participant temporarily grants that participant the ability to operate your computer. Although you can revoke this privilege at any time (see How do I revoke shared control?), use discretion when allowing other conference attendees to share control of your presentation.If you are the current presenter, you can give shared control of the presentation to any attendee, at any time. However, shared control can only be given to one attendee at a time. There are multiple ways to give a participant shared control.
You can grant shared control in any of the following ways:
Respond to a request for shared control through the notification
Respond to a request for shared control through the shared control list
From the Shared Control section of the Presenter Console, click the list that says No one then click on a participant's to give that person shared control. Once you choose a participant, that person will be notified that shared control has been granted.
Note:
If someone already has shared control, the list will show the name of the participant with shared control. Giving shared control to a different participant will revoke control from the original participant.If you are the current presenter, you will receive a notification when a participant asks for shared control. To give shared control to the requesting participant, click the Allow to Control button. The requesting participant will be notified that shared control has been granted.
When a participant asks for shared control, the Shared Control section of the Presenter Console will show a red badge to indicate pending requests. The number on the badge indicates how many requests are pending.
To grant a request, click the shared control list. Participants with a pending request show at the top of the list with a Request icon. Click a participant's name to grant that person shared control.
The current presenter can revoke shared control from another participant at any time. To revoke shared control, click the Revoke control icon located next to the Shared Control list in the Presenter Console.
Note:
If you have the Presenter Quick Access Bar open instead of the Full Presenter Console, you can click the Revoke Control icon (center mouse icon) within the Quick Access Bar to revoke control.If another participant is currently presenting, you can ask to share control of what is being presented. This will allow you to interact with the presenter's computer.
Click the Mouse icon to request for shared control.
The icon is updated and displayed with a ? over it. This indicates that your request is pending. You will be notified if you are given shared control.
If you currently have a shared control request pending (indicated by the ? shown over the Mouse icon), you can cancel the request by clicking the icon.
The icon will update to show just the Mouse icon. This indicates you no longer have a request pending.
Once you have been granted shared control, you can start and stop controlling the presentation at any time.
You can start controlling the presentation from the following places:
Once you have started sharing control, the normal conference controls disappears allowing you to interact with the presentation.
Use the Shared Control Quick Access Bar to stop sharing control or to access the conference controls (see How do I stop using shared control? and How do I interact with the conference controls when sharing control?). Click the drag strip (dots on the right side) and drag the Shared Control Quick Access bar to move it.
When you are granted shared control, you will see a dialog notification. Click the Start Controlling button to begin controlling the presentation.
If you have been granted shared control, you will see the Start Controlling icon in your conference toolbar. Click the icon to begin controlling the presentation.
If you are sharing control and the entire presentation does not fit within your viewing window, you can scroll the presentation to view other areas. In order to see another area, move your mouse to the edge of the window in the direction you would like to scroll. An arrow will appear. Hover on the arrow to scroll the view.
When sharing control, you may want to interact with the controls to perform actions such as changing your zoom level or viewing a chat message.
To view the conference controls, click on the full controls icon in the Shared Control Quick Access Bar. This allows you to interact with the conference controls in a restricted mode. When you are done interacting with the controls and want to return to controlling the presentation, click the background where it reads Click to resume control.
When you are done sharing control of the presentation, click the Stop controlling icon in the Shared Control Quick Access Bar to stop controlling the presentation.
Note:
When you stop controlling you do not give up your shared control rights. After you stop controlling, you can start controlling again as long as the current presenter does not revoke your rights (see How do I start using shared control? )While participating in an Oracle Beehive Conference, the system will notify you of any event or action that concerns you. These alerts and notifications will appear as pop-ups on your screen. For instance, you will get a pop-up alert when users join and exit the conference, when you have been granted or revoked special privileges, and when the host starts recording the conference.
The pop-up alerts appear on your screen for only a short period of time, unless you are actively hovering over them. Unless you hover your mouse over the pop-up, they will normally disappear after four seconds.
In some cases, you may miss a specific notification that required your attention. When that happens, a red badge appears over the attendee list icon or the shared control area to indicate your pending requests.
This section contains the following topics:
Some of the alerts you will get are purely informational. For instance, when a participant joins or leaves the conference, you get a pop-up alert to tell you that. Other alerts may tell you that your status within the conference has changed. For instance, you may be told that you can now present, or that your shared control privileges were revoked. Finally, you may receive a pop-up alert asking you to act on a particular request.
To configure your pop-up alert settings, see "Setting Conference Options".
When you receive an alert that requires an action from you (for instance, when someone requests shared control with you or requests presentation rights), a pop-up notification appears with the request details. You have the option to Accept or Decline the request.
You can choose to ignore the request for now, and the pop-up disappears after a few seconds. If you want to act on these requests again at a later time, you can do so through the Attendee List (if you are the host) or from the Presenter Console (if you are the presenter).
By default, whenever the status of the conference changes, such as an attendee joining, or the host granting shared control, an alert pop-up appears notifying attendees. You can choose to hide alerts, or turn off the alert sound, change alert timing and display settings.
For more information on turning on/off your pop-up alerts, see the section "Can I hide/show pop-up alerts?"
Yes, you can block all transient alerts when you are presenting, including requests for speaker rights or presenter rights.
For more information on turning on/off your pop-up alerts, see the section "Can I hide/show pop-up alerts?"
This section contains the following topics:
If you are currently setting up a conference and then decide to cancel it, simply click Cancel in the Create New Conference window. If you clicked Start, and want to cancel, see the section "How do I cancel a conference after it has started?."
If you are the host of the conference, and you clicked Start to begin a new conference, you can still cancel (or end) the conference by exiting the conference at any time. See the section "How do I end the conference when it's over?."
Note:
The conference will automatically end when the host exits the conference.Follow these steps to exit and end a conference (depending on your operating system):
To exit the conference, click the x in the top-right corner of the application's window.
At the prompt, click Yes if you want to disconnect from the conference. This will end your Oracle Beehive Conferencing session.
In the Mac toolbar, select Oracle Beehive Conferencing and click Exit. Alternatively, you can right-click on the Oracle Beehive Conferencing icon in the dock, and select Exit.
At the prompt, click Yes if you want to disconnect from the conference. This will end your Oracle Beehive Conferencing session.
To exit the conference, click the x in the top-right corner of the application's window.
At the prompt, click Yes if you want to disconnect from the conference. This will end your Oracle Beehive Conferencing session.
Note:
Since you are the host of the conference, the conference will automatically end when the you exit the conference.Oracle Beehive Conferencing includes a multiplex Voice-over-IP Voice Conferencing service for users to communicate with one another. This voice chat feature provides the host and attendees an opportunity to communicate directly and verbally with other users without necessarily requiring the use of a separate dial-in phone conference.
Note:
A microphone and speakers are required to speak and listen to a Beehive voice chat. The built-in microphone and speakers that come with your computer are generally sufficient for most Beehive voice chats. However, to keep other attendees' communication private, use your computer's headphones port to plug in a set of headphones or earphones. To adjust sound settings, see the sections "How do I adjust the volume (or mute) the speaker?" and "How do I adjust the volume (or mute) the microphone?."This section contains the following topics:
In the conference toolbar area of either the Oracle Beehive Conferencing Viewer Display or in the Presenter Console, click the Start Voice Chat icon.
In the dialogue that appears, click Beehive Voice Chat.
To adjust sounds settings, see "How do I adjust the volume (or mute) the speaker?" and "How do I adjust the volume (or mute) the microphone?."
As the host, you can grant the permission to speak to any attendee, at any time. However, as an attendee you can request speaker privileges from the conference host. See the section "How do I request to speak during the conference?" for more information.
Note:
If you encounter any issues with voice quality, or if you are unable to hear other speakers, see the section "Why can't I hear everyone speak?."You can allow someone else to speak in the following ways:
Respond to a request for presentation rights through a notification
Respond to a request for presentation rights through the Attendee List
If you are the host, you can give another person the right to speak through the Attendee List:
From the Oracle Beehive Conferencing Viewer Display or the Presenter Console, click the Attendee List button to show the Attendee List.
Select the participant from the Attendee List, and click Speaker.
The attendee now has speaking rights.
If you are not the host, you cannot grant speaker privileges. (But you can request speaker privileges. See How do I request to speak during the conference?)
If you are the host of the conference, you will receive a notification when a participant asks for speaker privileges.
To give the person speaker rights from the pop-up alert, click the Allow to Speak button. The requesting participant will be notified that speaker privileges have been granted.
When a participant asks for speaker privileges, the Attendee List section of the Oracle Beehive Conferencing Viewer Display or Presenter Console will show a red badge to indicate pending requests. The number on the badge indicates how many requests are pending.
From the Oracle Beehive Conferencing Viewer Display or the Presenter Console, click the Attendee List button to show the list of attendees.
Click the Requests tab in the Attendee List.
Select the participant from the Attendee List, and click Allow to Speak. Alternatively, you can grant speaker rights to all requests by clicking the Grant All button at the top of the window.
The participant now has speaker rights.
To adjust the volume (or mute) the speaker:
In the conference toolbar area of the Oracle Beehive Conferencing Viewer Display, hover over the volume button. Hovering over the icon will launch the volume controls.
Adjust the slider to the desired volume.
To mute and unmute the speakers, click on the volume button. This will move the volume slider to the bottom or back to the previous position.
The microphone volume is controlled by your computer's input device. You should go to your computer's volume settings to increase or decrease the microphone's volume.
To mute or unmute the microphone:
In the conference toolbar area of the Beehive Conferencing Viewer Display (or in the Presenter Console, if you are currently presenting), click the microphone icon.
Yes, if you are the host, you can mute all attendees in the conference when a voice conference is currently in progress. (Only the current host has the ability to mute other attendees.)
In the conference toolbar area of either the Beehive Conferencing Viewer Display or in the Presenter Console, click the Mute all participants icon.
Note:
Muting all the participants does not revoke their speaker privileges, nor is this a permanent operation. Participants can unmute themselves at any time and begin speaking again. The purpose of this feature is to quickly mute participants that may not be aware that they are broadcasting over voice chat.In the conference toolbar area of either the Beehive Conferencing Viewer Display or in the Presenter Console, click the Stop Voice Chat icon.
To start a voice chat at any time, see the section "How do I start a voice chat?."
Oracle Beehive Conferencing provides the host the ability to record the visual presentation and/or voice chat (depending on which are occurring). Additionally, the text chat session that occurs during the conference is also recorded. The voice and presentation is recorded together in one recording file, while the chat transcript is saved in a separate text file. By default, both recording files are stored in the same location.
This is especially useful if you want to keep a record of the conference and play back the file for future reference, particularly if you work with a globally-dispersed team, in which some invitees are unable to attend the conference when it was scheduled. Further, this is helpful if you want to track ongoing conversations or multiple topics being presented.
The section contains the following topics:
You can start a recording using the Start Recording option in the information toolbar of ether the Beehive Conferencing Viewer Display or the Presenter Console.
In the top information toolbar of the Oracle Beehive Conferencing Viewer Display or Presenter Console, click the Start Recording button (with a square record icon).
In the Recording [Conference Title] window, your conference information (Title, Host, and Start Time) appears in the top boxes. If you want to change this information (for the purpose of the recording file), enter new information.
In the Recording Location box, change one or more of the following:
Workspace: The workspace in which the conference recording will be saved. (The workspace selected when the conference was created is shown, by default)
Workspace Folder: Click the folder icon to select a different folder or workspace. The Documents folder is selected by default, for your Personal Workspace.
Recording Name: The title of the recording file. The title of the conference is shown, by default.
Optionally, you can customize the file name. By default, your name and the conference start time are shown as part of the recording file name. To change file naming options, clear one or both of the following options:
Include the host name in the recording file
Append the meeting start time to the recording file name
By default, any chat sessions that occur during the conference are also set to record. The chat archive file name reflects the same naming convention you selected for the recording file name.
If you do not want to save a transcript of the chat, clear the Save the conference chat transcript option.
When finished, click Start Recording.
When you are recording, a red dot and the word Recording appears in the information toolbar for all the participants.
You can start another recording (in the same conference session), by following similar steps as when you started the first recording. However, each additional recording will be saved to the same workspace location. You do not have an option to change this location. You can view a list of your existing files, but you cannot automatically customize the name of any additional recording files. To change the name of the recording file, enter a title for the new recording file.
Click the Pause(double bars) icon in the recording area of the information toolbar.
When a recording is paused, the Resume button appears. Click Resume to resume recording the same session.
When a recording is paused, the red dot turns gray and the notification Not recording appears in the information toolbar for all the participants.
Note:
If you pause and resume a recording, Oracle Beehive Conference will retain the original recording, and continue recording into the same file.Click the red Stop icon in the information toolbar of ether the Beehive Conferencing Viewer Display or the Presenter Console
At the prompt, click Yes to stop the recording, or No to keep recording.
When the recording is stopped, the red dot turns gray and the notification Not recording appears in the top information toolbar for all the participants.
Note:
Any time you stop a recording, Oracle Beehive Conference saves the recording in a media file for future access. If you restart the recording in the same session, a new media file will be created. See the section "Starting Another Recording."Recorded conference sessions are saved as a .asf file and stored in a designated Documents folder within either your personal workspace, or a team workspace. To access a recording, see the section "How do I access a recording?."
To play back a recording, you must use a Windows machine and have an Oracle-provided media player plug-in, called a codec, installed to open the file. For more information on how to play back a recording, see the section "How do I play back a recording?."
Attendees can change various display settings of their Oracle Beehive Conferencing session. For specific display enhancements added in this release, see the section "What are the display enhancements and changes in this release?."
This section contains the following topics:
By default, whenever the status of the conference changes, such as an attendee joining, or the host granting shared control, an alert pop-up appears notifying attendees. You can choose to hide alerts, or turn off the alert sound, change alert timing and display settings.
In the information toolbar at the top of the Beehive Conferencing Viewer Display, click the Preferences button (the wrench).
Clear the Show alerts when an attendee joins or leaves the conference check box.
Optionally, clear the Play a sound with alerts check box.
To hide alerts during your presentation, select the Hide all alerts while I am presenting option.
Click Save.
By default, whenever the status of the conference changes, such as an attendee joining, or the host granting shared control, an alert pop-up appears notifying attendees. You can choose to hide alerts, or turn off the alert sound, change alert timing and display settings.
In the information toolbar at the top of the Beehive Conferencing Viewer Display, click the Preferences button (the wrench).
To hide all alerts during your presentation, select the Hide all alerts while I am presenting option.
Click Save.
Note:
This will block all transient alerts, including requests for speaker rights or presenter rights.
|
Copyright © 2008, 2013, Oracle and/or its affiliates. All rights reserved. Legal Notices |
|