38 Creating a New Customer Center Profile Panel
This section uses an example to show how to create a new Oracle Communications Billing and Revenue Management (BRM) Customer Center profile panel using JBuilder.
Note:
These instructions assumed you have already set up JBuilder.Before you read this chapter, you should be familiar with these concepts:
You should also have a working knowledge of JBuilder.
Creating a New Profile Panel
Profile panels are extensions to the PIACAProfilePanel class. You use them to add data entry or display fields to the Customer Center Account Maintenance and New Accounts pages.
Note:
You mostly work with the widgets in the CCSDK Components widget palette since they are BRM aware. Additional widgets are included under the PFC Components tab, but they are not BRM aware. They provide functionality beyond the normal Java widget set, such as links, section headers, and drop-down menus.To create a new profile panel:
-
Be sure the /profile/creditscore profile object has been created in BRM.
Figure 38-1 shows a sample window from Developer Center. The CreditScoreProfile.sce file is open.
Figure 38-1 Developer Center View of /profile/creditscore Object
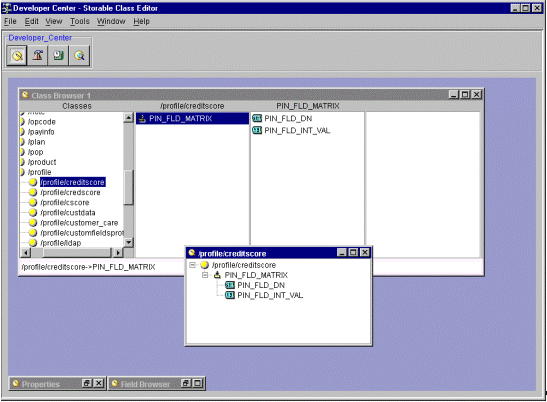
Description of ''Figure 38-1 Developer Center View of /profile/creditscore Object''
-
Go to the CCSDK_Home/CustomerCenterSDK/CustCntrExamples/Profile directory.
-
Copy ProfileTemplate.txt to CustomProfile.java. You can give the file any name.
-
Edit CustomProfile.java by changing all instances of XXX to CustomProfile (or whatever you have named your file) and move this file to the CCSDK_Home/CustomerCenterSDK/CustCntr/custom directory.
Important:
Always develop your deployment code in the CCSDK_Home/CustomerCenterSDK/CustCntr/custom directory. -
Find the following line of code:
setProfileType();
and modify this line to call out your profile subclass. For this example, change the line to:
setProfileType("creditscore");Important:
Be sure to omit the /profile. -
Start JBuilder and load the project you previously created.
The example project is called MyCustomizations.
-
Choose File – Open to open the CustomProfile.java file, and then click the Design tab.
-
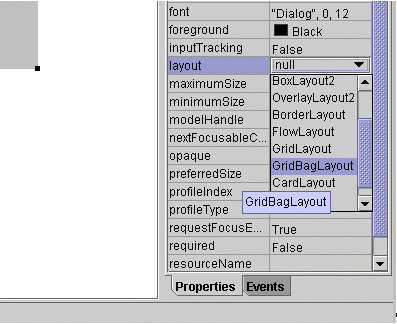
Select the gray panel in the center of the screen and make sure the layout is set to GridBagLayout.
If not, choose GridBagLayout from the drop-down menu associated with the layout property as shown in Figure 38-2.
-
From the Swing widget palette, select the Label widget as shown in Figure 38-3.
Figure 38-3 Selecting the Swing Label Widget
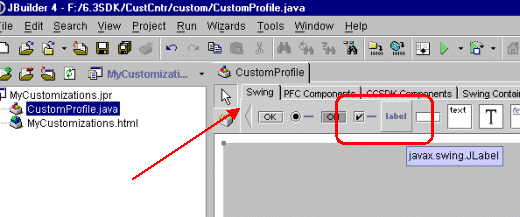
Description of ''Figure 38-3 Selecting the Swing Label Widget''
-
Drag a label widget in the gray work area in the center of the screen.
-
Select the label widget again and drag it below the first one as shown in Figure 38-4.
Figure 38-4 Adding a Second Label Widget
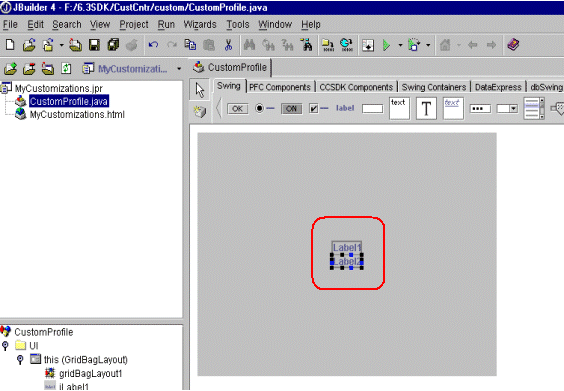
Description of ''Figure 38-4 Adding a Second Label Widget''
-
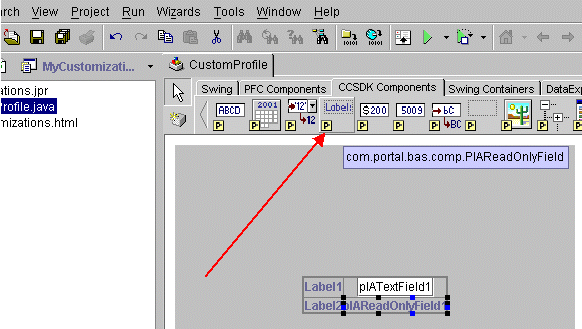
From the widget palette on the CCSDK Components tab, drag the PIATextField widget next to the first label widget as shown in Figure 38-5.
Figure 38-5 Adding a CCSDK PIATextField Widget
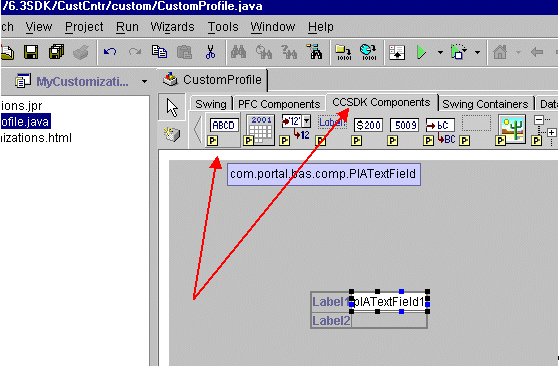
Description of ''Figure 38-5 Adding a CCSDK PIATextField Widget''
-
Drag a PIAReadOnlyField widget next to the second label widget.
In Figure 38-6, the first field is editable and the second is read-only:
-
Select the first label, click the text widget property, and enter the text Drivers License as shown in Figure 38-7:
Figure 38-7 Adding Text to a PIATextField
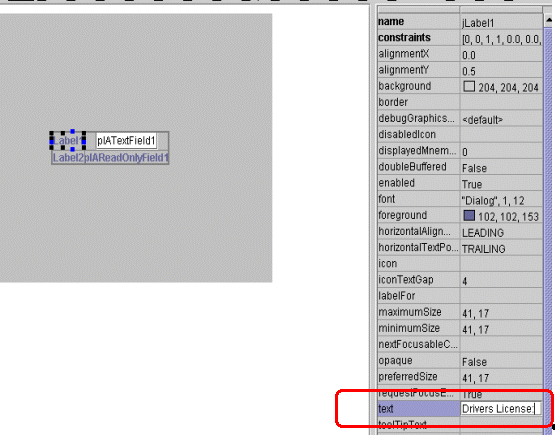
Description of ''Figure 38-7 Adding Text to a PIATextField''
-
Click the second label and enter Credit Score: as its text property.
-
Click the first textfield widget (the PIATextField).
In this example, you map this widget to the /profile/creditscore field that stores the drivers license data. With the widget selected, right-click the pIATextField1 instance variable on the left panel and choose Customizer.
-
To connect to BRM, enter the login and password.
Note:
You might need to expand the Connection info section and enter the host and port. -
In the Customizer dialog box, scroll down and expand the profile section of the tree and select the /profile/creditscore storable class. This is the profile object you created in Developer Center.
-
Select PIN_FLD_DN in the right pane.
The information at the bottom of the Customizer is filled in. This is the mapping of BRM fields to Java field names, which maps your widget to a BRM field. The customizer automatically fills in the necessary information to enable BAS to read and write the data to and from BRM.
In this example, you can leave the DisplayFieldFormat as is, it is used only when you are working with a BRM field that contains data that does not make sense to a person, such as the int values that represent an account's status. See the SDK documentation for more information on this field.
-
Click the Apply button, and then click OK.
The values are copied automatically from the Customizer to the appropriate widget properties.
-
Select the pIAReadOnlyField widget and display its customizer.
You are already connected to BRM, so you do not need to log in again.
-
Select PIN_FLD_INT_VAL, click Apply, and then click OK.
-
Save your changes in JBuilder.
At this point, you are done. However, you can modify the layout by adding space between the widgets and renaming the widgets more appropriately. For example, to rename the textfield widget, select its name property and change it to driversLicenseTextField.
-
If required, modify the initial widget values.
For example, select the textfield widget, select the columns property on the right side, and enter a value of 10 as shown in Figure 38-8.
Figure 38-8 Editing the Columns Property
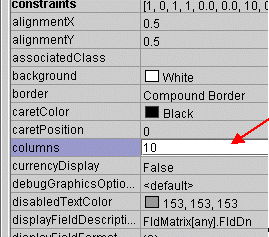
Description of ''Figure 38-8 Editing the Columns Property''
-
Select the textfield widget and on the right side of the JBuilder work area, click the text property. By default, it contains pIATextField. Delete the entire string.
-
If required, modify the read-only widget.
-
Right-click the widget and set its fill to Horizontal.
-
Select its text property value and delete it.
Tip:
You can switch back to the source code window to see the generated JBuilder code.
-
-
Save your code.
-
Use Configurator to integrate your profile panel to Customer Center:
-
If you are adding the profile panel to the account maintenance interface, see "Tab Options".
-
If you are adding the profile panel to the new account interface, see "New Account Page Options".
-
What's Next
If you have no further Customer Center customizations to code, see "Building Your Customer Center Customizations".