35 Using Configurator to Configure Customer Center
This section describes the Oracle Communications Billing and Revenue Management (BRM) Configurator application included with Customer Center Software Development Kit (SDK).
About Configurator
You use Configurator to configure the most commonly modified features of Customer Center. The Configurator interface mimics the tab organization of the Customer Center interface, so you can easily locate the features you want to modify.
When you choose File - Save in Configurator, Configurator saves the changes to the WizardCustomizations.properties and WizardCustomizationsResources.properties configuration files in the BRM_Home/CustomerCareSDK/CustCntr/bin directory, where BRM_Home is the directory in which you installed BRM components.
For an overview of all Customer Center properties files, see "Modifying the Customer Center Properties Files".
Using Configurator
To use Configurator to configure Customer Center:
-
Go to the CCSDK_Home/CustomerCareSDK/CustCntr/bin directory.
-
Double-click the runConfigurator executable script.
The Login dialog box appears.
-
Enter your login and password.
Important:
To verify that you have full access to make changes across all brands, use either your BRM root account or another account that is allowed to change permissions. See "About Granting Access to Brands" in BRM Managing Customers. -
Click the Connection Info button to display and, if needed, change the values for Host and Port. These entries are automatically filled in with the values you provided when you installed Customer Center SDK.
Note:
You can enter values that point to a different BRM server or database after installing Customer Center SDK. -
Click OK.
The Configurator application opens with the Summary Configurator tab on top.
-
Make your configurations:
-
To configure Customer Center panels that handle changes to existing accounts, see "Configuring Customer Center Account Maintenance Pages".
-
To configure Customer Center panels in the New accounts wizard, see "Configuring the Customer Center New Accounts Wizard".
Figure 35-1 shows where to find these options in the initial Configurator panel:
Figure 35-1 Customer Center Configurator Panel
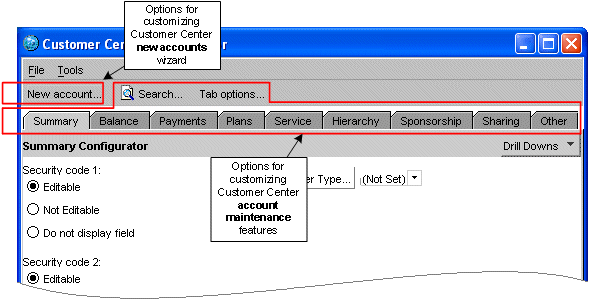
Description of ''Figure 35-1 Customer Center Configurator Panel''
-
-
Save your changes.
What's Next?
Continue coding your configurations using other methods described in "Customizing and Configuring Customer Center", or proceed to "Building Your Customer Center Customizations".
Configuring Customer Center Account Maintenance Pages
This section describes how to configure fields and pages used in Customer Center to display information about existing accounts.
Using the Account Maintenance Configurator Tabs
The tabs and toolbar selections in Configurator mirror the ones found in Customer Center.
Table 35-1 lists the Configurator tab selection options for configuring the corresponding account maintenance items in Customer Center.
Table 35-1 Configurator Account Maintenance Configurator Tab Selections
| Configurator Account Maintenance Tab | Tab Description |
|---|---|
|
Configures options in the Customer Center Summary tab |
|
|
Configures options in the Customer Center Contacts drill-down area of the Summary tab |
|
|
Configures options in the Customer Center Balance tab |
|
|
Configures options in the Customer Center Payment tab |
|
|
Configures options in the Customer Center Plans tab |
|
|
Configures options in the Customer Center Services tab |
|
|
Configures options in the Customer Center Hierarchy tab |
|
|
Configures options in the Customer Center Sponsorship tab |
|
|
Configures options in the Customer Center Sharing tab |
|
|
Handles configuration options that are not specific to a particular account maintenance tab |
Table 35-2 shows the Configurator toolbar selection options for configuring the corresponding account maintenance items in Customer Center.
Summary Configurator
Click the Summary tab to configure the fields and choices displayed on the Customer Center Summary page.
The Drill Downs menu on this tab displays two choices:
-
Summary
-
Contacts
Choose Summary to open the Summary Configurator, which displays the choices listed in Table 35-3:
| Item | Summary Page Action | Default |
|---|---|---|
|
Security code 1 |
Select an option to set permissions for the first Security code field.
|
Editable |
|
Security code 2 |
Select an option to set permissions for the second Security code field.
|
Editable |
|
Deferred actions |
Select or clear the option to display the Deferred actions field. |
Displayed |
|
Language (locale) |
Select or clear the option to display the Language field. |
Displayed |
|
Dispute |
Select or clear the option to display these dispute options:
|
Displayed |
|
Balance summary section |
Select or clear the option to display:
|
Displayed |
|
Payment type |
Select or clear the option to display the Billing Payment Method section of the Payments tab. Note: This option only affects the Payment page. It does not affect the Summary page. |
Displayed |
|
Show service in change status list |
Select or clear the option to display or hide the services in the Account/service drop-down list in the Change Account/Service Status panel in the Summary tab. |
Displayed |
|
Modify Customer Type |
Click Modify Customer Type to change the list of customer type options. See "Modifying the Customer Type List". |
Default list:
|
Modifying the Customer Type List
The Summary tab in Customer Center Configurator includes a Modify Customer Type button that allows you to modify the customer type pull-down list.
Adding a customer type
To add a customer type to the selector pull-down list:
-
In the Summary tab, click Modify Customer Type.
The Modify Customer Type window appears:
-
Type a BRM value in the Map the Infranet value field.
-
Type a string to associate with the BRM value in the To the string field.
Note:
The text in the To the string field will appear in the Customer Type selector pull-down list. -
Click Add.
Deleting a customer type
-
In the Summary tab, click Modify Customer Type.
-
Click the customer type you want to delete.
-
Click Delete.
Contacts Configurator
Choose Contacts from the Drill Downs menu to open the Contacts Configurator.
The Contacts Configurator options shown in the following table affect the text entry fields displayed in the Contact Information drill down on the Summary page. If you remove a field from the display, the fields that follow it are moved up on the displayed pages.
To change only the fields displayed in the New Account wizard, click the New account toolbar button and access the Contact Configurator for the "Configuring the Customer Center New Accounts Wizard". Set the values for the items listed in Table 35-4.
Note:
The Last name, Address, and Phone fields cannot be removed.Table 35-4 Contacts Configurator Items
| Item | Action | Default |
|---|---|---|
|
Company |
Select or clear the option to display the Company field. |
Displayed |
|
Job Title |
Select or clear the option to display the Job title field. |
Displayed |
|
Salutation |
Select or clear the option to display the Salutation field. |
Displayed |
|
First Name |
Select or clear the option to display the First name field. |
Displayed |
|
Middle Name |
Select or clear the option to display the Middle name field. |
Displayed |
|
City |
Select or clear the option to display the City field. |
Displayed |
|
State |
Select or clear the option to display the State/Province field. |
Displayed |
|
Zip |
Select or clear the option to display the ZIP/Postal field. |
Displayed |
|
Country |
Select or clear the option to display the Country field. |
Displayed |
|
|
Select or clear the option to display the Email field. |
Displayed |
Balance Configurator
Click the Balance tab to open the Balance Configurator. Use the Balance Configurator to configure the options (shown in Table 35-5) in the Balance tab of Customer Center:
Table 35-5 Balance Configurator
| Item | Balance Panel Action | Default |
|---|---|---|
|
Event browser |
Select or clear the option to display the Event Browser menu choice on the Edit menu. Note: This choice doesn't affect the Event Adjustment action. |
Displayed |
|
Refund |
Select or clear the option to display all of the following:
|
Displayed |
|
Dispute |
Select or clear the option to display all of the following:
|
Displayed |
|
Write-off |
Select or clear the option to display the of the following:
|
Displayed |
|
Make "Include Child Amount" checkbox read only |
Click the checkbox to enable or disable changing the selection of the Include Child Accounts checkbox. |
The Include Child Accounts checkbox choice can be modified. |
|
Balance summary section |
Select or clear the option to display the Balance Summary pane on the Balance page and the Currency Balance Summary pane on the Summary page. |
Displayed |
|
Noncurrency section |
Select or clear the option to display the Noncurrency panel. |
Displayed |
|
Account adjustment |
Select or clear the option to display the Account Adjustment link on the Balance and Bill Details pages. |
Displayed |
|
Item adjustment |
Select or clear the option to display the Item Adjustment choice in the Action menu in the Item Charges panel on the Bill Details drill-down page. |
Displayed |
|
Event adjustment |
Select or clear the option to display the Event Adjustment choice in the Action menu in the following:
|
Displayed |
|
Disable View Invoice Button in Bill Details page |
Select or clear the option to disable the View Invoice button in the Bills panel of the Balance tab. By default, this option is not selected. |
Enabled |
|
Tax treatment |
Select the option to control whether the customer center representative (CSR) can choose the Tax treatment on the adjustment, dispute, and settlement dialog boxes:
For more information on tax treatment, see "Configuring the Default Tax Treatment for Customer Center" in BRM Managing Accounts Receivable. |
None |
Payment Configurator
Click the Payments tab to open the Payment Configurator. Use the Payment Configurator to configure the options (shown in Table 35-6) in the Payment tab of Customer Center:
Table 35-6 Payment Configurator Items
| Item | Payments Panel Action | Default |
|---|---|---|
|
Payment section |
Select or clear the option to display the Payment Setup panel. |
Displayed |
|
Tax setup section |
Select or clear the option to display the Tax Setup panel. |
Displayed |
|
Credit Card Number - maximum digits allowed |
Enter an integer to indicate the maximum number of digits allowed for the Credit Card Number field. |
16 |
|
CVV2 Number - maximum digits allowed |
Enter an integer to indicate the maximum number of digits allowed for the CVV2 field. Important: If you change the default value, you must also customize the PCM_OP_CUST_POL_VALID_PAYINFO policy opcode to validate the number of CVV2 digits entered. See "Specifying the Maximum Number of Digits Allowed for CVV2 Verification" in BRM Configuring and Collecting Payments. |
3 |
|
Account Number - maximum digits allowed |
Enter an integer to indicate the maximum number of digits allowed for the Account Number field for direct debit accounts. |
26 |
|
Bank Number - maximum digits allowed |
Enter an integer to indicate the maximum number of digits allowed for the Bank Number field for direct debit accounts. |
26 |
|
Custom billing cycle/tax setup class |
Enter the custom PBillingCycleAndTaxSetupPage class name. For more information, see "Configuring Values in the Billing Day of Month Combo Box". |
Not customized |
Plan Configurator
Click the Plans tab to open the Plan Configurator. Use Plan Configurator to configure the options (listed in Table 35-7) in the Plans tab of Customer Center:
Table 35-7 Plan Configurator Items
| Item | Plan Panel Action | Default |
|---|---|---|
|
Product History |
Select or clear the option to display the Product History option in the Actions menu on the Plans page. |
Displayed |
|
Deal History |
Select or clear the option to display the Deal History option in the Actions menu on the Plans page. |
Displayed |
|
Service History |
Select or clear the option to display the Service History option in the Actions menu on the Plans page. |
Displayed |
|
Product status |
Globally modifies all Customer Center user permissions for altering Product Status settings. Note: To modify a specific user's permissions for altering Product Status settings, see the permission strings displayed when you click Additional note under the field. The permission string is entered in the Customer Center Permission dialog box. |
Read and write permissions |
Service Configurator
Click the Service tab to open the Service Configurator.
The Drill Downs menu on this tab displays two choices:
-
Service
-
Deferred Actions
Choose Drill Downs - Service to open the Service Configurator. Use Service Configurator to configure the options (shown in Table 35-8) on the Services tab of Customer Center:
Table 35-8 Service Configurator
| Item | Service Panel Action | Default |
|---|---|---|
|
Allow purchase products |
Select or clear the option to display the Purchase option. |
Displayed |
|
Service History |
Select or clear the option to display the Service History option. |
Displayed |
|
Status column |
Select an option to set permissions for entries in the Status column:
|
Editable |
|
Defer action column |
Select an option to set permissions for entries in the Defer Action column:
|
Editable |
|
Custom SIM Panel Class |
Enter the subclass of the SIMPanel.java class that you created for charging for Subscriber Identity Module (SIM) changes. For more information, see "Adding Charges for SIM and MSISDN Changes". |
Not customized |
|
Custom Number Panel Class |
Enter the subclass of the NUMPanel.java that you created for charging for MSISDN changes. For more information, see "Adding Charges for SIM and MSISDN Changes". |
Not customized |
|
Disable change in MSISDN number |
Select or clear the option to disable changes to the Mobile Station International Subscriber Directory Number (MSISDN) number. |
Enabled |
Choose Drill Downs - Deferred Actions to open the Deferred Actions Configurator. Set the items shown in Table 35-9.
Hierarchy Configurator
Click the Hierarchy tab to open the Hierarchy Configurator. Use Hierarchy Configurator to configure the options (shown in Table 35-10) on the Hierarchy tab in Customer Center:
Table 35-10 Hierarchy Configurator
| Item | Hierarchy Panel Action | Default |
|---|---|---|
|
Allow accounts to be moved |
Select or clear the option to display the Move button. |
Displayed |
|
Allow moves to be deferred |
Select or clear the option to display the Defer the action until field in the Move – Options dialog box. |
Displayed |
|
Custom Hierarchy Move Page Class |
Enter the name of your extended com.portal.app.cc.PHierarchyMovePage.java class for your custom search dialog box. For more information, see "Creating Customized Search Dialogs and Disabling the To Field". |
Not customized |
|
Allow accounts to be removed |
Select or clear the option to display the Actions – Remove from Hierarchy option. |
Displayed |
|
Allow removal to be deferred |
Select or clear the option to display the Action – Remove from Hierarchy – Effective Move Date option. |
Displayed |
|
Allow the bill in progress to be transferred or carried along |
Select or clear the option to display the:
Click the option under Default to set Transfer the (current) bill in progress as the default choice for both menus. |
Allowed |
|
Allow the bill in progress to be billed immediately |
Select or clear the option to display the Bill now option in the:
Click the option under Default to set Bill now as the default choice for both menus. |
Not allowed |
|
The confirmation dialog's default button is |
Select one of these options as the default confirmation button:
|
Yes Note: A CSR can still click the Cancel button. |
|
Custom NoHierarchy Page Class |
Enter your custom NoHierarchy page class. For more information, see "Adding a Custom NoHierarchy Page". |
Not customized |
|
Double click account opens the account |
Select or clear the option to enable opening any account in a hierarchy by double-clicking it. Note: If this feature is disabled, double clicking an account expands or collapses it. |
Enabled |
|
Show expand/collapse control |
Select or clear to display the expand and collapse controls (+ and - icons) in an account hierarchy. |
Not shown |
|
Expand entire hierarchy by default |
If the Show expand/collapse control option is selected, select or clear to specify whether the default tree display mode is expanded or collapsed. |
Not expanded |
|
Expand by default only when total number of accounts are less than |
If the Expand entire hierarchy by default, enter the threshold number of accounts above which the default display is collapsed. To show the entire hierarchy for any size tree, set the field to 0. Important: Customer Center performance might be affected if this field is set to 0 or a high number. If the number of accounts in the hierarchy is more than the expansion threshold, the account hierarchy is displayed as a collapsed tree and a message window indicates the complete hierarchy cannot be shown. |
Not specified (a default value of 25 is assumed) |
Sponsorship Configurator
Click the Sponsorship tab to open the Sponsorship Configurator. Click the Include sponsorship functionality checkbox to display or hide sponsorship information from all areas of Customer Center. The default behavior is to display sponsorship information.
Sharing Configurator
Click the Sharing tab to open the Sharing Configurator. Use Sharing Configurator to control how Customer Center adds members to resource sharing groups and to configure the options (shown in Table 35-11) on the Sharing tab in Customer Center:
Table 35-11 Sharing Configurator
| Item | Sharing Panel Action | Default |
|---|---|---|
|
Automatically participate in the membership |
Select the option to control whether members can automatically participate in group sharing:
Selecting Accept lets members benefit from resource sharing groups without having to explicitly join the group by clicking Participate in Membership. BRM automatically adds ordered balance groups to the data base for all members selected on the Add Members dialog box. For more information, see "Creating and Modifying Multiple Ordered Balance Groups Simultaneously" in BRM Managing Accounts Receivable. |
Decline |
|
Accepting the membership as |
Select the option to determine whether new resources sharing groups are added at the beginning or end of the ordered balance group list for participating services:
This setting controls the sequence in which BRM applies discount and charge sharing for a service. This setting also controls how the sharing groups for a service are arranged on the Sharing tab and Participate in Membership dialog box. For information on ordered balance groups, see "About Ordered Balance Groups" in BRM Managing Accounts Receivable. |
Last Priority |
|
Bill unit for group owner |
Select the option to display or hide Bill to put charges in and Payment method fields:
The Bill to put charges in field appears on the Charge Sharing Group and Discount Sharing Group dialog boxes. The Payment method field appears only on the Charge Sharing Group dialog box. |
Show it |
|
Ordering the Sharing combo box |
Change the order of the sharing groups in the View drop-down on the Sharing tab. To do so, select a group and click:
The list of groups always include PDiscount and PCharge. It also includes any new sharing group types you create and add to Customer Center. For information on adding new panels to Customer Center, see "Customizing the Customer Center Interface". For information on adding new sharing types to the View drop-down on the Sharing tab, see "Customizing Fields in the Sharing Tab". |
Discount sharing (PDiscount) is first |
Other Settings
Click the Other tab to configure default behavior for the items in Table 35-12:
| Item | Other Action | Default |
|---|---|---|
|
Alert user when opening accounts in different brands |
Select or clear the option to display an alert message to a CSR who opens two or more accounts in different brands. |
Not displayed Note: See "About Granting Access to Brands" in BRM Managing Customers. |
|
Display the connection info in the login dialog |
Select or clear the option to display the Connection Info button in the Login dialog box. |
Displayed Tip: If you are working in a single BRM environment, hide the Connection Info button. |
|
Background image in home page |
Enter the package path and name for an alternate image to display in the Customer Center home page. |
com/portal/app/cc/homebg.jpg |
|
Allow an account to have only one plan |
Select or clear this option to restrict accounts to have only one plan. When this option is selected, a CSR doesn't have the standard set of options in the Purchase Options field in the Plans - Purchase window. Instead, the CSR can only select the Upgrade from option to transfer the account to a new plan. |
Not restricted (accounts can have two or more plans) |
|
Enable plan options page when using plans with only optional deals |
Enable or disable the Plan Options tab in the Account purchase wizard when the plan being purchased has no required deals. |
Not enabled |
|
Class name for loading the Custom Properties |
Enter the class name that implements the LoadCustomProperties interface. Important: You must define the fully qualified class name, for example, com.helloworld.MyInterface. For more information, see "Configuring Dynamic Drop-Down Lists". |
Not customized |
|
Maximum number of contacts allowed for an account |
Enter the maximum number of contacts allowed for an account. |
-1 (No limit to the number of contacts in an account) |
|
Enforce deal customization |
Select or clear this option. When selected, Customer Center automatically reminds CSRs to visit the Customize Products page if they select a deal with required customization. |
Not selected |
Account Search Results Configurator
The Account Search Configurator wizard in the Customer Center SDK Configurator includes a Search Criteria section. You use this area to add, change, and delete custom search fields that CSRs use to search for accounts in Customer Center.
Note:
The Customer Center SDK includes sample configurations.To change Customer Search criteria field options in Customer Center by using the Account Search Configurator, follow these steps:
Starting Account Search Configurator
-
Start Configurator.
-
Click the Search toolbar button to open the Account Search Configurator dialog box. Use this dialog box to:
-
View and modify the list of fields available in the Customer Center Search dialog by default.
-
Add more fields.
-
Adding a New Search Criteria field
To add a new search criteria field:
-
In the Search Criteria section of the Account Search Configurator Wizard, click Add New.
-
In the Attributes window, type the values for the basic attributes fields:
-
Property file identifier: Type a keyword that is unique to the field.
Tip:
For easy identification, use a value that resembles the label name. For example, if you use Payment type for the label, you could use Payment_type for the Property file identifier.This key is stored in the Customized.properties file when you exit Configurator.
-
Label: The label that appears in the Search dialog box for this field.
-
(Optional) Mnemonic: A single letter that allows the customer service representative (CSR) to access this field quickly.
For example, if you specify t as the mnemonic for the Payment Type field, the CSR can access this field by typing Ctrl+t.
-
-
(Optional) To require CSRs to select from a set of specific values for the field:
-
Click the Define values for field option.
-
Type a selectable value in the Define value field.
-
Click Add.
-
Repeat steps 3b and 3c until all predefined options are added.
-
(Optional) To specify a default value for the field, select the button to the left of the field.
-
To delete a field value option, select its row and click Delete.
Figure 35-2 shows the Month field added with selectable values:
Figure 35-2 Month Field Attribute Configuration
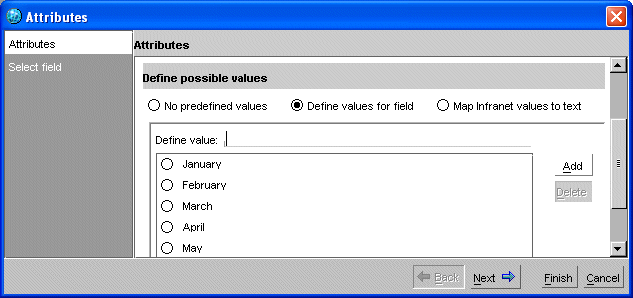
Description of ''Figure 35-2 Month Field Attribute Configuration''
When a CSR searches on the Month field, the pull-down list of months is presented (as shown in Figure 35-3):
Figure 35-3 Customer Center Month Pull-Down List
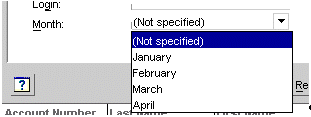
Description of ''Figure 35-3 Customer Center Month Pull-Down List''
Note:
If no default value is specified and the CSR selects it (the Not specified option) the search ignores the field. -
-
(Optional) To require CSRs to select from a set of predefined values that map to BRM values:
-
Click the Map Infranet values to text option.
-
Type value pairs for the Mapped the Infranet value and To the string fields.
-
Click Add.
-
Repeat steps 4b and 4c until all options are added.
-
(Optional) To specify a default value for the field, select the button to the left of the String field value.
-
To delete a field value option, select its row and click Delete.
Figure 35-4 shows how to add a Payment Type field with selectable values:
Figure 35-4 Adding a Payment Type in Configurator
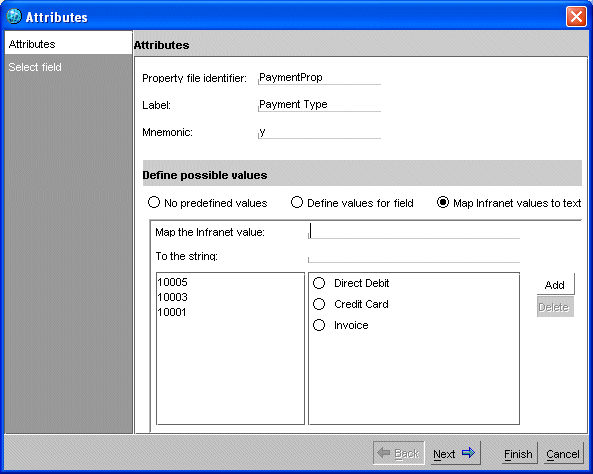
Description of ''Figure 35-4 Adding a Payment Type in Configurator''
When a CSR searches on the Payment Type field, the pull-down list of payment methods is presented as shown in Figure 35-5:
Figure 35-5 Customer Center Payment Type Pull-Down List
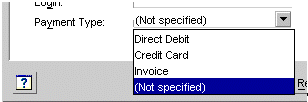
Description of ''Figure 35-5 Customer Center Payment Type Pull-Down List''
-
-
Click Next.
The Select field window displays storable classes and their fields in tree format.
-
Select a field from the appropriate storable class.
-
Click Finish. The new field appears at the bottom of the list in the Search Criteria section of the main Account Search Configurator window.
Modifying a Search Criteria Field
To modify an existing Search Criteria field:
-
In the Search Criteria area of the Account Search Configurator window, click the field to modify.
-
Click Modify.
-
In the Modify wizard, change the displayed attributes of the search field.
Note:
The Modify wizard is similar to the Add wizard. See "Adding a New Search Criteria field".The Modify wizard doesn't include a Property file identifier field in the Attributes window. You can't change the Property file identifier for a field after you add the field.
Deleting a Custom Search Criteria Field
To delete a custom Search Criteria field:
-
In the Search Criteria area of the Account Search Configurator window, select the custom field to delete.
-
Click Delete.
Note:
You cannot delete a default Search Criteria field. However, you can prevent it from displaying in Customer Center by clearing the check box next to the field. You can disable the display of custom Search Criteria in the same way.
Tab Options
This section describes how to reorder, modify, or add a page to the Customer Center account maintenance interface.
-
Start Configurator.
-
Click the Tab options button.
The Configure Page Maintenance wizard appears.
-
Make your configurations. See:
Reordering Pages
To reorder pages, highlight the page's name in the list and click one of the arrows to move its position on the page.
Modifying Attributes of an Existing Page
-
Highlight an existing page in the list.
-
Click Modify.
-
Modify the page's name, the tool tip text, or the name of the Java class that creates the page, as required.
Hiding an Existing Page
To hide an existing page, clear its checkbox in the list.
Important:
You cannot delete the default pages included with Customer Center. However, you can prevent their display.Adding a New Page
To add a new page, click the Add New button and enter information listed in Table 35-13:
Note:
To add a new page, first create the new page with an IDE tool such as JBuilder. See "Setting Up JBuilder to Customize the Customer Center Interface".Table 35-13 New Page Information
| Field | Description |
|---|---|
|
Property file identifier |
The property file key to attach your class values to. |
|
Name |
The tab text to display for your new page's name. |
|
Tool tip |
The tool tip text to display when the mouse hovers over the tab name. |
|
Java class name |
The name of the source file for your new page, in the format com.yourpackage.YourClassName. |
Removing a Custom Page
To remove a custom page, highlight the page and click the Delete button.
Note:
You cannot delete the default pages included with Customer Center, however, you can prevent their display.Configuring the Customer Center New Accounts Wizard
To configure fields and panels used in the Customer Center new accounts wizard:
-
Click the New account toolbar button in Configurator.
The new accounts configurator wizard appears.
-
Modify the configurator options as required.
Important:
The selections on each tab in this configuration wizard only affect the fields and options displayed in the New Account wizard. They do not impact the Contact Information drill-down on the account maintenance Summary page.Table 35-14 describes the main new account configuration pages:
Table 35-14 Contents of the New Account Configuration Page
New Account Wizard Panels Panel Description Configures options in the Customer Center New account Contacts panel
Configures options in the Customer Center New account General panel
Configures options in the Customer Center New account Payments panel
Configures options in the Customer Center New account Billing panel
To reorder, hide, or add New Account wizard panels, see "New Account Page Options".
Contacts Panel
Select Contacts in the navigation bar to open the Contacts Configurator. Use Contacts Configurator to configure the options (shown in Table 35-15) in the New accounts - Contacts tab in Customer Center.
Note:
-
If you clear a checkbox to hide a field, the fields that follow it are moved up in the display.
-
The Last name, Address, and Phone fields cannot be removed.
Table 35-15 Contacts Configurator Panel
| Item | New Account - Contacts Panel Action | Default |
|---|---|---|
|
Company |
Select or clear the option to display the Company field. |
Displayed (business accounts only) |
|
Job Title |
Select or clear the option to display the Job title field. |
Displayed (business accounts only) |
|
Salutation |
Select or clear the option to display the Salutation field. |
Displayed |
|
First Name |
Select or clear the option to display the First name field. |
Displayed |
|
Middle Name |
Select or clear the option to display the Middle name field. |
Displayed |
|
City |
Select or clear the option to display the City field. |
Displayed |
|
State |
Select or clear the option to display the State/Province field. |
Displayed |
|
Zip |
Select or clear the option to display the ZIP/Postal field. |
Displayed |
|
Country |
Select or clear the option to display the Country field. |
Displayed |
|
|
Select or clear the option to display The E-mail field. |
Displayed |
|
Contact Type |
Enter the default value for the Customer Center Contact Type field. Note: The default value appears during account creation and account maintenance operations. |
Account holder |
General Panel
Click the Next button or select General in the navigation bar to open the General Configurator. Use General Configurator to configure the options (shown in Table 35-16) in the New accounts - General tab in Customer Center:
Table 35-16 Items in General Panel for New Account
| Item | New Account-General Panel Action | Default |
|---|---|---|
|
Security Code 1 |
Select an option to set permissions for the first Security code field.
|
Editable |
|
Security Code 2 |
Select an option to set permissions for the second Security code field.
|
Editable |
|
Language (locale) field |
Select an option to set permissions for the Language field.
Note: If either the Read only or Hide options are selected, the user is given a choice at runtime to select the default locale to use. |
Editable |
|
Currency field |
Select an option to set permissions for the Primary currency and Secondary currency:
Select a default entry to use for the Primary currency field. Select a default entry to use for the Secondary currency field. Note: The Secondary currency is valid only if the Primary currency is Euro. |
Editable Note: The default currencies appropriate for the application's locale are displayed. |
|
Hierarchy support |
Select or clear the option to display the Hierarchy Setup panel. |
Displayed |
|
Hierarchy appears initially expanded |
Select or clear the option to display the hierarchies in expanded format. |
Displayed |
|
Sponsorship support |
Select or clear the option to display the Sponsorship Setup panel. |
Displayed |
|
Sponsorship appears initially expanded |
Select or clear the option to display the sponsorship in expanded format. |
Displayed |
Payment Panel
Click the Next button or select Payment in the navigation bar to open the Payment Configurator. Use Payment Configurator to configure the options (shown in Table 35-17) in the New accounts - Configurator tab in Customer Center:
Billing Panel
Click the Next button or select Billing in the navigation bar to open the Billing Configurator. Use Billing Configurator to configure the options (shown in Table 35-18) in the New accounts - Billing tab in Customer Center:
| Item | New Account Wizard – Billing Panel Action | Default |
|---|---|---|
|
Accounting type field |
Select one of these options to specify access to accounting type:
|
Editable |
|
Accounting type |
Select one of these options to specify access to accounting type:
|
Balance forward |
New Account Page Options
This section describes how to reorder, modify, or add a page, or add a profile panel to the Customer Center New Account wizard interface.
-
Start Configurator.
-
From any New account panel, select the Page Options button at the bottom of the panel.
-
Select either Consumer account or Business account depending on the account type you want to configure.
-
Make your configurations. See:
Reordering New Account Pages
To reorder pages, highlight the page's name in the list and click one of the arrows to change its position on the page.
Modifying an Existing Page
-
Highlight an existing page in the list.
-
Click Modify.
-
Modify the page's name, or the Java class that creates the page, as required.
Hiding an Existing Page
To hide an existing page, clear its checkbox in the list.
Note:
You cannot delete the default pages included with Customer Center. However, you can prevent their display.Adding a New Page
To add a new page, click the Add New button and enter information in the fields shown in Table 35-19:
Note:
To add a new page, first create the new page with an IDE tool such as JBuilder. See "Setting Up JBuilder to Customize the Customer Center Interface".Table 35-19 Information Required for a New Page
| Field | Description |
|---|---|
|
Property file identifier |
The property file key to attach your class values to. |
|
Name |
The tab text to display for your new page's name. |
|
Java class name |
The name of the source file for your new page, in the format com.yourpackage.YourClassName. |
Removing a Custom Page
To remove a custom page, highlight the page and click the Delete button.
Note:
You cannot delete the default pages included with Customer Center, however, you can prevent their display.Using the Configurator Resource String Editor
Configurator includes a Resource String Editor. You use this feature to replace Customer Center field labels with your custom text values.
To use the Resource String Editor, follow these steps:
Starting the Resource String Editor
To start the Resource String Editor, choose Tools - Resource String Editor from the Configurator main menu. The Resource String Editor appears.
Searching for Labels to Replace
To locate Customer Center field labels whose text you want to replace, type the label text you want to locate in the Change text from field and click Search. Any labels that contain matching text will appear in the results area.
Resource String Editor String Search Rules
-
Search matching is case sensitive.
-
Search matching is performed against the whole value of the field. For example, if you search for the string Balance, the results include screen labels that consist of only the word Balance.
-
You can use the use the wildcard symbol (*) at the end or beginning of your in your search string to return all labels that start or end with the search string, respectively.
-
Example 1
If you search for the string Balance*, you get the same matches as you do if you search for Balance plus longer labels that start with Balance, such as Balance summary and Balance forward.
-
Example 2
If you search for *forward, two items called Balance forward are returned.
-
Replacing Labels with New Strings
To replace label text with new text:
-
Click one or more matching fields whose label text you want to replace.
-
In the Change text to field, type the replacement text.
Important:
The entire label string of the selected labels is replaced with the replacement text in the Change text to field, not just the string you searched for. -
Click Apply.
Undoing Label Changes
To undo the last string replace operation during the current Configurator session:
-
If it is not already running, start Resource String Editor.
-
Click Undo.
-
When prompted to confirm, click Yes. Your changes are reversed.
Additional Configured Profile Panel Examples
For more complete examples, see the code in CCSDK_Home/CustomerCareSDK/CustCntrExamples/Profile:
-
CSProf.java demonstrates how to extend this example to manipulate the list of plans available for sale.
-
CDProf.java is an example similar to the one discussed above, but uses a different /profile object and different BAS widgets.