7 Installing BRM
This chapter describes how to install Oracle Communications Billing and Revenue Management (BRM) on HP-UX IA64, Linux, Solaris, and AIX.
This chapter is for network administrators, database administrators, and engineers who install and configure the BRM software. The person installing the software should be familiar with the following topics:
-
UNIX administration commands and the UNIX operating system.
-
Database configuration.
-
Network system management.
-
A UNIX text editor, such as vi or vuepad.
Important:
For instructions on installing optional components, such as RADIUS Manager or GSM Manager, see the documentation for those components.
Preparing for BRM Installation
To install BRM, you need the following:
-
A directory with sufficient space for the Third-Party software and the BRM software (at least 440 MB).
-
A user ID, such as pin, with the privileges to access the files under your BRM home directory and to execute BRM and third-party applications.
Important:
The user ID must also:-
Belong to the pin group.
-
Restrict file access from other operating system users.
-
Not have root access privileges.
-
Have password protections that prevent unauthorized access.
Important:
On the system on which you are installing BRM, make sure that a version of Java later than Java 1.6 is not installed. You can install the latest version of Java certified with BRM after installing the base BRM software.See "Other Compatible Software" for the latest version of JRE certified with BRM.
-
-
The BRM-related information that you noted when installing your database.
See "Information to Note during Oracle Installation".
Important:
If you are installing BRM on a HP-UX IA64 system, make sure you disable the memory window because BRM shares files for 32- and 64-bit applications from the same address space.
Granting Execute Permission for dbms_lock
Before you install BRM, you must grant execute permission to pin_user for dbms_lock. This ensures that all BRM stored procedures are successfully loaded into the database when the pin_setup script for BRM is run:
-
Log in to your database as user SYS:
% sqlplus "sys/password@databaseAlias as sysdba"
where:
-
password is the Oracle database user password.
-
databaseAlias is the Oracle database alias.
-
-
Grant execute privileges to pin_user:
SQL> grant execute on dbms_lock to pin_user
Granting Execute Permission for billing_updates
After you install BRM, grant execute permission to BRM users for the billing_updates store procedure on both primary and secondary databases by using SQL*Plus.
To grant execute permission for billing_updates:
-
Open SQL*Plus by running the following command:
% sqlplus "sys/password@databaseAlias as sysdba"
where:
-
password is the Oracle database password.
-
databaseAlias is the Oracle database alias.
-
-
Log in to the primary schema and run the following command:
SQL>grant execute on billing_updates to pin_schema1, pin_schema2
where:
-
pin_schema1 is the username of the primary schema.
-
pin_schema2 is the username of the secondary schema.
This command grants both the primary schema user and the secondary schema user the privilege to run billing_updates on the primary schema.
-
-
Log in to the secondary schema and run the following command:
SQL>grant execute on billing_updates to pin_schema1, pin_schema2
where:
-
pin_schema1 is the username of the primary schema.
-
pin_schema2 is the username of the secondary schema.
This command grants both the primary schema user and the secondary schema user the privilege to run billing_updates on the secondary schema.
-
Installing the SNMP Software
BRM uses the Simple Network Management Protocol (SNMP) to configure some system components.
Note:
SNMP is an optional component.To install the SNMP software, do the following:
-
Install the Third-Party software package.
-
Download the software to a temporary directory (temp_dir).
Important:
-
If you download to a Windows workstation, use FTP to copy the .bin file to a temporary directory on your UNIX server.
-
You must increase the heap size used by the Java Virtual Machine (JVM) before running the installation program to avoid ”Out of Memory” error messages in the log file. For information, see "Increasing Heap Size to Avoid ”Out of Memory” Error Messages".
-
-
Go to the directory where you installed the Third-Party package and source the source.me file.
Caution:
You must source the source.me file to proceed with installation; otherwise, ”suitable JVM not found” and other error messages appear.Bash shell:
source source.me.shC shell:
source source.me.csh -
Go to the temp_dir directory and enter the following command:
-
For Solaris 10 and Linux systems:
7.5.0_SNMP_3rd_party_tool_platform_64_opt.bin
where platform is solaris or linux.
-
For Solaris 11 systems:
7.5PS15_SNMP_3rd_party_tool_solaris11_64_opt.bin -
For AIX systems:
7.5PS1_SNMP_3rd_party_tool_aix_64_opt.bin -
For HP-UX IA64 systems:
7.5PS5_SNMP_3rd_party_tool_hpux_ia64_64_opt.bin
Note:
You can use the -console parameter to run the installation in command-line mode. To enable a graphical user interface (GUI) installation, install a GUI application such as X Windows and set the DISPLAY environment variable before you install the software. -
-
Follow the instructions displayed during installation. The default installation directory for the SNMP Third-Party package is opt/ifw.
The SNMP Third-Party software is now installed.
Installing and Configuring a BRM Demonstration System
The instructions in this section assume that you are installing all of the BRM components, including the database, on a single computer as shown in Figure 7-1:
Figure 7-1 Single Machine BRM Installation
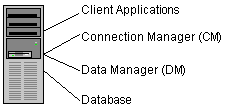
Description of ''Figure 7-1 Single Machine BRM Installation''
The procedures for installing a demonstration system include:
-
Enabling Different Classes for Partitioning during Installation
-
(Optional) Changing Your Database Partitions
Setting the BRM User's Environment
Create a BRM user, and set the user's environment before installing BRM.
-
In the .cshrc file, set the NLS_LANG environment variable to American_America.AL32UTF8.
Important:
You must use American_America as the language and territory, regardless of your locale, and the AL32UTF8 character set.The other environment variables are set during installation. See "BRM Environment Variables".
-
Update the environment for the current shell session:
% source .cshrc
Referencing Environment Variables in pin.conf Files
To prepare for migrating pin.conf files to other systems or platforms at a future time, you can reference certain environment variables from within the pin.conf files, as in this example:
- cm fm_module ${PIN_HOME}/lib/fm_utils/${LIBRARYEXTENSION} fm_utils_config fm_utils_init pin
For more information, see "Preparing for Platform Migration by Using Variables in pin.conf Files" in BRM System Administrator's Guide.
Installing a BRM Demonstration System
This section describes how to install a BRM demonstration system.
important:
If you are installing BRM to replace an identical release (for example, to restore a clean version of the package), you must first uninstall the existing installation. See "Uninstalling BRM".To install BRM:
-
If the Third-Party software package is not installed already, install it.
-
Log in as user pin.
% su - pinCaution:
Do not install as user root. -
Download the software to a temporary directory (temp_dir).
Important:
-
If you download to a Windows workstation, use FTP to copy the .bin file to a temporary directory on your UNIX server.
-
You must increase the heap size used by the Java Virtual Machine (JVM) before running the installation program to avoid ”Out of Memory” error messages in the log file. For information, see Increasing Heap Size to Avoid ”Out of Memory” Error Messages.
-
-
Stop all BRM processes. See "Starting and Stopping the BRM System" in BRM System Administrator's Guide.
-
Go to the directory where you installed the Third-Party package and source the source.me file.
Caution:
You must source the source.me file to proceed with installation; otherwise, ”suitable JVM not found” and other error messages appear.Bash shell:
source source.me.shC shell:
source source.me.csh -
Go to temp_dir directory and run the following command:
-
For Solaris 10 and Linux systems:
7.5.0_Portal_Base_platform_32_opt.bin
where platform is solaris or linux.
-
For Solaris 11 systems:
7.5PS15_Portal_Base_solaris11_32_opt.bin -
For AIX systems:
7.5PS1_Portal_Base_aix_32_opt.bin -
For HP-UX IA64 systems:
7.5PS5_Portal_Base_hpux_ia64_32_opt.bin
Note:
You can use the -console parameter to run the installation in command-line mode. To enable a graphical user interface (GUI) installation, install a GUI application such as X Windows and set the DISPLAY environment variable before you install the software. -
-
Follow the instructions displayed during installation (see Table 7-1). Your responses are written to the BRM_Home/setup/pin_setup.values file, where BRM_Home is the directory in which BRM is installed.
Prompt Description Directory name:
Enter the directory in which to install BRM. The default is /opt/portal/7.5.0.
Setup type:
Enter the type of installation you prefer. The default is Typical.
-
Enter Typical for development and production systems.
-
Enter Demo for test or demonstration systems. This is the quickest option and asks you the least number of questions.
-
Enter Custom for production systems. The installer lets you install a subset of the BRM components.
Select the database type:
Select the version of Oracle Database you are using.
Create BRM Database Tablespaces?
Enter whether you want the installer to create default tablespaces for you.
Enter No to create custom tablespaces manually. You must create your tablespaces before you run the pin_setup script.
Caution: Entering Yes may cause installation to fail.
Database alias:
Enter your database alias. The default is pindbhostname.
Oracle DM database number:
Enter the database number. The default is 0.0.0.1.
Oracle DM port:
Enter the port number for the BRM Data Manager (DM). The default is 12950.
Database username:
Enter your database user name. The default is pin.
Database password:
Enter your database password. The default is pin.
Oracle DM character set:
Enter the character set your database uses. BRM strongly recommends using the AL32UTF8 character set. The default is AL32UTF8.
Storage Model used for Oracle tablespaces:
Enter the desired size of your database. The default is Small.
-
Enter Test for test or demonstration databases smaller than 700 MB.
-
Enter Small for demonstration databases smaller than 1.5 GB.
-
Enter Medium for production databases smaller than 30 GB.
-
Enter Large for production databases larger than 30 GB.
Tablespace name for Tables:
Enter the name of your data tablespace. The default is pin00.
Tablespace name for Indexes:
Enter the name of your index tablespace. The default is pinx00.
Drop the BRM tables?
Enter whether you want to drop the database tables. The default is Yes.
Caution: If you select Yes, the installer drops all existing tables on your system. This results in irrecoverable loss of data. Do not use this unless you have backed up all of your existing data.
If you select No, the installer uses your existing BRM tables.
In test systems, select Yes to reinitialize the database.
Partition tables?
Specify whether you want to enable partitioning. The default is Yes.
Caution: To partition tables, you must have Oracle Partitioning installed. If you select Yes but do not have Oracle Partitioning installed, the BRM setup program fails when it tries to create partitions.
-
If you select Yes, the following classes are automatically enabled for partitioning: event, bill, invoice, item, journal, newsfeed, sepa, and user activity. To enable other classes for partitioning during installation, see "Enabling Different Classes for Partitioning during Installation".
Note: This sets the $ENABLE_PARTITION parameter to Yes in the pin_setup.values file.
-
If you select No, you can enable partitioning after installation. See "Converting Nonpartitioned Classes to Partitioned Classes" in BRM System Administrator's Guide.
-
If you plan to use Rated Event (RE) Loader to load prerated events, you must partition your event tables.
For more information, see "Partitioning Tables" in BRM System Administrator's Guide.
Add 12 fixed (monthly) partitions to all event tables?
This prompt is displayed only if you enter Yes to the "Partition tables?" prompt.
Specify whether you want the installer to add 12 monthly partitions to your event tables:
-
Enter Yes to have the installer add 12 monthly partitions, a historic partition, and a last partition to your event tables.
This sets the $SETUP_CREATE_PARTITIONS parameter to Yes in the pin_setup.values file.
-
Enter No if you want the installer to add only a historic partition and a last partition to the event tables. You can use this partitioning layout for a simple test or demonstration system. For a production system, however, you must add purgeable partitions after installation is complete and before the system generates events.
CM Port:
Enter the port number for the Connection Manager (CM). The default is 11960.
Install Summary:
The install location and features that will be installed are displayed.
-
-
Go to BRM_Home and source the source.me file:
Bash shell:
source source.me.shC shell:
source source.me.csh -
To further configure BRM, such as changing the default currency and country or adding partitions for additional storable classes, edit the BRM_Home/setup/pin_setup.values file.
For example, see "Enabling Different Classes for Partitioning during Installation".
This file stores the information you provided to the installer and a number of database and add-on component parameters.
-
Run the BRM_Home/setup/pin_setup script.
For information on how to run the pin_setup script, see "Running the pin_setup Script".
Enabling Different Classes for Partitioning during Installation
If you choose to enable partitioning during installation by responding Yes to the Partition tables? prompt (see step 7), the following storable classes are made partitionable by default when pin_setup is run:
-
bill
-
event
-
invoice
-
item
-
journal
-
newsfeed
-
sepa
-
user activity
To enable partitioning for different storable classes during the BRM installation, you must edit the pin_setup.values file before running the pin_setup script.
Note:
To enable partitioning for storable classes after installation, see "Converting Nonpartitioned Classes to Partitioned Classes" in BRM System Administrator's Guide.To enable different storable classes for partitioning during installation:
-
Open the BRM_Home/setup/pin_setup.values file.
-
Ensure that the $ENABLE_PARTITION parameter is set to Yes.
-
In the @CLASSES_TO_BE_PARTITIONED entry, add or remove storable classes. Following is the default list:
@CLASSES_TO_BE_PARTITIONED = ("/bill:local","/invoice:local","/item:local", "/journal:local","/newsfeed:local","/sepa:local","/user_activity:local");-
Add classes that you want to enable for partitioning, in the following format:
"/class_name:index_type"
Where:
-
class_name is the name of a base storable class.
Add only base storable classes to the list.
The event storable class is never added to the list. If partitioning is enabled ($ENABLE_PARTITION = Yes), the event tables are always partitioned.
-
index_type is one of the following index types available for non-event partitions (all event indexes are local):
:local — Maintenance can be done without shutting down BRM, but performance may suffer. Search operations are more time consuming because searches must hit every local index.
:global — Search operations are fast, but BRM services must be shut down before adding or dropping partitions. Tables with global indexes require the indexes to be rebuilt.
Caution:
When pin_setup is run, the tables of storable classes enabled for partitioning get an initial partition. Because BRM does not provide a tool to revert partitioned tables to nonpartitioned tables, these partitions cannot easily be removed after data starts being stored in them. -
-
Remove storable classes that you do not want to enable for partitioning.
-
-
Save and close the file.
Running the pin_setup Script
Important:
Make sure you logged in as user pin. If you logged in as another user, you must manually edit the BRM_Home/setup/pin_setup file by changing the PINUSER entry to your user name.The pin_setup script reads the pin_setup.values file and the pin_tables.values file and configures BRM by performing these tasks:
-
Initializes the database.
-
Configures the various configuration (pin.conf) files.
-
Sets up data files, such as Balance Element ID Objects (BEIDs), G/L IDs, ratable usage metrics (RUMs), and price lists.
-
Sets up database tables and indexes.
To run the pin_setup script:
-
Go to the BRM_Home/setup directory and enter the following command:
% ./pin_setup -
Check the pin_setup.log file for status and errors.
Note:
After you run pin_setup, the cm.pinlog file erroneously contains several PIN_ERROC_FLIST and PIN_ERRCLASS_SYSTEM_DETERMINATE error messages. You can safely ignore these messages.
Changing Your Database Partitions
If you did not enable partitioning during installation, skip this section.
Note:
To enable partitioning after installation, see "Converting Nonpartitioned Classes to Partitioned Classes" in BRM System Administrator's Guide.If you did enable partitioning for one or more storable classes during installation, the tables for those storable classes are now divided into the following partitions:
-
Event tables
-
If you chose to add 12 fixed partitions to your event tables, those tables were divided into 12 monthly partitions, a historic partition, and a last partition. See "About the Default Partitioning Scheme" in BRM System Administrator's Guide.
-
If you chose not to add 12 fixed partitions to your event tables, those tables were divided into a historic partition and a last partition (which stores all purgeable objects for the table). This partitioning scheme is sufficient for a test or demonstration system. For a production system, however, you must create purgeable partitions.
-
-
Item tables
Tables for item storable classes were divided into a historic partition and a last partition.
-
Tables for all other storable classes in @CLASSES_TO_BE_PARTITIONED
Tables for all storable classes listed in the pin_setup.values file's @CLASSES_TO_BE_PARTITIONED entry except the item storable class were given only one partition, partition_last (see "About Objects Stored in partition_last and partition_last_pin" in BRM System Administrator's Guide). For a production system, you must create purgeable partitions.
Note:
To test partitioning, you must add at least one purgeable partition.Important:
To change your partitioning scheme (for example, by adding purgeable partitions), do so before any objects are stored in the partitions you want to modify. Do not modify a partition after BRM adds objects to the partition.
For information about changing your partitioning scheme, see "Partitioning Tables" in BRM System Administrator's Guide.
Loading the Tailor-Made Stored Procedure
Loading of the stored procedure is required for the Tailor-Made Plan feature.
The following are the requirements to load the tailor-made stored procedure:
-
BRM and Pipeline Manager should be installed.
-
The BRM schema and the Pipeline Manager schema should reside on the same database.
To load the stored procedure, do the following:
-
Connect to the Oracle database with SQL*Plus:
% sqlplus system/manager@databaseAlias
-
Grant access of pipeline schema to user pin by doing the following:
-
Run the SQL grant select, update, insert, delete commands on the Pipeline Manager tables. For example, for the ifw_rateplan table, run the command:
SQL> grant select, update, insert, delete on ifw_rateplan to pin;Run the command on the following tables:
-
ifw_rateplan
-
ifw_rateplan_cnf
-
ifw_rateplan_ver
-
ifw_model_selector
-
ifw_selector_detail
-
ifw_selector_rule
-
ifw_selector_rule_lnk
-
ifw_selector_ruleset
-
ifw_pricemodel
-
ifw_pricemdl_step
-
-
Run the SQL grant select commands on the Pipeline Manager tables mentioned below. For example, for the ifw_service table, run the command:
SQL> grant select on ifw_service to pin;Run the command on the following tables:
-
ifw_service
-
ifw_timezone
-
ifw_timemodel
-
ifw_impact_cat
-
ifw_zonemodel
-
ifw_calendar
-
-
Run the SQL grant select commands on the Pipeline Manager sequences. For example, for the ifw_seq_selectordetail sequence, run the command:
SQL> grant select ifw_seq_selectordetail to pin;Run the command on the following tables:
-
ifw_seq_selectordetail
-
ifw_seq_selectorrule
-
ifw_seq_modelselector
-
ifw_seq_pricemodel
-
ifw_seq_rateplan
-
-
-
Type exit to exit SQL*Plus.
-
Go to the IFW_Home/database/Oracle/Scripts directory, where IFW_Home is the pipeline install directory.
-
Enter the following command to open SQL*Plus:
sqlplus pin/pin@database_Name
where database_Name is the service name or database alias of the Oracle database.
-
Enter the following command to load the stored procedure:
SQL>@create_pricing_tailormadeplan_procedures.plb -
Type exit to exit SQL*Plus.
Installing and Configuring a BRM Production System
For a production system, you optimize BRM performance and availability by installing and running the BRM database on its own computer and the various processes on separate computers.
In a production environment, computers are typically dedicated to the following functions:
-
Client applications
-
CM and Oracle DM
-
BRM database
For an overview of the different ways to set up a production system, see "Types of BRM Systems".
The instructions in this section assume that you have three machines in your production system as shown in Figure 7-2:
Figure 7-2 Production BRM System on Three Machines
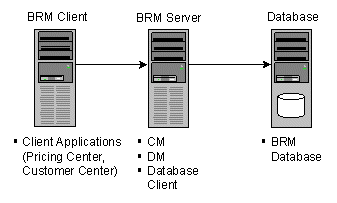
Description of ''Figure 7-2 Production BRM System on Three Machines''
-
The BRM client machine is a Windows system that runs BRM client applications, such as Pricing Center. These applications provide a graphical user interface to the data in the BRM database. All client applications communicate with BRM through the CM.
-
The BRM server machine contains your CM, DM, and database client. BRM communicates with the database through the Oracle DM.
-
The database machine contains your BRM database.
The procedures for installing a production system include:
-
Enabling Different Classes for Partitioning during Installation
-
(Optional) Changing Your Database Partitions
-
(Optional) Installing Sample Data Files
-
Installing Optional Components on a Separate Machine from the CM
Installing the Database Client
If you are installing the Oracle DM and your database on separate machines, you must install a database client. For information, see "Installing the Database and Oracle DM on Separate Machines".
Setting the BRM User's Environment
Create a BRM user and set the user's environment before installing BRM.
-
In the .cshrc file, see the NLS_LANG environment variable to American_America.AL32UTF8.
Important:
You must use American_America as the language and territory, regardless of your locale, and the AL32UTF8 character set. -
Update the environment for the current shell session:
% source .cshrc
Referencing Environment Variables in pin.conf Files
To prepare for migrating pin.conf files to other systems or platforms at a future time, you can reference certain environment variables from within the pin.conf files, as in this example:
- cm fm_module ${PIN_HOME}/lib/fm_utils/${LIBRARYEXTENSION} fm_utils_config fm_utils_init pin
For more information, see "Preparing for Platform Migration by Using Variables in pin.conf Files" in BRM System Administrator's Guide.
Installing a BRM Production System
Note:
If you have already installed the product, features that are already installed cannot be reinstalled without uninstalling them first. To reinstall a feature, uninstall it and then install it again.You can install a subset of BRM components, such as the CM and DM, on a single machine to save disk space.
Important:
If you are installing the CM and DM on separate machines, make sure all DMs are running before you install the CM.To install individual components:
-
If the Third-Party software package is not installed already, install it.
-
Log in as user pin.
-
Stop all BRM processes. See "Starting and Stopping the BRM System" in BRM System Administrator's Guide.
-
Go to the temp_dir directory where you downloaded the BRM software and enter the following command:
-
For Solaris 10 and Linux systems:
7.5.0_Portal_Base_platform_32_opt.bin
where platform is solaris or linux.
-
For Solaris 11 systems:
7.5PS15_Portal_Base_solaris11_32_opt.bin -
For AIX systems:
7.5PS1_Portal_Base_aix_32_opt.bin -
For HP-UX IA64 systems:
7.5PS5_Portal_Base_hpux_ia64_32_opt.bin
Note:
You can use the -console parameter to run the installation in command-line mode. To enable a graphical user interface (GUI) installation, install a GUI application such as X Windows and set the DISPLAY environment variable before you install the software.This starts the installation program.
-
-
Enter Custom when asked to specify the setup type.
Select features you want to install by typing their respective numbers. Click Next.
-
Follow the instructions displayed during installation.
Your responses are written to the BRM_Home/setup/pin_setup.values file. For a description of all prompts, see "Prompt Descriptions".
-
Go to the directory where you installed the BRM software and source the source.me file:
Bash shell:
source source.me.shC shell:
source source.me.csh -
To further configure BRM, such as changing the default currency and country, edit the BRM_Home/setup/pin_setup.values file.
The component files are copied to your machine.
Editing the pin_setup.values File
To further configure BRM, such as changing the default currency and country, you edit the BRM_Home/setup/pin_setup.values file. This file stores the information you provided to the installer and a number of database and add-on component parameters.
The entries you need to edit in the pin_setup.values file depend on which components you install on the current machine. For example, if you are installing the Email DM on the current machine, edit the $DM_EMAIL entries.
The following examples show the important entries to check in three configurations:
-
The CM and DM reside on separate machines.
-
The system contains multiple Oracle DMs connected to one database.
-
Invoices are stored in a separate database schema.
Example 7-1 The CM and DM Reside on Separate Machines
Machines that contain a CM must include the correct port number and host name of each DM in the system. This is especially critical when DMs reside on separate machines from the CM.
For example, you might install the Oracle DM and Email DM on a separate machine from the CM. In this case, you must modify the parameters in the CM machine's pin_setup.values file as shown in Table 7-2:
Table 7-2 CM Machine's pin_setup Values
| Entry | Description |
|---|---|
|
$DM_ORACLE{'port'} |
Must contain the port number of the Oracle DM. |
|
$DM_ORACLE{'hostname'} |
Must contain the host name of the machine running the Oracle DM. |
|
$DM_EMAIL{'port'} |
Must contain the port number of the Email DM. |
|
$DM_EMAIL{'hostname'} |
Must contain the host name of the machine running the Email DM. |
Example 7-2 The System Contains Multiple Oracle DMs Connected to One Database
When your system contains multiple Oracle DMs connected to one database, you must initialize the database and drop the tablespaces only once. In this case, you must modify each DM machine's pin_setup.values file as shown in Table 7-3:
Table 7-3 DM Machine's pin_setup Values
| Entry | Description |
|---|---|
|
$SETUP_INIT_DB |
Must be set to Yes on the primary Oracle DM machine; on all other machines containing an Oracle DM, set to No. |
|
$SETUP_DROP_ALL_TABLES |
Must be set to Yes on the primary Oracle DM machine; on all other machines containing an Oracle DM, set to No. |
Example 7-3 Invoices Are Stored in a Separate Database Schema
Storing invoices in their own database schemas speeds up the invoicing process; enables you to store a large number of invoices; and enables you to view, email, and print invoices without affecting the performance of the main BRM schema.
If you are storing invoices in their own schemas, you must update the pin_setup.values file to include the correct pointers to the invoice schema. Therefore, you must modify the parameters listed in Table 7-4 on the machine containing the Invoice DM.
Note:
The Invoice DM is supported only on Oracle databases.Table 7-4 Invoice DM Machine's pin_setup Values
| Entry | Description |
|---|---|
|
$INVOICE_DB{'user'} |
Must contain the user name to log in to your invoice schema. This user name must be different from the one used for the main BRM schema. |
|
$INVOICE_DB{'password'} |
Must contain the password to log in to your invoice schema. |
|
$INVOICE_DB{'alias'} |
Must contain the database alias of the invoice schema. |
|
$INVOICE_DB{'Host'} |
Must contain the host name of the machine running the invoice schema. |
|
$INVOICE_DB{'tables_group'} |
Must contain the name of the data tablespace. |
|
$INVOICE_DB{'indexes_group'} |
Must contain the name of the index tablespace. |
|
$DM_INVOICE{'port'} |
Must contain the port number of the Invoice DM. For guidelines, see "Guidelines for Database and Port-Number Entries" in BRM System Administrator's Guide. |
|
$DM_INVOICE{'db_num'} |
Must contain the database number for the invoice schema. |
Editing the pin_tables.values File
If you install BRM with the default settings, BRM data is stored in a single tablespace (pin00), and BRM indexes are stored in a second tablespace (pinx00). Although you can run and test BRM with just these tablespaces, you need multiple tablespaces for optimal performance on a production system.
If your BRM database contains multiple tablespaces, you must use the BRM_Home/setup/scripts/pin_tables.values file to map the BRM tables to the tablespaces you created in Oracle. For information on how to map your tables, see "Mapping Tablespaces to Logical Devices".
Enabling Different Classes for Partitioning during Installation
If you choose to enable partitioning during installation by responding Yes to the Partition tables? prompt (see step 7), the following storable classes are made partitionable by default when pin_setup is run:
-
bill
-
event
-
invoice
-
item
-
journal
-
newsfeed
-
sepa
-
user activity
To enable partitioning for different storable classes during the BRM installation, you must edit the pin_setup.values file before running the pin_setup script.
Note:
To enable partitioning for storable classes after installation, see "Converting Nonpartitioned Classes to Partitioned Classes" in BRM System Administrator's Guide.To enable different storable classes for partitioning during installation:
-
Open the BRM_Home/setup/pin_setup.values file.
-
Ensure that the $ENABLE_PARTITION parameter is set to Yes.
-
In the @CLASSES_TO_BE_PARTITIONED entry, add or remove storable classes. Following is the default list:
@CLASSES_TO_BE_PARTITIONED = ("/bill:local","/invoice:local","/item:local", "/journal:local","/newsfeed:local","/sepa:local","/user_activity:local");-
Add classes that you want to enable for partitioning, in the following format:
"/class_name:index_type"
Where:
-
class_name is the name of a base storable class.
Add only base storable classes to the list.
The event storable class is never added to the list. If partitioning is enabled ($ENABLE_PARTITION = Yes), the event tables are always partitioned.
-
index_type is one of the following index types available for non-event partitions (all event indexes are local):
:local — Maintenance can be done without shutting down BRM, but performance may suffer. Search operations are more time consuming because searches must hit every local index.
:global — Search operations are fast, but BRM services must be shut down before adding or dropping partitions. Tables with global indexes require the indexes to be rebuilt.
Caution:
When pin_setup is run, the tables of storable classes enabled for partitioning get an initial partition. Because BRM does not provide a tool to revert partitioned tables to nonpartitioned tables, these partitions cannot easily be removed after data starts being stored in them. -
-
Remove storable classes that you do not want to enable for partitioning.
-
-
Save and close the file.
Running the pin_setup Script
The pin_setup script reads the pin_setup.values and pin_tables.values files and configures BRM by:
-
Configuring your various configuration (pin.conf) files.
-
Setting up database tables and indexes.
To run the pin_setup script:
-
Go to the BRM_Home/setup directory and enter the following command:
% ./pin_setup -
If you receive a notification that you must append information to the CM pin.conf file:
-
Append the lines from the BRM_Home/append_to_cm_pin_conf file to the CM machine's BRM_Home/sys/cm/pin.conf file.
-
Stop and restart the CM process.
You receive the notification shown below when you install a DM component on a separate machine from the CM component:
Warning: File not found: BRM_Home/sys/cm/pin.conf
         To complete the install, append the following
         file to the sys/cm/pin.conf file and then restart the CM
         process:
         "BRM_Home/append_to_cm_pin_conf"
-
-
Check the pin_setup.log file for status and errors.
Note:
After you run pin_setup, the cm.pinlog file erroneously contains several PIN_ERROC_FLIST and PIN_ERRCLASS_SYSTEM_DETERMINATE error messages. You can safely ignore these messages.
By default, the pin_setup script configures only the last installed product by reading the pin_setup.values file. You can also do the following:
-
Use the -all parameter to configure BRM and all the optional components present in the @PRODUCT_LIST section of pin_setup.values.
For example, go to the BRM_Home/setup directory and enter the following command:
pin_setup -all -
Use the productname parameter to configure only BRM or an optional component present in the @PRODUCT_LIST section of the pin_setup.values file.
For example, go to the BRM_Home/setup directory and enter the following command:
pin_setup productname
where productname indicates the name of the optional component you want to configure.
Important:
Make sure productname matches the name of the optional component present in the @PRODUCT_LIST section of the pin_setup.values file.
Completing the Installation
After BRM has been installed on each computer, check the parameters in the CM configuration file (BRM_Home/sys/cm/pin.conf) and Oracle DM configuration file (BRM_Home/sys/dm_oracle/pin.conf).
-
In the BRM_Home/sys/cm/pin.conf file, verify that the dm_pointer entry contains the DM machine's host name or IP address.
Your pin.conf file must contain a dm_pointer entry for each DM in your system. Verify that any additional dm_pointer entries include the correct host name:
- cm dm_pointer 0.0.0.1 ip dm_machine 12950
-
In the BRM_Home/sys/dm_oracle/pin.conf file, make sure the DM points to the correct database:
- dm sm_database databaseAlias
Installation is now complete. If you encountered installation problems, verify that the settings in the pin_setup.values file on each computer point to the correct CM and DM.
Changing Your Database Partitions
If you did not enable partitioning during installation, skip this section.
Note:
To enable partitioning after installation, see "Converting Nonpartitioned Classes to Partitioned Classes" in BRM System Administrator's Guide.If you did enable partitioning for one or more storable classes during installation, the tables for those storable classes are now divided into the following partitions:
-
Event tables
-
If you chose to add 12 fixed partitions to your event tables, those tables were divided into 12 monthly partitions, a historic partition, and a last partition. See "About the Default Partitioning Scheme" in BRM System Administrator's Guide.
-
If you chose not to add 12 fixed partitions to your event tables, those tables were divided into a historic partition and a last partition (which stores all purgeable objects for the table). This partitioning scheme is sufficient for a test or demonstration system. For a production system, however, you must create purgeable partitions.
-
-
Item tables
Tables for item storable classes were divided into a historic partition and a last partition.
-
Tables for all other storable classes in @CLASSES_TO_BE_PARTITIONED
Tables for all storable classes listed in the pin_setup.values file's @CLASSES_TO_BE_PARTITIONED entry except the item storable class were given only one partition, partition_last (see "About Objects Stored in partition_last and partition_last_pin" in BRM System Administrator's Guide). For a production system, you must create purgeable partitions.
Note:
To test partitioning, you must add at least one purgeable partition.Important:
To change your partitioning scheme (for example, by adding purgeable partitions), do so before any objects are stored in the partitions you want to modify. Do not modify a partition after BRM adds objects to the partition.
For information about changing your partitioning scheme, see "Partitioning Tables" in BRM System Administrator's Guide.
Installing Sample Data Files
When you perform a custom installation, the installer does not copy sample data files, such as Balance Element ID Objects (BEIDs), G/L IDs, ratable usage metrics (RUMs), and price lists, to your system. You must create your own data files or install the BRM sample data files before you can use any client applications, such as Pricing Center.
To install the BRM sample data files:
-
Log in to the machine containing the primary CM.
-
Go to the BRM_Home/setup directory and open the pin_setup.values file in a text editor such as vi.
-
Change the $SETUP_INIT_DB entry to Yes and make sure all pointers to all DMs contain the correct port number.
-
Save and close the file.
-
Go to the BRM_Home/setup/scripts directory and enter the following command:
% perl pin_cmp_pin_billd.pl -
Stop and restart the CM processes. See "Starting and Stopping the BRM System" in BRM System Administrator's Guide.
Installing Optional Components on a Separate Machine from the CM
If you install any optional components on a separate machine from your CM, manually edit each component's configuration file to include the following:
-
The correct CM port number.
-
The correct host name for the CM machine.
-
Any component-specific Facilities Module (FM) entries. For information, see "Syntax for Facilities Module (FM) Entries" in BRM System Administrator's Guide.
Loading the Tailor-Made Stored Procedure
Loading of the stored procedure is required for the Tailor-Made Plan feature.
The following are the requirements to load the tailor-made stored procedure:
-
BRM and Pipeline Manager should be installed.
-
The BRM schema and the Pipeline Manager schema should reside on the same database.
To load the stored procedure, do the following:
-
Connect to the Oracle database with SQL*Plus:
% sqlplus system/manager@databaseAlias
-
Grant access of pipeline schema to user pin by doing the following:
-
Run the SQL grant select, update, insert, delete commands on the Pipeline Manager tables. For example, for the ifw_rateplan table, run the command:
SQL> grant select, update, insert, delete on ifw_rateplan to pin;Run the command on the following tables:
-
ifw_rateplan
-
ifw_rateplan_cnf
-
ifw_rateplan_ver
-
ifw_model_selector
-
ifw_selector_detail
-
ifw_selector_rule
-
ifw_selector_rule_lnk
-
ifw_selector_ruleset
-
ifw_pricemodel
-
ifw_pricemdl_step
-
-
Run the SQL grant select commands on the Pipeline Manager tables mentioned below. For example, for the ifw_service table, run the command:
SQL> grant select on ifw_service to pin;Run the command on the following tables:
-
ifw_service
-
ifw_timezone
-
ifw_timemodel
-
ifw_impact_cat
-
ifw_zonemodel
-
ifw_calendar
-
-
Run the SQL grant select commands on the Pipeline Manager sequences. For example, for the ifw_seq_selectordetail sequence, run the command:
SQL> grant select ifw_seq_selectordetail to pin;Run the command on the following tables:
-
ifw_seq_selectordetail
-
ifw_seq_selectorrule
-
ifw_seq_modelselector
-
ifw_seq_pricemodel
-
ifw_seq_rateplan
-
-
-
Type exit to exit SQL*Plus.
-
Go to the BRM_Home/sys/dm_oracle/data directory.
-
Enter the following command to open SQL*Plus:
sqlplus pin/pin@database_Name
where database_Name is the service name or database alias of the Oracle database.
-
Enter the following command to load the stored procedure:
SQL>@create_pricing_tailormadeplan_procedures.plb -
Type exit to exit SQL*Plus.
BRM Environment Variables
Table 7-5 shows the BRM environment variables. All of these environment variables are set during installation except for NLS_LANG.
Note:
Do not change the default setting for NLS_LENGTH_SEMANTICS.Table 7-5 BRM Environment Variables
| Environment Variable | Description |
|---|---|
|
PIN_HOME |
The directory where the BRM software will be installed. The default PIN_HOME value is /opt/portal/7.5. The BRM documentation refers to this location as BRM_Home. Note: You can reference this variable in pin.conf configuration files. See "Preparing for Platform Migration by Using Variables in pin.conf Files" in BRM System Administrator's Guide. |
|
PIN_LOG_DIR |
The directory where the BRM log file will be installed. The default PIN_LOG_DIR value is /opt/portal/7.5/var. Note: You can reference this variable in pin.conf configuration files. |
|
LIBPATH (AIX only) |
The path to the AIX library files. Set this to include $PIN_HOME/lib, $PIN_HOME/bin, and $PIN_HOME/bin/classic. |
|
LD_LIBRARY_PATH (Solaris and Linux) |
The path to the Solaris and Linux library files. Normally, this value should be $PIN_HOME/lib. |
|
SHLIB_PATH (HP-UX IA64 only) |
The path to the HP-UX IA64 library files. Normally, this value should be $PIN_HOME/lib. |
|
LIBRARYEXTENSION |
The extension for the libraries used by your platform. There is no default value. Extensions for Solaris, Linux, and HP-UX IA64 platform types are .so; extensions for AIX platform types are .a. Note: You can reference this variable in pin.conf configuration files. |
|
LIBRARYPREFIX |
The prefix for the libraries used by your platform. There is no default value.
Note: You can reference this variable in pin.conf configuration files. |
|
PATH |
The path of the BRM binary files. This value should be $PIN_HOME/bin. For AIX, also include $PIN_HOME/jre/bin. |
|
PERL5LIB |
Set this to include the path to your Perl files. By default, the BRM installer copies the Perl files to /opt/portal/7.5/lib and /opt/portal/7.5/perl/5.8.0/lib. |
|
NLS_LANG |
Set this to American_America.AL32UTF8. Important: You must use American_America as the language and territory, regardless of your locale, and the AL32UTF8 character set. |
What's Next?
You installed the BRM system software, which you can use to test your business models. To set up pricing plans, business policies, and customer accounts, you must install the BRM client applications. See "Installing BRM Client and Server Applications on UNIX".