
 Previous
Creating an Ajax-enabled Phobos Application
With the Phobos web application framework, you can write your entire web application in JavaScript. If you are developing Ajax applications with Phobos, you have the benefit of the same scripting language on the client and the server. Adding Ajax capability to a Phobos application is quite easy, and the JavaScript code is nearly the same as it is in any other web application.
This section uses a shopping list example that allows you to add items to a list, remove items from a list, and display the list using Ajax. Figure 5-3 shows a screenshot of the application. Notice that you add an item to the list by entering it in a field and clicking the Add to List button. After you click the button, the item appears in the list. You can remove an item from the list by clicking it.
Figure 5-3 Phobos Shopping List Application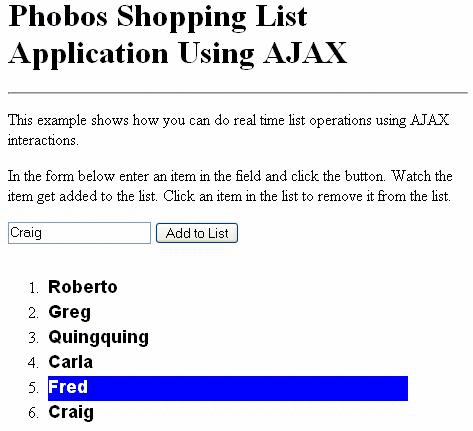
How the Application Works
As with any Phobos application, the AjaxList application includes a startup script, a view, and a controller. What's special about the AjaxList example is that the view and the controller need to deal with the XMLHttpRequest that is at the heart of the Ajax functionality.
The list.ejs file includes the HTML that defines the form components that appear on the page and any style information. It also includes another JavaScript file, called list.ejs.client.js, which contains the code to initialize and send the XMLHttpRequest object. The controller, list.js, handles the incoming XMLHttpRequest object and sends the updated list back to the client. The list.ejs file then renders the view.
When the user enters an item to add to the list and clicks the button, the following happens:
The XMLHttpRequest object is created, and the client sends a POST HTTP request to the /list/compute URL with the request parameters representing the value that the user entered and the command "add", thereby calling the compute function of the List controller with these parameters.
The compute function does the following:
Gets the value the user entered and the value of the command.
Adds the value to the list and saves it into the session.
Sends the list as part of the response back to the client.
The script included in list.ejs.client.js receives the list in the response and renders the HTML.
When the user clicks an item in the list that is rendered to the page, another XMLHttpRequest object is created and the compute function is called again, this time passing the index of the item to be deleted and the command "remove" as the request parameters.
The compute function does the following:
Gets the value of the index and the command from the request parameters.
Removes the item at the selected index from the list and saves the list into session.
Sends the new list as part of the response back to the client.
Again, the client-side script in list.ejs.client.js renders the new list to HTML.
Creating the List and Rendering the View
The first thing the controller does is to create a list and store it into the session:
var list = invocation.session.list;
if (list == undefined) {
    var list = new Array();
    invocation.session.list = library.json.serialize(list);
}
Because you can only save String values in session with Phobos, you need to serialize the JavaScript list into JavaScript Object Notation (JSON) format to save it in the session. Note that serializing an object to JSON will not work if the object contains some Java objects. Finally, the controller renders the view:
library.view.render("list.ejs");The view file, list.ejs, includes the following:
A set of CSS styles
The HTML tags that represent the form elements on the page
A small amount of script that includes the code in list.ejs.client.js and the submitData and removeItem functions. The code in list.ejs.client.js file initializes the XMLHttpRequest object, sends it to the controller, and handles the response.
The next two sections focus on creating the form template and writing the script that creates and sends the XMLHttpRequest object to the controller.
Creating the Form Template that Displays the List
The following code shows part of the list.ejs file that creates the form, which allows the user to add items to a list and remove items from a list.
<div id="listForm" class="listContainer">
  <form name="autofillform" onSubmit="submitData(); return false;">
   <input id="entryField" type="text" size="20" value="Enter New Value">
   <input type="button" onclick="submitData(); return false;" value="Add to List">
  </form>
 <div id="list" class="listDiv"></div>
</div>
Notice that there are two div tags, one inside the other. A JavaScript function looks for a tag in a page using the unique IDs of div tags. The outer div tag wraps the form component, which includes the field in which the user enters an item, and the button to add the item to the list, as well as the inner div tag. The inner div tag identifies the component that displays the list on the page.
When the user clicks the button, Phobos gets the ID of the entire list and invokes the submitData method, which the next section discusses. The response that the server returns includes the updated list, which includes the item the user added. This response replaces the inner div tag. The following code is an example of a response that shows a 2-item list:
<ol>
<li><div class=\"plain\" onmouseover=\"this.className ='over';\"
    onmouseout=\"this.className ='plain';\"
    onclick=\"removeItem('"0"')\">" + list[0] + "</div></li>
<li><div class=\"plain\" onmouseover=\"this.className ='over';\"
    onmouseout=\"this.className ='plain';\"
    onclick=\"removeItem('"1"')\">" + list[1] + "</div></li>
</ol>
Note that the removeItem function is invoked with the index of the item on which the user clicked. You'll see in the next section how submitData and removeItem construct URLs with the appropriate request parameters so that the controller appropriately adds an item to or removes an item from the list.
Creating and Sending the XMLHttpRequest to the Server
The previous section showed how the submitData function is invoked when the user clicks the Add to List button and how the removeItem function is invoked when the user clicks on an item in the list.
As shown by the following code, the submitData function gets the value of the text field in which the user entered the item to add to the list. It then creates a URL that it passes to the initRequest function, which is located in list.ejs.client.js. This function creates the XMLHttpRequest object.
function submitData() {
    entryField = document.getElementById("entryField");
    var url = <%= library.view.quoteUrl("/list/compute") %>
        + "?command=add&entryField=" + entryField.value;
    initRequest(url);
}
Here, the quoteURL function from the view JavaScript library available in Phobos returns a URL whose protocol, server, and port components are taken from the current request. This path is the specified string, which identifies the compute function of the List controller.
The submitData function adds the add command and the value of entryField to the URL as request parameters. The compute function of the List controller uses the command to determine if it needs to add an item to or remove an item from the list.
Similarly to submitData, the removeItem function creates a URL, which it passes to the initRequest function.
function removeItem(index) {
    var url = <%= library.view.quoteUrl("/list/compute") %>
        + "?command=remove&index=" + index;
    initRequest(url);
}
Note that removeItem takes the index of the item to remove and adds it and the remove command to the URL as request parameters.
The initRequest function creates the XMLHttpRequest object and sends it to the URL passed to it by the submitData or removeItem functions. As shown in the following code, the initRequest function is nearly the same as it would be if you were implementing this example with any other web application framework. See Creating and Configuring the XMLHttpRequest Object for more information on what this function does.
function initRequest(url) {
    var list = document.getElementById("list");
    if (window.XMLHttpRequest) {
        req = new XMLHttpRequest();
    } else if (window.ActiveXObject) {
        isIE = true;
        req = new ActiveXObject("Microsoft.XMLHTTP");
    }
    req.onreadystatechange = processRequest;
    req.open("POST", url, true);
    req.setRequestHeader("Content-Type", "application/x-www-form-urlencoded");
    req.send(null);
    ... // the processRequest function goes here.
}
In this example, the initRequest function calls the processRequest callback function when the server returns a response. The callback function renders the HTML, as described in Updating the HTML DOM.
After creating the XMLHttpRequest object, the initRequest function uses it to send the request to the URL specified, which means that the compute function of the List controller will be invoked.
Processing the XMLHttpRequest
The XMLHttpRequest object explained in the previous section sends the URL to the compute function of the List controller. In this section, you'll see how the compute function adds items to the list, removes items from the list, and generates the response. The JavaScript code described in the previous section runs in the browser, whereas the JavaScript code detailed in this section runs on the server.
The compute function uses the onMethod function of the Phobos httpserver library to restrict parts of its implementation to be invoked only during certain HTTP methods. In the case of the code that adds items to or removes items from the list and returns the response, the compute function ensures that this code is only executed during a POST:
this.compute = function() {
    library.httpserver.onMethod({
        POST: function() {
        //code to add items from the list and remove items from the list
    },
Before adding items to or removing items from the list, the compute function must deserialize the list stored in the session from JSON into a list variable:
var list = library.json.deserialize(invocation.session.list);
Then the compute function checks if the command request parameter is equal to "add"or "remove" to determine whether it should add an item or remove an item.
if (command == "add") {
    var index = list.length;
    list[index] = entryField;
}
if (command == "remove") {
    var index = Number(request.getParameter("index"));
    var length = list.length;
    if (index != null) {
        while (index < length - 1){
            list[index] = list[index+1];
            index = index + 1;
        }
        list.length = index;
    }
}
After updating the list, the compute function serializes the updated list back into JSON and stores it into the session. It then sends the list back to the client:
response.setStatus(200);
response.setContentType("text/javascript");
var writer = response.getWriter();
var result = invocation.session.list;
writer.write(result);
writer.flush();
Because Phobos enables JavaScript on the server, your Phobos controller can send the list data back to the client in JavaScript form. In contrast, the servlet version of the AjaxList application described in Basic Ajax-Enabled Web Application renders the HTML on the server and writes it out to the client.
The following section explains how the client-side code handles the response from the server and manipulates the JSON data contained in the response.