
 Previous
Updating the HTML DOM
When the client receives the response from the server, the initRequest function calls the processRequest callback function, which evaluates the JavaScript response from the controller into a String JavaScript variable. It then loops through the list and renders it into HTML. Finally, it replaces the list div element with the HTML:
function processRequest () {
    if (req.readyState == 4) {
        if (req.status == 200) {
            var listRes = eval(req.responseText);
            var listTemp = "<ol>";
            for (var index = 0; index < listRes.length; ++index){
                listTemp += "<li><div class=\"plain\"
                onmouseover=\"this.className='over';\"
                onmouseout=\"this.className='plain';\"
                onclick=\"removeItem('"+index+"')\">" +
                listRes[index] + "</div></li>";
            }
            listTemp += "</ol>";
            list.innerHTML = listTemp;
        }
    }
}
Notice that for every item in the list, a div element is rendered. This element has several attributes, including an onclick attribute that is set to the function call removeItem('" + index +"'). When the user clicks on an item in the list, the removeItem function is called with the index of the item the user clicked.
Having JavaScript on the client and the server makes it easier to transfer data between them because the data is represented as the same object on both ends. This example shows the server sending the list as JSON to the client and letting the client render the HTML there.
Using jMaki Widgets in a Phobos Application
Just as you can add jMaki widgets to web applications built with JSP technology, you can add jMaki widgets to web applications built with Phobos. The Phobos NetBeans module includes a palette of jMaki widgets that you can use to drag and drop widgets onto your embedded JavaScript files.
The bioFisheye Example
The bioFisheye example, located in swdp.tutorial.home/examples/phobos/, includes two views that each use a different jMaki widget to select a value. The fisheye.ejs view includes a jMaki Dojo Fisheye widget that allows you to select a photo of a Sun engineer. When you select a photo, the jMaki dContainer widget loads a page containing biographical information about the person shown in the photo. Figure 5-4 shows a screen shot of this view.
Figure 5-4 Using the Fisheye Widget in a Phobos Application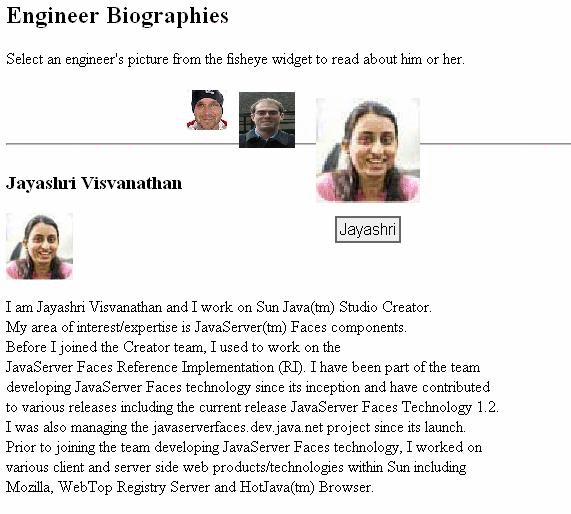
The other view, combobox.ejs, is the same as fisheye.ejs, except that it uses a jMaki combobox widget that allows you to select the name of a Sun engineer, thereby displaying his or her biographical information in the dContainer widget, as shown in Figure 5-5.
Figure 5-5 Using the ComboboxWidget in a Phobos Application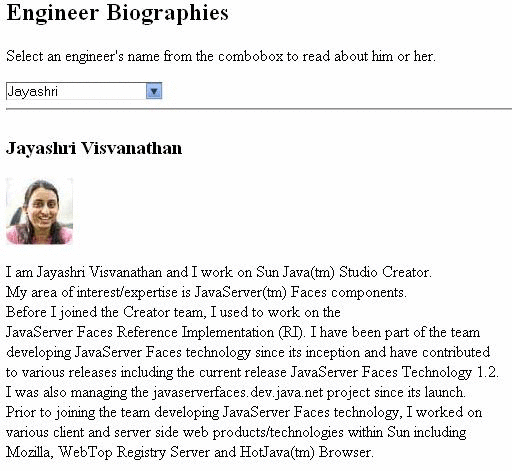
Including a jMaki Widget in a Phobos Application
To add a jMaki widget to a Phobos application, you use the insert function of the jMaki JavaScript integration library provided by the Phobos project. This function inserts all the jMaki resource JavaScript code required by the widget into the view. The following code shows using the insert function to include a Fisheye widget in a Phobos view:
<% library.jmaki.insert({
    component: "dojo.fisheye",
    args: {items:[
        {iconSrc: '../images/blog_murray.jpg', url: 'greg',
         caption: 'Greg', index: 3}
        {iconSrc: '../images/chinnici.jpg', url: 'roberto',
         caption: 'Roberto', index: 2},
        {iconSrc: '../images/JayashriVisvanathan.jpg', url: 'jayashri',
         caption: 'Jayashri', index: 1},
    ]}
}); %>
The arguments that you pass to the insert function are nearly the same as the attributes you would define for the equivalent ajax tag that you would include in a JSP page.
The component argument tells the function which widget you are inserting into your page. The args argument identifies an array of icons that are included in the widget along with the properties for each of those icons. One of the properties is url, which identifies a URL that must be accessed when the user clicks the photo that the icon represents. Each URL points to a view that contains the appropriate biographical information.
To display the view with the appropriate biographical information, the view that includes the Fisheye widget also includes a dContainer widget, whose purpose is to load content from URLs in the same domain as the application using it. The dContainer widget subscribes to a topic that gets the URL and loads it into the page:
<div><%library.jmaki.insert({
    component: "jmaki.dcontainer",
    args:{topic:'/jmaki/centercontainer'} }); %></div>
Other than using the insert function rather than an ajax tag to add a widget to a view, you use jMaki features in a Phobos application the same way you use them in a standard web application. You can learn more about using jMaki widgets from the Project jMaki chapter.
Loading Data into a jMaki Widget
Recall from Loading Your Own Data Into a jMaki Widget in the Project jMaki chapter that you need to convert Java object data to JSON data when working in a JSP environment. When you work in the Phobos environment, the data on the server is already in JavaScript format. Therefore, you can refer to the data directly from the jMaki widget. When the page is rendered, the data will automatically be serialized into JSON.
You use the value attribute to load JSON data into a widget. The jMaki combobox widget inserted into the combobox.ejs file uses the value attribute to point to the data contained in the model.value variable. The following code shows inserting the combobox widget into combobox.ejs:
<% library.jmaki.insert({
   component : "dojo.combobox",
   value : model.value,
   args: {topic:'/dojo/combobox/value'}
}); %>
The model.value server-side variable is initialized in the fisheye controller:
this.combobox = function() {
    var value;
    model = { value: [
        ['Jayashri','fisheye/jayashri'],
        ['Greg','fisheye/greg'],
        ['Roberto','fisheye/roberto']
    ]}
    ...
As you can see from the preceding code, you don't need to perform any data conversion as you would in a JSP environment.
Using the Java Persistence API in a Phobos Application
The Java Persistence API can be used in Phobos applications by using the persistence.js JavaScript library. This library exposes functions that allow you to look up entity managers, and convenience functions for working with Java Persistence API entities in Phobos applications.
For more information on how to use Persistence in Phobos applications, see the jpaExample bundled with the Sun Web Developer Pack in swdp.home/phobos/samples.
The Phobos Examples
Four examples that demonstrate Phobos are included in the tutorial:
AjaxList: a Phobos version of the AjaxList application discussed in Basic Ajax-Enabled Web Application
bioFisheye: a Phobos web application that includes jMaki widgets
Calculator: a basic calculator example
hello: a simple “Hello, world” example
This section tells you how to build and run each example.
Configuring Your Environment
To run the Phobos examples, you must have:
Installed the Sun Web Developer Pack
Configured the Sun Web Developer Pack with Application Server 9.1
Optionally installed NetBeans IDE 5.5.1 and the Sun Web Developer Pack modules
Building and Running the AjaxList Application
 Building and Running the AjaxList Application in NetBeans IDE 5.5.1
- Select File→Open Project in NetBeans IDE 5.5.1.
- Navigate to swdp.tutorial.home/examples/phobos, select AjaxList, and click Open Project Folder.
- Right-click the AjaxList application in the
Projects pane and select Run Project.
This will spawn a Phobos runtime process, on which the application will run. It will also launch the application in your web browser. You can enter a value in the list, click the button, and see it added to the list. To remove an item from the list, click it.
- To stop the application, right-click the AjaxList application in the Projects pane and select Stop Phobos Runtime.
- If you want to create a WAR file of the application so that you can deploy it onto your web server or application server, right-click the AjaxList application in the Projects pane and select Export as Web Archive (WAR).