Oracle® Enterprise Manager
System Monitoring Plug-in for Oracle Enterprise Manager Ops Center Guide
11g Release 1 (11.1.3.0.0)
E18950-03
November 2011
This document provides describes the System Monitoring Plug-in for Oracle Enteprise Manager Ops Center, prerequisites for installing the plug-in, and step-by-step instructions on how to download, install, verify, and validate the plug-in.
Introduction
Oracle Enterprise Manager Grid Control and Oracle Enterprise Manager Ops Center are complementary technologies that are designed to provide an enterprise-level data center management solution for all levels, from applications to storage disks. Enterprise Manager Grid Control software enables businesses to improve application, middleware, and database performance. Enterprise Manager Ops Center software enables businesses to manage the operating systems, virtual machines, servers, and storage devices.

The Infrastructure Stack Plug-in for Oracle Enterprise Manager Ops Center extends Oracle Enterprise Manager Grid Control monitoring features with additional infrastructure layers below the operating system, including the following:
-
Virtual assets, including Oracle Solaris Zones and Oracle Solaris VM Server for SPARC domains and guests
-
Service processors
-
Server containers (chassis)
-
Sun Oracle SPARC Enterprise M3000/M4000/M5000/M8000/M9000 Server domains
When you configure Oracle Enterprise Manager Ops Center and Oracle Enterprise Manager Grid Control applications to work together, each application shares information with the other application: Each user interfaces includes information from the other application. Resources managed by Oracle Enterprise Manager Ops Center are visible on the Oracle Enterprise Manager Grid Control user interface and resources managed by Oracle Enterprise ManagerGrid Control are visible on the Oracle Enterprise Manager Ops Center user interface. Alerts generated in one application are reported in the other application.
Requirements
The following are the supported Oracle Enterprise Manager versions:
-
Oracle Enterprise Manager Grid Control 10g Release 2 (10.2.0.5) and higher or Oracle Linux 5.5
-
Oracle Enterprise Manager Ops Center 11g Release 1 and higher
Before deploying the Infrastructure Stack Plug-in, install, configure, and deploy the following software:
-
Oracle Enterprise Manager Grid Control Server
-
Oracle Enterprise Manager Grid Control Agents on the systems to be monitored
-
Oracle Enterprise Manager Ops Center Enterprise Controller and Proxy Controller, including configuring the Enterprise Controller to access the Knowledge Base
-
Discover and manage the systems in Oracle Enterprise Manager Ops Center to deploy the Agent on the systems to be monitored
Note:
The plug-in requires access to the Knowledge Base (KB). In Connected Mode, this is done by providing a My Oracle Support user name and password in the Oracle Configuration Manager during installation. If Oracle Enterprise Manager Ops Center is installed, see the Oracle Enterprise Manager Ops Center Administration Guide for the steps to configure the Oracle Configuration Manager. If you are using the software in Disconnected Mode, run the Harvester script to obtain the bundle, load the KB bundle, and then switch to Disconnected Mode.Optionally, if you a use a WS-MAN/JMX HTTP proxy, you can use an existing HTTP proxy that is used by the Oracle Management Agent or you can configure a new proxy to access the Oracle Enterprise Manager Ops Center Enterprise Controller.
See the Oracle Enterprise Manager Grid Control installation documentation at http://download.oracle.com/docs/cd/E11857_01/index.htm for instructions on installing and deploying Enterprise Manager Grid Control server and agents. See the OS-specific Oracle Enterprise Manager Ops Center Installation Guide at http://download.oracle.com/docs/cd/E11857_01/nav/management.htm for instructions on installing and configuring the Enterprise Controller and Proxy Controller. See the Oracle Enterprise Manager Ops Center Advanced User's Guide for instructions on discovering and managing systems to install the Oracle Enterprise Manager Ops Center Agent. Additional sub-requirements for proper operation of the plug-in are met if the Enterprise Manager software is installed as documented. The plug-in uses the Java version that is bundled with the Oracle Management Agent.
User Requirements
The Oracle Enterprise Manager SYSMAN user is required to deploy the plug-in and view the asset information collected by the Oracle Enterprise Manager Ops Center software in the Oracle Enteprise Manager Grid Control console.
A new user in Oracle Enterprise Manager Ops Center for Oracle Enterprise Manager Grid Control integration is required. This user does not require any roles or permissions. See the Oracle Enterprise Manager Ops Center Administration Guide for more information about creating a user.
Configuring the Management Agent to Deploy the Plug-In
The Oracle Management Agent in Enterprise Manager Grid Control is responsible for monitoring all targets on the host, for communicating that information to the middle-tier Management Service, and for managing and maintaining the host and its targets. You must set the preferred credentials on all agents where you want to deploy the plug-in.
Setting and Validating Preferred Credentials
Perform the following steps to set the preferred credentials on all Enterprise Manager Grid Control Agents where you want to deploy the plug-in:
-
In Enterprise Manager Grid Control, click Preferences.
-
In the Preferences page, click Preferred Credentials in the left pane. The Preferred Credentials page is displayed.
-
For the corresponding Target Type, for the Host target type, from the Set Credentials column, click the icon.
-
In the Host Preferred Credentials page, in the Target Credentials section, for the host that is running the Management Agent where the plug-in has to be deployed, specify the user name and password.
-
After setting the credentials, on the same page, click Test. If you test runs successfully, your credentials are set correctly.
-
Run the OS Command job for the Oracle Management Agent where the plug-in has to be deployed.
-
Log in to Enterprise Manager Grid Control.
-
Click the Jobs tab.
-
In the Job Activity page, from the Create Job list, select OS Command, and click Go.
-
Complete the details required in the following pages, then click Submit to run the job. If the job runs successfully, your credentials are set correctly.
-
Deploying the Plug-in
The plug-in software is available beginning with the Oracle Enterprise Manager 11g Ops Center Release 1 software bundle. The plug-in jar file contains the management plug-in software and is located in the /var/tmp/OC/xvmoc_full_bundle/ocasmp directory on the Enterprise Controller.
The jar file name is based on the Oracle Enterprise Manager Ops Center release. The 11g Release 1 (11.1.0.0) is ocas_plugin-2.0.jar.
Note:
New versions of the jar file might be delivered in update releases. If multiple versions are available, use the latest version.After ensuring that the requirements are met, perform the following steps to import and deploy the plug-in:
-
Verify that you have set preferred credentials on all agents where you want to deploy the plug-in.
-
Navigate to the plug-in jar file in the
ocasmpdirectory on the Enterprise Controller.#cd /var/tmp/OC/xvmoc_full_bundle/ocasmp #ls ocas_plugin-2.0.jar
-
Copy the
ocas_plugin-2.0.jarfile to your desktop or computer on which the browser is launched. -
Log in to Enterprise Manager Grid Control as sysman, then click the Setup link above the navigation bar.
-
From the Overview of Setup page, click Management Plug-ins in the left menu.
-
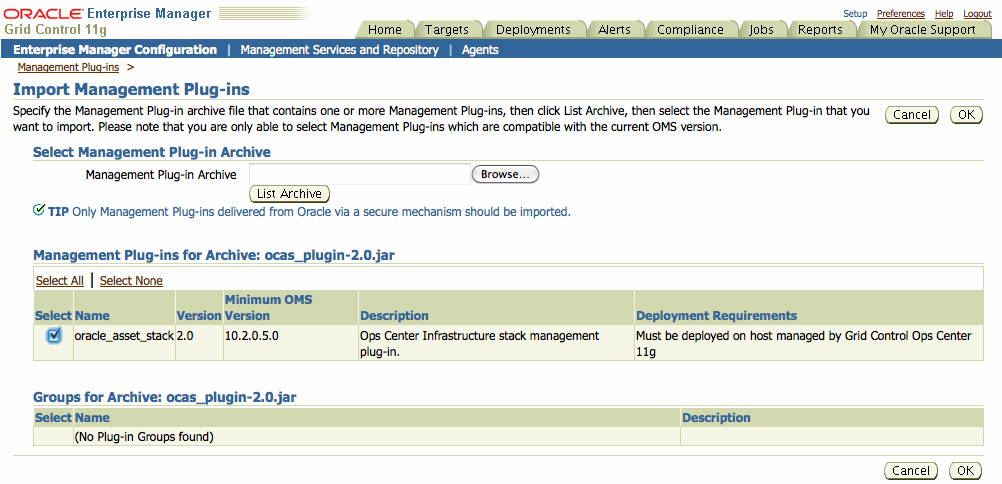
On the Management Plug-ins page, click Import. The Import Management Plug-ins page is displayed.
-
Click Browse to navigate to where you saved the
ocas_plugin-2.0.jarfile, then click List Archive to extract the plug-in jar file. When the plug-in is extracted it appears in the Management Plug-ins for Archive table as oracle_asset_stack version 2.0. Click the check box to select the plug-in, then click OK to import the plug-in.Oracle Enterprise Manager Ops Center Infrastructure stack management plug-in is now imported successfully.
-
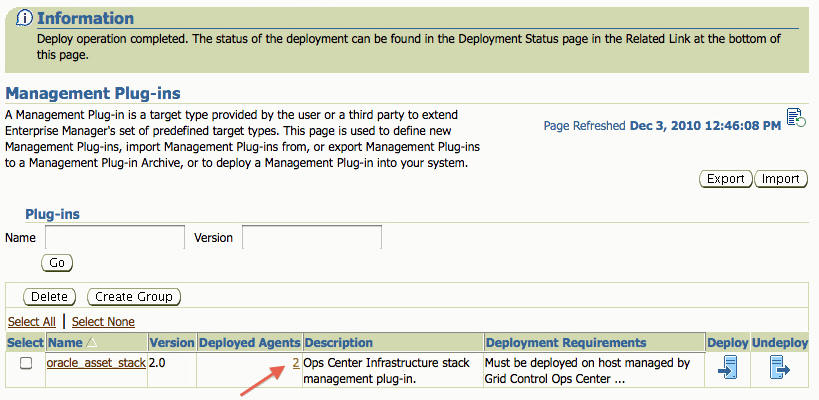
In the Management Plug-ins page, click the check box to select the oracle_asset_stack, then click the associated Deploy icon.
Figure 4 Management Plug-ins Confirmation

Description of "Figure 4 Management Plug-ins Confirmation"
The Deploy Management Plug-in wizard is displayed.
-
In the Deploy Management Plug-in wizard, click Add Agents, then select one or more agents to which you want to deploy the plug-in. The wizard reappears and displays the agent you selected.
Note:
Establish the Preferred Credentials on an agent before deploying the plug-in. -
Click Next, then click Finish. The Deployed Agents field indicates the number of agents deployed.
If you see an error message stating that the preferred credential is not set up, go to the Preferences page and add the preferred credentials for the Agent target type.
-
To check the deployment status, go to Related Links at the bottom of the page and click the Deployment Status link.

Adding Infrastructure Stack Targets for Monitoring
Deploying the plug-in creates a new Infrastructure Stack target type in the Oracle Enterprise Manager Grid Control UI. To begin sharing monitoring information, define the targets by adding the Infrastructure Stack for each agent to be monitored. After a target is defined, you must enable monitoring for plug-in alerts in the Infrastructure Stack target's metric and policy settings.
Perform the following steps to add the plug-in target to Grid Control:
-
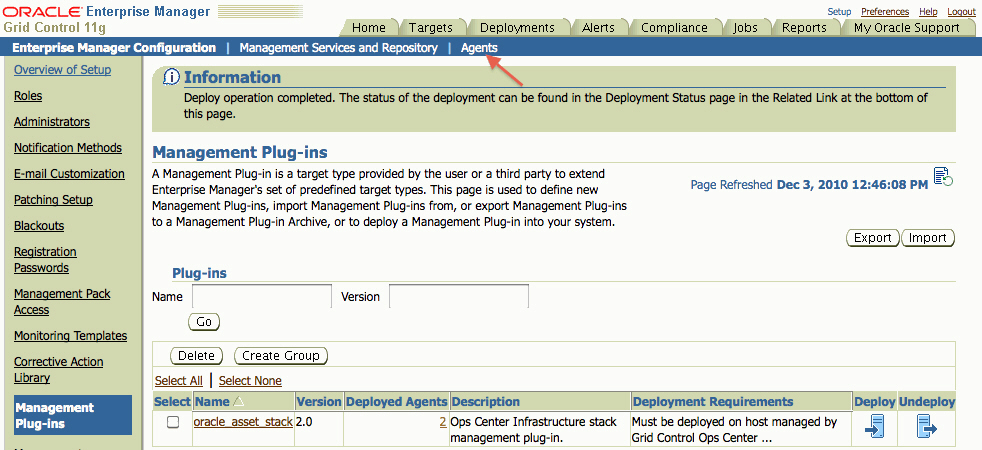
In Oracle Enterprise Manager Grid Control, click Setup, then click the Agents tab.
-
Click an agent where the plug-in was successfully deployed.
-
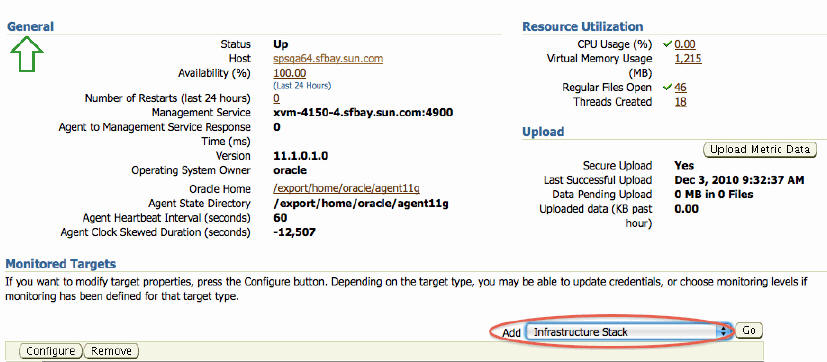
Select Infrastructure Stack from the Add drop-down menu, then click Go.
-
Provide the following configuration details in the Add Infrastructure Stack page:
-
Name. This is a free text field, but the recommendation is to use a hostname-stack pattern. For example, myhost-t5140-02-stack
-
Oracle Enterprise Manager Ops Center Enterprise Controller host name.
-
Oracle Enterprise Manager Ops Center Enterprise Controller user name. The recommendation is to create an Oracle Enterprise Manager Ops Center user for Grid Control integration. This user does not require any roles.
-
Oracle Enterprise Manager Ops Center Enterprise Controller password
-
Oracle Enterprise Manager Repository (DB) host name
-
Oracle Enterprise Manager Repository (DB) port
-
Oracle Enterprise Manager Repository (DB) SID
-
(Optional) WS-MAN/JMX http proxy host name. You can use an existing HTTP proxy that is used by the Oracle Enterprise Management Agent, or configure a new proxy to access the Oracle Enterprise Manager Ops Center Enterprise Controller.
-
(Optional) WS-MAN/JMX http proxy port
-
-
Click OK to create the target.
-
Go to the main page for the Infrastructure Stack target and click Metric and Policy Settings.
-
Click the Disabled link to enable and set values for the collection schedule for the target's Oracle Enterprise Manager Ops Center Alarm Severity metric.
Note:
In virtualized environments that contain Oracle Solaris Zones and Oracle VM Server for SPARC, select the level from which you want the alerts triggered. By default, alerts are generated from the entire virtualized environment. If you want alerts generated from a specific virtualized OS or system, you must define the level.
Configuring the Software
To establish the connection in Oracle Enterprise Manager Ops Center, you must configure the Enterprise Controller to communicate with the Oracle Enterprise Manager Grid Control repository.
Note:
The SYSMAN user credentials are required to access the repository.-
Launch the Oracle Enterprise Manager Ops Center software and log in as an Administrative user.
-
Expand the Administration section in the Navigation pane, then click Grid Control.
-
Click Configure/Connect in the Actions pane.
-
Enter the server name and port number for the Oracle Enterprise Manager Grid Control console. The default port is 7799.
-
Enter the Oracle Enterprise Manager Grid Control database host name, port number, SID (Oracle System ID), SYSMAN user name and password. The default port is 1521.
-
Click Finish.
Integrating with Oracle Enterprise Manager Ops Center
After the plug-in is deployed and configured, you must enable the feature in the Administration section of the Oracle Enterprise Manager Ops Center UI. When fully enabled, problems identified based on the monitoring rules and profiles that you established in OracleEnterprise Manager Ops Center are displayed in the Oracle Enterprise Manager Grid Control UI.
You can import the baseline analysis and OS policies for the Oracle Solaris OS and display those problems and run the Baseline Analysis Report from Oracle Enterprise Manager Grid Control.
-
In Oracle Enterprise Manager Grid Control, click the Jobs tab.
-
In the Create Job field, select Import Ops Center Policies from the drop-down menu, then click Go.
-
Enter a Name and description for the policy, such as Baseline Policy, then click Add.
-
Select Infrastructure Stack from the Target Type drop-down menu, then select all targets on which you want to install the Oracle Solaris agent, then click Select.
-
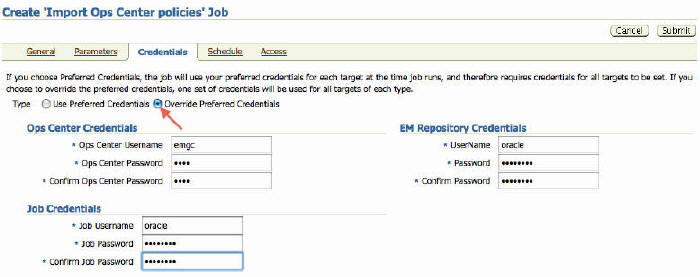
Click the Credentials tab and select the Override Preferred Credentials option.
-
Provide the user name and password credentials for Oracle Enterprise Manager Ops Center, Enterprise Manager Grid Control and the Job Credentials. Job Credentials enable all jobs to use a single set of credentials.
-
Click Submit. A confirmation page is displayed.
Verifying and Validating the Plug-in
In Enterprise Manager Grid Control, you can launch the Oracle Enterprise Manager Ops Center home page from the Infrastructure Stack target home page. If correctly configured, the page appears for the OS that is associated with the target.
Wait a few minutes for the target to be created and associated, then perform the following steps to verify and validate the target in the Enterprise Manager Grid Control UI:
-
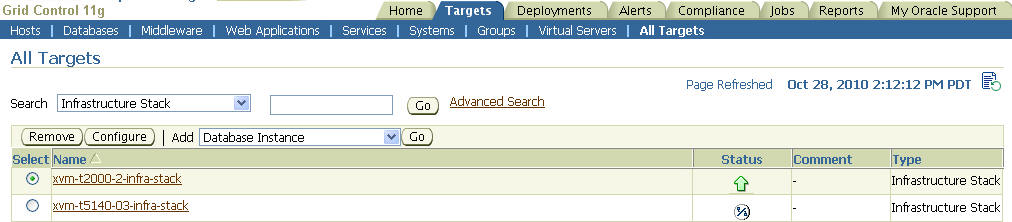
On the Home page, select Infrastructure Stack from the Target Search drop-down menu, then click Go. The All Targets page is displayed and shows all available targets that are aware of the infrastructure stack.
-
Verify that the target status is Up, as indicated by a green arrow in the graphic.
You can also validate the plug-in by launching the Targets Host home page and selecting Infrastructure Stack.
Viewing Information
Basic information gathered by both applications is accessible from both user consoles. For more detailed information, go to the software console that gathered the information.
From the Oracle Enterprise Manager Ops Center user interface, you can launch the Oracle Enterprise Manager Grid Control console while viewing a specific asset that is being monitored by both applications, or from the Administration tab.
To Launch the Oracle Enterprise Manager Ops Center Console From Oracle Enterprise Manager Grid Control
Perform the following steps to launch the Oracle Enterprise Manager Ops Center console from Oracle Enterprise Manager Grid Control.
-
Log into Grid Control as SYSMAN, then navigate to the target's home page.
-
Click Launch Ops Center console in the Related Links section at the bottom of the page.
See the Oracle Enterprise Manager Ops Center User's Guide for information about monitoring in Ops Center.
To Launch the Oracle Enterprise Manager Grid Control Console From Oracle Enterprise Manager Ops Center
An asset, or target, that is being monitored by both applications has information from both software applications. While in Oracle Enterprise Manager Ops Center, you can view more details about the information gathered with Oracle Enterprise Manager Grid Control by clicking the asset to launch the monitored target page in Oracle Enterprise Manager Grid Control.
Perform the following steps to launch the Oracle Enterprise Manager Grid Control console from Oracle Enterprise Manager Ops Center:
-
Log into Enterprise Manager Ops Center.
-
Click Assets in the Navigation pane, expand and click an OS that has the Oracle Enterprise Manager Grid Control Agent installed.
The Dashboard page is displayed.
-
Click the Targets Tab to view Grid Control target information, including status alerts, and availability.
See Oracle Enterprise Manager Ops Center and Oracle Enterprise Manager Grid Control for information about accessing and viewing alerts generated by Oracle Enterprise Manager Grid Control. See the Oracle Enterprise Manager Grid Control documentation for details.
To Launch the Oracle Enteprise Manager Grid Control Console From Oracle Enterprise Manager Ops Center Administration
To launch the Oracle Enterprise Manager Grid Control console outside the context of a specific monitored asset, use the link in the Administration section of Oracle Enterprise Manager Ops Center. This method is useful to confirm configuration and connectivity.
Perform the following steps to launch the console from Oracle Enterprise Manager Ops Center Administration:
-
Log into Oracle Enterprise Manager Ops Center.
-
Click Administration in the Navigation pane.
-
Click Grid Control Console in the Action pane.
See Oracle Enterprise Manager Grid Control Access in the Oracle Enterprise Manager Ops Center documentation for more information. See the Oracle Enterprise Manager Grid Control documentation for details about using the software.
Viewing Metrics and Reports
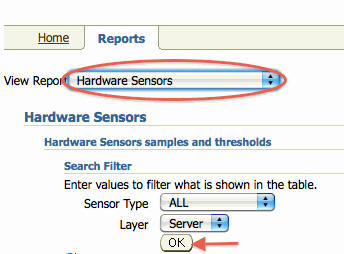
With the Infrastructure Stack plug-in, the following reports are available in the Oracle Enterprise Manager Grid Control UI:
-
Topology report – Provides stack layers report
-
Hardware sensors report – Provides hardware sensors details based on the service processor, including current value and status, and thresholds
-
Configuration report – Provides basic configuration of each layer within the stack
If you imported the Oracle Solaris policies from Oracle Enterprise Manager Ops Center, the Baseline Analysis Report and metrics are available for Oracle Solaris.
-
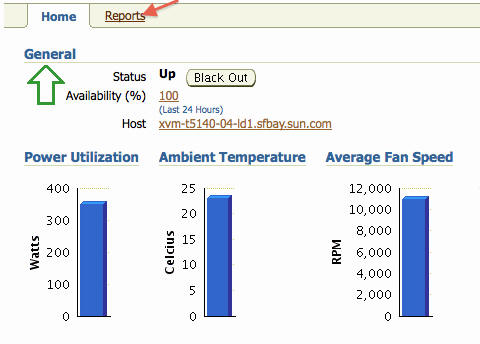
Navigate to the home page of a target.
-
To view metrics, click All Metrics in the Related Links section at the bottom of the page.
-
To view reports, click the Reports tab. Select a report type from the View Report drop-down menu, define the values to display in the report, then click Ok.
Running an Oracle Solaris Baseline Report
You can import an Oracle Solaris baseline from Enterprise Manager Ops Center and use the policy to generate an Oracle Solaris Baseline Analysis reports in Grid Control.
-
Navigate to the home page of an Oracle Solaris Infrastructure Stack target.
-
Click Metric and Policy Settings in the Related Links section at the bottom of the page. The Metric and Policy Settings page is displayed.
-
Click the Policies tab.
-
Click Add Policies, then select the Oracle Solaris baseline.
-
Click Yes, then Ok, then Ok to confirm adding the policies and baselines.
-
Click the Jobs tab, select Generate baseline analysis report in the Create Job drop-down menu, then click Go.
-
Add the Solaris agent, then click Submit.
-
In Job Activity, select All in the Status drop-down menu.
-
Click Go. The job status of the request is displayed.
See the Enterprise Manager Grid Control documentation for details about the metrics and reports.
Upgrading the Plug-in
As update releases are available for Oracle Enteprise Manager Ops Center or Oracle Enterprise Manager Grid Control, a new version of the plug-in software might become available.
Upgrading the plug-in software is performed in the Oracle Enterprise Manager Grid Control console by importing the latest version of the software and deploying it to the Oracle Enterprise Manager Grid Control agents.
-
Download the Oracle Enterprise Manager plug-in file to the system on which the browser is launched. You can download the file from the Oracle Technology Network (OTN).
-
Log into Enterprise Manager Grid Control as a Super Administrator (SYSMAN).
-
Click the Setup link in the upper right corner of the Grid Control Home page, then click the Management Plug-ins link on the left side of the Setup page.
-
Click Import.
-
Click Browse and select the plug-in archive that you have downloaded for upgrading.
-
Click List Archive.
-
Select the plug-in and click OK.
-
Verify that preferred credentials are set on all Agents to which you want to deploy the plug-in.
-
Blackout the Oracle Enterprise Manager Ops Center plug-in targets for agents to which you want to deploy higher version of the plug-in. Ensure that you select immediate blackout.
-
In the Management Plug-ins page, click the icon in the Deploy column for the Ops Center Plug-in. The Deploy Management Plug-in wizard appears.
-
Click Add Agents, then select one or more Agents to which you want to deploy the plug-in. The wizard reappears and displays the Agent you selected.
-
Click Next, then click Finish.
If you see an error message stating that the preferred credential is not set up, go to the Preferences page and add the preferred credentials for the Agent target type.
-
Remove blackout for the targets (required only if Step 9 applies).
Un-Deploying the Plug-in
Follow instructions provided within the Oracle Enterprise Manager documentation to un-deploy a plug-in. At a high level, the Oracle Enterprise Manager Grid Control administrator must:
-
Ensure that all Infrastructure Stack instances being monitored are removed from the agent monitoring configuration
-
Un-deploy the Plug-in from all agents
-
Remove the Plug-in
Perform the following steps to undeploy the plug-in from an agent:
-
Log in to Enterprise Manager Grid Control as a Super Administrator.
-
Select the Targets tab, then the All Targets subtab. The All Targets page is displayed.
-
Select the Ops Center Plug-in target and click Remove. You must do this step for all targets of the specific version of the plug-in.
-
Make sure that the preferred credentials are set on the agents where the plug-in is deployed.
-
Click the Setup link in the upper right corner of the All Targets page, then click the Management Plug-ins link on the left side of the Setup page. The Management Plug-ins page is displayed.
-
Click the icon in the Undeploy column for the Ops Center Plug-in. The Undeploy Management Plug-in page is displayed.
-
Check all the agents that are currently deployed with the Ops Center Plug-in, then click OK. You must undeploy the plug-in from every agent in the system to completely remove it from the enterprise.
-
Select the Ops Center Plug-in on the Management Plug-in page, then click Delete.
Documentation Accessibility
For information about Oracle's commitment to accessibility, visit the Oracle Accessibility Program website at http://www.oracle.com/pls/topic/lookup?ctx=acc&id=docacc.
Oracle customers have access to electronic support through My Oracle Support. For information, visit http://www.oracle.com/pls/topic/lookup?ctx=acc&id=info or visit http://www.oracle.com/pls/topic/lookup?ctx=acc&id=trs if you are hearing impaired.
Oracle Enterprise Manager System Monitoring Plug-in for Oracle Enterprise Manager Ops Center, 11g Release 1 (11.1.3.0.0)
E18950-03
Copyright © 2007, 2011, Oracle and/or its affiliates. All rights reserved.
This software and related documentation are provided under a license agreement containing restrictions on use and disclosure and are protected by intellectual property laws. Except as expressly permitted in your license agreement or allowed by law, you may not use, copy, reproduce, translate, broadcast, modify, license, transmit, distribute, exhibit, perform, publish, or display any part, in any form, or by any means. Reverse engineering, disassembly, or decompilation of this software, unless required by law for interoperability, is prohibited.
The information contained herein is subject to change without notice and is not warranted to be error-free. If you find any errors, please report them to us in writing.
If this is software or related documentation that is delivered to the U.S. Government or anyone licensing it on behalf of the U.S. Government, the following notice is applicable:
U.S. GOVERNMENT RIGHTS Programs, software, databases, and related documentation and technical data delivered to U.S. Government customers are "commercial computer software" or "commercial technical data" pursuant to the applicable Federal Acquisition Regulation and agency-specific supplemental regulations. As such, the use, duplication, disclosure, modification, and adaptation shall be subject to the restrictions and license terms set forth in the applicable Government contract, and, to the extent applicable by the terms of the Government contract, the additional rights set forth in FAR 52.227-19, Commercial Computer Software License (December 2007). Oracle America, Inc., 500 Oracle Parkway, Redwood City, CA 94065.
This software or hardware is developed for general use in a variety of information management applications. It is not developed or intended for use in any inherently dangerous applications, including applications that may create a risk of personal injury. If you use this software or hardware in dangerous applications, then you shall be responsible to take all appropriate fail-safe, backup, redundancy, and other measures to ensure its safe use. Oracle Corporation and its affiliates disclaim any liability for any damages caused by use of this software or hardware in dangerous applications.
Oracle and Java are registered trademarks of Oracle and/or its affiliates. Other names may be trademarks of their respective owners.
Intel and Intel Xeon are trademarks or registered trademarks of Intel Corporation. All SPARC trademarks are used under license and are trademarks or registered trademarks of SPARC International, Inc. AMD, Opteron, the AMD logo, and the AMD Opteron logo are trademarks or registered trademarks of Advanced Micro Devices. UNIX is a registered trademark of The Open Group.
This software or hardware and documentation may provide access to or information on content, products, and services from third parties. Oracle Corporation and its affiliates are not responsible for and expressly disclaim all warranties of any kind with respect to third-party content, products, and services. Oracle Corporation and its affiliates will not be responsible for any loss, costs, or damages incurred due to your access to or use of third-party content, products, or services.