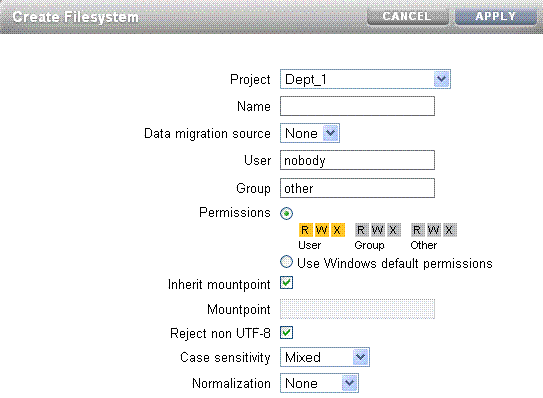
8.6 Create Custom Shares
Shares are file systems and LUNs that are exported over supported data protocols to compute nodes. File systems export a file-based hierarchy and can be accessed over NFS over IPoIB in Exalogic machines.
To create a custom share, such as domain_home under the Dept_1 project, do the following:
- In the Browser User Interface (BUI), click the Shares tab.
The shares page is displayed.
- Click the + button next to Filesystems to add a file system. The Create Filesystem screen is displayed.
- In the Create Filesystems screen, choose the target project from the Project pull-down menu. For example, choose
Dept_1. - In the Name field, enter a name for the share. For example, enter
domain_home. - From the Data migration source pull-down menu, choose None.
- Select the Permissions option. Table 8-3 lists the access types and permissions.
Table 8-3 File System Access Types and Permissions
Access Type Description Permissions to Grant User
User that is the current owner of the directory.
The following permissions can be granted:
-
R - Read - Permission to list the contents of the directory.
-
W - Write - Permission to create files in the directory.
-
X - Execute - Permission to look up entries in the directory. If users have execute permissions but not read permissions, they can access files explicitly by name but not list the contents of the directory.
Group
Group that is the current group of the directory.
Other
All other accesses.
You can use this feature to control access to the file system, based on the access types (users and groups) in
Dept_1. -
- You can either inherit a mountpoint by selecting the Inherit mountpoint option or set a mountpoint.
Note:
The mount point must be under
/export. The mount point for one share cannot conflict with another share. In addition, it cannot conflict with another share on cluster peer to allow for proper failover.When inheriting the mountpoint property, the current dataset name is appended to the project's mountpoint setting, joined with a slash ('/'). For example, if the
domain_homeproject has the mountpoint setting/export/domain_home, thendomain_home/configinherits the mountpoint/export/domain_home/config. - To enforce UTF-8 encoding for all files and directories in the file system, select the Reject non UTF-8 option. When set, any attempts to create a file or directory with an invalid UTF-8 encoding will fail.
Note:
This option is selected only when you are creating the file system.
- From the Case sensitivity pull-down menu, select Mixed, Insensitive, or Sensitive to control whether directory lookups are case-sensitive or case-insensitive.
Table 8-4 Case Sensitivity Values
BUI Value Description Mixed
Case sensitivity depends on the protocol being used. For NFS, FTP, and HTTP, lookups are case-sensitive. This is default, and prioritizes conformance of the various protocols over cross-protocol consistency.
Insensitive
All lookups are case-insensitive, even over protocols (such as NFS) that are traditionally case-sensitive. This setting should only be used where CIFS is the primary protocol and alternative protocols are considered second-class, where conformance to expected standards is not an issue.
Sensitive
All lookups are case-sensitive. In general, do not use this setting.
Note:
This option is selected only when you are creating the file system.
- From the Normalization pull-down menu, select None, Form C, Form D, Form KC, or Form KD to control what unicode normalization, if any, is performed on filesystems and directories. Unicode supports the ability to have the same logical name represented by different encodings. Without normalization, the on-disk name stored will be different, and lookups using one of the alternative forms will fail depending on how the file was created and how it is accessed. If this property is set to anything other than None (the default), the Reject non UTF-8 property must also be selected.
Table 8-5 Normalization Settings
BUI Value Description None
No normalization is done.
Form C
Normalization Form Canonical Composition (NFC) - Characters are decomposed and then recomposed by canonical equivalence.
Form D
Normalization Form Canonical Decomposition (NFD) - Characters are decomposed by canonical equivalence.
Form KC
Normalization Form Compatibility Composition (NFKC) - Characters are decomposed by compatibility equivalence, then recomposed by canonical equivalence.
Form KD
Normalization Form Compatibility Decomposition (NFKD) - Characters are decomposed by compatibility equivalence.
Note:
This option is selected only when you are creating the file system.
- After entering the values, click Apply.
