Creating a vServer Template
To create a vServer template from an existing vServer (for example, pwtest), do the following:
-
Stop the vServer as described in Stopping vServers.
-
Log in to the OVMM web interface as the
rootuser and do the following:Note:
-
In this procedure, you use OVMM to clone and start a vServer. Unless explicitly documented (as in this appendix), do not use OVMM to create a vServer or perform any lifecycle operations on a vServer. Use only Exalogic Control to manage vServers.
-
The steps in this procedure are based on the OVMM web interface of Oracle VM release 3.2, which is included in Exalogic Elastic Cloud Software 2.0.6.x.x. If you are at Exalogic Elastic Cloud Software 2.0.4.x.x (or a lower release), the corresponding Oracle VM release would be 3.0.3, and the OVMM web interface may be different from that described here.
-
Select the Servers and VMs tab.
-
Expand Server Pools in the navigation pane on the left, and select the server pool displayed there.
-
In the tool bar of the main display pane, change the Perspective to Virtual Machines.
A list of all the VMs is displayed.
-
Look for the vServer that you stopped in step 1. The status of the VM would be Stopped.
-
Right-click on the VM, and from the resulting context menu, select Clone or Move.
The Clone or Move Virtual Machine wizard starts.
-
Leave the Create a clone of this VM option selected, and click Next.
-
On the next screen, do the following:
i. Leave the Clone to a Virtual Machine option selected.
ii. Leave the Clone Count value at 1.
iii. Enter a name for the clone (for example,
pw-test2), and enter a description.iv. Click OK.
Wait for the OVMM job to finish. The job may take a few minutes, depending on the size of the virtual disks in the VM being cloned.
OVMM assigns the new vServer (
pw-test2) to one of the available servers in the pool. -
Select the new VM, right-click, and select Start.
-
Expand the row corresponding to the new VM by double-clicking in the first column.
In the resulting pane, look for the ID (for example,
0004fb000006000030c6ec27dd5a2327). This is the UUID of the VM. Note the UUID for later use.Note:
In this procedure, this ID is referenced as
VM_CLONE_UUID.
-
-
After the clone VM (
pw-test2) starts, log in asrootto the Oracle VM Server node that hosts the VM (slce02cn02in this example).View a list of the VMs running on the node, by running the following command:
[root@slce02cn02 ~]#xm listThis command displays output, as in the following example:
Name                                        ID  Mem  VCPUs    State   Time(s)
0004fb00000600009c75583293d01d04            1   4096   2       -b---- 139169.3
0004fb000006000030c6ec27dd5a2327            24  4096   1       -b----    36.8
Domain-0                                    0   2002   24       r----- 115451.5
Log in to the VM (
pw-test2) by using thexm console <ID>command, where<ID>is the ID of the VM, which has<VM_CLONE_UUID>as its name. For example, run thexm console 24command onslce02cn02. This command displays output, as in the following example:Oracle Linux Server release 5.6 Kernel 2.6.32-200.21.2.el5uek on an x86_64 pw-test login: root Password: Last login: Thu May 24 12:35:35 on ttyS0 [root@pw-test ~]#
Note:
In the output, note that the hostname is the same as the original VM (
pw-test). It is not the name of the clone (pw-test2). Further, the network interfaces initialized by/etc/sysconfig/network-scripts/ifcfg-bond*are also the same as the original VM. The next step unconfigures the VM, so it can be used to create a template that causes Exalogic Control to configure hostname and network scripts when a vServer is created with the template. -
Unconfigure the clone VM (
pw-test2), and stop the VM as follows:-
Edit and
/etc/sysconfig/ovmdfile and change theINITIAL_CONFIG=noparameter toINITIAL_CONFIG=yes. Save the file after making this change. -
Remove DNS information by running the following commands:
cd /etcsed -i '/.*/d' resolv.conf -
Remove SSH information by running the following commands:
rm -f /root/.ssh/*rm -f /etc/ssh/ssh_host* -
Clean up the
/etc/sysconfig/networkfile by running the following commands:cd /etc/sysconfigsed -i '/^GATEWAY/d' network -
Clean up the
hostsfiles by running the following commands:cd /etcsed -i '/localhost/!d' hostscd /etc/sysconfig/networking/profiles/defaultsed -i '/localhost/!d' hosts -
Remove network scripts by running the following commands:
cd /etc/sysconfig/network-scriptsrm -f ifcfg-*eth*rm -f ifcfg-ib*rm -f ifcfg-bond* -
Remove log files, including the ones that contain information you do not want to propagate to new vServers, by running the following commands:
cd /var/logrm -f messages*rm -f ovm-template-config.logrm -f ovm-network.logrm -f boot.log*rm -f cron*rm -f maillog*rm -f messages*rm -f rpmpkgs*rm -f secure*rm -f spooler*rm -f yum.log* -
Remove kernel messages by running the following commands:
cd /var/logrm -f dmesgdmesg -c> ovm-network.log -
Edit the
/etc/modprobe.conffile and remove the following lines (and other lines starting withalias bond):options bonding max_bonds=11 alias bond0 bonding alias bond1 bonding
Save the file after making these changes.
-
Edit the
/etc/sysconfig/hwconffile and modify thedriver: mlx4_enentry todriver: mlx4_core. Save the file after making changes. -
Remove the Exalogic configuration file by running the following command:
rm -f /etc/exalogic.conf -
Remove bash history by running the following commands:
rm -f /root/.bash_historyhistory -cDo this in the end to avoid recording the cleanup commands.
Note:
Before proceeding, consider the following points:
-
Any storage volume that is attached to the base VM (
pw-test) is cloned to the clone VM (pw-test2), including all the contents of the volume. This also applies to the template you are creating in the next step and to the vServers created from the template. Be sure to delete any unwanted files, or drop the storage volume before proceeding with template creation. -
When creating a vServer, Exalogic Control resizes any attached storage volumes smaller than the storage size in the Server Type to the specified storage size. For example, if you have an attached volume of size 2 GB and you select a Server Type with storage size of 4 GB, the new attached volume will have the size 4 GB. There is no change to the file systems on the volume.
-
-
-
Package the template for upload into Exalogic Control as follows:
-
Log in to any Oracle VM Server node, such as
slce02cn01, as therootuser. -
Create a workspace on the Sun ZFS Storage Appliance, which is included in your Exalogic machine.
The following example uses a directory in the
/export/common/imagesshare:[root@slce02cn01 ~]# mkdir -p /u01/common/images [root@slce02cn01 ~]# mount -t nfs slce02sn01:/export/common/images /u01/common/images [root@slce02cn01 ~]# mkdir /u01/common/images/pw-template
-
Change directory to the Oracle VM Server (OVS) repository for the VM clone and verify that you are in the correct directory:
[root@slce02cn01 ~]# cd /OVS/Repositories/*/VirtualMachines/<VM_CLONE_UUID>
[root@slce02cn02 0004fb000006000030c6ec27dd5a2327]# grep simple_name vm.cfgOVM_simple_name = 'pw-test2'
-
Copy the configuration file to the Sun ZFS Storage Appliance workspace:
[root@slce02cn01 0004fb000006000030c6ec27dd5a2327]# cp vm.cfg /u01/common/images/pw-template
-
Display the disk(s) used by the cloned VM:
[root@slce02cn01 0004fb000006000030c6ec27dd5a2327]# grep disk vm.cfg
disk = ['file:/OVS/Repositories/0004fb0000030000169d06eb2fdfcc6f/VirtualDisks/0004fb00001200004e5b424a5f5965bf.img,hda,w', 'file:/OVS/Repositories/0004fb0000030000169d06eb2fdfcc6f/VirtualDisks/0004fb00001200008d2bc3496683e1c4.img,xvdb,w']
-
Copy the disk(s) to the Sun ZFS Storage Appliance workspace using the file name(s) displayed above:
[root@slce02cn01 0004fb000006000030c6ec27dd5a2327]# cp /OVS/Repositories/0004fb0000030000169d06eb2fdfcc6f/VirtualDisks/0004fb00001200004e5b424a5f5965bf.img /u01/common/images/pw-template/
[root@slce02cn01 0004fb000006000030c6ec27dd5a2327]# cp /OVS/Repositories/0004fb0000030000169d06eb2fdfcc6f/VirtualDisks/0004fb00001200008d2bc3496683e1c4.img /u01/common/images/pw-template/
-
Create a compressed tar file with template configuration and disk(s) as follows:
[root@slce02cn01 0004fb000006000030c6ec27dd5a2327]# cd /u01/common/images/pw-template
[root@slce02cn01 pw-template]# tar zcvf pw-template.tgz * 0004fb00001200004e5b424a5f5965bf.img 0004fb00001200008d2bc3496683e1c4.img vm.cfg
The resulting file is a server template ready for upload into Exalogic Control.
-
Delete the VM clone, which you no longer need. In OVMM, right-click on the VM clone, and select Delete. In the Delete Confirmation screen, select the virtual disk(s) used by the VM, and click OK.
-
-
If the HTTP protocol is not enabled on the Sun ZFS Storage Appliance with access to the workspace, complete the following steps:
-
Use SSH to log in to the storage node (for example,
slce02sn01) and enable the HTTP service, as in the following example:slce02sn01:> configuration services http slce02sn01:configuration services http> enable slce02sn01:configuration services http> show Properties: <status> = online require_login = false protocols = http/https listen_port = 80 https_port = 443 -
Verify that the workspace with the template package is accessible by HTTP.
slce02sn01:configuration services http> cd /
slce02sn01:> shares
slce02sn01:shares> select common
slce02sn01:shares common> get sharedav
                      sharedav = off
slce02sn01:shares common> set sharedav=ro
                      sharedav = ro (uncommitted)slce02sn01:shares common> commit
slce02sn01:shares common> select images
slce02sn01:shares common/images> get sharedav
                      sharedav = off
slce02sn01:shares common/images> set sharedav=ro
                      sharedav = ro (uncommitted)
slce02sn01:shares common/images> commit
If the
sharedavproperty is already set torworro, you do not need to change it. -
Log out of the Sun ZFS Storage Appliance:
slce02sn01: shares common/images> exit
Connection to slce02sn01 closed.
-
-
Using Exalogic Control, upload the new server template to an account as follows:
-
Log in to the Exalogic Control web interface as a
Cloud AdminorCloud User. -
In the navigation pane on the left, click vDC Management. Under vDC Accounts, click the name of your Account. The vDC Account dashboard is displayed.
-
Click Server Templates on the top navigation bar. The server templates available in your Account are listed.
-
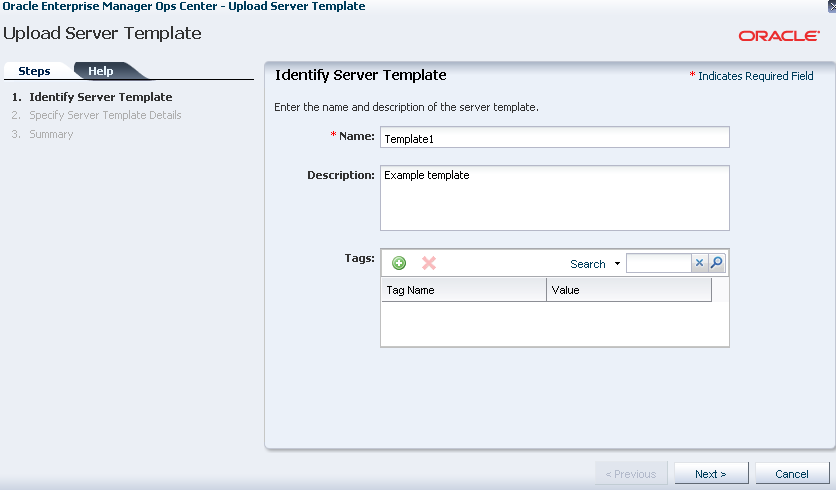
Under Server Templates, click the Upload Server Template icon. Alternatively, click Upload Server Template under Operate on the Actions pane. The Upload Server Template wizard is displayed, as shown in Figure G-1.
-
On the Identify Server Template screen, enter a name and description for the server template to be uploaded. For example, enter
Template1in the Name field. In the Description field, enter a brief description.You can add tags for later identification and search. -
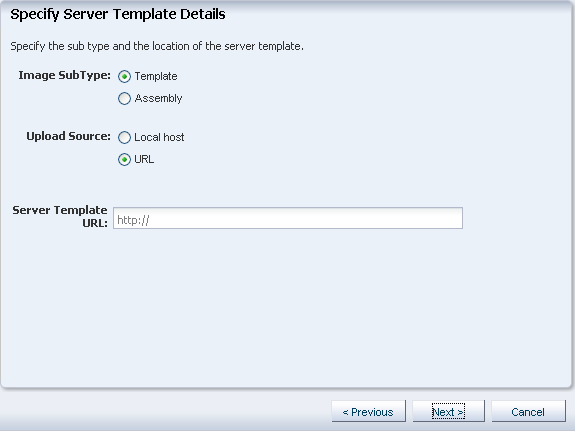
Click Next. The Specify Server Template Details screen is displayed, as shown in Figure G-2.
Figure G-2 Specify Server Template Details

Description of "Figure G-2 Specify Server Template Details" -
Select the Image SubType option, and select Template.
-
Select URL as the Upload Source. To specify a URL, enter the HTTP URL for the template package created in Step 6, in the Server Template URL field.
If you used the same workspace as this document, the URL will be:
http://<zfssa-host>/shares/export/common/images/<workspace>/<template>.tgzClick Next.
-
Review the summary, and click Upload to upload the server template.
-
Click Server Templates on the top navigation bar. You should see the newly uploaded server template listed. You can start creating vServers based on this server template.
-
