Release 12.1
Part Number E12065-06
Contents
Previous
Next
| Oracle E-Business Suite Integrated SOA Gateway Developer's Guide Release 12.1 Part Number E12065-06 | Contents | Previous | Next |
Oracle E-Business Suite Integrated SOA Gateway allows you to use PL/SQL application programming interfaces (APIs) to insert or update data in Oracle E-Business Suite. APIs are stored procedures that let you update or retrieve data from Oracle E-Business Suite.
Once a PL/SQL API interface definition is exposed as a Web service representing in WSDL URL, the generated Web service can be deployed from the Oracle Integration Repository to Oracle E-Business Suite application server. Services can then be exposed to customers through service provider and invoked through any of the Web service clients or orchestration tool including Oracle JDeveloper, Apache Axis, .NET Web Service Client, Oracle BPEL Process Manager, and Oracle Enterprise Service Bus (ESB).
For example, these deployed Web services can be orchestrated into a meaningful business process with service endpoints using a BPEL language. At run time, the BPEL process can be deployed to Oracle BPEL server or a third party BPEL server that can be consumed by customers.
To better understand how each individual Web service represented in WSDL URL can be used in inserting or updating application data, detailed design-time and run-time tasks in creating and deploying a BPEL process are discussed in this chapter. For the example described in the following sections, we use Oracle JDeveloper 10.1.3.3.0 as a design-time tool to create the BPEL process and use Oracle SOA Suite BPEL server 10.1.3.3.0 for the process deployment.
BPEL Process Scenario
Take PL/SQL Supplier Ship and Debit Request API OZF_SD_REQUEST_PUB as an example to explain the BPEL process creation.
When the creation of a ship and debit request is received, the creation information including input ship and debit payload will be read and passed to create a ship and debit request. Once the request is created, the request number will then be returned to the requestor.
If the BPEL process is successfully executed after deployment, you should find a ship and debit request is created in the Oracle Order Management. The request number should be the same as the payload input value.
Prerequisites to Create a BPEL Process Using a PL/SQL Web Service
Before performing the design-time tasks for PL/SQL Web services, you need to ensure the following tasks are in place:
Note: Before generating the Web service for a selected interface, you can also create a security grant to a specific user (such as "TRADEMGR") or user group if necessary to ensure the user has the access privilege to the interface.
An integration repository administrator needs to successfully generate and deploy a Web service to the application server.
An integration developer needs to locate and record the deployed WSDL URL for the PL/SQL exposed as a Web service.
SOAHeader variables need to be populated for Web service authorization.
Please note that certain PL/SQL APIs exposed from Oracle E-Business Suite Integrated SOA Gateway take record types as input. Such APIs expect default values to be populated for parameters within these record types for successful execution.
The default values are FND_API.G_MISS_CHAR for characters, FND_API.G_MISS_DATE for dates, and FND_API.G_MISS_NUM for numbers. Oracle E-Business Suite Integrated SOA Gateway can default these values when the parameters within the record type are passed as nil values, for example, as shown below:
<PRICE_LIST_REC>
<ATTRIBUTE1 xsi:nil="true"/>
<ATTRIBUTE2 xsi:nil="true"/>
<ATTRIBUTE3 xsi:nil="true"/>
...
</PRICE_LIST_REC>
Deploying PL/SQL WSDL URL
An integration repository administrators must first create a Web service for a selected interface definition, and then deploy the service from Oracle Integration Repository to the application server.
For example, the administrator must perform the following steps before letting the integration developers use the deployed WSDL in creating a BPEL process:
To generate a Web service, locate the interface definition first (such as a PL/SQL interface OZF_SD_REQUEST_PUB) and click Generate WSDL in the interface details page.
Once the service is successfully generated, the Web Service - SOA Provider region appears in the interface details page. For detailed instruction on how to generate a Web service, see Generating Web Services, Oracle E-Business Suite Integrated SOA Gateway Implementation Guide.
To deploy a generated Web service, select at least one authentication type and click Deploy in the Web Service - SOA Provider region of the interface details page to deploy the service.
Once the service is successfully deployed, the selected authentication type(s) will be displayed along with 'Deployed' Web Service Status. For more information on securing Web services with authentication types, see Managing Web Service Security, Oracle E-Business Suite Integrated SOA Gateway Implementation Guide.
For detailed instruction on how to deploy a Web service, see Deploying, Undeploying, and Redeploying Web Services, Oracle E-Business Suite Integrated SOA Gateway Implementation Guide.
Searching and Recording WSDL URL
Apart from the required tasks performed by the administrators, an integration developer also needs to log on to the system to locate and record the deployed Web service WSDL URL for the interface that needs to be orchestrated into a meaningful business process in Oracle JDeveloper using BPEL language.
This can be done by clicking the View WSDL link in the interface details page to open a new window. Copy the WSDL URL from the new window. This URL will be used later in creating a partner link for the interface exposed as a Web service during the BPEL process creation at design time.
Viewing and Recording a Deployed WSDL URL
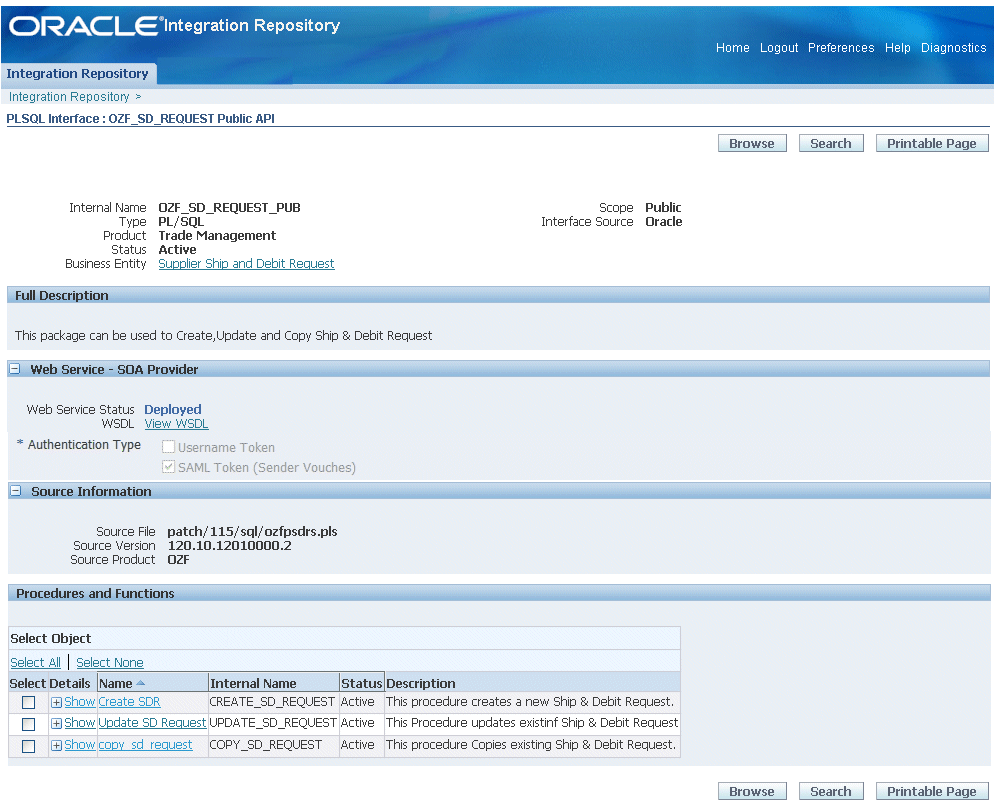
How to search for an interface and review the interface details, see Searching and Viewing Integration Interfaces.
Setting Variables in SOAHeader for SOAP Request
You must populate certain variables in the BPEL process for SOAHeader elements to pass values that would be used to set application context during service execution. These SOAHeader elements for PL/SQL interface type are Responsibility, RespApplication, SecurityGroup, NLSLanguage, and Org_Id.
Note: The user information is defined by the wsseUsername property passed within the security headers. Detailed instructions on how to pass the security headers along with the SOAP request, see Passing Values to Security Headers.
The expected values for these elements are described in the following table:
| Element Name | Expected Value |
|---|---|
| Responsibility | responsibility_key (such as "SYSTEM_ADMINISTRATOR") |
| RespApplication | Application Short Name (such as "FND") |
| SecurityGroup | Security Group Key (such as "STANDARD") |
| NLSLanguage | NLS Language (such as "AMERICAN") |
| Org_Id | Org Id (such as "202") |
Note: NLS Language and Org_Id are optional values to be passed.
If the NLS Language element is specified, SOAP requests can be consumed in the language passed. All corresponding SOAP responses and error messages can also be returned in the same language. If no language is identified, then the default language of the user will be used.
If a service execution is dependent on any particular organization, then you must pass the Org_Id element of that SOAP request.
The context information can be specified by configuring an Assign activity before the Invoke activity in the BPEL PM.
Detailed information on how to set SOAHeader for the SOAP request, see Assigning SOAHeader Parameters.
BPEL Process Creation Flow
Based on the single invoice creation scenario, the following design-time tasks are discussed in this chapter:
Use this step to create a new BPEL project called ShipDebitRequest.bpel using an Synchronous BPEL Process template. This automatically creates two dummy activities - Receive and Reply - to receive input from a third party application and to reply output of the BPEL process back to the request application.
Use this step to create a ship and debit request in Oracle Order Management by using the Supplier Ship and Debit Request API OZF_SD_REQUEST_PUB exposed as Web service.
Add a Partner Link for File Adapter
Use this step to synchronous read invoice header details passed from the first Assign activity.
Use this step to configure two Invoke activities in order to:
Point to the File Adapter to synchronous read invoice header details that is passed from the first Assign activity.
Point to the OZF_SD_REQUEST_PUB partner link to initiate the request creation with payload and transaction details received from the Assign activities.
Use this step to configure Assign activities in order to pass request header details, payload information and request number to appropriate Invoke activities to facilitate the request creation. At the end, pass the request number to the request application through the dummy Reply activity.
For general information and basic concept of a BPEL process, see Understanding BPEL Business Processes and Oracle BPEL Process Manager Developer's Guide for details.
Use this step to create a new BPEL project that will contain various BPEL process activities.
To create a new BPEL project:
Open JDeveloper BPEL Designer.
From the File menu, select New. The New Gallery dialog box appears.
Select All Items from the Filter By box. This produces a list of available categories.
Expand the General node and then select Projects.
Select BPEL Process Project from the Items group.
Click OK. The BPEL Process Project dialog box appears.
Entering BPEL Project Information
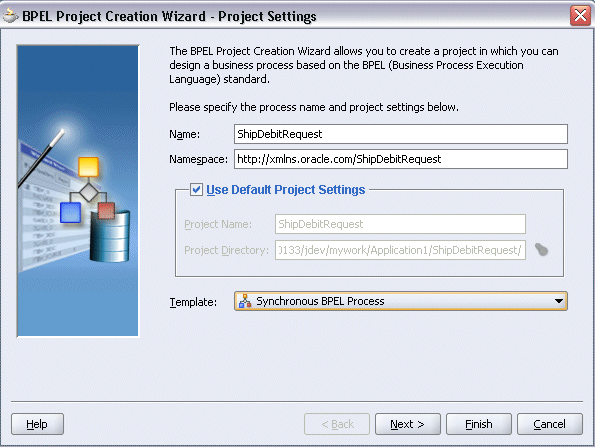
In the Name field, enter a descriptive name such as ShipDebitRequest.
Note: SOA Provider does not support service creation for PL/SQL stored procedures or packages which have '$' character in parameter type names. The presence of $ in the name would cause the XSD generation to fail.
From the Template list, select Synchronous BPEL Process. Select Use Default Project Settings.
Use the default input and output schema elements in the Input/Output Elements dialog box.
Click Finish.
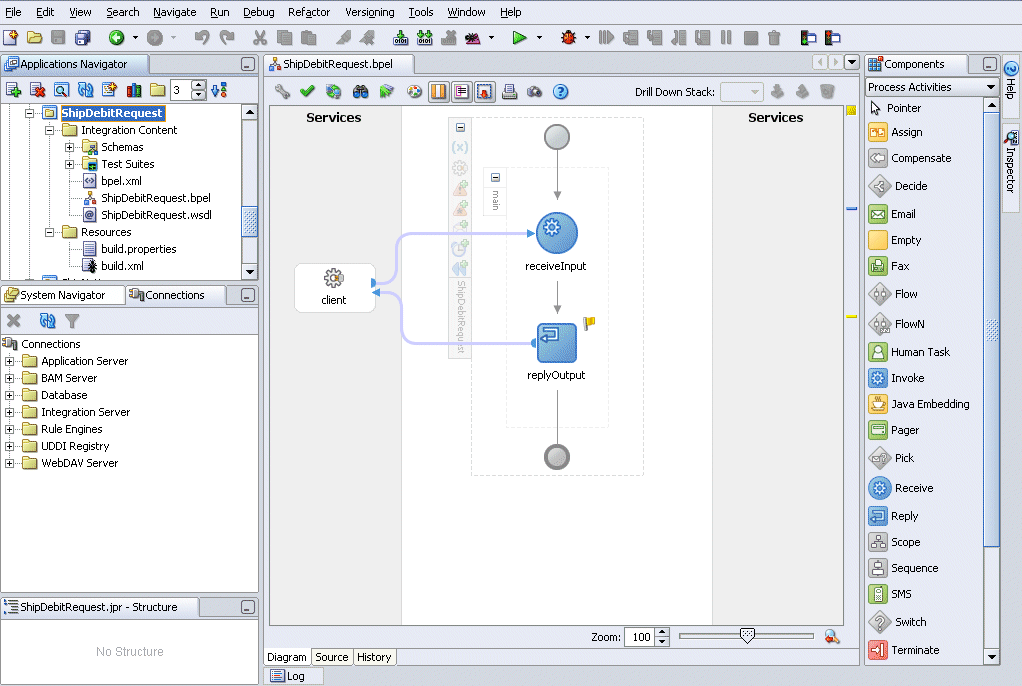
A new synchronous BPEL process is created with the Receive and Reply activities. The required source files including bpel.xml, using the name you specified (for example ShipDebitRequest.bpel) are also generated.
New BPEL Process Diagram
Use this step to create a Partner Link called OZF_SD_REQUEST_PUB.
To create a partner link for OZF_SD_REQUEST_PUB Web service:
In JDeveloper BPEL Designer, drag and drop the PartnerLink service from the Component Palette into the Partner Link border area of the process diagram. The Service Name dialog box appears.
Copy the WSDL URL corresponding to the OZF_SD_REQUEST_PUB service that you recorded earlier from the Integration Repository, and paste it in the WSDL File field.
A Partner Link Type message dialog box appears asking whether you want the system to create a new WSDL file that will by default create partner link types for you.
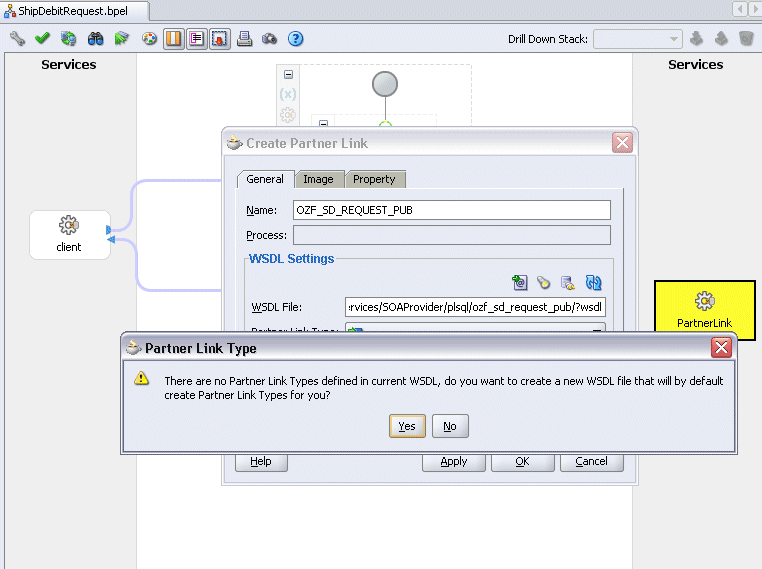
Click Yes to have the Partner Name value populated automatically. The name is defaulted to OZF_SD_REQUEST_PUB.
Select Partner Role and My Role fields from the drop-down lists.
Create Partner Link
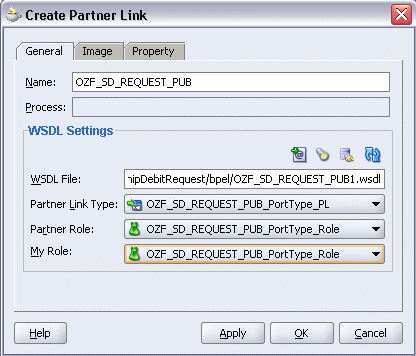
Click Apply.
The partner link is created with the required WSDL settings, and is represented in the BPEL project by a new icon in the border area of the process diagram.
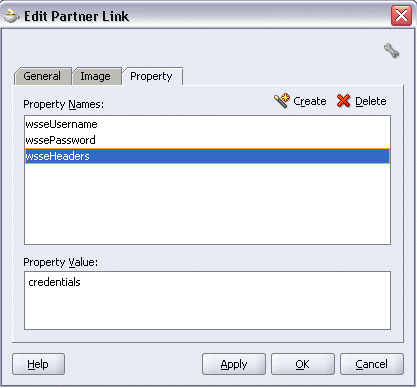
Passing Values to Security Headers
Select the Property tab and click the Create Property icon to select the following properties from the property name drop-down list in order to pass the security headers along with the SOAP request:
wsseUsername
Specify the username to be passed in the Property Value box.
wssePassword
Specify the corresponding password for the username to be passed in the Property Value box.
wsseHeaders
Enter credentials as the property value.
Click Apply to save the selected property values.
Adding Properties
Click OK to complete the partner link configuration.
Viewing a Partner Link from BPEL Diagram
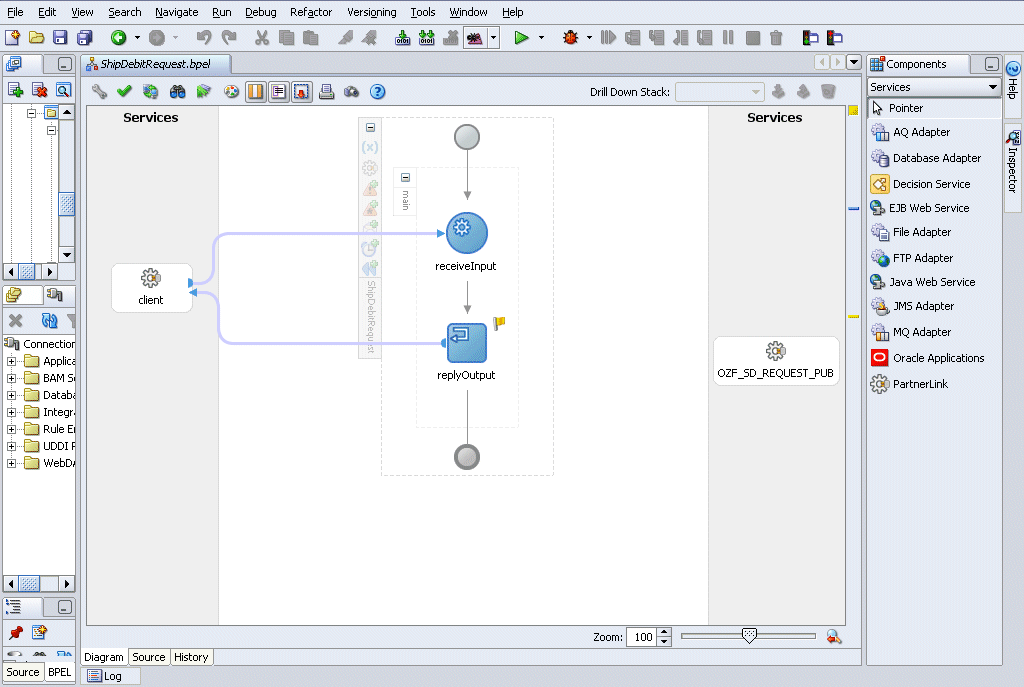
Partner Link OZF_SD_REQUEST_PUB is added to the Services section in the BPEL process diagram.
Use this step to configure a BPEL process by reading current contents of a file.
To add a Partner Link for File Adapter to Read Payload:
In JDeveloper BPEL Designer, drag and drop the File Adapter service from the Adapter Service section of the Component Palette into the Partner Link area of the process diagram. The Adapter Configuration wizard welcome page appears.
Click Next. The Service Name dialog box appears.
Enter a name for the file adapter service such as ReadPayload. You can add an optional description of the service.
Click Next. The Operation dialog box appears.
Specifying the Operation
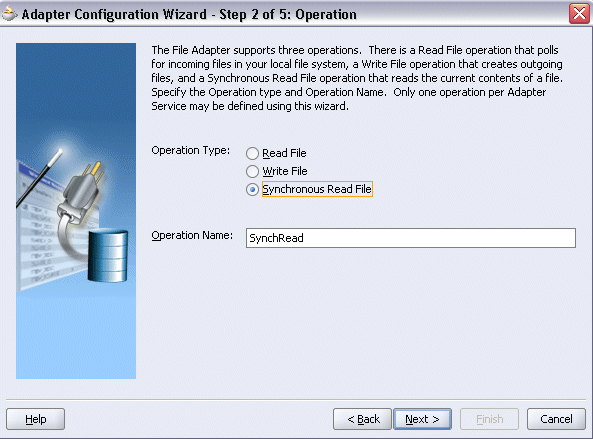
Specify the operation type, for example Synchronous Read File. This automatically populates the Operation Name field.
Click Next to access the File Directories dialog box.
Specifying the Input File Directory
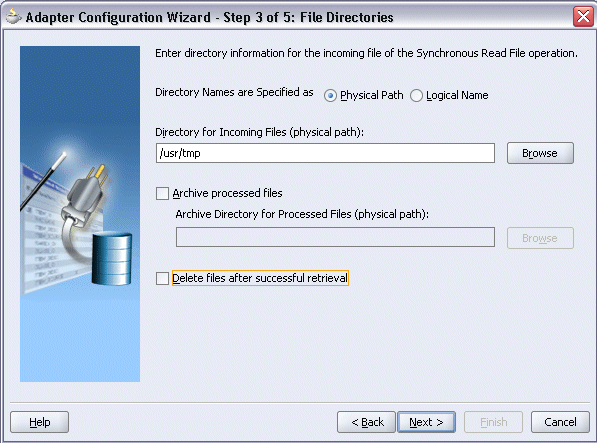
Select Physical Path radio button and enter the input payload file directory information. For example, enter /usr/tmp/ as the directory name.
Note: You must ensure the input payload file InputCreateSDRequest.xml is available in the directory ‘/usr/tmp/’ folder of SOA Suite server (or D:\HOL in case of SOA Server in Windows machine).
Uncheck the Delete Files after successful retrieval check box. Click Next to open the File Name dialog box.
Enter the name of the file for the synchronous read file operation. For example, enter InputCreateSDRequest.xml.
Specifying the Input File Name
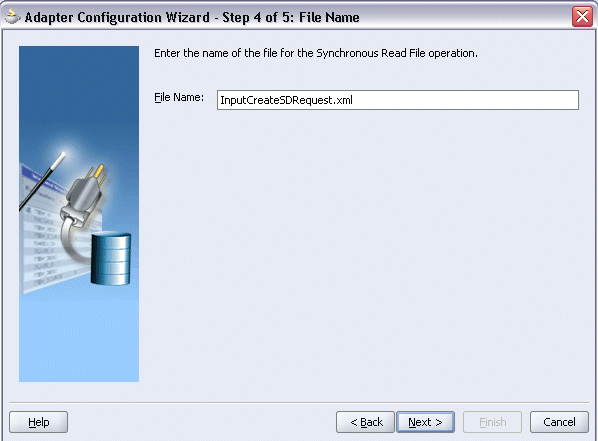
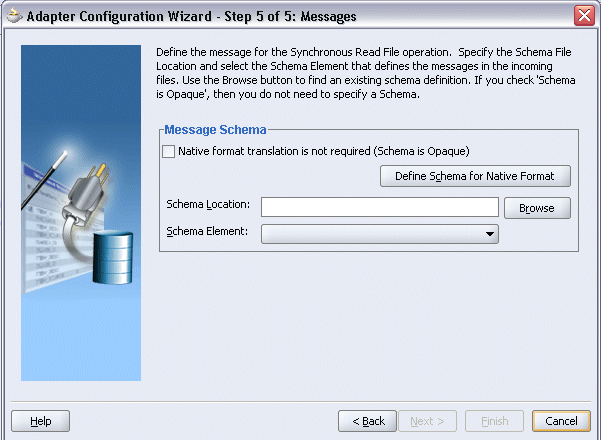
Click Next. The Messages dialog box appears.
Select Browse for schema file in Schema Location.
The Type Chooser window is displayed.
Specifying Message Schema
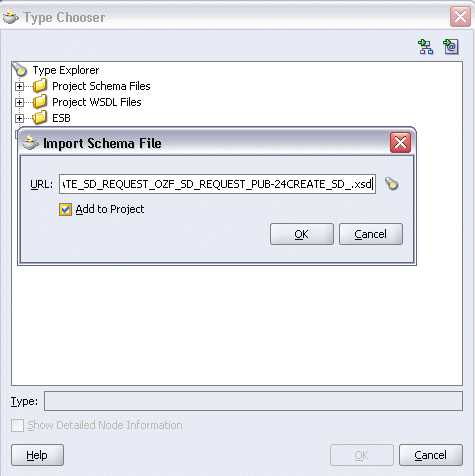
Click Import Schema Files button on the top right corner of the Type Chooser window.
Enter the schema location for the service. Such as http://<myhost>:<port>/webservices/SOAProvider/plsql/ozf_sd_request_pub/APPS_ISG_CREATE_SD_REQUEST_OZF_SD_REQUEST_PUB-24CREATE_SD_.xsd.
Schema location for your service can be found from the service WSDL URL (for example, http://<myhost>:<port>/webservices/SOAProvider/plsql/ozf_sd_request_pub/?wsdl).
Select the Add to Project check box and click OK.
Importing Schema File
Click OK for Import schema prompt.
The Imported Schemas folder is automatically added to the Type Chooser window.
Identifying Message Schema
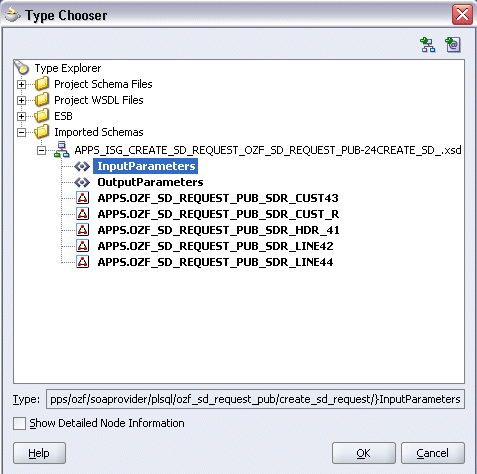
Expand the Imported Schemas folder and select InputParameters Message in the APPS_ISG_CREATE_SD_REQUEST_OZF_SD_REQUEST_PUB-24CREATE_SD_.xsd. Click OK.
The selected xsd is displayed as Schema Location, and the InputParameters is selected as Schema Element.
Viewing Selected Message Schema and Element
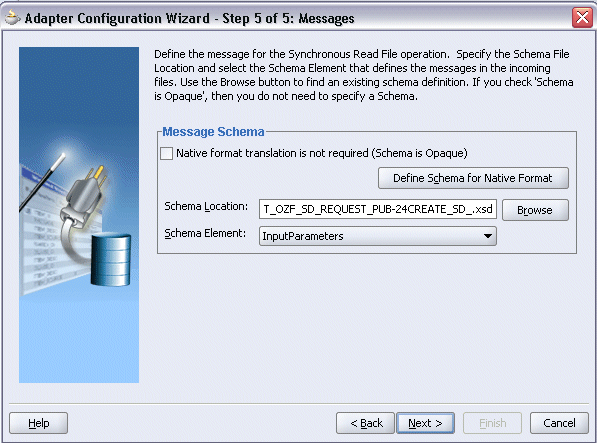
Click Next and then Finish. The wizard generates the WSDL file corresponding to the partner link. The main Create Partner Link dialog box appears, specifying the new WSDL file ReadPayload.wsdl.
Completing the Partner Link Configuration
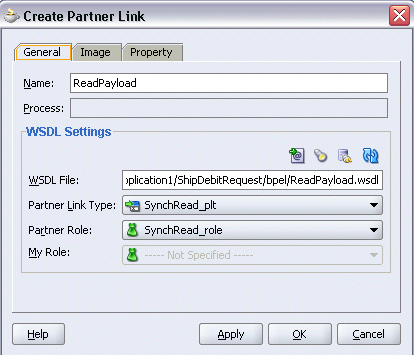
Click Apply and then OK to complete the configuration and create the partner link with the required WSDL settings for the File Adapter Service.
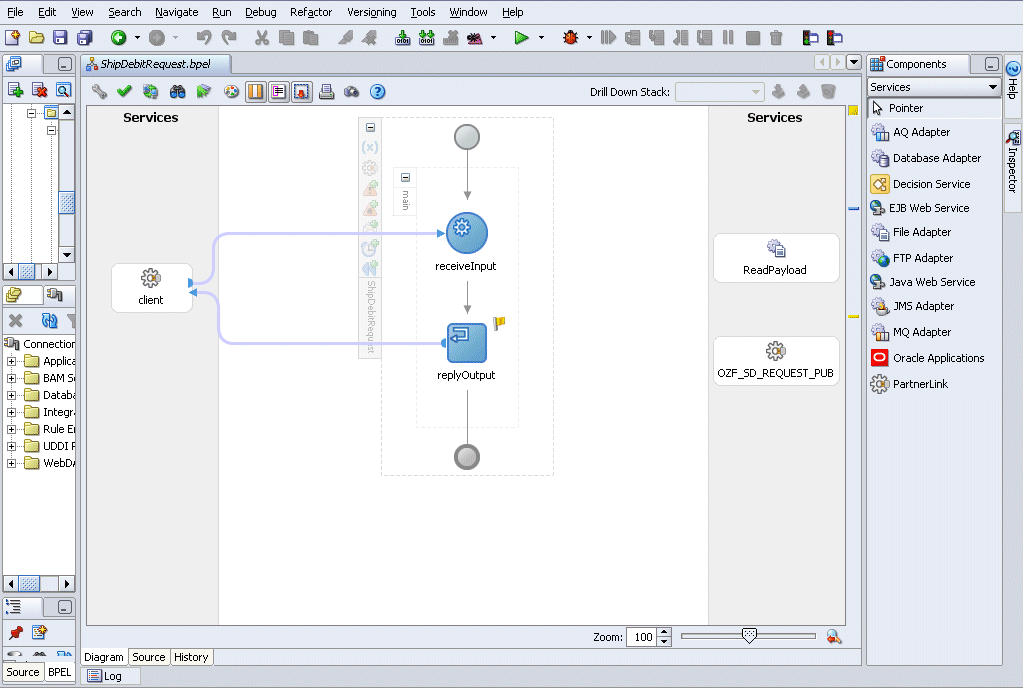
The ReadPayload Partner Link appears in the BPEL process diagram.
Adding the Partner Link for File Adapter
This step is to configure two Invoke activities:
Read request creation details that is passed from the first Assign activity using ReadPayload partner link for File Adapter.
Send the payload and request details received from the Assign activities to create a ship and debit request by using the OZF_SD_REQUEST_PUB partner link.
To add an Invoke activity for ReadPayload Partner Link:
In JDeveloper BPEL Designer, drag and drop the Invoke activity from the Component Palette into the Activity box of the process diagram, between the Receive and Reply activities.
Link the Invoke activity to the ReadPayload service. The Edit Invoke dialog box appears.
Enter a name for the Invoke activity, and then click the Create icon next to the Input Variable field to create a new variable. The Create Variable dialog box appears.
Enter 'ReadPayload_InputVariable' as the input variable name. You can also accept the default name.
Creating a Variable
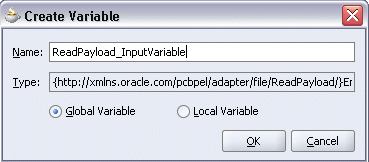
Select Global Variable, and then enter a name for the variable. Click OK.
Click the Create icon next to the Output Variable field to create a new variable. The Create Variable dialog box appears.
Enter 'ReadPayload_OutputVariable' as the output variable name. You can also accept the default name.
Select Global Variable, and then enter a name for the variable. Click OK.
Editing the Invoke Activity
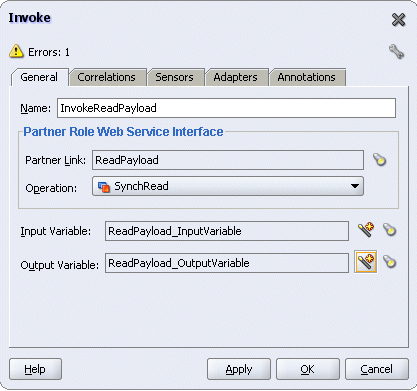
Click Apply and then OK in the Edit Invoke dialog box to finish configuring the Invoke activity.
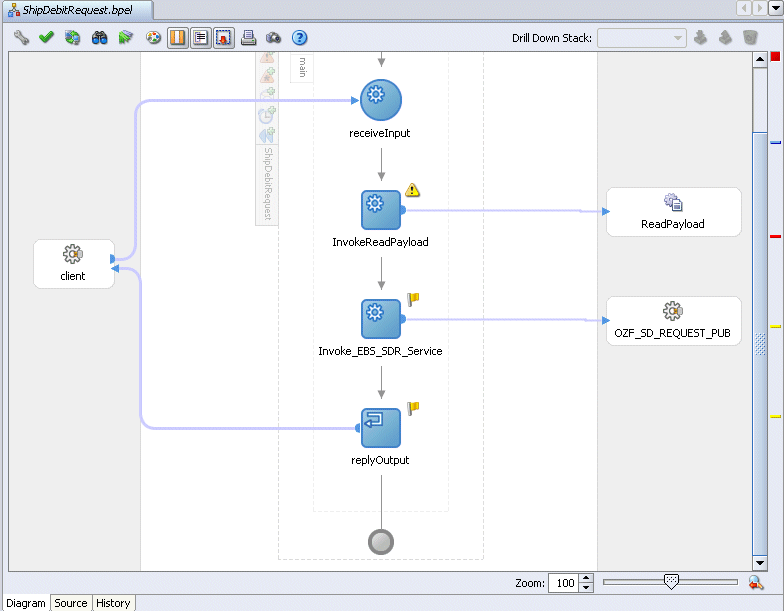
The Invoke activity appears in the process diagram.
Adding an Invoke Activity
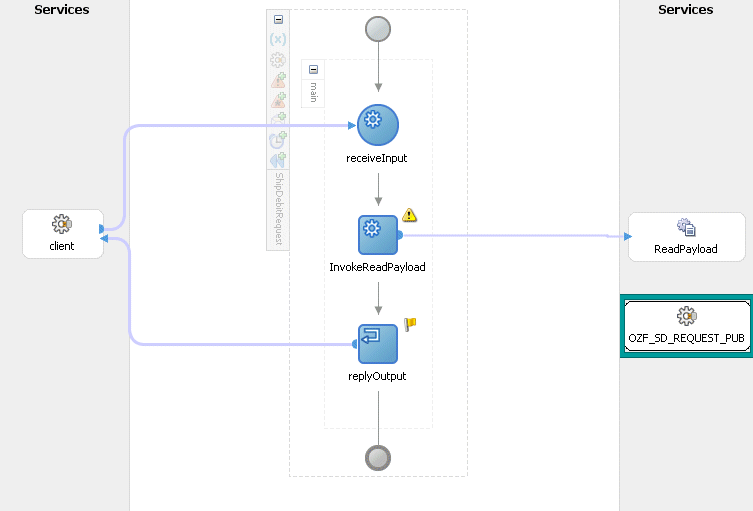
To add an Invoke activity for OZF_SD_REQUEST_PUB Partner Link:
In JDeveloper BPEL Designer, drag and drop the Invoke activity from the Component Palette into the Activity box of the process diagram, after the first Invoke activity and the Reply activity.
Link the Invoke activity to the OZF_SD_REQUEST_PUB service. The Edit Invoke dialog box appears.
Enter a name for the Invoke activity such as 'Invoke_EBS_SDR_Service'.
In the Operation field, select CREATE_SD_REQUEST from the drop-down list.
Create global Input and Output variables as CREATE_SD_REQUEST_InputVariable and CREATE_SD_REQUEST_OutputVariable.
Click OK in Edit Invoke.
Editing the Invoke Activity
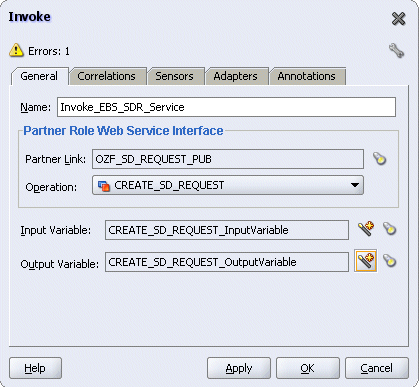
Click Apply and then OK in the Edit Invoke dialog box to finish configuring the Invoke activity.
The Invoke activity appears in the process diagram.
Viewing the Invoke Activities in the BPEL Process Diagram
This step is to configure four Assign activities:
To set the SOAHeader details for ship and debit SOAP request.
Note: You also need to populate certain variables in the BPEL process for SOAHeader elements to pass values that may be required to set application context during service execution. These SOAHeader elements are Responsibility, RespApplication, SecurityGroup, NLSLanguage, and Org_Id.
To set input payload for SOAP request.
To set input for SOAP request.
To set the SOAP response to output.
To add the first Assign activity to set SOAHeader details:
Assigning SOAHeader Parameters:
In JDeveloper BPEL Designer, drag and drop the Assign activity from the Component Palette into the Activity box of the process diagram, between two Invoke activities.
Adding an Assign Activity
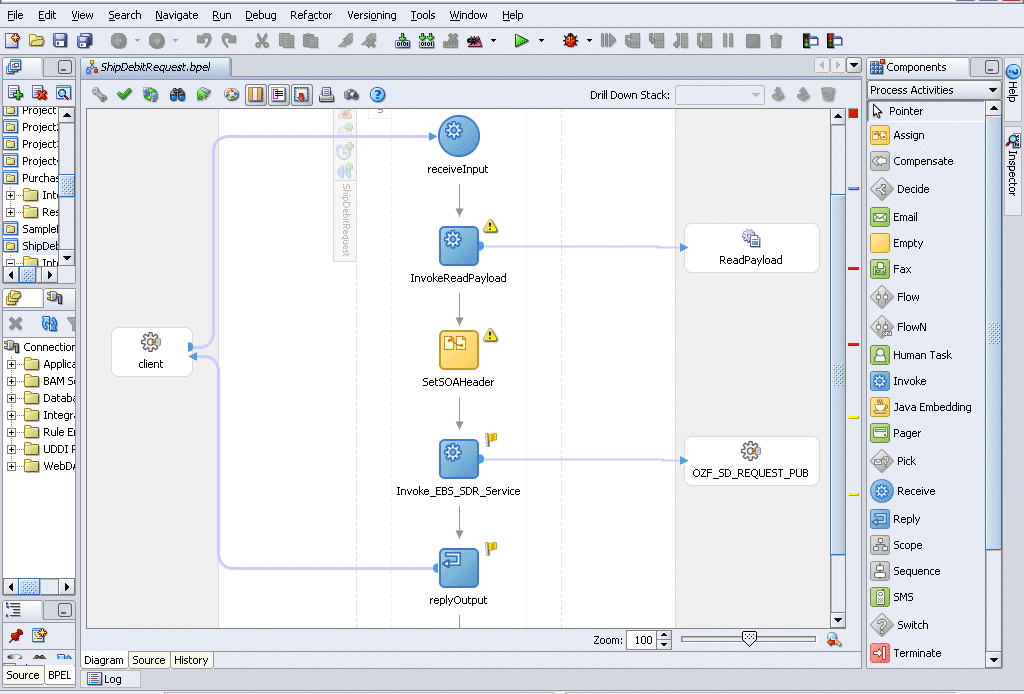
Double-click the Assign activity to access the Edit Assign dialog box.
Click the General tab to enter the name for the Assign activity, such as 'SetSOAHeader'.
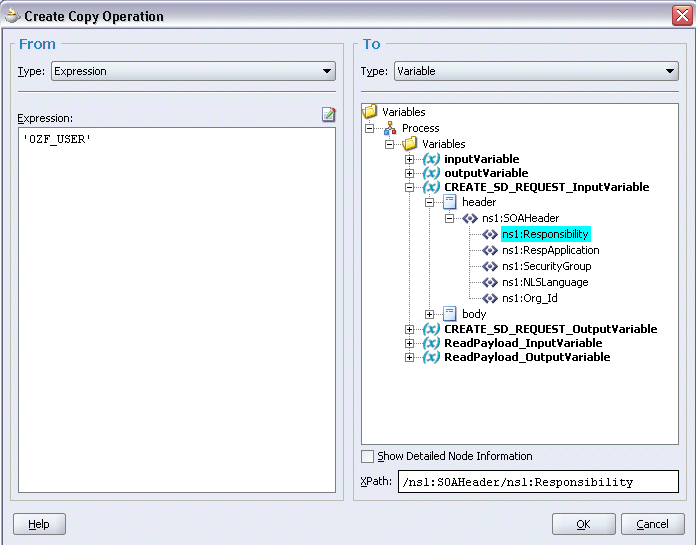
On the Copy Operation tab, click Create and then select Copy Operation from the menu. The Create Copy Operation window appears.
Enter the first pair of parameters:
In the From navigation tree, select type Expression and then enter 'OZF_USER' in the Expression box.
In the To navigation tree, select type Variable. Navigate to Variables > Process > Variables > CREATE_SD_REQUEST_InputVariable > header > ns1:SOAHeader and select ns1:Responsibility. The XPath field should contain your selected entry.
Assign Responsibility Parameter
Click OK.
Enter the second pair of parameters by selecting Copy Operation from the Create drop-down list with the following values:
In the From navigation tree, select type Expression and then enter 'OZF' in the Expression box.
In the To navigation tree, select type Variable. Navigate to Variables > Process > Variables > CREATE_SD_REQUEST_InputVariable > header > ns1:SOAHeader and select ns1:RespApplication. The XPath field should contain your selected entry.
Click OK.
Enter the third pair of parameters:
In the From navigation tree, select type Expression and then enter 'STANDARD' in the Expression box.
In the To navigation tree, select type Variable. Navigate to Variables > Process > Variables > CREATE_SD_REQUEST_InputVariable > header > ns1:SOAHeader and select ns5:SecurityGroup. The XPath field should contain your selected entry.
Click OK.
Enter the fourth pair of parameters:
In the From navigation tree, select type Expression and then enter 'AMERICAN' in the Expression box.
In the To navigation tree, select type Variable. Navigate to Variables > Process > Variables > CREATE_SD_REQUEST_InputVariable > header > ns1:SOAHeader and select ns1:NLSLanguage. The XPath field should contain your selected entry.
Click OK.
Enter the fifth pair of parameters by selecting Copy Operation from the Create drop-down list with the following values:
In the From navigation tree, select type Expression and then enter '204' in the Expression box.
In the To navigation tree, select type Variable. Navigate to Variables > Process > Variables > CREATE_SD_REQUEST_InputVariable > header > ns1:SOAHeader and select ns1:Org_Id. The XPath field should contain your selected entry.
Click OK.
The Edit Assign dialog box appears.
Assign Parameters
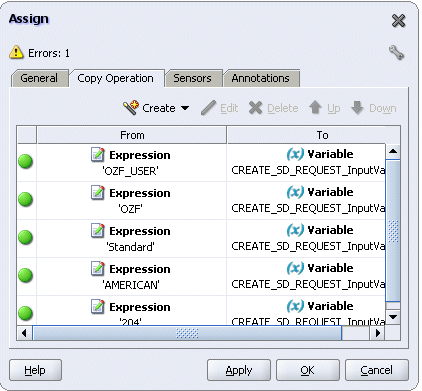
Click Apply and then OK to complete the configuration of the Assign activity.
To enter the second Assign activity to pass payload information to the Invoke_EBS_SDR_Service Invoke activity:
Add the second Assign activity by dragging and dropping the Assign activity from the Component Palette into the Activity box of the process diagram, between the 'SetSOAHeader' Assign activity and the 'Invoke_EBS_SDR_Service' Invoke activity.
Repeat Step 2 to Step 4 described in creating the first Assign activity to add the second Assign activity called 'SetPayload'.
Enter the following information:
In the From navigation tree, navigate to Variable > Process > Variables > ReadPayload_OutVariable and select InputParameters.
In the To navigation tree, select type Variable and then navigate to Variable > Process > Variables > CREATE_SD_REQUEST_InputVariable and select Body.
Click OK.
Assigning Parameters
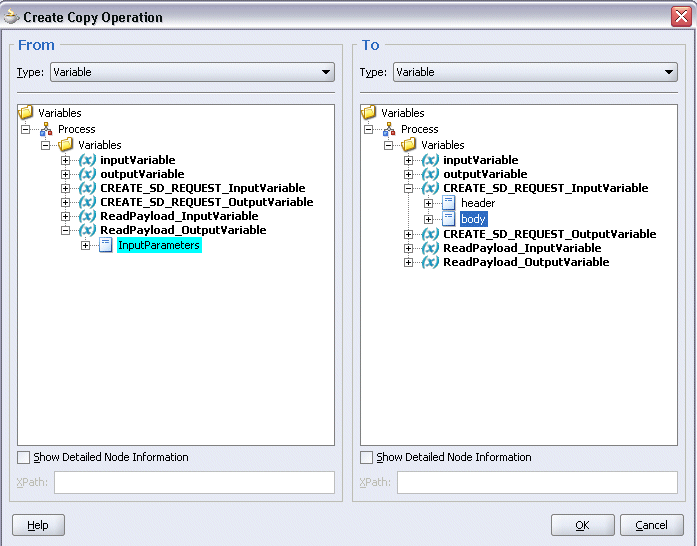
The Edit Assign dialog box appears.
Click Apply and then OK to complete the configuration of the Assign activity.
Defining Schema for BPEL Process Input Request
Before setting the input request for the SOAP request, you need to define necessary schema for BPEL process request.
From the Applications Navigator window, expand the ShipDebitRequest > Integration Content > Schemas folder to open the ShipDebitRequest.xsd file.
In the Design mode, expand 'ShipDebitRequestProcessRequest' to view elements within process request.
Defining Schema for BPEL Process Request
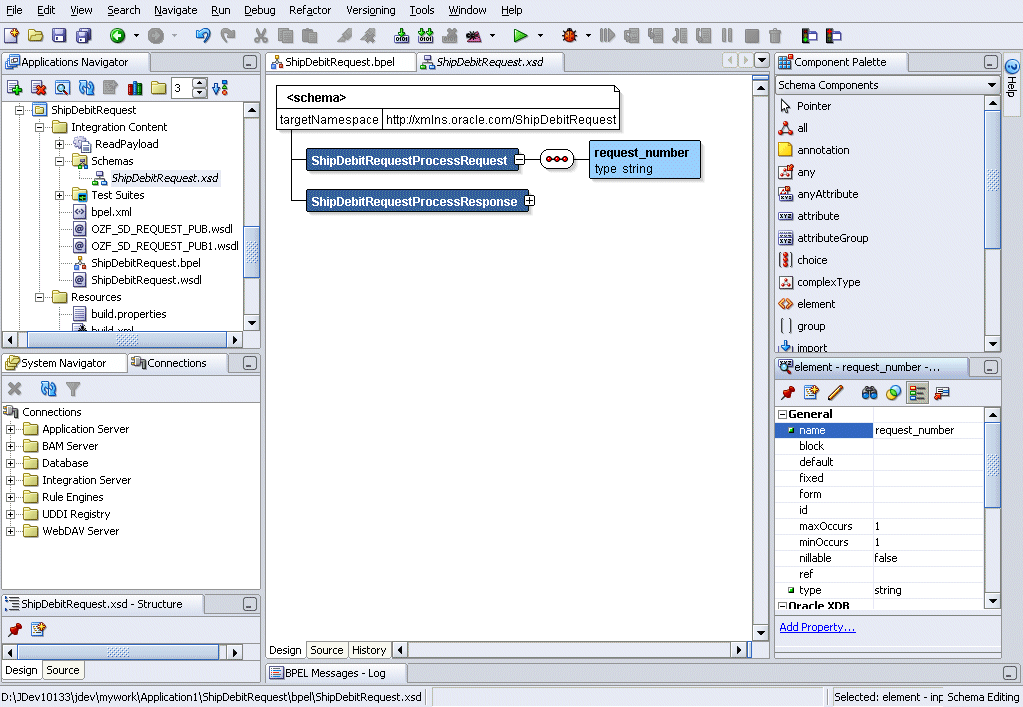
From element properties, change the name from 'input' to ‘request_number’.
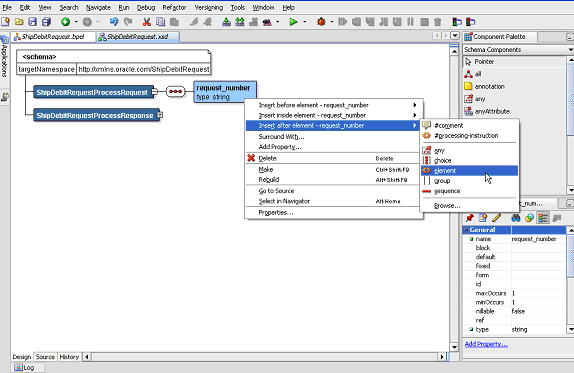
Select and right-click on the 'request_number’ element to open the pop-up menu.
Select Insert after element – request_number > element option. New element 'element1' is displayed in the schema design window underneath the 'request_number' element.
From element properties section, change the name from 'element1' to 'description’ and enter type as ‘string’.
Adding Schema Elements
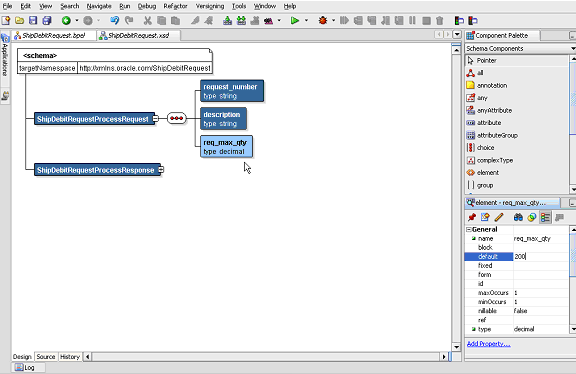
Similarly insert another element called ‘req_max_qty’ after element ‘description’.
Enter default value as ‘200’ and type as ‘decimal’.
Defining Schema Elements
Right-click on mouse and select Rebuild option.
Rebuilding Schema Elements
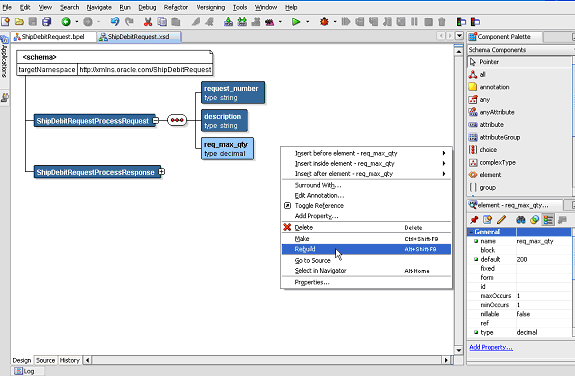
Look for compilation messages in Log to ensure the successful compilation.
To set the third Assign activity to pass the input request to the Invoke_EBS_SDR_Service Invoke activity:
Add the third Assign activity by dragging and dropping the Assign activity from the Component Palette into the Activity box of the process diagram, between the second Assign activity 'SetPayload' and the Invoke_EBS_SDR_Service Invoke activity.
Repeat Step 2 to Step 4 described in creating the first Assign activity to add the third Assign activity called 'SetInput'.
Enter the following information:
In the From navigation tree, navigate to Variable > Process > Variables > inputVariable > Payload > client:ShipDebitRequestProcessRequst and select client:request_number. The XPath field should contain your selected entry.
In the To navigation tree, select type Variable and then navigate to Variable > Process > Variables > Create_SD_REQUEST_InputVariable > Body > ns3:InputParameters >ns3:P_SDR_HDR_REC and select ns3:REQUEST_NUMBER. The XPath field should contain your selected entry.
Assigning Parameters
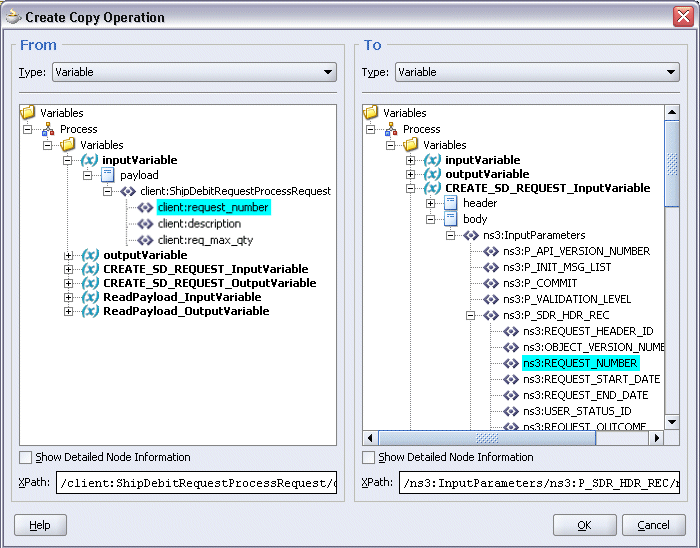
Click OK.
Enter the second pair of parameters by selecting Copy Operation from the Create drop-down list with the following values:
In the From navigation tree, navigate to Variable > Process > Variables > inputVariable > Payload > client:ShipDebitRequestProcessRequst and select client:description. The XPath field should contain your selected entry.
In the To navigation tree, select type Variable and then navigate to Variable > Process > Variables > Create_SD_REQUEST_InputVariable > Body > ns3:InputParameters >ns3:P_SDR_HDR_REC and select ns3:REQUEST_DESCRIPTION. The XPath field should contain your selected entry.
Click OK.
Enter the third pair of parameters by selecting Copy Operation from the Create drop-down list with the following values:
In the From navigation tree, navigate to Variable > Process > Variables > inputVariable > Payload > client:ShipDebitRequestProcessRequst and select client:req_max_qty. The XPath field should contain your selected entry.
In the To navigation tree, select type Variable and then navigate to Variable > Process > Variables > Create_SD_REQUEST_InputVariable > Body > ns3:InputParameters >ns3:P_SDR_LINES_TBL > ns3:P_SDR_LINES_TBL_ITEM and select ns3:MAX_QTY. The XPath field should contain your selected entry.
Click OK.
The Edit Assign dialog box appears.
Click Apply and then OK to complete the configuration of the Assign activity.
To add the fourth Assign activity to set SOAP response to output:
Add the third Assign activity by dragging and dropping the Assign activity from the Component Palette into the Activity box of the process diagram, between the Invoke_EBS_SDR_Service Invoke and the Reply activities.
Repeat Step 2 to Step 4 described in creating the first Assign activity to add the fourth Assign activity called 'SetResponse'.
Enter the following information:
In the From navigation tree, select type Variable. Navigate to Variable > Process > Variables > CREATE_SD_REQUEST_OutputVariable and select body.
In the To navigation tree, select type Variable. Navigate to Variable > Process > Variables > outputVariable and select payload.
Assigning Parameters
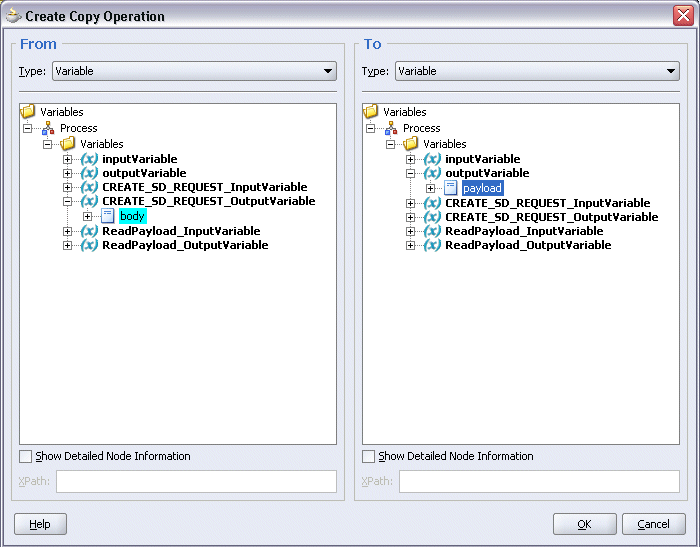
Click OK.
The Edit Assign dialog box appears.
Click Apply and then OK to complete the configuration of the Assign activity.
After creating a BPEL process using the WSDL URL generated from a PL/SQL interface definition, you can deploy it to a BPEL server if needed. To ensure that this process is modified or orchestrated appropriately, you can also manually test the BPEL process by initiating the business process contained in the BPEL process to test the interface integration.
Prerequisites
Before deploying the BPEL process using Oracle JDeveloper, you must ensure that you have established the connectivity between the deign-time environment and the run-time servers including the application server and the integration server.
How to configure the necessary server connection, see Configuring Server Connection.
The payload information for the creation of supplier ship and debit request, see Sample Payload for Creating Supplier Ship and Debit Request.
To validate your BPEL process, perform the following run-time tasks:
Once you deploy the process to a BPEL server, it becomes available so that you can run the process manually to test it for validation.
After deploying a BPEL process, you can manage the process from the BPEL console to manually initiate the business process and test the interface integration contained in your BPEL process.
You must deploy the BPEL process (ShipDebitRequest.bpel) that you created earlier before you can run it.
To deploy the BPEL process:
In the Applications Navigator of JDeveloper BPEL Designer, select the ShipDebitRequest project.
Right-click the project and click Make action from the menu.
Look for any compilation error messages in Message Log.
Right-click the project and select Deploy >Integration Server Connection name > Deploy to Default Domain action from the menu.
For example, you can select Deploy > BPELServerConn > Deploy to Default Domain to deploy the process if you have the BPEL Process Manager setup appropriately.
Deploying the BPEL Process
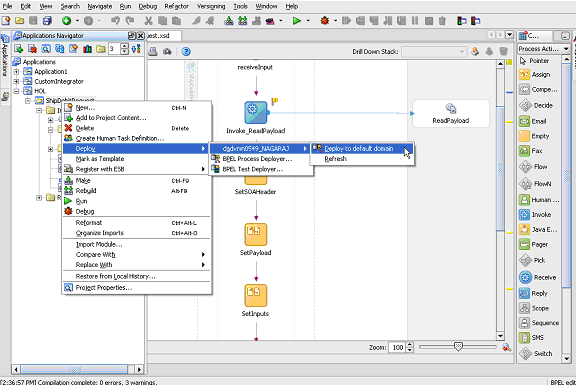
Look for ‘Build successful’ message in Apache Ant – Log to ensure that the BPEL project is compiled and successfully deployed.
To validate whether the BPEL process that you created works or not, you need to manually initiate the process after it has been successfully deployed to the BPEL server. Therefore, the validation starts with the BPEL console to ensure that you can find the deployed BPEL process listed in the console. Then, you can log on to Oracle E-Business Suite to manually initiate the purchase order approval and acknowledgement processes and to confirm that the relevant event is raised and the updated purchased order details is also written in the XML file.
To test the BPEL process:
Log into Oracle Application Server 10g BPEL Console ( http://<soaSuiteServerHostName>:<port>/BPELConsole). The BPEL Console login page appears.
Enter the username and password and click Login.
In the BPEL Console, confirm that ShipDebitRequest has been deployed.
Deployed BPEL Processes
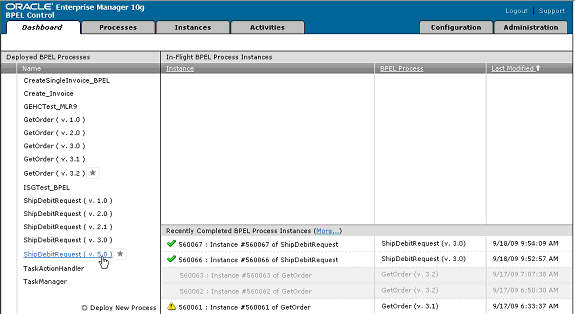
Click the ShipDebitRequest link to open the Initiate tab
In the payload region, enter the following fields:
request_number: Enter an unique number in this field, such as BPEL-1.
Note: The Request Number entered here should be unique each time that you initiate. The Supplier Ship and Debit Request Number should be unique across users in Supplier Ship and Debit of Oracle Trade Management.
description: Enter appropriate description information.
req_max_qty: Enter 100 as the value.
Specifying Input Payload Information
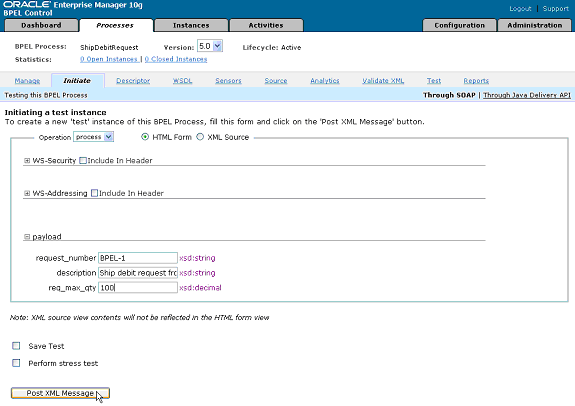
Click Post XML Message to initiate the process.
Verifying SOAP Response in BPEL Console
Verifying SOAP Response in BPEL Console
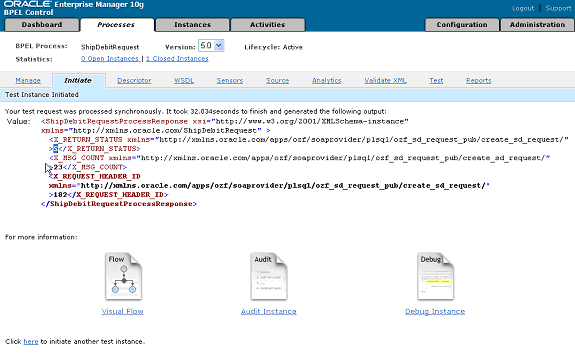
You can view the SOAP response displayed synchronously in BPEL Console. Look for ‘S’ in X_RETURN_STATUS (for success). If ‘E’ is displayed in X_RETURN_STATUS, then it means error has occurred while processing the service. Look for detailed exception message in SOA Monitor.
Verifying Created Supplier Ship and Debit Request in Oracle Trade Management
Log on to Oracle E-Business Suite with the Oracle Trade Management User responsibility. Select the Supplier Ship and Debit link from the navigation menu to open the Ship and Debit Overview window.
Verifying in Oracle Trade Management
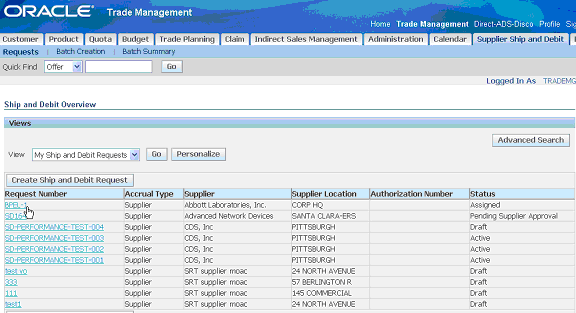
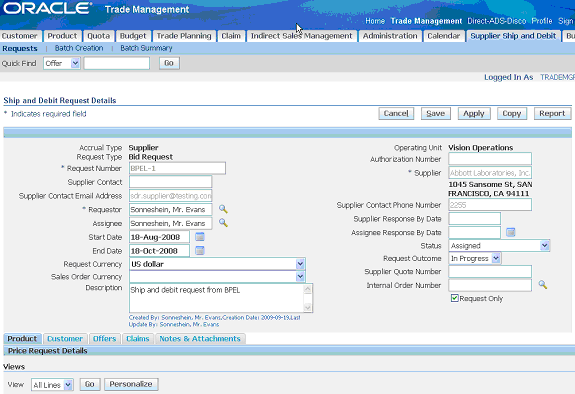
Notice that the Request Number BPEL-1 entered earlier is displayed in the list. Click the request number BPEL-1 link to open the Ship and Debit Request Details page for the created request. Verify the details.
Verifying the Ship and Debit Request Details
![]()
Copyright © 2008, 2010, Oracle and/or its affiliates. All rights reserved.