Release 12.1
Part Number E12169-06
Contents
Previous
Next
| Oracle E-Business Suite Integrated SOA Gateway Implementation Guide Release 12.1 Part Number E12169-06 | Contents | Previous | Next |
Native services are native packaged public integration interfaces that are directly published in the Oracle Integration Repository by default. However, to make these native interfaces available over the Internet for service requesters or Web service clients to use or consume, the integration repository administrator must first transform these native interface definitions into a machine-processable format that complies with Web standards using WSDL description.
Once the Web services representing in WSDL URLs have been successfully generated, the administrator can further deploy them from the Integration Repository to Oracle Application Server. Additionally, those deployed services can also be undeployed from the server or redeployed again if necessary.
In addition to the service generation and deployment, the administrator can subscribe to a business event to create an event subscription with Out Agent, and view Generate and Deploy time logs for the service that has logging enabled at the site level.
To enforce the security access on certain integration interface methods and allow authorized users to have the access privileges, the administrator can create or revoke security grants to restrict user access to a specific interface method. This security mechanism will guard the integration interface access only to the right people at the right time.
The following native interfaces can be service enabled in Oracle E-Business Suite Integrated SOA Gateway:
PL/SQL
XML Gateway Map
Concurrent Program
Important: Service enablement for concurrent programs linked to Open Interfaces are currently not supported. This type of concurrent program can be viewed and displayed under the Open Interface category which Oracle Integration Repository does not support for service enablement.
Business Event
Business Service Object
Note: The Business Service Object, formerly known as Service Bean, is service enabled by Web Service Provider, not SOA Provider.
The service for XML Gateway Map can be enabled by both Web Service Provider in release 12.0 and SOA Provider in this release. For backward compatibility, a profile option 'FND: XML Gateway Map Service Provider' is used to let you select an appropriate service provider in enabling services for XML Gateway Map interface type. For more information on service enablement for XML Gateway Map, see XML Gateway Map Web Service Region, Oracle E-Business Suite Integrated SOA Gateway User's Guide.
Java APIs for Forms
Note: Java APIs for Forms are XML document-based integration points wrapped in Java classes for executing business logic in Oracle Forms. These specialized Java classes are categorized as a subtype of Java interface.
Only integration repository administrators (defined by the Integration Repository Administrator role) can transform an integration interface definition into a Web service and then deploy (undeploy, or redeploy) the service.
The Web service generation and deployment process flow can be illustrated in the following diagram:
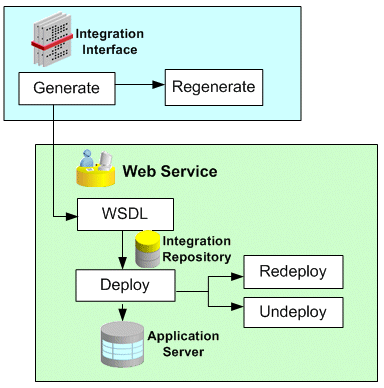
In addition to generating and deploying the Web services, the administrators can perform additional administrative tasks including creating subscription for a business event, creating security grants for appropriate interface methods access, and viewing available log messages written during service generation and deployment.
Note: All Integration Repository Administration functions are grouped under Integration Repository Administrator permission set (FND_REP_ADMIN_PERM_SET) and performed by the users with the Integration Repository Administrator role.
The integration repository administrators (defined by the Integration Repository Administrator role) can find the Administration tab displayed next to the Integration Repository tab. The Administration tab is specifically for the administrators to perform additional administrative tasks outside the Integration Repository user interface. This tab contains the following administrative and management features:
SOA Monitor: The SOA Monitor subtab allows the administrators to monitor and audit all SOAP messages in and out through SOA Provider and view the message details.
For information about how to use SOA Monitor, see Monitoring and Managing SOAP Messages Using SOA Monitor.
Log Configuration: The Log subtab allows the administrators to configure and manage log setups.
For information about log configuration, see Logging for Web Services.
For more information about the Integration Repository Administrator permission set, see Role-Based Access Control (RBAC) Security.
The following administrative tasks are discussed in this section:
Oracle Integration Repository provides a capability of transforming interface definitions to a machine-processable format that complies with Web standards using WSDL. Once the WSDL file is generated successfully, a Web Service region becomes visible in the interface details page.
Deploying, Undeploying, and Redeploying Web Services
Integration repository administrators can further deploy the Web service to Oracle Application Server.
If the service is successfully deployed, the administrators can undeploy the service if the service is no longer required for integration, or redeploy the service if needed.
Subscribing to Business Events
This task allows the administrators to subscribe to selected business events and create subscriptions for the selected events.
This allows the administrators to create security grants by authorizing the access permission for a selected interface method, or a procedure or function to an appropriate user, a user group, or all users.
Viewing Generate and Deploy Time Logs
This allows the administrators to view and download the logs recorded during service generation and deployment for specific services or all services that have the logging enabled at the Site level only.
To make integration interfaces available to customers over a network where customers can dynamically interact between applications, Oracle E-Business Suite Integrated SOA Gateway provides the feature allowing these interface definitions that are used internally within an organization to become Web services.
To accomplish this goal, these interface definitions will be transformed to a machine-processable format that complies with Web standards using Web Services Description Language (WSDL). The WSDL code contains operations or messages that can be bound to a concrete network protocol and message format to define Web services.
To generate a Web service, you must be granted with the Integration Repository Administrator role allowing you to perform certain administrative functions or tasks, such as generating, deploying, or undeploying Web services.
Clicking Generate WSDL invokes Service Generator to generate service artifacts.
Note: A composite service consists of multiple native services which have WSDL files generated already; therefore, there is no Generate WSDL or Regenerate WSDL shown in the composite service details page.
Generating Web Services
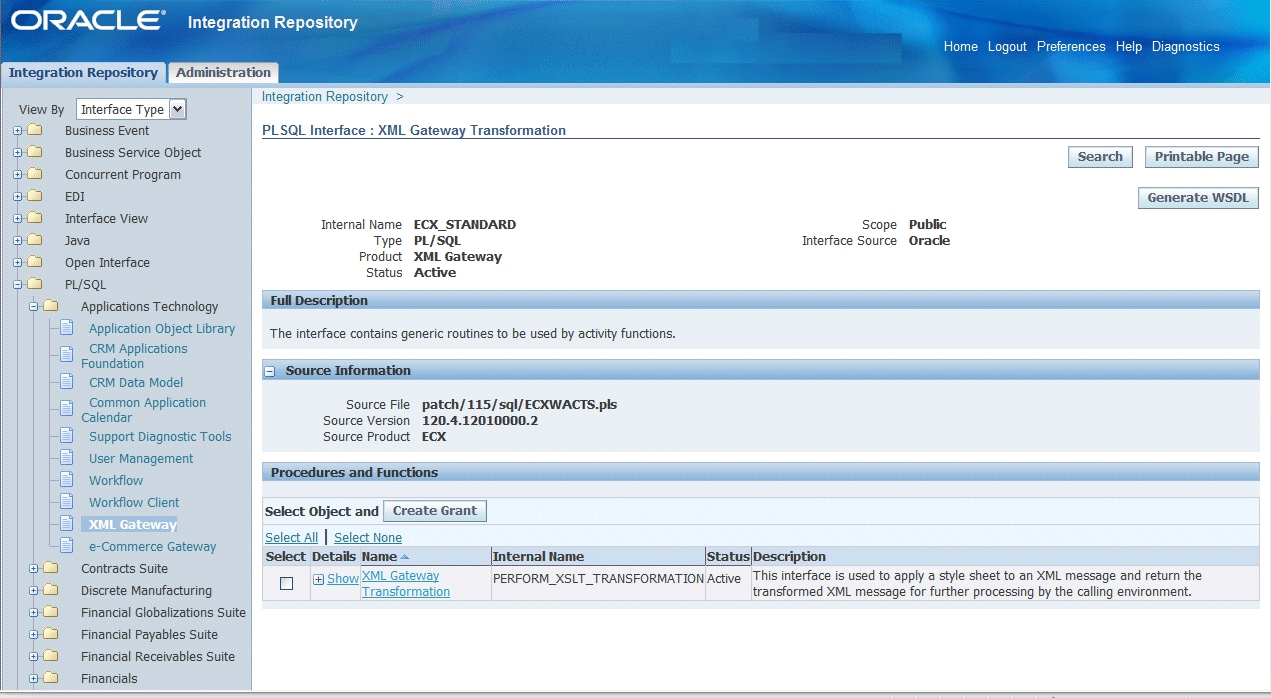
Important: Multiple requests to generate Web services for an integration interface are not allowed. While a Web service is getting generated, the status of the service is changed to 'Generating' and the Generate WSDL button is disabled.
Web Service - SOA Provider Region
Once a Web service for a selected interface has been successfully generated, the Web Service - SOA Provider region will be displayed in the interface details page.
Note: If you are trying to generate a Web service for Business Service Object interface type, then you will find Web Service - Web Service Provider region available, instead of Web Service - SOA Provider region. If it is for XML Gateway Map interface type, you might find more than one Web Service Region available. See Generating Web Service Region(s) Based on a Selected Interface Type.
You will notice the following fields available in the Web Service - SOA Provider region (or Web Service - Web Service Provider region):
Web Service Status: This field appears with 'Generated' value which indicates that this selected interface has WSDL description available.
View WSDL link: Click this link allowing you to view the generated WSDL code.
For more information about WSDL, see: Reviewing Web Service WSDL Source, Oracle E-Business Suite Integrated SOA Gateway User's Guide.
Authentication Type: Prior to deploying the generated Web service, an integration repository administrator must select at least one authentication type for the selected interface. The selected authentication type(s) will be used by SOA Provider to authenticate and secure Web services throughout the service deployment cycle.
The supported authentication types are Username Token and SAML Token (Sender Vouches). For more information, see Deploying and Undeploying Web Services.
Note: Composite services such as BPEL files are typically not deployed within Oracle E-Business Suite like other service enabled interface types. Instead, you need a separate BPEL PM (SOA Suite or third party BPEL PM server) to deploy the BPEL composite services. Therefore, you will not be able to find Deploy in the composite service details page.
The Deploy Button: This button appears allowing you to deploy the generated Web service.
Note: Composite services such as BPEL files are typically not deployed within Oracle E-Business Suite like other service enabled interface types. Instead, you need a separate BPEL PM (SOA Suite or third party BPEL PM server) to deploy the BPEL composite services. Therefore, you will not be able to find Deploy in the composite service details page.
For more information, see Deploying and Undeploying Web Services.
Regenerating the WSDL If the Definition is Changed
If the interface definition is changed, you need to regenerate the service from the Interface Details page by clicking Regenerate WSDL. Upon regeneration, the service definition will also change to reflect the changes done in the interface. You will have to modify its Web service clients based on the new service definition.
If interface definition is not changed, then regenerating the service would not change the service definition. You can continue to use the existing Web service clients, if any, with the new service definition.
Generating Web Service Region(s) Based on a Selected Interface Type
In supporting Web Service Provider based and SOA Provider based service enablement for different interface types, an appropriate Web Service region will be displayed in the interface details page if a Web service is successfully generated.
For XML Gateway Map interface type
The administrators could find either one of the following options available in the interface details page depending on the profile value set in the FND: XML Gateway Map Service Provider profile option:
Web Service - Web Service Provider region
In Release 12.0, XML Gateway Map interface type is deployed by default through Web Service Provider. You can find both the standard WSDL URL (http://<myhost>:<port>/webservices/AppsWSProvider/oracle/apps/fnd/XMLGateway?wsdl) and deployed ones available in this region.
Web Service - SOA Provider region (default)
You will find a WSDL file along with Deploy, Undeploy, or Redeploy.
Important: If you do not start from this release and your system is upgraded from Oracle E-Business Suite Release 12.0, then the default value should be set to 'Both' (Web Service Provider and SOA Provider). This is because Web Service Provider could have already been used in enabling services for XML Gateway Maps in the Release 12.0. To continue to support service enablement in this release using SOA Provider and to support backward compatibility, both service providers should be enabled in transforming XML Gateway Map interface definitions into Web Services. The Web Service - Web Service Provider region and the Web Service - SOA Provider region can both be displayed simultaneously in the interface details page if Web services are available.
If you start with this release, then the default value remains the same which is SOAP (SOA Provider). Therefore, the Web Service Provider that generates the generic XML Gateway Web services should be disabled at run time.
Both the Web Service - Web Service Provider region and Web Service - SOA Provider region
Business Service Object (BSO) interface type
This interface type has been service enabled by Web Service Provider since Oracle E-Business Suite Release 12.0. Web Service Provider will continue to support the BSO service enablement in this release. Therefore, you will only find the Web Service - Web Service Provider region displayed for BSO interface type.
Other interface types supported by SOA Provider
The Web Service - SOA Provider region will be displayed.
Important: As mentioned earlier, in Release 12.0, Oracle E-Business Suite is service partially enabled by using Web Service Provider to enable XML Gateway Map and Business Service Object (formerly known as Service Bean) interface types.
In this release, Oracle E-Business Suite Integrated SOA Gateway will continue to support the Release 12.0 based Web Service Provider service enablement, plus the following additional interface types using SOA Provider:
Inbound Native Interfaces
PL/SQL
XML Gateway Map
Concurrent Program
Java APIs for Forms
Java APIs for Forms are XML document-based integration points wrapped in Java classes for executing business logic in Oracle Forms. These specialized Java classes are categorized as a subtype of Java interface.
Business Event
Composite Service - BPEL
To generate a Web service:
Log on to Oracle Integration Repository with the integration repository administrator role through the Integrated SOA Gateway responsibility. Select the Integration Repository link.
In the Integration Repository tab, select 'Interface Type' from the View By drop-down list.
Expand an interface type node to locate your desired interface definition.
Click the interface definition name link to open the interface details page.
If this selected interface definition has never been generated into Web service, click Generate WSDL to generate the WSDL description.
Once the Web service is successfully generated, the Web Service - SOA Provider region becomes available. The Web Service Status field marked as 'Generated' also appears which indicates that this selected interface has WSDL description available.
Note: If you are trying to generate a Web service for Business Service Object interface type, then you will find Web Service - Web Service Provider region available, instead of Web Service - SOA Provider region. You might find more than one Web Service region available if it is for XML Gateway Map interface type.
Click the View WSDL link to view the WSDL description.
Click Regenerate WSDL to regenerate the WSDL description if necessary.
Generating Web Services from Backend Processing
When trying to generate a Web service from the Integration Repository user interface, if the system takes too long for the service generation to complete, the following HTTP 403 exception may appear on the interface:
oracle.apps.fnd.soa.util.SOAException:SystemError:Error while sending message to server.

Server returned HTTP response code: 403 for URL: http://myhost.us.oracle.com/webservices/SOAProvider/EbizAuth?Generate=1656&soa_ticket=u0GKj8W6SbCL2BMDY_Mv9w..' when attempting to perform 'GENERATE'.
To resolve the issue, a standalone soagenerate.sh script is created allowing you to generate WSDL services for PL/SQL, concurrent program, and XML Gateway Map interfaces through backend processing.
Prerequisites to run soagenerate.sh:
Environment variable (like $IAS_ORACLE_HOME) needs to be set by running .env file in APPL_TOP of your environment.
If the user has appmgr privileges and has read permission on $INST_TOP/ora/10.1.3/j2ee/oafm/config/oc4j.properties, then he or she can run soagenerate.sh without any setup described in step 3.
If user does not have read permission on $INST_TOP/ora/10.1.3/j2ee/oafm/config/oc4j.properties, then he or she needs to set the following properties present in JAVA_TOP/oracle/apps/fnd/soa/provider/wsdl/data/soa.properties:
Set the following two database connection related properties in soa.properties file:
SOA_CREATE_DB_CONN_CONTEXT = true
JTFDBCFILE =<Physical Location of dbc file, to which User has read access>
Set the other required properties:
SOA_SERVER_TEMP_DIRECTORY_LOCATION=<location of $INST_TOP/soa>
SOA_SERVER_URL=<protocol://host:port of Apps Self Service URL>
SOA_ENABLE_STANDALONE_LOGGING = true
User should have write permission on SOA_SERVER_TEMP_DIRECTORY_LOCATION mentioned in step 3.
User should have write permission on the directory from where he or she is running this script.
Usage of soagenerate.sh:
$FND_TOP/bin/soagenerate [help] irepname=<irepname> logfile=<logfile> printprops=<true|false>
Valid arguments for soagenerate are described as follows:
irepname: (mandatory) irepname of the interface to be generated.
logfile: (optional) logfilename, if log file is to be created in any other directory.
By default, a log file is created with name 'ServiceGenerator.log' in the directory from which soagenerate.sh is fired. If you want to create log file in any other directory, give the location of the file in this argument.
printprops: (optional) true|false, whether system properties should be printed in logfile.
By default, system properties related with SOA is not printed in logfile. If you want to print system properties in log file, specify printprops=true.
For more troubleshooting information, see Oracle E-Business Suite Integrated SOA Gateway Troubleshooting Guide, Release 12, My Oracle Support Knowledge Document 726414.1 for details.
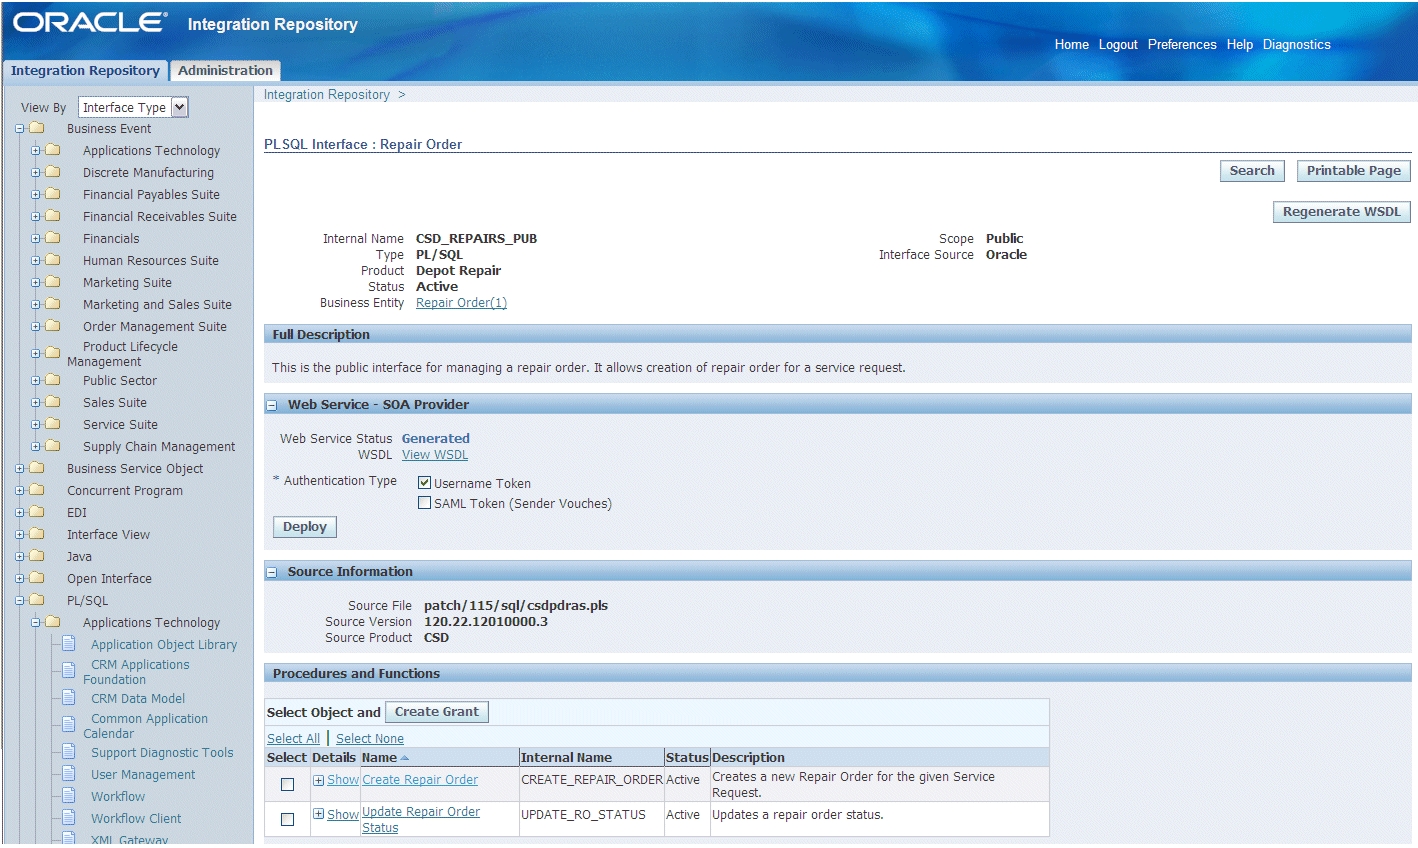
If a Web service WSDL file has been generated successfully, the administrators can find the Deploy button in the appropriate Web Service region of an interface details page.
Deploying Web Services
Note: Unlike native services that they are deployed through the Web Service region of an interface type detail page, composite services are typically not deployed within Oracle E-Business Suite like those of other service enabled interface types. You need a separate BPEL PM (SOA Suite or third party BPEL PM server) to deploy the BPEL composite services. For example, a composite service - BPEL type can be deployed through Oracle JDeveloper to a BPEL server in Oracle SOA Suite BPEL PM (Process Manager) or a third party BPEL PM in a J2EE environment. This deployed composite service - BPEL project can update Oracle Applications if necessary.
Deploying Web Services with Authentication Types
To secure Web service content and authenticate Web service operation, Oracle E-Business Suite Integrated SOA Gateway supports multiple authentication types for inbound service requests. Prior to deploying or redeploying a Web service generated by SOA Provider, an integration repository administrator must first select at least one of the following authentication types:
Username Token
This authentication type provides username and password information in the security header for a Web service provider to use in authenticating the SOAP request. It is the concept of Oracle E-Business Suite username/password (or the username/password created through the Users window in defining an application user).
SAML Token (Sender Vouches)
This authentication type is used for Web services relying on sending a username only through SAML Assertion.
After identifying the preferred authentication type(s) for a Web service, clicking the Deploy button deploys the Web service with selected authentication type(s) from Oracle Integration Repository to Oracle Application Server. When SOA Provider receives inbound SOAP requests, the Web service framework will authenticate the SOAP message based on the specified authentication type(s).
If no authentication type is identified for the service, then an validation error occurs requesting you to select an appropriate authentication type.
Once the Web service has been successfully deployed, the Web Service Status field is updated to 'Deployed' (from "Generated") along with selected authentication type check box(es). This indicates that the selected service has been successfully deployed to the application server.
For more information on supported authentication types for Web service security, see Managing Web Service Security.
Reviewing Deployed WSDL
Once the Web service has been successfully deployed, you can view the deployed Web service WSDL description by clicking the View WSDL link. The following example shows the deployed WSDL code:
<?xml version="1.0"encoding="UTF-8" ?>
<definitions name="FNDWF_MOVE_MSGS_EXCEP2NORMAL"
targetNamespace="http://xmlns.oracle.com/apps/owf/soaprovider/concurrentprogram/fndwf_move_msgs_excep2normal/"
xmlns:tns="http://xmlns.oracle.com/apps/owf/soaprovider/concurrentprogram/fndwf_move_msgs_excep2normal/"
xmlns="http://schemas.xmlsoap.org/wsdl/" xmlns:soap="http://schemas.xmlsoap.org/wsdl/soap/"
xmlns:tns1="http://xmlns.oracle.com/apps/owf/soaprovider/concurrentprogram/fndwf_move_msgs_excep2normal/">
<types>
<schema xmlns="http://www.w3.org/2001/XMLSchema" elementFormDefault="qualified"
 targetNamespace="http://xmlns.oracle.com/apps/owf/soaprovider/concurrentprogram/fndwf_move_msgs_excep2normal/">
  <include schemaLocation="http://rws60132rems.us.oracle.com:8009/webservices/SOAProvider/concurrentprogram/fndwf_move_msgs_excep2normal/APPS_ISG_CP_REQUEST_CP_SUBMIT.xsd" />
</schema>
<schema xmlns="http://www.w3.org/2001/XMLSchema" elementFormDefault="qualified"
 targetNamespace="http://xmlns.oracle.com/apps/owf/soaprovider/concurrentprogram/fndwf_move_msgs_excep2normal/">
  <element name="SOAHeader">
    <complexType>
     <sequence>
      <element name=="Responsibility" minOccurs="0" type="string"/>
      <element name="RespApplication" minOccurs="0" type="string"/>
      <element name="SecurityGroup" minOccurs="0" type="string" />
      <element name="NLSLanguage" minOccurs="0" type="string" />
      <element name="Org_Id" minOccurs="0" type="string" />
     </sequence>
   </complexType>
  </element>
 </schema>
</types>
   . . .
Additionally, you can find the following buttons available in the Web Service - SOA Provider region:
Redeploy: It allows you to redeploy the deployed Web service for the following reasons:
The service was regenerated from a new interface definition.
The original service was corrupt.
You modify the Authentication Type field for a deployed service.
Clicking on the Redeploy button will update the deployed service with the current system values.
Undeploy: It allows you to undeploy the Web service from Oracle Application Server back to Oracle Integration Repository if necessary.
Any previously selected authentication type(s) for a service will be deselected by default.
If you try to undeploy a native service that is not used, Oracle Integration Repository undeploys the native service from the server.
Note: The Deploy and Redeploy buttons appear only if you are granted with the Integration Repository Administrator role.
To deploy, undeploy, redeploy a Web service:
Log on to Oracle Integration Repository with the integration repository administrator role through the Integrated SOA Gateway responsibility. Select the Integration Repository link.
In the Integration Repository tab, select 'Interface Type' from the View By drop-down list.
Expand an interface type node to locate your desired interface definition.
Click the interface definition name link to open the interface details page.
From the Web Service - SOA Provider region, select at least one of the following authentication type check boxes:
Username Token
SAML Token (Sender Vouches)
Click Deploy to deploy the service from Oracle Integration Repository to Oracle Application Server.
Note: If this selected interface definition has never been generated into a Web service, you need to first generate the service and then deploy it. How to generate a Web service, see Generating Web Services.
Click the deployed View WSDL link to view the deployed WSDL description.
Redeploy the service if needed by clicking Redeploy.
Note: If changes are made to the Authentication Type field for a deployed Web service, you must redeploy the service.
Click Undeploy to undeploy the service if necessary.
Subscribing to Business Events
For business events, users with Integration Repository Administrator role can find Subscribe available in the interface details page which allows the administrators to subscribe to selected business events and create subscriptions for the selected events.
Subscribing to a Business Event
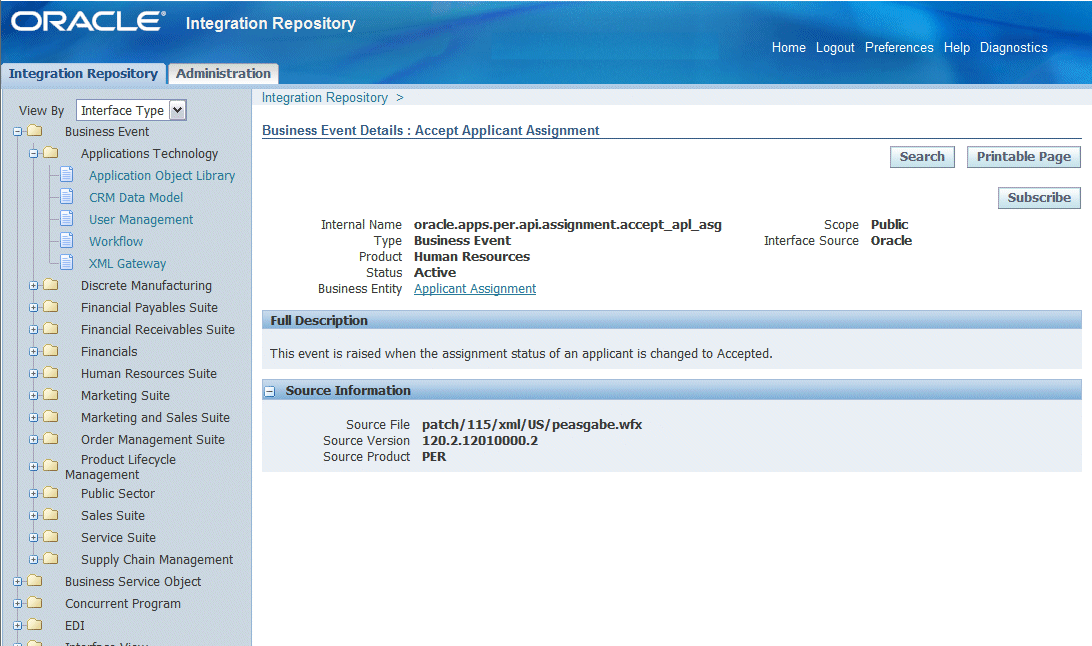
Clicking the Subscribe button lets you subscribe to the selected business event. Internally, an event subscription is automatically created for that event with WF_BPEL_QAGENT as Out Agent. Once the event subscription has been successfully created, a confirmation message appears on the Business Event interface detail page.
To consume the business event message, you should register to dequeue the event from Advanced Queue WF_BPEL_Q. If a business event is enabled and if there is at least one subscriber registered to listen to WF_BPEL_Q, then the event message will be enqueued in WF_EVENT_T structure to Advanced Queue WF_BPEL_Q.
Unsubscribing to Business Events
The Unsubscribe button becomes available in the business event details page if the selected event has been subscribed. Clicking the Unsubscribe button removes the event subscription from WF_BPEL_Q queue. A confirmation message also appears after the subscription has been successfully removed.
For more information on how to dequeue messages, see Oracle Streams Advanced Queuing User's Guide and Reference.
To subscribe to a business event:
Log on to Oracle Integration Repository with the Integration Repository Administrator role through the Integrated SOA Gateway responsibility. Select the Integration Repository link.
In the Integration Repository tab, select 'Interface Type' from the View By drop-down list.
Expand the Business Event interface type node to locate your desired event.
Click the business event interface that you want to subscribe to it to open the Interface details page for the event.
Click Subscribe to subscribe to the selected event. Internally, an event subscription is created with Out Agent as WF_BPEL_QAGENT. A confirmation message appears after the event subscription is successfully created.
You can remove the subscribed event by clicking Unsubscribe to remove or delete the event subscription if needed.
By leveraging Oracle User Management function security and data security, Oracle E-Business Suite Integrated SOA Gateway provides a security mechanism which only allows users with authorized privileges to access or execute certain API methods exposed through Oracle Integration Repository. This protects application data from unauthorized access without security checks.
To accomplish this goal and only allow authorized users to access certain API methods, the interface methods of an inbound API are precreated as permissions and stored in FND function repository. An integration repository administrator can then select one or more methods in a package and then authorize a user, user group, or all users to execute the selected method(s) by creating appropriate security grants.
Note: To create and revoke grants, you must log on to Oracle Integration Repository with the Integration Repository Administrator role.
This security grant can be performed in the Create Grant page for a given interface type to control the method at a very granular level.
Note: Each of the overloaded function contained in an interface can be uniquely granted to a specific user, user group, or all users through the create grant feature. If you select more than one overloaded function in the Procedures and Functions region (or the Methods region), in the Create Grant page an Overloaded column appears in the selected methods table indicating more than one overloaded function is selected for the grant.
To create grants:
Log on to Oracle Integration Repository with the integration repository administrator role through the Integrated SOA Gateway responsibility. Select the Integration Repository link.
In the Integration Repository tab, select 'Interface Type' from the View By drop-down list.
Expand an interface type node and click an interface definition name link you want to open the interface details page.
Select one or multiple method names for which you want to create grants.
Click Create Grant.
The Create Grants page appears.
Create Grants
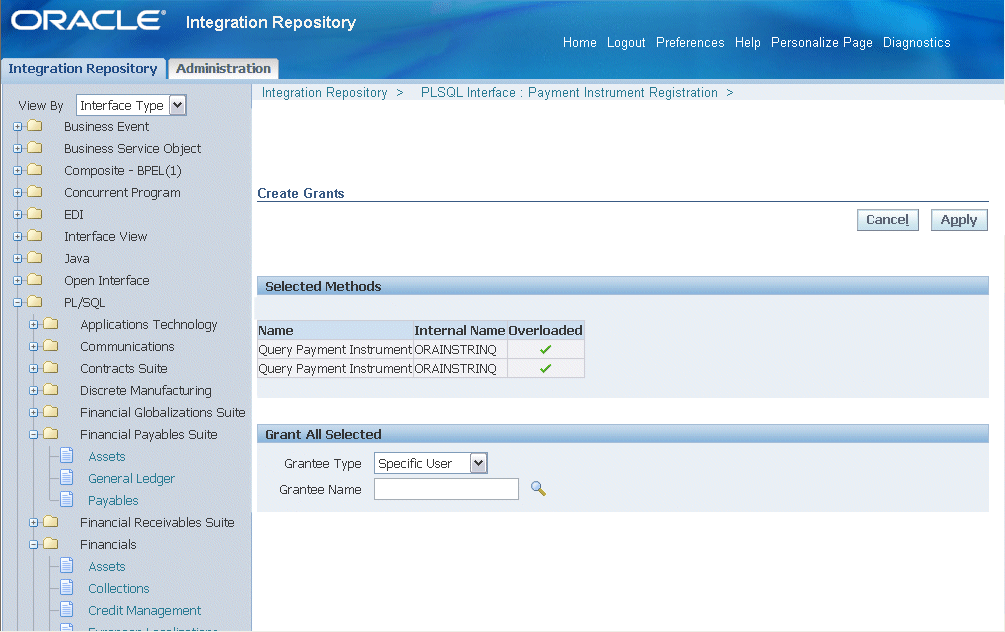
Select a grantee type:
Specific User
Group of Users
All Users
If you selected Specific User or Group of Users, specify the user or group for which to create the grants in the Grantee Name field.
Click Apply.
The interface details page reappears.
To view or revoke grants:
You can view and revoke existing grants directly in the methods list on the interface details page.
Navigate to the interface details page that you want to view or revoke the grants.
In the Methods region, click Show for a given method to view its grant details in a table.
Grant details for two methods
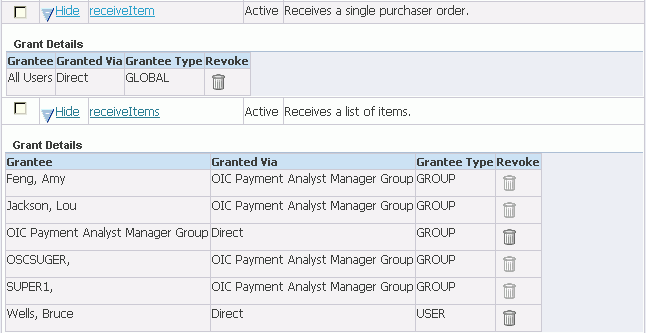
If you specified a group of users as the grantee, each member of the group, plus the group itself, is listed as a grantee.
For each member, the Granted Via column displays the name of the group. For grantees who were selected directly, the value in the Granted Via column is Direct.
Grantee Type can be one of the following values:
USER - The grantee is an individual user who was selected directly.
GROUP - The grantee is a group of users or a member of a group of users.
GLOBAL - The grant was issued to all users.
You can revoke a grant by clicking the trash can icon in the Revoke column.
A confirmation page appears, where you can click Apply or Cancel to execute or cancel the action.
Note: For any users who were issued their grants as members of a group, you cannot revoke their grants individually, but only by revoking the grant for the entire group. The trash can icon is disabled for group members.
For information on function security, see Managing Function Security.
To effectively troubleshoot any issues or exceptions encountered at design time during service generation and deployment, error messages and service activity information can be logged and viewed through the Interface Details page if logging is enabled for specific services or all services at the Site level only. Administrators can find View Log displayed in the Interface Details page.
Please note that if logging is enabled for 'All Services' at the Site level, then View Log will be shown in the Interface Details page for all interfaces that can be service enabled. If the logging is enabled at the Site level for specific operations, then there will be no log generated and you will not find View Log in the Interface Details page. Generate and Deploy time log is only available if logging is enabled for specific services or all services at the Site level.
Note: You will not find View Log available in the Interface Details page for a given service if the logging is enabled at the user level. Only site level logging configuration with specific services or all services will have the Generate and Deploy time logs captured.
How to configure logging at the site level for enabling specific services, see Enabling Logging at the Service Level.
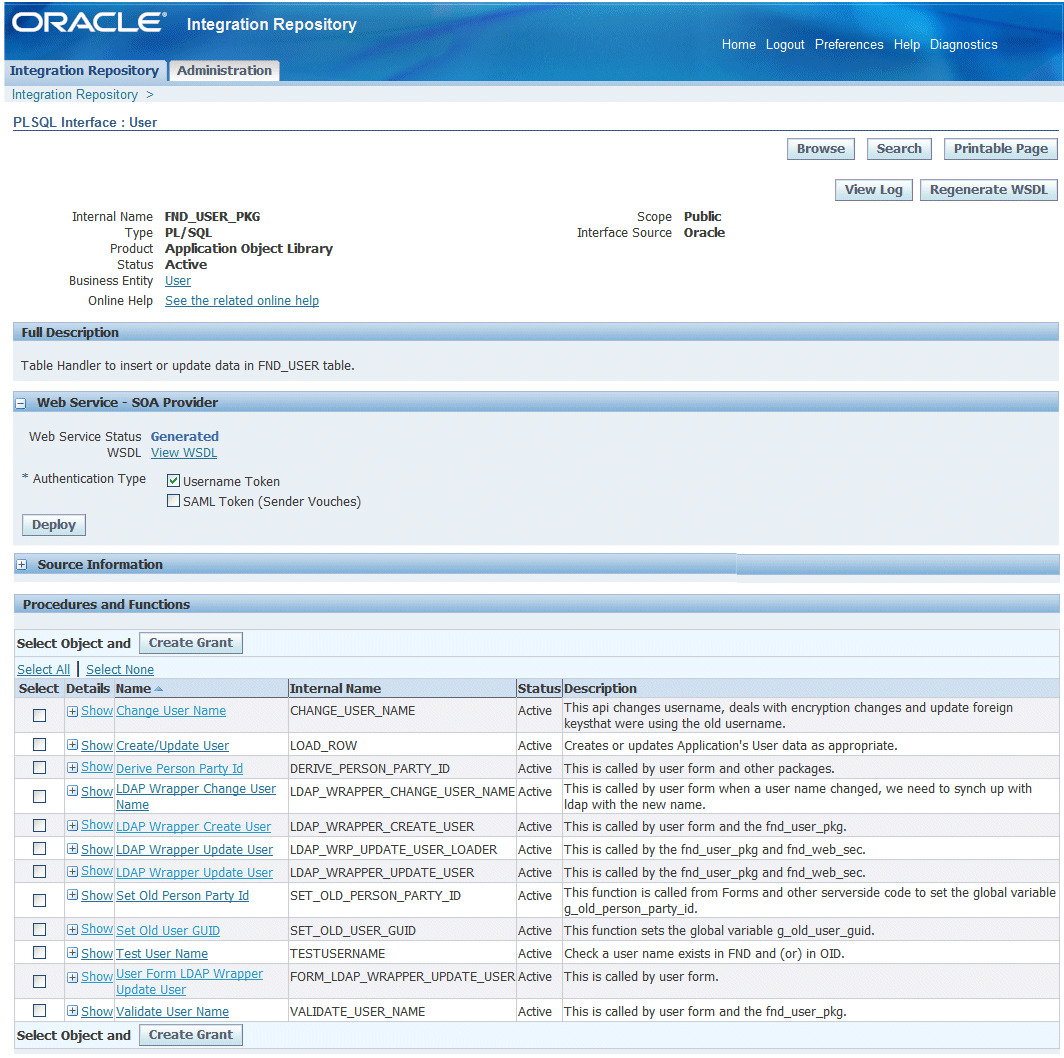
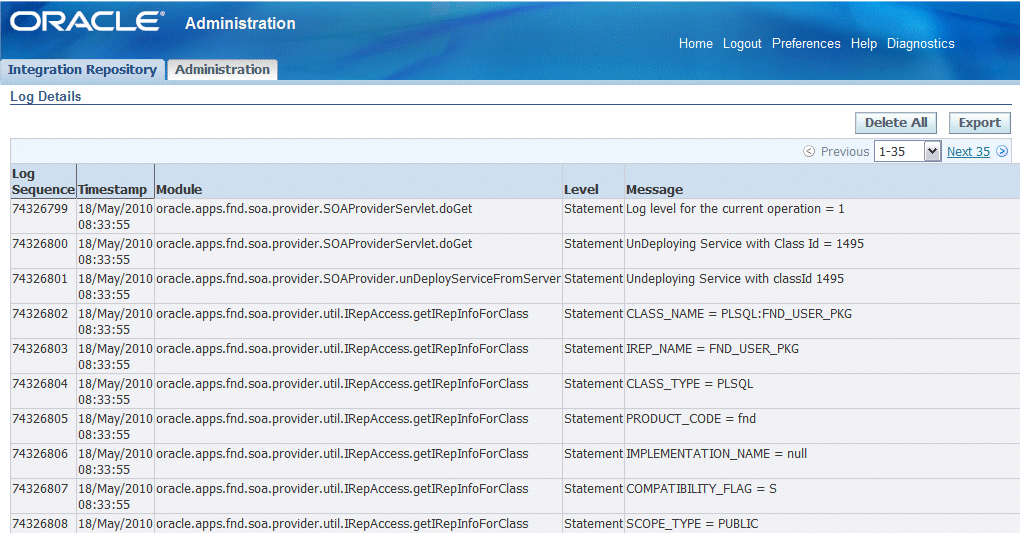
Click View Log to open the Log Details page. All logs recorded for the selected service are listed in the table. Each log contains log sequence, log timestamp, module, log level, and actual message recorded at the design time.
Note: Generate and Deploy time logs might be present for a service that has the logging enabled at the site level even if no error occurs while generating (regenerating) and deploying (redeploying or undeploying) the service. For example, if log setup is done at the log level of Statement, then statement level log messages can be written and listed in the log table.
Deleting and Exporting Logs Listed in the Log Details Page
After viewing log messages retrieved for a service in the Log Details page, you can delete them if needed by clicking Delete All. A warning message appears alerting you that this will permanently delete all the logs retrieved in the page. Click Yes to confirm the action. An empty log table appears in the page after logs are successfully deleted.
Before deleting the logs, you can save a backup copy by clicking Export. This allows you to export the records listed in the Log Details page to Microsoft Excel and save them to a designated directory and use it later.
For more logging information, see Logging for Web Services. For information on how to add a new log configuration, see Adding a New Log Configuration.
At run time during the invocation of Oracle E-Business Suite services by Web service clients, if a service has the logging enabled, log messages can be viewed in SOA Monitor against that instance. For information on viewing log messages through SOA Monitor, see Viewing Service Processing Logs.
To view Generate and Deploy time log messages:
Log on to Oracle Integration Repository with the integration repository administrator role through the Integrated SOA Gateway responsibility. Select the Integration Repository link.
In the Integration Repository tab, select 'Interface Type' from the View By drop-down list.
Expand an interface type node to locate your desired interface definition.
Click the interface definition name link to open the interface details page.
If logs are available for this selected service that has logging enabled properly, you will find View Log available in the interface details page.
Click View Log to open the Log Details page where you can view the log details.
Click Delete All to delete all the logs listed in the table if needed. Click Yes to confirm the action. Click No to return back to the Log Details page.
Click Export to export log list table to Microsoft Excel and save the records.
![]()
Copyright © 2008, 2010, Oracle and/or its affiliates. All rights reserved.