Order Entry
This chapter covers the following topics:
- Negotiation in Order Management
- Setup
- Considerations
- Sales Orders
- Process Steps
- TeleSales eBusiness Center to Sales Orders Window
- Order Purge
- Considerations during Order Copy
- Sales Agreements
- Preview and Print Sales Documents
- XML Publisher Multi-Language Support
- Internal Sales Orders
- Enhanced Intercompany Invoicing for Internal Sales Orders
- Integration of Advanced Pricing and Intercompany Invoicing
- Intercompany Invoicing
- Intercompany Invoicing Incoming Cost
- Returns and Credits
- Process Flow
- Workflow
Negotiation in Order Management
Overview
Order Management provides an end to end solution for processing a simple Quote through the negotiation process and automating the transition of the document to fulfillment. This process reduces administration expenses, and increases productivity in an environment geared for rapid response to the customer base.
A quote can pass through various stages from its initial preparation to fulfillment (as a Sales or Sales Agreement). These stages include preparation of a draft; negotiation with the customer; internal and external business approvals; versioning based on customer feedback and conversion to an order or archival as an unsuccessful or unused quote. Negotiation in Order Management provides a seamless flow from a quote status through to firm order. Negotiation:
-
Prepares and publishes quotes for assisted selling of products and services to customers and business partners.
-
Creates and manage quotes as a negotiation tool and transition the quote to a firm order acting as a single point of entry into Order Management.
-
Allows quick entry of order lines with a minimum of data entry. Quoting processes the quote and submits to Oracle Order Management a firm order complete with approvals (Internal/External). Relevant information captured by the quote flows through to the order.
You can use quoting to:
-
Create, modify and select quotes.
-
Configure Complex Products.
-
Manually adjust quote prices.
-
Perform real time global availability checks.
-
Calculate taxes
-
Assign sales Credits
-
Convert quotes to orders.
-
Support E-Business requirements.
-
Reduce administration expenses and increase productivity.
Oracle Order Management includes a workflow phase to support the activities that typically occur within a negotiation process, such as internal approval and customer acceptance. This allows you to create and manage quotes during the negotiation phase and transition the quote to a firm order. Features include:
-
A separate menu option for entering Quotes
-
Date Expiration
-
Pricing and Availability queries
-
Copy support
-
Defaulting of attributes that can affect a quote
-
Display of Related Items, such as up-sell, cross-sell or substitute items, and their price and availability
-
Integration with Pricing
-
Integration with TCA
-
Minimal data entry that can be processed through to Oracle Order Management as a firm order complete with approvals (Internal/External). Relevant information captured by the quote flows through to the order.
-
Change Management using Processing Constraints and versioning
-
Automated Process definition—workflows can be defined and extended.
-
Visibility through the Order Information Portal
Miscellaneous
Both Quotes and SAs use the same seeded Negotiation workflows.
After Customer Acceptance, Quotes transition to a sales order and Sales Agreements become Active.
SAs do not capture an Offer Expiration date and therefore do not leverage this functionality in the Negotiation flow.
Unsupported Features
The functionality supported with Quotes is similar to the level of support for Sales Orders. There are a few Sales Order features that are not available during the negotiation phase of a transaction including:
-
Holds
-
Scheduling
-
Copy a return from a quote.
-
Independent line flows
-
Cancellations – progress to LOST Status
-
Ship and Arrival Sets
-
Commitments
-
Quotes for returns or Internal Sales Orders
-
Sales Agreements - Can specify sales agreement reference on a quote but released quantity and released amount on a sales agreement are updated only when a quote is converted to an order
Setup
Transaction Type
To create a Transaction Type
-
Set up the transaction type. See Transaction Types for generic setup instructions. Note that when the transaction type contains both a fulfilment and negotiation phase there are some additional implementation considerations associated with set up. These impact when and how document numbers are generated by document sequencing.
On the transaction type set up form there is a check box for retain Document Number. When an order type is created two categories are created. Depending upon the value of Retain Document Number the following steps need to be taken.
-
If you want to keep the document number from the quote when the transaction moves to fulfilment, use the category appended with “TTXXX-Quote” when creating and assigning document sequencing.
-
If you need to generate a new document number for the transaction in the fulfilment phase, two document sequences need to be set up:
-
One for fulfilment, using the category with no appending text “TTXXX”
-
One for the category appended with “-Quote”.
If this is not set up correctly then the document will not transition to fulfilment because the document cannot be assigned a Sales Order Number.
NOTE: Retain Document Number check box applies only to transaction types with Sales Document Type of Sales Order. Sales Agreements have only one document number, Sales Agreement Number, associated with the transaction irrespective of whether agreement is in negotiation or fulfillment phase.
-
-
Then optionally assign a default transaction phase. The transaction phase defaults to either Negotiation or Fulfillment based on Order Management defaulting rules when the quick sales or standard sales order form is opened. The transaction phase always defaults to Negotiation independent of the defaulting rules when the form is opened through the Quotes menu option. If the transaction phase defaults to Negotiation, only the transaction types that also have a negotiation workflow associated with it are displayed.
In the absence of a default, the fulfillment phase is automatically populated by the system.
Note: The transaction phase can be changed up to the point of saving the transaction or before lines are entered. Once the transaction is saved or lines are entered, the transaction phase cannot be changed and the transaction phase field is non-updatable.
You can set the transaction phase directly on the sales document; the transaction phase determines where in the workflow the transaction starts. Using a single transaction type you can choose to begin the transaction process in either phase if both fulfillment and negotiation workflow assignments exist on that transaction type. Note: While Sales Orders lines are assigned a line type through which the transaction is processed, quotes and SAs do not use line types and follow a header flow only.
Transaction type designed for use with Sales documents For example in addition to header and line block data:
SA uses the following settings on the transaction types:
Document numbering
Flow assignments
Layout and contract templates.
Transaction phase
Quotes use:
Retain document number
Header flow assignment
Transaction phase
Layout and contract templates.
Workflows
Quotes and Sales Agreements leverage the flexibility of Workflow to manage the quote life cycle. There are two phases for workflow: Negotiation and Fulfillment. Workflow flexibility allows you to tailor your Negotiation and Fulfillment phases to your specific processes. You can choose one of the following generic seeded header-level negotiation flows, these flows can be associated to transaction types for both Sales Orders and Sales Agreements. Both can be converted to an order. Quotes can be converted to sales orders in either the Entered or Booked status (if the booking activity is synchronous). The seeded workflows are as follows:
-
Negotiation Flow - Simple:This workflow does not require any approvals nor customer acceptance. However the quote can either expire or get lost if it does not progress to being converted to an order.
-
Negotiation Flow—Generic: Simple negotiation flow, without approval. Prepares quote document, get customer final acceptance, convert quote to the Sales Order.
-
Negotiation Flow—Generic with Approval: Flow with Approval. Prepare quote document, get management approval, get customer final acceptance, and convert the quote to an order.
In support of a quote the following Status types are predefined:
-
Draft
-
Pending Internal Approval
-
Lost
-
Pending Customer Acceptance
-
Draft Submitted
-
Internal Approved
-
Customer Accepted
-
Offer Expired - This status does not apply to Sales Agreements.
-
Draft - Customer Accepted
-
Draft - Customer Rejected
Seeded workflow that incorporates Internal Approval and customer acceptance
After a quote has been put together, it can be submitted for approval. The relevant documents can be routed to various people in the organization, including people from Sales, Business Practice, Legal, or Finance, for review.
The list of approvers is defined at the Transaction Type level. The document must be approved by each participant in the list before the transaction is eligible to move forward in the workflow. If the approver fails to respond within the time limit, the system will re-send the notification. If the approver again fails to respond, the system will either send the notification to the next approver (if the current approver is not the last approver), or reject the notification based on the system parameter setup.
The Approver List can be accessed two ways:
-
From the Transaction Type setup window: (N) > Orders, Returns > Setup > Transaction Type > Define. Select the Approvals button to bring up the Approver List.
-
Navigate directly to the window: (N) > Orders, Returns > Setup > Transaction Type > Approvals.
If an approver is deleted from the list the notifications still need to be processed.
If an approver is added to the list and any transaction is pending approval they will receive a notification.
The user will receive a notification and must approve or reject.
Defaulting
Quotes use same defaulting framework as Sales Orders. Defaulting rules can be set up for following quote attributes -
Transaction Phase
Quote Date
Offer Expiration Date
Customer Location
Seeded defaulting rules for transaction phase on quote are evaluated in following order - 1. Using profile OM: Default Sales Transaction Phase. Seeded profile value is null. 2. Default Transaction Phase from Order Type. If both of these sources do not return a default, system sets transaction phase to Fulfilment.
Sales agreements are not integrated with defaulting rules framework. However transaction phase is automatically defaulted using the same sequence as for seeded rules for sales orders - 1. Using profile OM: Default Sales Agreement Transaction Phase. Seeded profile value is null 2. Default Transaction Phase from the Sales Agreement Transaction Type. For sales agreements also, system sets transaction phase to Fulfilment if no default is returned.
If transaction phase default is to be based on user or responsibility creating the transaction, setup profile values at the appropriate levels. If a more global defaulting strategy is required then it is recommended that it should be defaulted from transaction type.
This profile is an alternative defaulting source for the transaction phase. The default is null.
Processing Constraints
Decide when/who can amend following attributes on the sales document and define processing constraints accordingly -
Quote Number - Not applicable to Sales Agreements)
Quote Date - Not applicable to Sales Agreements
Offer Expiration Date - Not applicable to Sales Agreements
Document Name
Transaction Phase
User Status
Offer Expiration Date
On the constraint, you can optionally specify if constraint applies only while document is in negotiation phase or fulfilment phase.
Validation Templates have also been seeded using the new negotiation workflow statuses. Example of such a validation template is - Pending Customer Acceptance. Use these templates in constraint conditions to restrict changes or to version the sales document while it is in that status. Refer to appendix on constraints for a complete list of seeded templates.
User Status Quick Codes
You can define status codes and capture them in the quote for reference. User statuses can be associated to sales documents for internal tracking purposes by salespeople. These statuses are based on quick codes associated with lookup type of User Status and are user-defined. Note that the user statuses are not validated against the Order/Quote workflow status.
A user status code can be used in a query in conjunction with an additional attribute. See Lookups for more information on setting this up.
Setting the Offer Expiration Date
You can limit the validity of the Quote to a specific period and assign an offer expiration date. The workflow updates status at expiration, and expired transactions may be purged. This date can be manually entered, or defaulted. For example, if you use defaulting rules and select a defaulting condition for negotiation, then select the system variable and enter sysdate+1, the expiration date will default 1 day from the current system date. Notifications can be generated prior to expiration. The expiration date ranges can be used in a search.
An offer expiration date is necessary to ensure successful closure of a Quote in progress. Although this is an optional field, transactions which have not been manually processed to a lost status remain active until an expiration date is assigned. Dates entered are honored by workflow and when the date has passed the Quote automatically moves to a expired status in the workflow and becomes eligible for purge.
When the Quote is due to expire, a notification can be generated that will be sent a variable number of days before the offer expires. Decide when pre-expiration notification should be sent and assign a value accordingly to workflow item attribute for negotiation (OENH) item type e.g. if quote expires in 10 days and notification should be sent 2 days before expiration, Pre-Expiration Time Percentage (PRE_EXPIRE_TIME_PERCENT) attribute should beset to 20% (20% of 10 days => 2 days). This setup is not needed if default of 10% is fine i.e. by default, notification will be sent 1 day prior if quote is to expire in 10 days.
NOTE: Expiration date on sales agreements have a different function, this offer expiration feature is not applicable for sales agreements.
Sales agreement expire only after the document becomes active in fulfilment phase while offer expiration applies to quotes in negotiation phase.
Features include:
-
Expiration Dates entered will be honored by workflow and when the date has passed the quote will automatically move to a offer expired status in the work flow and become eligible for purge.
-
The offer expiration date can be entered manually or by the defaulting rule framework. The date can be overridden at any time unless processing constraints are defined to manage who and when may amend the date.
-
When the quote is due to expire, a notification can be generated to alert the CSR. The user may require the notification to be sent ten days before the offer expires. This duration/notification initiation may vary from transaction type to transaction type.
Customer Location
Oracle Order Management allows the display and capture of a customer location address type. For example, you can use this to show the address a quote needs to be mailed. This is optional.
Considerations
The following table gives a high level comparison of the features and functions available in Order Management Quoting and Oracle Quoting.
| Feature | Quotes in Order Management | Quotes in Oracle Quoting |
|---|---|---|
| Collaboration across sales suite | X | |
| Collateral (Web Catalog, Content Manager) | X | |
| Proposals | X | |
| Opportunity Integration | X | |
| iStore Integration | X | |
| Approvals | Basic | Advanced |
| What-If Analysis (Gross Margin, Pricing and Compensation) | Basic | Advanced |
| Printing | X | X |
| Versioning | X | X |
| Quote Statuses | X | X |
| Expiration | X | X |
| Contract Negotiation | X | X |
Note: Oracle Quoting uses the AME (Approval Manager) for approvals and as a result is able to perform hierarchal approvals during the Quoting process.
Related Topics
Using Workflow in Order Management
Define Document Sequences for Order Numbering
Define Order Management Transaction Types
Sales Orders
Overview
In Oracle Order Management, the Sales Orders window enables you to organize, enter, view, and update order information. Order Management offers line level independence where you can capture regular orders as well as returns using the same window. The Sales Orders window offers you a convenient and quick entry point for creating and editing order information as well as viewing summary information from other subsystems such as Shipping, Receivables, and Purchasing, as well as the status of orders.
Oracle Order Management designed a mechanism called the Process Order API that performs a consistent validation of data manipulation (i.e. changes, deletions etc.) on the Sales Order attributes. This provides a consistent, secure, and valid means for managing sales orders.
Required Setup
To accomplish entering an order from entry to invoicing, the following setups are required:
Order Header/Line Workflow Processes
Order Management comes with seeded Workflow processes. Review the seeded flows, activities and notifications to determine if the seeded data can meet your business needs. To successfully enter a standard order in OM, you can use the Generic - Order and Line Flows. If you need to modify the seeded workflows, it is recommended that you make a copy and modify the copy. You can also determine if you want certain activities to be Synchronous, Deferred, or Manual. The Workflow engine will move the order/line ahead as long as the activities are synchronous activities. The order or line flow will stop at any manual activity which will require a manual task to move the workflow along. The Workflow background engine processes deferred activities, notifications, wait activities and time out activities. You setup the Workflow background engine when setting up Workflow in your environment. You also need to schedule the Workflow Background Process concurrent program to re-submit periodically. When scheduling the concurrent program, please specify Order Management work item types as the parameter so that it will only pick up the activities or notifications for Order Management work items.
Transaction Types
Both order and line transaction types need to be setup in order for an order to process from entry to invoicing. When setting up order types, assign order header and line workflows to the order type. Since each line can go through its own flow process, each line needs to have its own workflow process. Line level workflow processes are assigned based on the order type, line type, and item type combination. For example, adding Generic Order Type to Generic Line Type and Standard Item gives you a Generic Line Workflow process.
Document Sequence
The document sequence functionality is for numbering orders. The same sequence can then be assigned to all order types. For instance, you could define an automatic sequence beginning with 1 and assign it to all your order types. Then each new order that you enter will receive the next number in the sequence.
Processing Constraints
Order Management ships with seeded constraints that prevent data integrity problems. If your business requires more restrictive rules when processing orders, rules can be set up to control changes or operations of the order process flow. See Processing Constraints for details on setting up processing constraints.
Scheduling Activity
The Schedule function can be performed anywhere in a process flow according to your business needs. If you want to setup scheduling to run automatically, you can set it as a synchronous function within the workflow process so it will happen automatically. The profile option OM: Autoschedule should be set to Yes. Or the user can schedule manually directly from the sales orders window. See Scheduling for details on scheduling setup.
Shipping Parameters
Set the Shipping Parameters specific to company picking and ship confirmation processes. The Shipping Parameters window consists of the following tabs: General, Pick Release, Shipping Transaction and Delivery Grouping. The General Tab includes percent fill basis, or quantity, and Weight and Volume UOM Class. These parameters are primarily used for the containerization functionality. The Pick Release Tab includes a default Pick Slip Grouping Rule, Release Sequence Rule and a Auto Pick Confirmation flag which confirms your order to be released from Inventory. The Shipping Transactions Tab includes default Shipping Documents at ship confirmation and container packing controls. Finally, the Delivery Grouping Tab includes the criteria for grouping delivery lines. It must have the same ship to location, warehouse, and so forth as the order lines.
Master Items
A standard, finished good item should be defined in the Inventory module, with attributes set appropriately. The key attributes that control the processing of a finished good item are on the Order Management tab in the Master Item setup window. The flag Shippable and Transactable should be selected. The best way to create your items is to copy them from the Finished Good seeded template.
Item Quantity On-Hand
In order to ship an item, there must be sufficient quantity available. In a test environment you can create inventory by executing a miscellaneous receipt.in the Inventory module., To generate a miscellaneous receipt, go to the Transactions > Miscellaneous Transactions window. Enter the newly created Item name and specify a subinventory and quantity and save. In a production environment, your inventory will typically come from receipts against purchase orders or completion of work orders. The quantity on hand for the item will be decremented the amount of the order line when pick releasing the order.
Price List Setup
To price the new item when entering the ordered item on the order, the user should add the new item to a price list. The item is added to a price list via the Price List Setup window: Pricing > Lists > Price Lists Setup. Query an existing price list or create a new price list. Add a new line, enter the item name, UOM and price and save. The price and UOM will default when entering the item on the order line.
Install Base Integration
If you are using Oracle Install Base and you have items that are non-shippable but need to be interfaced to the Installed Base (such as PTO Models, PTO Option Classes, and Service Items), then you will need to add the Installed Base Interface activity to your line level workflows. The activity is seeded. It should be added to the line workflow processes following the fulfillment activity.
Process Steps
This section will guide you through a basic sales order flow from entry to invoicing, including:
-
Entering a standard sales order
-
Scheduling the order
-
Booking the order
-
Pick release
-
Ship confirm
-
Fulfillment
-
Invoicing interface
-
Enter Order Header information with a standard order type.
Note: There are no seeded transaction types. You will need to create a standard order type which uses the generic order and line workflow to progress the order through to invoicing. Refer to the Required Setup section for Workflow and Transaction Type setup.
Sales Order Information (Header) Window
The Order Information screen is in a single record format. The most commonly used fields by all industries will be displayed by default. You may use the folder tools to add or remove fields which are displayed. Forms can be customized to meet business needs. Field values can be set up to default from a variety of sources such as the Order Type or the customer record. All defaults can be overridden unless the business unit defines constraints preventing update.
Once the Order Header information is entered, you will enter the line information within the Line Items screen. The Line Items window, shown in Figure 2, will display in multi-line format. The overflow region will display Item Description, Line Total and Line Quantity fields. The Line, Ordered Item and Quantity fields are static in the window. Minimum line information required to book an order is item number and quantity. Other line information that can be entered in the Main tab include Schedule Date, Line Type, Source Type, etc. The Line Items window includes five additional tabs to enter detailed line information. These tabs include Pricing, Shipping, Addresses, Returns, Services, and Other.
Sales Orders: Line Items
Other functions are available through the Actions button on both the Order Information and Line Items forms. On the Order Information window, the Actions include functions such as, Copy, Cancel, Apply and Release Holds, Price Order, etc. In the Line Items window, the Actions include additional functions such as, Split Line, ATP, Price Line, Configurator, etc.
-
Schedule the order. This can be setup to be performed manually or automatically, depending on the user's needs. The user can schedule orders automatically by setting the Autoscheduling feature via a profile option or from the Special menu. Or the user can schedule orders manually by using the right mouse button or from the Special menu. Refer to the topical essay on Scheduling in this manual for the details of scheduling. Once the order is scheduled, the schedule ship date will be populated on the lines of the order.
-
Book the order. You can book an order at either the Order Information tab or Line Items tab via the Book button.
-
Pick release the order from the Shipping > Release Sales Orders > Release Sales Orders window. Make sure to include a Release Sequence Rule, a Warehouse, a Pick Slip Grouping Rule and check the Auto Detail and Auto Pick Confirm boxes. Users can also pick release their orders from the Shipping Transaction window. Although, the user will need to setup their Shipping Parameters to ensure the order is released. Refer to the Required Setup section below for details.
-
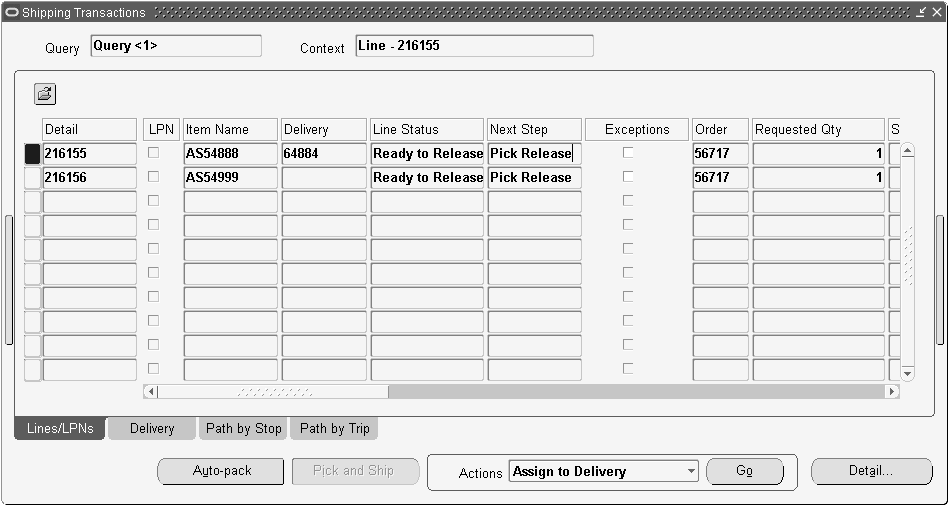
View the Pick Status of the lines. The lines of the order must be in a status Released to proceed to the Ship Confirmation activity in the Workflow process. You can view the status in the Shipping Transaction window. First, the user will query the order number in the Query Manager window. This window will execute your query and populate the order lines in the Shipping Transaction window.
Query Manager Window
To view the status of the lines, use the horizontal scroll bar in the Lines/ Containers tab of the Shipping Transaction window, and scroll to the right to a field called Pick Status. You can also click Detail to open up the window. The status should be Released for all lines.
-
Create a Delivery. This can be performed automatically during Pick Release by selecting AutoCreate Delivery equal to Yes. This can also be performed manually or automatically within the Shipping Transaction window. If you manually create a delivery, you need to use the same ship to address, warehouse etc. based on the setup criteria of the shipping parameters. Refer to the Required Setup section for information on Shipping Parameters. In this example, we will create a delivery automatically within the Shipping Transaction window. Once the order has been queried, the lines will appear in the Shipping Transaction Window. To create a delivery automatically, highlight (Ctrl + mouse click) the lines you want to include in the delivery, select the Actions list and choose Autocreate Deliveries and GO. A system generated delivery name will be populated on all of the lines selected. At this time, you can click on the Delivery Tab to see the delivery name, ship to location and other shipping information.
Note: If you want to use prefixes or suffixes with delivery names, modify the wsh_external_custom.delivery_name package. No profile options exist for specifying prefixes or suffixes.
Shipping Transactions Window
-
Ship Confirm the order. Specify a quantity to be shipped in the Lines/Containers tab of the Shipping Transaction window, and optionally enter a Waybill in the Delivery Tab. To ship confirm the order, select the Actions list in the Delivery Tab, choose Ship Confirm and GO. The ship confirmation window will appear and give you the options to backorder, ship all or ship partial quantities and set user defined shipping documents to print. The ship confirm process triggers the inventory interface automatically to update quantities, and triggers the Order Management Interface to update the status of the order lines.
-
The fulfillment activity acts as a synchronization point for all lines on the order that are in a fulfillment set. The lines in the fulfillment set will wait at the fulfillment activity until all the lines in the set have reached the activity. Lines that are not in a fulfillment set simply pass through the activity.
The seeded Line Flow - Generic flow has a Defer activity before the fulfill activity. Fulfill the order. Once the Shipping activity completes, a Background Workflow Process processes the order line(s) to the Fulfillment activity.
-
Invoice the order. Once the Fulfillment activity completes, a Background Workflow Process processes the order line(s) to the Invoice Interface activity. The invoice interface activity places the information from the sales order line into the Receivables Interface tables. When the information is written to the tables, the invoice interface activity is complete, and the line proceeds to the close line activity. However, note that the invoice is not actually generated until the Autoinvoice program in Receivables has been run. The invoice will then be viewable in the Sales Orders window.
TeleSales eBusiness Center to Sales Orders Window
Overview
The TeleSales eBusiness Center now enables you to view order history and create new orders. The New button on the Order tab can launch either the Sales Orders window or the Quick Sales Orders window, where the relevant Party, Account, Address, and Contact information entered in the eBusiness Center are carried over automatically and populated in the Sales Orders window. If an account does not yet exist in TeleSales, Order Management creates a new account. You can then enter any necessary details and process the Order.
Setup
There are no mandatory setup steps necessary to enable the functionality of this feature. However it is required to enter a value in the Deliver To field in Customer Address (in the Customer window of Order Management). Only if a value is entered in the Deliver To field, will the sales orders window open in Telesales.
Profiles:
OM: Create Account Information
This profile sets permissions to create Accounts, Sites and Contacts. This profile can be modified at the Site, Application, Responsibility, and User levels. The seeded profile values are:
-
All: The user is permitted to create Accounts, Account Sites, Account Contacts and related information.
-
Account Site and Account Contact Only: The user is permitted to create Account Sites, Account Contacts and related information only.
-
None: The user is not permitted to create any of the above.
The default value is None. The profile is visible to the user but not updateable. The profile is visible and updateable at all levels to the system administrator. The Create Account Layer API will check this profile and create the account layer only if the correct permissions are set.
OM: Sales Order Form Preference
This profile defines which sales orders window is evoked from the Telesales e-business center.
Related Topics
Oracle TeleSales Implementation Guide
Order Purge
Overview
Oracle Order Management purges order data that is no longer needed within the operational requirements of the order taken and order administrator. Purging:
-
Allows orders to progress on the current order book in an efficient manner, without being distracted or encumbered by obsolete data.
-
Frees storage space
Restrictions
Orders must be closed before they can be purged. The order is purged only if there is no open activity for the order including uninvoiced lines or open returns.
Profile
Profile: OM: Transactions Purged Per Commit
This profile determines how many orders can be purged per commit. The default is set to 100.
Considerations during Order Copy
Overview
The Copy Orders function in Order Management is tightly integrated with the Sales Orders window and supports multi-selection of records. In addition to copying orders it facilitates copying lines within an order or across to a new or existing order. This feature solves many functional problems, including the following:
Template Orders
You can use copy to place multiple orders that are very similar or identical. For example: A private Elementary School places a standard Order with a School Supplies Vendor every 2 weeks to meet its Stationery needs. You can set up a source sales order that matches this need and create orders as required based on this source order to minimize data entry time.
Creation of Return Material Authorizations
When a customer returns items against an order, the customer service clerk can copy lines from the original order to create a RMA instead of entering it from scratch.
Setup
-
The following columns for Copied Orders should be set as follows:
Copied Orders R12 Column Value SOURCE_DOCUMENT_TYPE_ID 2 SOURCE_DOCUMENT_ID SO_HEADERS.ORIGINAL_SYSTEM_REFERENCE -
All Lines belonging to the Copied Orders that have their original_system_line_reference populated should have their columns set as follows:
Original_system_line_reference Settings R12 Column Value SOURCE_DOCUMENT_TYPE_ID 2 SOURCE_DOCUMENT_ID Select soh.original_system_reference from so_headers soh where soh.header_id = so_lines.header_id SOURCE_DOCUMENT_LINE_ID SO_LINES.ORIGINAL_SYSTEM_LINE_REFERENCE
Copying Descriptive FlexFields
The checkbox Descriptive Flexfields in the Copy Header/Copy Lines tabs of the Copy window is limited in that it cannot provide for Order-to-RMA copies; in addition you are not able to manipulate the DFF attributes. In order to overcome these, an API hook has been provided so that you can control copying of the line level DFF attributes. This API will also have visibility to many other controls like:
-
Order Type: Order Type selected on copy
-
Line Type: Line Type Selected on copy
-
Operation: Order to RMA, Order to Order and RMA to Order
-
Copy Flex: True/False, based on the user’s decision (On COPY form) to copy or not copy line level DFF.
Using these controls, you can write your own logic to clear, retain or assigning new values to the DFF context and attributes (attribute1..attribute20).
In order to enable this flexible solution, you will first need to set the system parameter “Call line DFF extension API in COPY” to YES. This will enable the callout to the hook. It will also enable the ‘Include Descriptive Flex’ check box on Lines TAB for Order to RMA copy.
The Hook API will look like:
OE_COPY_UTIL_EXT.COPY_LINE_DFF(
p_copy_rec IN OE_Order_Copy_UTIL.Copy_Rec_Type,
p_operation IN VARCHAR2 ,
p_ref_line_rec IN OE_Order_PUB.Line_Rec_Type ,
p_copy_line_rec IN OUT NOCOPY OE_Order_PUB.Line_Rec_Type )
where you can derive the following:
-
Order Type -> p_copy_rec.hdr_type
-
Line Type ->_copy_rec.line_type
-
Line Type ->_copy_rec.line_type
If the ‘Include Descriptive Flex’ is checked then DFF attributes will be populated from the source line and will pass the record ( p_copy_line_rec) to the Hook API. Otherwise all DFF attributes will remain blank (G_MISS_CHAR).
When you implement this solution, please ensure that you increase the file versions for Hook API (Spec + Body) to say 1000, so that it never gets overwritten by any future patches.
Sales Agreements
Overview
Sales Agreements are used when you have specific characteristics related to a purchasing agreement between a customer and a supplier. These characteristics include the date range of the agreement, the items included, the price of the items, the quantity of each item that the parties committed to, as well as other attributes, like freight or payment terms. Once a Sales Agreement is entered for a customer, multiple releases (sales orders) against the Sales Agreement are processed over a period of time within Order Management. The order is fulfilled and billed according to the terms of the Sales Agreement. Tracking information will also be accumulated for Sales Agreements, such as, quantity fulfilled, and dollar value fulfilled of released lines. This information is used to view status of orders executed against a Sales Agreement.
Sales Agreement functionality includes the following:
-
New windows: Find Sales Agreements, Sales Agreements Summary, and Sales Agreements windows
-
Captures agreement information
-
Enforce sales agreements terms such as: price list, shipping method, payment terms, ship to, bill to.
-
Ability to secure who can enter Sales Agreements
-
Specify defaulting rules for sales agreement attributes for releases
-
Ability to create non-customer specific Sales Agreements
-
Default information from the Sales Agreement to the release
-
Support Standard, ATO items, Kits, Services, and other items
-
Support Item Categories and all items
-
Ability to create releases by Order Import and Process Order API
-
View releases of Sales Agreements
-
Process the releases against the Sales Agreement
-
Aggregate information about the releases and access that consolidated information from the Sales Agreement
-
Integrations with Advanced Pricing and Release Management
-
Effectivity dates of the agreement
-
Inline Pricing
-
Enhanced sales documents with Preview and Print
-
Ability to terminate a Sales Agreement
-
Workflows:
-
Negotiation and Fulfillment flows
-
Automatically attach Adobe Portable Document Format (PDF) of current SA for Approvers to reference easily
-
Quality Assurance (QA) validation for contractual terms and conditions included in Negotiation flow
-
Draft, Internal Approval, Customer Acceptance, Terminate, Expire, Lost, and Close
-
-
Internal Approvals
-
Create Internal Approver List
-
Processes:
-
Automatic and Manual Versioning
-
Customer Acceptance captured
-
Ability to create customer-specific Price List
-
Ability to add customer items to a Price List
-
Ability to author and negotiate Contract Terms with Oracle Sales Contracts enabled
-
-
Configuration support:
-
Ability to define options and option classes on the Sales Agreement to hold price for configurations on releases
-
-
Attachments
-
Contract Documents
-
Copy
-
Security through Processing Constraints
Profiles
OM: Default Sales Agreement Type
This enables the system to use a common (default) transaction type across Sales Agreements to generate unique sales agreement numbers. There is no default value for this profile option. This profile is seeded as available to setup at the responsibility and site level. In most business processes, the profile option can only be modified by the System Administrator. The profile is visible to the user but not updateable.
OM: Default Agreement Transaction Phase
This profile enables the system to use a common transaction phase across Sales Agreements.
Setup
To set up the Order Management system to enter Sales Agreements:
-
Install Order Management.
-
Define a Sales Agreement type for assigning sales agreement numbers. See Define Document Sequences for Order Numbering , and Define Order Management Transaction Types .
-
Set up the profile option OM: Default Sales Agreement Type in order to default the category to generate the sales agreement number.
-
Optionally, set up the profile option OM: Default Sales Agreement Transaction Phase in order to default the transaction phase to Negotiation or Fulfillment.
-
Create folders on a Sales Order or Quick Sales Order and Quote or Quick Quote forms to show SA related fields: At the header: Sales Agreement Number, Sales Agreement Name, on the lines: Sales Agreement Number, Sales Agreement Line Number.
Defining transaction types for Sales Agreements
Navigate to the Transaction Types window to set up transaction types. See Define Order Management Transaction Types for more information.
The three seeded workflows for Sales Agreements are:
-
Negotiation Flow—Generic: Simple negotiation flow, without approval. Prepares negotiation, no management approval, get customer final acceptance, converts from negotiation phase to fulfillment phase.
-
Negotiation Flow—Generic with Approval: Flow with approval. Prepares draft, gets management approval, gets customer final acceptance, converts from negotiation phase to fulfillment phase.
-
Sales Agreement Flow—Generic: Generic fulfillment flow for Sales Agreements.
Note the following when setting up a transaction type for Sales Agreement:
-
Fulfillment Flow: Assign the fulfillment flow.
-
Negotiation Flow: Assign the optional negotiation flow.
-
Default Transaction Phase: Transaction phase determines where in the workflow the transaction will start. Select either Fulfillment or Negotiation. The profile OM: Default Sales Agreement Transaction Phase is the preferred source for the transaction default on Sales Agreements. If the profile has not been set, the system looks at the transaction phase defined on the transaction type. If neither default is available, the system uses Fulfillment phase as the default. (Optional)
-
Layout Template: Assign the layout template that you would like to use when generating a customer facing document to be previewed or printed. See Preview and Print Sales Documents. (Optional)
-
Contract Template: When Oracle Sales Contracts is enabled, assign a Contract Template to the sales agreement type for defaulting purposes. See Authoring and Negotiating Contract Terms. (Optional)
Transaction types can point to the same template or different templates depending on the business process.
There is direct access to the Approval List setup from the transaction type. It can also be accessed from the menu. For more information on setting up Approvals, see Defining Approvals .
The Negotiation flow offers Internal Approval as well as Customer Acceptance prior to transitioning the Sales Agreement transaction to Active where releases can be placed against the Sales Agreement.
Note: If you want to create an automatic attachment on the workflow notification (to allow approvers to easily view the document), on the transaction itself as a reference in Contract Documents when Oracle Sales Contracts is enabled, or for FND attachments, the workflow must be extended to add the "Sales Agreement/Sales Order Generation" process in between Submit Draft and Internal Approval, and XML Publisher must be installed.
Defining processing constraints for Sales Agreements
The processing constraints framework in Order Management gives the unique ability for user and system to define the conditions and status at which an update can be made to an entity. For example, a Sales Agreement cannot be updated while it is in the "Pending Internal Acceptance" status. This has been seeded as a system constraint to prevent data corruptions. Likewise you can define constraints that suites to your business practices and prevent changes. These constraints can be defined at the entity level and for each attribute.
Sales Agreements use the same constraint framework as Quotes or Sales Orders. This framework can also be used to set up when and what changes trigger automatic versioning for Sales Agreements. Navigate to the Processing Constraint Window. See Define Processing Constraints for more information on defining processing constraints.
Note the following when defining processing constraints for Sales Agreement:
-
Entity: A Sales Agreement Header or Line
-
Assign a workflow phase: In the Applies To field, select a workflow phase (Negotiation or Fulfillment) to assign to the sales agreement header or line.
-
Assign a validation template: In the Conditions region, select a validation template in the Validation Template field. See Defining Validation Templates .
Constraints seeded for Sales Agreements are listed in Appendix E.
Price List Setup/Price Modifier Setup windows open in query only mode if the Not Allowed constraint applies for update operation on the New Price List/New Modifier List setup attribute on the Sales Agreement Header entity.
If Oracle Sales Contracts is enabled and the Not Allowed constraint is applicable for update operations, then attribute Contract Terms, in the Contract Terms window opens in query only mode.
Defining constraints for releases
Determine when Sales Agreement references should be allowed to be changed on releases. For example, if "Cannot change Sales Agreement references on a shipped line" is specified, setup constraints Sales Agreement numbers on the Order Header or the Sales Agreement number/Line number on Order Line.
Defaulting Rules for releases
Determine which terms from Sales Agreements should default to the release. Define defaulting rules for Order Header/Order Line using the source type "Related Record" using source object of Sales Agreement Header/ Line. For example, if you want to ensure that the SA number is always defaulted in the release header and lines, set up a defaulting rule with a source type as "Related Record." You must also
In addition, if you commonly place orders/releases against agreements, create a folder with sales agreement number field on the order header and save this as the default folder. Now when you click on Create Releases button from the Sales Agreement window, the Sales Orders form opens and the cursor goes to the Sales Agreement Number field. When you tab out of this field, customer data will default from the SA to the release order.
This is recommended if a business process also requires a term to be enforced. For example, if enforce price list is checked on the Sales Agreement Line, define a rule to default the price list from Sales Agreement Line to Order Line. Otherwise, a validation error may occur while processing the release line and you will have to update the price list manually. See Defaulting Rules.
Menu entries
Appropriate form functions should be added to provide or restrict access to the Sales Agreement window.
-
Contract Documents
-
Contract Terms
-
Price List Setup
-
Price Modifier Setup
-
Contract Terms
-
Contract Documents
-
Price List Setup
-
Price Modifier Setup
Query only Mode
The following actions are available when the Sales Agreement is in query only mode:
-
Preview and Print
-
Release Rules
-
Version History
-
View Notification Details
-
View Reason
-
View Releases
-
View Workflow Status
Cumulative Range Breaks
With Advanced Pricing, users have the ability to create Cumulative Range Breaks across releases for a particular Sales Agreement. You can create range breaks using the Sales Agreement action, Price Modifier Setup.
There are three Sales Agreement Accumulation Attributes:
-
Sales Agreement Amount
-
Sales Agreement Line Quantity
-
Sales Agreement Line Amount
Related Topics
Preview and Print Sales Documents
Oracle Order Management User's Guide
Oracle Advanced Pricing User's Guide and Implementation Manual
Oracle Advanced Pricing Implementation Manual
Preview and Print Sales Documents
Overview
Preview and Print provides the ability to generate a printable Adobe Portable Document Format (PDF) that can meet business layout requirements. Preview and Print is an action available on each sales document, (such as Sales Order, Release Order, Quote, or Sales Agreement), that displays the PDF document to be viewed and printed.
Features include:
-
Layout Templates can be easily designed to meet specific formatting requirements
-
Ability to print all necessary information of the business document including header, line information, and signature block
-
A default Layout Template that can be defined on the Transaction Type
-
A field on the business document that displays the Layout Template defined for the Preview and Print
-
Automatic attachment of a PDF in Workflow notification to Internal Approvers and attachment of a PDF to the business document in the system
Profiles
OM: Printed Document Extension Class Name
This profile extends the standard functionality of the preview and print feature by providing a hook that will call a specified custom java code class path. The printing API reads the profile class path and executes the java function.
Setup
Create or modify layout templates as needed. Layout templates are created in XML Publisher. Several layout templates are preseeded and can be used or copied to create a new layout template. All Layout Templates must be registered before they can be used. In the OM Transaction Type set up, the layout template can be associated as a default format for the Preview and Print action.
Oracle XML Publisher is required to use Oracle Sales Contracts, so if Sales Contracts is enabled, preview and print is available. However, if Sales Contracts is not enabled, then you must install XML Publisher to generate sales document previews. All users must have Adobe Acrobat installed for preview and print capabilities.
To set up Preview and Print:
-
Set the Responsibility to: XML Publisher Administrator >Layout Templates.
-
Search for an existing Layout template by application and select a template to view. With your responsibility set to Responsibility: XML Publisher Administrator > Layout Templates, search for an existing Layout template by application or create a new template.
-
In the Layout Template select a stylesheet from the list of values to be tied to this Transaction Type. The following are seeded:
-
Sales Order XSL Template: This is a XSL-FO Layout Template sample used for defining a Sales Order printing format.
-
Sales Agreement XSL Template: This is a XSL-FO Layout Template sample used for defining a Sales Agreement printing format.
Sales Order RTF Template: This is a standard RTF Layout Template sample used for defining a Sales Order printing format.
-
Sales Agreement RTF Template: This is a standard RTF Layout Template sample used for defining a Sales Agreement printing format.
-
Sales Agreement RTF Extension Template: This is a template that is imported into the standard RTF Layout Template for Sales Agreements. The RTF Extension Layout Template provides the standard RTF Template with table layout formatting for printing price lists, modifiers, and products within a table.
-
Sales Order XSL Extension Template: This is a XSL-FO Extension Layout Template that is imported into the standard RTF Layout Template for Sales Orders. The XSL-FO Extension Layout Template provides the standard RTF Template with global XSL variables, XSL templates returning specific values, XSL templates for article variable substitution, and rich text editor tag support for article text.
-
Sales Agreement XSL Extension Template: This is a template that is imported into the standard RTF Layout Template for Sales Agreements. The XSL-FO Extension Layout Template provides the standard RTF Template with global XSL variables, XSL templates returning specific values, XSL templates for article variable substitution, and rich text editor tag support for article text.
Note: Seeded stylesheets and RTF templates cannot be modified. You can, however, download a stylesheet and register it as a valid stylesheet with or without modifications.
-
-
Navigate to N > Setup > Transaction Types > Define. See Define Order Management Transaction Types.
-
Assign a layout template to the appropriate transaction type. In the OM Transaction Type setup, the layout template can be associated as a default format for the Preview and Print action.
-
Save your changes. The stylesheet you selected determines the formatting for a sales document from this transaction type.
Note: It is highly recommended that layout templates associated to a transaction type not be end dated as long as there are open transactions.
To create your own layout template:
You can also create your own stylesheets and register them with the application.
-
Set the Responsibility to: XML Publisher Administrator >Layout Templates.
-
Search for an existing Layout template by application and select a template to view. With your responsibility set to Responsibility: XML Publisher Administrator > Layout Templates, and create a new template.
Sales Agreement Order Generation Workflow Subprocess
The workflow subprocess Sales Agreement Order Generation is available for customers who intend to view the sales document as an attachment from notifications within the OM Approval workflow. The workflow process submits a concurrent request to generate the PDF for the transaction and saves it as an attachment.
This subprocess is included as a part of the OM Negotiation header workflow, but is not seeded in a flow. Insert this subprocess into your Negotiation-Generic with Approval flow before the Approval process to generate the attachments and also view these attachments from the workflow approval notification.
Related Topics
Oracle XML Publisher Report Designer's Guide.
Oracle XML Publisher Administration and Developer's Guide.
XML Publisher Multi-Language Support
Prior to version 5.5, Oracle XML Publisher only supported one language, so you would have to create a different template for each language. Now you can use one template for different translations.
Note: Currently, only the RTF template supports multilingual translations.
The boilerplate text within a template can be extracted, translated, and then merged back into the original template, creating a translated version that preserves the layout. The translated text for each language is stored within database tables so it may be reused or exported later.
To use the Multiple Language Support (MLS) support for RTF templates you must check a check box on the Template Detail page in XML Publisher for XMLP to generate XLIFF files for the boilerplate text. You can download the template and along with it the XLIFF files for each language from ARU.
XML Publisher technology is based on the W3C XSL-FO standard to transform XML data into an GET DEF FO object; this contains both data and formatting information that can then be further transformed to an output format such as PDF.
Using programs like Adobe Acrobat and Microsoft Word you can create and maintain report formats based on development delivered XML extracted data. XML Publisher then converts these documents to the XSL-FO format. Note: When developing a template for multilingual applications, you must avoid any references to area specific information.
You can also obtain 3rd party PDF forms for example government tax forms and merge XML data to populate the forms prior to printing.
Number Formatting
To format a number field correctly, the data type and the number format mask must be specified according to the guidelines described below. Both data type and format mask are set as the properties of a text form field. There are two ways to specify format mask for number:
-
Using Microsoft number format mask
-
Calling format-number function with Oracle number format mask
Only one method above should be used. In the case where format masks are specified in both places, the data will be formatted twice using Oracle format mask and Microsoft format mask and unexpected behavior will occur.
Although the current internationalization library (I18N lib) should work properly with Microsoft format mask listed by MS Word today, I18N development team (IPG) does not have any plan to track them in the future. Also when users specify Microsoft format mask by hand, it is not clear if the I18N lib truly support all masks Microsoft provide.
However, according to XML Publisher product management, the templates will often be customized by customers; thus the recommendation here is still to use Microsoft format mask for ease of use by customers.
Group separator and decimal separator will be set at runtime based on the template locale. This is applicable for both Oracle format mask and Microsoft format mask. Including currency in the Microsoft format mask, e.g.¥#,##0.00;(¥#,##0.00) is strongly discouraged because data will be based on that currency all the time. In Oracle format mask, eg. L999G999G999D99, L will be replaced by the currency symbol based on the locale at run time.
“%” should not be included in the format mask because it will fix the location of the “%” sign in the number display, while “%” could be at the beginning or at the end of a number depending on the locale.
Please refer to the Oracle XML Publisher User’s Guide for more information on supported Microsoft Number Format Mask.
Please refer to the Oracle XML Publisher User’s Guide for more information on supported Oracle Number Format Mask.
Translation
A translation unit is a translatable text paragraph in the template. Some Translation Units are:
-
id: The id is a hash value of the source string
-
maxbytes: always set to 4000 (Hyperhub limit)
-
maxwidth: Value will be 150% more than the number of characters in the source string, or 15 characters more than the source string, whichever is greater.
-
translate: Will be set to No if:
-
Source string is empty
-
Source string contains an underscore character "_"
-
Source string doesn't contain any alphabets.
-
-
tokens and prop-group:If there are untranslatable elements within the source string (code/graphics/etc.), they will be replace with a token with the <source> element. Their value will be placed in the ora_reconstruction prop-group, which cannot be translated.
Internal Sales Orders
Overview
The Internal Requisition/Internal Orders process is used for requesting and transferring material from one inventory or expense location to another. An Internal Requisition is initiated in Oracle Purchasing. Sourcing rules can automatically determine if the source type is to be Inventory or an external supplier. Order Management receives information from the Purchasing Application to create an Internal Sales Order. When the sales order is shipped (to indicate either intra or inter-organization movement of goods), the requisition can be received to record receipt of goods.
The Source Type attribute on the requisition line controls whether a line will be fulfilled internally or purchased from a supplier. A source type of Inventory indicates an internal order. Order Management is seeded with an Order Source of Internal, to identify lines created from internal requisitions. The internal requisition id is stored in the Original System Reference column on the order header of the Internal Order. It is not possible to manually enter Internal Orders using the Order Management user interface – these orders must come in via Order Import.
The internal order is processed in a similar way as an order that is to be shipped to an external customer. There is close integration between Order Management and Purchasing in the internal order processing functionality.
Setup
The following setup steps are required to process Internal Orders:
Customers
Set up a customer/address in the shipping operating unit to represent the receiving operating unit. Additionally, set up a supplier/site in the receiving operating unit to represent the shipping operating unit.
Because internal orders are processed through the sales orders window, corporate locations that receive product from internal orders must be set up as customers. Create customer records to correspond to internal locations, and link them using location associations on the Customer bill-to site usage.
Items
Set up the items you want to allow on Internal Orders with both the Internal Orders Enabled flag and the Internal Ordered Item flag on. Enable the item in both the source and the destination organizations
Order Transaction Type/Line Transaction Type
You do not have to set up special order transaction types or line transaction types for Internal Orders. You do have to specify in your Purchasing setup what order transaction type you are using for internal orders, however. You can use any generic order transaction type for internal orders.
Shipping Network
You have to set up relationships and accounting information between the Source (From) and the Destination (To) Organization. You must set "Internal Order Required" to "Yes."
Note: If you use a Transfer Type of "Intransit," then you need to explicitly receive using the Enter Receipts screen. This is a standard receipt. If you use a Transfer type of "Direct," then the goods are shipped directly to Inventory. This is Direct delivery. Receipt Routing can be Standard or Direct.
Defaulting Rules
Analyze your business process and define defaulting rules for Internal Order defaults.
Processing Constraints
Seeded processing constraints in Order Management prevent changes to the Customer, Ship To, Invoice To, Warehouse, Request Date, Source Type, and the Ordered Quantity for internal lines. If you want to further restrict what can be changed on internal orders, you can constrain other attributes using the Internal Order validation template.
Order Source
An order source (for Order Import) of Internal is seeded. This should be selected in the Purchasing options setup for Order Source.
Price List
A price list needs to be defaulted during order processing but there is no validation during the internal order process. This price list must be associated with the customer address setup earlier. The items are transferred at their cost as defined in the source organization; this is the value that appears as the unit price on an internal requisition. On the internal sales order the value displayed is the cost as defined in the source organization plus any transfer charges.
Note: General Ledger distributions generated is based on their cost as defined in the source organization.
Process Steps
-
Enter Requisition in Oracle Purchasing. Sourcing Rules may set source type attribute to Inventory, or manually choose Inventory source type.
-
Approve the Internal Requisition.
-
Run the Create Internal Sales Order concurrent program in Purchasing to load the Order Import tables. This can also be scheduled as part of your set up to run periodically to meet business needs.
-
Run Order Import with Order Source = Internal in OM to create the Internal Order. Be sure to run Order Import using a responsibility that corresponds to the operating unit in which the internal order needs to be created. It is possible to create an internal order in an operating unit different from that of the internal requisition. This can also be scheduled as part of your set up to run periodically to meet business needs.
-
After Order Import completes successfully, book, pick and ship the internal order.
-
Receive against the Internal Requisition.
Workflow
There are no special Oracle Workflow implications to processing Internal Orders, the Standard Flows can be used. Even if the workflow contains a step for Invoicing Interface, Internal Order lines will not be invoiced.
Note: RMA functionality is not supported for Internal Sales Orders.
Synchronizing Changes between Internal Requisitions and Internal Sales Orders
After you create an internal sales order, you might want to make changes to either the Internal Requisition or Internal Sales Order. In such a situation, Order Management and iProcurement/Purchasing need to ensure that the changes that you make in the Internal Requisition are also updated in the Internal Sales Order and vice versa. In the event an Internal Requisition or Internal Sales Order is cancelled, the complementary document will also be cancelled.
Possible modifications to the approved Internal Requisition include:
-
Changing the Need-By Date
-
Changing the Quantity field
-
Cancellation of approved Internal Requistion/Line
Possible modifications to the Internal Sales Order include:
-
Changes to Scheduled Ship Date or Arrival Date
-
Changes to Ordered Quantity on the Internal Sales Order line
-
Cancellation of Internal Sales Order
The following table outlines the changes that are synchronized between the Internal Requisition and Internal Sales Order:
| Document Type | Change | Conditions | Result | Other Considerations |
|---|---|---|---|---|
| Internal Requisition | Quantity field value. It should trigger re-approval based on the tolerance limits defined. | Requisition should be Approved; Sales Order should be Entered / Booked; Sales order Line up to “Awaiting Shipping” status (Delivery details should not be pick released). | Quantity is updated in Internal Sales Order. | If the quantity changes on the internal requisition line are approved, the updated quantity on the Internal Requisition line should get propagated to the internal sales order line. The Hold from the Internal Sales Order line gets released. If the Quantity changes on the internal requisition line are not approved, the IR line quantity shouldn’t change, but the Hold from the ISO line gets released. Message that is displayed: Ordered Quantity, Supply Picture and Corresponding Internal Requisition line has been updated. |
| Internal Requisition | Need-by Date / Request Date: You can update the date to a future date only. | Requisition should be Approved; Sales Order should be Booked; Sales Order Line should be upto Awaiting Shipping Status. | The Request Date on the ISO line gets updated to the New Need By date on the IR line. This triggers rescheduling and Scheduled Ship Date/ Arrival Date in the Internal Sales Order are appropriately changed.c | Provide a reason for the change. If the reason code is not provided, then an error message is displayed: Enter reason for change request.Before you approve the changes, the order line goes on hold and the Order Management processing constraints validate the changes. The changes are updated only if the validation (processing constraints) and subsequent approval take place. |
| Internal Sales Order | Change to Scheduled Ship Date / Arrival Date : You can update the date to a future date only. | Profile option POR: Sync up Need by date on IR with OM, set only at site level: If Yes, then Need By Date on the Internal Requisition Line gets updated with the new Scheduled Arrival Date on Internal Sales Order line. if No, then the changes are not updated. | Need-by Date on Internal Requisition should be updated to the value of the changed Scheduled Ship Arrival Date on Internal Sales Order line. | |
| Internal Requisition | Cancellation of Internal Requisition/Line. | You can select the requisition header / lines to cancel; You need to provide a reason for cancellation. | The Internal Requisition / Line and corresponding Internal Sales Order / Line are cancelled. | The internal sales order is cancelled only when Order Management processing constraints allow the order to be cancelled. |
| Internal Sales Order | Cancellation of Internal Sales Order / Line. | The Internal Requisition / Lines are cancelled automatically. | The Internal Sales Order / Lines and corresponding Internal Requisition / Lines are cancelled automatically. | |
| Internal Sales Order | Support multiple order types for internal sales order | The order type field can be Null on the Purchasing Parameters definition form.If the order type is null, then the Create Internal Orders concurrent program populates the Order interface table with order type as NULL. | If the Order Type field is Null in the OM interface tables for an internal order, then Order Import uses the Order Management defaulting rules to default the Order type based on Customer/ Ship To/ Bill To or any other definition specified in the defaulting rule setup. | |
| Internal Requisition | Urgent Flag | Set the Profile Option POR: Urgent Flag on Int Req maps to shipping Priority with a value of expected shipment priority on the ISO line. If the Urgent Flag field is unselected, the Shipment Priority field gets a default value from the defaulting rules | The ISO line corresponding to the IR line with the Urgent Flag checked should have the Shipment Priority as mentioned in the profile option. | SHIPMENT_PRIORITY_CODE (Quickcode) has 2 seeded values: High and Standard. This lookup is extensible. |
Support multiple order types for internal sales order
The order type field can be Null on the Purchasing Parameters definition form.If the order type is null, then the Create Internal Orders concurrent program populates the Order interface table with order type as NULL
If the Order Type field is Null in the OM interface tables for an internal order, then Order Import uses the Order Management defaulting rules to default the Order type based on Customer/ Ship To/ Bill To or any other definition specified in the defaulting rule setup.
Urgent Flag on the Internal Requisition
Set the Profile Option POR: Urgent Flag on Int Req maps to shipping Priority with a value of expected shipment priority on the ISO line. If the Urgent Flag field is unselected, the Shipment Priority field gets a default value from the defaulting rules. The ISO line corresponding to the IR line with the Urgent Flag checked should have the Shipment Priority as mentioned in the profile option.
Note: SHIPMENT_PRIORITY_CODE (Quickcode) has 2 seeded values: High and Standard. This lookup is extensible.
Setup Considerations
A seeded processing constraint in Order Management prevents update of Ordered Quantity on an Internal Sales Order line. This processing constraint has been made a non-system constraint so that you can enable or disable this processing constraint as per your business requirement.
A seeded processing constraint in Order Management prevents update of Request Date on an Internal Sales Order line. This processing constraint has been made a non-system constraint so that you can enable or disable this processing constraint as per your business requirement. If you change the Need-By Date in the Internal Requisition, and if this processing constraint has been disabled, the Request Date will update to the value of the Need-By Date.
If you do not have iProcurement installed you can still update and synchronize changes to the Internal Requisition using Purchasing. The updates are available when you navigate to an Internal Requisition in the Requisition Summary window and select the Change icon.
When changes are made to the Need-By Date, Quantity or if the internal requisition/internal sales order is cancelled, then an FYI notification is sent either to the requesting organization or the fulfillment organization. Additionally, a notification should be sent to the Planner of the item in the fulfillment organization. If there is no planner defined for that item in the fulfillment organization, then there shouldn’t be any notification sent to the fulfillment organization. The planner for an item in an organization can be found out by querying directly on Item master.
You can specify Auto Approval tolerances for Internal requisitions. The two kinds of changes that you can set Auto Approval tolerances for are Quantity and Need by date.
Integration with Planning
Purchasing lets you import or reschedule internal requisitions from other Oracle systems. ASCP automatically creates requisitions using Requisition Import when you mass load internal requisitions. ASCP also automatically reschedules existing requisitions by updating the need-by date/ quantity during this process.
Related Topics
Oracle Purchasing User's Guide for details of Purchasing set up and processing.
Enhanced Intercompany Invoicing for Internal Sales Orders
Setup
You can generate Intercompany Invoices for Internal Sales Orders which have a Transfer Type of "Intransit." In order to use this feature:
-
Setup Intercompany Invoicing See the Oracle Advanced Pricing Implementation Guide and the Oracle Inventory User's Guide for more information.
-
Set the profile option INV: Intercompany Invoice for Internal Orders to "Yes." This profile option can be set at the site level and has a Default value of "No."
If you have Advanced Pricing installed you can derive the intercompany invoice price for an item:
-
Set the profile option INV: Intercompany Invoice for Internal Orders to "Yes." This profile option can be set at the site level and has a Default value of "No."
-
Set the profile option INV: Advanced Pricing for Intercompany Invoicing to "Yes." This profile option can be set at the site level.
Integration of Advanced Pricing and Intercompany Invoicing
Case 1
-
INV: Intercompany Invoice for Internal Sales Orders is set to 'Yes'
-
INV: Advanced pricing for Intercompany Invoice is set to 'Yes' and Advanced Pricing is installed
Intercompany Invoicing will look for an external API—a customer/user programmable hook—to return the price for the item included on the Internal sales order. If the API does not return a value then pricing logic gets the price from the price list. If it is able to find the price for that item in one of the price lists then Intercompany Invoicing uses that value. If it is unable to find the correct price for that item then the Intercompany Invoicing process logs an error message.
Case 2
-
INV: Intercompany Invoice for Internal Sales Orders is set to "Yes"
-
INV: Advanced Pricing for Intercompany Invoice is set to "No"
The pricing logic gets the price for the item from the static transfer price list that has been specified for that customer (Internal) in the Customer setup. If there is no price defined then an error message is logged.
Advanced Pricing setup allows you to define different rules based on which price list should be used to get the invoice price for an item. New Request Type, Global Structure, Context and a new set of Qualifier and Pricing Attributes are seeded.
Implementation Considerations
If you want to use Advanced Pricing feature for Intercompany Invoicing, you have to set the following profiles at the user level with the following values: QP: Pricing Transaction Entity - Intercompany Transaction, QP: Source System Code - Oracle Inventory. This will allow you to see and use the Intercompany context, in addition to the Order Fulfillment context to define attribute-mapping rules.
Two new mappings/relationships between request type and source system codes have been seeded. One is between request type IC and source system INV, and the second is between request type IC and source system QP. The request type IC and Source system INV are new set of seed data. The above two mappings allow you to have price lists that are common to both inter-company invoicing and sales order invoicing. For trade orders, price lists are created with source system code of "QP," and the mapping between OM (Oracle order management system) and QP (Advanced pricing) is used to pick price lists for trade order invoices. Similarly, inter-company users may decide to create separate price lists for intercompany invoicing, that is with source system code of INV. This can be achieved by setting the profile "QP: Source system code" to INV.
In order to use only these prices lists for inter-company invoicing, the mapping between IC and QP should be disabled, otherwise if pricing engine finds a better fit for the price list defined under QP, it will return use that price list.
A new global structure has been defined that can be used to define mapping rules for qualifier attributes and pricing attributes for price lists. This global structure is based on all the information that is captured and available in a sales order or an internal sales order record. All seeded defaulting rules are defined by using this global structure. Users can use the data in this global structure to define more mapping rules.
Related Topics
Oracle Advanced Pricing Implementation Guide
Oracle Advanced Pricing User's Guide
Setting up Intercompany Invoicing
Oracle Inventory Implementation Guide
Intercompany Invoicing
You can view intercompany invoices for internal sales orders on the sales orders window (Actions > View Additional Line/Order Info > Invoices / Credit Memos) There is no provision for internal sales order to be invoiced using ‘Invoice Interface - Line’ workflow activity. Order Management extracts data from the Accounts Payables and Accounts Receivables tables to display the data in the Invoices / Credit Memo tab for internal sales orders. If the value of the profile option OM: View Intercompany AR invoice is set to Yes, you will be able to view Intercompany invoices for internal sales orders. The other options are No or Null.
Process Steps
-
Requesting (Receiving) Operating Unit—Purchasing: Create Internal Requisition with Source organization and Destination organization. Approve the internal requisition
.
Note: The destination inventory organization must be a part of a separate operating unit such as the Shipping Operating Unit in order to trigger Intercompany transactions.
-
Requesting (Receiving) Operating Unit—Purchasing: Launch the Create Internal Sales Order program
-
Shipping Operating Unit—Order Management: Import the Internal Sales Order. Pick and Ship confirm the Internal Order
-
Requesting (Receiving) Operating Unit—Purchasing: Perform a Receiving transaction.
-
Source Organization—Inventory: Run 'Create Intercompany AR Invoice' for the Shipping operating unit
-
Shipping Operating Unit—Receivables: Run ' AutoInovice Master' program for the internal order with Invoice Source as "Intercompany." This generates the accounts receivable invoice for the Shipping Operating Unit.
-
Destination Organization—Inventory: Run "Create Intercompany AP Invoice" for the Requesting (Receiving) Operating Unit
-
Requesting (Receiving) Operating Unit—Payables: Run the Expense Import program with source "Intercompany."
Intercompany Invoicing Incoming Cost
When using Intercompany Invoicing for Internal Sales Orders you can allow the Incoming cost for the Destination organization to be based purely on the Transfer price and not the item cost from the Source organization. In order to use this feature you must:
-
Setup Intercompany Invoicing for Internal Sales Orders. See the Oracle Advanced Pricing User's Guide and the Oracle Inventory User's Guide.
-
Set the profile option CST: Transfer Pricing Option to "Yes - Price As Incoming Cost"
-
If it is set to "Yes - Price as Incoming cost" or "Yes - Price Not As Incominng Cost," new accounting entries are generated in Costing. When set to 'Yes - Price Not As Incoming Cost' - incoming cost to the Destination organization is the Source organization inventory cost.
-
If it is set to "No" then existing costing entries occur.
-
Both Inventory Cost of Goods Sold Account and the profile OM: Generate Cost of Goods Sold Account workflow processes must be defined.
Process Steps
Follow the Process Steps described for Intercompany Invoicing. In addition you may need to launch the Cost Manager to cost the transactions once you have performed the Receipt transaction in the Requesting (Receiving) Unit.
Related Topics
Oracle Costing Implementation Guide
Returns and Credits
Overview
Oracle Order Management provides Return Materials Authorization (RMA) functionality within the Sales Orders window, where you can enter both standard and return order lines within the same order. RMA is often used interchangeably with Return or Credit Orders and Returned Material. An order can have a mix of outbound (standard) and inbound (return) lines, as restricted by the order type definition. Credit order types can have an order type category as Return or an order with both standard and return lines can have an order type category as Mixed. Each order type and each line type is associated with a workflow process. A return line is indicated by Line Type Category of return negative and highlighted item quantity and negative line total. Return Line types can include flows like Return with Approval, or Return for Credit Only, etc.
There are three ways to create RMA's within Order Management. First, identify a sales order to be returned and query the order lines. After you have selected the sales order or order lines, use the Copy function in the Actions list to generate the return order or line by specifying an RMA line type. Second, reference a sales order, invoice, PO number or serial number of an item directly in the Return Reference field within the Line Items tab of the Sales Orders window. Lastly, for return without originating sales order line, manually enter return line information and choose the appropriate return line type in the Sales Orders window.
Setup
Profile Options
OM: Return Item Mismatch Action
This profile allows a mismatch value between the item on the RMA line and the item on the referenced line. For example, you may need to allow a mismatch when a wrong item is shipped and you want to put the correct item on the RMA line. The seeded value is Allow or no profile option entry will be treated as Allow.
OM: Return Unfulfilled Referenced Line Action
This profile allows non-fulfilled lines to be used as referenced lines. The seeded value is Allow or no profile option entry will be treated as Allow.
OM: Overshipment Invoice Basis
This profile option has been moved to System Parameter. For more information, please refer to the section Profile Options that have been moved to System Parameters.
OM: Credit Memo Transaction Type
This profile option has been moved to a System Parameter. For more information, please refer to the section Profile Options that have been moved to System Parameters.
OM: Over Return Tolerance
This profile option indicates the percentage by which a return line can be over-received. Any value greater than or equal to zero (0) is a valid value. This profile option is set at the site level. The default value is zero (0).
OM: Under Return Tolerance
This profile option indicates the percentage by which a return line can be under-received for it to be considered fulfilled. Any value between zero (0) and 100 (both inclusive) is a valid value. This profile option is set at the site level. The default value is zero (0).
OM: Charges for Back Orders
In previous releases, Calculate Price Flag on the split (back order) lines was set to Freeze Price always. Now in the current release, for return lines that are split, this profile option enables you to control the setting of the Calculate Price Flag to calculate, partially calculate or freeze the price. If the Calculate Price Flag is set to Partial, no repricing is carried out and only charges can be applied for return lines. If the Calculate Price Flag is set to Freeze, the return lines are not priced. For a value of Calculate, the return lines are priced.
Workflow
Order Management comes with seeded Oracle Workflow processes. Review the seeded flows, activities and notifications to determine if the seeded data can meet your business needs. To successfully enter an RMA in OM, you can use the Generic - Order Flow Return with Approval and Line Flow - Return for Credit only.
Note: For Mixed Order types, if the workflow attached is Order Flow Return with Approval, then notifications are sent to the users only if the order contains return lines.
The user can also modify existing seeded workflows or create new workflows to include or exclude inspections and/or invoicing activity. For instance, you can have the Invoicing Activity after the Receiving activity, or you can simply close the line without interfacing data to Receivables. For inspections, a workflow can be setup to process Invoicing once the materials have been received or to wait until inspection has been completed before invoicing is invoked. The seeded workflow will process Invoicing only after the completion of Inspection (delivery) Activity. Also, if any return lines are flagged as non-shippable or non-transactable, the Receiving workflow activity will complete with a Not Eligible result.
However, fulfillment of ATO/PTO items is required before crediting the ATO/PTO lines. This is achieved by inserting ATO/PTO lines into Fulfillment sets. This means the ATO/PTO line will wait at fulfillment until all its children are received and reach fulfillment. ATO model line workflow waits until the configured line is shipped and then it progresses further no matter whether it is PTO and ATO or only ATO or PTO. With services, OM will use only the seeded "Return for Credit Only" workflow for returning service items when product items are returned. Now, Order Management will use the RMA line to govern full or partial credit to the customer when a product is returned. Install Base will use the information from the RMA product line to determine whether a credit is given.
Transaction Types
Both order and line transaction types need to be setup in order to process an RMA. When setting up order types, you need to assign order header and line workflows to the order type. Since each line can go through its own flow process, you need to setup workflow assignments to let each line assign its own workflow process. Credit order types have an order type category Return. An order with a Mixed order type category can contain both standard and return lines. Line level workflow processes are assigned based on the order type, line type, and item type combination. When you setup a return order type or mixed order type, you have the option to set a default return line type, so that the user doesn't have to manually choose the line type unless they want it to be different. Refer to the topical essay Using Transaction Types in Oracle Order Management at the end of this manual for details on setting up transaction types.
Master Items
You can create a return line only if an item is Returnable. Therefore, a standard, finished good item should be defined in Oracle Inventory with appropriately set attributes. The best way to create your items is to copy them from the Finished Good seeded template and set additional attributes as needed in the Master Item window. The key attributes that control the processing of a returnable item are:
-
Order Management Tab: Returnable, Shippable and Transactable = Yes, RMA Inspection Required = Yes or No
-
Receiving Tab: Receipt Routing = Inspection (if required)
-
Invoicing Tab: Invoicable Item = Yes or No, Invoice Enabled = Yes or No
Note: If the Item is not flagged as Returnable, Shippable and Transactable, you cannot receive in Oracle Purchasing's receiving module and if the item is not flagged as Invoicable the return lines will not interface to Receivables. Also, an item can be returnable but not orderable. This is commonly used if a company stops selling an item, but they still want to be able to do returns for it.
For lot and/or serial controlled items, Oracle Order Management has the capability to store one or more lot and serial numbers associated with one RMA line. Oracle Order Management does not validate the serial numbers against Inventory serial numbers in the system or against serial numbers associated with the referenced sales order. Receiving captures the serial numbers of the items at delivery. The Credit Order Discrepancy Report can show the difference between actually delivered lot/serial numbers and the numbers on the RMA. The sales orders window can capture lot and serial numbers suggested by the customer for the RMA line.
For ATO/PTO configurations, only the Returnable configuration lines are displayed on the sales orders window. You need to make sure that the item attributes are set correctly for ATO/PTO children items.
Price List Setup
In order to price any new items when entering an ordered item on the sales orders window, add the new item to a price list. The item is added to a price list in the Price List Setup window: Pricing > Lists > Price Lists Setup. Query an existing price list or create a new price list. Add a new line, enter the item name, UOM and price and save. The price and UOM will default when entering the item on the order line. When an RMA line is created and the originating transaction is known, the pricing information is populated from the originating order line. The user can change the pricing if needed. The list of values on the Price List will show all the active price lists on the pricing date. Also, ATO configured items and PTO included items should be included on a price list in order to be received and credited.
Processing Constraints
Order Management has seeded constraints that prevent data integrity problems. For instance, you can prevent change for a line if it has been:
Closed
Canceled
Canceled at order level
Shipped
Invoiced
A return line cannot be canceled after it has been interfaced to Receivables or after it has been received. If your business needs more restrictive rules when processing orders, you can set up rules to control changes or operations of the order process flow. See Processing Constraints for details on setting up processing constraints.
Return Reason Codes
You can set up your own reason codes in the Receivables QuickCodes window. Navigate to the Order Management responsibility and select the menu: Setup > Quickcodes > Receivables. The Oracle Receivables Lookup window will appear. Query the CREDIT_MEMO_REASON code from the query manager (Flashlight icon). View the existing codes or add a new code. These codes appear in the Return Reason list of values.
Reports
The Returns by Reason report can be used to view all return reasons setup in the system. You can run the report by Return Reason, Credit Order Date, Credit Order or Line Type and/or Item Number.
Freight and Special Charges for Returns
When setting up freight or special charges, you can specify if the charge is returnable, meaning the charge may be refunded. When you create a return line from an original order line, you should copy the refundable invoiced charges. You can also setup special charges to be applied specifically to returns, like restocking fees, return handling, damage etc. You can set this through an attribute called Refundable Flag (Include on Returns field) within the Pricing Modifier setup. See Freight and Special Charges for more information.
Process Flow
This section will guide you through a basic flow for a Return for Credit with Receipt, from entry to generating a credit memo, including:
-
Create an RMA having a single line whose originating transaction is unknown
-
Book the RMA
-
Receive the RMA using the Receipts window of Oracle Purchasing
-
Check the on-hand quantity of the item in Inventory to verify that correct quantity was received
-
Fulfill RMA line
-
Generate a Credit Memo
-
View the Credit Memo in Order Management
-
Check the Shipped and Fulfilled quantity on the RMA line
-
Enter the RMA on the Sales Orders window. Entering a return on the Sales Orders window is exactly the same as entering an order, except at the line level the user specifies the Line Type as a Return and a negative line quantity. Thus, in the Order Information tab of the Sales Orders window, the user will enter the same information (i.e. Customer Name, Order Type, etc.) as a standard order. The Standard order type is assigned to a Generic Order and Line workflow which allows either an order or return to be entered. Refer to the Workflow section for details on the Generic Order and Line workflow for returns. This is the Sales Orders window for entering the Header information for the RMA:
Sales Orders (Header) window for Returns
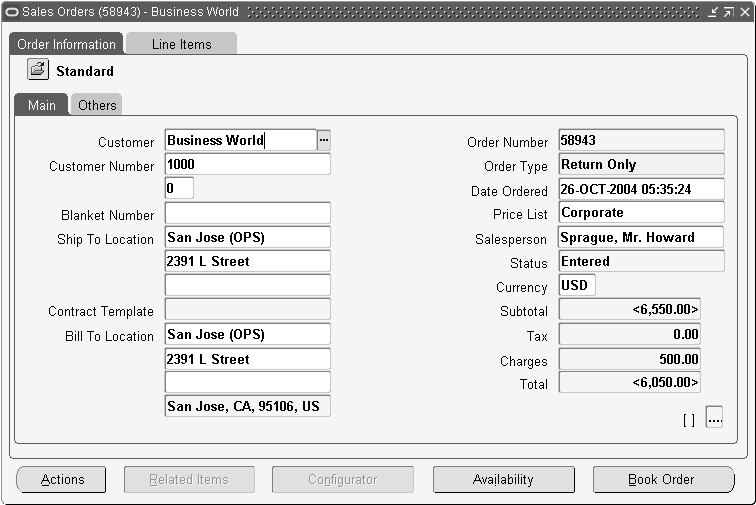
-
Once the Order Header information is entered, you will enter the line information within the Line Items screen:
Line Items Window
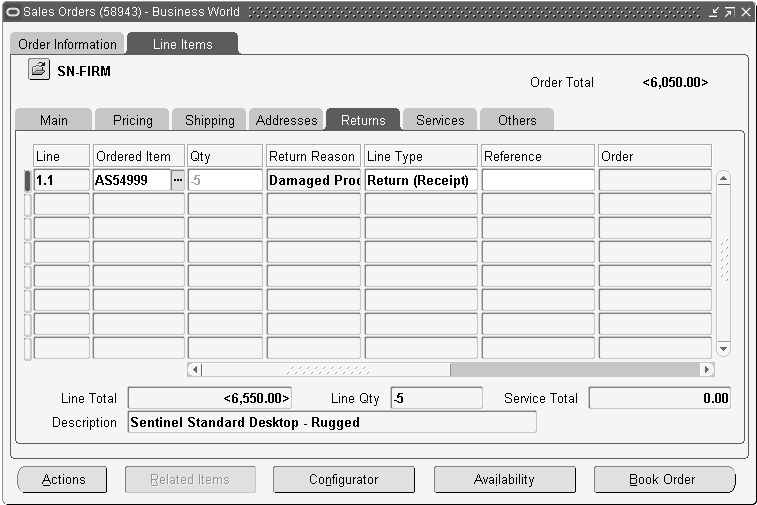
-
In the Main Tab, enter the Ordered Item and the Quantity to be returned. The user can enter a positive or negative number. You will also see that the negative quantity will be highlighted in another color. Next, in the Returns tab, the user will need to enter the Line Type as a return (i.e. Return for Credit with Receipt of Goods) and enter a Return Reason. A Return Reason is required to be entered (i.e. Product Discontinued). Since we did not reference a sales order, we are entering a single line RMA where the originating transaction is unknown.
If you receive the returns partially, and if the Calculate Price Flag is set to Y (Calculate Price) or P (Partial Price), then freight charges get applied automatically on the partially received lines. However if the Calculate Price Flag is set to N, then the freight charges do not get applied on the partially received lines.
-
Book the RMA. Users are able to book an order or return at either the Order Information Tab or Line Items Tab via the Book button.
-
Receive the RMA using the Receipts window in Oracle Purchasing. Change responsibilities to Purchasing and navigate to the Receiving > Receipts window. In the Find Expected Receipts window, an Organization window will be displayed if this is the first time you have navigated to the Purchasing > Receipts window since your login. The organization you choose should be the same warehouse where your RMA is created. In the Receipt Header window, select the Customer Tab and find your RMA #. Tab through the Header window to the Receipts Line window. Once you are in the Receipts Line window, the RMA number and quantity will populate the window. Check the box next to the line you wish to receive, enter a Destination Type as Inventory and subinventory. Save this transaction and record the receipt number in the Header window. By choosing the Destination Type as Inventory, the user is creating a transfer to inventory transaction in Purchasing. These items are now considered as supply. Purchasing will communicate the quantity received to Order Management to update the RMA.
Receipt Header Window
Receipts (Line) Window
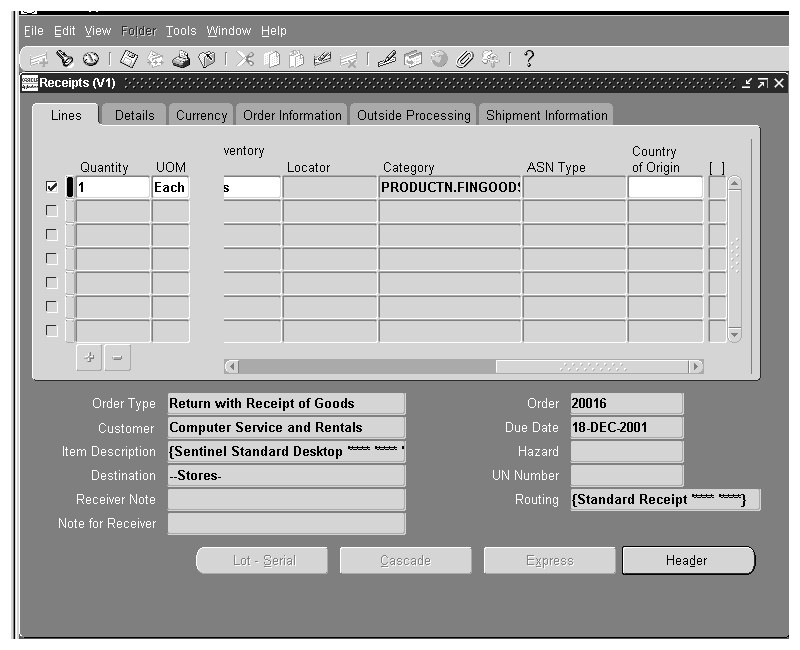
-
Check the on-hand quantity of the item in Inventory to verify that correct quantity was received. Change responsibilities to Inventory and navigate to the Transactions > Material Transactions window. In the Material Transactions window, an Organization window will be displayed if this is the first time you have navigated to the Inventory > Material Transactions window since your login. The organization you choose should be the same warehouse where your RMA is created. Find the item being returned and navigate to the Transaction Type tab. Verify that the source type is RMA and the source is your RMA # for the quantity being returned. This window will show you your item #, the subinventory chosen and the quantity specified to be returned from the Receipts window.
Material Transaction Window

-
Fulfill RMA line. The fulfillment activity acts as a synchronization point for all lines on the order that are in a fulfillment set. The lines in the fulfillment set will wait at the fulfillment activity until all the lines in the set have reached the activity. Lines that are not in a fulfillment set simply pass through the activity automatically. The user will not have to perform anything during this step. The eligible lines will automatically be put into a fulfillment set.
-
Generate a credit memo for the return. The Workflow process of the return line(s) will be on the Invoice Interface activity, once the Fulfillment activity completes. The invoice interface activity places the information from the return line into the Receivables Interface tables. Once the information is written to the tables, the invoice interface activity is complete, and the line proceeds to the close line activity. However, note that the credit memo is not actually generated until the Autoinvoice program in Receivables has been run. The credit memo will then be viewable in the Sales Orders window. To run the Autoinvoice program, the user needs to change responsibilities to Receivables and navigate to the Interfaces window. Select the Autoinvoice Master program and run the program for your RMA # and specify the invoice source as the one associated with the line type of the RMA line. The Autoinvoice Master program will generate the Autoinvoice Import program which generates the credit memo. These programs can be setup to run automatically in the background. Just set the programs as 'Deferred.'
-
View the credit memo in Order Management. To view the credit memo in Order Management, the user need to change responsibilities to Order Management > Orders, Returns > Order Organizer window. Query your RMA # in the Order Organizer. Once the RMA is queried, open the RMA order, click Actions and choose Additional Order Information. Once the Additional Order Information window has opened, click on the Receivables tab to view the credit memo. This window will show your the credit memo number and amount.
-
Check the Shipped and Fulfilled quantity on the RMA line. From the above step, navigate in the Sales Orders window to the Line Items tab for the RMA. Scroll to view the Shipped Quantity field. To access the Fulfilled Quantity field, the user needs to use the folder technology to add the field to the sales orders window. To add the field, click on the Warehouse field in the Shipping Tab of the Line Items window. Next, select the Folder menu at the top of the window, select Show Field and choose the Quantity Fulfilled field from the list. The field will populate in the window. The Shipped Quantity means the received quantity for return lines and the Fulfilled Quantity means the delivered quantity for the return lines.
Workflow
In Oracle Order Management, you can have many types of credit order by specifying it's Order Type and Line Type. Each order type and each line type is associated with an Oracle Workflow process. You can customize order types and RMA line types to meet your business needs. For instance, you can use Approvals and Holds with returns in order to manage exceptions when your customer returns more or less than you authorize.
Credit order types have order type category Return'. An order with a Mixed order type category can contain both standard and return lines. But you cannot enter return lines into an order with order type category Regular.
The following is an example of a seeded Order Return Flow process (enter -> book -> approval notification -> close):
Order Flow - Return with Approval

The following is an example of a seeded Order Return Line Flow process (enter -> return-> invoice -> close):
Line Flow - Return for Credit with Receipt
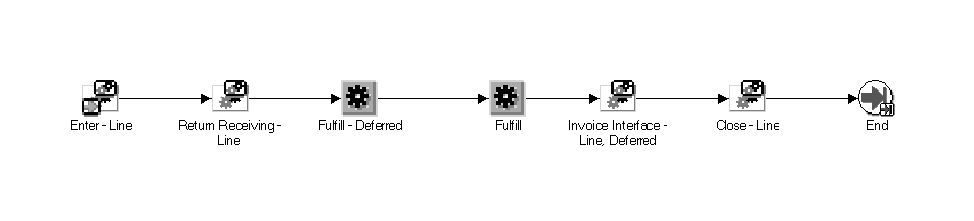
The following are other workflow processes that Order Management seeds for Return Line flows:
Line Flow - Return for Credit only
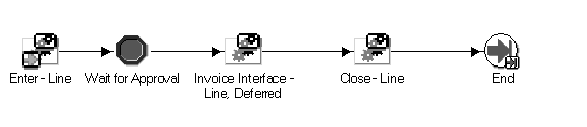
Line Flow - Return for Credit only with Approval

In Oracle Order Management, there are also flows that support both order and return lines (inbound and outbound transactions), however, there are no seeded workflows for these flows. You can create flows that support both Order and Return Lines. For instance, the flow listed below will not work correctly, since once a line is booked, workflow randomly picks which transition to process first. It then processes it all the way till it can go no further. So for an outbound Line using this flow, if the branch ‘Returns receiving' is first processed, it will get marked as Not Eligible and hit the Fulfill -Defer activity and stop. Then the WF Engine starts executing the other branch; the line will schedule and hit the Ship - Line, Manual sub-process, where it will stop and wait to get picked and shipped. However the Background Engine could pick up the deferred activity and execute the Fulfill activity. This activity will error out since the fulfilling event for the order line Ship-Confirmation is not yet complete.
INCORRECT Line Flow - Supporting inbound and outbound shipments
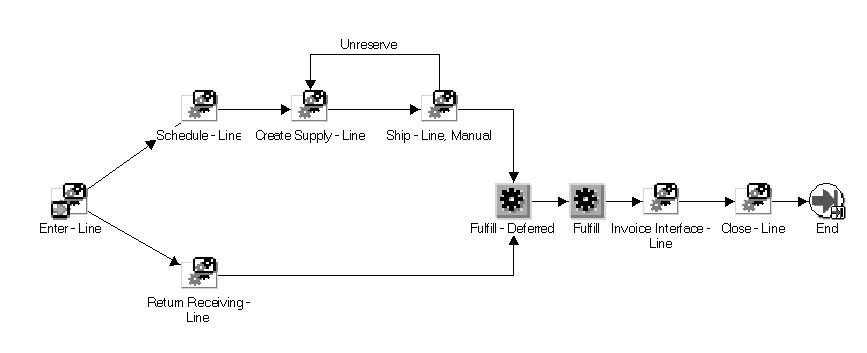
For this flow to work correctly, the flow ensures that only one transition is executed (Order or Return). The flow needs to be defined as follows:
CORRECT Line Flow - Supporting inbound and outbound shipments
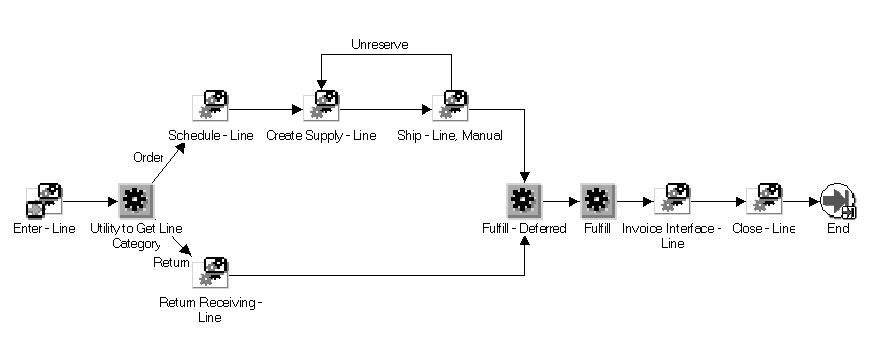
After booking the line flow branches based on the Line Category ensuring that only one of the branches are (Order or Return) executed runtime. The activity Utility to get Line Category is seeded OM: Order Line Work Item.
With regard to item inspections, the Order Management system does not process inspection results, and only processes delivery transactions. Based on the users business rules, if an item is rejected, the user can either deliver to inventory (scrap sub-inventory) or return to the customer. Delivering to inventory will give credit to the customer. Returning to the customer will reduce the shipped quantity and credit will be given for only accepted goods. Therefore, receiving transactions drive the flow of the return and what gets credited.