Requisitions Setup
Requisitions Setup Checklist
Use the following checklist for all setup related to requisition creation and management. The steps are organized by functional area. For example, all steps that concern setting up delivery information on requisitions appear together. This is a checklist of all setup steps in this chapter. These steps appear in a suggested, but not required, order.
| Number | Step | Functional Area | Required or Optional | Information Source |
|---|---|---|---|---|
| 1 | Foreign Currency Support | Shopping | Optional | Foreign Currency Support |
| 2 | Information Templates | Shopping | Optional | Information Templates |
| 3 | Suggested Buyer | Delivery | Optional | Suggested Buyer |
| 4 | One-Time Address | Delivery | Optional | One-Time Address |
| 5 | Purchase Order Grouping for Requisition Lines with One-Time Addresses | Delivery | Optional | Purchase Order Grouping for Requisition Lines with One-Time Addresses |
| 6 | Hazard Information | Delivery | Optional | Hazard Information |
| 7 | Global Requester | Delivery | Optional | Global Requester |
| 8 | Charge Account Displays | Billing | Optional | Charge Account Displays |
| 9 | Expense Charge Account Rules | Billing | Optional | Expense Charge Account Rules |
| 10 | Employee P-Cards | Billing | Optional | Employee P-Cards |
| 11 | Supplier P-Cards | Billing | Optional | Supplier P-Cards |
| 12 | PO Extract for P-Card Reconciliation | Billing | Optional | PO Extract for P-Card Reconciliation |
| 13 | Project Accounting | Billing | Optional | Project Accounting |
| 14 | Grants Accounting | Billing | Optional | Grants Accounting |
| 15 | Favorite Charge Accounts | Billing | Optional | Favorite Charge Accounts |
| 16 | Approvals | Approval | Required if you have not implemented Oracle Purchasing | Approvals |
| 17 | Global Approver | Approval | Optional | Global Approver |
| 18 | Requisition Changes | Requisitions | Optional | Requisition Changes |
| 19 | Requester-Initiated Changes to Purchase Orders | Requisitions | Optional | Requester-Initiated Changes to Purchase Orders |
| 20 | Requisition Cancellations | Requisitions | Optional | Requisition Cancellations |
| 21 | Life Cycle Tracking | Requisitions | Optional | Life Cycle Tracking |
| 22 | Internal Requisitions | Requisitions | Optional | Internal Requisitions |
| 23 | Oracle Services Procurement | Requisitions | Optional | Oracle Services Procurement |
Foreign Currency Support
Each time a requester searches for an item in a catalog, the search can display the currency associated with that item. This currency can be any valid currency defined in the application, including the functional currency. Similarly, users can make a non-catalog request in any valid currency. When these items are added to the shopping cart, the application converts the price for that item into the functional currency using the relevant exchange rate, and then displays the functional currency throughout the application.
The foreign currency feature displays the foreign currency price along with the functional currency price on key windows in the application.
The foreign currency can appear on the following pages:
-
Shopping Cart
-
Approver Shopping Cart
-
Edit Single Account
-
Edit Multiple Accounts
-
Review Charge Accounts
-
Edit Lines - Delivery information
-
Edit Lines - Billing information
-
Review and Submit - expand line details
-
Printer-friendly
-
Approval Notification
-
Approval Notification Reminders
-
Requisitions: click requisition - click Details icon - expand line details
Setup Steps
Decide whether to display the transaction currency price to requesters during checkout. Use Oracle Applications Framework personalization to display or hide the field.
The following table shows the default settings of transaction and functional prices and amounts in the shopping cart:
| Field Name | Personalization Name | Displayed or Hidden by Default? |
|---|---|---|
| Transaction Currency Price | Price | Displayed by default |
| Functional Currency Price | FuncPrice | Hidden by default |
| Transaction Amount | TxnAmountFlow | This field cannot be personalized |
| Functional Amount | FuncAmount and TxnAsFuncAmount | This field cannot be personalized |
If you do not want to accept the defaults for Transaction Currency Price and Functional Currency Price, then use Oracle Applications Framework personalization to change them. For more information, see Personalize Oracle iProcurement Using Oracle Applications Framework.
To apply your changes to the Review and Submit page of the checkout process, apply your personalizations to that page.
Note: The Transaction Amount is hidden if the transaction currency is the same as the functional currency for all lines in the cart. It is visible if there is at least one foreign currency line. The Functional Amount always appears. Personalization does not control these fields.
Information Templates
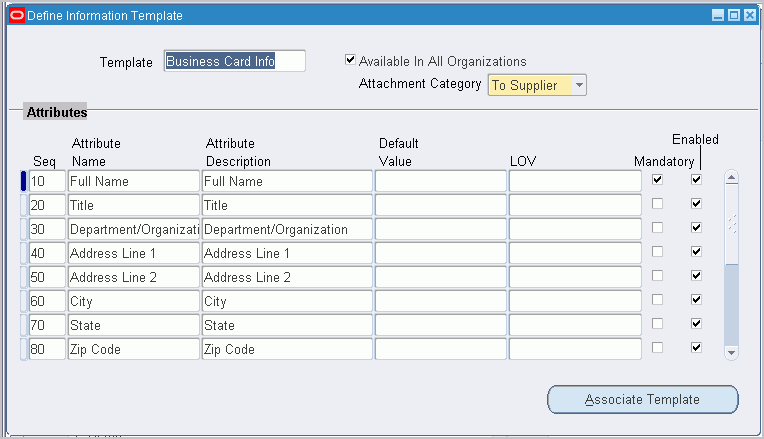
You can set up information templates to gather additional information in Oracle iProcurement to pass necessary order processing information to suppliers. When an information template is assigned to a category or item, the application prompts requesters to provide the information specified in the template when the item is added to the shopping cart. This information becomes a line-level attachment to the requisition.
For example, you can implement information templates for items such as business cards that require additional information (name, address, e-mail address, phone) from the requester. Oracle iProcurement prompts for name, address, e-mail address, and phone number when you order business cards. Each information template must be associated with an Oracle Purchasing item or item category. If an information template is associated with an item category, all items belonging to that category are also associated with the template.
Setup Steps
Create an information template
-
Navigate to the Define Information Template window in Oracle Purchasing.
-
Give your Template a name.
This name appears as a heading during checkout.
-
Select Available in All Organizations to make the template available to requesters in all operating units. Deselect this option to make the template available only to requesters in the same operating unit in which you are creating the information template.
For example, you are logged in with a responsibility that is tied to the Vision France operating unit. If you leave this option deselected, then your information template is available only to users in your French operating unit.
-
Select an Attachment Category of To Supplier or To Buyer.
To Buyer means that the requisition, when turned into a purchase order, displays the information template as an attachment to the buyer. To Supplier means that the information template also is available as an attachment to the supplier.
-
Enter an Attribute Name and Description. The Attribute Description is the actual field prompt that appears in Oracle iProcurement.
Define Information Template Window
If you use Multilingual Support (MLS), you can enter translations for the following fields: Template, Attribute Name, Attribute Description, and Default Value. To enter the translations, select Translations from the View menu. For more information, see the Oracle E-Business Suite User's Guide.
-
Optionally, enter a default value to automatically appear in the field.
For example, for an Attribute Name of Body Color, the default value could be Black.
-
To make the template field to be a list of values from which the requester selects, see the steps for creating lists.
-
Indicate whether the field is mandatory for Oracle iProcurement requesters. If the field is mandatory, requesters must enter a value in the field before proceeding to complete the requisition.
-
Indicate whether to activate the attribute to actually appear in Oracle iProcurement. In certain circumstances, you can define an attribute, but delay enabling it for display.
-
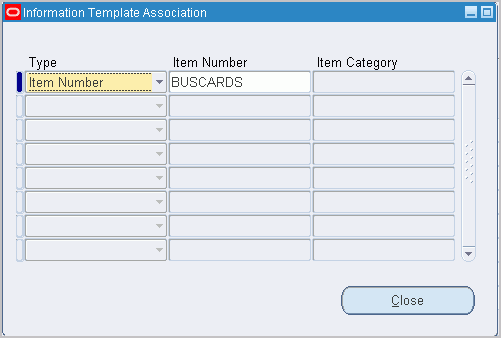
Choose Associate Template to associate the template with an item or item category.
Information Template Association Window
-
In the Information Template Association window select the type of association (Item Number or Item Category) to associate with the template.
-
If you selected Item Number, enter the number. If you selected Item Category, enter the category.
-
Save your work.
Complete these steps to make your template fields a menu of valid values. For example, you create a Country of Origin field. Instead of letting the requester enter any value, you provide a menu that contains only the values Canada, US, and Mexico.
For more information about the following steps, see the Oracle E-Business Suite Flexfields Guide.
-
Log in to Oracle Purchasing.
-
Use the following navigation: Setup > Flexfields > Validation > Sets.
-
Create a flexfields validation set that satisfies the following criteria:
-
Format Type is Char, and Maximum Size is less than or equal to 240.
-
Validation Type is either Independent or Translatable Independent.
-
List Type is any of the provided options.
-
-
Use the following navigation: Setup > Flexfields > Validation > Values.
-
Search for the validation set name that you created and add values to it.
For example, your validation set is Country of Origin, and the values are Canada, US, or Mexico.
-
Access the Information Templates window the preceding instructions for defining information templates describe
-
In the LOV field, select your validation set name.
-
Save your work.
Implementation Considerations
If information templates are created for both the item and a category that it belongs to, then both templates apply to that item.
The information template is also accessible through a Special Information link in the cart, if the requester wishes to update the fields after initially adding the items to the cart.
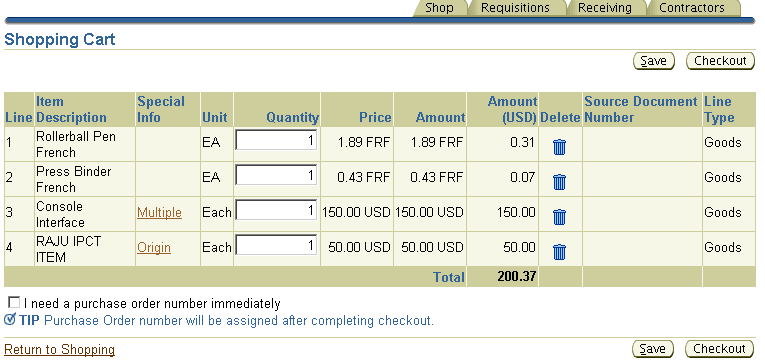
The preceding figure shows how information templates are associated with multiple lines in a cart, through the Special Information column. (The Special Information column appears by default.)
Suggested Buyer
As requisitions are created in Oracle iProcurement, it is possible to indicate the suggested buyer for each requisition and requisition line. You can define a buyer for any of the following:
-
Blanket purchase agreement or quotation
-
Requisition template
-
Item
-
Category
If a buyer is found on any of the preceding items, then it becomes the default buyer in the corresponding purchase requisition based on its position in the document hierarchy. The Oracle iProcurement requester can accept this default or override it based on the list of buyers in the Suggested Buyer field on the requisition. This suggested buyer information is then passed to the resulting purchasing document and may be overridden during the document creation process.
Profile Options
-
The profile option HR: Cross Business Groups lets buyers be the default buyers from other business groups. See Profile Options.
Workflow
-
The Get Buyer process of the PO Create Documents workflow retrieves buyer information for the purchase order when it is being created. For standard purchase orders, this process retrieves the buyer from the requisition line (through the Get Buyer From Req Line function). If no buyer is defined at the requisition level, then the item master, category, source document, and contract are subsequently examined. When a blanket release is created, the process retrieves the buyer from the blanket agreement, regardless of the buyer defined on the associated requisition.
Implementation Considerations
-
When the profile HR: Cross Business Groups is set to Yes:
-
When using the Category to determine the default buyer, Oracle iProcurement spans business group boundaries when selecting the default buyer.
-
The list of values for the Suggested Buyer field crosses business groups, enabling the user to select an employee from another business group as the suggested buyer.
-
One-Time Address
Requesters can specify alternate delivery locations, such as a home address, that are not an office location or other location from the database. This is a one-time address. This feature lets requesters specify the one-time address on a requisition line during the checkout process. The requester can associate the one-time address with specific requisition lines or with all requisition lines on a given requisition. One-time locations appear as line-level attachments on the resulting purchase order.
Setup Steps
To set up a default one-time address:
-
Set up a dummy HR location to use as the deliver-to location on the requisition line whenever the requester specifies a one-time location. When defining this location, it might or might not be associated with an organization. If it is associated with an organization, then you must define a distinct location for every organization. You can set up this location on the Location window, which you can access from the Setup > Organizations > Locations...Purchasing menu.
-
Set the value of the POR: One Time Location profile option to be equal to the name of the location that you created in the preceding step. You can set this profile value at the site, responsibility, or user level.
-
By default, enter the address details. Use Oracle Applications Framework personalization to configure the address so that individual address lines are available. For more information, see Personalize Oracle iProcurement Using Oracle Applications Framework.
Profile Options
POR: One Time Location must be set to a location that has been previously defined in the Location window.
Function Security
You can restrict access to this functionality using menu function security. Under Menu Exclusions, exclude the function One Time Location. For information about function security setup, see Function, Menu, and Data Security.
Workflow
None
Implementation Considerations
No additional considerations.
Purchase Order Grouping for Requisition Lines with One-Time Addresses
As requisitions are created in Oracle iProcurement, it is possible to assign one-time addresses as the deliver-to locations for each line. Requesters specify one-time locations (delivery addresses) when they want to have heir ordered items delivered to a location that has not been previously defined (and most likely not used again). Delivery of items on individual requisition lines can be to distinct one-time locations. Each one-time location appears on the resulting purchase order line as an attachment.
In the case where the same item is found on two or more requisition lines, each with a separate one-time delivery address, the buyer or requester may not want these two (or more) requisition lines to be grouped onto the same purchase order line since there could be some confusion as to the quantity to be delivered to each location. The following figure details the requisition-to-purchase order process when one-time locations are employed:
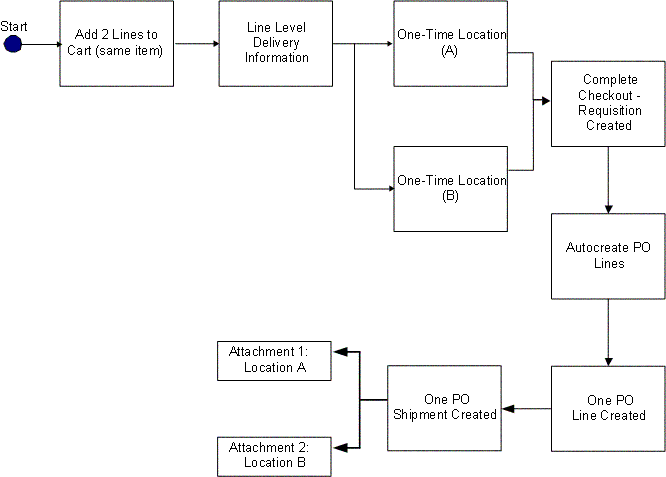
As requisition lines are converted into purchase order lines, multiple requisition lines are grouped onto one purchase order line if certain characteristics, such as item and unit of measure, are the same. If one-time locations are associated with the requisition lines, each one-time location is represented on the resulting purchase order line as an attachment. Details of the main functional elements of the one-time location grouping functionality follow.
Grouping Options
Attributes in the PO Create Documents Workflow control the grouping feature and provide the requester the ability to not group requisition lines that contain one-time locations. The workflow looks at the available requisition lines to be converted into purchase order lines and first determines the value of these attributes to determine whether to group requisition lines with the same data.
The workflow attributes are:
-
Is Grouping of Requisition Line Allowed?
-
Is Grouping of One Time Address Line Allowed?
Each of these attributes can have a value of Yes or No. Depending on the value selected, the workflow PO Create Documents behaves differently:
-
If the attribute Is Grouping of Requisition Line Allowed? is set to No, then no requisition lines are consolidated into a single purchase order line.
-
If grouping is set to occur, but Is Grouping of One Time Address Line Allowed? is set to No, then requisitions with one-time locations are not grouped.
-
If both attributes are set to Yes, then all similar requisition lines, even those with one-time locations are consolidated onto a single purchase order line. The default values for both attributes are Yes.
Note: When the attribute Is Grouping of One Time Address Line Allowed? is set to No, then no grouping of requisition lines with one-time locations occurs, even if the one-time addresses are the same.
The internal names of the preceding attributes are GROUPING_ALLOWED_FLAG and GROUP_ONE_ADDR_LINE_FLAG, respectively.
Append Quantity and UOM to Attachment
As one-time locations are converted and become attachments for the purchase order lines, these text attachments include the following information (for one-time location text attachments only):
-
Unit of Measure (UOM)
-
Quantity Ordered
-
Location
The following is an example of the text of an attachment:
Please ship 30 (Each) to:
100 Mason St.
Palo Alto, CA
95320
Setup Steps
-
Access the PO Create Documents Workflow. For more information, see Customize Workflows.
-
Find the workflow attributes Is Grouping of Requisition Line Allowed? and Is Grouping of One Time Address Line Allowed?
-
To modify the grouping logic, change the values of these attributes from Yes to No. Yes is the default value for both attributes. The following table details the results of the various attribute setting combinations:
One-Time Location Grouping Attributes Is Grouping of Requisition Line Allowed? Is Grouping of One Time Address Line Allowed? Result YES YES Groups all similar requisition lines regardless of the existence of one-time locations. YES NO Groups similar requisition lines unless a one-time location is found on the requisition line. NO YES No grouping of requisition lines ever occurs. NO NO No grouping of requisition lines ever occurs.
Profile Options
-
POR: One Time Location must be set. For profile setup instructions, see Set Profile Options.
Workflow
-
The PO Create Documents workflow looks at the following attributes--Is Grouping of Requisition Line Allowed? and Is Grouping of One Time Address Line Allowed?--when determining if requisition lines should be grouped onto a single purchase order line.
Implementation Considerations
-
The automatic grouping logic only applies to the workflow PO Create Documents. When creating purchase documents through the Autocreate window, the buyer always has the ability to control the grouping function.
-
The POR: One Time Location profile option must be properly set for one-time locations to use within Oracle iProcurement.
-
If the first workflow attribute Is Grouping of Requisition Line Allowed? is set to No, then no grouping occurs, regardless of the setting of Is Grouping of One Time Address Line Allowed?
Hazard Information
Requesters can indicate hazard information for each line item of a requisition. As requesters create requisitions in Oracle iProcurement, they can associate both a hazard identification number and a hazard class with a requisition line. In addition, if an item already has a hazard identification number or a hazard class linked to it, either from a source document or the item master, then this default information is copied to the resulting requisition line.
Setup Steps
By default, the hazard fields are hidden. To display them, use Oracle Applications Framework. For more information, see Personalize Oracle iProcurement Using Oracle Applications Framework.
Global Requester
Oracle iProcurement lets requesters create requisitions on behalf of another requester, even if that requester is in a different operating unit or business group. For example, a manager in the United Kingdom can order office supplies for a newly hired employee in the United States, even though the UK and the US represent different business groups. Possible scenarios include:
-
Global preparer. The manager in the UK logs on using the US responsibility. Even though the manager is not part of the US business group, the manager can create a requisition for a US employee.
-
Global requester. The manager in the UK logs on using the US responsibility and picks himself as the requester, even though the manager is not an employee in the US business group. For example, the manager is traveling to the US and needs to order supplies while in the US.
The process flow routes the resulting requisition for approval based on the preparer's approval path, when using an employee-supervisor hierarchy. When using a position hierarchy and the preparer or approver belongs to a different business group than the requester, then the preparer or approver must manually select an approver for the requisition. (The workflow cannot generate an approval list in this scenario.)
During Checkout, iProcurement shows the Requester field on the requisitiont. When global requester functionality is enabled, then clicking the Search icon next to this field lets you select requesters in other business groups.
Note: When you click the Flashlight icon, the list of available requesters includes all employees in the business group associated with the login responsibility, plus the preparer. For example, a manager in the UK logs on using the US responsibility. This manager sees everyone in the US business group, plus himeself.
If the global requester functionality is enabled while searching for requisitions on the Requisitions tab, then you can select the option Include employees from other organizations to expand the search to preparers or requesters in other business groups. The list of available preparers and requesters includes all employees in the business group associated with the login responsibility, plus the preparer.
Note: You can monitor only those requisitions that were created in the operating unit associated with your login responsibility. For example, a manager in the UK logged on using the US responsibility and created a requisition. When the manager logs on using the UK responsibility, the manager does not find the requisition. The manager finds it only when logging in using the US responsibility.
Setup Steps
-
Set HR: Cross Business Group to Yes to allow the selection of requesters in other business groups.
If this profile option is set to No, then preparers can select requesters in other operating units, but not in other business groups.
-
Set the profile option ICX: Override Requestor to either By All or Within Organization.
When ICX: Override Requestor is set to No, then the Requester field on the requisition defaults to the preparer and cannot be changed.
-
Set the following profile options as described in the preceding setup steps:
-
HR: Cross Business Group
-
ICX: Override Requestor
-
-
The following table show how Oracle iProcurement behaves depending on the setting of these profile options:
HR: Cross Business Group and ICX: Override Requestor HR: Cross Business Group ICX: Override Requestor Preparer's Actions Yes By All Preparer can select any employee in or outside one's business group. Yes Within Organization Preparer can select any employee in or outside one's business group.
-
The functions for viewing or performing actions on My Group's Requisitions, My Requisitions, All Requisitions, Requisitions I Approved, and Orders to Approve behave the same regardless of how HR: Cross Business Group is set. For example, if the requester is given access to View My Group's Requisitions (and the security level access for the requisition document type in Oracle Purchasing is set to Public), then the requester can view all requisitions created in the operating unit that the requester is logged in to, regardless of whether the preparer belongs to the same business group.
-
The accounting for the global requester functionality behaves no differently than it normally does:
-
If the item is an expense item and no account information is defined for the item, then the system verifies whether an account is associated with the requester (in the People window in Oracle Applications). As always, this account must share the same set of books as the operating unit in which the requisition is created.
-
If the account is not valid for the set of books of the operating unit in which the requisition is being created, then the system verifies the favorite accounts that the preparer has defined in the iProcurement Preferences. If a valid account does not exist in the preferences, then the system still tries to build the account using the expense charge account rules, if set up.
-
If the system cannot build the account information, then the preparer receives a prompt to enter the appropriate accounting information manually during checkout.
Displaying Charge Accounts
The following profile option determines how or whether to display charge account information at certain points during the checkout process:
-
The POR: Generate and Display Account at Checkout profile option affects the first step of the checkout.
The default setting for the POR: Generate and Display Account at Checkout profile option is No. When set to No, no charge account information appears during the first step of the checkout. (Charge account information always appears when you edit lines and on the last, review-and-submit page of the checkout.)
When POR: Generate and Display Account at Checkout is set to Yes, the charge account appears during the first step of the checkout, in the Billing section of the Checkout: Requisition Information page. (If the charge account varies by line, then the Charge Account field displays a Multiple link.)
-
The POR: Display Legacy Accounting Flex UI profile option affects the optional edit lines step of the checkout.
For example, the charge account, 01-510-7530-0000-000, appears in a single field if POR: Display Legacy Accounting Flex UI profile option is set to No (its default value). The requester can edit this field.
The same charge account, 01-510-7530-0000-000, would display each segment in a separate field if the POR: Display Legacy Accounting Flex UI profile option is set to Yes. In this example, the segments appear in separate columns: Company (01), Department (510), Account (7530), and Sub-Account (0000).
Whether the account appears in a single or separate field, the names of each segment still appear, and the requester can click a search icon to search for the valid accounts for each segment. Only the method of displaying and searching the segments changes.
-
Set the following profile options to implement this feature:
-
POR: Generate and Display Account at Checkout
-
POR: Display Legacy Accounting Flex UI
See Profile Options.
-
Expense Charge Account Rules
When determining the default charge account, the account generator may reference the charge account defined on the employee record. Expense Charge Account Rules enable you to override one or multiple segments of that default account based on the item category. This ability to override does not interfere with the action of the account generator, but replaces those segments you configure after the account generator has created a charge account.
Setup Steps
-
Log in to Oracle Applications and choose the Procure to Pay Administrator responsibility.
-
Navigate to Purchasing Setup > Financials > Accounting > Expense Account Rules.
-
Define the rules (for each item category) in the window. Duplicate rules for the same category or account segment are not permitted.
-
Save your work.
-
Set POR: Apply Expense Account Rules to Favorite Charge Accounts to Yes. See Profile Options.
Employee P-Cards
Employee P-Cards let companies incorporate electronic payment and settlement procedures to streamline their procure-to-pay processes. Employers assign each requester his or her own employee P-Card to make purchases using Oracle iProcurement.
Setup Steps
For more information about setting up procurement cards, see the sections on Setting Up Credit Card Programs and Procurement Card Management in the Oracle Payables User's Guide.
In addition to the setup steps provided in the Oracle Payables User's Guide, you must enable supplier sites to accept procurement cards.
-
Log in to Oracle Applications. From the Oracle Purchasing menu, choose Supply Base > Suppliers.
-
Query the supplier associated with the supplier site that you want to set up.
-
Choose Sites. Query the supplier site for which you want to enable procurement cards.
-
Select the Procurement Card check box to indicate that the supplier site is P-Card enabled.
-
Save the changes.
-
POR: Override Supplier P-card must be evaluated when implementing this feature. For profile setup instructions, see Profile Options.
Supplier P-Cards
Supplier P-Cards (or Ghost Cards) let companies incorporate electronic payment and settlement procedures to streamline their procure-to-pay processes. Instead of having to maintain a separate employee P-Card for each requester in the company and each requester having to use his or her own employee P-Card to make purchases, companies can maintain a single supplier P-Card for each supplier or supplier site in the system, and consolidate all purchases from that supplier or supplier site on the single P-Card. The feature lets all requisitions in Oracle iProcurement (across requesters) created against the respective supplier or supplier site be automatically charged to the single supplier P-Card. To enable the feature, the supplier P-Card must be set up and tied to the supplier or supplier site in advance. This arrangement improves control on the purchasing process and reduces maverick spending.
The following are the major business flows involved in the supplier P-Card functionality used in Oracle iProcurement:
-
Supplier P-Card Setup
-
Supplier P-Card Assignment For Requisitions
Supplier P-Card Setup
To enable the supplier P-Cards feature, enable supplier or supplier sites to accept procurement cards.
-
Log in to Oracle Applications. From the Oracle Purchasing menu, select Supply Base > Suppliers.
-
Query the supplier associated with the supplier site.
-
Choose Sites. Query the supplier site for which you want to enable procurement cards.
-
Select the Procurement Card check box to indicate that the supplier site is P-Card enabled.
-
Save the changes.
After the supplier or supplier sites have been enabled for P-Cards, set up supplier P-Cards in Oracle Payables using a process similar to the setup for employee P-Cards. The following diagram shows the windows that you use to set up supplier P-Cards in Oracle Payables.
Setup for Supplier P-Card
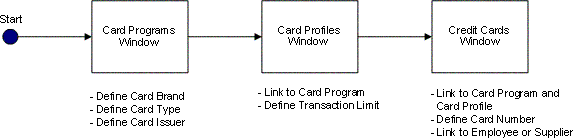
Card Programs: On this page, set up the following information for a P-Card: See the Oracle Payables User Guide for details.
-
Card Brand: Card brand name (American Express, Diners, Visa, Mastercard, and so forth).
-
Card Type: Select whether the card is of type Procurement, Travel, or Supplier. You can use only P-Cards of type Supplier and Employee in Oracle iProcurement. To set up a supplier P-Card, you would select a card type of Supplier.
-
Card Issuer/Issuer Site: Select a card issuer or issuer site for the card program. The card issuer or issuer site needs to be an active supplier or supplier site in the system.
Card Profiles: On this page, associate card profiles to the card program. You can associate multiple credit card profiles with each card program. The profile records any transaction amount limits that are associated with a P-Card. These transaction limits are passed to the P-Cards (both employee and supplier) that you create using the profile. See the Oracle Payables User Guide for details.
Note: When using the P-Card (employee or supplier) associated with the card profile for a requisition checkout in Oracle iProcurement, the transaction limit enforcement is::
-
If the aggregate amount (in functional currency for the operating unit) for all lines in the requisition checkout that can be charged to the P-Card is equal to or smaller than the transaction limit defined on the card profile, then the P-Card is assigned to all the lines.
-
If the aggregate amount (in functional currency for the operating unit) for all lenses) in the requisition checkout that can be charged to the P-Card is greater than the transaction limit defined on the card profile, then the P-Card is not assigned to any of the lines.
Credit Cards: On this page, define the P-Card and associate it with a card program and card profile. See the Oracle Payables User Guide for details.
In the Credit Cards window:
-
Enter Information for the P-Card, such as the card number and expiration date.
-
Associate the card with the card program and card profile.
-
If the card program is of type Procurement, then enter additional information about the employee who would own the P-Card.
-
If the card program selected is of type Supplier, then enter the supplier or supplier sites, which are to be associated with the supplier P-Card. The business rules for associating the P-Card to a supplier or supplier site when the card program selected is of type Supplier are:
-
You cannot complete the fields in the window that apply for a card program of type Procurement (such as Card Member Name, Employee Name, and Employee Number).
-
The supplier and supplier site fields on the window are mandatory. That is, each supplier P-Card must have at least one supplier or supplier site associated with it.
-
You can associate each supplier site only with a single supplier P-Card.
-
You can associate a single supplier P-Card with (shared by) multiple supplier sites as long as the supplier sites belong to the same supplier.
-
You can associate supplier sites within a supplier with different supplier P-Cards.
-
The Select All Eligible Sites button provides the requester the ability to enter the multiple supplier sites. Clicking this button automatically completes the supplier site fields for the selected supplier with valid but unassigned (that is, the site is not assigned to another supplier P-Card) supplier sites for the selected supplier.
-
For additional information about setting up supplier P-Cards, see the Oracle Payables User's Guide.
-
Supplier P-Card Assignment for Requisitions
When the requester creates a requisition in Oracle iProcurement, one of the following payment methods can be assigned to each line on the requisition:
-
Employee P-Card
-
Supplier P-Card
-
No P-Card (payment method on invoice)
As the requester is checking out a requisition in Oracle iProcurement, the application verifies and determines which payment method to assign to each line on the requisition. The first payment method (employee P-Card) is an option which the requester can explicitly select during the requisition checkout. When certain conditions are met (the requester does not have to explicitly select them), the application automatically assigns the other payment methods (supplier P-Card and no P-Card) to the requisition line.
Note: A requisition in Oracle iProcurement can contain multiple lines. Depending on the source of the item or service on the line (internal or from external supplier or supplier site), the type of the item (expense or inventory) and other setup, different payment methods could apply to each line. Hence, the assignment of the payment method is done at the requisition line level, and not at the requisition header level.
The following business rules apply for the assignment of payment methods to a requisition line during checkout:
-
No P-Card (neither employee P-Card nor supplier P-Card) can be assigned to a requisition line in the following cases:
-
No supplier or supplier site is available or selected for the requisition line.
-
The item or service on the requisition line is sourced internally.
-
The supplier or supplier site available or selected for the requisition line is not P-Card enabled.
-
No employee P-Card has been set up for the requester and no supplier P-Card has been set up for the supplier or supplier site that is available or selected for the requisition line.
-
The requisition line is associated with a project, in which case a P-Card (employee or supplier) cannot be assigned to the line.
-
For an inventory item being delivered to a subinventory, a P-Card (employee or supplier) cannot be assigned to the line. On the other hand, if the inventory item is not delivered to a subinventory, then a P-Card (employee or supplier) can be assigned to the line.
-
-
If none of the preceding cases is met, then P-Cards (employee or supplier), if set up, are eligible to be assigned to the requisition line. Only one of them can be applied, and Oracle iProcurement determines which one to apply during the requisition checkout process.
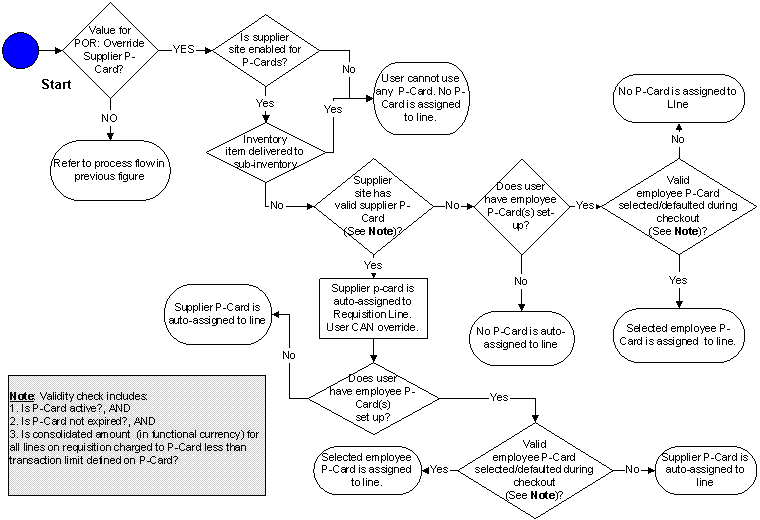
To provide maximum flexibility, a system profile controls which P-Card (employee or supplier) gets precedence when both P-Card types are eligible to be applied to the requisition line. The profile option is POR: Override Supplier P-Card. This profile option applies to the Supplier P-Card Assignment for Requisitions business flow.
-
The following figure shows the business logic for assignment of P-Cards to a requisition line during a checkout if none of the cases mentioned in Rule #1 applies, and if the POR: Override Supplier P-Card profile option is set to No.
Supplier P-Card Assignment for Profile Set to No

-
The following figure shows the business logic for assignment of P-Cards to a requisition line during a checkout if none of the cases mentioned in Rule #1 applies and if the POR: Override Supplier P-Card profile option is set to Yes.
Supplier P-Card Assignment for Profile Set to Yes
-
After the application has determined the payment method for the requisition lines during checkout, the information is visible to the requester. Access to this information is available on the Review and Submit page during checkout, and also on the Requisition Details page after the requisition has been submitted. If an employee P-Card has been assigned to at least one line on the requisition, then the partially masked employee P-Card number appears in the P-Card Number field at the requisition header level. At the requisition line level, the P-Card Used field indicates which payment method is assigned to that particular line. The possible values for this field are:
-
Yes, when employee P-Card is assigned to the line
-
Supplier P-Card, when supplier P-Card is assigned to the line
-
No, when no P-Card is assigned to the line
-
Only one employee P-Card can be used for each requisition, and it might or might not apply to all the lines on the requisition. The P-Card Number field at the requisition header level contains either a single partially masked employee P-Card number or a blank value.
-
The requester does not see the actual supplier P-Card number (neither in the P-Card Number field at the requisition header level nor in the P-Card Used field at the requisition line level). The value of the P-Card Used field at the requisition line level (when it is Supplier P-Card) is the only indication to the requester that a supplier P-Card has been assigned to the line.
-
Common P-Card Logic
The requisition that is created in Oracle iProcurement is converted into a purchasing document in Oracle Purchasing. When all the necessary conditions are met, the resulting purchase order document contains the supplier P-Card number that was associated with the requisition line. The processes in Oracle Purchasing to convert a requisition into a purchase order include:
-
PO Create Documents workflow: Workflow process to automatically create standard purchase orders and blanket releases from approved requisitions.
-
Autocreate: Utility to manually create standard purchase orders and blanket releases from approved requisitions.
-
Create Releases: Concurrent program to generate releases for existing blanket purchase agreements from approved requisitions.
Requisition-to-Purchase Order Conversion Processes
-
The P-Card Used flag for the requisition lines coming from Oracle iProcurement holds the possible values: Yes, No, or Supplier P-Card. This flag determines whether and which P-Card number (employee or supplier or none) should apply to the purchase order, which Oracle Purchasing generates.
-
A P-Card (employee or supplier) can be assigned to purchase order documents of type Standard Purchase Order and Blanket Purchase Release only. Only one P-Card number (employee or supplier) can be assigned for each purchase order and is applied at the header level of the purchase order only, and, unlike a requisition in Oracle iProcurement, applies to all the lines on the purchase order.
Note: If purchase orders are created directly or are created from requisitions submitted in Oracle Purchasing (that is, there is no associated requisition in Oracle iProcurement), then no P-Card can be assigned to the purchase order, even if the particular supplier or supplier site accepts P-Cards.
The logic to determine how and which P-Card number (employee or supplier or none) should be applied to the purchase order works as indicated in the following table. This logic applies to all the requisition-to-purchase order conversion processes.
| Number | Value of P-Card Number for Requisition Header | Value of P-Card Used Flag for Requisition Lines | Requisition-to-Purchase Order Conversion Logic in Oracle Purchasing |
|---|---|---|---|
| 1 | None | Yes | Scenario is NOT possible. If no P-Card number is at requisition header level, all values for P-Card Used flag should be either No or Supplier. |
| 2 | None | No | No employee P-Card can apply to purchase orders. For such requisition lines: If requisition lines have same supplier or supplier site and other purchase order header level information, then requisition lines can appear on a single purchase order. Else, requisition lines appear on different purchase orders. |
| 3 | None | Supplier | No employee P-Card can be applied to purchase order. Derive supplier P-Card defined for supplier or supplier site: If supplier P-Card is valid (see Validity Verification), maintain supplier P-Card for requisition lines. If supplier P-Card is invalid, delete supplier P-Card for requisition lines. For such requisition lines: If requisition lines have same supplier or supplier site and other purchase order header level information, then requisition lines can be put on a single purchase order. Else, requisition lines appear on different purchase orders. |
| 4 | Employee P-Card Number | Yes | Employee P-Card from requisition header can be applied to purchase order: If employee P-Card is valid (see Validity Verification), maintain employee P-Card for requisition lines. If employee P-Card is invalid, delete employee P-Card for requisition lines. For such requisition lines: If requisition lines have same supplier or supplier site and other purchase order header level information, then requisition lines can be put on a single purchase order. Else, requisition lines appear on different purchase orders. |
| 5 | Employee P-Card Number | No | Do not apply employee P-Card from header level to lines. For such requisition lines: If requisition lines have same supplier or supplier site and other purchase order header level information, then requisition lines can be put on a single purchase order. Else, requisition lines appear on different purchase orders. |
Note: Validity verification for employee and supplier P-Cards includes:
-
Is card active?, AND
-
Is card not expired?, AND
-
Is supplier or supplier Site P-Card enabled?
P-Cards In The Purchase Order Autocreate Window
In addition to the logic discussed in the preceding table, when a buyer in Oracle Purchasing converts a requisition into a purchase order using the Purchase Order Autocreate window, the buyer can resolve or change the supplier or supplier site at that time. Even if the buyer selects a supplier or supplier site that accepts supplier P-Cards, the P-Card information is not applied at that time. In other words, only the requisition lines that have P-Card information assigned to them during the requisition checkout in Oracle iProcurement can have P-Cards assigned to them in the resulting purchase order.
Changing Supplier Or Supplier Site On A P-Card Purchase Order
Even if a P-Card is assigned to the purchase order, the buyer has the ability to change the supplier or supplier site on the purchase order. The new supplier or supplier site might not accept P-Cards (employee or supplier) and it could lead to an error condition. Hence, if a P-Card (employee or supplier) exists on a purchase order, and, if the buyer changes the supplier or supplier site on the purchase order, the application automatically deletes the P-Card number on the purchase order. Before doing so, the application generates an appropriate warning message for the buyer.
Purchase Order Communication to Supplier
When the purchase order with the assigned supplier P-Card has been created and approved, the supplier P-Card information is sent as a part of the purchase order when it is communicated to the supplier. The information sent is adequate for the supplier to charge the amount on the purchase order to the assigned supplier P-Card. Similar to the existing support for the employee P-Card, the following information for the supplier P-Card is sent as a part of the purchase order:
-
P-Card Number
-
Card Member Name
-
Expiration Date for P-Card
-
Credit Card Brand
Also, similar to existing support for employee P-Cards, the supplier P-Card information is included as a part of the purchase order only when the purchase order is communicated to the supplier through EDI delivery and XML delivery.
For information about purchase order communication to the supplier using EDI delivery, see the Oracle e-Commerce Gateway User's Guide. For more information about purchase order communication to the supplier through XML delivery, see the Oracle Purchasing XML Transaction Delivery Guide and the Oracle XML Gateway User's Guide.
-
POR: Override Supplier P-Card must be set. For profile setup instructions, see Set Profile Options.
Purchase Order (PO) Extract for P-Card Reconciliation
The P-Card reconciliation process electronically reconciles the P-Card statements and the corresponding purchase orders in the buyer's purchasing application for both employee and supplier P-Card transactions. The card issuer typically provides the reconciliation engine, which resides in the buyer's purchasing system. To accommodate the reconciliation process, the engine needs a couple of information feeds:
-
Transaction feed from the P-Card issuer containing charges for the billing cycle.
-
Purchase order history feed from the buyer's purchasing system for the billing cycle.
This reconciliation is necessary so that the buyer is able to electronically verify that only valid supplier purchase orders are included in the invoices that are paid to the card issuer. After a successful reconciliation between the PO history feed and the transaction feed, the reconciliation engine sends the reconciled data files to Oracle Payables (using the Oracle Payables Open Interface). The following figure shows the flow for the P-Card reconciliation process:
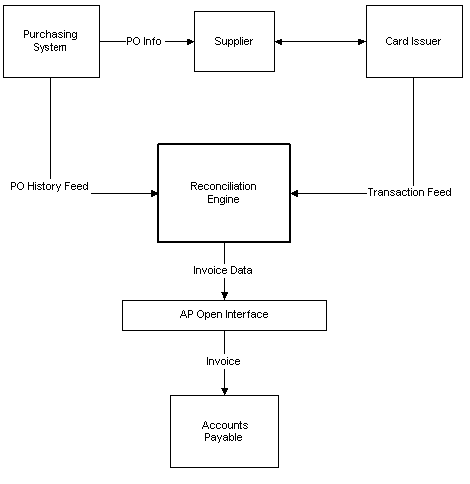
For more information about this part of the process, see the documentation provided with the reconciliation engine and the Oracle Payables User's Guide.
At the end of the P-Card billing cycle, the buying company receives a transaction feed containing an electronic statement for all P-Card purchases that the buying company made. The Purchase Order Extract for P-Card Reconciliation feature:
-
Extracts the corresponding purchase order information for the P-Card billing cycle
-
Provides the capability to prepare the purchase order history feed for the reconciliation engine. You can run the PO History Feed concurrent report or request in Oracle Purchasing to generate the feed. For more information, see the following topic, About the PO History Feed Concurrent Report.
Major Features
PO History Feed Concurrent Report
The concurrent report accumulates and compiles the necessary PO history data in a specific format. Upon its completion, the output file is stored in a specified directory location. The following business rules apply to the concurrent request:
-
Name for the concurrent program:
-
Title: Purchase Order History Feed for P-Card Reconciliation
-
Description: Purchase Order History Feed for reconciling P-Card payments
-
-
The concurrent program is a part of Oracle Purchasing.
-
You can run the program at any time, but typically you run it before the end of the monthly billing cycle for the P-Card. You can also set it to run at a specified frequency through standard report submission (SRS).
-
The output of the concurrent program appears in a specific directory. The directory is derived from the UTL_FILE_DIR parameter in the INIT.ORA file of the Oracle Purchasing installation. The application administrator should set up the output directory location prior to running the concurrent program.
-
Specify the following parameters on the PO History Feed Report Request window before running the report:
-
Card Brand Name: List of values containing all available card brand names.
-
Card Issuer/Card Issuer Site: List of values containing all valid card issuer and issuer Sites.
-
From Date/From Time: From Date and Time. The last_update_date for a purchase order should be on or later than the selected date and time.
After the requester has entered a valid Card Brand Name, Card Issuer and Card Issuer Site, the From Date/From Time field on the window gets automatically filled with the To Date and To Time information from the last successfully run report (report with Completed Phase with Normal status or Complete Phase with Warning status) for the selected card brand name and card issuer or card issuer site combination. Using this logic reduces the chances of sending duplicate PO History Feeds by running reports with overlapping dates and missing PO records by skipping intermediate dates.
Note: If the last run report for a particular card brand name and card issuer or card issuer site combination is not completed successfully (the request is in any phase or status other than Completed Phase with Normal Status or Complete Phase with Warning Status), then no tracking of the To Date/Time information for that request occurs.
-
To Date/To Time: To Date and Time. The last_update_date for a purchase order should be earlier than the selected date and time for it to be selected.
-
Output Filename: The name of the file in which the PO History feed file that the report generated should be stored in the output directory location. If a file with the same filename as the one selected in the Output Filename field already exists in the output directory, then the new file overwrites the existing file in the output directory.
-
-
Criteria Selection of Purchasing Records
Only purchase orders that satisfy certain selection criteria are included in the PO history feed. Some of the selection criteria for the purchase records are entered on the PO History Feed Report Request window (as described in the preceding section), while the application automatically and internally applies the rest of the selection criteria. The internal selection criteria are:
-
Only purchase orders of type Standard Purchase Order and Blanket Release are available for selection.
-
Only purchase orders created against supplier or supplier sites that belong to the same operating unit as the requester's responsibility are selected.
-
The different values for the Approval Status, Control Status, and On Hold Status for the purchase order in Oracle Purchasing determine whether the purchase orders should be sent as a part of the PO History Feed. The following business rules apply:
-
Only purchase orders with an approval status of Approved and Requires Reapproval are eligible for selection. Purchase orders with any other approval status do not get extracted.
-
Purchase orders with an approval status of Requires Reapproval get selected only if they have been approved at least one time before they were put in the current approval status of Requires Reapproval.
-
Based on a combination of the Approval status, Control status, and On Hold status for the purchase order, the program generates possible statuses for the Order Status field for the purchase order included in the PO History Feed:
-
ON: Purchase order is open and should be reconciled with the corresponding transaction feed from the card issuer.
-
HL: Purchase order is temporarily put on hold, but the hold may get released at a later time. It should not be reconciled with the corresponding transaction feed from the card issuer while it remains in the HL status.
-
CN: Purchase order is permanently canceled and should not be reconciled with the corresponding transaction feed from the card issuer.
-
-
The following figure indicates the selection logic based on the Approval, Control, and On Hold statuses of the purchase order in Oracle Purchasing and the appropriate output status for the purchase order in the PO History Feed.
| Number | Approval Status | Control Status | On Hold Status | Selection and Status of Purchase Order in PO History Feed |
|---|---|---|---|---|
| 1 | Approved | All except Canceled and Finally Closed | Not On Hold | PO is sent with Order Status = ON |
| 2. | Approved | All except Canceled and Finally Closed | On Hold | PO is sent with Order Status = HL |
| 3 | Approved | Canceled OR Finally Closed | Does Not Matter | PO is sent with Order Status = CN |
| 4 | In Process | Does Not Matter | Does Not Matter | PO is not sent |
| 5 | Incomplete | Does Not Matter | Does Not Matter | PO is not sent |
| 6 | Pre-approved | Does Not Matter | Does Not Matter | PO is not sent |
| 7 | Rejected | Does Not Matter | Does Not Matter | PO is not sent |
| 8 | Requires Reapproval1. | All except Canceled and Finally Closed | Does Not Matter | If (PO APPROVED_DATE ¹ NULL), PO is sent with Order Status = HL If (PO APPROVED_DATE = NULL), PO is not sent |
| 9 | Requires Reapproval3. | Canceled or Finally Closed | Does Not Matter | If (PO APPROVED_DATE ¹ NULL), PO is sent with Order Status = CN If (PO APPROVED_DATE = NULL), PO is not sent |
For information about the format and data elements of PO History Feed, see PO History Feed File.
Setup Steps
The output of the concurrent program is stored in a specific directory. The directory is derived from the UTL_FILE_DIR parameter in the INIT.ORA file of the Oracle Purchasing installation. For more information about setting the output directory location, see the Oracle e-Commerce Gateway Implementation Manual.
Project Accounting
Integration with Oracle Projects enables requesters to optionally reference project and task information on requisition lines. Cost distribution of a single requisition line can span one or more projects.
Setup Steps
You must license and implement Oracle Projects. For more information, see the Oracle Projects Implementation Guide.
When you are implementing Oracle Projects, decide whether to expose the project and task fields to requesters:
-
By default, the following fields appear if Oracle Projects is installed and the destination type is Expense: Project, Task, Expenditure Type, Expenditure Organization, and Expenditure Item Date.
-
If the destination type is Inventory or Shop Floor, then the Project and Task fields require you to enable Project Manufacturing.
To hide any of the project-related fields, then use Oracle Applications Framework. For more information, see Personalize Oracle iProcurement Using Oracle Applications Framework.
Note: If you have installed Oracle Projects, then the project-related fields appear in the Billing section of the requisition, even if you do not implement or use Oracle Projects. You can hide these fields if you do not use them.
Grants Accounting
Oracle Grants Accounting integrates with Oracle iProcurement to support the charging of requisitions and resulting purchase orders to projects that grants (awards) funded. The integration introduces the concept of an award number, which represents additional information about the source of funding associated with projects and tasks.
In addition to the standard project and task information, the Award dimension from Oracle Grants Accounting can specify the source of funding associated with projects and tasks. This helps organizations manage all aspects of the grant funding they receive. In higher education institutions, other public sector agencies, and project-intensive commercial enterprises, it is often necessary to distribute the cost of a purchase request line across multiple projects. To support this need, you can enter multiple projects and awards for each requisition line.
You must enable the Award number field if you have implemented Oracle Grants Accounting for the associated operating unit. The Award number field is only required for projects that awards in Oracle Grants Accounting fund.
Setup Steps
You must license and implement Oracle Projects and Oracle Grants Accounting. For more information, see the Oracle Grants Accounting User's Guide.
By default, the Award field appears if you have implemented Oracle Grants Accounting for the associated operating unit. To hide this field, use Oracle Applications Framework. For more information, see Personalize Oracle iProcurement Using Oracle Applications Framework.
Favorite Charge Accounts
The favorite charge accounts functionality provides the requester the capability to maintain a list of up to 50 frequently used charge accounts on the iProcurement Preferences page. During the checkout process, the requester can access the favorite charge accounts list and use it to automatically complete the charge account information for the items, rather than having to manually enter the charge account information.
Setup Steps
-
Log in to Oracle iProcurement.
-
On the Home page, click Preferences in the upper-right corner.
-
In the Preferences area, click iProcurement Preferences.
-
Enter Favorite Charge Accounts and a nickname for each account. To add another row, click Add Another Row.
-
Select a default favorite charge account.
-
Save the changes.
Function Security
-
Function Security exists to disable the Favorite Charge Account List functionality. The function is called Favorite Charge Accounts. For information about function security setup, see Set Up Function, Menu, and Data Security.
Implementation Considerations
-
The favorite charge account list is the last resort to generate the charge account information for the item. If the Account Generator workflow engine, which includes Employee Default Charge Account and the Commodity-based Accounting Rules, has already been set up, then the favorite charge accounts functionality does not affect it.
-
The requester can add, delete, or modify accounts in the list. A nickname for an account is mandatory, and it must be unique by list. One of the accounts in the list must be selected as the default.
-
The requester can have one favorite charge account list for each responsibility. If the requester has multiple responsibilities, they can choose a favorite charge account list by responsibility. The accounts maintained in one responsibility are not available in the other responsibilities. If the requester has responsibilities that roll up to multiple sets of books with different accounting structures, then the favorite charge accounts list conforms to the respective accounting structures.
-
The favorite charge account functionality does not affect the system profile for Dynamic Insertion of Charge Accounts. If the profile has been turned on, requesters still can create new charge accounts simultaneously in the preferences as well as during the edit lines step of the checkout.
-
A requester can store only valid charge accounts in the favorite charge account list. If a charge account is deactivated in Oracle General Ledger after the requester has already stored it in the favorite charge accounts list, then an error appears when the requester resubmits the iProcurement Preferences page (by clicking Apply Changes). The requester then has the opportunity to edit or delete the charge account in the favorite charge account list. Until the deactivated account is changed, it displays an error if it is used during checkout.
Approvals
You can conduct requisition approvals in Oracle iProcurement in the following ways:
-
Use the approval setup from Oracle Purchasing. For more information, see the Oracle Purchasing User's Guide.
-
Use Oracle Approvals Management, also known as the Approvals Management Engine (AME). AME lets you define approval rules one time and leverage them across multiple applications.
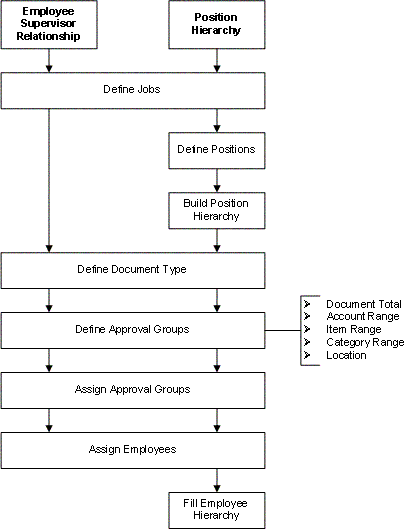
The following figure shows that an employee and supervisor approval setup in Oracle Purchasing consists of:
-
Define jobs
-
Define document types
-
Define approval groups
-
Assign approval groups
-
Assign employees
Approval Setup in Oracle Purchasing
The following figure shows how the approvals setup appears using AME. For descriptions of each of these steps, see the AME implementation steps.
Approval Setup Using AME
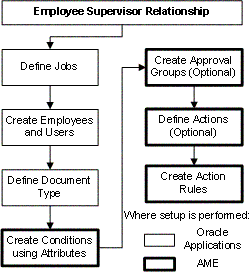
Whether you set up approvals in Oracle Purchasing or AME, the Requisition approval workflow in Oracle Purchasing handles the approval. For example, the Approval List Routing Using AME process in the Requisition approval workflow is initiated if AME approvals have been set up. (See the AME Implementation Steps.) This process uses your approval setup in AME to perform the approval, send notifications, and complete other approval tasks in Oracle iProcurement.
Implementing Oracle Purchasing Approvals
For instructions, see the approval setup information in the Oracle Purchasing User's Guide. See also information about requisition approval workflow attributes, whose defaults you can change, in the Oracle Purchasing User's Guide.
Implementing AME Approvals
-
Offline, analyze your approval structure. Determine the approval structure to use in iProcurement
An example of Employee/Supervisor approval structure:
-
Meredith Walton, Buyer, reports to
-
Pat Stock, Manager, reports to
-
Casey Brown, Executive
An example of Position Hierarchy approval structure:
-
Shop Floor Manager reports to
-
Production Manager who reports to
-
Plant Manager
-
-
If you are going to use the Employee/Supervisor structure you must perform the following tasks:
-
In the Human Resources responsibility, navigate to the Job Window.
-
Create a job.
-
Assign approval authority to the job.
-
Create employees and assign appropriate jobs and supervisors.
-
Create users.
-
Add appropriate responsibilities to the users.
For complete details on performing these steps, see: Oracle HRMS Enterprise and Workforce Management Guide.
-
-
If you are going to use the Position Hierarchy structure you must perform the following tasks:
-
In the Human Resources responsibility, navigate to the Positions Window.
-
Create all of your organization's positions.
-
Use the Position Hierarchy window to build and administer your position hierarchies.
-
Create employees and assign them to the referenced positions with the Enter Person window.
-
Use the Submit Requests window to run the Fill Employee Hierarchy process.
-
Create users.
-
Add appropriate responsibilities to the users.
For complete details on performing these steps, see: Oracle HRMS Enterprise and Workforce Management Guide.
-
-
In Oracle Purchasing, navigate to the Document Types window.
-
Select a Document Type:
-
Purchase Requisition
-
Internal Requisitions
-
Change Order Request: Requisition
-
-
For the selected document type, select one of the provided Approval Transaction Types, or one that you created in AME:
-
PURCHASE_REQ
-
INTERNAL_REQ
-
RCO
Document Types Window
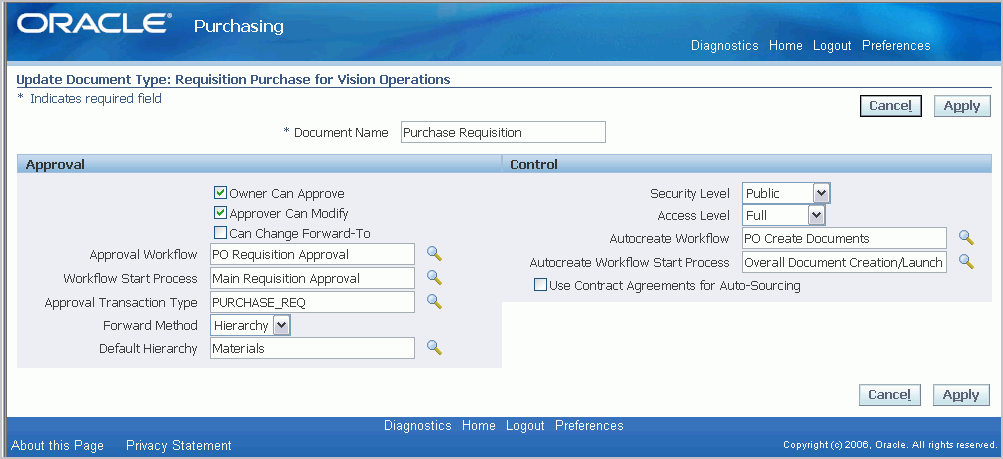
Note: Use the Approval Transaction Types field to enable or disable AME. If a transaction type is selected in this field, then Oracle iProcurement uses AME to conduct approvals. If you leave the Approval Transaction Types field blank, then AME approvals are not used. Instead, the approval setup in Oracle Purchasing are used.
-
-
Use the Oracle Approvals Management Implementation Guide, available on My Oracle Support forum to complete the following steps:
-
Create attributes. See the following list of attributes that Oracle iProcurement provides. For example:
-
ITEM_CATEGORY (line level)
-
REQUISITION_TOTAL (header level)
-
-
Create conditions using the attributes. Conditions are the "if" clause in an action rule. They are similar to approval groups in Oracle Purchasing. For the rule to apply to a transaction, all of its conditions must be true.
For example, to enforce a rule about a requisition's total amount, you could have the following condition, where REQUISITION_AMOUNT is an attribute: USD1000 <= REQUISITION_AMOUNT < USD5000. In this example, a requisition initiates this approval rule when the requisition total amount is greater than or equal to 1000 USD and under 5000 USD.
-
Create approval groups. An approval group is an ordered set or list of one or more approvers. For example, an approval rule can add an approval group's members, in order, to a transaction's approval list. Typically, approval groups represent functional approvers outside a transaction's chain of authority, such as finance or internal legal counsel, who must approve a transaction before or after management has done so. You can also insert an approval group into the chain of authority.
-
Define actions. Actions generate the approval list for a transaction. If a transaction satisfies all conditions in an action rule, then the associated actions are processed to generate the approval list.
-
The Action Types page is where you would define approval groups with the same order number to enable parallel approval.
-
It is also the page where you define voting methods. This provides you with the ability to model group approvals more closely to the business rules that your organization uses. For example, you might choose First Responder Wins.
-
-
Create action rules.
Define rules based on the conditions that result in an action. For example:
-
If the condition USD1000 <= REQUISITION_AMOUNT < USD5000 is met, then require approvals up to at least level 1 approval authority.
-
If the condition USD5000 <= REQUISITION_AMOUNT < USD9000 is met, then require approvals up to at least level 2 approval authority.
-
-
Example
In the following example:
-
If the condition 0 USD <= REQUISITION_TOTAL <= 100 USD, then require approvals up to at least level 1.
-
If the condition 1000 USD < REQUISITION_TOTAL <= 25000 USD, then require approvals up to at least level 2.
-
If the condition ITEM_CATEGORY in {IT.EQUIPMENT...}, then require post-approval from IT approval group.
| Name | Job | Approval Authority |
|---|---|---|
| Meredith Walton | Buyer | 1 |
| Pat Stock | Manager | 2 |
| Casey Brown | Executive | 3 |
| Connie Horton (in the IT approval group) | IT Manager | 4 |
Provided AME Attributes
Oracle iProcurement provides the following types of AME attributes:
-
AME mandatory attributes
-
AME non-mandatory header attributes
-
AME non-mandatory line attributes
The following tables display and describe the attributes that Oracle iProcurement provides for use by AME.
| Mandatory Attribute Name | Attribute Type | Attribute Description | Static Usage? |
|---|---|---|---|
| ALLOW_DELETING_RULE_GENERATED_APPROVERS | Boolean | Requisition preparer allowed to delete system-generated approvers? The value is derived from the POR: System Approvers Are Mandatory profile option, for the user or responsibility. It determines whether the user can delete mandatory approvers from the system-generated approver list during checkout. |
No |
| ALLOW_REQUESTOR_APPROVAL | Boolean | Determines if preparer can approve own requisitions if preparer has enough approval authority. The value is derived from the document type setup for the requisition (Purchase, Internal, or Change Order Request). | No |
| AT_LEAST_ONE_RULE_MUST_APPLY | Boolean | AME raise exception when no rules apply to a transaction? | Yes |
| EFFECTIVE_RULE_DATE | Date | Date that determines active rules. The default provided value assumes every rule is effective. | Yes |
| EVALUATE_PRIORITIES_PER_LINE_ITEM | Boolean | Determines whether to evaluate rule priorities for each line item under strict line-item evaluation | Yes |
| REJECTION_RESPONSE | String | How AME responds to a rejection | Yes |
| USE_RESTRICTIVE_LINE_ITEM_EVALUATION | Boolean | Determines whether to require that the same line item satisfy all line-item conditions in a given rule | Yes |
| USE_WORKFLOW | Boolean | Determines whether Oracle Approval Manager should log exceptions to the workflow context stack | |
| WORKFLOW_ITEM_KEY | String | Requisition approval workflow's item key | No |
| WORKFLOW_ITEM_TYPE | String | Workflow item type | No |
| Non-Mandatory Header Attribute Name | Attribute Type | Attribute Description | Static Usage? |
|---|---|---|---|
| REQUISITION_TOTAL | Currency | Total of all requisition lines that have not been canceled, given in the functional currency. Conversion method is derived from POR: Default Currency Conversion Rate Type for the user. General Ledger currency conversion must be enabled. | No |
| JOB_LEVEL_NON_DEFAULT_STARTING_POINT_PERSON_ID | Number | Person ID of non-default first approver for job-level authority approval types | Yes |
| INCLUDE_ALL_JOB_LEVEL_APPROVERS | Boolean | Determines whether to include all approvers at a given job level | Yes |
| TRANSACTION_DATE | Date | Date when requisition was created | No |
| TRANSACTION_GROUP_ID | Number | Business group identifier (ID) of the requisition preparer | No |
| TRANSACTION_ORG_ID | Number | Operating unit in which the requisition was created | No |
| TRANSACTION_REQUESTOR_PERSON_ID | Number | Person ID of the requisition preparer | No |
| TRANSACTION_REQUESTER_USER_ID | Number | User ID of the person initiating the transaction | No |
| TRANSACTION_SET_OF_BOOKS_ID | Number | ID of the set of books that owns the transaction. The value is derived from the Financials System Parameters for the operating unit. | No |
| Non-Mandatory Line Attribute Name | Attribute Type | Attribute Description | Static Usage? |
|---|---|---|---|
| PO_NATURAL_ACCOUNT | String | Natural Account: Segment of the accounting flexfield that is specified as the Natural Account Segment. The value is derived from the natural account segments for the charge accounts specified on the requisition line distributions. | No |
| PO_COST_CENTER | String | Cost Center: Segment of the accounting flexfield that is specified as the Cost Center Segment. The value is derived from the cost center segments for the charge accounts specified on the requisition line distributions. | No |
| ITEM_NUMBER | String | Item Number: Item number composed by concatenating all segments defined on the Item key flexfield. The value is derived from the item number associated with the requisition line. | No |
| ITEM_CATEGORY | String | Item Category: Item category composed by concatenating all segments defined on the Item Category key flexfield. The value is derived from the item category associated with the requisition line. | No |
| DELIVER_TO_LOCATION | String | Deliver-to Location: The value is derived from the deliver-to location specified on the requisition line. The value is the location code in the database base language. (AME does not use multi-lingual support that is provided in the Oracle Applications setup windows.) | No |
Note: A requisition has a header, lines, and distributions. AME does not support three levels of attributes. Therefore, the definition of a line is a combination of the line and distribution information. For example, a requisition line with two distributions is considered as two lines in AME approvals.
Profile Options
-
The following profile options affect the approval process in Oracle iProcurement:
-
PO: Allow Requisition Approval Forward Action
-
PO: Workflow Processing Mode
-
POR: Display Graphical Approval List.
-
POR: System Approvers are Mandatory
For more information, see Set Profile Options.
-
Function Security
-
A number of functions control the approval process, such as whether to permit requesters to add approvers. For more information, see the list of the functions relating to the Approvals Status page and the Approvers and Add Approvers pages in Set Up Function, Menu, and Data Security
Workflow
-
If you do not want to accept the default setting, you can modify one workflow attribute in the requisition approval workflow. For more information, see Customize Workflows.
Global Approver
As requisitions are created in Oracle iProcurement, approval paths are generated. You can set up the list of approvers to include employees belonging to different business groups. For example, it is possible for requester A from business group 1 to have his or her requisition routed to approver B from business group 2. In addition, approvers from different business groups can be manually inserted into the approval list. As such, the list of values for approvers can include a column containing the business group of each potential approver.
Approvers can view the requisition details from the notifications pages, even if the requisition was created in a different operating unit. Requisitions that were created in a different operating unit are not available through the general requisition status pages nor are they available for modification. The approval action history display includes business group information for each approver.
Setup Steps
If any approvers in the hierarchy are employees in different business groups, then set the profile option HR: Cross Business Groups to Yes before you set up your approval hierarchy.
Requisition Changes
A requester in Oracle iProcurement can change a requisition after it has been submitted. Requesters can change the requisition at any time prior to its conversion to a purchase order, even though it currently is on an approver's notifications list. When the requisition is in the change process, it is removed from the current approver's notification list. (It is withdrawn from the approval process.)
Note: A different change process occurs if the requisition line has been placed on an approved purchase order. For more information, see Requester-Initiated Changes to Purchase Orders.
Either requesters or approvers can make changes to requisitions.
Requester-Initiated Changes
-
The change feature was known as Requisition Withdrawal. The Change button has replaced the Withdraw button.
-
The Change button, which depending on the status of the requisition, launches the requester into either of the following flows:
-
Change Requisition flow (when no lines appear on a purchase order). The requester can directly change the entire requisition or select and change individual lines on the requisition. No buyer approval is needed.
-
Requester Change Order Request flow (when at least one line is placed on a purchase order). For the lines placed on a purchase order, the requester can request changes that the buyer on the purchase order may need to approve. For more information, see Requester-Initiated Changes to Purchase Orders.
-
Approver-Initiated Changes
The approver can also make changes to a requisition while approving it. The approver can add, delete, or modify the requisition lines. When finished, the approver checks out the requisition again. The checkout is initiated from a special Approver Shopping Cart. (For more information, see the online Help.)
In some cases, the approver checkout process assumes the requisition preparer's information. In other cases, the approver's. These assumptions are taken during defaulting and validation. For example, if the approver adds a line to the requisition, the Need-By Date defaults from the preparer's preferences, not the approver's. In the Approver Shopping Cart and checkout process, all requisition lines (even the unchanged ones) are validated again. For example, the system verifies whether the account information on the requisition remains valid.
The following table shows the information that either the preparer or the approver assumes during the approver checkout.
| Information | Preparer or Approver |
|---|---|
| Oracle Applications Framework personalization and page functions | Approver |
| Function security | Approver |
| Favorite charge accounts list | Approver |
| General preferences, such as Date Format | Approver |
| iProcurement preferences, such as Need-By Date Offset | Preparer |
| Billing and encumbrance, such as list of valid projects and tasks | Preparer |
| Validation (for example, that the account information remains valid) | Preparer |
| P-card and p-card profile | Preparer |
| Delivery related profile options such as ICX: Override Requester | Preparer |
| Account generation, if the account cannot be retrieved from the item or preparer's user definition in the People window | Approver |
Function Security
-
The function View My Reqs Withdraw controls requisition update. See Set Up Function, Menu, and Data Security.
Note: When choosing Change, the shopping cart is available to the requester to make changes.
Workflow
-
If the PO Create Documents workflow is running in background mode, there is potentially a longer time period for requesters to make changes before the requisition is converted to a purchase order.
The PO Requisition Approval workflow (also known as the Requisition workflow) handles the withdrawal of the changed requisition from the requisition approval process. For example, suppose a requisition's approval list consists of approvers 1, 2, 3, and 4. When the approval is between approvers 2 and 3, the requester changes the requisition. The workflow withdraws the requisition as soon as the requester clicks the Change button. Approvers 3 and 4 never receive a notification request for approval. After the requester makes the changes and submits the requisition, approvers 1, 2, 3, and 4 receive a notification request for approval, as they would for any other requisition.
For more information, see Customize Workflows.
Requester-Initiated Changes to Purchase Orders
Requester-initiated changes to purchase orders can often be time-consuming and labor-intensive. Oracle iProcurement supports a streamlined and self-service process for making changes. Requesters can request line cancellations, changes to the order quantity or amount, need-by date, and, under some conditions, price. This capability complements the requisition change feature. When submitted and approved, the purchasing business unit retains appropriate controls and can accept or reject proposed changes. As expected, material changes to the purchase order result in both a new revision and an immediate supplier notification.
This feature provides the Oracle iProcurement requester the ability to request attribute changes and line cancellations to purchase orders that have been created from the requisition. The following attributes on the purchase order lines are available for changes:
-
Need-by Date
-
Quantity ordered
-
Price for non-catalog request items
-
Cancel purchase order line
-
Amount (on contractor requests or fixed price service lines)
-
Start Date on contractor requests
-
End Date on contractor requests
Oracle iProcurement allows administrators to define when a requester change request should be forwarded to the requester's approval hierarchy, or the buyer for approval. In some cases, it is more efficient to bypass steps of the approval process if the change request is below some predefined limit. There are tolerance settings to control when requester changes are routed to the requester's approval hierarchy.
Setup Steps
Whenever the requester initiates a purchase order change order request, the change order request gets routed through the Oracle iProcurement requester’s approval hierarchy. Since the requisition has already been through the approval hierarchy at least once before, some customers would not want the change order request to be routed through the approval process and others would.
To change the tolerance settings use the Setup: Tolerances and Routings function in Oracle Purchasing. See: Oracle Purchasing Users Guide.
Function Security
-
The View my Reqs Change Order and View Reqs Change Order History functions control this feature. See Set Up Function, Menu, and Data Security.
Workflow
-
For more information about the PO Change Request Tolerance Check workflow, see Customize Workflows.
Implementation Considerations
-
Buying organizations can specify whether or not the buyer should be involved in the requester change order process. This is regardless of the data (unit price, quantity, amount, need by date, start date and end date) changed by the requester on the requisition or the magnitude of the change. In cases where the buyer is not involved in the change order approval process, the system sends an FYI notification to the buyer when the change request is accepted.
-
Administrators can setup upper and lower tolerance limits with these attributes. So, for any change to these attributes that lie within its tolerance limits, buyer approval would not be required.
-
The tolerances can be defined by either % amount or absolute amount.
-
There is also an option to bypass buyer’s approval if the PO was originally autocreated for the requisition. These controls are defined at OU level.
-
Administrators can define an Upper Tolerance limit and a Lower Tolerance limit for all these attributes in the Tolerances and Routings for Requester Change Order workflow.
-
-
At any given time, there can be only a single change request pending for each requisition. Until the pending change request is completely acted upon, the requester cannot request any new purchase order (PO) change requests for the requisition.
-
Only the preparer of the requisition can request purchase order change requests for the requisition.
-
If a purchase order line contains multiple distributions corresponding to the different requisition lines, then the purchase order line is not eligible for change request and none of the Oracle iProcurement requesters who prepared the requisitions can request changes to the purchase order.
-
If the purchase order has any approval status other than Approved, then the purchase order is not eligible for a change request and none of the Oracle iProcurement requesters who prepared the requisitions associated with the purchase order can request changes to the purchase order.
-
If the purchase order has a control status of Closed, Cancelled, Finally Closed, Freeze or Hold, then the purchase order is not eligible for a change request and none of the Oracle iProcurement user who prepared the requisitions associated with the purchase order can request changes to the purchase order.
-
If the purchase order shipment has a control status of Closed, Cancelled, Finally Closed, Freeze or Hold, then the purchase order shipment is not eligible for a change request and none of the Oracle iProcurement requester who prepared the requisition lines associated with the purchase order shipment can request changes to the purchase order shipment.
-
Price changes for non-catalog request items are not allowed for Partially Invoiced, Received, or Accrue on Receipt purchase orders, if the profile option PO: Allow Retroactive Pricing of POs is set to NEVER or OPEN RELEASES. If the profile option is set to ALL RELEASES, then the price changes are allowed, even for Partially Invoiced, Received, or Accrue on Receipt purchase orders.
-
When the purchase order line contains a non-catalog request item in a foreign currency, the Oracle iProcurement requester can request a price change for that item in both the foreign currency of the item as well as the functional currency for the operating unit. In case of a price change request in the foreign currency of the item, the conversion rate used for the change request is the same as the one used at the time of purchase order creation.
-
While the purchase order change request is being approved in the Oracle iProcurement requester's approval hierarchy, if the purchase order becomes ineligible for change (purchase order goes into a Cancelled control status), then the purchase order change request is automatically rejected. The buyer does not receive the notification to process the change request. The change request does not appear on the buyer self-service window.
-
After the purchase order change request has been approved in the Oracle iProcurement requester's approval hierarchy and before the request is sent to the buyer on the purchase order for processing, a verification compares the requested values for the attributes on the change request and the current values on the purchase order. If these values are same, then the purchase order change request is automatically accepted. The buyer does not receive the notification to approve the change request, nor does the request appear in the buyer self-service window.
-
While the purchase order change request is being approved in the Oracle iProcurement requester's approval hierarchy, if the purchase order goes into an In Process approval status or a Requires Re-approval status, then the purchase order change request is deferred and is not sent to the buyer until the purchase order is in the Approved status.
-
Encumbrance support (if enabled) is available for the change request. When the requester is creating the purchase order change request in Oracle iProcurement, the encumbrance funds verification runs for the revised requisition document total if there is a change (increase or decrease) to the document total. The actual funds reservation runs after the buyer responds to the purchase order change request.
-
Tax support is available for the change request. While submitting the change request, the estimated tax that applies to the requisition is recomputed based on the revised requisition document total.
-
If price breaks apply to the purchase order that are based on the changes that the requester has made, those price breaks apply to the purchase order.
Requisition Cancellations
This feature provides the Oracle iProcurement requester with the capability to select and cancel individual requisition lines (in addition to the entire requisition), before they are placed on a purchase order or a sales order.
Note: After the requisition lines are placed on an order, a cancellation triggers the requester change order process. See Requester-Initiated Changes to Purchase Orders.
Setup Steps
Enabling the function security for a requester enables the requester to select and cancel individual lines (including all lines on the requisition, which would be equivalent to canceling the entire requisition).
-
The functions View my Reqs Cancel, View All Reqs Cancel, and View My Group's Reqs Cancel control the ability to cancel requisitions.
-
The Cancel Requisition button, depending on the status of the requisition, launches the requester into either of the following flows:
-
Requester Cancel Order Request flow (when at least one line is placed on a purchase order). For the lines placed on a purchase order, you can request cancellations that the buyer on the purchase order must approve. For lines that are not placed on the purchase order, the requester can directly cancel the line, and no buyer approval is required.
-
Cancel Requisition flow (when no lines are placed on a purchase order). The requester can directly cancel the entire requisition or select and cancel individual lines on the requisition. Buyer approval is not required.
-
-
You cannot cancel internal requisition lines after they have been linked to an internal sales order, unless the corresponding sales order is also canceled. If the sales order has already been canceled, then you can cancel the corresponding internal requisition lines.
Life Cycle Tracking
Requesters can view the following information when they click the Details icon for a requisition line, as the information is updated:
-
Negotiation. If your company uses Oracle Sourcing, then the buyer may have placed the requisition lines on a negotiation (such as reverse auction). If so, requesters can view the associated negotiation.
-
Purchase order. After the requisition is converted to a purchase order, the requester can view the associated purchase order and purchase order status. The requester can view only those purchase order lines with at least one distribution that is associated with the requisition line.
Note: Although Oracle iSupplier Portal appears the purchase order details, you do not have to install or set up Oracle iSupplier Portal.
-
Sales order. For internal requisitions, the requester can view the associated sales order number.
Note: Requesters can view the sales order number, but not click the number to For more information, see the sales order details.
-
Shipment. If the supplier sends Advance Shipment Notices (ASNs), then the ASN information, such as Tracking Number, appears. If Oracle Transportation Execution is installed and implemented, then requesters can also track the progress of the shipment by the carrier.
-
Receipt. After the requester or appropriate party enters a receipt for the requisitioned items, the receipt details for the requisition also appear.
-
Invoice. Requesters can view the corresponding invoice created in Oracle Payables.
-
Payment. Requesters can view the corresponding payment created in Oracle Payables.
-
Time card. If Oracle Services Procurement is implemented, then requesters can view the contractor's approved time card, if Oracle Time & Labor is also implemented.
Setup Steps
No setup is required for displaying the procure-to-pay life cycle details, except for the shipment information. For example, if you use Oracle Payables to create the invoice and match the invoice to the purchase order that corresponds to the requisition line, then the invoice appears. If the information, such as the invoice or payment, has been created in Oracle Applications for the requisition line, then it appears.
The following steps show what needs to happen to display shipment information for a requisition line.
In the shipment details, the Shipment number, Shipment Date, Expected Receipt Date, and (optional) Freight Carrier come from the ASN that the supplier sends to Oracle Purchasing or enters in Oracle iSupplier Portal. The Track Shipment icon appears if a link is set up to the carrier. A Tracking Number appears if the carrier is set up to find the shipment by tracking number.
If ASNs are not used and carrier setup has not been performed, then the Shipment section appears with the text No data exists.
To set up a carrier (optional)
-
Log in to Oracle Applications using the Procure-to-Pay Administrator responsibility.
-
Navigate to Purchasing Setup > Shipment Tracking Setup.
-
For instructions on setting up a carrier and a carrier URL, see the Oracle Transportation Execution Implementation Manual.
The URL that you set up is accessed when the requester clicks the Track Shipment icon. If you have chosen a Tracking Number as your lookup parameter during this setup, the Tracking Number displays that shipment's information at the carrier's URL.
To populate, display, or update the shipment details (optional)
-
A purchase order for the requisition line must be created in Oracle Purchasing.
-
The supplier must respond to the purchase order with an ASN. The supplier can send the ASN electronically to Oracle Purchasing, which uses the Receiving Open Interface to process the ASN, or the supplier can use Oracle iSupplier Portal to enter the ASN.
The Shipment number, Shipment Date, and Expected Receipt Date are required on the ASN. Freight Carrier is optional. Waybill/Airbill Number is optional. If provided, it appears as the Tracking Number in Oracle iProcurement. These are the only fields from the ASN that appears in the shipment details in Oracle iProcurement.
-
To display or update the shipment details, run the Receiving Transaction Processor:
-
View Purchase Order Internal (POS_VIEW_ORDER_INT) controls whether the requester can click the purchase order number and view the purchase order. This function is an Oracle iSupplier Portal function. It is already included in the default Internet Procurement responsibility.
-
View Receipts (POR_SHOW_VIEW_RECEIPTS) and View All Receipts (POR_SHOW_ALL_RECEIPTS) control whether the requester can view the Receipt section of the life cycle details. (The Receipt section appears if at least one of these functions is assigned to the requester's responsibility.)
Internal Requisitions
In a buying organization, the source of goods are from either:
-
External suppliers.
-
Internal inventory and warehouse locations.
Requests for externally sourced items use purchase requisitions. Requests for internally sourced items use internal requisitions. Oracle iProcurement supports the creation of internal requisitions. Unlike purchase requisitions, the process does not convert internal requisitions into purchasing documents (purchase orders or blanket releases). Instead, the process converts internal requisitions into internal sales orders. Subsequent processing of these internal sales orders occurs. Receiving of the requested items occurs in Oracle iProcurement. The following is a summary diagram of the process.
Internal Requisition Process Flow

For complete implementation of internal requisitions you must start in Oracle Purchasing. See the section Overview of Internal Requisitions in the Oracle Purchasing User's Guide.
Source Subinventory
In addition to Oracle iProcurement determining the source organization, the source subinventory is also a default setting. When sourcing is automatic and transparent, and the source is determined to be an internal organization, the subinventory that is reservable and that has the greatest available inventory is selected. If multiple subinventories have equal available inventory, then the first subinventory alphabetically is the default. If all subinventories have zero available inventory, then no subinventory is the default. The available inventory figure is an estimate only, the definition of which is:
[INVENTORY ON HAND - RESERVED INVENTORY IN SUBINVENTORY]
Note: If inventory is reserved without an indication of subinventory, then that reservation is not included in the available inventory calculation.
When requesters manually select the source information, all available subinventories that are enabled for quantity tracking appear. The available inventory for each subinventory appears with the subinventory value in the list. The inventory is only an estimate and may not be valid at the time of order fulfillment.
Checkout and Validation (Mixed Lines)
It is possible to include both internally sourced and supplier sourced lines on a single requisition. Because of additional constraints for internally sourced lines, during checkout extra validation is performed on the internally sourced lines.
The following table shows a comparison of the checkout validation between supplier-sourced lines and internally sourced lines.
| Field or Attribute | Supplier-Sourced Line | Internally Sourced Line |
|---|---|---|
| Deliver-to Location | Item must belong to the organization associated with the deliver-to location |
|
| One-Time Address | None | Cannot deliver internally sourced items to a one-time address. |
| Requester | None | New requester cannot result in a new deliver-to location that infringes on the preceding deliver-to location rules. |
| Buyer | None | Buyer cannot be entered. |
| Charge Account | Non-modifiable if destination is inventory. |
|
It is possible to create internal requisitions for both expense and inventory destinations.
At the end of the checkout process a single requisition, containing both internal and external lines is created. This requisition is then routed through the same approval path as a requisition with all purchase requisition lines. Upon approval, the internally sourced lines are converted into internal sales orders and the externally sourced lines are converted into purchasing documents (purchase orders or blanket releases).
It is possible to receive internal orders in Oracle iProcurement. For more information, see Receipt Creation.
Setup Steps - Profile Options
-
PO: Legal Requisition Type
-
POR: Allow Manual Selection of Source
-
POR: Select Internal Requisition for Confirm Receipts
-
POR: Select Inventory Replenishment Lines for Confirm Receipts
-
POR: Urgent Flag maps to Shipping Priority
-
POR: Sync up Need by date on IR with OM
-
MRP: Default Sourcing Assignment Set
Workflow
Implementation Considerations
-
Purchasing sourcing applies when users select an internally orderable item. If users select a strictly purchasable item, then no sourcing applies.
-
If the profile PO: Legal Requisition Type is set to Internal, then the following are true:
-
It is not possible to sort by unit price.
-
Strictly purchasable items do not appear.
-
Display of the Click here to select a source link depends on the setting of the POR: Allow Manual Selection of Source profile option.
-
Items that are both purchasable and internally orderable appear only as internally orderable.
-
All prices on the catalog pages are null.
-
-
If the profile PO: Legal Requisition Type is set to Purchase, then the following are true:
-
The Click here to select a source link does not appear regardless of the setting of the POR: Allow Manual Selection of Source profile option.
-
No sourcing is called.
-
-
If the profile PO: Legal Requisition Type is set to Both, then the following are true:
-
Display of the Click here to select a source link depends on the setting of the POR: Allow Manual Selection of Source profile option.
-
If both internal and external items have been extracted into the catalog, then both item types appear.
-
-
For internally sourced items, the unit of issue from the destination organization applies. The transfer price calculation is based on the cost price of the source organization and the unit of measure conversion rates.
-
General planning information does not apply when determining the source for a given item. All sourcing is based on the defined sourcing rules.
-
If a requisition has both internally and externally sourced lines and the delivery information is changed at the header level, then the deliver-to location validation is different for each line type. The list of values for the deliver-to location provides a list of all deliver-to locations. If a location that is invalid for internal line items is selected, then an error message appears for the internal line item. Requesters must select a valid location for the line before proceeding.
-
It is not possible to add information templates to internally sourced lines.
-
It is not possible to modify the source information during checkout. To modify the source, requesters must delete the item from the shopping cart and then re-select the item from the catalog.
-
The source defined on a requisition template (public list) does not apply when Oracle iProcurement determines the source. Sourcing is strictly based on sourcing rules.
-
In order to make updates to an approved Internal Requisition from iProcurement, please ensure that the value for the Order Management system parameter Schedule Lines on Hold is set to NULL or Yes
Internal Requisition Changes
You can use Internal Requisitions/Internal Sales Orders to transfer material between warehouses / inventory organizations of the same company. The internal requisition from Oracle iProcurement generates an internal sales order in Oracle Order Management, which fulfills the transfer-shipping request.
In the Requestor Change Order window, we can specify the auto-approval tolerances for internal requisitions. Using a Purchasing responsibility, navigate to Setup > Tolerances and Routings > Requestor Change Order to change the tolerances for Need-by Date and Quantity.
The following sections describe the ways in which changes to the Internal Requisition are synchronized with the Internal Sales Order and vice versa.
Urgent Flag and Shipment Priority Code
The Urgent flag on the Internal Requisition line determines whether the internal requisition line is urgent. Oracle Order Management tracks shipment priority differently. Shipment priority is an extensible quick code (lookup). The Urgent flag on the internal requisition line maps to the Shipment Priority field on the internal sales order line via the profile option POR: Urgent Flag maps to Shipping Priority. The values for this profile option come from the Shipment Priority Code lookup. The seeded values of the lookup are High and Standard. If the urgent flag is checked then the Create Internal Orders concurrent program takes the value of the profile option and populates the shipping priority field in the Order Management interface tables. If the profile option value is not set, then the shipping priority for the order line remains null.
Need-by Date and Request Date
You can update the Need-By Date on the Internal Requisition to a future date only and the change will get reflected in the Request Date of the Internal Sales Order. However, the changes made in the Internal Requisition need to be approved before the change is reflected in the Internal Sales Order. Before you make the changes, the Order Management processing constraints validate the changes. The order line goes on hold until the changes are approved. Upon approval, the hold gets released and changes are reflected in Internal Sales Order.
A seeded processing constraint in Order Management prevents the update of Request Date on an Internal Sales Order line. This processing constraint has been made a non-system constraint so that you can enable or disable this processing constraint as per your business requirement. If you change the Need-By Date in the Internal Requisition, and if this processing constraint has been disabled, the Request Date will update to the value of the Need-By Date.
If you change the Request Date on the Internal Sales Order, you can only update it as the Scheduled Ship Date/ Arrival Date. The profile option POR: Sync up Need by date on IR with OM ensures that the value of the Scheduled Ship Date and Scheduled Arrival Date on the Internal Sales Order line is reflected in the Need-By Date on the Internal Requisition line. If the value of the profile option is set to Yes, then the value of the Need-By Date on the Internal Requisition line is updated with the changed value of the Scheduled Ship Date / Scheduled Arrival Date. If the profile option is set to No, then the changed value of the Scheduled Ship Date / Scheduled Arrival Date will not be updated in the Need-By Date of the Internal Requisition.
Changing the Quantity on the Internal Requisition Line
If you change the quantity on the Internal Requisition line, you need to get the Internal Requisition re-approved. Also, the sales order line is put on hold during the re-approval process. The Internal Sales Order line should not be Pick Released, Invoice Interfaced, or Closed. A seeded processing constraint in Order Management prevents update of Ordered Quantity on an Internal Sales Order line. This processing constraint has been made a non-system constraint so that you can enable or disable this processing constraint as per your business requirement.
Cancellation
If you choose to cancel the Internal Requisition, the Internal Sales Order gets cancelled provided the Order Management processing constraints allow the cancellation. Similarly if the Internal Sales Order gets cancelled, the Internal Requisition gets cancelled as well.
Making Internal Requisition changes in iProcurement
If you have created an Internal Requisition and a corresponding Internal Sales Order, you can go to the iProcurement home page to make changes to the Internal Requisition. You can also initiate changes via the Requisitions Summary form in Oracle Purchasing using the Tools > Change menu option.
The Requistions page has a change link at the bottom of the page. If you click the To Change Internal Requisition Lines, Click Here link, the Change Order page is displayed.
The Requisitions > Requisitions tab displays the Change Order page. On this page, you can change the Need-By Date, Quantity or Cancel the line. For any changes you make, you must provide a Reason in the Reason text box on the same row.
After you have changed the Need-By Date, Quantity or cancelled the requisition line, click Next to view the Approvals.
In this example, no approvals are required; otherwise the approval details would be displayed on this page. Click Next to review the changed information on the requisition line. Approval logic is determined by Requester Change Order Approval workflow.
The changes are indicated by a green icon next to the changed value. Click Submit to confirm your changes, the following page displays on successful submission:
You can now view the status of the change request from the Requisition Status page. The changed quantity is also reflected in the Internal Sales Order. For more information on Internal Sales Orders, please refer to the Oracle Order Management Implementation Manual.
Oracle Services Procurement
Oracle Services Procurement is a separately licensed and implemented product. Oracle Purchasing includes the following line types that Oracle iProcurement uses:
-
Quantity-based or Goods. For example, for 10 books at 5 USD each, the price is 5 and the quantity is 10 on the purchase order.
-
Amount-based. For example, at 500 USD for a service, the price is 1 and the quantity is 500 on the purchase order.
When you license and implement Oracle Services Procurement, Oracle iProcurement supports the following additional line types:
-
Fixed price service. For example, at 500 USD for a service, the amount is 500 on the purchase order, and a quantity is not required.
-
Rate-based temporary labor. For example, for a contractor at 100 USD for each hour, on the purchase order, the rate is 100 in the price field, the UOM is hour, and the amount is the agreed-upon amount for the labor, plus any additional amount to cover rate differentials such as overtime and weekend time.
-
Fixed price temporary labor. For example, consulting at a fixed 15,000 USD is for the labor.
Determination of line types is based on their Purchase Basis and Value Basis in the Line Types window in Oracle Purchasing. The following table shows the default line types, their respective purchase and value bases, and whether or not Oracle Services Procurement is required.
| Line Type | Purchase Basis | Value Basis | Oracle Services Procurement Required? |
|---|---|---|---|
| Goods | Goods | Quantity | No |
| Services (Amount-Based) | Services | Amount | No |
| Fixed Price Services | Services | Fixed Price | Yes |
| Rate-Based Temp Labor | Temp Labor | Rate | Yes |
| Fixed Price Temp Labor | Temp Labor | Fixed Price | Yes |
Create Requests
Oracle iProcurement can requisition fixed price services by using a non-catalog request. Oracle iProcurement requisitions temporary labor by using a contractor request.
Note: Oracle iProcurement is the only application in which you can create a temporary labor request.
Requesters can use a non-catalog request to create requisitions for fixed price services line types. The Item Type field is used to select Goods or services billed by amount, which uses the line type selected in the POR: Amount Based Services Line Type profile option. (The Services billed by quantity item type corresponds to the line type selected in the POR: Rate Based Services Line Type profile option.)
The Create Contractor Request page is used to create requisitions for rate-based or fixed price temporary labor line types. Some of the fields you enter on a contractor request include a job and start date, and contact information.
The second step of contractor request creation is to provide supplier information. If an approved supplier list (ASL) has been set up in Oracle Purchasing, then the ASL suppliers also appear in a preferred supplier list, from which the requester can select a supplier.
Note: Oracle iProcurement prevents combining goods and temporary labor on the same requisition. If the requester tries to create a contractor request while goods are in the shopping cart, Oracle iProcurement advises the requester to keep these on separate requisitions.
Contractor Request Flow
Contractor requests use either of the following flows:
-
Fast-Track. Also known as a manual request, the fast-track request results in a contractor request status of Not Applicable. This flow works the same as any normal requisition. The requester completes the contractor request, checks out, and receives the required approvals. In a fast-track request, typically the requester does not care who the contractor is.
-
Full-Track. A full-track request results in a contractor status of Pending. This flow starts when:
-
Users select more than one preferred supplier on the contractor request
-
Users select the candidate screening option on the contractor request.
-
The target rate entered on the contractor request does not equal the rate on an existing contract in Oracle Purchasing.
The flow is:
-
Requester completes the contractor request, checks out, and receives the required approvals.
-
Oracle iProcurement sends an automated notification to the supplier or suppliers on the request.
-
Requester works with the supplier or suppliers offline to choose a contractor.
-
Requester assigns the contractor to the requisition, changes amounts if necessary, and checks out.
-
Depending on how the POR: Reapproval after Contractor Assignment profile option is set, the requisition may require reapproval.
-
Note: For more information about the contractor requisitioning flow, contractor status, and contractor request fields, see the online Help in Oracle iProcurement.
The following figure shows the fast-track and full-track contractor status flows previously described. (If contractor assignment is not required, then it is a fast-track flow. If contractor assignment is required, then it is a full-track flow.)
The following diagram also shows the following integration points with Oracle Purchasing: during creation and checkout, Oracle iProcurement verifies whether approved supplier list (ASL) entries have been defined for the job or category. For more information, see Oracle iProcurement Setup. When the requisition is finished, Oracle Purchasing creates the purchase order.
Overview of Contractor Request Flow
The main points of receiving against Oracle Services Procurement items include:
-
Can receive only fixed price services lines in Oracle iProcurement.
-
Cannot receive rate-based temporary labor. (Typically, the contractors entering a timecard receive it. These timecards can be converted into receipts, for accounting purposes, by submitting a process in Oracle Purchasing. If Oracle Time & Labor is installed, then the timecard icon is available on the Contractors tab when viewing active and past contractors, or on the Requisitions tab when viewing the requisition line details.)
-
You cannot create a return for fixed price temporary labor or fixed price services.
Requesters can also enter contractor performance evaluations online in Oracle iProcurement. They can also view previously entered evaluations to help them select contractors. As shown in the preceding Contractor Assignment figure, the Contractors tab enables contractor assignment and performance evaluations.
Expense Lines
If the requester enters an amount for the contractor's expenses (such as air travel) on the contractor request, then Oracle iProcurement handles this amount as a separate line on the requisition. The following table shows the expense line numbering.
| Line Number | Description |
|---|---|
| 1 | Database administrator |
| 1.1 | Database administrator - expense |
| 2 | Executive assistant |
| 3 | Project manager |
| 3.1 | Project manager - expense |
Notifications
Oracle iProcurement sends the following notifications in the contractor request flow, in addition to those sent in the standard requisition flow:
-
Notification to each supplier of the request, for Pending contractor requests only. The notification states the request for a contractor and provides most of the information from the request, including the Job Details, Start Date, Rate or Amount, and any notes to the supplier that the requester entered.
-
Notification to supplier that the contractor request has been canceled, if the requester canceled it.
-
Notification to the requester if the supplier's e-mail address cannot be found.
-
The existing notification to the requester that the requisition is now approved, is also sent in the case of an approved contractor request. For Pending contractor requests, the notification also reminds the requester that the requisition requires contractor assignment next.
Setup Steps
Prerequisites
-
Oracle Services Procurement license (Required)
-
Oracle Purchasing (Required)
-
Oracle iProcurement (Required)
Note: For more information about Oracle Services Procurement, including supported features and product dependencies, see About Oracle Services Procurement in Oracle Supply Management, available on My Oracle Support forum.
Oracle Purchasing Setup (Required)
Before you can implement the services and temporary labor functionality in Oracle iProcurement, you must perform some setup in Oracle Purchasing. For more information, see the Oracle Services Procurement setup information in the Oracle Purchasing User's Guide.
Oracle iProcurement Setup (Required)
-
Set the following profile options:
-
POR: Contractor Expense Line Type.
-
POR: Reapproval after Contractor Assignment
-
POR: Amount Based Services Line Types.
You might have already set the following profile options when you performed the Oracle Purchasing setup:
-
PO: Enable Services Procurement
-
PO: UOM Class for Temp Labor Services
For more information, see Set Profile Options.
-
-
Assign the Contractor Request catalog to stores. (Optional)
Requesters can always click Contractor Request on the Shop tab to create a contractor request. You can make contractor requests also accessible in one or more stores. For example, you can assign the Contractor Request catalog to a store that you created. When a requester clicks the store on the Shop page, all of the catalogs in that store appear. The requester can then click the Contractor Request catalog in the store and be taken to the contractor request entry page. (If you create a store that contains only the Contractor Request catalog, then clicking the store takes the requester directly to the contractor request entry page.)
Log in using the iProcurement Catalog Administration responsibility and access the eContent Manager. For more information about adding catalogs to stores, see the online Help.
-
Create non-catalog request templates for services. (Optional)
You can create non-catalog request templates specifically for services. When requesters create a non-catalog request, they can select the desired template. You can also assign a non-catalog request template to a services-related store, so that the requester always selects the correct template when in that store. For example, for each service type, you can define default values for certain service attributes and optionally restrict the requester from overriding defaults.
Log in using the iProcurement Catalog Administration responsibility and access the eContent Manager. For more information about creating non-catalog request templates, see the online Help.
-
Define approved supplier list (ASL) entries. (Optional)
If you have defined ASL entries for the job category selected on the contractor request, then the contractor request displays them as preferred suppliers. The requester can then choose one or more preferred suppliers. If global blanket agreements are associated with the ASL entries, then the pricing information from those documents also appears. If contract purchase agreements are associated with the ASL entries, then the contract number appears. See the previous figure, Contractor Request Preferred Suppliers.
For instructions on setting up the ASL, see the Oracle Purchasing User's Guide.
-
Set up supplier e-mail address for temporary labor suppliers. (Required)
Provide an e-mail address for the Oracle iSupplier Portal user defined in the Users window for the supplier, supplier site, or supplier contact. For more information, see the supplier registration information in the Oracle iSupplier Portal Implementation Guide.
Source Document Setup (Optional)
Temporary labor (contractor) requests in Oracle iProcurement use global blanket agreements or contract purchase agreements (global or local) for source documents. Temporary labor jobs on requisition lines can source these documents that same as any other line.
-
For instructions on setting up agreements as source documents, see Chapter 3 and the Oracle Purchasing User's Guide.
-
You can include price differentials on your global blanket agreement, at the shipment or line level. Price (or rate) differentials are overtime or holiday rates.
-
In the PO Create Documents workflow, set the following attributes to Yes, if you are using contracts as source documents:
-
Should Contract be used to autocreate doc?
-
Should temp labor request be autosourced from contracts? (By default, this attribute is set to Yes.)
Note: You cannot use advanced pricing for fixed price services or temporary labor line types..
-
-
To prevent the requester from changing the rate or amount on the contractor request, deselect the Price Override option on the global blanket agreement line, if you are using global blanket agreements as source documents.
-
The following profile options affect Oracle Services Procurement. For more information, see Set Profile Options.
-
ICX: Days Needed By (The Start Date on the contractor request defaults based on this profile option, which is also part of the requester's iProcurement preferences.)
-
PO: Amount Billed Threshold Percentage
-
PO: Enable Services Procurement
-
PO: Contractor Assignment Completion Warning Delay
-
PO: UOM Class for Temp Labor Services
-
POR: Reapproval after Contractor Assignment
-
POR: Contractor Expense Line Type
-
POR: Default Currency Conversion Rate Type
Note: Other standard Oracle iProcurement profile options, such as ICX: Override Location Flag, also affect Oracle Services Procurement requisitions. The preceding list shows those profile options that must also be considered if you are implementing Oracle Services Procurement.
-
Function Security
-
See the Oracle Services Procurement table of functions in Set Up Function, Menu, and Data Security.
-
In the PO Create Documents workflow, you can set the following attributes to determine whether contract document sourcing occurs for temporary labor lines:
-
Should Contract be used to autocreate doc? (By default, this attribute is set to No.)
-
Should temp labor request be autosourced from contracts? (By default, this attribute is Yes. This attribute is verified only if Should Contract be used to autocreate doc is set to Yes.)
For more information, see PO Create Documents.
-
-
In Oracle Purchasing, you have the choice of encumbering a blanket purchase agreement or the requisition. For Pending contractor requests, the encumbrance is always done on the requisition. During contractor assignment, Oracle iProcurement temporarily unreserves (releases reserved) funds. The funds are re-reserved after contractor assignment is completed.
-
Jobs
Oracle Human Resources jobs are specific to a business group. Therefore, the job selected on the contractor request limits the deliver-to location on the requisition to those locations that belong to the preparer's business group.
-
If you have set up global blanket agreement or contract purchase agreement document sourcing, then Oracle iProcurement displays the source document information in the preferred supplier list on the contractor request if the following conditions are met. (Some of these conditions apply only to blanket, not contract, agreements.)
-
The source document's supplier and supplier site match a supplier and supplier site in the ASL for the selected job category.
-
The start date entered on the contractor request must fall within the effective dates of the source document.
-
Price break information from the source document is used, based on the deliver-to location selected on the contractor request and the date the request was created. That is, if the date that the request was created is within the effective dates on the price break, then that price break is used.
-
The line type on the source document must match the line type on the contractor request. For example, if a Type of Fixed Price Temporary Labor is selected on the contractor request, then only source document lines with this line type appear.
Note: Oracle iProcurement does not obtain new source document information if the requester changes the start date during contractor assignment or changes the requisition later using the Change button.
If the currency on the global blanket agreement differs from the requester's functional currency, then Oracle iProcurement uses the exchange rate in the system to perform a currency conversion. If an exchange rate cannot be found, then Oracle iProcurement uses the exchange rate the POR: Default Currency Conversion Rate Type profile option determined.
-
-
For contractor requests, descriptive flexfields do not appear in the shopping cart, even if you use Oracle Applications Framework personalization to display them.
-
Miscellaneous
See also About Oracle Services Procurement, available on My Oracle Support forum.