Label Printing and Material Handling Equipment
This chapter covers the following topics:
- Labeling Overview
- Customer Labeling Requirements
- Defining Label Formats and Sets
- Defining Custom Label Fields
- Defining Labels for Clients
- Setting Up Label Format Assignment Rules
- Associating Label Types to Business Flows
- Label Printing for Pallets and Cases Without Cartonization
- Defining Printer IP
- Viewing Label Requests
- Explaining Material Handling Devices
- Material Handling Devices and Business Events
- Defining Devices
- Explaining Device History Requests
- Warehouse Control System
- Searching for Tasks Within the Directive Queue
- Carousel Configuration
- Defining Device Response Messages
Labeling Overview
Oracle Warehouse Management labeling helps you to move inventory more efficiently through the warehouse. Supplier labeling speeds-up the receiving process by enabling bar code scanning of inbound purchase orders, that results in less receipt processing time, immediate recognition of available materials, and higher receiving accuracy.
Labeling also enables you to comply with customer requirements for barcoding. You can produce customer-specific labels on demand for each shipment and for advanced shipment notices (ASNs).
You can also use labeling in manufacturing. You can generate labels for WIP jobs and flow manufacturing. You can also use the Oracle Manufacturing Execution System (MES) to generate labels from the desktop.
-
Prior to the start of the first operation: For example, you can create a label that contains routing information.
-
During any operation: The location of the next assembly routing maybe dynamically determined based on the outcome of the operation. For example, material may need to be scrapped during an operation. A label can be printed to route the material to the scrap subinventory.
-
After quality inspection of an operation: Material may not be of quality; therefore, it might be sent to a prior operation, or to scrap, or sent forward to the next operation.
-
At completion: An organization may build items to stock, in which case the finished product requires a label for stocked material. An organization may also assemble to order, in which case finished products are not stored in inventory, rather they are sent directly to shipping. A label can be printed with shipping instructions, address, sales order number, and so on.
Oracle Warehouse Management labeling features enable you to:
-
Produce supplier or customer bar code labels for products and containers
-
Produce partner-compliant shipping labels that are specific to the carrier and customer
-
Add the material status to certain types of labels.
Related Topics
Manually Printing Labels Using the Manual Interface
Customer Labeling Requirements
Defining Label Formats and Sets
Associating Label Types to Business Flows
Customer Labeling Requirements
Customer labels are typically centered on the following major requirements:
-
Label format
-
Label data
-
Bar code specifications
-
Symbol content
Oracle Warehouse Management labeling features enable all of these requirements to work together to meet customer guidelines. It supports the following label types:
-
Materials label: Provides information about an item, including the item's lot information, if applicable.
-
Serial label: Provides information that is specific to a serial of an item.
-
LPN label: Provides information about the License Plate Number (LPN). This label does not contain content information. You typically use the LPN label to identify LPNs as they travel throughout the warehouse.
-
LPN Contents label: Provides information about the LPN contents. You typically use this label to identify LPNs as they travel throughout the warehouse.
-
LPN Summary label: Provides information about the LPN and a summary view of the LPN contents. If an LPN contains multiple LPNs, then all of the contents of all the nested LPNs are summed by item, revision, and lot.
-
Location label: Provides information about specific warehouse locators.
-
Shipping label: Provides information for an outbound shipment. It does not include information about the contents of the shipment. It includes only addresses and information that is pertinent to the shipment itself.
-
Shipping Contents label: Provides information about outbound shipment. It includes information about all of the contents that are part of the shipment.
-
WIP Content label: Provides information about the WIP components that are picked for a WIP job. It includes component number, serial, lot, job number, assembly number, and start date.
-
Flow Content label: Provides information about flow components. It includes the component number, serial, lot, job number, assembly number, and start date.
-
Dispense Pallet label: Provides information about a pallet. It includes batch information, batch completion information, quantity, and formula information.
-
Process Dispense Material label: Provides information about dispensed material. It includes the organization, batch number, batch step number, security tag, dispense number, dispense quantity, dispense UOM, and return to stock quantity.
-
Process Material label: Provides information about material remaining from the dispense operation. It includes weight, container, dispensing type, and hazard class information.
-
Process Product label: Provides information about a finished product. It includes batch information, batch completion information, quantity, and formula information.
-
Process Sample label: Provides information about a product sample.
-
WIP Move Contents: Provides information about the attributes associated with a WIP move transaction. You print this label type when you perform a move transaction within the Oracle Manufacturing Execution System (MES).
Electronic Product Code
If you selected LPN, LPN Contents, or LPN Summary as the label type, you can create Electronic Product Code (EPC) information for the label. Some retailers require EPC information from their supplier. Oracle Warehouse Management models EPCs after LPNs. You can generate EPCs while LPNs are completed, packed, or staged.
Related Topics
Defining Label Formats and Sets
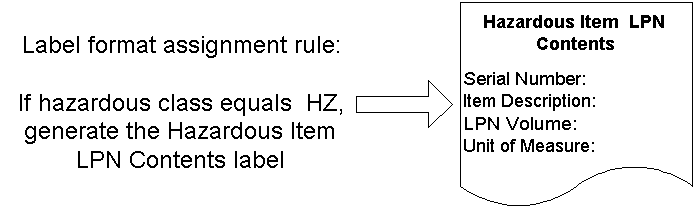
When you define label formats and sets, you are setting up the data fields to include on a particular label. You can use system-seeded fields or create custom fields to include on a label. The following figure provides an example of the data that might appear on a small hazardous items LPN content label. To define this label, you set up the following label fields in the system: serial number, item description, LPN volume, and unit of measure.
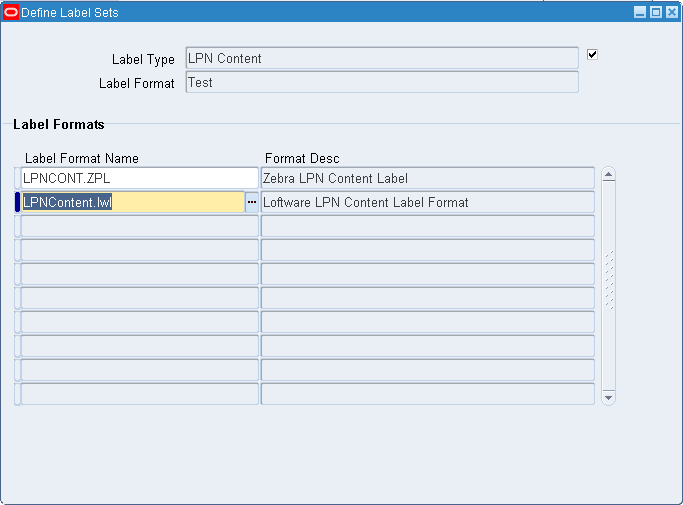
When you create a label set, you can associate multiple label formats of the same label type together. When you select the label set for printing, then the system prints all of the formats within the label set. You can create label sets for the following label types: LPN, LPN content, material, and serial.
Setting Up Label Formats and Sets
Before you can specify label generation points and construct label format rules, you must define label formats and sets. You can use label sets to print multiple label formats of the same label type. You define labels in the Define Label Field Variables window.
-
Navigate to the Define Label Formats and Sets window.
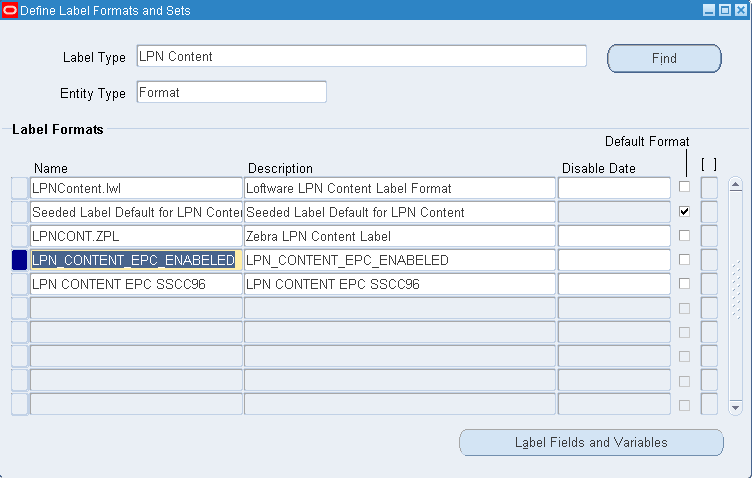
-
In the Label Type field, use the list of values to select the label type for which you want to define label formats.
-
Select the entity type. If you select format, you can create a label format. If you select Set, then you can create a label set.
-
In the Label Formats region, Name field, enter a name for the label.
This name should be the name that is recognized by the third-party printing software.
-
Enter an optional description to describe the label format.
-
In the Disable Date field, enter an optional date on which this label format can no longer be used.
-
Select the Default Label check box to identify that this label format will be used as the default label type if the system cannot find a rule that determines the label format.
Note: You can specify only one label format as the default label.
-
Save your work.
Note: You must disable printer assignments for label formats before you can delete individual label formats.
-
Click Label Fields to open the Define Label Field Variables window, or click Define Sets to define sets to open the Label Sets window.
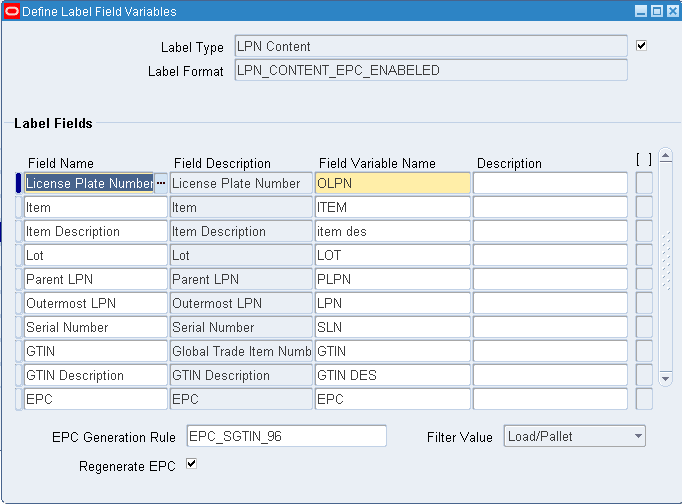
Defining Label Field Variables
These instructions assume you defined a label format and that you clicked the Label Fields and Variables button.
Note: You cannot print labels for which you do not define label fields.
-
In the Label Fields region, Field Name field, use the list of values to select the data element that represents the field on the label.
The label type that you selected in the Define Label Formats window determines the list of values for this field.
Note: Custom label fields that you created also appear in this list. A value of Yes in the Custom SQL column indicates the field is a custom SQL field.
-
In the Field Variable Name field, enter a unique text string that will be used as a variable to represent the data field on the label format.
-
Enter an optional description for the field variable name.
-
If you selected EPC as the field name, select an EPC generation rule from the list of values.
-
If you entered an EPC generation rule, select the Regenerate EPC checkbox to always generate a new EPC for this label type. The new EPC replaces all cross-reference associations. If you do not select the Regenerate EPC check box, then the system checks for a previously generated EPC. If found, the system uses that EPC. If an EPC does not exist, the system uses the current EPC rule, and generates a new EPC.
-
Select a filter value for the EPC generation rule.
-
Repeat steps 1 through 3 to enter additional label fields.
-
Save your work.
Adding Label Formats to a Set
To add label formats to a set you select from previously defined label formats. When you print the label set, the system prints all of the labels assigned to the set. You can add a label format to a set more than once. If you do so, the label prints more than once.
Related Topics
Associating Label Types to Business Flows
Warehouse Organization Setup, Oracle Warehouse Management Implementation Guide
Defining Custom Label Fields
You can create custom label fields and associate them with label formats. This enables you to have additional control over the values that are listed on a label. You can write a custom SQL statement to create the custom label field. For example, if you have a requirement to show the carrier PRO number, and the system does not seed this field, then you can write a custom SQL statement that creates this field. For more information about creating the custom SQL statement and SQL restrictions see Custom Label Fields in the Oracle Warehouse Management Implementation Guide.
The custom label field that you create appears in the Define Label Fields window along with the seeded values. You should restrict this window from certain responsibilities; only users with knowledge of SQL should have access to this window. You can use any field that you create on this window in a label. To define custom label fields:
-
Navigate to the Define Custom Labels window.
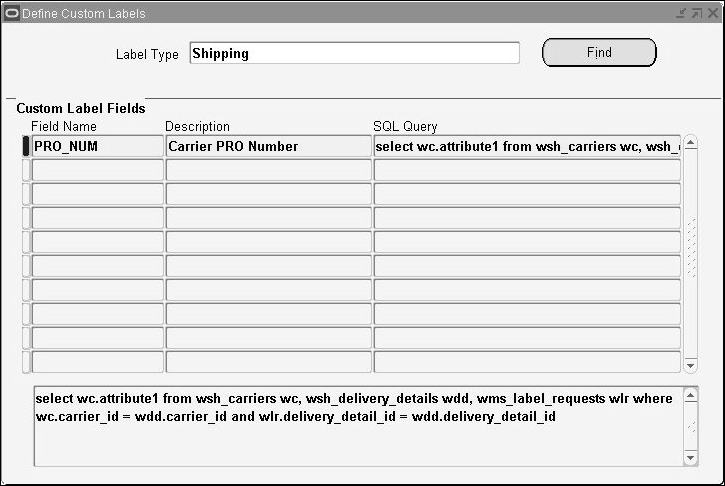
-
Select the label type. This associates the fields with the appropriate label type.
-
Enter the field name, description, and SQL query statement.
-
Save your work.
Related Topics
Defining Label Formats and Sets
Defining Labels for Clients
If you are operating in a third party logistics environment, you can create and assign labels by client to insure that the materials are associated with the proper client. When you create a label format, you can assign the client code and client item code information.
Note: You can use the flexfield attribute you created during setup to assign the client code information.
You can define client and client item information for the following label types:
-
Material
-
Serial
-
LPN Content
-
LPN Summary
-
Shipping Contents
After you have created the label, then you can assign it to the appropriate business flow. After you have assigned it to the business flow, you can then create a label format rule based on the label format.
Note: When you generate the shipping contents label, the system uses the name of the client instead of the code used in the warehouse to segregate material.
Related Topics
Associating Label Types to Business Flows
Setting Up Label Format Assignment Rules
After you define label formats and sets and associate them with the appropriate business flows, you can define label format assignment rules. Label format assignment rules associate a particular label with a business object based on the parameters and restrictions that you specify. For example, assume that you have defined an LPN Content label for small hazardous items. The following figure provides an example of a rule that you might create to generate an LPN Content label. When Oracle Warehouse Management executes this rule, it returns the value LPN_HAZ if all of the rule's restrictions are met that represent the label format for the LPN Content label.
How to Define Label Format Rules
After you associate label types with business flows, you can create label format assignment rules. You use the Oracle Warehouse Management Rules window to create these rules.
Note: Before you set up label format rules, you should manually plan and design your rule.
-
Navigate to the Oracle Warehouse Management Rules window.
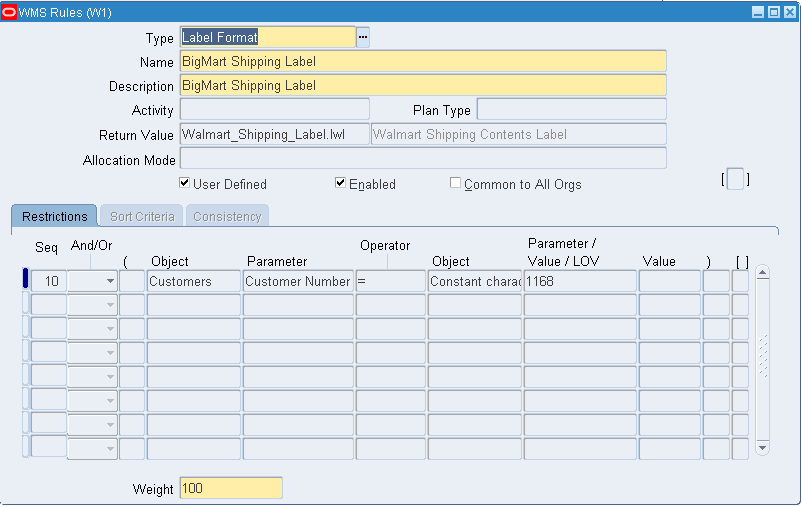
-
In the Type field, select Label Format.
-
Enter a name for the label format assignment rule.
Note that the Sort Criteria and Consistency tabs are disabled for this type of rule.
-
Enter a description for the label format assignment rule.
-
In the Return Value field, use the list of values to select the label format that you want the system to generate whenever the rule is executed.
Note: The User Defined check boxes User Defined, Enable, and Common to All Orgs are explained following the instructions on the rule definition.
-
In the Weight field (located at the bottom of the window), enter a weight that specifies the rule processing priority in relation to other label rule execution priorities.
Higher-weighted rules receive a higher priority and will be processed first.
-
On the Restrictions tab, in the Seq field, enter a sequence number for the first restriction.
-
In the Object field, use the list of values to select the first business object for the rule.
-
In the Parameter field, enter the value that is associated with the business object.
-
In the Operator field, select the operator that represents the rule conditions.
-
In the second Object field, use the list of values to select the appropriate business object.
-
In the second Parameter field, either use the list of values or enter the parameter value that is associated with the second business object.
-
Repeat steps 7 through 12 to add more restrictions to your rule; however, in the Seq field, enter a subsequent sequence number and in the And/Or field, join the new restriction with the previously defined restriction.
-
If the Common to All Orgs check box is selected, then clear it.
Rules should not be selected across organizations because task types, resources, and departments are all organization specific.
-
If more than one restriction is specified, select the options for the restriction.
This determines how the restrictions should be considered during execution of the rules.
-
Select the Enabled check box if you want to enable the rule.
Note: When you enable a rule, the system compiles the rule and checks for possible syntax errors.
-
Save your work.
Related Topics
Defining Label Formats and Sets
Associating Label Types to Business Flows
After label formats are set up, you must assign them to a specific warehouse business flow so they can be printed automatically as part of that business flow. For example, if a miscellaneous transaction is done through the mobile device then the associated label type can be printed.
Note: Labels are printed mainly from transactions using mobile devices. The only transactions from the desktop that trigger labels are PO Receiving and Oracle Work in Process completion transactions.
You can also print the same label type from different business flows with a different format used at each flow. For example, many times a package is labeled with a carton label when it is picked (Shipping Contents label type at Pick Load business flow), but is then labeled with a shipping label when it is shipped (Shipping Contents label type at Ship Confirm Business flow.) This enables you to set up a label format selection rule that is based on the business flow that the label print request was generated from.
The following table provides a list of the various business flows and the types of labels that you can associate with each flow. The horizontal header row of the table lists the various label types that are available. The far left vertical column lists the warehouse-related business flow. Yes indicates that the system can generate the label type for that business flow. No means that the system does not generate that label type for the business flow.
| Bus. Flow | Mat'l | Serial | LPN | LPN Cont. | LPN Sum | LOC | Ship | Ship Cont. | WIP Cont. | Flow Cont. | WIP Move Cont. |
|---|---|---|---|---|---|---|---|---|---|---|---|
| Receipt | Yes | Yes | Yes | Yes | Yes | No | No | No | No | No | |
| Inspection | Yes | Yes | Yes | Yes | Yes | No | No | No | No | No | |
| Deliver | Yes | Yes | Yes | Yes | Yes | No | No | No | No | No | |
| Receiving Put away drop | Yes | Yes | Yes | Yes | Yes | No | No | No | No | No | |
| LPN Correction / update | Yes | No | Yes | Yes | Yes | No | No | No | No | No | |
| Sales order Cross-Dock | Yes | Yes | Yes | Yes | Yes | No | Yes | Yes | No | No | |
| Replen. drop | Yes | No | Yes | Yes | Yes | No | No | No | No | No | |
| Cycle count | Yes | No | Yes | Yes | Yes | No | No | No | No | No | |
| Phys. Count | Yes | No | Yes | Yes | Yes | No | No | No | No | No | |
| Mat. Stat. Update | Yes | Yes | Yes | Yes | Yes | Yes | No | No | No | No | |
| Cost Group Update | Yes | No | Yes | Yes | Yes | No | No | No | No | No | |
| Lot Split / Merge | Yes | Yes | Yes | Yes | No | No | No | No | No | No | |
| Misc / Alias Receipt | Yes | No | Yes | Yes | Yes | No | No | No | No | No | |
| Inter-org Xfer | Yes | Yes | Yes | Yes | No | No | No | No | No | No | |
| Sub. Xfer | Yes | Yes | Yes | Yes | No | No | No | No | No | No | |
| LPN Gen. | No | No | Yes | No | No | No | No | No | No | No | |
| Serial Gen. | No | Yes | No | No | No | No | No | No | No | No | |
| Pick Load | Yes | No | Yes | Yes | Yes | No | Yes | Yes | No | No | |
| Pick Drop | Yes | No | Yes | Yes | Yes | No | Yes | Yes | No | No | |
| Pack / unpack / update LPN | Yes | No | Yes | Yes | Yes | No | No | No | No | No | |
| Ship Con. | Yes | Yes | Yes | Yes | Yes | No | Yes | Yes | No | No | |
| Cartonization. | Yes | No | Yes | Yes | Yes | No | Yes | Yes | No | No | |
| Misc. / Alias Issue | Yes | Yes | Yes | Yes | Yes | No | No | No | No | No | |
| Dyn. Loc | No | No | No | No | No | Yes | No | No | No | No | |
| Import ASN | No | No | Yes | Yes | Yes | No | No | No | No | No | |
| WIP Comp. | Yes | Yes | Yes | Yes | Yes | No | No | No | No | No | |
| Put. Pregen. | Yes | Yes | Yes | Yes | Yes | No | No | No | No | No | |
| WIP Pick Load | Yes | No | Yes | Yes | No | No | No | No | Yes | No | |
| WIP Pick Drop | Yes | No | Yes | Yes | No | No | No | No | Yes | No | |
| Inv. Put. drop | Yes | Yes | Yes | Yes | Yes | No | No | No | No | No | |
| Flow Line Start | No | No | No | No | No | No | No | No | No | Yes | |
| Flow Line Op. | No | No | No | No | No | No | No | No | No | Yes | |
| Flow / Work ord. Assem. Comp. | Yes | Yes | Yes | Yes | Yes | No | No | No | No | No | |
| Replen. Load | Yes | No | Yes | Yes | Yes | No | Yes | Yes | No | No | |
| WIP / Flow Put Away Drop | No | No | No | No | No | No | No | No | No | Yes | |
| Pck. Wrkbch | No | No | Yes | Yes | Yes | No | Yes | Yes | No | No | |
| Manufacturing Cross-Dock | Yes | Yes | No | No | No | No | No | No | Yes | No | |
| Pick Release | No | No | No | No | No | No | No | Yes | No | No | No |
| Replen. Drop | No | No | No | Yes | No | No | No | No | No | No | No |
| Flow Line Start | No | No | No | No | No | No | No | No | No | Yes | No |
| WIP Move Job Txn | No | No | No | No | No | No | No | No | No | No | Yes |
| Process Business Flow | Dispense Pallet | Process Dispense Material | Process Material | Process Product | Process Sample |
|---|---|---|---|---|---|
| Process Dispensing | Yes | Yes | Yes | No | No |
| Process Production | No | No | No | Yes | No |
| Process Quality | No | No | No | No | Yes |
From the previous tables, the following business flows are also supported in the Mobile Supply Chain Applications (MSCA):
-
Receipt
-
Inspection
-
Delivery
-
Replenishment Drop
-
Cycle Count
-
Physical Count
-
Miscellaneous/Alias Receipt
-
Inter-Org Transfer
-
Subinventory Transfer
-
Serial Generation
-
Pick Load
-
Pick Drop
-
Ship Confirm
-
Miscellaneous/Alias Issue
-
Dynamic Locator
-
WIP Completion
-
Process Dispensing
-
Process Production
-
Process Quality
-
WIP Move Contents
How to Associate Label Types to Business Flows
-
Navigate to the Assign Label Types to Business Flows window.
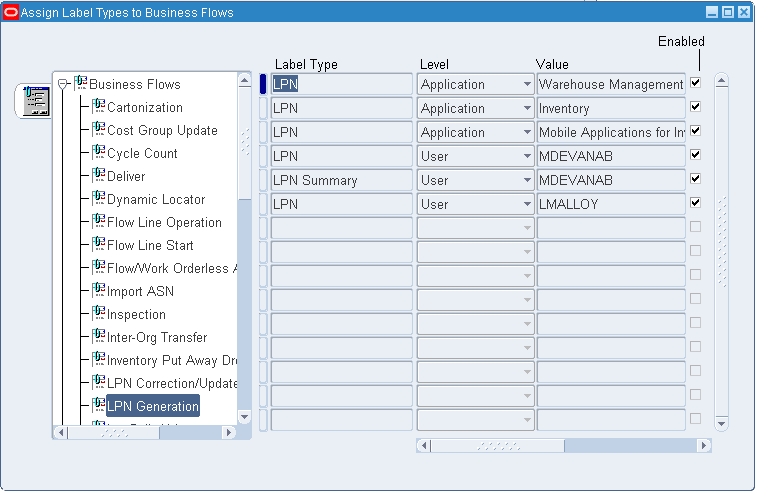
-
In the left panel of the window, Expand the Business Flows icon to display a list of business flows.
-
Select the business with which you want to associate a label type.
-
In the Label Type field, use the list of values to select the label type that you want to associate with the business flow.
Note: The list of values displays only those label types that are valid for the business flow.
-
In the Level field, select the level at which you want to control printing for this label type.
Valid values are Site, Application, Responsibility, and User.
-
In the Value field, select the value for the level that you selected in step 5.
The Value field is disabled if you selected Site as the level in step 5. If you selected Application, then the list of values displays a list of valid applications. If you selected User, then the list of values displays a list of valid users. If you selected Responsibility, then the list of values displays a list of valid responsibilities.
The Enabled check box indicates that you can use this label type to generate the label associated with the business flow. Clearing this check box disables this association, and the label type will not be generated for the business flow.
-
In the Comments field, enter any comments about the association that you just created.
-
Save your work.
Note: Not all label fields for a given label type are available during all business flows. In some situations, the data is available only at certain times and cannot be obtained during other business flows. In other situations, the data is located in different places depending on the business flow and not all locations of the data have been implemented yet.
Note: The Delivery business flow is triggered by the delivery of material from receiving to inventory. If you want to use LPN label types, then you should use the Receiving Put Away Drop business flow.
Related Topics
Defining Label Formats and Sets
Label Printing for Pallets and Cases Without Cartonization
You can also print a shipping contents label for a case or pallet if you do not enable cartonization. The system produces labels for the case or pallet based on the Pick UOM, quantity and the user task type stamped on the task. To set up printing by picking by case or pallet you must enable the following:
-
Setup the pick UOM (Required): You must enable the pick UOM on the Subinventories window.
-
Setup the label format and assign it to the Pick Release business flow (Required): You must setup the shipping contents label format and assign it to the Pick Release business flow.
-
Setup the user task type attributes (Optional): You can use the User Task Type Attributes window to specify the task type, if the task should honor the pick UOM, and specify the pick load page template to use.
Label Printing for Cases and Pallets
The pick release business flow ensures label printing occurs with or without cartonization. The system produces labels for cases or pallets on the task quantity and user task type. The pick release and label printing logic verifies if the User Task Type Attribute Honor Case Pick is enabled. If the attribute is enabled, then the system generates a unique LPN for each case without any associated contents.
For example, if you pick 50 Ea and 10 Ea and create a case that resides in subinventory that has Pick UOM of Ca. If you do not enable cartonization, and a label printing setup exists for the pick release business flow, you can still print a label for the case. However, if you want to print five labels each with a unique LPN and want to pick it as one task, then you must associate this task with the associated task type parameters. After you enable the pick release or cartonization business flow, then you can generate as many labels as the nearest whole number in the pick UOM.
When you select an honor case pick task type, the pick UOM of the subinventory controls the number of labels printed even if you use the allocation mode Allocate Entire LPN, pick an entire LPN, or pick an indivisible lot.
Related Topics
Setting Up User Task Type Attributes
Defining Label Formats and Sets
Associating Label Types to Business Flows
Defining Subinventories, Oracle Inventory User's Guide
Defining Printer IP
You can define the IP addresses for label printers.
-
Navigate to the Define Printer IP window.
-
Select the printer name from the list of values.
The printer type, and a description of the printer are provided automatically.
-
Enter the IP address in the IP Address field.
-
Enter the port number the printer uses in the Port field.
-
Select Test to test the printer.
-
Save your work.
Related Topics
Defining Label Formats and Sets
Viewing Label Requests
Every request for label printing creates a history record. You can analyze records of the label requests that have been generated. The history contains the XML data that was generated as part of the label request as well as other information regarding that label request. You can query the history of requests based on any of the relevant attributes of the request. You can also resubmit the label request. You can query, view, and resubmit label requests using the Label Requests History window.
How to View Label Request History
-
Navigate to the Label Requests History window.
-
Enter the query information on the Request Related or Label Info tab.
Request Related
-
User
-
Printer
-
Business Flow
-
Label Type and Label Format
-
Request Status: Success/Error
-
Request Date: To/From
Label Info Tab
-
Organization
-
Item
-
Subinventory
-
Locator
-
LPN
-
Sales Order
-
Delivery
-
-
Click Find.
-
Results appear in the Label Requests History window.
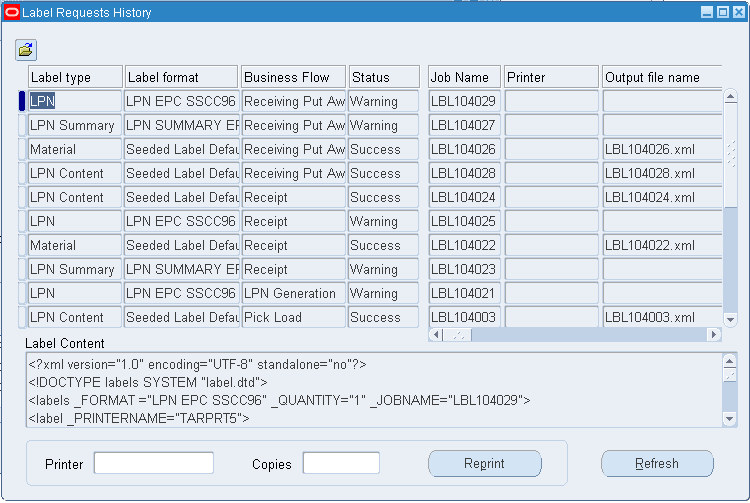
How to Resubmit Label Print Requests
You can resubmit a particular label request to be printed. This resubmission sends the XML as a new label request through the printing mode that has been specified. You can resubmit the job to a different printer than the original printer it was sent to. You can also specify the number of copies of the labels. You may need to resubmit a label for any of the following reasons:
-
The original label is unreadable.
-
The Original label was lost or destroyed.
-
The problem occurred with the integration between Oracle Warehouse Management and the third-party label printing software.
-
When resubmitting a label request, specify the printer and the number of copies.
-
Select Reprint.
Mobile Label Requests
You can use the mobile user interface to print labels.
-
Navigate to the Label Printing page.
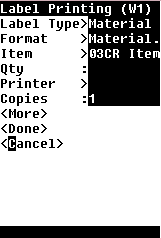
-
Enter the label type and format.
-
Enter the information associated with the label type you selected. For example, if you selected material as the label type, you must enter the item and item quantity. If you selected location as the label type, you must enter the subinventory and locator.
-
Enter the printer and number of label copies to print.
-
Choose <More> to print additional labels, <Done> to finish printing, or <Cancel> to cancel the print job.
Note: You can print labels based on label format. The printer selection logic searches for printers at the format level prior to searching for printers at the user level.
Mobile Resubmission of Label Requests
You can use the mobile interface to view labels that you recently printed and reprint those labels. You can resubmit labels for printing that you originally printed with the user id with which you are currently logged onto the system. You can select label requests to be reprinted based on the following criteria:
-
Last number of labels printed for an active user
-
Last number of labels of a certain label type printed for an active user
-
Business flow, label type, or LPN
You can resubmit the job to a different printer than the original printer it was sent to through the mobile user interface.
-
Navigate to the mobile Label Requests History page.
-
On the Find page, enter any of the following search criteria:
-
Printer
-
Business Flow
-
Label Type
-
LPN
-
Requests
-
-
Choose <Find>.

-
The Label Requests History page displays information about the label and enables you to resubmit the label request.
The page displays the following information:
-
Date and Time
-
Printer
-
Business Flow
-
Label Type
-
Format
-
Item
You can navigate through the labels with the <Next> and <Previous> buttons.
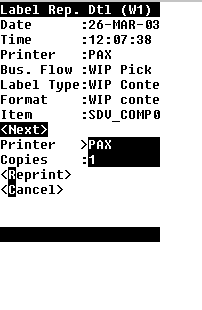
-
-
To resubmit the job to a different printer than the original printer it was sent to, specify the printer and number of copies.
-
Choose <Reprint>.
Explaining Material Handling Devices
The Oracle Warehouse Management integration tool kit enables you to integrate with material handling devices such as conveyors, carousels, pick-to-light systems and RFID readers.
Oracle Warehouse Management can export task information to material handling devices in the form of a PL/SQL API, an XML flatfile, or a CSV flatfile. Material handling devices use the Device Response PL/SQL API to return completed task information to Oracle Warehouse Management.
The following steps detail the material handling device process:
-
Oracle Warehouse Management sends information about the tasks created at pick release to the Warehouse Control System through the device integration toolkit.
-
The Warehouse Control System manages the tasks that Oracle Warehouse Management generates. The tasks may be picked through an automated storage and retrieval system (ASRS), a pick-to-light system, or other automated equipment. The Warehouse Control System coordinates the transacting of the tasks via the material handling device.
-
After the tasks are transacted, the Warehouse Control System calls the Oracle Warehouse Management Device Response API to notify Oracle Warehouse Management the tasks are complete. Discrepancy information, such as quantity information, drop locations, and reason codes, is included if necessary.
-
Oracle Warehouse Management updates the tasks according to the information received through the Oracle Warehouse Management Device Response API.
Related Topics
Explaining RFID Device Integration
Material Handling Devices and Business Events
Defining Devices, Oracle Warehouse Management Implementation Guide
Assigning Devices to Business Events, Oracle Warehouse Management Implementation Guide
Explaining Radio Frequency Identification Device Integration
Radio frequency identification (RFID) enables you to tag any physical item with a unique identifier that a scanner can read. You can associate the identifier with a system representation of the object that contains all associated item records.
An RFID device uses a PL / SQL API to export an RFID event to Oracle Warehouse Management. Oracle Warehouse Management returns the success or failure of the transaction to the device in the form of PL/SQL API, XML, or CSV. This is in contrast to material handling integration.
The following steps detail the RFID device integration process:
-
The RFID device sends the RFID device name that interrogates the object and the LPN number to the Oracle Warehouse Management system through the device integration tool kit.
-
The Oracle Warehouse Management system determines the business event and automatically performs the associated task.
-
After the tasks are completed, Oracle Warehouse Management system sends the success or failure of the message to an output device (usually a light stack or computer beep) by calling PL/SQL API, XML, or CSV.
Electronic Product Code
Certain retailers and government organizations require suppliers to label pallets, cases, and items, with an Electronic Product Code (EPC). An EPC relates to a Global Trade Identification Number (GTIN) or a Serial Shipping Container Code (SSCC). The GTIN is a unique identifier given to each class of product, such as a 12-ounce bottle of pink soap. The EPC uses the GTIN as a base, and extends it one step further so you can uniquely identify each bottle of soap. That is, each 12-ounce bottle of pink soap in a box would have the same GTIN, yet a different EPC. Many components that comprise an EPC, such as an EPC Manager and Object Class are identical in meaning to the manufacturer code and product code that comprise a GTIN. Where the labeled unit does not correspond to a standard pack represented by a single GTIN, an SSCC encoding would be used instead. EPC generation is built on the foundation for GTIN & SSCC generation. To provide flexibility to meet the multiple mandates and to change as the standards bodies change, EPCs are defined using an extensible framework
Related Topics
Material Handling Devices and Business Events
Defining Devices, Oracle Warehouse Management Implementation Guide
Assigning Devices to Business Events, Oracle Warehouse Management Implementation Guide
Material Handling Devices and Business Events
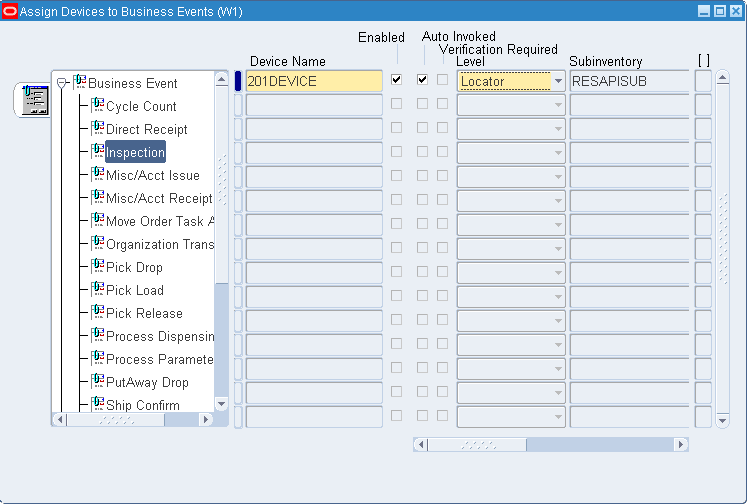
Oracle Warehouse Management enables you to associate material handling devices to business events so Oracle Warehouse Management can automatically export the task information during business event processing.
For example, you can set up Oracle Warehouse Management to automatically export a list of totes and pick locations to a conveyor at pick release.
To Assign Devices to Business Events
-
Navigate to the Assign Devices to Business Events window.
-
Select a business event, the available choices are:
-
Cycle Count- Cycle count entry
-
Direct Receipt- PO receipt with direct routing
-
Inspection- PO receipt with inspection routing
-
Misc./Acct. Issue- Miscellaneous issue transaction or account alias issue transaction.
-
Misc./Acct. Receipt- Miscellaneous receipt transaction or account receipt transaction.
-
Move Order Task Allocation- Move order line allocation.
-
Organization Transfer- Organization transfer transaction.
-
Pick Drop- Warehouse management task drop.
-
Pick Load-warehouse management pick load.
-
Pick Release- Release sales orders.
-
Putaway Drop-Warehouse management putaway drop.
-
Ship Confirm-Ship confirm transaction.
-
Standard/Inspection Receipt- PO receipt with standard or inspection routing.
-
Subinventory Transfer- Subinventory transfer transaction.
-
Truck Load- Truck load for ship confirm.
-
Truck Load and Ship- Truck Load and Ship- Load truck; close and ship transaction.
-
WIP Pick Release- Work in process component pick release.
-
Process Dispensing Event- Process manufacturing material dispense transaction.
-
Process Parameter Event- Process manufacturing process parameter transaction.
-
-
Select the device to associate to the business event. The available types of devices depend on the business event you select.
-
Uncheck the Enabled check box to disable the device.
-
Uncheck the Auto Invoked check box to disable Auto Invoke.
-
Uncheck the Verification Required check box if you do not want to system to verify the minimum required percentage of EPC-tagged cases are present on an EPC-tagged pallet for RFID-enabled business flows.
-
Select the control level from the drop down list.
Note: If the device you selected is an RFID, the control level is always locator, and the system assigns the value automatically.
-
If applicable, enter the subinventory.
-
If applicable, enter the associated value. If you select organization as your control level, the value field is populated automatically with the current organization. If you select locator, the value is the locator number. If you select user, the value is the associated user.
Material Handling Device Sign On
Oracle Warehouse Management enables you to sign onto a particular device in order to restrict the tasks you receive. When you navigate to the Tasks page, you can sign onto devices. You can use the Choose Eqp/Sub page to change the devices you are signed onto.
You may only sign onto devices that are associated with subinventories. When you are signed onto a device, you receive tasks from only the subinventory with which the device is associated.
Multiple Device Sign On and Carousel Pods
Oracle Warehouse Management enables you to sign onto more than one device. When you sign on to multiple devices, you receive tasks from the subinventories associated to the devices. You receive tasks from the devices in the order in which you signed onto the devices. In addition, Oracle Warehouse Management dispatches tasks into your queue so you always have tasks from each device in your queue. The system sends device integration information when it dispatches a task to a device.
For example, suppose you sign onto devices Carousel_1, Carousel_2, and Carousel_3 in that order. When you attempt to accept the next task, you receive one task from each carousel dispatched into your queue (assuming there are available tasks from each carousel). At that time, the integration information is sent so all three carousels begin rotating for the first series of picks. The system displays the task information for Carousel_1 on the mobile device and requests you to confirm the pick. Once you complete the task, the system requests you to confirm the pick for the task from Carousel_2. At the same time, the system dispatches you another task from Carousel_1, and sends integration information for that task in order for Carousel_1 to continue rotating while you confirm the tasks for Carousel_2 and Carousel_3. You continue to receive tasks from Carousel_1, Carousel_2, and Carousel_3 in that order, and the system continues to send integration information in advance.
Related Topics
Material Handling Devices and Business Events
Defining Devices, Oracle Warehouse Management Implementation Guide
Assigning Devices to Business Events, Oracle Warehouse Management Implementation Guide
Defining Devices
Use the following procedure to define devices. You can also use the Define Devices window to manually sign off employees from a device.
To define devices
-
Navigate to the Define Devices window.
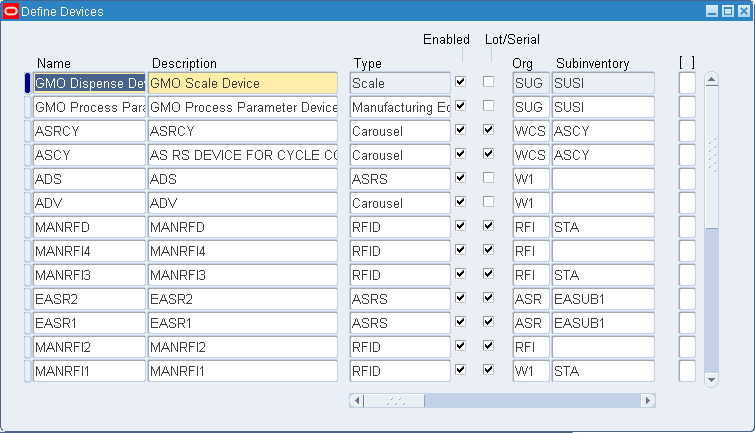
-
Enter a name and a description for the device.
-
Enter or select the device type from the list of values. The available device types are:
-
Carousel
-
Scale
-
Conveyor
-
Pick-to-light
-
Pick-to-audio
-
ASRS
-
RFID
-
-
Select the Enabled check box to enable the device.
-
Select the Lot/Serial check box if this device can track by lot number or serial number.
Note: RFID devices do not support lot or serial information.
-
Enter the Organization to assign the device to in the Org field.
-
Optionally, enter the subinventory in the Sub field.
Note: If you assign an RFID device to a subinventory, you are required to assign the RFID device to a locator.
-
Optionally, enter the locator.
-
Enter the output method in the Output Method field. The available choices are:
-
XML
-
API
-
CSV
-
-
Enter the output directory. If you selected API as your output method, this field is not available.
-
Enter the prefix. If you selected API as your output method, this field is not available.
-
Optionally, enter the batch limit
-
Optionally, enter the input method. For an RFID device, the device input method is always API.
-
Optionally, enter the device model.
-
Select the Notify on Task Completion check box to notify you when the task is complete. This is not applicable for RFID devices.
-
Select the Force Sign On check box to force employees to sign onto the device. If employees do not sign on to the device the system does not dispatch tasks to that employee. This is not applicable for RFID devices.
-
Optionally, enter an employee to assign to the device.
-
Select the Multi Sign on check box to allow multiple employees to use the device.
-
Optionally, specify the message template for the device. The system uses this template to interpret response messages from the device.
-
Save your work.
To manually sign off an employee from a material handling device
-
Navigate to the Define Devices window.
-
Select the desired device.
-
Select Sign Off from the Tools menu. This signs off the employee assigned to the selected device.
-
Save your work.
Related Topics
Material Handling Devices and Business Events
Explaining RFID Device Integration
Defining Device Response Messages
Assigning Devices to Business Events, Oracle Warehouse Management Implementation Guide
Defining Devices, Oracle Warehouse Management Implementation Guide
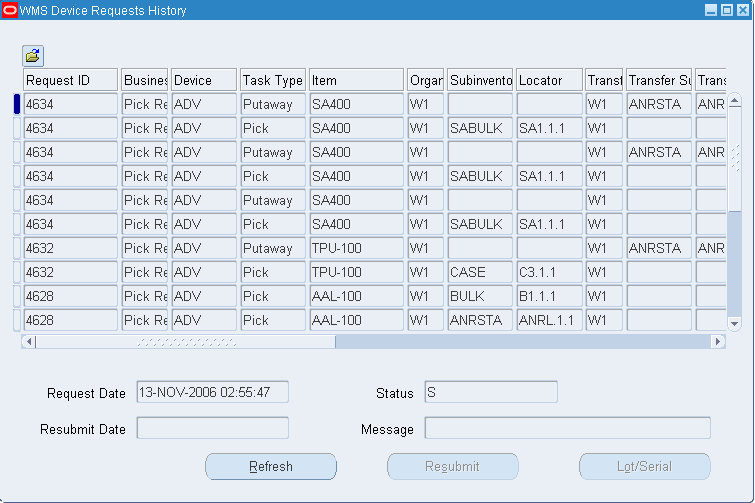
Explaining Device History Requests
The Device Requests History window enables you to view the device history across the system. You can view which device was, which user used the device, and the task type as well as other additional information.
-
Navigate to the Device Request History window.
-
Enter the desired search criteria in the Find Device Requests window.
-
Choose Find.
-
The Device request window displays the following fields. The fields populate depending on the different task types.
-
The Oracle Warehouse Management Device Requests History window displays the Request Date, Status, Resubmit Date and Message of the selected task.
-
Choose Lot/Serial to view the lot and serial information associated with the device request.
-
Close the window when finished.
-
Choose Refresh to refresh the Oracle Warehouse Management Device Requests History window.
Note: Viewing Serial Genealogy, Oracle Inventory User's Guide
Warehouse Control System
The Warehouse Control System provides a bridge between devices and Oracle Warehouse Management. You can use it to push tasks to devices and receive real-time information about the status of devices. For example, if a particular device becomes inactive, the Warehouse Control system cancels all tasks assigned to the device and informs Oracle Warehouse Management the device is inoperative. The complexity of the Warehouse Control system depends on:
-
Device type
-
Device communication mechanisms and protocols
-
Number of automated devices and implemented systems
Note: To enable the Warehouse Control System you must enable the WCS field on the Organization Parameters window. See Defining Default Inventory Parameters, Oracle Inventory User's Guide.
Warehouse Control System Dashboard
The Warehouse Control System Dashboard contains a table that shows the devices defined in the current organization, total number of messages, and the total number of message attempts. In an ideal case, the total number of messages equals the total number of attempts. If the total number of attempts is more than the total number of messages, the device is busy, over loaded, or not responding.
The Device Level Directive Queue Status region lists the message information for devices that reside in the organization. It contains the following information:
-
Pending: Number of received and attempted pending task messages.
-
Current: Number of received and attempted current task messages.
-
Success: Number of successfully completed tasks and the number of message attempts for those tasks.
-
Failure: Number of failed tasks and the number of message attempts for those tasks.
-
Cancelled: Number of canceled tasks and the number of message attempts for those tasks.
-
Job Status: The status of the job. The green upwards arrow indicates the device is operational. The red downwards error indicates the device is not operational.
-
Listener Status: The status of the listener. The green upwards arrow indicates the listener is operational. The red downwards error indicates the listener is not operational.
Directive Queue
The Directive Queue enables you to view task and device information. You can navigate to the Directive Queue from either the Setup tab or the links on the Warehouse Control System Dashboard.
Carousel Configuration
You can search and view carousel information. If you have administrator privileges you can create and update configurations.
Log Information
You can use the Log window to view and export log information to a CSV file.
Related Topics
Searching for Tasks within the Directive Queue
Searching for Tasks Within the Directive Queue
You can use the Directive Queue to view task information. It displays task and device information.
To perform a basic search for task information:
-
Optionally, enter the Request Id. This is the ID for the concurrent request you submitted. See Submitting Concurrent Requests, Oracle Applications User's Guide
-
Optionally, enter the Task Id. This is the Id associated with the task.
-
Optionally, enter the business event. See Material Handling Devices and Business Events.
-
Select the Device type to search from the drop down list. See Explaining Material Handling Devices.
-
Select the Device from the drop down list. See Defining Devices.
-
Optionally, enter a directive.
-
Optionally, enter a task status. The available choices are:
-
Cancel
-
Current
-
Pending
-
Failure
-
Success
-
-
Click Go to view the task information.
To perform an advanced search for task information
-
Select Advanced Search from the Directive Queue page.
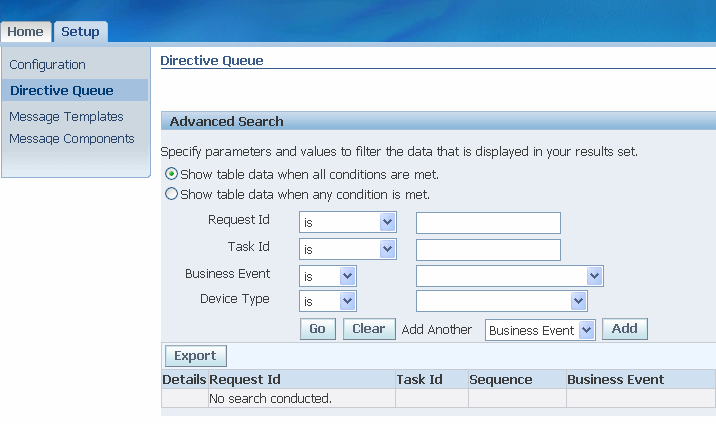
-
Select the desired search filter.
-
Optionally, enter the concurrent request Id information in the Request Id field. You can limit the search are based on the following criteria:
-
Is
-
Starts with
-
Greater than
-
Less Than
-
-
Optionally, enter the task Id information in the Task Id field. You can limit the search based on the following criteria:
-
Is
-
Starts with
-
Greater than
-
Less Than
-
-
Select the business event. See Material Handling Devices and Business Events.
-
Select the Device type. See Explaining Material Handling Devices.
-
Click Go to perform the search, Clear to clear the search criteria, or select another search limitation based on the previous criteria.
The Directive Queue contains the following information:
-
Details: You can show or hide the Task information details. If you choose to show the details the system displays the following information:
-
Zone: Area of the warehouse where you perform picks.
-
Prev Id: Previous Task Id is used to associate dependencies within a task directive set and across task directive sets. When a previous Id is present in this column, the dispatching queue waits for completion of the previous task before dispatching the next task.
-
Last Attempt: The date and time of the last dispatch attempt.
-
Task Group: Group of tasks dispatched within a single batch set of task directives.
-
Task Count: Number of tasks dispatched in the current task group.
-
Task Left: Number of tasks remaining to dispatch in the task group.
-
Attempts: The current number of dispatched attempts for the queue entry. This is the value that appears on the dash board. The system automatically cancels the task if it reaches the maximum number of attempts.
-
Addr: The task address value for the associated task zone.
-
Response Timeout: The interval the system waits for a device response.
-
Segment: 1 through 10 Segment locators that contain the subinventory segment locator values in positional order.
-
Last Updated: Last time the queue entry was updated.
-
-
Request Id: The concurrent request Id.
-
Task Id: The Id of the task.
-
Sequence: The sequence number of the task.
-
Business Event: The business event associated with the task
-
Device Type: The type of device associated with the task.
-
Directive: The task directive.
-
Request: The directive created for dispatch to the device. It may contain the subinventory, locator, LPN, item, quantity to pick, or other directives.
-
Response: The response message Oracle Warehouse Management receives from the material handling device.
-
Status: The status of the task.
Related Topics
Carousel Configuration
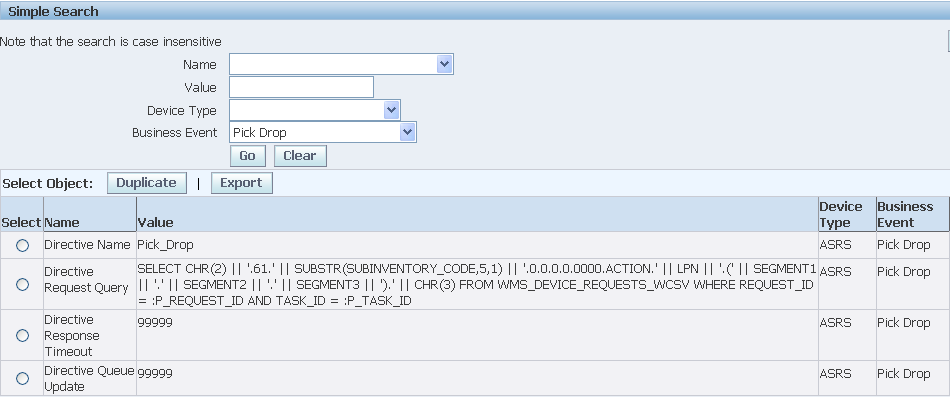
You can view carousel configuration information. You can conduct a simple search or an advanced search. To search for configuration information complete the following steps:
Performing Configuration Searches
To perform a configuration simple search
-
Select the configuration name from the list of values.
-
Optionally, enter the configuration value.
-
Select the Device type. See Explaining Material Handling Devices.
-
Select the Business Event. See Material Handling Devices and Business Events.
-
Click Go to conduct the search, or click Clear to cancel the search.
To perform a configuration advanced search
-
Select Advanced Search from the Configuration page.
-
Select the search filter.
-
Select the configuration Name from the drop down list.
-
Optionally, Enter the configuration Value. You can limit the search are based on the following criteria:
-
Is
-
Contains
-
Starts with
-
Ends with
-
-
Select the Device Type from the drop down list.
-
Select the Business Event from the drop down list.
-
Click Go to perform the search, Clear to clear the search criteria, or select another search limitation based on the previous criteria.
The Configuration Page contains the following information:
-
Name: The configuration name.
-
Value: The configuration value.
-
Device Type: The device type associated with the configuration.
-
Sequence Number: The configuration sequence number.
-
Business Event: The business event associated with the configuration.
-
Active: If this box is checked, the configuration is active.
Note: If you have administrator privileges you can edit the configuration.
To Edit device configurations
-
Select the Configuration to edit on the configuration page.
-
Select Edit.
-
Select the Device type. See Explaining Material Handling Devices.
-
Select the Business Event. See Material Handling Devices and Business Events.
-
Enter the Sequence number.
-
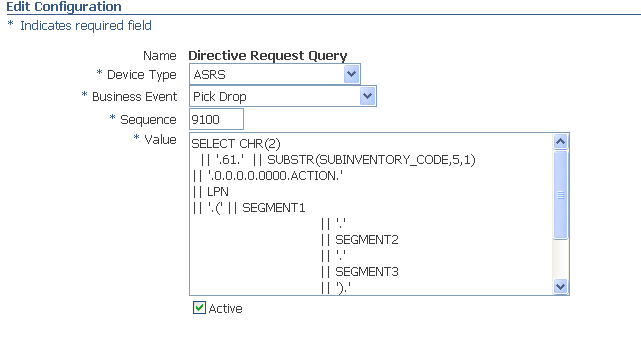
Enter or modify the Value with either single configuration parameter values or with SQL syntax used for creating directive requests and associated responses for device communication.
-
Select the Active check box to activate the configuration.
-
Select Apply to apply the changes, or Cancel to discard the changes to the configuration.
Related Topics
Searching for Tasks within the Directive Queue
Defining Device Response Messages
You can use the Warehouse Control System to create response messages that different devices can send. You can define the response messages to include various pieces of information as well as determine the information sequence. You create message templates and add components to the templates to create the response messages. The information you can include in a message is provided as a list of seeded components. You can create three types of message templates XML, message with delimiter, and message without delimiter. A message with delimiter uses a character such as a comma or semi colon, to separate the components of the message. In a message without delimiter, the component length separates each component in the message.
To create a message template
-
Navigate to the Message Templates page.
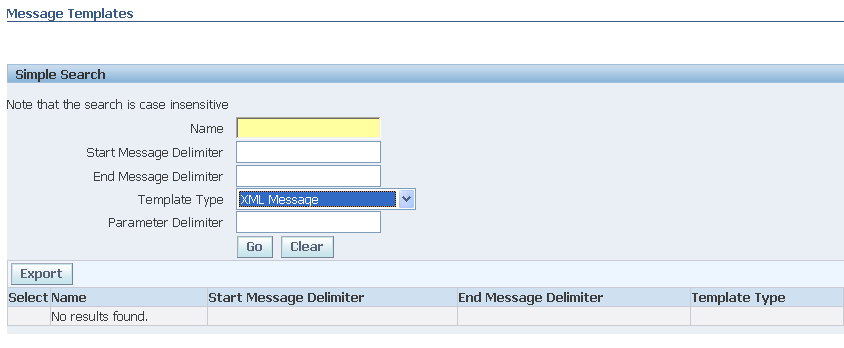
-
Click Create.
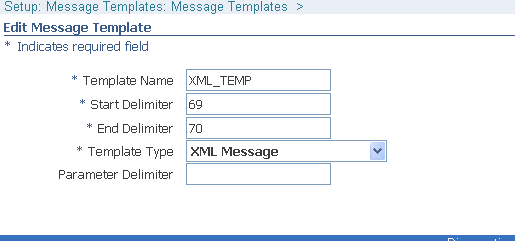
-
Enter the Template Name, Start Delimiter, End Delimiter, and Template Type. If you select message with delimiter as the template type, then enter the Parameter Delimiter.
-
Click Apply to save your work.
To add message components to the template
-
Navigate to the Message Components page and select a Message Template.

-
Click Create.
-
Enter the Sequence number. The sequence number determines the order the components appear in the response message.
-
Select a component from the list of values.
-
Optionally, enter the component length. This value determines how to separate the components in the message if you choose message without delimiter as the template type.
-
Optionally, enter the L / R padding.
-
Optionally, enter the start and end delimiters.
-
Optionally, enter the XML tag.
-
Click Apply to save your work.