Change Management
This chapter covers the following topics:
- Overview of Change Management
- Creating New Versions of a Contract Document
- Viewing Change Request Records
- Creating Change Requests
- Changing Contract Lines And Fields
Overview of Change Management
This chapter describes creating change requests and new versions of contract documents in Project Contracts.
Changes, or versioning, of contract documents may occur many times during a contract's life cycle. Oracle Project Contracts provides two methods for creating different contract versions: manually or through the workflow process.
You can create a manual change by incrementing the version of your contract document, and then manually updating the changes on the specific contract windows and fields.
When you create new versions using the workflow process for approvals, the Change Management windows are employed to implement the process. These windows enable you to add change request, descriptive text of the change, and reason codes to the change record. For each change, a funding flag indicates if the modification has implications for funding.
Every new version of a contract is displayed in the History tabbed window of the Contract Organizer. You can select a version from the Document History region, and view the version in the Contract Authoring Workbench, Deliverables Tracking System, and Funding Workbench.
You can compare versions of a contract document to see the specific changes by accessing a report through a browser window. The report displays columns showing the field changes in the versions selected.
See Also
Creating New Versions of a Contract Document
You can make manual changes to a document that does not require approval. The first step is to create a new version. After incrementing the version number, you can then make revisions in the Contract Authoring Workbench, Deliverables Tracking System, and Funding Workbench.
To create a manual revision of a contract document:
-
Navigate to the Contract Organizer window.
-
Select the contract document you want to revise.
-
Choose Action to display the Actions window.
-
Select Create New Version, and choose OK.
A confirmation message displays, however, the value in the Version field on the Contract Organizer window is not incremented until your updates are saved.
-
Navigate to the Project Contract area you want to change, and enter your changes.
You can change values on the Contract Authoring Workbench, Deliverables Tracking System, and Funding Workbench.
-
Save your work.
The value in the Version field for the contract is updated.
Viewing Change Request Records
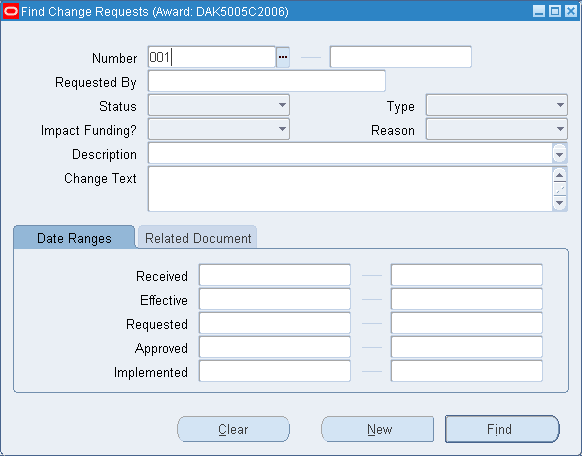
The Find Change Requests window enables you use numerous selection criteria to query your contract document.
To find and view contract change requests:
-
In the Contract Organizer, select a contract and choose Action.
-
In the Actions window, select Change Management.
The system displays the Find Change Requests window.
-
Search for change records using any combination of the fields on this window for your search criteria.
The query fields include Change Request Number, Requested By, Description, Change Text, Date Ranges, and Related Documents.
-
Choose Find.
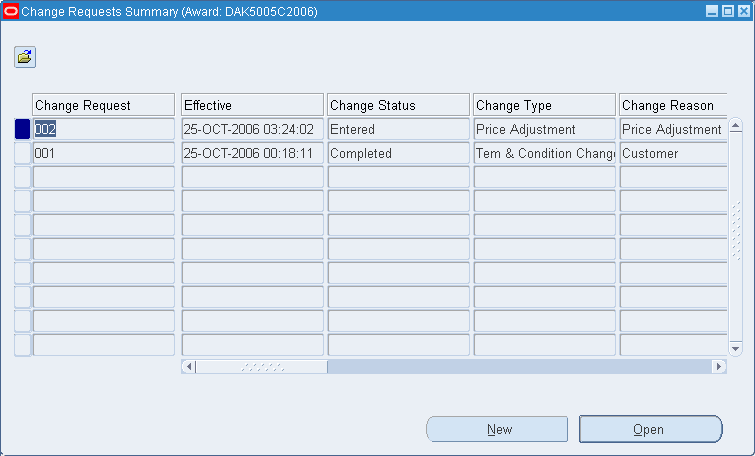
The system displays the Change Requests Summary window. This window lists all change requests, effective dates, status, type, and reason for changes, approval information, and descriptive text.
-
Select the document you want to view, and choose Open.
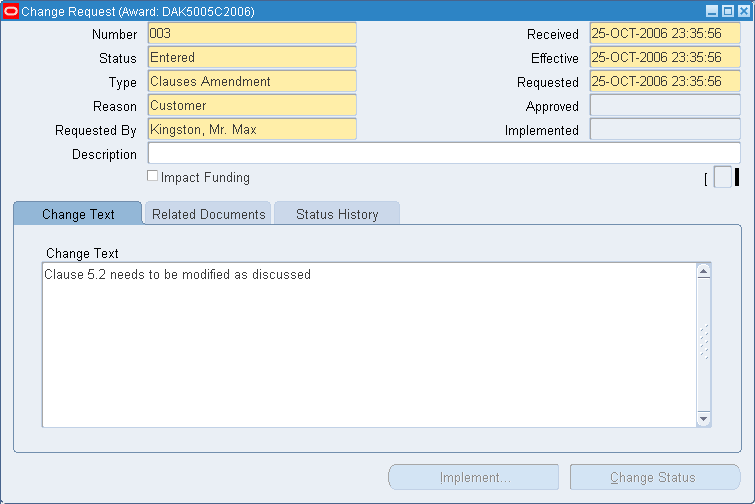
The system displays the Change Request window. You can view all relevant information about this change including applicable dates, text changes, related document, status history of all changes, and requestor. See: Creating Change Requests.
Creating Change Requests
The change request process consists of several steps involving the Contract Authoring Workbench and Change Request windows:
-
Change management uses workflows to process approvals for the contract changes. You must first define the workflows used for this contract document in the Administration window of the Contract Authoring Workbench. See: Administration Window.
-
The request to make revisions is completed in the Change Request window. Enter the change information, and then launch the workflow to receive the needed approvals.
-
When approval is received, return to the Change Request to indicate that the changes can be performed, or implemented. You then enter the contract modifications in the appropriate Contract Authoring Workbench regions.
To change a contract document:
-
In the Contract Organizer, select a contract and choose Action.
-
In the Actions window, select Change Management.
The Find Change Requests window displays.
-
Choose New on the Find Change Requests window. Or enter applicable search criteria and choose New on the Change Requests Summary window.
The Change Request window displays.
-
Enter a change request value in the Number field.
The value in the Status field displays as Entered for new change requests.
-
In the Type field, select the type of change—for example, price adjustment or term change.
-
Select a reason for this change in the Reason field.
-
Select the name of the contact who requested this change in the Requested By field.
-
The current date displays in the date fields, but you can change the values for Received, Effective, and Requested dates.
-
If this change will effect funding for this contract, mark the Impact Funding check box.
-
Optionally, you can add a description of this change in the Description field.
-
There are three tabbed windows in the lower part of this window. Optionally, you can enter additional text or associate documents.
-
Change Text: Enter or paste any textual information regarding this change.
-
Related Documents: Select any documents you may want to associate with this change. You have the options to choose any version of a particular document.
-
Status History: The status is initially entered when you save this record. The window will list all the transaction changes as it moves through the change process.
-
-
Save your work.
-
Choose Change Status.
The Change Statuses window displays.
-
Select Submitted from the list of values to continue with this change request. Or, if you want to cancel this transaction, select Canceled.
When you submit this record, this action launches the workflow to the approvers listed in the process.
-
When the change request is approved, navigate to the Change Request window and choose Implement.
This creates a new contract version. You are now able to enter the contract modifications in the appropriate regions.
-
Navigate to the Contract Authoring Workbench.
-
Enter the changes for this contract document on the appropriate regions and windows.
-
Save your work.
-
Change the Status to Completed. This creates a new contract version.
See Also
Overview of Setting Up, Oracle Workflow User's Guide
To Schedule Background Engines, Oracle Workflow User's Guide
Reviewing Notifications via Electronic Mail, Oracle Workflow User's Guide
Changing Contract Lines And Fields
Changes to contract lines can be automatically defaulted to the Deliverables Tracking System. Changes default when fields exist on both the Authoring Workbench and the Deliverable Tracking System window.
After creating the change, and saving your work on the Authoring Workbench, a decision window prompts you for updating existing deliverables. You can choose to automatically update the deliverables, update at another time, or not update the deliverables with your changes.
See Also
Deliverables Tracking System Window.
Defaulting Contract Changes to the Deliverables Tracking System .