Oracle Marketing Business User Flows
This chapter covers the following topics:
- Sending Monthly Newsletters to a Set of Customers
- Sending Mailers to a Set of Customers to Promote a Product
- Advertising on the Web to Promote a Product
- Following Up to Responders to an Earlier Activity with a Telemarketing Campaign Activity
- Generating Leads Using a Sales Campaign Activity
- Creating a Media Plan for Advertising an Event
- Improving Campaign Results Using Predictive Analytics
Sending Monthly Newsletters to a Set of Customers
This business user flow describes how you can use the repeating e-mail campaign activity functionality of Oracle Marketing to create, execute, and track the activity of sending a monthly newsletter to a specific set of customers.
Scenario
Vision Enterprises, a manufacturer of computers and computer accessories, sends out a monthly newsletter to selected customers to keep them informed about the latest product information and troubleshooting tips. Each e-mail communication must contain a link to Vision Enterprise’s Web site address that customers can click for more detailed information.
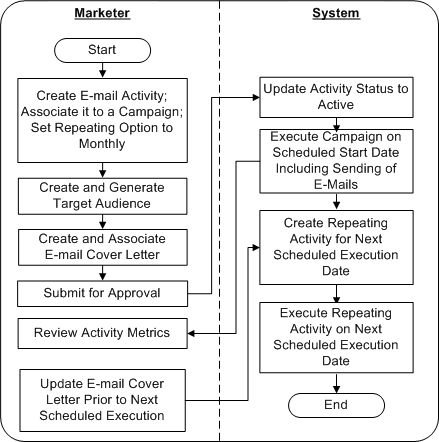
Process Flow Diagram
The following figure displays the process flow for the monthly newsletter e-mail campaign activity.
Repeating Campaign Activity Flow
Dependencies and Prerequisites
-
Oracle Marketing must be fully implemented
-
Integrations with the following must be set up:
-
Oracle Content Manager
-
Oracle One-to-One Fulfillment
-
A campaign must exist
Optionally, for metrics to roll up and be reported at a program level, a program must exist
Steps
Use the steps in this section to complete this flow.
Step 1: Create a Repeating E-mail Campaign Activity
You will create a campaign activity, choosing E-mail as the channel of execution. You must associate this campaign activity to an existing campaign to which it will roll up. For the campaign to roll up to a program, a program must exist and the campaign must be associated with it.
For information on campaigns and programs, see:
The steps involved in creating a repeating e-mail activity are as follows:
Step 1.1: Complete the Mandatory Data for the Campaign Activity
Choose an e-mail campaign activity template to create this campaign activity. Selection of this template enables a set of attributes which must be completed.
Step 1.2: Set the Frequency at Which the Activity Must Repeat
For the newsletter to be sent to customers every month, you must set frequency at which the e-mail campaign activity repeats.
Step 1.3: Complete the Optional Setup for the Activity
You can optionally associate products or offers, collaboration material, notes, tracking metrics, and other additional information to the campaign activity.
For information on how to include optional setup data, see:
Step 1.4: Create Newsletter Content and Corresponding Cover Letter and Associate them to the Activity
The e-mail cover letter is the newsletter that will go to the target customers. You can (optionally) include a click-through destination (CTD) in the cover letter that the customers can click to navigate to Vision Enterprise’s Web site.
Step 1.5: Prepare a List of Customers to Send the Newsletter to
You can specify the audience to whom to send the newsletter. You do so by creating a target group using list templates or based on existing lists, segments, workbooks, or custom SQL. Note that the activity repeats to this list each time it executes.
Optionally, you can choose to apply fatigue rules for the activity. You can view fatigue reports to know how many customers are fatigued and how many available to target.
For information on how to create and associate a target group, see Creating and Associating Target Groups
For information on fatigue rules, see:
Refer Oracle Marketing Implementation Guide to know how to create fatigue rules.
Step 2: Submit the Campaign Activity for Approval
When you have completed the various details for the campaign activity, you can submit it for approval. The approval goes through the Workflow process, and when a campaign activity is approved it moves to the Active status.
To know more about Approvals, see Approvals Overview.
When the campaign activity is automatically activated by the Repeating Trigger, e-mail is sent to all the customers in the target group using the live version of the cover letter.
The target group is evaluated for suppressed and fatigued customers before the e-mail is sent out.
Step 3: Update the Cover Letter in Oracle Content Manager
You can update the cover letter (the newsletter that was sent by the e-mail activity) in Oracle Content Manager and keep the next version ready for circulation the following month. When the campaign activity executes the following month, the latest live version of the newsletter is picked up and sent to the target group.
Refer Oracle Content Manager Implementation and Administration Guide for information on updating cover letters.
Sending Mailers to a Set of Customers to Promote a Product
This business user flow describes how to use the direct mail print campaign activity functionality of Oracle Marketing to create, execute, and track an activity to send mailers to a set of customers to promote a new product.
Dependencies and Prerequisites
Oracle Marketing must be fully implemented
Integrations with the following must be set up:
-
Oracle Content Manager
-
Oracle One-to-One Fulfillment
-
A campaign must exist
Optionally, for metrics to rollup and be reported at the program level, a program must exist.
Scenario
Vision Enterprises, a manufacturer of computers and computer accessories, wants to send a direct print mail communication to its customers who purchased its computers in the last month. The mailer includes a URL for the customers to visit the product details information on the company website, where the customers can go for additional information. Since this web site also lists the products to up sell for the computer, the marketing manager wants to track who visited that URL, and view reports for these visits. The marketing manager also wishes to view the fatigue reports to know the number of customers fatigued.
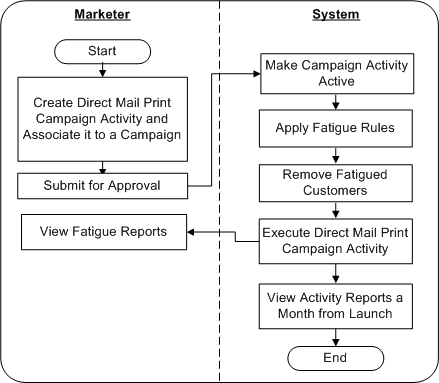
Process Flow Diagram
The following figure depicts the process flow for a direct mail print campaign activity.
Process Flow for a Direct Mail Print Campaign Activity
Steps
Use the steps in this section to complete this flow.
Step 1: Create a Direct Mail Print Campaign Activity
You will create a campaign activity, choosing Print as the channel of execution. You must associate this campaign activity to an existing campaign to which it can roll up. Additionally, for the campaign to roll up to a program, ensure that the program exists and the campaign is associated with it.
For information on campaigns and programs, see:
The steps involved in creating a print campaign activity are as follows:
Step 1.1: Complete the Mandatory Data for the Campaign Activity
Choose the Direct Mail - Print campaign activity template to create this campaign schedule. Selection of this template enables a set of attributes which must be completed.
Step 1.2: Complete the Optional Setup For the Campaign Activity
You can optionally associate products or offers, collaboration material, notes, tracking metrics, and other additional information to the campaign activity.
For information on how to include optional setup data, see:
Step 1.3: Create Mailer Content and Corresponding Cover Letter and Associate them to the Activity
The print cover letter is the mailer that will go to the target customers. You can select the mailer from Oracle Content Manager (OCM) repository or create it and submit it for approval. When approved, it is available to be used by the campaign activity. You must have the necessary folder permissions to create and store content in OCM. Refer Oracle Content Manager Implementation and Administration Guide for information on folder permissions.
You may also generate the recipient information for the members of the target group, and download and use the resulting .csv file to print labels using external programs.
Step 1.4: Define Response Tracking URL for the Web Landing Page URL Included in the Mailer
Include in the mailer the additional product details URL for the customers to visit. You must define a Response Tracking URL in the Collateral Mid Tab and register the Web Landing Page URL published in the mailer with this campaign activity. Your administrator defines a web page for product details. Specify the URL to that Product Details Page as the Redirect URL (Go To URL) for the published Landing Page URL. The Marketing Application generates a Click Through Tracking URL. Your administrator must configure this redirection by correlating the published Web Landing Page URL and the Click Through Tracking URL generated by the Marketing Application. See the Oracle Marketing Implementation Guide for details.
Step 1.5: Prepare a List of Customers to Send the Mailer to
You can specify the audience to whom to send the mailer. You do so by creating a target group using list templates or based on existing lists, segments, workbooks, or custom SQL. Optionally, you can choose to apply fatigue rules for the activity. You can view fatigue reports to know how many customers are fatigued and how many available to target.
For information on how to create and associate a target group, see Creating and Associating Target Groups
For information on fatigue rules, see:
Refer Oracle Marketing Implementation Guide to know how to create fatigue rules.
Step 2: Submit the Activity for Approval
When you have completed the various details for the campaign activity, you can submit it for approval. The approval goes through the Workflow process, and when a campaign activity is approved it moves to the Active status.
To know more about Approvals, see Approvals Overview.
When the campaign activity is approved and active, mailers are printed and sent to all the customers in the target group.
The target group is evaluated for suppressed and fatigued customers before the mailers are sent out.
Step 3: Review Landing Page URL Responses
After the mailer activity is launched, go to the report for the campaign activity and review how many customers visited the Web Landing Page to review product details. You can then target these customers for up sell activities.
Advertising on the Web to Promote a Product
This business user flow describes how you can use the Web marketing functionality of Oracle Marketing to create and execute a Web Ad.
Dependencies and Prerequisites
-
Oracle Marketing must be fully implemented
-
Integration with Oracle iStore and Oracle Content Manager must be set up
-
The Product page for the product you are promoting must be set up in iStore
-
A campaign must exist
-
Optionally, for metrics to rollup and be reported at the program level, a program must exist
Scenario
Vision Enterprises, a manufacturer of computers and computer accessories, wants to promote its new sleek monitors on Vision iStore's Home page. When Web visitors click on the Ad, they will be brought to the product page for the monitors.
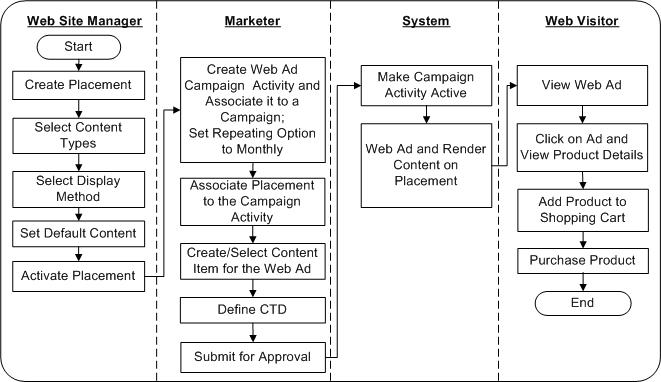
Process Flow Diagram
The following figure depicts the process flow for creating and executing a Web ad.
Process Flow for Creating and Executing a Web Ad
Steps
Use the steps in this section to complete this flow.
Step 1: Specify the Location on the Web Site Where the Ad Must be Displayed
As the Web site manager (who could well be the marketer, too), you will define and activate the location where the Web Ad will be rendered when the Web Advertising Acttivity becomes active and executes. You can select the content types, the display method, and the default content for a placement.
Step 2: Create a Web Ad Campaign Activity
As a marketer, you will create a campaign activity using the Web channel. You must associate this campaign activity to an existing campaign to which it can roll up. Additionally, for the campaign to roll up to a program, ensure that the program exists and the campaign is associated with it.
For information on campaigns and programs, see:
The steps involved in creating a Web Ad campaign activity are as follows:
Step 2.1: Complete the Mandatory Data for the Campaign Activity
Choose the Web Advertising campaign activity template to create this campaign activity. Selection of this template enables a set of attributes which must be completed.
For information on entering mandatory data, see Entering Basic Details.
Step 2.2: Complete the Optional Setup For the Activity
You can optionally associate a specific audience, notes, metrics that you want to track, and other additional information to the campaign activity.
For information on how to include optional setup data, see:
Step 2.3: Select the Product that you Want to Promote in the Web Ad
In this step you will associate the sleek monitors (Offering) that you wish to promote through the Web Ad. Only products that have been associated to the parent campaign are available to be associated with the Web Ad campaign activity.
See Associating a Product or Offer for information on how to associate a product.
Step 2.4: Specify the Web Site Location Where the Ad Will be Displayed and Select Content to Display
In this step, you will specify the placement to which this activity must render content and the content item that must be displayed. Because Oracle Marketing integrates with Oracle Content Manager (OCM), OCM content types determine what and how content will be rendered in a placement. Content types have one or more stylesheets associated with them, which define how the content type is actually displayed in a Placement.
If you have the necessary access permissions to OCM folders, you can create the content item and submit it for approval. Content must be approved before it can be rendered. Refer to the Oracle Content Manager Implementation and Administration Guide for information on folder permissions.
See Associating a Web Ad or Web Offer to a Placement for information on associating a Web activity to a placement.
Step 2.5: Specify the Action for the Click-Through Destination
In this step, you will enable the visitor to go to the product page directly and get more details for the monitors. Alternatively, you could have enabled the visitor to add the product immediately to the shopping cart. You do so by defining a CTD for the content item and selecting an action for the CTD. Actions available include:
-
Go to URL
-
Go to iStore Registration Page
-
Go to Minisite
-
Go to Section Details
-
Go to Product Details
-
Go to Shopping Cart
-
Go to Shopping Cart with an Item
-
Go to Web Script
-
Go to Content Item
For information on creating click-through destinations, see Associating a Web Ad or Web Offer to a Placement.
Step 3: Submit the Activity for Approval
When the Web Ad Activity is approved and active, it can be executed and its content rendered in the selected Placements. Note that this does not mean that this activity will actually run. It only means that this activity is eligible to run. Whether it actually runs or not will depend on other conditions like what the selection method is for the Placements associated with the Activity, if there are other higher priority activities using the same Placement, and so on.
In this scenario, it is assumed that the Web Ad schedule that was just created is the only Web Ad activity using the associated Placement.
To know more about Approvals, see Approvals Overview.
Step 4: Verify if the Web Ad is Displayed on the Web Site
If you log into the iStore Web site, you should see the advertisement in the specified location.
Following Up to Responders to an Earlier Activity with a Telemarketing Campaign Activity
This business user flow describes how to use Oracle Marketing to create and execute a telemarketing campaign. You will use the Campaign Workbench to complete the flow.
Dependencies and Prerequisites
-
Oracle Marketing must be fully implemented
-
Integrations with Oracle Content Manager and Oracle TeleSales must be set up
-
A campaign must exist
-
Optionally, for metrics to rollup and be reported at the program level, a program must exist
Setup Needed for this Scenario
Integration with Oracle Scripting must be set up
The data sheet for the product being promoted must be available
Scenario
Vision Enterprises wants to execute a Telemarketing follow up activity for customers who responded to an earlier e-mail activity to promote their new sleek monitors. The product data sheet that must go out to the telesales agents must be included.
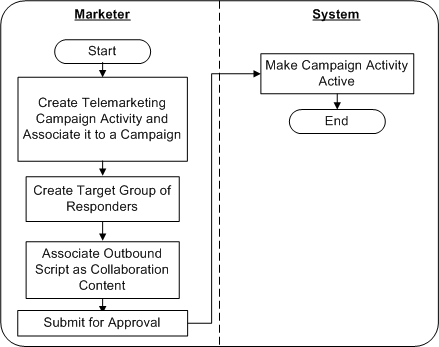
Process Flow Diagram
The following figure depicts the process flow for creating and executing a telemarketing campaign activity.
Process Flow for Creating and Executing a Telemarketing Campaign Activity
Steps
Use the steps in this section to complete this flow.
Step 1: Create a Telemarketing Campaign Activity
You will create a campaign activity, choosing Telemarketing as the channel of execution. You must associate this campaign activity to an existing campaign to which it can roll up. Additionally, for the campaign to roll up to a program, ensure that the program exists and the campaign is associated with it.
For information on campaigns and programs, see:
The steps involved in creating a print campaign schedule are as follows:
Step 1.1: Complete the Mandatory Data for the Campaign Activity
Choose the Telemarketing campaign activity template to create this campaign activity. Selection of this template enables a set of attributes which must be completed.
Step 1.2: Complete the Optional Setup For the Activity
You can optionally associate products or offers, notes, tracking metrics, and other additional information to the campaign activity.
For information on how to include optional setup data, see:
Step 1.3: Prepare a List of Customers who Responded to an Earlier Activity
You can specify the audience which the telemarketing agents must contact. You do so by creating a target group using list templates or based on existing lists, segments, workbooks, or custom SQL. Optionally, you can choose to apply fatigue rules for the activity. You can view fatigue reports to know how many customers are fatigued and how many available to target.
In this scenario, you will create the target group of respondents to an earlier e-mail campaign activity by using seeded list templates (Interaction Follow Up - B2B or Interaction Follow Up - B2C).
For information on how to create and associate a target group using seeded list templates, see Creating and Associating Target Groups
For information on fatigue rules, see:
Refer Oracle Marketing Implementation Guide to know how to create fatigue rules.
Step 1.4: Associate the Data Sheet for the Product as Collaboration Content
In this step, you will associate the product data sheet as an outbound script that must reach the telemarketing agents.
Scripts are usually used to guide agents in their interactions with customers or prospects. This reduces agent training time and ensures that consistent corporate messages are communicated to customers and prospects. Scripts are also used to poll target audiences, receive and analyze responses, and take action based on the compiled survey data. Scripts are created in Oracle Scripting.
Step 2: Submit the Campaign Activity for Approval
When you have completed the various details for the campaign activity, you can submit it for approval. The approval goes through the Workflow process, and when a campaign activity is approved it moves to the Active status.
When the campaign activity is approved and active, the proposal template and the list of customers is sent out to the telemarketing agents.
The target group is evaluated for suppressed and fatigued customers before the activity executes.
To know more about Approvals, see Approvals Overview.
Generating Leads Using a Sales Campaign Activity
This business user flow describes how sales managers can use the Sales Campaign Activity functionality of Oracle Marketing to generate leads from their install base.
Dependencies and Prerequisites
-
Oracle Marketing must be fully implemented
-
Integration with Oracle Content Manager must be set up
-
A campaign must exist
-
Optionally, for metrics to rollup and be reported at the program level, a program must exist
Setup Needed for this Scenario
-
Integration with Oracle Proposals must be set up
-
A proposal template must be available
Scenario
The sales manager of Vision Enterprises plans to generate top quality leads from Vision’s install base. The sales team will receive the proposals and sales material it needs to aid training and to follow up the leads generated.
Process Flow Diagram
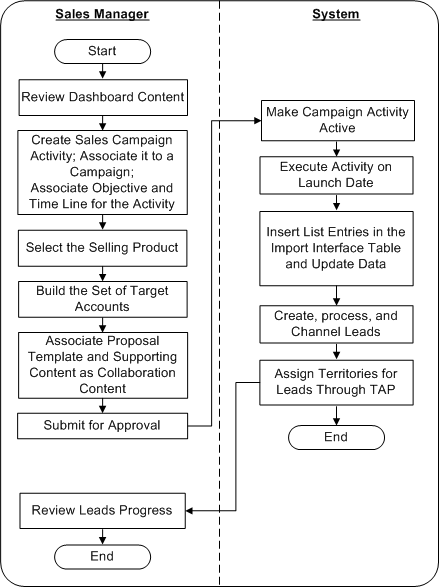
The following figure depicts the process flow for creating and executing a sales campaign.
Process Flow for Creating and Executing a Sales Campaign
Steps
Use the steps in this section to complete this flow.
Step 1: Review the Sales Dashboard
Using the Sales Funnel, Latest Forecast, Top Customers, Top Opportunities, and the Cross Sell/Up Sell Sales Campaigns regions of the Sales Dashboard, you can make decisions for the what, why, and when of a new sales blitz.
Refer the Oracle Sales User Guide for more details on the dashboard.
Step 2: Create a Sales Campaign Activity
You will create a campaign activity, choosing Sales as the channel of execution. You must associate this campaign activity to an existing campaign to which it can roll up to. This allows Oracle Marketing to track the overall success of this effort as part of larger enterprise marketing activities.
Additionally, for the campaign to roll up to a program, ensure that the program exists and the campaign is associated with it.
For information on campaigns and programs, see:
The steps involved in creating a Sales campaign activity are as follows:
Step 2.1: Complete the Mandatory Data for the Campaign Activity
Choose the Sales campaign activity template to create this campaign activity. Selection of this template enables a set of attributes which must be completed. You will define the launch date, the methodology, and the objective for the sales campaign.
Step 2.2: Select the Selling Product for the Activity
You will define the target product being cross sold or up sold for the sales effort. this product will be the product used to generate the sales leads. The product selected also drives the content for the sales training.
For information on how to select a product, see Associating a Product or Offer.
Step 2.3: Complete the Optional Setup for the Activity
You can optionally associate notes, tracking metrics, and other additional information to the sales campaign activity.
For information on how to include optional setup data, see:
Step 2.4: Prepare the List of Customers that the Activity Must Target
You can define the set of accounts against which leads will be generated for sales follow up. You can do so by creating a target group using list templates or based on existing lists, segments, workbooks, or custom SQL. List templates are based on the sales effort purpose - for example, to cross sell to the install base for the selected sales group. This functionality is leveraged from Oracle Marketing’s Audience Workbench.
After defining the target group, you can generate the target list and view its entries.
For information on how to create and associate a target group, see Creating and Associating Target Groups
Step 2.5: Select and Associate a Proposal Template
In this step, you will associate the proposal template for the leads for this campaign. Sales representatives can use templates to generate and fulfill proposals for the sales campaign activity leads. The proposal template is created in Oracle Proposals and is associated as collaboration content.
Step 2.5: Select and Associate Content to aid Sales Training/Collaboration
Here you define the content for the sales effort. This content will be made available to the sales representatives as read-only content to help train on the product strategy and cross sell opportunity while working on the leads.
Content items can be selected from the Oracle Content Manager (OCM) repository. You may also create the content if you have the necessary access permissions for OCM folders.
Refer Oracle Content Manager Implementation and Administration Guide for information on folder permissions.
Step 3: Submit the Campaign Activity for Approval and Return to the Sales Dashboard
When you have completed the various details for the campaign activity, you can submit it for approval. The approval goes through the Workflow process, and when the campaign activity is approved, it moves to the Active status.
Read only access is provided to the sales representatives for content associated with leads assigned to them. The read-only page also provides information about the target product, install base criteria for the leads, and objective information provided by the manager.
To know more about Approvals, see Approvals Overview.
Step 4: Review the Leads Generated from the Sales Campaign
Leads for the sales campaign are set to be scored as 'A' leads to ensure they are prioritized in the workload for the sales representative queue. All leads are channeled to Direct to call Territory Manager to be assigned to sales representatives.
Refer the Oracle Sales User Guide for more details.
Creating a Media Plan for Advertising an Event
This business user flow describes how you can use the integration of Oracle Marketing with Web ADI functionality to plan and create a media plan to deploy a large number of activities to advertise an upcoming event. the flow will also describe how an advertisement can be placed on third party Web sites.
Scenario
Vision Peripherals plans to conduct road shows to promote its new laser printers. The marketing department wants to advertise the event and elicit online event registrations.
Advertisements will be displayed on billboards and deployed via TV and radio. Web Ads will be deployed on third party Web sites, such as Yahoo and CNN using Web activities. Web Ads on the company Web site will invite prospects and customers to register for the event online. Clicks on the third party Web sites will also lead visitors to the company Web site for online registration.
In all, 50 campaign activities must be created.
Process Flow Diagram
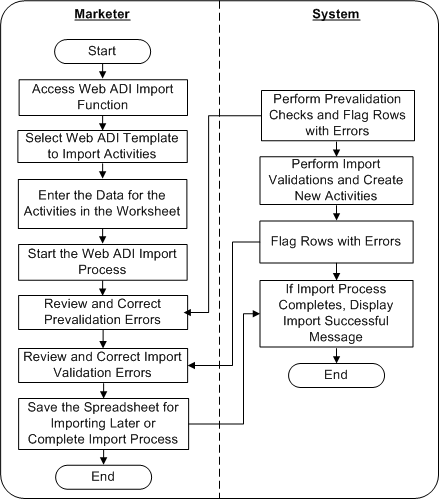
The following figure displays the process flow for creating a large number of campaign activities using Web ADI and importing them into the Oracle Marketing Application.
Dependencies and Prerequisites
-
Oracle Marketing must be fully implemented
-
Integrations with the following must be set up:
-
Oracle Content Manager
-
Oracle One-to-One Fulfillment
-
Oracle Web ADI
-
-
A campaign must exist
-
Optionally, for metrics to roll up and be reported at a program level, a program must exist
Steps
Use the steps in this section to complete this flow.
Step 1: Start the Web ADI Import Process to Create New Activities
You will choose the Activities Import layout in the Activities List page on the Campaign Workbench and select a suitable spreadsheet layout. You must associate each campaign activity to an existing campaign. All the campaign activity metrics will roll up to this campaign. For the campaigns to roll up to programs, the programs must exist, and each campaign must be associated with a relevant program.
For information on campaigns and programs, see:
Step 2: Enter Basic Campaign Activity Details in the Spreadsheet
Enter the details for the campaign activities in the relevant columns of the selected spreadsheet layout. Select any collateral and the script for inviting event registrations.
For general information on campaign activities, see:
For detailed information on using Web ADI layouts for importing campaign activities, see:
Step 3: Enter Landing Page URL Details for Soliciting Responses
For advertising activities, where needed, specify the Landing Page URL details.
After creating the spreadsheet, complete the Import process to get the schedules data into the application.
Step 4: Send Content and Tracking URL for Deployment on Third Party Web Sites
For Web Ads to be displayed on third party Web sites, you must manually send the content (mostly images) and the associated click through tracking URL to the relevant third parties. The third party will serve this banner on their Web site and associate the click through tracking URL to it.
Improving Campaign Results Using Predictive Analytics
This business user flow describes how to use Oracle Marketing to build and evaluate a predictive model and use the model's results to generate a target list for a campaign activity.
Dependencies and Prerequisites
-
Oracle Marketing must be fully implemented
-
Oracle Data Mining 10g Release 2 or higher must be installed
Scenario
Vision Enterprise plans to launch a new product, Vision Wireless Laptop, into the market. The Vision marketing group expects that existing laptop customers are good candidates for a campaign to promote the new product. However, Vision would like to cut its marketing costs for this campaign. Instead of targeting all laptop customers, Vision plans to intelligently target only those customers who are most likely to respond to the marketing campaign. This will help Vision ensure a better return on investment.
Process Flow Diagram
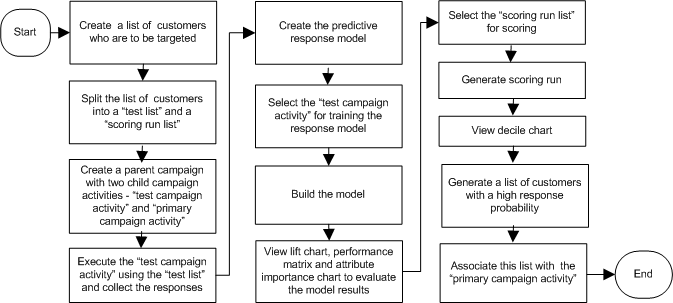
The following figure depicts the process flow for a predictive response model.
Process Flow for Predictive Campaign Response Model
Steps
Use the steps in this section to complete this flow.
Step 1: Identify Target Customers
In this step, you will create a list of all existing laptop customers and split this list into the following two lists:
A ’test list’ based on a random subset, for example 5%, of the original listA ’scoring run list’ with the rest of the customers
For the procedures on creating a list of target customers, see Creating a List Using Natural Language Query.
Step 2: Create and Execute a Test Campaign Activity
In this step, you will perform the following:
-
Create a parent campaign with two child campaign activities - "test campaign activity" and "primary campaign activity"
-
Attach the "test list" to the "test campaign activity"
-
Execute the "test campaign activity" and collect the responses (captured within Interaction History)
For the procedures on creating a campaign and campaign activities, see Creating a Campaign.
Step 3: Create and Build a Campaign Response Model
A predictive model is a set of rules that can be used to determine the value of a specific customer attribute (for example, response to a campaign) based on the known values of other attributes.
In this step, you will:
Create a campaign response model
Use the "test campaign activity" as training data for this model
Preview the data used for this response model
Build the model
For the procedures on creating and building a model, see:
Step 4: Evaluate the Model Results
When a predictive model is built, the model's results are available as:
-
Lift Chart - that shows how well the model is expected to perform, that is, the benefit of Intelligent Targeting Vs. Random Targeting
-
Performance Matrix - that provides statistical insight into the accuracy of the Model
-
Attribute Importance Report - that shows the customer attributes that have the greatest impact on response probability
By evaluating this information, you can determine the accuracy of the model and make adjustments to the training data to enhance the performance and predictive power of the model.
For more information on model build results and how to evaluate the build, see:
Step 5: Create and Score a Target Population
Scoring is the process of using a predictive model to determine the future behavior of a target population. During the scoring run, each customer record in the target population is assigned a probability score. This score indicates the likelihood that the customer will exhibit the target behavior. For example, respond to a marketing campaign.
In this step, you will:
-
Create a scoring run
-
Identify the "scoring run list" for the scoring run selection
-
Generate the scoring run
See Generating a Scoring Run for the procedures to complete the generation of a scoring run and generate a list.
Step 6: View Scoring Run Results
The scoring run result is divided into ten continuous deciles. Each decile has an associated percentage range (for example 80-90%) that indicates the likelihood that the customers within this range will exhibit the target behavior.
For the procedure to view scoring run results, see Viewing Scoring Run Results.
Step 7: Generate a List and Associate it to a Campaign Activity
The scoring run results helps you narrow your target population by selecting only those customers with a high likelihood to exhibit the "target behavior"
-
Select the top customer deciles to be included in the list
-
Generate this list of customers
-
Associate this list to the "primary campaign activity"
By intelligently targeting only those customers with a high propensity to exhibit the target behavior, you can increase Marketing ROI by decreasing the number of contacts and increasing the response rate.
For the procedure on generating a list and associating it to a campaign activity, see Generating a List Based on Decile Scores.