Asset Maintenance
This chapter covers the following topics:
- Changing Asset Details
- Adjusting Accounting Information
- Mass External Transfers of Assets and Source Lines
- Placing Construction-In-Process (CIP) Assets in Service
- Revaluing Assets
- Asset Management in a Highly Inflationary Economy (Revaluation)
- Asset Impairments
- The United Kingdom Local Authority Accounting for Revaluations and Impairments
- Physical Inventory
- Scheduling Asset Maintenance
Changing Asset Details
You can change descriptive information for an asset at any time. Changing asset descriptive information other than category and units has no financial impact on the asset.
Reclassifying Assets
Reclassify assets to update information, correct data entry errors, or when consolidating categories. You cannot reclassify fully retired assets.
Note: When you reclassify an asset in a period after the period you entered it, Oracle Assets creates journal entries to transfer the cost and accumulated depreciation to the asset cost and accumulated depreciation accounts of the new asset category. This occurs when you create journal entries for your general ledger. Oracle Assets also changes the depreciation expense account to the default depreciation expense account for the new category, but does not adjust for prior period expenses.
Reclassifying an Asset to Another Category
To reclassify an asset to another category:
-
Choose Asset > Asset Workbench from the Navigator window.
-
Find the asset you want to reclassify.
Tip: For best performance, find by asset number or tag number since they are unique values.
-
Choose Open.
-
Enter the new category.
-
Save your changes.
Note: Reclassification does not redefault the depreciation rules to the default rules from the new category. Manually change the depreciation rules in the Books or Mass Change windows if necessary.
Reclassifying a Group of Assets
You can reclassify a group of assets using the Mass Reclassifications window. In addition to reclassifying assets to a new category, when you run the Mass Reclassification process, you have the option to have assets inherit the depreciation rules of the new category. If you choose to have the reclassified assets inherit depreciation rules, you can also choose to either amortize or expense the resulting depreciation adjustments. See: Depreciation Rules (Books).
If you want only fully reserved assets to be reclassified, check the Fully Reserved - Yes check box. If you want only assets that are not fully reserved to be reclassified, check the Fully Reserved - No check box. If you do not check either check box, both fully reserved assets and assets that are not fully reserved will be reclassified.
When you run the Mass Reclassification process, Oracle Assets first reclassifies the assets (changes the assets from one category to another), then changes the depreciation rules, if you have chosen to have the reclassified assets inherit the depreciation rules of the new category. Oracle Assets reclassifies assets to a new category, even if inheriting depreciation rules fails. However, if reclassification fails (assets are not changed to the new category), assets will not inherit the depreciation rules of the new category.
Reclassification
Reclassification is done at the asset level. If an asset cannot be reclassified in one book, the asset will not be reclassified in any of the books to which it belongs.
If you attempt to reclassify assets to the same category (for example, you have a group of assets assigned to category PC, and you run the Mass Reclassification process to reclassify the assets to category PC), the assets will not be reclassified and will not inherit depreciation rules.
You cannot reclassify an asset in a prior period.
Inheriting Depreciation Rules
Inheriting depreciation rules is performed at the book level, meaning that if assets do not inherit depreciation rules in one book to which the assets belong, it will not prevent assets from successfully inheriting depreciation rules in other books to which they belong.
When you choose to have assets inherit the depreciation rules of the new category, you can choose to have all rules inherited by checking the Inherit Depreciation Rules of New Category check box on the Mass Reclassifications window, or no rules by ensuring that the check box is not checked. You cannot choose to have assets inherit only specified depreciation rules. When an asset with a salvage value is reclassified to a category that does not have a default salvage value, the asset will retain the salvage value even after the reclassification.
When you choose to have assets inherit depreciation rules, you can also choose to amortize the resulting adjustments by checking the Amortize Adjustments check box on the Mass Reclassifications window. If you do not check the Amortize Adjustments check box, adjustments will be expensed. Note that if you choose to expense adjustments on the Mass Reclassifications window (the Amortize Adjustments check box is not checked), reclassification will fail for any assets for which you have previously amortized an adjustment.
Note: Depreciation rules are inherited in both the corporate and tax books. The rules set up for the category in the corporate book are inherited in the corporate book and the rules set up for the category in the tax book are inherited in the tax book. Depreciation rules are not copied from the corporate book to the tax book. Therefore, you do not need to check the Allow Mass Copy - Copy Adjustments check box in the Accounting Rules tabbed region of the Books Controls window.
Setting Up Assets to Depreciate
If the Depreciate check box on the Books window is checked for an asset before the asset is reclassified, the check box will remain checked after reclassification. If the Depreciate check box is not checked for an asset before the asset is reclassified, that asset will inherit the depreciation rules of the new category, but the Depreciate check box will remain unchecked.
See: Entering Financial Information
Allowing Mass Changes
If you check the Inherit Depreciation Rules of New Category check box, you must also ensure you have checked the Allow Mass Changes check box in the Accounting Rules region of the Book Controls window, for any assets that you want to inherit depreciation rules. If the Allow Mass Changes check box is not checked, reclassified assets will not inherit depreciation rules, even though you checked the Inherit Depreciation Rules of New Category check box on the Mass Reclassifications window.
Note: You cannot perform a mass change on the depreciation method on assets with unplanned depreciation.
See: Entering Accounting Rules for a Book
Copying Descriptive Flexfield Information
You can choose to copy descriptive flexfield information to the new category by checking the Copy Category Descriptive Flexfield to New Category check box on the Mass Reclassifications window. Descriptive flexfield information will be copied only if assets are being reclassified within the same major category. The descriptive flexfields should be set up with the same segments in both the old and the new category. Otherwise, descriptive flexfield information in the old category may be copied incorrectly into an incorrect segment in the new category. If a segment in the old category and a corresponding segment in the new category have different formats (for example, segment 1 in the old category is alphanumeric and segment 1 in the new category is in date format), the information will be copied, but you will need to correct the descriptive information in that segment.
Note: If you do not choose to copy category descriptive flexfield information to the new category, the category descriptive flexfield information from the old category will be deleted.
Previewing Your Mass Reclassifications
You can run the Mass Reclassification Preview Report before submitting the Mass Reclassifications process. The report allows you to preview the changes before actually submitting them. The report lists all the assets that the mass reclassification process will reclassify.
See: Mass Reclassification Preview and Review Reports
Running the Mass Reclassification Process
After reviewing the Mass Reclassification Preview Report, run the mass reclassification process. If reclassification fails for any of the assets, the mass reclassification process completes with a warning. You need to review the log file to determine the reasons the assets were not reclassified.
To review the changes to category and depreciation rules, run the Mass Reclassification Review Report.
See: Mass Reclassification Preview and Review Reports
Note: You can run the Mass Reclassification Review Report from either Oracle Assets or the ADI Request Center.
To reclassify a group of assets:
-
Choose Mass Transactions > Reclassifications from the Navigator window.
-
Find the assets you want to reclassify.
-
Specify the corporate book on which you want to run reclassification.
-
Optionally specify other asset selection criteria in the following fields:
-
Asset Type
-
Expense Accounts
-
Location
-
Group Asset
-
Employee Name
-
Employee Number
-
Category
-
Asset Key
-
Cost Range
-
Asset Numbers
-
Dates In Service
-
-
Enter the new category.
-
Specify if you want the current category descriptive flexfield information copied to the new category.
If you do not choose to copy the flexfield information, the current category descriptive flexfield information will be deleted.
-
Specify whether to inherit the depreciation rules of the new category.
-
Specify whether to inherit the group asset of the new category.
-
If you choose to inherit the depreciation rules of the new category, specify whether to amortize the changes.
-
Choose Preview to run the Mass Reclassification Preview report.
-
Query the Mass Transaction number and choose Run to submit the Mass Reclassification concurrent process.
If you wish to simultaneously run this program in more than one process to reduce processing time, Oracle Assets can be set up to run this program in parallel. For more information on setting up parallel processing and the FA: Number of Parallel Requests profile option, see: Profile Options and Profile Options Categories Overview.
Note: If Oracle Assets encounters assets with invalid employee names and numbers during the Mass Reclassification concurrent process, it will set the employee name and number to null (blank) and will process the reclassification for those assets. The process completes with a warning status, and the log file displays the affected asset numbers and the invalid employee names and numbers assigned at the time of the reclassification.
Related Topics
Journal Entries for Transfers and Reclassifications
Changing Financial and Depreciation Information
Adjusting Units for an Asset
To adjust the number of units for an asset:
-
Choose Asset > Asset Workbench from the Navigator window.
-
Find the asset whose units you want to adjust.
Tip: For best performance, find by asset number or tag number since they are unique values.
-
Choose Open.
-
Change the number of Units.
-
Update assignment information to reflect the new number of units in the Assignments window. See: Assigning an Asset (Detail Additions Continued).
-
Save your work.
Related Topics
Adjusting Accounting Information
You can adjust financial, depreciation, distribution, and invoice information for an asset.
Changing Financial and Depreciation Information
Transferring Assets Between General Ledger Depreciation Expense Accounts
Changing Invoice Information for an Asset
Changing Financial and Depreciation Information
You can correct an error or update financial and depreciation information for a single asset or for multiple assets. You can also override depreciation information for an asset while adding it using the Detail Additions process. See: Asset Setup Processes (Additions).
Before running depreciation (in the period in which you added the asset), you can change any field.
After you have run depreciation (in any period after the one in which you added the asset), you can change asset cost, salvage value, prorate convention, depreciation method, life, capacity and unit of measure (in the corporate book), rate, bonus rule, depreciation ceiling, and revaluation ceiling.
If the asset is fully reserved, you can adjust the same fields as for an asset for which you have run depreciation. If the asset is fully retired, you cannot change any fields.
You can choose whether to amortize or expense the adjustment. See: Amortized and Expensed Adjustments.
Changing Financial Information for a Single Asset
To change financial information for a single asset:
-
Choose Asset > Asset Workbench from the Navigator window.
-
Find the asset for which you want to change financial information.
Tip: For best performance, find by asset number or tag number since they are unique values.
-
Choose Books.
-
Choose the Book to which the asset belongs.
-
Choose whether to Amortize Adjustment or expense it in the current period.
Note: When you adjust a group or member asset using a prior period amortization start date, Oracle Assets automatically submits the Process Group Adjustments concurrent program to calculate the prior period depreciation expense for the group asset. You must acknowledge the message containing the request number of the program submission.
-
Enter the new financial information for the asset.
Note: You can change the depreciation method from units of production to a flat-rate or life-based method if the asset is not depreciating by units of production in any associated tax book.
You can only change the depreciation method from life-based or flat-rate to units of production in the period you added the asset.
-
Save your work.
Changing Financial Information for Multiple Assets (Mass Change)
When you change financial information for multiple assets using the Mass Changes window, the mass change transaction will exclude the following assets from the mass change transaction:
-
CIP assets.
-
Retired assets.
To change financial information for multiple assets
-
Choose Mass Transactions > Changes from the Navigator window.
-
Enter the Book to which the assets belong.
-
Select Amortize Adjustments if you wish to amortize your adjustments. If Amortize Adjustments is not selected, the adjustments will be expensed in the current period. When Amortize Adjustments is selected, enter the Amortization Start Date in the Change Date field. This allows you to select the date the amortization begins. The new date selected defaults to the current period date.
Note: When you adjust a group or member asset using a prior period amortization start date, Oracle Assets automatically submits the Process Group Adjustments concurrent program to calculate the prior period depreciation expense for the group asset. You must acknowledge the message containing the request number of the program submission.
-
In the Change Date field, enter the date of the mass change.
You can perform a prior period depreciation rule change by entering a prior period date in the Change Date field and checking the Amortize Adjustment check box. The date in the Change Date field defaults to the current period date.
-
Select the assets you wish to change. Specify the asset numbers, dates placed in service, and category for which the mass change applies.
-
Select the asset type of the assets you wish to change in the Asset Type field, you can select one of the following values:
-
Capitalized
-
Group
The system will automatically include assets with an asset type of Capitalized or Group if you do not select an Asset Type.
-
-
Choose whether to Change Fully Reserved Assets.
-
You can use the Before and After fields as either information to change or as a selection criterion without changing the information. When you enter the same value for the Before and After fields, the mass change affects only assets that match that information.
-
Specify the new financial information for these assets in the After column.
-
Select the group asset association of the assets you wish to change. In the Group Association field, you can select one of the following values:
-
Member: The system will select only member assets belonging to a group asset for the mass change transaction.
-
Standalone: The system will select only standalone assets for the mass change transaction. All the member assets are excluded from the mass change transaction.
-
No Selection: The system will include all assets, regardless of the group association of the assets. For example, the system will include group, member, and standalone assets for the mass change transaction. If you do not select the group asset association in a Before field, you cannot select the Member or Standalone values in the corresponding After field. The default value of the Before and After fields is No Selection.
-
-
If you selected the Member value for the Group Association field, you must enter a valid group asset number in the Group Asset field.
-
The following fields are applicable only to the requirements related to Japan Tax Reforms FY2007 .
-
Salvage Type
-
Salvage Value
-
Salvage Value Percent
-
Depreciation Limit Type
-
Limit Amount
-
Limit Percent
Note: The system displays the above fields only if you set the FA: Japan 2007 Tax Reforms Features profile option to Yes.
For more information, see: Japan Tax Reforms FY2007 Requirements.
-
-
Choose Preview to run the Mass Change Preview report. Use this report to preview what effects to expect from the Mass Change before you perform it. If necessary, update the definition and run the preview report again.
The mass change status determines what action to perform next. The following table defines each mass change status and their next actions available.
Status Definition Possible Action New Newly created mass change definition Preview Preview Preview report currently running None Previewed Preview report completed successfully Run Updated Mass change definition updated after previewing Preview Running Mass change currently running None Completed Mass Change completed successfully Review
CopyError Preview report or mass change completed in error Preview or Run, whichever failed -
To perform the mass change, query the definition and choose Run. Oracle Assets submits a concurrent process to perform the change.
If you wish to simultaneously run this program in more than one process to reduce processing time, Oracle Assets can be set up to run this program in parallel. For more information on setting up parallel processing and the FA: Number of Parallel Requests profile option, see: Profile Options and Profile Options Categories Overview.
-
To review a completed mass change, query the definition and choose Review. Oracle Assets runs the Mass Change Review report.
-
Review the log file and report after the request completes.
Performing Group Reclassifications Using Mass Change
You can also use the Mass Changes window to perform a group reclassification by changing the group asset assignment of a range of assets. However, you cannot change both the depreciation rules and the group asset assignment of the capitalized assets in the same mass change transaction. You must perform the mass group reclassification as a separate mass change transaction.
When you use the Mass Changes window to change the group asset assignment of capitalized assets, the system will always use the Calculate transfer type to process the reclassification. The date placed in service of the asset changed is used as the group amortization start date. The date in the Change Date field has no affect on the group amortization start date. For more information about the group amortization start date and group reclassifications, see: Transfer Type - Calculate
Note: If the mass change will change the group asset membership, the following restrictions apply:
-
You cannot change other asset attributes, such as prorate convention, depreciation method, life, and bonus rule, in the same mass change transaction.
-
Oracle Assets will only process the change using the Calculated transfer type. For more information about reassigning group asset membership, see: Transactions: Group Reclassification
You can change the group membership of an asset by performing the following reclassification transactions:
-
-
Transfer a member asset from a source group asset to a target group asset
-
Remove a member asset from a group asset
-
Add a standalone asset to a group asset
The following examples describe the ways in which you can change the group membership of an asset.
Transferring Member Assets Between Group Assets
The table below describes the group assignment of a member asset before and after it is reassigned from a source group asset to a target group asset.
| Asset Attribute | Before | After |
|---|---|---|
| Group Association | Member | Member |
| Group Asset Assignment | Group Asset 1 | Group Asset 2 |
Removing Member Assets from a Group Asset
The table below describes the group assignment of an asset before and after it is reassigned from a member asset to a standalone asset.
| Asset Attribute | Before | After |
|---|---|---|
| Group Association | Member | Standalone |
| Group Asset Assignment | Group Asset 1 | Null |
Adding Standalone Assets to a Group Asset
The table below describes the group assignment of an asset before and after it is reassigned from a standalone asset to a member asset.
| Asset Attribute | Before | After |
|---|---|---|
| Group Association | Standalone | Member |
| Group Asset Assignment | Null | Group Asset 1 |
If you select Standalone in the Group Association field, you cannot enter a group asset number in the Group Asset field. However, if you select Member in the Group Association field, you must enter a valid group asset number in the Group Asset field.
Related Topics
Journal Entries for Adjustments
Amortized and Expensed Adjustments
Mass Change Preview and Review Reports
Assets Depreciating Under Units of Production
Defining Additional Depreciation Methods
Transferring Assets
You can transfer assets between employees, depreciation expense accounts, and locations. When transferring assets, you should consider the following:
-
You can change the transfer date to a date in a prior period for a particular transfer, but the transfer must occur within the current fiscal year
-
You can change the transfer date of an asset to a prior period only once per asset.
-
You cannot transfer an asset to a future period.
Note: You cannot transfer assets from one corporate book to another corporate book.
Transferring a Single Asset
To transfer an asset between employees, expense accounts, and locations:
-
Choose Asset > Asset Workbench from the Navigator window.
-
Find the asset you want to transfer between employees, expense accounts, and/or locations.
Note: For best performance, find by asset number or tag number since they are unique values.
-
Choose Assignments.
-
Optionally update the Transfer Date.
Note: If you transfer an asset during the period in which it was added, the Transfer Date automatically defaults to the asset's date placed in service and you cannot change it.
-
In the Units Change field, enter a negative number for the assignment line from which you want to transfer the asset.
-
Create one or more new lines, entering a positive number in the Units Change field for the assignment lines to which you want to transfer the asset.
-
Enter the new Employee Name, Expense Account, and/or Location for the new distribution.
-
Save your changes.
Transferring Multiple Assets in One Transaction
Oracle Assets allows you to transfer multiple assets in one transaction. You use the Transfer From and Transfer To fields to identify the assets to be transferred.
You can transfer between expense accounts, locations, and employees and employee numbers. By selecting any combination of these criteria, you can further restrict the range of assets to be transferred.
Transferring Between Expense Accounts
For the From account, you can enter a single expense account or a range of expense accounts. When entering a single account number, you need to enter the account number in both the low and high fields for the From account. You can enter the entire account combination or only a partial combination.
For the To account, you can enter the entire account combination or only a partial combination. Note that when specifying partial combinations for both From and To accounts, you do not need to specify the same segment in both. For example, you can specify the first segment for the From account, and the second segment for the To account.
The following table shows an example of transferring between expense accounts:
In the following example, both the From and To fields contain complete account combinations. Assets with expense accounts in the From range will be transferred to the 02-300-5000-600 expense account.
| From | To |
|---|---|
| Complete | Complete |
| 01-100-2000-500 01-110-2000-500 |
02-300-5000-600 |
In the following example, the From field contains a partial account combination, and the To field contains a complete account combination. Regardless of the value of the other segments, assets with a second segment between 200 and 400 are transferred to the 02-300-5000-600 expense account.
| From | To |
|---|---|
| Partial | Complete |
| XX-200-XXXX-XXX XX-400-XXXX-XXX |
02-300-5000-600 |
In the following example, the From field contains a complete account combination, and the To field contains a partial account combination. Assets with the expense account 01-100-2000-500 will be transferred to the expense account 01-300-2000-600.
| From | To |
|---|---|
| Complete | Partial |
| 01-100-2000-500 01-100-2000-500 |
XX-300-XXXX-600 |
In the following example, both the From and To fields contain partial account combinations. Assets with expense accounts in which the second segment is between 200 and 400 will be transferred to an expense account in which the second segment is 600. The other segments will remain unchanged.
| From | To |
|---|---|
| Partial | Partial |
| XX-200-XXXX-XXX XX-400-XXXX-XXX |
XX-600-XXXX-XXX |
In the following example, both the From and To fields contain partial account combinations. However, the second segment is specified in the From fields, and the fourth segment is specified in the To field. Assets with expense accounts in which the second segment is between 200 and 400 will be transferred to an expense account in which the fourth segment is 600. The second segment will remain unchanged.
| From | To |
|---|---|
| Partial | Partial |
| XX-200-XXXX-XXX XX-400-XXXX-XXX |
XX-XXX-XXXX-600 |
Transferring Between Locations and Employees
You can transfer an asset between two locations, for example from the New York office to the Dallas office. You can also transfer assets between employee name and number. For example, you can transfer and asset from Robert Smith (employee 103) to Janet Jones (employee 214).
The following is an example of an asset transfer:
| From | To |
|---|---|
| Expense Accounts: 1 - 100 | Expense Account: 10000 |
| Location: New York | Location: Dallas |
| Employee Name: Robert Smith | Employee Name: Janet Jones |
The above transfer affects all assets that are assigned to Robert Smith in New York with an expense account in the range of 1 through 100. An asset must satisfy all three criteria to be transferred to Janet Jones in Dallas with an expense account of 10000.
To transfer multiple assets between employees, expense accounts, and locations:
-
Choose Mass Transactions > Transfers from the Navigator window.
-
Choose the corporate depreciation Book for the assets you want to transfer.
-
Optionally select a Category to use as a selection criterion for the mass transfer.
-
Optionally update the Transfer Date.
You can change the transfer date to a a prior period date. You cannot change the date to a future period date.
-
Enter one or more selection criteria for the mass transfer in the Transfer From and Transfer To fields.
-
Choose Preview to run the Mass Transfers Preview report. Use this report to preview the expected effects of the Mass Transfer before you perform it. If necessary, update the definition and run the preview report again.
-
To perform the Mass Transfer, query the mass transfer and choose Run. Oracle Assets submits a concurrent process to perform the transfer.
If you wish to simultaneously run this program in more than one process to reduce processing time, Oracle Assets can be set up to run this program in parallel. For more information on setting up parallel processing and the FA: Number of Parallel Requests profile option, see: Profile Options and Profile Options Categories Overview.
-
Review the log file after the request completes.
Transferring Invoice Lines Between Assets
To transfer invoice lines between assets:
-
Choose Asset > Asset Workbench from the Navigator window.
-
Find the asset whose invoice information you want to change.
Note: For best performance, find by asset number or tag number since they are unique values.
-
Choose Source Lines.
-
Choose the line(s) you want to transfer.
To transfer the entire amount, check the check box to the left of the source line. Otherwise, enter a partial amount.
Note: When you perform a source line transfer on a member asset using a prior period amortization start date, Oracle Assets automatically submits the Process Group Adjustments concurrent program to calculate the prior period depreciation expense for the group asset. You must acknowledge the message displaying the request number of the program submission.
-
Choose Transfer To.
-
In the Transfer To window, query the destination asset to which you want to transfer the line.
-
Save your work.
Related Topics
Journal Entries for Transfers and Reclassifications
Changing Invoice Information for an Asset
If you brought over mass addition lines from invoices or discounts in your payables system, use the Source Lines window to change invoice information for an asset. You can:
-
Add a new invoice line to an asset
-
Change the cost of a invoice line
-
Delete an invoice line from an asset
To change invoice information for an asset
-
Choose Asset > Asset Workbench from the Navigator window.
-
Find the asset whose invoice information you want to change.
Note: For best performance, find by asset number or tag number since they are unique values.
-
Choose Source Lines.
-
Enter a description and cost to manually add a new invoice line to the asset.
-
Change the cost of a line for a CIP asset if necessary.
-
To delete an invoice line, uncheck Active.
Note: When you adjust a source line or add a new source line to an existing member asset using a prior period amortization start date, Oracle Assets automatically submits the Process Group Adjustments concurrent program to calculate the prior period depreciation expense for the group asset. You must acknowledge the message containing the request number of the program submission.
-
-
Save your changes.
Mass External Transfers of Assets and Source Lines
The Mass External Transfers features provides a mechanism for accepting data about asset transfers and source line transfers from external systems. The system includes an interface table that allows other systems to pass details of assets and source lines to be transferred. A preview screen lets you view, accept, or reject the transfers from external systems. A new process, similar to the existing Post Mass Additions program, processes the transfer detail information from the new table directly to Oracle Assets.
| Phase | Description |
|---|---|
| Create | Enter mass external transfer information into the FA_MASS_EXTERNAL_TRANSFERS interface table. Make note of the system-generated transfer number so you can use it to locate the batch if you must modify the batch information. |
| Post | Submit the Post Mass External Transfers request to post the external asset transfer information to Oracle Assets. Similarly, submit the Post Mass Source Line Transfers request to post the external source line transfer information to Oracle Assets. |
| Review | Query on the mass external transfer batch to check for errors. |
| Clean up | Set the status of posted transfers to Delete. Submit the Purge Mass External Transfers program to delete these rows from the interface table. |
To process asset and source line transfers from external systems:
-
After populating the interface table, from the Navigator, select Other > Requests > Run.
-
In the Submit Request window, select Post Mass External Transfers in the Request Name field to process asset transfers. To process source line transfers, select Post Mass Source Line Transfers.
-
Choose Submit Request to post the mass external transfer information to Oracle Assets.
If the system finds errors in the batch information, the mass external transfer process is aborted. You can view the errors to determine what transactions caused the process to abort. After you have submitted the mass external transfer batch for posting, use the following process to look for possible errors.
To check a mass external transfer batch for errors:
-
From the Navigator, choose Mass Transactions > External Transfers.
-
In the Find External Transfers window, enter the Transfer Number or other information in the window and click Find.
-
In the External Transfers Summary window, scroll down to view the Transaction Status for each transaction.
-
If you locate a transaction with a status of Error, highlight that row and click Open to view and correct the transaction details in the Modify External Transfer window.
After you determine what corrections need to be made, use the following process to make those corrections.
To correct mass external transfer transaction errors:
-
From the Navigator, select Mass Transactions > External Transfers.
-
In the Find External Transfers window, enter the Transfer Number or other information in the window and choose Find.
-
In the External Transfers Summary window, select the transaction you want to modify and click Open.
-
In the Modify External Transfer window, modify specific information as appropriate and click Done. Repeat this process to make all the necessary corrections before you resubmit the batch.
-
From the Navigator, select Other > Requests > Run to submit a request to run the Post Mass External Transfer process again. This process resubmits the batch for processing.
After the mass external transfer batch has completed successfully, you can delete the mass transfer information from the interface table using the following process:
To delete the mass external transfer information from the interface table:
-
Open the batch that you want to purge in the Modify External Transfer window.
-
Change the Transaction Status to Delete.
-
From the Navigator, select Other > Requests > Run.
-
In the Submit Request window, select Purge Mass External Transfers in the Request Name field.
-
Click Submit Request to delete the mass external transfer information from the interface table.
For details on the accounting for Asset Transfers and Source Line Transfers, see: Transferring Assets.
| Column Name | Null? | Type | Remarks | Apply to Asset Transfer (A), Source Line Transfer (S), or Both (B) |
|---|---|---|---|---|
| BATCH_NAME | Not Null | VARCHAR2(15) | Name of Batch. | B |
| MASS_EXTERNAL_TRANSFER _ID | Not Null | NUMBER(15) | System-generated identifier of the external transfer. | B |
| EXTERNAL_REFERENCE_NUM | VARCHAR2(15) | Reference number used by external system. | B | |
| TRANSACTION_REFERENCE _NUM | NUMBER(15 | Indicates the order of transactions for the same asset ID. | B | |
| TRANSACTION_TYPE | Not Null | VARCHAR2(15) | Type of transaction for this record: Adjustment or Transfer. Use Adjustment for source line transfers and Transfer for asset transfers. | B |
| BOOK_TYPE_CODE | VARCHAR2(15) | Corporate Book Type Code. | B | |
| TRANSACTION_STATUS | Not Null | VARCHAR2(20) | Status of Transaction: New, Post, Posted, On Hold, Delete or Error. | B |
| TRANSACTION_DATE_ENTERED | DATE | Date when this transaction is entered into Oracle Assets. | B | |
| DESCRIPTION | VARCHAR2(200) | Description of transaction. | B | |
| CREATED_BY | Not Null | NUMBER(15) | Person who created the record. | B |
| CREATION_DATE | Not Null | DATE | Record creation date. | B |
| LAST_UPDATED_BY | Not Null | NUMBER(15) | Last updated by person. | B |
| LAST_UPDATE_DATE | Not Null | DATE | Last updated date. | B |
| LAST_UPDATE_LOGIN | NUMBER(15) | Last update login user. | B | |
| ATTRIBUTE columns 1 to 15 | VARCHAR2(150) | Descriptive flexfield segments. | B | |
| ATTRIBUTE_CATEGORY_CODE | VARCHAR2(30) | Descriptive flexfield structure defining column. | B | |
| WORKER_ID | NUMBER(15) | When the program is run in parallel, this is the worker that is processing the asset. The worker number corresponds to the sequence number assigned by the program, which is used to match assets with available processors. | B | |
| POST_BATCH_ID | NUMBER(15) | Unique identifier for a Post Mass External Transfer or Post Source Line Transfer request. | B | |
| FROM_DISTRIBUTION_ID | NUMBER(15) | Originating Distribution ID. Applicable to Transfer transactions only. | A | |
| FROM_LOCATION_ID | NUMBER(15) | Originating Location ID. Applicable to Transfer transactions only. | A | |
| FROM_GL_CCID | NUMBER(15) | Originating GL Code Combination ID. Applicable to Transfer transactions only. | A | |
| FROM_EMPLOYEE_ID | NUMBER(15) | Originating Employee ID. Applicable to Transfer transactions only. | A | |
| TO_DISTRIBUTION_ID | NUMBER(15) | Destination Distribution ID. Applicable to Transfer transactions only. | A | |
| TO_LOCATION_ID | NUMBER(15) | Destination Location ID. Applicable to Transfer transactions only. | A | |
| TO_GL_CCID | NUMBER(15) | Destination GL Code Combination ID. Applicable to Transfer transactions only. | A | |
| TO_EMPLOYEE_ID | NUMBER(15) | Destination Employee ID. Applicable to Transfer transactions only. | A | |
| TRANSFER_UNITS | NUMBER | Number of asset units to transfer. Applicable to Transfer transactions only. | A | |
| FROM_ASSET_ID | NUMBER(15) | Source asset for source line transfer. Applicable to Adjustment transactions only. | S | |
| TO_ASSET_ID | NUMBER(15) | Destination asset for source line transfer. Applicable to Adjustment transactions only. | S | |
| TRANSFER_AMOUNT | NUMBER | Amount of cost to transfer. Applicable to Adjustment transactions only. | S | |
| SOURCE_LINE_ID | NUMBER(15) | Source line identifier. Applicable to Adjustment transactions only. | S |
Related Topics
Placing Construction-In-Process (CIP) Assets in Service
Capitalize finished assets that are ready to be placed in service. You can capitalize a single asset or a group of assets in a transaction. If you erroneously capitalize a CIP asset, you can reverse the capitalization.
Note: If you have CIP assets in both your corporate book and your tax book, you capitalize the CIP assets in your corporate book, and they are automatically capitalized in the tax book. See: Automatically Adding CIP Assets to Tax Books.
Prerequisites
-
Create CIP assets using Mass Additions or manual additions. See: Asset Setup Processes (Additions).
-
Create CIP assets using Mass Additions or manual additions. See: Overview of the Mass Additions Process.
-
Build CIP assets as you spend money for raw materials and labor to construct them.
To capitalize a CIP asset:
-
Navigate to the Capitalize CIP Assets window.
-
Find assets with asset type CIP.
-
Enter the date you placed the asset in service. Oracle Assets uses this date to begin calculating depreciation for the assets you are placing in service.
-
Choose the CIP asset(s) you want to capitalize. Choose Special, Check All if you want to capitalize all the assets in the Capitalize CIP Assets window.
-
Choose Capitalize.
-
Override the depreciation rules re-defaulted from the asset category if necessary. See: Changing Financial and Depreciation Information.
To reverse capitalize an asset:
-
Navigate to the Capitalize CIP Assets window.
-
Query assets with type Capitalized.
-
Choose the asset(s) you want to reverse capitalize. Choose Special, Check All to reverse capitalize all the assets in the Capitalize CIP Assets window.
Note: You can reverse capitalize an asset only in the period you capitalized it, and only if you did not perform any transactions on it.
-
Choose Reverse.
Related Topics
Construction-In-Process (CIP) Assets
Capitalization Journal Entry Example
Revaluing Assets
Revalue assets to adjust the value of your capitalized assets in a highly inflationary economy. You can revalue all categories in a book, all assets in a category, or individual assets.
You can revalue all assets using the Mass Revaluation process. The Mass Revaluation process does not use price indexes to revalue assets.
The Mass Revaluation process includes the following steps:
-
Create Mass Revaluation Definition
-
Preview Revaluation
-
Run Revaluation
-
Optionally Review Revaluation
Tip: To obtain a value for replacement cost for insurance purposes, run the Mass Revaluation Preview Report without performing the revaluation.
Prerequisites
-
Set up your Revaluation Rules and Accounts. See: Defining Depreciation Books.
To revalue all assets in a category:
-
Navigate to the Mass Revaluation window.
-
Enter the Book for which you want to revalue assets.
-
Enter a Description of the revaluation definition.
-
Specify revaluation rules. See: Asset Management In a Highly Inflationary Economy (Revaluation).
-
Enter the category you want to revalue.
-
Enter the revaluation percentage rate to revalue your assets. Enter either a positive or negative number.
-
Override revaluation rules if necessary.
-
Choose Preview.
Oracle Assets runs the Mass Revaluation Preview Report so you can preview what effect this revaluation will have when you perform it. If necessary, update the definition and run the preview report again.
Note: You must preview the revaluation definition before you perform it.
-
Find the revaluation definition using the Mass Transaction Number.
-
Choose Run. Oracle Assets begins a concurrent process to perform the revaluation.
-
Review the log file after the request completes.
Note: You cannot run Mass Revaluation more than once per period. Once you run Mass Revaluation, values are changed in the Oracle Assets system. If you re-run Mass Revaluation in the same period, the Mass Revaluation calculation will be based on the previous Mass Revaluation calculation. You can run the Mass Revaluation Preview report as many times as you like, without affecting actual values in the system.
To revalue an individual asset:
-
Enter the asset number you want to revalue instead of a category. If you revalue a single asset in a category which is also being revalued, the rate you enter for the asset overrides the category rate.
To review the effects of a revaluation:
-
Navigate to the Mass Revaluations window.
-
Find the revaluation definition you want to review.
-
Choose Review to run the Mass Revaluation Review Report.
-
Review the log file and report after the request completes.
To copy an existing revaluation definition:
-
Navigate to the Mass Revaluations window.
-
Query the revaluation definition you want to copy.
-
Choose Special, Copy Definition from the menu.
-
Specify your rates and override any of the copied information in your new definition.
-
Save your work.
Related Topics
Asset Management in a Highly Inflationary Economy (Revaluation)
Journal Entries for Revaluations
Mass Revaluation Preview and Review Reports
Revaluation Reserve Detail and Summary Reports
Revaluation Reserve Balance Report
Asset Management in a Highly Inflationary Economy (Revaluation)
Oracle Assets allows you to periodically adjust the value of your capitalized assets due to inflation or deflation, according to rates you enter. This process is known as revaluation. The rules for revaluation often differ from country to country. Oracle Assets has the flexibility to handle your specific requirements.
Oracle Assets multiplies the asset cost by the revaluation rate you enter in the Mass Revaluations window to determine the adjustment to the asset cost.
Revaluations are not processed for:
-
Fully retired assets
-
Assets with pending retirements
Tip: Since Oracle Assets does not Mass Copy revaluations, when you perform a revaluation in your corporate book, also perform it in each tax book associated with that corporate book.
Set Up Revaluation Accounts
You must set up the following revaluation accounts before you can perform a revaluation:
-
Revaluation reserve account and revaluation amortization account for each category in the Asset Categories window
-
Revaluation reserve retired gain and loss accounts in the Book Controls window
Specify Default Revaluation Rules
Allow revaluation and specify default revaluation rules for a book in the Book Controls window. If necessary, you can override these rules when creating a revaluation definition in the Mass Revaluations window.
Revalue Accumulated Depreciation
If you decide to revalue accumulated depreciation, Oracle Assets revalues the accumulated depreciation by the same rate by which you revalue your asset cost. Then it determines the change in net book value and transfers the difference to the revaluation reserve account. Oracle Assets calculates current depreciation expense based on the net book value after revaluation, salvage value, and the remaining life.
Revalue YTD Depreciation
If you need to revalue depreciation expense, Oracle Assets creates a journal entry including a line crediting or debiting the depreciation expense account. The amount credited or debited results from applying the revaluation rate to the year-to-date depreciation. Assets that are fully reserved will be adjusted for inflation without extending the life of the asset.
Change In Net Book Value = Change In Asset Cost - Change In Accumulated Depreciation
If you decide not to revalue accumulated depreciation, Oracle Assets transfers the current accumulated depreciation to revaluation reserve. In this case, Oracle Assets calculates current depreciation expense based on the recoverable cost after revaluation and the remaining life.
If you do not amortize the revaluation reserve, the amount remains in the revaluation reserve account until you retire the asset.
Retire Revaluation Reserve
If you want to retire revaluation reserve, Oracle Assets creates journal entries for the remaining reserve to the revaluation reserve retired gain or loss accounts when you retire assets.
Revalue Fully Reserved Assets
You can revalue fully reserved assets that are depreciating under a life-based method. If you choose to revalue fully reserved assets, Oracle Assets also requires you to enter a life extension factor to extend the asset life.
Oracle Assets does not revalue fully retired assets. So if you retire an asset, revalue its category, and reinstate it, the asset is reinstated without being revalued. You can revalue it individually if necessary.
Maximum Fully Reserved Revaluations
You can limit the number of times an asset can be revalued as fully reserved. If you allow revaluation of fully reserved assets, Oracle Assets does not revalue a fully reserved asset if the revaluation exceeds the maximum number of times you can revalue an asset as fully reserved.
Life Extension Factor
When you revalue a fully reserved asset, you must extend the asset life so its revalued cost can be depreciated over one or more periods. To determine the new asset life, Oracle Assets multiplies the original asset life by the life extension factor.
Revalue CIP Assets
If you want to include CIP assets in the revaluation of a tax book, Oracle Assets includes all the tax book CIP assets in the revaluation calculation. This rule is only available for tax books. By default, this rule is selected if the tax book allows CIP assets.
Life Extension Ceiling
The life extension ceiling limits the amount of depreciation you can back out when you revalue fully reserved assets. If your life extension factor is greater than the life extension ceiling, Oracle Assets uses the life extension ceiling to calculate the new accumulated depreciation and the depreciation adjustment. It uses the life extension factor to calculate the new asset life regardless of whether a life extension ceiling exists.
Revaluation Ceiling
Use the ceiling to prevent revaluation above the fair market value. Enter the revaluation ceiling in the Books window.
Related Topics
Control Your Revaluation
Use the status to track your revaluation. The revaluation status determines what action to perform next. The following table defines each revaluation status and their next action available.
| Status | Definition | Possible Action |
|---|---|---|
| New | Newly created mass depreciation definition | Preview |
| Preview | Preview report currently running | None |
| Previewed | Preview report completed successfully | Run |
| Updated | Revaluation definition updated after previewing | Preview |
| Running | Revaluation currently running | None |
| Completed | Revaluation completed successfully | Review Copy |
| Error | Preview report or revaluation completed in error | Preview or Run, whichever failed |
Use Mass Transaction Number to Track Your Revaluation Definition
When you save a new definition, Oracle Assets gives it a unique Mass Transaction Number. Use this number to find your revaluation definition when you want to perform the next stage in the transaction cycle.
Mass Revaluation Process
The following figure graphically illustrates the Mass Revaluation process. A detail description of the process was provided in the preceding text.
Related Topics
Mass Revaluation Preview and Review Reports
Revaluation Reserve Detail and Summary Reports
Revaluation Reserve Balance Report
Asset Impairments
This section covers the following topics:
Overview
Capital assets may incur unexpected or sudden decline in value. This decline in value could be due to physical damage to the asset, obsolescence due to technological innovation, or changes to legal codes. When the recoverable cost of an asset is less than its carrying cost, the amount by which the carrying amount of the asset exceeds its recoverable cost is treated as an impairment loss and is recognized as an expense on the income statement.
Setting Up Impairments
To process asset impairments with Oracle Assets, complete the following setup tasks:
Defining Cash Generating Unit
A Cash Generating Unit is the smallest identifiable group of assets that generates cash inflows from continuous use and is independent of cash inflows from other assets or group of assets. If your organizations groups assets into Cash Generating Units, perform the following setup to define a cash generating unit.
Define the Cash Generating Units based on the cash inflow criteria for each unit.
-
Navigate to the Define Cash Generating Units window.
Navigation: Setup > Asset System > Cash Generating Units
-
In the Book field, select the asset book name for the Cash Generating Unit.
-
Enter the name and description for unit in the Cash Generating Unit and Description fields.
-
Save your work.
Assign Impairment Accounts
Impairment losses are accounted for in the Organization’s General Ledger and are reported on the income statement. In order for the impairment transactions to be accounted for correctly in the general ledger, the general ledger impairment accounts are assigned for the asset category.
Perform the following steps to assign impairment accounts to asset categories:
-
Navigate to the Asset Categories window.
Navigation: Setup > Asset System > Asset Categories
-
Use the Search tool to query the asset category.
-
Query the asset book the impairment accounts are to be assigned.
-
Enter the impairment account combination in the Impairment Expense and Accumulated Impairment fields.
-
Save your work.
Asset Impairment Business Process
The following are the processes for creating, posting and managing asset impairment:
Assigning Cash-Generating Units to Assets (Optional)
Use one of the following options, to assign assets to a Cash Generating Unit:
Manual Assignment
Perform the following steps to manually assign an existing asset to a Cash Generating Unit:
-
Navigate to the Asset Workbench window.
Navigation: Assets > Asset Workbench
-
Query the asset to be assigned.
-
Click the Book button to open the Books window.
-
In the Book field, select the asset book from the list of values.
-
Click the Impairment tab.
-
Select the Cash Generating Unit from the list of values.
-
Save your work.
WebADI Assignment
Perform the following steps to use the Cash Generating Units WebADI spreadsheet to assign assets to a cash generating unit:
-
Navigate to the Assign Cash Generating Units spreadsheet.
Navigation: Assets > Impairment > Assign Cash Generating Units
-
In the spreadsheet enter the following data:
-
Book: From the list of values, select the asset book from which the assets are to be assigned to the cash generating unit.
-
Asset Number: From the list of values, select the asset numbers to be assigned to the cash generating unit.
-
Cash Generating Unit: From the list of values, select the cash generating unit.
-
-
Upload the assignments. From the main menu go to Oracle > Upload.
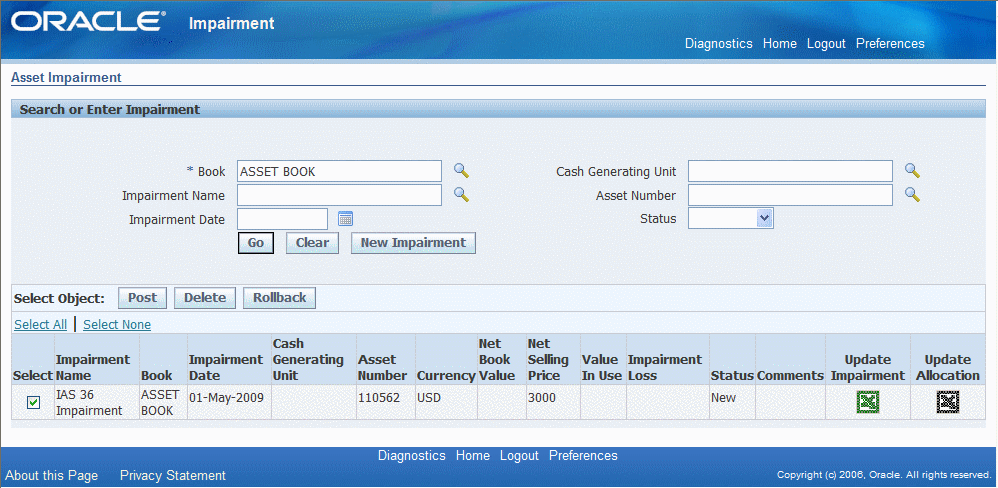
Entering and Uploading Asset Impairments
Oracle Assets uses the WebADI for creating, loading and maintaining impairment transactions.
Perform the following steps to create and upload asset impairment transactions:
-
Navigate to the Create and Post Impairments window
Navigation: Assets > Impairment > Create and Post
-
Click the New Impairment button. The File Download window is displayed.
-
Choose to Open the file when prompted. The system will download and display the Impairments spreadsheet. The Confirmation window will appear. Click Close to return to the spreadsheet.
-
Populate the mandatory header fields (Book, Impairment Name and Impairment Date) and Impairment detail information (Status, Cash Generating Unit / Asset Number, Net Selling Price, Value in Use, Impairment Loss, Goodwill, and optionally Comments).
-
Upload the records to the system for processing. From the main menu go to Oracle > Upload; The Upload Parameter window is displayed. Accept the defaults and click Upload to start the process.
-
The Process Impairments request is executed. When the process is successfully completes, the Upload Parameters window displays the Request ID for the Impairment Preview Process.
Updating Asset Impairments
Use the Update Impairment icon to modify the impairment’s status or transaction details. Only impairments processed with a status of Preview can be posted.
Perform the following steps to update an existing unposted impairment:
-
Navigate to the Create and Post Impairments window.
Navigation: Assets > Impairments > Create and Post
-
Enter the query criteria: Book, Cash-Generating Unit, Impairment Name, Asset Number, Impairment Date and/or Status. Click the Go button.
-
Click Update Impairment button for the row of the impairment to update. The File Download window is displayed.
-
Choose to Open the file when prompted. The system will download and display the Impairments spreadsheet. The Confirmation window will appear, Click Close to return to the spreadsheet.
-
Make the necessary updates to the impairment record.
-
Upload the records to the system for processing. From the main menu go to Oracle > Upload; The Upload Parameter window is displayed. Accept the defaults and click Upload to start the process.
-
The Process Impairments request is executed. When the process is successfully completed, the Upload Parameters window displays the Request ID for the Impairment Preview process.
Reviewing Asset Impairment Reports
The Asset Impairment report is created as part of the upload process. The report displays the following details of the impairments entered: cost, new net book value, net selling price, value in use and impairment loss amount. Only impairments with a status of Preview are included in the report. Use the Asset Impairment report to review and validate the impairment transactions prior to posting the transaction to Oracle Assets.
Perform the following steps to view the Asset Impairment Report:
-
Navigate to Requests window.
Navigation: View > Requests
-
Search or Enter in the Request ID for the Impairment Preview Process displayed in the Upload Parameters Confirmation window.
-
Select the Request ID row for the Asset Impairment report.
-
Click View Output.
Posting Asset Impairments
Impairments are not reflected against the asset until the impairment is posted to Oracle Assets. After confirming the impairment transactions are correct using the Asset Impairment report, commit the results by posting the impairment.
Perform the following to post the impairment transaction to Oracle Assets:
-
Navigate to the Create and Post Impairments window.
Navigation: Assets > Impairments > Create and Post
-
Enter the query criteria: Book, Cash-Generating Unit, Impairment Name, Asset Number, Impairment Date and/or Status. Click the Go button.
-
Check Select box for the row of the impairments to be posted. Press Post button to launch the process.
-
Click Yes to confirm and post the impairments.
-
The Process Impairments concurrent program is executed and the concurrent request id is displayed.
-
Upon successful completion of the posting process, the Asset Impairment report is generated once again and the impairment’s status is updated to Posted.
Viewing Asset Impairments
After the posting process is complete, use the Financial Inquiry feature in Oracle Assets to view the results of the impairment transaction posted to the asset.
Perform the following to view impairments posted to an asset:
-
Navigate to Financial Inquiry window.
Navigation: Inquiry > Financial Information
-
Query the asset by Asset Detail or Book. The View Financial Information window will appear displaying financial data for the selected asset.
-
Click the Impairments tab to display the Impairment details for the asset.
Rolling Back Asset Impairments
If after the impairment is posted to Oracle Assets it is determined that the impairment transactions was invalid, the effects of the impairment can be “rolled back”. Impairments can only be rolled back in the asset period the transaction was posted and as long as the asset period is still open. Once the impairment is rolled back, the impairment cannot be posted again. A new impairment transaction will need to be created.
Perform the following steps to rollback an impairment:
-
Navigate to the Create and Post Impairments window.
Navigation: Assets > Impairments > Create and Post
-
Enter the query criteria such as Book, Cash-Generating Unit, Impairment Name, Asset Number, Impairment Date and Status. Click the Go button.
-
Check Select box for the impairments to be rolled back. Click the Rollback button to launch the process.
-
Click Yes to confirm and rollback the impairments.
-
The Process Impairments concurrent program is executed and the concurrent request id is displayed.
-
Upon successful completion of the process the impairment’s status is updated to Deleted.
Deleting Asset Impairments
Use the Delete functionality to delete unposted asset impairments from the system.
Perform the following to delete unposted impairments:
-
Navigate to the Create and Post Impairments window.
Navigation: Assets > Impairments > Create and Post
-
Enter the query criteria such as Book, Cash-Generating Unit, Impairment Name, Asset Number, Impairment Date and Status. Click the Go button.
-
Check Select box for the row of the unposted impairments to be deleted. Click Delete button to launch the process.
-
Click Yes to confirm and delete the impairments.
-
The Confirmation is displayed with the Impairment ID of the deleted impairment and the impairment’s status is updated to Deleted.
Accounting Methods
There are several methods for deriving the impairments loss amount on an asset. The method used is based on customer’s business practices and regulatory guidance. The methods supported by Oracle Assets are as follows:
-
Calculate Impairment Loss using either Fair Value (Net Selling Price) or Value in Use for the asset.
-
Calculate Impairment Loss using both Fair Value (Net Selling Price) and Value in Use for the asset.
Examples of Impairment Methods and Corresponding Accounting Entries
Below highlights the logic and accounting entries generated for the various methods mentioned above.
-
The account entries detailed may not reflect all the accounting entries created by Oracle Assets for an asset.
-
For Japan Depreciation methods specific calculations and examples, see the FY2007 Japan Tax Reforms - Impairment section .
Initial Data for Impairments Transactions Examples
| Asset Setup Item | Asset Setup Information |
|---|---|
| Book Type Code | Asset Book |
| Asset Numbers | 109662,109663,109664,109682 |
| Method | STL 3Y |
| Cost | 5,000 |
| Addition Period | Feb-2009 |
| DPIS | 01-JAN-2009 |
| Prorate Date | 01-JAN-2009 |
| Depreciate | Y |
| Divide Depreciation | Evenly |
Depreciation has been run until MAY- 2009. As of May 01, 2009 the assets’ details are as follows:
| Asset Item | Asset Information |
|---|---|
| Cost | 5,000 |
| Depreciation Reserve | 555.56 |
| Monthly Depreciation | 138.89 |
Calculate Impairment Loss Using Either Fair Value (Net Selling Price) or Value in Use for the Asset
Users can enter in either the Fair Value (Net Selling Price) or the Value in Use to determine the impairment loss amount. The system calculates the impairment loss amount based on which value has been entered.
Example 1: Using Fair Value (Net Selling Price)
The impairment is created with the following transaction details:
| Impairment Item | Impairment Value |
|---|---|
| Book | Asset Book |
| Impairment Name | IAS 36 Impairment |
| Impairment Date | 01-May-2009 |
| Status | Preview |
| Asset Number | 109662 |
| Fair Value (Net Selling Price) | 3,000 |
The impairment transaction is uploaded to the interface and posted to the asset.
Impairment calculations are as follows:
Carrying Amount (NBV) = Cost - (Accumulated Depreciation + Current Period Depreciation) - Previously Impairment Expense
5,000 - 694.45 - 0 = 4,305.55
Note: When determining the NBV, the depreciation for the current period is added to the Accumulated Depreciation. That is, May-09, 694.45 = (555.56 + 138.89).
Since the Carrying Amount > Net Selling Price, the Impairment Loss amount (Expense) is calculated as:
Impairment Loss Amount Expense = Carrying Amount - Net Selling Price
4,305.55 - 3,000 = 1,305.55
The Adjusted Cost is equal to the Net Selling Price (3000) and will depreciate over the remaining life of the asset. The monthly depreciation is recalculated as follows:
Monthly Depreciation = Adjusted Cost / Remaining life in years
3,000 / 31 = 96.77
Example 2: Using Value in Use
The impairment is created with the following transaction details:
| Impairment Item | Impairment Value |
|---|---|
| Book | Asset Book |
| Impairment Name | IAS 36 Impairment |
| Impairment Date | 01-May-2009 |
| Status | Preview |
| Asset Number | 109663 |
| Value in Use | 3,000 |
The impairment transaction is uploaded to the interface and posted to the asset.
Impairment calculations are as follows:
Carrying Amount (NBV) = Cost - (Accumulated Depreciation + Current Period Depreciation) - Previously Impairment Expense
5,000 - 694.45 - 0 = 4,305.55
Note: When determining the NBV, the depreciation for the current period is added to the Accumulated Depreciation. That is, May-09, 694.45 = (555.56 + 138.89).
Since the Carrying Amount > Value in Use, the Impairment Loss Amount (Expense) is calculated as:
Impairment Loss Amount (Expense) = Carrying Amount - Value in Use
4,305.55 - 3,000 = 1,305.55
The Adjusted Cost will be equal to the Value in Use (3,000) and will depreciate over the remaining life of the asset. The monthly depreciation is recalculated as follows:
Monthly Depreciation = Adjusted Cost / Remaining life in years
3,000 / 31 = 96.77
Calculate Impairment Loss Using Fair Value (Net Selling Price) and Value in Use for the Asset
Users can enter in both the Fair Value and Value in Use for the asset or cash-generating unit to determine the impairment loss amount. The system calculates the impermanent loss amount based on both values entered.
Example 3: Using both Fair Value and Value in Use
The impairment is created with the following transaction details:
| Impairment Item | Impairment Value |
|---|---|
| Book | Asset Book |
| Impairment Name | IAS 36 Impairment |
| Impairment Date | 01-May-2009 |
| Status | Preview |
| Asset Number | 109682 |
| Value in Use | 2,800 |
| Net Selling Price | 3,500 |
The impairment transaction is uploaded to the interface and posted to the asset.
Impairment calculations are as follows:
Carrying Amount = Cost - (Accumulated Depreciation + Current Period Depreciation) - Previously Impairment Expense
5,000 - 694.45 - 0 = 4,305.55
Note: When determining the NBV the depreciation for the current period is added to the Accumulated Depreciation. That is, May-09, 694.45 = (555.56 + 138.89).
Since the Carrying Amount > Max (Value in Use, Net Selling Price), the Impairment Loss Amount (Expense) is calculated as:
Impairment Loss Amount (Expense) = Carrying Amount - Net Selling Price
4,305.55 - 3,500 = 805.55
The Adjusted Cost is equal to the Maximum (Value in Use, Net Selling Price) = 3,500 and will depreciate over the remaining life of the asset. The monthly depreciation is recalculated as follows:
Monthly Depreciation = Adjusted Cost / Remaining life in years
3,500 / 31 = 112.90
Using Known Impairment Loss Amount
When the Impairment Loss amount is known, users can enter in the Impairment Loss amount directly into the system and the system will use the entered amount for the impairment calculations.
Example 4: Known Impairment Loss Amount
| Impairment Item | Impairment Value |
|---|---|
| Book | Asset Book |
| Impairment Name | IAS 36 Impairment |
| Impairment Date | 01-May-2009 |
| Status | Preview |
| Asset Number | 109664 |
| Impairment Expense | 1,000 |
The Impairment transaction is uploaded to the interface and posted to the asset.
Impairment Calculations are as follows:
Adjusted Cost = Cost - (Accumulated Depreciation + Current Period Depreciation) - Impairment Loss Amount
3,305.55 = 5,000 - 694.45 - 1,000
Note: When determining the Adjusted Cost (NBV), the depreciation for the current period is added to the Accumulated Depreciation. That is, May-09, 694.45 = (555.56 + 138.89).
The monthly depreciation is recalculated as follows:
Monthly Depreciation = Adjusted Cost / Remaining life in years
106.63 = 3,305.55 / 31
Reversing the Impairment Loss in a Future Period
There are two ways to reverse impairment transactions once the impairment loss has been posted to Oracle Asset:
-
In the transaction period the impairment was posted (Rollback).
-
In a future period when the asset’s Value in Use and/or Net Selling Price are different.
Reversing Impairments in a future period may be necessary to:
-
Correct a previous impairment transaction that was mistakenly added to the asset.
-
Reverse the previous impairment by actualizing the asset information in the future current period as the result of change in Value in Use and/or Net Selling Price.
| Asset Item | Asset Information |
|---|---|
| Current Period Counter | AUG-2009 |
| Asset Numbers | 109662, 109663 |
| Cost | 5,000 |
| Depreciation Reserve | 984.76 |
| Monthly Depreciation | 96.77 |
| Previous Impairment Expense | 1,305.55 |
| Carrying Amount (NBV) | 2,709.69 |
Correcting Previous Impairment Transaction
Users will use this method when it is necessary to remove the effects of a previous impairment transaction and the depreciation to be expensed going forward is as if the impairment transaction had never taken place. As a result, at the end of the asset life, the depreciation reserve on the asset will be the same value as the cost of the asset.
In order to reverse the impairment transaction it is necessary to calculate the asset’s NBV on the Impairment Date as if the impairment had not taken place.
For example, on 01-May-2009 the asset’s Value in Use and Net Selling Price would have been 4,305.55 (5000 - (5*138.89)). In order to reverse the effects of the impairment, a backdated amortized adjustment is performed using the impairment date and the Value in Use / Net Selling Price of 4,305.55 or the Impairment Loss (Expense) amount of <1,305.55>.
Example 5: Reversing Impairments using Value in Use and Net Selling Price:
The impairment is created with the following transaction details:
| Impairment Item | Impairment Value |
|---|---|
| Book | Asset Book |
| Impairment Name | IAS 36 Impairment |
| Impairment Date | 01-May-2009 |
| Status | Preview |
| Asset Number | 109662 |
| Fair Value (Net Selling Price) | 4,305.55 |
The impairment transactions is uploaded to the interface and posted to the asset.
Impairment calculations are as follows:
Carrying Amount = Cost - (Accumulated Depreciation + Current Period Depreciation) - Previously Impairment Expense
3,000 = 5,000 - (5*138.89) - 1,305.55
Since the Carrying Amount < Max (Value in Use, Net Selling Price). The Impairment Loss Amount (Expense) is calculated as:
Impairment Loss Amount (Expense) = Carrying Amount - Value in Use
-1,305.55 = 3,000 - 4,305.55
Depreciation Catch-up
(3*1,38.89) - (3*96.77) = 416.67 - 290.31 = 126.36
Adjusted Cost = Cost - (Accumulated Depreciation + Current Period Depreciation) - Previously Impairment Expense - Impairment Loss Amount (Expense)
3,888.89 = 5,000 - (984.76 + 126.36) - 1,305.55 - (- 1,305.55)
The Adjusted Cost is now equal to 3,888.89 and will be depreciated over the remaining life of the asset.
The monthly depreciation is recalculated as follows:
Monthly Depreciation = Adjusted Cost / Remaining life in years
138.89 = 3,888.89 / 28
Reverse Previous Impairment by Actualizing Asset Data Starting from Current Period
Due to the economic changes, the Value in Use and Fair Value of the asset are considered as if the assets have not had a prior impairment. Meaning the values for period AUG-2009 will be 3,888.89 (5,000 - (8 * 138.89)). The same result would also occur if used the Impairment Loss amount of <1,305.55 > with an Impairment Date in the AUG-2009 period.
Example 6: Reversing Impairment by Actualizing the Asset Data Starting from Current Period
In this example, Value in Use and Net Selling Price will be used.
The impairment is created with the following transaction details:
| Impairment Item | Impairment Value |
|---|---|
| Book | Asset Book |
| Impairment Name | IAS 36 Impairment Reversal |
| Impairment Date | 01-Aug-2009 |
| Status | Preview |
| Asset Number | 109663 |
| Value in Use / Net Selling Price | 3,888.89 |
The impairment transaction is uploaded to the interface and posted to the asset.
Impairment calculations are as follows:
Carrying Amount (NBV) = Cost - (Accumulated Depreciation + Current Period Depreciation) - Previously Impairment Expense
2,709.69 = 5,000 - 984.76 - 1,305.55
Since the Carrying Amount < Max (Value in Use, Net Selling Price), the Impairment Loss Amount (Expense) is calculated as:
Impairment Loss Amount (Expense) = Carrying Amount - Value in Use
-1,179.2 = 2,709.69 - 3,888.89
Depreciation is calculated from now on the Adjusted Cost (Value in Use) over the remaining life.
The monthly depreciation is recalculated as follows:
3,888.89 / 28 = 138.89
Impairment Journals
The following examples provide the accounting entries that are generated for:
Example of Accounting for Impairment Loss with no Prior Revaluation
This example is related to an asset impairment where the asset has had no prior revaluation.
On February 1, 2009, an asset was purchased and recorded into Oracle Assets with the following details:
| Asset Setup Item | Asset Setup Information |
|---|---|
| Book Type Code | Asset Book |
| Method | STL 3Y |
| Cost | 5,000 |
| Addition Period | Feb-2009 |
| DPIS | 01-JAN-2009 |
| Prorate Date | 01-JAN-2009 |
| Depreciate | Y |
| Divide Depreciation | Evenly |
| Salvage Value | 0.00 |
Depreciation has been run until MAY- 2009. As of May 01, 2009 the assets' details are as follows:
| Asset Item | Asset Information |
|---|---|
| Cost | 5,000 |
| Depreciation Reserve | 555.56 |
| Monthly Depreciation | 138.89 |
On May 1, 2009, it was determined the asset was damaged. The following impairment transaction is recorded:
| Impairment Item | Impairment Value |
|---|---|
| Book | Asset Book |
| Impairment Name | IAS 36 Impairment |
| Impairment Date | 01-May-2009 |
| Status | Preview |
| Impairment Loss Amount (Expense) | 1,000 |
Impairment calculations are as follows:
Adjusted Cost (NNBV) = Cost - (Accumulated Depreciation + Current Period Depreciation) - Impairment Loss Amount
3,305.55 = 5,000 - 694.45 - 1000
Note: When determining the Adjusted Cost (NNBV) the depreciation for the current period is added to the Accumulated Depreciation. That is, May-09, 694.45 = (555.56 + 138.89).
The monthly depreciation is recalculated as follows:
Monthly Depreciation = Adjusted Cost (NNBV) / Remaining life in years
106.63 = 3,305.55 / 31
The effect of the impairment is illustrated in the following table:
| Date | Cost | Depreciation Expense | Accumulated Depreciation | Asset CNBV (End of Period) *1 | Asset NNBV *2 | Revaluation Reserve | Revaluation Amortization | Accumulated Impairment |
|---|---|---|---|---|---|---|---|---|
| Feb-09 | 5,000 | 277.78 | 277.78 | 4,722.22 | ||||
| Mar-09 | 138.89 | 416.67 | 4,583.33 | |||||
| Apr-09 | 138.89 | 555.56 | 4,444.44 | |||||
| Impairment | 4,305.55 | 3,305.55 | 1,000.00 | |||||
| May-09 | 5,000 | 138.89 | 694.45 | 3,305.55 | 1,000.00 | |||
| Jun-09 | 106.63 | 801.08 | 3,198.92 | 1,000.00 |
*1 Current Net Book Value
*2 New Net Book Value
The following accounting entries are generated to record the impairment loss without an existing revaluation balance:
| Account Description | Debit | Credit |
|---|---|---|
| Impairment Loss Expense (Impairment Loss Amount (Expense)) | 1,000.00 | |
| Accumulated Impairment (Impairment Loss Amount (Expense)) | 1,000.00 |
At the end of the month, the following accounting entry is booked to record the depreciation expense for the May-09 period:
| Account Description | Debit | Credit |
|---|---|---|
| Depreciation Expense | 138.89* | |
| Accumulated Depreciation | 138.89 |
* Since the current month depreciation is considered in the NBV calculation, depreciation is not recalculated until the following month.
Example of Accounting for Impairment Loss with Prior Revaluation
This example is related to an asset impairment where the asset has had a revaluation and there is an existing revaluation reserve balance.
On February 1, 2009, a used asset was purchased and recorded into Oracle Assets with the following details:
| Asset Setup Item | Asset Setup Information |
|---|---|
| Book Type Code | Asset Book |
| Method | STL 3Y |
| Cost | 5,000 |
| Addition Period | Feb-2009 |
| DPIS | 01-JAN-2009 |
| Prorate Date | 01-JAN-2009 |
| Depreciate | Y |
| Divide Depreciation | Evenly |
| Salvage Value | 0.00 |
Depreciation has been run until MAY- 2009. As of May 01, 2009 the asset’s details are as follows:
| Asset Item | Asset Information |
|---|---|
| Cost | 5,000 |
| Depreciation Reserve | 555.56 |
| Monthly Depreciation | 138.89 |
On May 1, 2009, it was determined the asset was undervalued. The following revaluation transaction is recorded:
| Revaluation Item | Revaluation Value |
|---|---|
| Book | Asset Book |
| Revaluation Date | 01-May-2009 |
| Status | Preview |
| Revaluation (Adjusted Cost: 6,000) | 20% |
Current Net Book Value (CNBV) = Cost + Cost Adjustments + Revaluations - Salvage Value - Accumulated Depreciation - Accumulated Impairments - Retirements
CNBV = 5,000.00 + 0.00 + 0.00 - 0.00 - 555.56 - 0.00 - 0.00
CNBV = 4,444.44
Adjusted Cost (NNBV) = Asset value change as deemed by professional valuation
Adjusted Cost (NNBV) = Cost + (Cost * Rate %)
6,000 = 5,000 + (5,000 * 20%)
Revaluation Amount = NNBV - CNBV
Revaluation Amount = 1,555.56
The effect of the revaluation is illustrated in the following table:
| Date | Cost | Depreciation Expense | Accumulated Depreciation | Asset CNBV (End of Period) *1 | Asset NNBV *2 | Revaluation Reserve | Revaluation Amortization | Accumulated Impairment |
|---|---|---|---|---|---|---|---|---|
| Feb-09 | 5,000 | 277.78 | 277.78 | 4,722.22 | ||||
| Mar-09 | 138.89 | 416.67 | 4,583.33 | |||||
| Apr-09 | 138.89 | 555.56 | 4,444.44 | |||||
| Revaluation | 555.56 | 4,444.44 | 6,000.00 | 1,555.56 | 48.61 | |||
| May-09 | 6,000 | 187.50 | 187.50 | 5,812.50 | 1,506.95 | 48.61 | ||
| Jun-09 | 187.5 | 375.00 | 5,625.00 | 1,458.34 | 48.61 |
*1 Current Net Book Value
*2 New Net Book Value
The following accounting entries are generated to record the revaluation.
When booking a revaluation on the asset, an entry to the Accumulated Depreciation account is made to reverse the accumulated depreciation to date on the asset and set the account balance to zero. This will cause the fixed asset cost to be equal to the new net book value.
| Account Description | Debit | Credit |
|---|---|---|
| Accumulated Depreciation | 555.56 | |
| Fixed Asset Cost (Revaluation Amount – Accumulated Depreciation) | 1,000.00 | |
| Revaluation Reserve | 1,555.56 |
-
If the result of (Revaluation Amount - Accumulated Depreciation) is positive, then the Fixed Asset Cost account is debited.
-
If the result of (Revaluation Amount - Accumulated Depreciation) is negative, then the Fixed Asset Cost account is credited.
At the end of the month, the following accounting entry is booked to record the new depreciation expense for the period (May-09):
| Account Description | Debit | Credit |
|---|---|---|
| Depreciation Expense | 187.50* | |
| Accumulated Depreciation | 187.50 |
* Depreciation is recalculated and is based on the revalued net book value.
Monthly Depreciation = Adjusted Cost (NNBV) / Remaining deprecation periods
187.50 = (6,000 / 32)
On September 1, 2009 the asset suffered damage due to flooding in the area. The following impairment transaction is recorded:
| Impairment Item | Impairment Value |
|---|---|
| Book | Asset Book |
| Impairment Name | IAS 36 Impairment |
| Impairment Date | 01-Sep-2009 |
| Status | Preview |
| Impairment Loss Amount (Expense) | 4,000 |
When determining the current net book value (CNBV), the current period’s depreciation is included in the CNBV calculation.
Current Net Book Value (CNBV) = Cost + Cost Adjustments + Revaluations - Salvage Value - (Accumulated Depreciation + Current Period Depreciation) - Accumulated Impairments - Retirements
CNBV = 5,000.00 + 0.00 + 1,000.00 - 0.00 - 937.50 - 0.00 - 0.00
CNBV = 5,062.50
Impairment Loss Amount = 4,000.00
Adjusted Cost (NNBV) = CNBV - Impairment Loss Amount
1,062.50 = 5,062.50 - 4,000.00
The monthly depreciation is recalculated as follows:
Monthly Depreciation = Adjusted Cost (NNBV) / Remaining life in years
39.35 = 1,062.50 / 27
The effect of the impairment is illustrated in the following table:
| Date | Cost | Depreciation Expense | Accumulated Depreciation | Asset CNBV (End of Period) *1 | Asset NNBV *2 | Revaluation Reserve | Revaluation Amortization | Accumulated Impairment |
|---|---|---|---|---|---|---|---|---|
| Feb-09 | 5,000 | 277.78 | 277.78 | 4,722.22 | ||||
| Mar-09 | 138.89 | 416.67 | 4,583.33 | |||||
| Apr-09 | 138.89 | 555.56 | 4,444.44 | |||||
| Revaluation | 555.56 | 4,444.44 | 6,000.00 | 1,555.56 | 48.61 | |||
| May-09 | 6,000 | 187.50 | 187.50 | 5,812.50 | 1,506.95 | 48.61 | ||
| Jun-09 | 187.50 | 375.00 | 5,625.00 | 1,458.34 | 48.61 | |||
| Jul-09 | 187.50 | 562.50 | 5,437.50 | 1,409.72 | 48.61 | |||
| Aug-09 | 187.50 | 750.00 | 5,250.00 | 1,361.11 | 48.61 | |||
| Impairment | 5,062.50 | 1,062.50 | 1,312.50 | 48.61 | 4,000 | |||
| Sep-09 | 187.50 | 937.50 | 1,062.50 | 48.61 | 4,000 | |||
| Oct-09 | 6,000 | 39.35 | 976.85 | 1,023.15 | 4,000 | |||
| Nov-09 | 39.35 | 1,016.20 | 983.80 | 4,000 | ||||
| Dec-09 | 39.35 | 1,055.56 | 944.44 | 4,000 |
*1 Current Net Book Value
*2 New Net Book Value
The following accounting entries are generated to record the impairment with a prior revaluation reserve balance:
| Debit | Credit |
|---|---|
| Revaluation Reserve (Up to the amount of the impairment loss) | |
| Impairment Loss (Impairment loss not covered by the Revaluation Reserve | |
| Accumulated Impairment (Impairment loss amount) |
Note: When determining the amount of the revaluation reserve available, the current month revaluation reserve amortization is taken in to account. For example, the Revaluation Reserve balance is reduced by the current month’s amortization. The remaining balance is then applied to the impairment loss amount to determine the amount to be booked to the Impairment Loss expense account.
At the end of the month, the following accounting entries are booked:
To record the impairment for the period:
| Account Description | Debit | Credit |
|---|---|---|
| Revaluation Reserve | 1,312.50 | |
| Impairment Loss Expense | 2,687.50 | |
| Accumulated Impairment | 4,000.00 |
To record the depreciation expense for the period (Sep-09):
| Account Description | Debit | Credit |
|---|---|---|
| Depreciation Expense | 187.50* | |
| Accumulated Depreciation | 187.50 |
* Since the current month depreciation is considered in the CNBV calculation, depreciation is not recalculated until the following month.
To record the revaluation amortization reserve for the period (Sep-09):
| Account Description | Debit | Credit |
|---|---|---|
| Revaluation Reserve | 45.61* | |
| Revaluation Amortization | 45.61 |
* The available revaluation reserve is reduced by the current month revaluation amortization to the current period revaluation reserve amortization is recorded to set the accounts to zero.
Asset Impairment Considerations
The following conditions are to be considered when performing impairments in Oracle Assets:
-
Mass copy does not copy the impairment transactions to the Tax book.
-
Impairment transaction can be performed separately in the Tax book.
-
Transfer, reclassification, or Source Line Transfer will move the Accumulated Impairment balance from source to destination asset or distribution.
-
If the goodwill asset number is provided in the impairment WebADI spreadsheet and a goodwill amount is not given, the entire net book value of the goodwill asset is considered as goodwill applicable for the Cash Generating Unit.
-
Only one impairment transaction in a period is allowed. If additional impairments are required for the asset, rollback the impairment to undo the transactions and create a new impairment transaction for the revised amount.
-
The Accumulated Impairment amount is reversed at the time of retirement. Backdated impairment transactions are not allowed.
-
Impairment of Group asset and allocation of corporate asset are not supported.
-
Accounting entries are created for goodwill only if goodwill is being tracked as a fixed asset and the goodwill asset number is entered against the Cash Generating Unit at the time of impairment creation.
Post-Impairment Transactions
After Impairment transactions are complete, Oracle Assets enables the following post-impairment transactions
Depreciation
After the recognition of an impairment loss, the depreciation charge for the asset is adjusted in future periods to allocate the asset revised carrying amount, less its residual value, on a systematic basis over the asset remaining useful life. The formula for this calculation is:
Depreciable Basis after Impairment = (Cost - Salvage Value - Accumulated Depreciation - Accumulated Impairment)
Revaluation
Revaluations can be performed on previously impaired assets. When a revaluation is performed on an asset where there is an existing balance in the Accumulated Impairment Loss account, the accumulated impairment loss is first reversed, and the remaining amount is applied to the asset cost.
Example of accounting for asset revaluation after impairment loss:
| Asset | Amount |
|---|---|
| Cost | 10,000 |
| Accumulated Depreciation | 2,000 |
| Accumulated Impairment | 1,000 |
| Net Book Value after Impairment | 7,000 |
The asset is revalued by 20%, then the accounting entries for reversing Accumulated Impairment are
| Account Description | Debit | Credit |
|---|---|---|
| Accumulated Impairment | 1,000 | |
| Revaluation Reserve | 1,000 |
The remaining revaluation cost is accounted as:
| Account Description | Debit | Credit |
|---|---|---|
| Asset Cost | 1,000 | |
| Accumulated Depreciation | 400 | |
| Revaluation Reserve | 600 |
Retirement
An asset may be retired after the recognition of the impairment loss. Since the impairment loss is already recognized in the financial statements, the impairment is considered in the calculation of asset’s NBV Retired amount. The formula for calculating NBV Retired is:
NBV Retired = Cost - Accumulated Depreciation - Accumulated Impairment
Example of accounting for asset revaluation after impairment loss:
| Asset | Amount |
|---|---|
| Cost | 10,000 |
| Depreciation Reserve | 3,000 |
| Impairment Reserve | 500 |
| Net Book Value Retired | 6,500 |
The asset is retired and the following accounting entries are recorded:
| Account Description | Debit | Credit |
|---|---|---|
| Depreciation Reserve | 3,000 | |
| Impairment Reserve | 500 | |
| NBV Retired | 6,500 | |
| Asset Cost | 10,000 |
Asset Impairment Reports
Oracle Assets provides the following Asset Impairment reports:
Asset Impairment Report
Use the Asset Impairment report to view and validate impairment transactions uploaded to the Oracle Assets interface table prior to posting the transactions into Oracle Assets. The Asset Impairment report is automatically executed when impairment transactions are uploaded to the Oracle Asset interface from WebADI and when impairment transactions are posted. It can also be executed manually via the concurrent manager.
Only impairment transactions with a status of Preview, Previewed or Posted are displayed in the Asset Impairment report.
Report Parameters:
The Asset Impairment report includes the following parameters:
-
Required:
-
Book: Asset Book
-
Ledger Currency: Currency the Ledger associated with the Asset book
-
Period: Fixed asset period transactions are recorded.
-
-
Optional:
-
Impairment: Name of the Impairment
-
Cash Generating Unit: Name or value of the Cash Generating unit
-
Report Headings:
The headings for Asset Impairment report are:
| Heading | Description |
|---|---|
| Current Net Book Value | The asset’s current carrying value calculated as of the date of the impairment transaction. It contains the depreciation amount for the period in which the impairment transaction occurred. |
| Net Selling Price | The amount entered in as the Net Selling Price for the asset to be used to derive the impairment loss on the asset. |
| Value in Use | The amount entered in for the Value in Use for the asset to be used to derive the impairment loss on the asset. |
| Impairment Loss | The amount of the impairment loss on the asset. Either calculated based on Net Selling Price and/or Value in Use or entered in manually. |
| Revaluation Reserve Adjustment | The amount of the revaluation reserve available on the asset before applying the impairment. |
| New Net Book Value | The asset’s new carrying value after applying the impact of the impairment. |
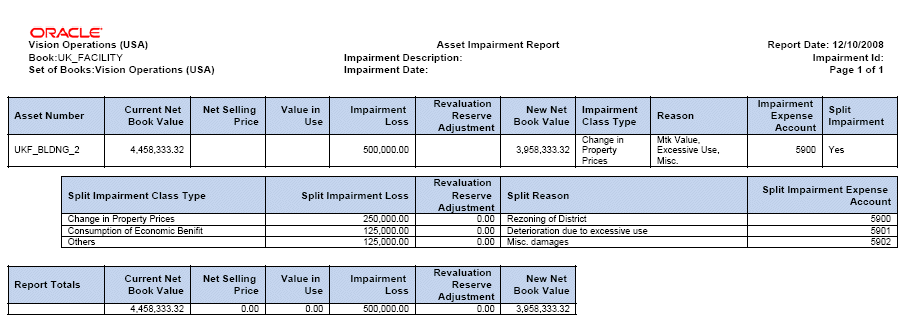
List Assets By Cash Generating Unit Report
Use the List Assets by Cash Generating Unit report to review and validate impairment transactions on an individual asset or all the assets within a Cash Generating unit.
Report Parameters:
The List Assets By Cash Generating Unit report includes the following parameters:
-
Required:
-
Book: Asset Book
-
Ledger Currency: Currency the Ledger associated with the Asset book
-
-
Optional:
-
Cash Generating Unit: Name or value of the Cash Generating unit
-
Asset Number: The asset number of the individual asset to be reported
-
Report Headings:
The headings for the List Assets By Cash Generating Unit report are:
| Heading | Description |
|---|---|
| Cost | The current asset or CGU cost. |
| Net Book Value | The asset’s current carrying value as of the current fixed asset period. |
| Accumulated Impairment | The total accumulated impairment loss amount currently on the asset. |
| YTD Impairment | The total amount of the accumulated impairment loss to date on the asset in the current accounting year. |
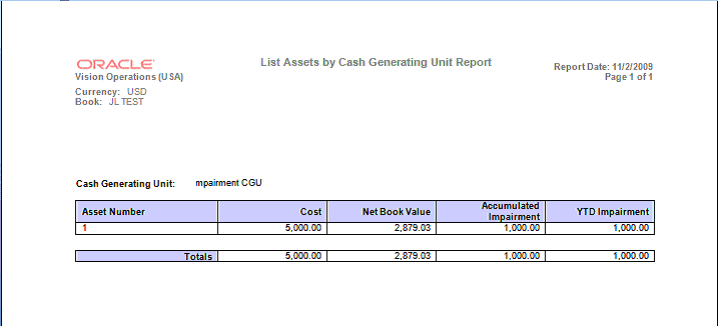
Loading Impairment Data
Organizations who wish to load in impairment data from an external system into Oracle Assets, can load their impairment transactions into the Oracle Assets FA_IMPAIRMENTS interface table. The following table details the columns and descriptions for FA_IMPAIRMENTS interface table.
| Column Name | Description | Type | Optional or Required |
|---|---|---|---|
| IMPAIRMENT_ID | The system-generated impairment identification number. | NUMBER(15) | System-generated |
| IMPAIRMENT_NAME | The name of the Impairment transaction. | VARCHAR2(30) | Required |
| DESCRIPTION | The description of the Impairment transaction. | VARCHAR2(240) | Optional |
| REQUEST_ID | System-generated request id when impairment line is uploaded, posted, adjusted, rolled back or deleted. | NUMBER(15) | System-generated |
| STATUS | Current Impairment status. You can upload impairments only with New or Preview status. | VARCHAR2(30) | Required |
| BOOK_TYPE_CODE | Use the column for the book that will receive the Impairment transaction. | VARCHAR2(15) | Required |
| CASH_GENERATING_ UNIT_ID | The identification number for Cash Generating Unit. If you enter the value for this column then you cannot enter the Asset_Id information. | NUMBER(15) | Conditionally required |
| ASSET_ID | The identification number for the Asset. If using this column then Cash_Generating_Unit_Id shouldn’t be used. | NUMBER | Conditionally required |
| NET_BOOK_VALUE | System-generated amount for Net Book Value used as reference in Impairment transaction. | NUMBER | System-generated |
| NET_SELLING_PRICE | The value entered for Net Selling Price of Asset/CGU. You can use this column and/or Value_In_Use or Impairment_Amount. | NUMBER | Conditionally required |
| VALUE_IN_USE | The value entered for Value in Use of Asset/CGU. You can use this column and/or Net_Selling Price or Impairment_Amount. | NUMBER(15) | System-generated |
| GOODWILL_AMOUNT | The entered Goodwill amount for the Asset/CGU. | NUMBER | Optional |
| USER_DATE | The extra date that users can use as reference for the Impairment transaction. | DATE | Optional |
| PERIOD_COUNTER_IM PAIRED | The system- generated period counter of the impairment transaction. | NUMBER(15) | System-generated |
| IMPAIRMENT_AMOUN T | The Impairment expense amount for Asset/CGU. If used then Net_Selling_Price and Value_In_Use shouldn’t be used. | NUMBER | Conditionally required |
| DATE_INEFFECTIVE | The system- generated date in the moment when the impairment is deleted. | DATE | System-generated |
| CREATION_DATE | Standard who columns. The date when Impairment was created. | DATE | System-generated |
| CREATED_BY | Standard who columns. Typically the user id of the person that created the Impairment. | NUMBER(15) | System-generated |
| LAST_UPDATE_DATE | Standard who columns. This date corresponds to the date a user updated the Impairment transaction. | DATE | System-generated |
| LAST_UPDATED_BY | Standard who columns. The user id of the person that updated the transaction. | NUMBER(15) | System-generated |
| LAST_UPDATE_LOGIN | Standard who columns. The user id of the last person that updated the transaction. | NUMBER(15) | System-generated |
The United Kingdom Local Authority Accounting for Revaluations and Impairments
This section covers the following topics:
Overview
CIPFA/LASAAC Joint Committee produced, in accordance with the Accounting Standards Board’s code of practice, a “Code of Practice on Local Authority Accounting in the United Kingdom 2006” on proper accounting practice. This is also generally referred to as “A Statement of Recommended Accounting Practice (SORP) 2006”. The SORP is required to be adhered to by all local authorities in United Kingdom (UK). The SORP includes recommendations on how fixed assets are to be revalued from April 1, 2007 and onwards
The UK Local Authority Accounting for Revaluations and Impairments feature enhances the existing functionality in Oracle Assets in order to address the above fixed asset revaluation requirements that apply to UK local authorities. The enhanced Revaluation and Impairment functionality for fixed assets in Oracle Assets addresses the following requirements:
Revaluation Reserve Accounting – Net Book Value
The accounting for revaluations and impairments is based on the difference between new net book value (professional valuation) and current net book value of the assets at the time of revaluation or impairment. The revaluation reserve, capital adjustment and statement of movement on general fund balances are stored at the asset level. As required by SORP, impairment and revaluation of fixed assets are now accounted for using the Revaluation Reserve and Capital Adjustment accounts instead of the Fixed Asset Restatement account.
For impairments, when calculating the current net book value, the current net book value includes the depreciation amount of the period where the Impairment date is entered when determining the impairment loss on the asset.
Generating Depreciation Neutralizing Entries
Under SORP, any debit entry to an Income or Expenditure account that impacts a Profit and Loss account is to be neutralized. This includes depreciation. The effect of the depreciation charge on revenue is neutralized by booking an accounting entry to the Capital Adjustment and Statement of Movement on the General Fund Balance (General Fund) accounts. The neutralizing entry is generated and posted in conjunction with the depreciation accounting entry for the asset. The Depreciation program of Oracle Assets creates the neutralizing accounting entry. The accounting entries are generated based on the asset’s assigned depreciation schedule and the amount used is the same as the corresponding standard depreciation accounting entry.
The accounts assigned for the Capital Adjustment and Statement of Movement on General Fund Balance for the asset’s category are used.
The neutralizing accounting entries consist of:
| Debit | Credit |
|---|---|
| Capital Adjustment | |
| Statement of Movement on the General Fund Balance |
Revaluation of Donated and Discounted Assets
Assets, which are acquired as donations or at a discount, are required to be revalued and accounted for through the Revaluation Reserve account. Inherited assets are to be treated in the same manner as discounted or donated assets. Whenever a donated asset is acquired, the asset must be revalued to its current market value. The revaluation is to be accounted through the revaluation reserve account as any other revalued asset.
The existing Oracle Assets Release 11i functionality previously supported revaluation based on a percentage increase of the historical cost. To accommodate the above requirement, users now can enter the asset’s revalued amount in the Revaluation window using the following approaches:
-
Percentage increase based on Net Book Value
-
Enter the actual Revalued Net Book Value
-
Incremental Amount of the Net Book Value
Note: Revaluation only affects assets added in a prior period. Revaluations can only be performed in a subsequent period to the asset addition.
Impairment Classification Types
In order to determine the appropriate accounting treatment for impaired assets, impairments are required to be classified as either Consumption of Economic Benefit, Change in Property Prices, or Other.
The Impairment WebADI feature contains additional columns to capture the impairment data elements for the impairment classification type, reason, impairment amount, and impairment expense account number fields. Users can select the impairment classification type; enter in the reason for the impairment and the portion of the impairment amount to attribute to the type of impairment event in addition to the impairment expense account to be used to record the impairment loss.
Reason and Purpose Descriptions
Per SORP, the reason or purpose for the impairment is to be recorded and maintained at the Asset and Event levels. Both the Revaluation and Impairment windows now contain the Reason field in which you can enter the reason for the asset’s impairment or revaluation.
Generating Impairment Loss Neutralizing Accounting Entries
When an impairment loss occurs it is a requirement that the effect of the impairment expense loss accounting entry to the profit and loss account be neutralized through the use of the Capital Adjustment and Statement of Movement on the General Fund Balance accounts.
The accounting entry consists of a debit to the Capital Adjustment account and a credit to the Statement of Movement on General Fund Balance account in the amount equivalent to the impairment expense loss accounting entry.
Oracle Assets creates the required neutralizing accounting entry for the impairment expense loss. Whenever an impairment accounting entry is debited to the Impairment Loss of income and expenditure account, regardless of its impairment classification, the neutralizing accounting entries are created. The Capital Adjustment and Statement of Movement on General Fund Balance accounts assigned to the asset’s category are used for generating the neutralizing accounting entries.
The neutralizing accounting entries consist of:
| Debit | Credit |
|---|---|
| Capital Adjustment | |
| Statement of Movement on the General Fund Balance |
Revaluations Directly Related to Prior Impairments
In rare circumstances, a revaluation may reverse the impact of a prior impairment on an asset. When a revaluation can be linked to a prior impairment, it is a required that the effect of the impairment be taken in account when booking the revaluation.
To accommodate this requirement, the Revaluation window contains the Link Impairments feature that allows users to select an asset's impairment or impairment classification type to link to the Revaluation.
When the Link option is selected for an individual asset or asset category, the system displays the Link Impairments window. The Link Impairments window includes the following tabs:
-
Asset Level tab: This tab displays all the historic impairment transactions for the asset. Users select a single historic impairment record to link to the revaluation. Only impairments with an impairment classification type of Change in Property Prices or Other are enabled for selection.
-
Category tab: This tab displays the impairment classifications types to be linked to the assets within the category. Only the most recent impairment for the impairment classification type selected is reversed for the assets within the category.
Oracle Assets contains the necessary logic to generate the accounting entries for reversing the impact of the prior impairment on linked revaluations.
Note: Revaluations cannot be linked to impairments with an impairment classification type of Consumption of Economic Benefit.
Generate Asset Decommission and Disposal Entries
When disposing or decommissioning an asset, the carrying amount of the asset is to be removed from the balance sheet.
The accounting entries to record the removal are:
| Debit | Credit |
|---|---|
| Disposal Gain or Loss (Income Statement account) | |
| Fixed Asset Cost |
The accounting entry is based on the assumption that the Fixed Asset Cost, Accumulated Depreciation, Accumulated Impairment, and Revalued Cost are posted to the Fixed Asset Cost account. However, SORP requires the reversal of the carrying amount for the asset be from the balance sheet account that it was originally posted. As a result, the following reversal accounting entries (based on Asset Category setup and Asset Book level setup) are required:
| Debit | Credit |
|---|---|
| Disposal Gain or Loss (Income Statement account) | |
| Accumulated Depreciation | |
| Accumulated Impairment | |
| Fixed Asset Cost |
Additionally, the neutralizing accounting entries to the Capital Adjustment and Statement of Movement on the General Fund balance are posted. Any remaining balance in the Revaluation Reserve for the asset is also removed and transferred to the Capital Adjustment account.
The accounting entries to transfer the remaining revaluation reserve balances are:
| Debit | Credit |
|---|---|
| Revaluation Reserve | |
| Capital Adjustment |
Accounting for Grants and Contributions
Accounting entries for government grants and contributions (apart from the asset acquisition and depreciation on asset, which is fulfilled by standard Oracle Asset functionality) will be managed by UK local authorities through the creation of manual journal entries in Oracle General Ledger.
Accounting for Usable Capital Receipts
Funding and write-off charges to revenue can be performed by the UK local authorities on an annual basis using Manual Journals and Recurring Journals features in Oracle General Ledger.
Maintaining Historical and Revalued Asset Information Separately at the Asset Level
The existing functionality of Oracle Assets addresses the UK authority requirements by maintaining historical and revaluation information separately for each asset.
The historical record contains the following data elements:
-
Gross Cost (Acquisition and adjustments)
-
Accumulated Depreciation
-
Impairment
-
Net Book Value
For the current value record (Revalued):
-
Revalued Amount
-
Revalued Accumulated Depreciation
-
Impairment
-
Net Book Value
-
Revaluation Reserve
-
Capital Adjustment
-
Statement of Movement on the General Fund Balance
The UK Local Authority Accounting for Revaluations and Impairments feature provides additional fields to support the generation of accounting entries for revaluation gains and losses, storing purpose description, impairment classification code, impairment and revaluation identifiers to link back to an impairment.
Application Setup
To use the UK Local Authority Accounting for Revaluations and Impairments feature, complete the following setup tasks:
Enable the UK Local Authority Accounting Option
In order to use the UK Local Authority Accounting for Revaluations and Impairments feature for an accounting or tax book, the UK Local Authority Accounting option must be enabled at the book level.
Perform the following steps to enable the UK Local Authority Accounting option for an accounting or tax book:
-
Navigate to the Book Controls window.
Navigation: Setup> Asset System > Book Controls
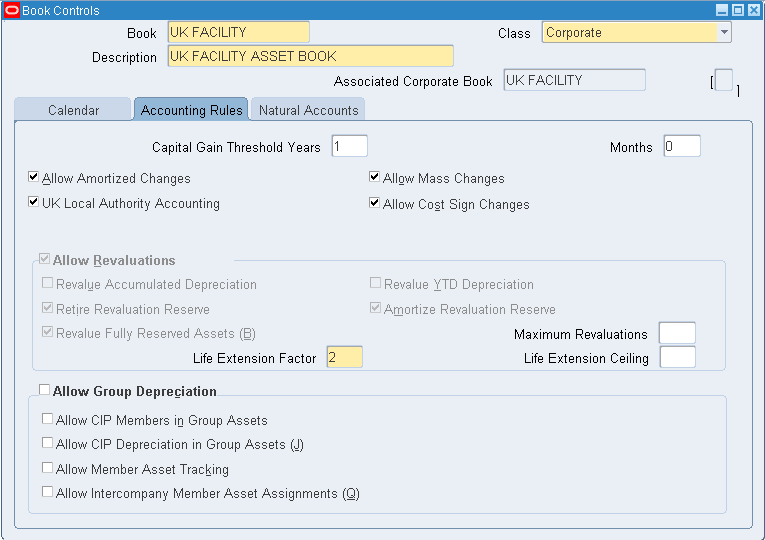
-
Create a new book or query an existing book.
-
Select the Accounting Rules tab.
-
Select the UK Local Authority Accounting check box.
The system automatically enables the Allow Revaluations region and the necessary revaluations rules to perform revaluations for the UK Local Authority Accounting:
-
Retire Revaluation Reserve
-
Revalue Fully Reserved Assets
-
Amortize Revaluation Reserve
Note: If you select the UK Local Authority Accounting check box, changes to the revaluation rules within the Allow Revaluations region will be prohibited.
-
-
If defining a new book, complete the remaining necessary Book Control setup.
-
Save your work.
Add Additional Account Information to Asset Categories
After enabling the UK Local Authority Accounting option for the book, assign the book to the relevant assets categories and add additional required accounting information.
Perform the following steps for assigning and adding additional account information to the asset categories:
-
Navigate to the Asset Categories window.
Navigation: Setup> Asset System > Asset Categories
-
Query the asset category to be assigned and updated.
-
In the Book field, select the book from the list of values.
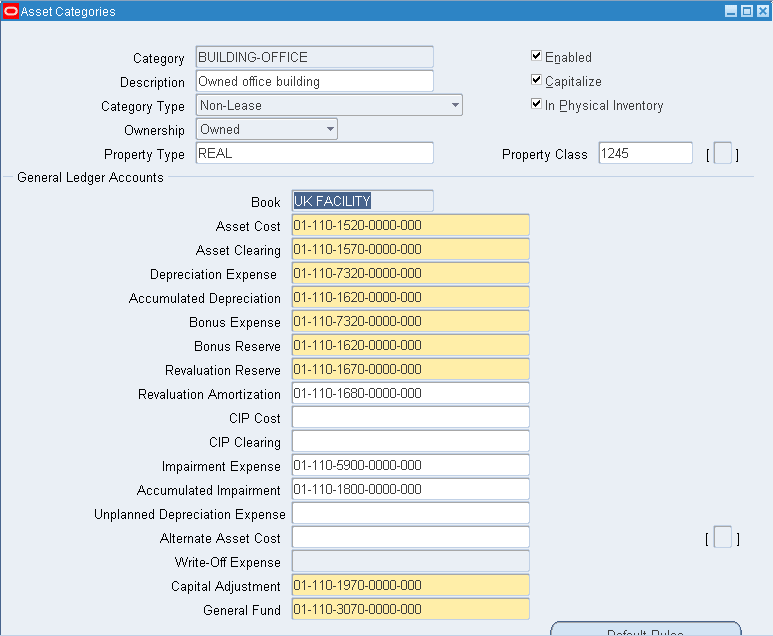
-
For the books that the UK Local Authority Accounting option is enabled, the system displays the following additional fields for setting up account assignments for the Capital Adjustment and Statement of Movement of General Fund Balance accounts:
-
Capital Adjustments
-
General Fund
-
-
In the Capital Adjustment and General Fund fields, enter the appropriate balance sheet accounts to be used when creating the neutralizing accounting entries. The system performs the following account type validation on the entered accounts:
-
Capital Adjustments: Asset
-
General Fund: Liability or Owner's Equity
-
-
Save your work.
Note: If you have not previously performed asset impairments for fixed assets, ensure that you also enter Accumulated Impairment and Impairment Expense accounts for each asset category to be used.
Managing Impairments
The UK Local Authority Accounting for Revaluations and Impairments feature enables users to manage fixed asset impairments based on the regulatory requirements for UK local authorities.
Prerequisites:
Enable the UK Local Authority Accounting for Revaluations and Impairments feature. For more information, see Setting Up UK Local Authority Accounting for Revaluations and Impairment section.
Asset Impairment Considerations
The following conditions are to be considered when performing impairments using the UK Local Authority Accounting for Revaluations and impairments feature in Oracle Assets:
-
Impairments are defined at the asset level only.
-
Impairments must be performed through the WebADI Impairments user interface. Impairments may not be performed through the Mass Revaluations window, as this may result in the creation of a negative revaluation reserve, which is contrary to CIPFA guidelines for the UK local authority accounting treatment for fixed asset revaluations and impairments.
-
To reverse a prior impairment once it has been posted and the period closed, perform an upward revaluation through the Mass Revaluation user interface.
-
An asset can have only one posted impairment event per period. If a second impairment is required, the first posted impairment must be rolled back prior to uploading the second impairment.
-
To ensure proper accounting treatment, the Generate Accounts process, invoked during the depreciation process, must be executed and is not to be disabled or cancelled.
This section covers the following topics:
Performing Impairments
Oracle Assets uses the WebADI for creating, loading and maintaining impairment transactions.
The steps for performing impairments are:
Entering and Uploading Asset Impairments
Perform the following steps to create and upload impairment transactions:
-
Navigate to the Asset Impairment window.
Navigation: Assets > Impairment > Create and Post
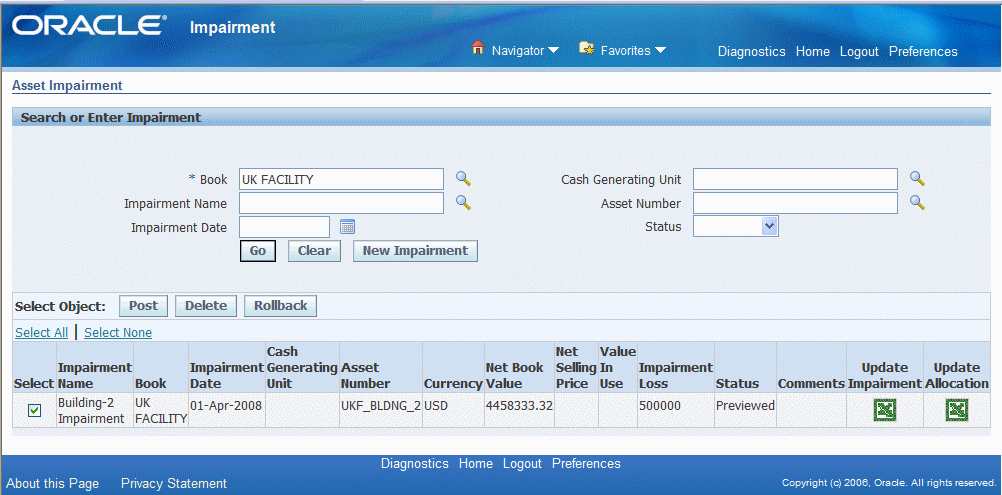
-
Click the New Impairment button. The File Download window is displayed.
-
Choose to Open the file when prompted. The system will download and display the Impairments spreadsheet. On completion, the Confirmation window will appear, Click Close to return to the spreadsheet.
-
Populate the mandatory spreadsheet fields.
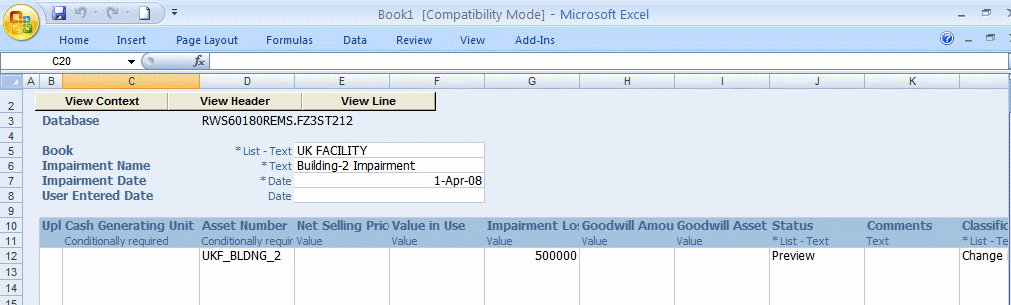
-
In the Book field, enter or select the asset book of the asset to be impaired from the list of values.
-
In the Impairment Name field, enter a name for the impairment event.
-
In the Impairment Date field, enter the date for the impairment. The system populates the User Entered Date field when the worksheet is uploaded.
-
In the Status field, select the Preview option from the list of values. By selecting the Preview option when the spreadsheet is uploaded, Oracle Assets submits the Impairment Preview process to the concurrent request manager to generate the Asset Impairment report for the records with the Preview status. Use the report to preview the impairment results before posting.
-
-
Enter the necessary information in the following fields:
-
Cash Generating Unit: If Applicable, enter the name of Cash Generating Unit.
-
Asset Number: Enter the asset number or select it from the list of values.
-
Net Selling Price: If applicable, enter the Net Selling Price amount.
-
Value in Use: If applicable, enter the Value in Use amount.
-
Impairment Loss: Enter the Impairment Loss amount or leave it blank if the Net Selling Price or Value in Use fields are populated. When the Net Selling Price or Value in Use field is populated, the system calculates impairment loss.
-
Goodwill Amount and Asset: If applicable, enter the Goodwill Amount and Asset.
-
Comments: Enter a description about the impairment in this field.
-
-
The following fields are specific to the asset books that use the UK Local Authority Accounting for Revaluations and Impairments feature and are not used when defining impairments for assets of non-UK Local Authority Accounting asset books.
-
Classification Type: Indicates the type of impairment being defined. Select one of the following impairment classification types from the list of values:
-
Select Consumption of Economic Benefit if the impairment is fully attributed to an event such as demolition or vandalism.
-
Select Change in Property Prices if the impairment is fully attributed to a decrease in the value of the property due to events such as rezoning or market conditions.
-
Select 'Other' if the cause of the impairment is unclear.
-
-
Reason Description: Enter the reason or cause for impairment.
-
Impairment Account: Enter the natural account number for the impairment loss expense account if you want to select a specific impairment loss expense account for the impairment classification type or leave blank to use the impairment expense account assigned for the asset category.
-
Split Indicator: If the impairment is the result of a combination of events, such as both consumption of economic benefit and change in property prices, set the Split Indicator option to Yes. The accounting for the impairment components is similar as if the impairment is fully attributed to a specific event. Each component is accounted for separately based on its classification type.
-
If the Split Indicator is set to Yes, enter in the required information for each split in the following fields:
-
Split: Classification Type
-
Split: Reason Description
-
Split: Loss Percent
-
Split: Impairment Account
Note: Impairments can be split into two or three components. Each component is assigned a percentage allocation of the impairment loss. The sum of the percentage allocation of the impairment loss for all components must equal 100%.
-
-
-
Upload the records to the system for processing. From the main menu go to Oracle > Upload. The Upload Parameters window is displayed. Accept the default settings and click Upload to start the process. If errors are encountered during the upload process, an error message is displayed in the Messages Column of the spreadsheet.
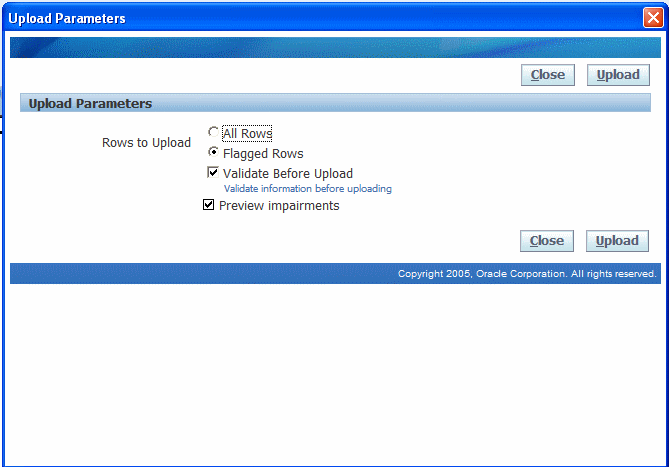
-
The Process Impairments request is executed. When the process successfully completes, the Upload Parameters window displays the Request ID for the Impairment Preview process and you can review the impairment results using the Asset Impairment report.
Note: Ensure that the Validate Before Upload check box is selected.
Reviewing and Posting Impairment Results
After successfully uploading the impairments to Oracle Assets, review the Asset Impairment report generated during the upload process. Confirm that the impairment details uploaded and results are correct. If the results are correct, commit the results to the system by posting the impairments.
Perform the following steps to review and post impairments:
-
To review the Asset Impairment report, navigate to the View Request window and enter in the Request ID.
-
Select View Output to display the report. In addition to the impairment details entered, the report includes the following information:
-
New Net Book Value of the asset after the effects of the impairment.
-
Split Impairment Loss amounts as calculated using percentages entered.
-
Summary Totals for all the impairment records defined in the spreadsheet for the following columns: Current Net Book Value, Net Selling Price, Value in Use, Impairment Loss and New Net Book Value.
-
-
To post the impairment, navigate to the Asset Impairment window.
Navigation: Assets: Impairment > Create and Post
-
Enter the query criteria for the impairment: Asset Book or Asset Number. For more information about running a Query, see Oracle Assets User Guide. The system displays the impairment records for the search criteria entered. Only impairments that are in the Previewed status can be posted.
-
Select the check box for the row of the impairment to be posted. Click the Post button to launch the process.
-
Click Yes to confirm and post the impairments. The Process Impairments concurrent program is executed and the concurrent request id is displayed.
-
Upon successful completion of the Posting process, the Asset Impairment report is generated once again and the status of impairment is updated to Posted.
Rolling Back Impairments
Impairment transactions can only be rolled back in the fixed asset’s period the transaction is posted and the period is still open. Once the fixed assets period is closed, the transactions cannot be rolled back.
To rollback an impairment transaction:
-
Navigate to the Create and Post Impairments window.
Navigation: Assets > Impairments > Create and Post
-
Enter the query criteria for the impairment: Asset Book or Asset Number. For more information about running a Query, see Oracle Assets Users Guide. The system displays the impairment records for the search criteria entered.
-
Select the check box for the row of the impairments to be rolled back. Press Rollback button to launch the process.
-
Click Yes to confirm and rollback impairments. The Process Impairments concurrent program is executed and the concurrent request id is displayed.
-
Upon successful completion of the process the impairment’s status is updated to Deleted.
Note: After an impairment transaction is rolled back, the transaction cannot be posted again.
Deleting Impairments
Use the Delete functionality to delete unposted asset impairments from the system.
Perform the following steps to delete unposted impairments:
-
Navigate to the Create and Post Impairments window
Navigation: Assets > Impairments > Create and Post
-
Enter the query criteria for the impairment to be deleted. Click the Go button. The system displays the impairment records for the search criteria entered.
-
Select the check box for the row of the unposted impairment to be deleted.
-
Click the Delete button to launch the process
-
Click Yes to confirm and delete the impairments.
-
The Confirmation is displayed with the Impairment ID of the deleted impairment and the impairment’s status is updated to Deleted.
Managing Revaluations
The UK Local Authority Accounting for Revaluations and Impairments feature enables users to manage fixed assets revaluations based on the regulatory requirements for UK local authorities.
Revaluations can be performed on an asset category or individual asset level.
Prerequisites: Enable the UK Local Authority Accounting for Revaluations and Impairments feature. For more information, see Setting Up UK Local Authority Accounting for Revaluations and Impairment section.
Revaluation Considerations:
The following conditions are to be considered when performing revaluations using the UK Local Authority Accounting for Revaluations and impairments feature in Oracle Assets:
-
Fully reserved assets can only be revalued at the asset level since their Net book value is equal to zero. If the category level is selected and the fully reserve assets flag enabled, then the asset will be processed, however, the revalued amount will be zero.
-
The system does not allow negative revaluations through the Mass Revaluation window for the asset books where the UK Local Authority Accounting for Revaluations and Impairments feature is enabled. To perform negative revaluations on the UK Local Authority Accounting enabled book assets, use the Impairment feature.
-
The revaluation is based on the asset's net book value at the time of the revaluation.
-
The net book value for historic and revalued assets is stored at the asset level.
-
To ensure proper accounting treatment, the Generate Accounts process, invoked during the depreciation process, must be executed and is not to be disabled or cancelled.
Performing Revaluations
Perform the following steps to execute an asset revaluation:
-
Navigate to the Mass Revaluations window.
Navigation: Assets > Mass Revaluations
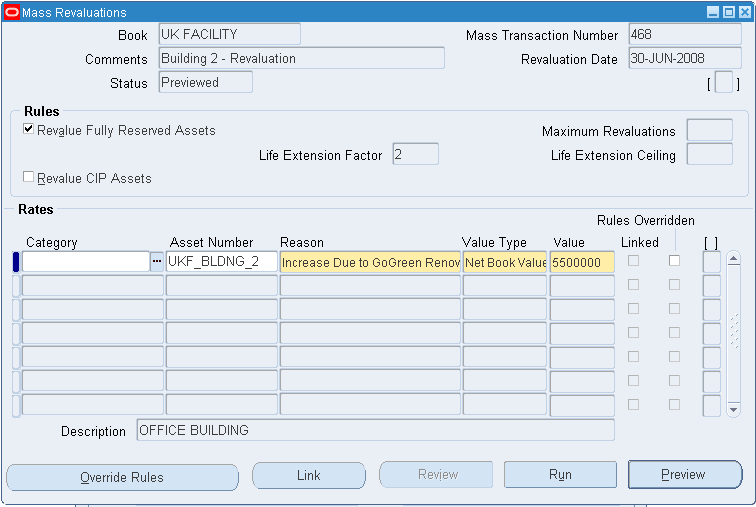
-
In the Book field, select the asset book that you want to process from the list of values.
-
In the Comments field, enter the reason or other information about the revaluation. This is a required field.
-
The Mass Transaction Number, Revaluation Date, and Status fields are populated by the system.
-
In the Rules region, the following fields are defaulted based on the values that were assigned to the asset book during setup:
-
Revalue Fully Reserved Assets
-
Life Extension Factor
-
Maximum Revaluations
-
Life Extension Ceiling
Note: You cannot revalue CIP assets. Only once the CIP asset is capitalized, can you revalue the asset.
-
-
In the Category or Asset Number field, select the asset category or individual asset from the list of values.
-
In the Reason field, provide a description for the revaluation. This is a required field.
Note: Revaluations are only performed on assets that are added in prior periods. Revaluations are not processed on assets that are:
-
Added or backdated in the current open period
-
Fully retired
-
With pending retirements
-
-
If a value is entered for the Asset Number field, from the list of values for the Value Type field select one of the following options:
-
Net Book Value: This is the new net book value for the asset based on the professional valuation.
-
Amount: This is the incremental amount increase to the asset's current net book value based on the professional valuation.
-
Percentage: This is the percentage increase to the asset's current net book value based on the professional valuation.
-
-
If an asset category is selected in the Category field, the value for the Value Type field is automatically set to Percentage and cannot be changed.
-
In the Value field, enter an amount based on the option that was selected for the Value Type field. The format of the Value field is based on the Value Type selection and the Currency Precision definition for the base currency as defined for the Ledger linked to the selected Asset Book.
-
To define override rules for the asset or category that are different than the default set for the book, select the Rules Overridden check box and then click the Override Rules button. The system displays the Override Rules window that you can use to override defaults for the asset or category.
-
To link a prior impairment to a revaluation for an asset or category, highlight the revaluation row and then click the Link button. The system displays the appropriate Link Impairments window. For more information, see Using the Link Impairments window.
-
Once the revaluation criteria is defined, process the revaluations and preview the revaluation results prior to committing them. To process and preview the revaluations, click the Preview button on the Mass Revaluation form. The Revaluation concurrent program is submitted, a Request ID is displayed and the Mass Transaction Number field is populated. When the process is complete, the transaction status is changed to Preview on the Mass Revaluation window. Use the Request ID to query and display the Revaluation Preview report in the Request window.
-
After verifying the information provided in the Revaluation Preview report, navigate to the Mass Revaluations window and query your revaluation using the number that was provided in the Mass Transaction Number field.
-
If the Preview results are correct, click the Run button to process and commit the revaluation results. If the results are incorrect, make the necessary changes to the revaluation criteria and press Preview to process the changes.
-
Once the revaluation is executed in the run mode, the revaluation is committed and the status on the Mass Revaluation Transaction record is changed to Completed and cannot be updated.
Using the Link Impairments Window
If the revaluation can be directly linked to a prior impairment event and will negate the impairment, then under the new SORP guidelines, the effects of the impairment must be taken into consideration when accounting for the revaluation. To link an impairment or impairment classification type to a revaluation, in the Mass Revaluation window, highlight the row of the revaluation to be linked and click the Link button. The system launches the Link Impairments window and displays the appropriate tab for the type of revaluation that is being linked.
The Link Impairment window consists of following tabs:
-
Category Level: If you selected an asset category revaluation for linking, the system displays the Category Level tab of the Linked Impairment window. The tab displays the Impairment Classification Type codes available for linking to a category. The tab contains the following check boxes:
-
Change in Property Prices
-
Other
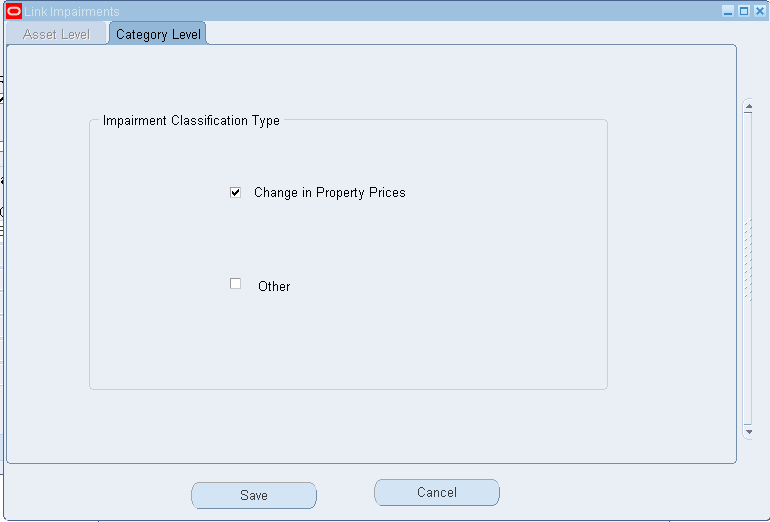
Note: For each asset in the category that links to prior impairments, only one impairment per asset will be reversed (the most recent impairment record) for the Impairment Classifications selected.
-
-
Asset Level: If an asset level revaluation is selected for linking, the system displays the Asset Level tab of the Linked Impairment window. The Asset Level tab displays all existing impairments for the asset. Only impairments with the classification type of Change in Property Prices (CPP) or Other (OTH) can be selected for linking and reversal. Only one asset impairment can be linked and reversed per revaluation. The Asset Level tab displays the following impairment details:
-
Reference Number: Assigned to record at the time it was originally processed.
-
FA Period: The fixed asset period that the impairment was posted.
-
Impairment Date: The original date of the impairment.
-
Impairment Classification Type: The Impairment Classification type that was assigned to the record.
-
Reason: The detail reason or cause for the impairment.
-
Impairment Loss Amount: Amount of the Impairment transaction.
-
Unused Impairment Loss Amount: The remaining impairment loss amount available for future reversal. Impairment Loss Amount is the unused portion of the impairment loss amount from a previous linked event.
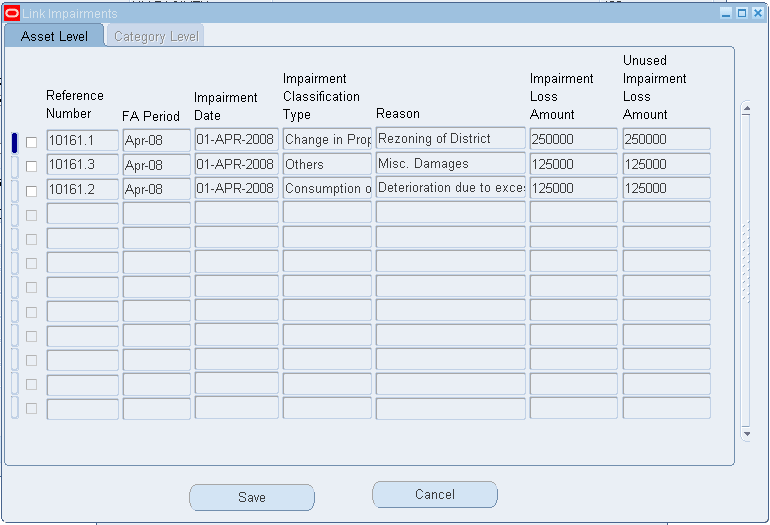
-
After making your selections, click:
-
Save to link the transaction.
-
Cancel to discard your selection, close the window, and return to the Mass Revaluation window.
Note: Use the existing RXi Revaluation Reserve Balance report to review the Revaluation Reserve balance before or after a revaluation has been performed. In the RXi Revaluation Reserve Balance report, upward revaluations are reflected through all columns in the report. However, impairments that impact the revaluation reserve balance are reported within the Adjustments column.
Accounting Entry Examples
This section highlights the logic and accounting entries generated for the UK Local Authority Accounting for Revaluations and Impairments feature. It does not reflect all the accounting entries created by Oracle Assets for the asset.
Depreciation Neutralizing Accounting Entries
Under SORP, any debit entry to an Income or Expenditure account that impacts a profit and loss account is to be neutralized. This includes depreciation. The affects of the depreciation charge on revenue are neutralized by booking an accounting entry to the Capital Adjustment and Statement of Movement on the General Fund Balance (General Fund) account. The neutralizing entry is generated and posted in conjunction with the depreciation accounting entry for the asset.
The Depreciation program of Oracle Assets creates the neutralizing accounting entry. The accounting entries are generated based on the asset’s assigned depreciation schedule and the amount used is the same as the corresponding standard depreciation accounting entry.
The accounting entry uses the Capital Adjustment and Statement of Movement on General Fund Balance accounts assigned to the asset category of the asset.
The neutralizing accounting entry consists of:
| Debit | Credit |
|---|---|
| Capital Adjustment (Depreciation Expense Amount) | |
| Statement of Movement on the General Fund Balance (Depreciation Expense Amount) |
Revaluations
The SORP guidelines for UK Local Authority, requires the use of Revaluation Reserve account for revaluations of assets, including discounted and donated assets and the revaluation is to be based on the asset’s current net book value.
A revaluation occurs when a professional valuation on an asset is greater than the asset’s current net book value. Where:
-
Current Net Book Value (CNBV) = Cost + Cost Adjustments + Revaluations - Salvage Value - Accumulated Depreciation - Accumulated Impairments - Retirements
-
New Net Book Value (NNBV) = Asset value as deemed by professional valuation
-
Revaluation Amount = NNBV - CNBV. When the revaluation amount is positive it is considered a revaluation. If the amount is negative, it is an impairment.
Note: For revaluations, the CNBV does not include depreciation for the period of the Revaluation Date.
The accounting entries generated for revaluation are dependent on whether the asset has been previously impaired or the revaluation can be linked to a prior impairment.
Revaluations - Example 1
Building #1 has had its first professional revaluation. The building has not been previously impaired and there is no balance in the Accumulated Impairment account for this asset.
Building #1 was purchased on April 1, 2007 and recorded into Oracle Assets with the following details:
| Asset Setup Item | Asset Setup Information |
|---|---|
| Cost | 5,000,000 |
| Life | 10 Years |
| Addition Period | April - 2007 |
| Method | STL – 10 yr |
| Prorate Convention | Monthly |
| Monthly Depreciation | 41,667 |
| Salvage Value | 0.00 |
Depreciation has been run up to and including March - 2008.
On April 1, 2008, a professional valuation was performed on Building #1 and was revalued to 5,500,000.
As of April 1, 2008, the accounting and asset details are as follows:
| Asset Item | Asset Information |
|---|---|
| Cost | 5,000,000 |
| Accumulated Depreciation | 500,000 |
| Accumulated Impairment | 0.00 |
| Cost Adjustment | 0.00 |
| Salvage Value | 0.00 |
| Retirements | 0.00 |
| Remaining Life | 108 Months |
| Professional Valuation | 5,500,000 |
Revaluation Calculations are as follows:
Current Net Book Value (CNBV) = Cost + Cost Adjustments + Revaluations - Salvage Value - Accumulated Depreciation - Accumulated Impairments - Retirements
CNBV = 5,000,000 + 0.00 + 0.00 - 0.00 - 500,000 - 0.00 - 0.00
CNBV = 4,500,000
New Net Book Value (NNBV) = Asset value as deemed by professional valuation
NNBV = 5,500,000
Revaluation Amount = NNBV - CNBV
Revaluation Amount = 1,000,000
When booking a revaluation on the asset, an entry to the Accumulated Depreciation account is made to reverse the accumulated depreciation to date on the asset and set the account balance to zero. This will cause the fixed asset cost to be equal to the new net book value.
The effect of the revaluation is illustrated in the following table:
| Period | Cost | Depreciation Expense | AccumulatedDepreciation | Asset CNBV (End of Period) | Asset NNBV | Revaluation Reserve | Revaluation Amortization |
|---|---|---|---|---|---|---|---|
| Apr-07 | 5,000,000 | 41,667 | 41,667 | 4,958,333 | |||
| May-07 | 41,667 | 83,333 | 4.916,667 | ||||
| Jun-07 | 41,667 | 125,000 | 4,875,000 | ||||
| Jul-07 | 41,667 | 166,667 | 4,833,333 | ||||
| Aug-07 | 41,667 | 208,333 | 4,791,667 | ||||
| Sep-07 | 41,667 | 250,000 | 4,750,000 | ||||
| Oct-07 | 41,667 | 291,667 | 4,708,333 | ||||
| Nov-07 | 41,667 | 333,333 | 4,666,667 | ||||
| Dec-0 | 41,667 | 375,000 | 4,625,000 | ||||
| Jan-08 | 41,667 | 416,667 | 4,583,333 | ||||
| Feb-08 | 41,667 | 458,333 | 4,541,667 | ||||
| Mar-08 | 41,667 | 500,000 | 4,500,000 | ||||
| Revaluation | 500,000 | 4,500,000 | 5,500,000 | 1,000,000 | 9,259 | ||
| Apr-08 | 5,500,000 | 50,926 | 50,926 | 5,449,074 | 990,741 | 9,259 | |
| May-08 | 50,926 | 101,852 | 5,398,148 | 981,481 | 9,259 |
The following accounting entries are generated to record the revaluation:
| Account Description | Debit | Credit |
|---|---|---|
| Accumulated Depreciation (Current Balance) | 500,000 | |
| Fixed Asset Cost (Revaluation Amount - Accumulated Depreciation) | 500,000 | |
| Revaluation Reserve | 1,000,000 |
-
If the result of (Revaluation Amount - Accumulated Depreciation) is positive, then the Fixed Asset Cost account is debited.
-
If the result of (Revaluation Amount - Accumulated Depreciation) is negative, then the Fixed Asset Cost account is credited.
Revaluation Reserve Amortization Gain Neutralizing Accounting Entry:
At the end of the month, the following accounting entry is booked to record the amortization of the Revaluation Reserve for the period:
| Account Description | Debit | Credit |
|---|---|---|
| Revaluation Reserve | 9,259 * | |
| Capital Adjustment | 9,259 |
* Monthly Revaluation Reserve Amortization = Revaluation Reserve / Remaining Life
9,259 = 1,000,000 / 108
Depreciation and Depreciation Neutralizing Accounting Entries:
At the end of the month, the following accounting entry is booked to record the depreciation expense and its corresponding neutralizing entries for the period:
| Account Description | Debit | Credit |
|---|---|---|
| Depreciation Expense | 50,926 * | |
| Accumulated Depreciation | 50,926 |
* Depreciation is recalculated and is based on the revalued net book value.
New Monthly Depreciation Expense = NNBV / Remaining depreciation periods
50,926 = 5,500,000 / 108
The following is the neutralizing depreciation accounting entry:
| Account Description | Debit | Credit |
|---|---|---|
| Capital Adjustment | 50,926 | |
| General Fund | 50,926 |
Revaluations - Example 2
Building #2 has undergone a professional revaluation. The building had been previously impaired and has an existing balance in the Accumulated Impairment account.
Building #2 was purchased on April 1, 2007 and recorded into Oracle Assets with the following details:
| Asset Setup Item | Asset Setup Information |
|---|---|
| Cost | 5,000,000 |
| Life | 10 Years |
| Addition Period | April-2007 |
| Method | STL – 10 yr |
| Prorate Convention | Monthly |
| Monthly Depreciation | 41,667 |
| Salvage Value | 0.00 |
On March 1, 2008, a professional valuation was performed on Building #2 and the building’s value had decreased by 500,000. The monthly depreciation after the impairment is 37,037.
On March 1, 2008, the accounting and asset details are as follows:
| Asset Item | Asset Information |
|---|---|
| Cost | 5,000,000 |
| Accumulated Depreciation | 458,333* |
| Accumulated Impairment | 0.00 |
| Salvage Value | 0.00 |
| Remaining Life | 109 Months |
| Monthly Depreciation | 41,667 |
* Excludes depreciation for March 2008.
Impairment Calculations are as follows:
When determining the impairment loss amount, the current period's (March 2008) depreciation is included in the CNBV calculation. Where:
-
Current Net Book Value (CNBV) = Cost + Cost Adjustments + Revaluations - Current Period Depreciation - Salvage Value - Accumulated Depreciation - Accumulated Impairments - Retirements
-
New Net Book Value (NNBV) = Asset value as deemed by professional valuation
-
Impairment Amount = NNBV - CNBV is negative
Note: CNBV includes depreciation for the period of the Impairment Date.
Current Net Book Value (CNBV) = Cost + Cost Adjustments + Revaluations - Current Period Depreciation - Salvage Value - Accumulated Depreciation - Accumulated Impairments - Retirements
4,500,000 = 5,000,000 + 0.00 + 0.00 - 41,667 - 0.00 - 458,333 - 0.00 - 0.00
Impairment Amount = Provide by professional valuation
Impairment Amount = 500,000
New Net Book Value (NNBV) = CNBV - Impairment Amount
4,000,000 = 4,500,000 - 500,000
The following accounting entries are generated to record the impairment loss without an existing revaluation reserve balance for all impairment classification types:
| Account Description | Debit | Credit |
|---|---|---|
| Impairment Loss Expense (Expensed Impairment Loss Amount) | 500,000 | |
| Accumulated Impairment (Expensed Impairment Loss Amount) | 500,000 |
The following is the impairment loss neutralizing accounting entry:
| Account Description | Debit | Credit |
|---|---|---|
| Capital Adjustment | 500,000 | |
| General Fund (Expensed Impairment Loss Amount) | 500,000 |
Depreciation and Depreciation Neutralizing Accounting Entries:
At the end of the month, the following accounting entry is booked to record the depreciation expense and its corresponding neutralizing entries for the period (March 2008):
| Account Description | Debit | Credit |
|---|---|---|
| Depreciation Expense | 41,667 * | |
| Accumulated Depreciation | 41,667 |
* Since the current month depreciation is considered in the CNBV calculation, depreciation is not recalculated until the following month.
Monthly Depreciation Expense = CNBV / Remaining depreciation periods
41,667 = 4,541,667 / 109
The following is the neutralizing depreciation accounting entry:
| Account Description | Debit | Credit |
|---|---|---|
| Capital Adjustment | 41,667 | |
| General Fund | 41,667 |
On April 1, 2009, another professional valuation was performed and the building’s value had increased to 5,500,000. The revaluation is not linked to the prior impairment.
On April 1, 2009, the accounting for the building is as follows:
| Asset Item | Asset Information |
|---|---|
| Cost | 5,000,000 |
| Accumulated Depreciation | 944,444 |
| Accumulated Impairment | 500,000 |
| Salvage Value | 0,00 |
| Remaining Life | 96 Months |
| Impairment Loss Amount | 500,000 |
| Professional Valuation | 5,500,000 |
| Monthly Depreciation | 37,037 |
The revaluation calculations are as follows:
Current Net Book Value (CNBV) = Cost + Cost Adjustments + Revaluations - Salvage Value - Accumulated Depreciation - Accumulated Impairments - Retirements
3,555,556 = 5,000,000 + 0.00 + 0.00 - 0.00 - 944,444 - 500,000 - 0.00
New Net Book Value (NNBV) = Asset value as deemed by professional valuation
NNBV = 5,500,000
Revaluation Amount = NNBV - CNBV
1,944,444 = 5,500,000 - 3,555,556
The effect of the revaluation is illustrated in the following table:
| Period | Cost | DepreciationExpense | Accumulated Depreciation | Asset CNBV (End of Period) | Asset NNBV | Revaluation Reserve | RevaluationAmortization | Accumulated Impairment |
|---|---|---|---|---|---|---|---|---|
| Apr-07 | 5,000,000 | 41,667 | 41,667 | 4,958,333 | ||||
| May-07 | 41,667 | 83,333 | 4.916,667 | |||||
| Jun-07 | 41,667 | 125,000 | 4,875,000 | |||||
| Jul-07 | 41,667 | 166,667 | 4,833,333 | |||||
| Aug-07 | 41,667 | 208,333 | 4,791,667 | |||||
| Sep-07 | 41,667 | 250,000 | 4,750,000 | |||||
| Oct-07 | 41,667 | 291,667 | 4,708,333 | |||||
| Nov-07 | 41,667 | 333,333 | 4,666,667 | |||||
| Dec-0 | 41,667 | 375,000 | 4,625,000 | |||||
| Jan-08 | 41,667 | 416,667 | 4,583,333 | |||||
| Feb-08 | 41,667 | 458,333 | 4,541,667 | |||||
| Impairment | 500,000 | 4,041,667 | 4,000,000 | 500,000 | ||||
| Mar-08 | 5,500,000 | 41667 | 500,000 | 4,000,000 | 500,000 | |||
| Apr-08 | 37,037 | 537,037 | 3,962,963 | 500,000 | ||||
| May-08 | 37,037 | 574,074 | 3,925,926 | 500,000 | ||||
| Jun-08 | 37,037 | 611,111 | 3,888,889 | 500,000 | ||||
| Jul-08 | 37,037 | 648,148 | 3,851,852 | 500,000 | ||||
| Aug-08 | 37,037 | 685,185 | 3,814,815 | 500,000 | ||||
| Sep-08 | 37,037 | 722,222 | 3,777,778 | 500,000 | ||||
| Oct-08 | 37,037 | 759,259 | 3,740,741 | 500,000 | ||||
| Nov-08 | 37,037 | 796,296 | 3,703,704 | 500,000 | ||||
| Dec-08 | 37,037 | 833,333 | 3,666,667 | 500,000 | ||||
| Jan-09 | 37,037 | 870,370 | 3,629,630 | 500,000 | ||||
| Feb-09 | 37,037 | 907,407 | 3,592,593 | 500,000 | ||||
| Mar-09 | 37,037 | 944,444 | 3,555,556 | 500,000 | ||||
| Revaluation | 5,500,000 | 1,944,444 | 20,255 | 0 | ||||
| Apr-09 | 5,500,000 | 57,292 | 57,292 | 5,442,708 | 1,924,190 | 20,255 | 0 |
When booking a revaluation on the asset with a prior impairment, an entry to the Accumulated Depreciation and Accumulated Impairment accounts will be made to set the accounts balance to zero.
Accounting entries are:
| Account Description | Debit | Credit |
|---|---|---|
| Accumulated Depreciation (Entire current balance in the account) | 944,444 | |
| Accumulated Impairment (Entire current balance in the account) | 500,000 | |
| Fixed Asset Cost (Revaluation Amount - (Accumulated Depreciation + Accumulated Impairment)) | 500,000 | |
| Revaluation Reserve (Revaluation Amount) | 1,944,444 |
-
If the result of (Revaluation Amount - Accumulated Depreciation - Accumulated Impairment) is positive, then debit the Fixed Asset Cost account.
-
If the result of (Revaluation Amount - Accumulated Depreciation - Accumulated Impairment) is negative, then credit the Fixed Asset Cost account.
The following accounting entry is booked to record the amortization of the Revaluation Reserve for the month:
| Account Description | Debit | Credit |
|---|---|---|
| Revaluation Reserve | 20,255 * | |
| Capital Adjustment | 20,255 |
* Monthly Revaluation Reserve Amortization = Revaluation Reserve / Remaining Life
20,255 = 1,944,444 / 96
At the end of the month, the following accounting entry is booked to record the depreciation expense and its corresponding neutralizing entries for the period:
| Account Description | Debit | Credit |
|---|---|---|
| Depreciation Expense | 57,292 * | |
| Accumulated Depreciation | 57,292 |
* Monthly Depreciation is recalculated and is based on the revalued net book value.
Monthly Depreciation = NNBV / Remaining depreciation periods
57,292 = 5,500,000 / 96
The following is the neutralizing depreciation accounting entry:
| Account Description | Debit | Credit |
|---|---|---|
| Capital Adjustment | 57,292 | |
| General Fund | 57,292 |
Impairments
Impairment occurs when a professional valuation on an asset is less than the asset’s current net book value. Under the new SORP guidelines, the classification type assigned to the impairment determines the accounting treatment for the impairment. The primary difference in the accounting treatment is in regard to the impact of the revaluation reserve account balance. When booking impairment with the classification type of Change in Property Prices (CPP) or Other (OTH), the impairment loss amount booked to the Impairment Loss account is reduced by the amount available in the Revaluation Reserve account for the asset, up to the impairment loss amount.
Whereas for Impairments with the classification type of Consumption of Economic Benefit (CEB), the entire amount of the impairment loss is booked to the Impairment Loss account and then if a balance does exist in the Revaluation Reserve account, the balance is transferred to the Capital Adjustment account. When booking the impairment on an asset, the impairment loss accounting entries will be reflected in the Accumulated Impairment account. Impairments have no effect on the Accumulation Depreciation Reserve account.
The following examples provide the accounting entries that are generated for an asset impairment with no revaluation reserve balance and impairment classification type that is equal to Change in Property Prices, Other, or Consumption of Economic Benefit.
Impairments - Example 1:
On April 1, 2007, Building #2 was purchased and recorded into Oracle Assets with the following details:
| Asset Setup Item | Asset Setup Information |
|---|---|
| Cost | 5,000,000 |
| Life | 10 Years |
| Addition Period | April-2007 |
| Method | STL – 10 yr |
| Prorate Convention | Monthly |
| Salvage Value | 0.00 |
On March 1, 2008, a professional valuation was performed on Building #2 and the building’s value had decreased due to a decline in property values in the area. The building was impaired by 500,000.
On March 1, 2008, the accounting for the building is as follows:
| Asset Item | Asset Information |
|---|---|
| Cost | 5,000,000 |
| Accumulated Depreciation | 458,333 * |
| Accumulated Impairment | 0.00 |
| Cost Adjustment | 0.00 |
| Revaluation | 0.00 |
| Salvage Value | 0.00 |
| Retirements | 0.00 |
| Remaining Life | 109 Months |
| Monthly Depreciation | 41,667 |
* Excludes depreciation for March 2008.
When determining the impairment loss amount, the current period's (March 2008) depreciation is included in the CNBV calculation. Where:
-
Current Net Book Value (CNBV) = Cost + Cost Adjustments + Revaluations - Salvage Value - Accumulated Depreciation - Accumulated Impairments - Retirements)
-
New Net Book Value (NNBV) = Asset value as deemed by professional valuation
-
Impairment Amount = NNBV - CNBV is negative
Note: CNBV includes depreciation for the period of the Impairment Date.
Impairment calculations are as follows:
Current Net Book Value (CNBV) = Cost + Cost Adjustments + Revaluations - Current Period Depreciation - Salvage Value - Accumulated Depreciation - Accumulated Impairments - Retirements
4,500,000 = 5,000,000 + 0.00 + 0.00 - 41,667 - 0.00 - 458,333 - 0.00 - 0.00
Impairment Amount = Provided by professional valuation
Impairment Amount = 500,000
New Net Book Value (NNBV) = CNBV - Impairment Amount
4,000,000 = 4,500,000 – 500,000
The effect of the impairment is illustrated in the following table:
| Period | Cost | Depreciation Expense | Accumulated Depreciation | Asset CNBV (End of Period) | Asset NNBV | Revaluation Reserve | Revaluation Amortization | Accumulated Impairment |
|---|---|---|---|---|---|---|---|---|
| Apr-07 | 5,000,000 | 41,667 | 41,667 | 4,958,333 | ||||
| May-07 | 41,667 | 83,333 | 4.916,667 | |||||
| Jun-07 | 41,667 | 125,000 | 4,875,000 | |||||
| Jul-07 | 41,667 | 166,667 | 4,833,333 | |||||
| Aug-07 | 41,667 | 208,333 | 4,791,667 | |||||
| Sep-07 | 41,667 | 250,000 | 4,750,000 | |||||
| Oct-07 | 41,667 | 291,667 | 4,708,333 | |||||
| Nov-07 | 41,667 | 333,333 | 4,666,667 | |||||
| Dec-07 | 41,667 | 375,000 | 4,625,000 | |||||
| Jan-08 | 41,667 | 416,667 | 4,583,333 | |||||
| Feb-08 | 41,667 | 458,333 | 4,541,667 | |||||
| Impairment | 4,500,000 | 4,000,000 | 500,000 | |||||
| Mar-08 | 5,000,000 | 41667 | 500,000 | 4,000,000 | 500,000 | |||
| Apr-08 | 37,037 | 537,037 | 3,962,963 | 500,000 |
The following accounting entries are generated to record the impairment loss without an existing revaluation reserve balance for all impairment classification types:
| Account Description | Debit | Credit |
|---|---|---|
| Impairment Loss Expense (Expensed Impairment Loss Amount) | 500,000 | |
| Accumulated Impairment (Expensed Impairment Loss Amount) | 500,000 |
The following is the impairment loss neutralizing accounting entry:
| Account Description | Debit | Credit |
|---|---|---|
| Capital Adjustment | 500,000 | |
| General Fund (Expensed Impairment Loss Amount) | 500,000 |
Depreciation and Depreciation Neutralizing Accounting Entries:
At the end of the month, the following accounting entry is booked to record the depreciation expense and its corresponding neutralizing entries for the period (March 2008):
| Account Description | Debit | Credit |
|---|---|---|
| Depreciation Expense | 41,667 * | |
| Accumulated Depreciation | 41,667 |
* Since the current month depreciation is considered in the CNBV calculation, depreciation is not recalculated until the following month.
Monthly Depreciation = CNBV / Remaining depreciation periods
41,667 = 4,541,667 / 109
The following is the neutralizing depreciation accounting entry:
| Account Description | Debit | Credit |
|---|---|---|
| Capital Adjustment | 41,667 | |
| General Fund | 41,667 |
Impairments - Example 2
Building #3 is being impaired as a result of a change in property values. The building has had a previous revaluation and there is an existing revaluation reserve balance for this asset.
Building #3 was purchase on April 1, 2007, and recorded into Oracle Assets with the following details:
| Asset Setup Item | Asset Setup Information |
|---|---|
| Cost | 5,000,000 |
| Life | 10 Years |
| Addition Period | April-2007 |
| Method | STL – 10 yr |
| Prorate Convention | Monthly |
| Monthly Depreciation | 41,667 |
| Salvage Value | 0.00 |
On April 1, 2008, a professional valuation was performed on Building #3 and the building’s value had increased due improvements made. The building was revalued to a net book balance of 5,500,000. With a new monthly depreciation of 50,926, revaluation reserve balance of 1,000,000, and a monthly revaluation reserve amortization amount of 9,259, and a remaining life of 108 months.
On March 1, 2009, a professional valuation was performed on Building #3 and the building’s value had decreased due to a decline in property values in the area. The buildings value is now 3,500,000 resulting in an impairment of 1,388,889.
On March 1, 2009, the accounting for the building is as follows:
| Asset Item | Asset Information |
|---|---|
| Cost | 5,000,000 |
| Accumulated Depreciation | 560,185 * |
| Accumulated Impairment | 0.00 |
| Revaluation Reserve | 898,148 ** |
| Salvage Value | 0.00 |
| Remaining Life | 97 Months |
| Monthly Depreciation | 50,926 |
| Monthly Revaluation Reserve Amortization | 9,259 |
* Accumulated Depreciation at end of February 2008.
** Revaluation Reserve at end of February 2008.
When determining the impairment loss amount, the current period’s (March 2008) depreciation is included in the CNBV calculation.
Impairment calculations are as follows:
Current Net Book Value (CNBV) = Cost + Cost Adjustments + Revaluations - Current Period Depreciation - Salvage Value - Accumulated Depreciation - Accumulated Impairments - Retirements
4,888.889 = 5,000,000 + 0.00 + 500,000 - 50,926 - 0.00 - 560,185 - 0.00 - 0.00
New Net Book Value (NNBV) = Provided by professional valuation
NNBV = 3,500,000
Impairment Amount = NNBV - CNBV
-1,388,889 = 3,500,000 - 4,888,889
The effect of the impairment is illustrated in the following table:
| Period | Cost | DepreciationExpense | Accumulated Depreciation | Asset CNBV (End of Period) | Asset NNBV | Revaluation Reserve | Revaluation Amortization | Impairment Loss | Accumulated Impairment |
|---|---|---|---|---|---|---|---|---|---|
| Apr-06 | 5,000,000 | 41,667 | 41,667 | 4,958,333 | |||||
| May-06 | 41,667 | 83,333 | 4.916,667 | ||||||
| Jun-06 | 41,667 | 125,000 | 4,875,000 | ||||||
| Jul-06 | 41,667 | 166,667 | 4,833,333 | ||||||
| Aug-06 | 41,667 | 208,333 | 4,791,667 | ||||||
| Sep-06 | 41,667 | 250,000 | 4,750,000 | ||||||
| Oct-06 | 41,667 | 291,667 | 4,708,333 | ||||||
| Nov-06 | 41,667 | 333,333 | 4,666,667 | ||||||
| Dec-06 | 41,667 | 375,000 | 4,625,000 | ||||||
| Jan-07 | 41,667 | 416,667 | 4,583,333 | ||||||
| Feb-07 | 41,667 | 458,333 | 4,541,667 | ||||||
| Mar-07 | 41,667 | 500,000 | 4,500,000 | ||||||
| Revaluation | 500,000 | 4,500,000 | 5,500,000 | 1,000,000 | 9,259 | ||||
| Apr-07 | 5,500,000 | 50,926 | 50,926 | 5,449,074 | 990,741 | 9,259 | |||
| May-07 | 50,926 | 101,852 | 5,398,148 | 981,481 | 9,259 | ||||
| Jun-07 | 50,926 | 152,778 | 5,347,222 | 972,222 | 9,259 | ||||
| Jul-07 | 50,926 | 203,704 | 5,296,296 | 962,963 | 9,259 | ||||
| Aug-07 | 50,926 | 254,630 | 5,245,370 | 953,704 | 9,259 | ||||
| Sep-07 | 50,926 | 305,556 | 5,194,444 | 944,444 | 9,259 | ||||
| Oct-07 | 50,926 | 356,481 | 5,143,519 | 935,185 | 9,259 | ||||
| Nov-07 | 50,926 | 407,407 | 5,092,593 | 925,926 | 9,259 | ||||
| Dec-07 | 50,926 | 458,333 | 5,041,667 | 916,667 | 9,259 | ||||
| Jan-08 | 50,926 | 509,259 | 4,990,741 | 907,407 | 9,259 | ||||
| Feb-08 | 50,926 | 560,185 | 4,939,815 | 898,148 | 9,259 | ||||
| Impairment | 4,888,889 | 3,500,000 | 888,889 | 9,259 | 500,000 | 500,000 | |||
| Mar-08 | 50,926 | 611,111 | 3,500,000 | 500,000 | 500,000 | ||||
| Apr-08 | 5,500,000 | 36,458 | 647,569 | 3,463,542 | 500,000 | 500,000 | |||
| May-08 | 36,458 | 684,028 | 3,427,083 | 500,000 | 500,000 | ||||
| Jun-08 | 36,458 | 720,486 | 3,390,625 | 500,000 | 500,000 | ||||
| Jul-08 | 36,458 | 756,944 | 3,354,167 | 500,000 | 500,000 | ||||
| Aug-08 | 36,458 | 793,403 | 3,317,708 | 500,000 | 500,000 | ||||
| Sep-08 | 36,458 | 829,861 | 3,281,250 | 500,000 | 500,000 | ||||
| Oct-08 | 36,458 | 866,319 | 3,244,792 | 500,000 | 500,000 | ||||
| Nov-08 | 36,458 | 902,778 | 3,208,333 | 500,000 | 500,000 | ||||
| Dec-08 | 36,458 | 939,236 | 3,171,875 | 500,000 | 500,000 | ||||
| Jan-09 | 36,458 | 975,694 | 3,135,417 | 500,000 | 500,000 |
The following accounting entries are generated to record the impairment with a prior revaluation reserve balance:
| Debit | Credit |
|---|---|
| Revaluation Reserve (Up to the amount of the impairment loss) | |
| Impairment Loss (Impairment loss not covered by the Revaluation Reserve balance) | |
| Accumulated Impairment (Impairment loss amount) |
Note:
-
Revaluation Reserve: When determining the amount of the revaluation reserve available, the current month revaluation reserve amortization is taken in account. For example, the Revaluation Reserve balance is reduced by the current month’s amortization. The remaining balance is then applied to the impairment loss amount to determine the amount to be booked to the impairment loss account.
For example, the Revaluation Reserve balance is reduced by the current month’s amortization. The remaining balance is then applied to the impairment loss amount to determine the amount to be booked to the impairment loss account.
Account Details Data Revaluation Reserve 898,148 Current Month Amortization 9,259 Available Revaluation Reserve 888,889 Amount to Book to the Impairment Loss Account 1,388,889 - 888,889 = 500,000 -
Current Net Book Value: When determining the impairment loss amount, the Current Net Book Value calculation will take in account the current month’s depreciation as previously mentioned.
Account Description Debit Credit Revaluation Reserve 888,889 Impairment Loss Expense 500,000 Accumulated Impairment 1,388,889
Impairment Loss Neutralizing Accounting Entry:
Under the new SORP guidelines, any debit to the Impairment Loss account must have a corresponding neutralizing entry to the Capital Adjustment and Statement of Movement on General Fund Balance (General Fund) accounts. As a result, the following neutralizing entry is also created:
| Account Description | Debit | Credit |
|---|---|---|
| Capital Adjustment (Expensed impairment loss amount) | 500,000 | |
| General Fund (Expensed impairment loss amount) | 500,000 |
Depreciation and Depreciation Neutralizing Accounting Entries:
At the end of the month, the following entry is booked to record the depreciation expense and its corresponding neutralizing entries for the period:
| Account Description | Debit | Credit |
|---|---|---|
| Depreciation Expense | 50,926 * | |
| Accumulated Depreciation | 50,926 |
* Since the current month depreciation is considered in the CNBV calculation, depreciation is not recalculated until the following month.
Monthly Depreciation = CNBV / Remaining depreciation periods
50,926 = 4,939,815 / 97
The following is the neutralizing depreciation accounting entry:
| Account Description | Debit | Credit |
|---|---|---|
| Capital Adjustment | 50,926 | |
| General Fund | 50,926 |
Asset Decommission and Disposal Accounting Entries:
When an asset is disposed of or decommissioned, the carrying amount (NVB) of the asset is removed from the balance sheet. The following accounting entries are generated to remove the remaining NBV from the balance sheet accounts (based on Asset Category and Asset Book level setup):
| Debit | Credit |
|---|---|
| Disposal Gains or Loss (Income Statement account) | |
| Accumulated Depreciation | |
| Accumulated Impairment | |
| Fixed Asset Cost |
Additionally, a neutralizing entry to the Capital Adjustment and Statement of Movement on the General Fund balance is posted. Any remaining balance in the Revaluation Reserve for the asset is also cleared out and transferred to the Capital Adjustment account.
Disposal Neutralizing Accounting Entries:
Carrying Amount (NBV)
| Debit | Credit |
|---|---|
| Capital Adjustment (NBV) | |
| General Fund (NBV) |
Revaluation Reserve
| Debit | Credit |
|---|---|
| Revaluation Reserve (Remaining balance on the account) | |
| Capital Adjustment (Remaining balance on the account) |
Physical Inventory
Physical inventory is the process of ensuring that the assets a company has listed in its production system match the assets it actually has in inventory. A company takes physical inventory by manually looking at all assets to ensure they exist as recorded, are in the appropriate locations, and consist of the recorded number of units.
A person taking physical inventory can collect physical inventory data in a number of ways, such as by writing down information about the asset manually, or by using a barcode scanner to automatically scan asset information into a file such as an Excel spreadsheet. After this information is collected, any discrepancies need to be reconciled. For example, if a computer is located in Room 549 according to your production data, but is actually in Room 346, you need to either change the record to reflect the true location of the computer, or move it to Room 549.
About Physical Inventory
The Physical Inventory feature in Oracle Assets assists you in comparing and reconciling your physical inventory data. To use the Physical Inventory feature, you must first take physical inventory of your assets. You need to include the following information about your assets:
-
A unique identifier, which can be either the asset number, tag number, or serial number
-
The location
-
The number of units
You can include other information that may make it easier for you to keep track of the assets you are comparing, such as a description of each asset, but only the information listed above is required.
You load your physical inventory data into Oracle Assets using the Physical Inventory Entries window, or you can use the Record Physical Inventory process in the Applications Desktop Integrator (ADI), which allows you to import data from an Excel spreadsheet. You can also use SQL*Loader to import physical inventory data from a non-Oracle file system.
When you finish entering physical inventory data into Oracle Assets, you run the Physical Inventory comparison program, which highlights the differences between the asset information in Oracle Assets and the actual assets in physical inventory. This program compares your physical inventory data with your Oracle Assets data for all assets that have the In Physical Inventory check box checked.
You can view the results of the comparison online in the Physical Inventory Comparison window, or by running the Physical Inventory Comparison Report. The comparison results highlight differences between the assets in your production system and those in physical inventory You can reconcile the differences between physical inventory and the information in your database by updating each asset manually, or you can use the mass additions process to add assets that are missing from the production system.
When you have completed your physical inventory, you can run the Missing Assets Report, which lists all assets that have not been accounted for in the physical inventory process.
Prerequisites
-
Ensure that the In Physical Inventory check box is checked for all assets in Oracle Assets that you want included in the physical inventory comparison program. See: Setting Up Oracle Assets Data to be Included in Physical Inventory.
To gather and reconcile physical inventory information:
-
Take physical inventory of your assets by using a barcode scanner (if your assets are set up with barcodes) or by manually noting the location, number of units, and a unique identifier.
-
Navigate to the Physical Inventory window.
-
Enter the inventory name (for example, Q2 Physical Inventory USA) and the start date. Entering an end date indicates that the physical inventory is complete, so you should not enter an end date until you have completed all physical inventory tasks.
-
Save your changes.
-
Load the physical inventory data into Oracle Assets using the Physical Inventory window, the Record Physical Inventory process in ADI, or SQL*Loader. See: Loading Physical Inventory Data.
-
Run the Physical Inventory Comparison program. See: Physical Inventory Comparison Program.
-
Run the Physical Inventory Comparison Report or review the results online using the Find Physical Inventory Comparison window. See: Viewing Comparison Results.
-
Analyze the report results.
-
Change Oracle Assets data to reconcile with the physical inventory data and ensure you have accounted for all assets. See: Reconciliation.
-
Run the Missing Assets Report. See: Missing Assets
-
Purge the physical inventory data. See: Purging Physical Inventory Data.
Related Topics
Overview of the Mass Additions Process
Adding an Asset Specifying Details (Detail Additions)
Record Physical Inventory Feature (Oracle Applications Desktop Integrator User Guide)
Setting Up Oracle Assets Data to be Included in Physical Inventory
Assets listed in Oracle Assets will be compared by the Physical Inventory Comparison program only if the In Physical Inventory check box is checked for those assets. If the In Physical Inventory check box is not checked for a particular asset, that asset will be ignored in the comparison.
The In Physical Inventory check box allows you to determine which assets are included in the physical inventory process. For example, you may have several buildings that you track as assets in Oracle Assets, but you do not want the buildings included in the physical inventory process.
Mass Additions
You can designate a group of assets to be included in the physical inventory process by checking the In Physical Inventory check box in the Mass Additions window.
Asset Categories
When you set up asset categories in the Asset Categories window, the In Physical Inventory check box is checked by default. If you do not want assets in a particular category to be included in physical inventory, you can uncheck the In Physical Inventory check box when you set up the category. For example, you may set up a category called BUILDING, which includes all of the buildings owned by your company. You may not want your buildings included in the physical inventory process, so you can uncheck the In Physical Inventory check box so that all assets with a category of BUILDING will not be included in physical inventory.
After setting up categories, you can override the value of the In Physical Inventory check box for individual assets using the Asset Details window.
Asset Details
You can use the Asset Details window to override the value of the In Physical Inventory check box. For example, you may have assets with a category of COMPUTER designated to be included in the physical inventory process. You may also have a particular asset with a category of COMPUTER that you do not want included in the physical inventory process. You can open the Asset Details window for that particular asset and uncheck the In Physical Inventory check box.
Loading Physical Inventory Data
To use the Physical Inventory feature in Oracle Assets, you must load physical inventory data that you have collected into the FA_INV_INTERFACE table in Oracle Assets. The Usage column in the following table indicates whether a field is required, optional, or system-generated.
The following table lists the column name, type, description, and usage for each column in the FA_INV_INTERFACE table.
| Column Name | Type | Description | Usage |
|---|---|---|---|
| INVENTORY | VARCHAR2 (80) | The user-defined inventory identification number to which this entry belongs. | Required |
| ASSET_ID | NUMBER (15) | The system-generated asset identification number. | System-generated |
| ASSET_NUMBER | VARCHAR2 (15) | The unique asset number assigned by either the user or Oracle Assets during asset setup. Although this field is not required, it is recommended, because it is the first field compared by the Physical Inventory Comparison program when it attempts to match an asset in physical inventory with one in the production system. | Conditionally required. When you enter physical inventory data in the Physical Inventory window, either the asset number, tag number, or serial number is required. |
| ASSET_KEY_CCID | NUMBER (15) | The asset key flexfield combination. | Optional |
| TAG_NUMBER | VARCHAR2 (15) | The tag number of the asset. The Physical Inventory Comparison program uses the tag number to uniquely identify an asset if it was unable to do so using the asset number, because it was not provided. | Conditionally required. When you enter physical inventory data in the Physical Inventory window, either the asset number, tag number, or serial number is required. |
| DESCRIPTION | VARCHAR2 (80) | The description of the asset. | Optional |
| MODEL_NUMBER | VARCHAR2 (40) | The model number of the asset. | Optional |
| SERIAL_NUMBER | VARCHAR2 (35) | The serial number of the asset. The Physical Inventory Comparison program uses the serial number to uniquely identify an asset if it was unable to do so using the asset number or tag number, because neither was provided. | Conditionally required. When you enter physical inventory data in the Physical Inventory window, either the asset number, tag number, or serial number is required. |
| MANUFACTURER_NAME | VARCHAR2 (30) | The name of the manufacturer that made the asset. | Optional |
| ASSET_CATEGORY_ID | NUMBER (15) | The category to which the asset belongs. | Optional |
| UNITS | NUMBER | The number of units in physical inventory for the asset. | Required |
| LOCATION_ID | NUMBER (15) | The location ID that corresponds to the location of the asset. | Required |
| STATUS | VARCHAR2 (15) | The status of the asset will be one of the following: NEW TO RECONCILE RECONCILED DIFFERENCE NO ASSET NUMBER NON-INVENTORIAL NOT UNIQUE |
Initially system-generated, but can be manually changed by the user. |
| UNIT_ADJ | VARCHAR2 (1) | Indicates whether this entry needs a location adjustment. A NULL value indicates that this physical inventory entry has not been compared. | System-generated |
| UNIT_RECONCILE_MTH | VARCHAR2 (20) | The unit adjustment reconciliation method must be one of the following: NONE ADDITION UP - UNIT ADJUSTMENT DOWN - UNIT ADJUSTMENT REINSTATEMENT FULL RETIREMENT PARTIAL RETIREMENT |
System-generated |
| LOCATION_ADJ | VARCHAR2 (1) | Indicates whether this entry needs a location adjustment. If there is no value in this field, it indicates that this physical inventory entry has not been compared. | System-generated |
| LOC_RECONCILE_MTH | VARCHAR2 (20) | The location adjustment reconciliation method: NONE TRANSFER |
System-generated |
| CREATED_BY | NUMBER (15) | Standard who columns. Typically, the username or user ID of the person running Physical Inventory. | System-generated |
| CREATION_DATE | DATE | Standard who columns. The date when the physical inventory was opened. | System-generated |
| LAST_UPDATE_DATE | DATE | Standard who columns. This date corresponds to the last date a user entered physical inventory information. | System-generated |
| LAST_UPDATED_BY | NUMBER (15) | Standard who columns. The user ID of the last user to update physical inventory information. | System-generated |
| LAST_UPDATE_LOGIN | NUMBER (15) | Standard who columns. The user ID of the last user to update physical inventory information. | System-generated |
Status Codes
After you have loaded your physical inventory data and run the Physical Inventory comparison program, Oracle Assets generates a status code based on the information it has stored about an asset and the information you provided during the physical inventory process. The following table contains descriptions of these codes.
| Status Code | Description | Set by |
|---|---|---|
| DIFFERENCE | During the comparison, Oracle Assets identified a difference in the location or number of units for this asset. | Oracle Assets |
| NEW | When you enter a new physical inventory entry, the status is automatically set to NEW. A status of NEW indicates the entry has not been compared. After an entry has been compared, you also have the option to reset the status to NEW, so that it will be compared again. You can reset the status to New in the Inventory Entries window. | Oracle Assets/User |
| NO ASSET NUMBER | The comparison program could not locate the asset number in Oracle Assets. | Oracle Assets |
| NON-INVENTORIAL | The asset associated with the physical inventory entry is not designated to be included in physical inventory (the In Physical Inventory check box is not checked). | Oracle Assets |
| NOT UNIQUE | During the comparison, more that one asset listed in Oracle Assets matched a single physical inventory entry. | Oracle Assets |
| RECONCILED | The asset is the same in Oracle Assets and in physical inventory, and is automatically set to a status of RECONCILED. | User/Oracle Assets |
| TO RECONCILE | When a difference is identified in the comparison, you change the status to TO RECONCILE to indicate that the entry is ready to be reconciled. | User |
Unit Reconciliation Methods
When you run the Physical Inventory Comparison program, Oracle Assets updates the UNIT_RECONCILE_MTH field in the FA_INV_INTERFACE table with the appropriate unit reconciliation code. The code indicates whether the asset needs an adjustment in the number of units stored in Oracle Assets, and if so, the type of unit adjustment needed. The following table lists the unit reconciliation codes and a description of each code:
| Code | Description |
|---|---|
| ADDITION | An asset was found in physical inventory that is not in Oracle Assets. The asset needs to be added to Oracle Assets. |
| DOWN - UNIT ADJUSTMENT | For a particular asset, more units are listed in Oracle Assets than are found in physical inventory. The number of units needs to be adjusted down in Oracle Assets. |
| FULL RETIREMENT | An asset needs to be fully retired, because it is listed in Oracle Assets but not found in physical inventory. |
| NONE | No unit adjustment is necessary. |
| PARTIAL RETIREMENT | An asset needs to be partially retired. Usually, you would do this when for a particular asset, you found less units in physical inventory than are listed in Oracle Assets. |
| REINSTATEMENT | An asset needs to be reinstated. Although it was retired, during the physical inventory process, it was found that the asset was still being used. |
| UP - UNIT ADJUSTMENT | For a particular asset, less units are listed in Oracle Assets than are found in physical inventory. The number of units needs to be adjusted up in Oracle Assets. |
Methods for Loading Physical Inventory Data
You can load physical inventory data into Oracle Assets using several different methods. You can:
-
Import data from an Excel spreadsheet using ADI
-
Enter data in the Physical Inventory Entries window
-
Import data from a non-Oracle system using SQL*Loader
Import data from an Excel spreadsheet using the ADI
You can use ADI to load your physical inventory data into an Excel spreadsheet and import the data into Oracle Assets.
See: Uploading Physical Inventory Data into Oracle Assets (Oracle Applications Desktop Integrator User Guide)
Enter data using the Physical Inventory Entries window
You can enter data for each asset directly into Oracle Assets using the Physical Inventory Entries window. Keep in mind that you can only enter data for one asset at a time when using this method.
Import data from a non-Oracle system using SQL*Loader
You can use SQL*Loader to import physical inventory data by completing the following steps:
-
Define your interim table in the Oracle database.
Use a single interim table if possible. You can use multiple tables if the data exists in multiple tables or files in the system from which you are loading data. In either case, you must eventually place the data in a single table, the FA_INV_INTERFACE table.
If you prefer, you can load data directly into the FA_INV_INTERFACE table, but it is more difficult due to the complexity of the table.
-
Load your interim table using SQL*Loader.
Use SQL*Loader to import information from outside your Oracle database. SQL*Loader accepts a number of input file formats and loads your physical inventory data into your interim table.
If the data already resides within an Oracle database, there is no need to use SQL*Loader. Simply consolidate the physical inventory information in your interim table using SQL*Plus or import, and go directly to .
-
Convert the physical inventory information into text form.
Most database or file systems can output data in text form. Usually you can generate a variable or fixed format data file containing comma or space delimiters from the existing system. If you cannot find a way to produce clean text data, try generating a report to disk, using a text editor to format your data. Another option is to have SQL*Loader eliminate unnecessary information during its run. If there is a large volume of information, or if the information is difficult to convert into a loadable format, you can write your own import program. Construct your program to generate a SQL*Loader readable text file.
-
Create the SQL*Loader control file.
In addition to the actual data text file, you must write a SQL*Loader control file. The control file tells SQL*Loader how to import the data into your interim table. Be sure to specify a discard file if you are planning to use SQL*Loader to filter your data.
-
Run SQL*Loader to import your physical inventory data.
Once you have created your physical inventory data file and SQL*Loader control file, run SQL*Loader to import your data. SQL*Loader produces a log file with statistics about the import, a bad file containing records that could not be imported due to errors, and a discard file containing all the records that were filtered out of the import by commands placed in the control file.
-
-
Compare record counts and check the SQL*Loader files.
Check the number of rows in the interim table against the number of records in your original physical inventory data file or table to ensure that all physical inventory records were imported.
The log file shows if records were rejected during the load, and the bad file shows which records were rejected. Fix and re-import the records in the bad file.
-
Spot check the interim table.
Check several records throughout the interim table and compare them to the corresponding records in the original physical data file or table. Look for missing or invalid data. This step ensures that your data was imported into the correct columns and that all columns were imported.
Physical Inventory Comparison Program
To run the Physical Inventory Comparison program, navigate to the Run Comparison window. You must enter the name of the physical inventory being compared. You can also enter either the location, the category, or both, if you want to narrow the search criteria. If you do not enter either of these parameters, the comparison program compares all assets in the physical inventory with the assets in your production system.
Note: The Physical Inventory Comparison program only compares physical inventory entries with a status of NEW. If an entry has been compared and you want it to be compared again, you must change the status of that entry back to NEW in the Inventory Entries window.
During the comparison, the comparison program attempts to match each asset in the physical inventory data to an asset in the production system. It begins the comparison by searching for matching unique identifiers. The matching unique identifier can be either the asset number, tag number, or serial number.
The program first determines whether the physical inventory data includes an asset number. If an asset number has been provided, the comparison program searches the Oracle Assets production system for a matching asset number. If it finds a matching asset number, the program continues the comparison by determining whether the location and number of units match. If they do not match, the program updates the status of that asset to DIFFERENCE. For a list of status codes, see: Loading Physical Inventory Data.
If the program cannot find a matching asset number in the Oracle Asset production system, it terminates the comparison for that asset and continues on to the next asset.
If an asset number has not been recorded as part of the physical inventory, the program next determines whether the physical inventory data includes a tag number. If there is a tag number, the program searches the Oracle Assets production system for a matching tag number. Similarly, if the physical inventory data includes neither an asset number nor a tag number, the program determines whether a serial number has been recorded for the asset. If so, it searches the Oracle Assets production system for a matching serial number. In both cases, if the program finds a match, it will continue the comparison to determine whether the location and number of units match. If they do not match, the program updates the status of that asset to DIFFERENCE. For a list of status codes, see: Loading Physical Inventory Data.
In both cases, if the program cannot find a matching identifier in the Oracle Assets production system, it terminates the comparison for that asset and continues on to the next asset.
If none of the three unique identifiers are present for that asset, the program attempts to match the asset using other criteria, such as description and asset key CCID.
Note: When the program attempts to match assets using criteria other than the three unique identifiers, the matching criteria may not be unique and the program may not be able to uniquely identify an asset. Therefore, we strongly recommend that when bringing physical inventory data into Oracle Assets using any method other than the Physical Inventory window (which does not allow you to save your changes unless you have entered an asset number, tag number, or serial number), that you include at least one of the three unique identifiers for each asset in physical inventory.
After completing the comparison, the comparison program updates the FA_INV_INTERFACE table, indicating the assets in physical inventory that cannot be reconciled with the assets in Oracle Assets, and, if necessary, the type of adjustment that needs to be made (either a unit adjustment or location adjustment). If there are no differences between the Oracle Assets data and the physical inventory data for a particular asset, and the asset meets the other requirements for inclusion in the physical inventory process, the asset will automatically have a status of RECONCILED. If there are differences between the Oracle Assets data and the physical inventory data for a particular asset, or the asset does not meet the requirements for inclusion in the physical inventory process, another status code will be assigned to the asset. You can view the comparison data online using the Find Physical Inventory Comparison window, or by running the Physical Inventory Comparison Report.
Viewing Comparison Results
There are two ways to view the results of the Physical Inventory Comparison.
-
Physical Inventory Comparison window
-
Physical Inventory Comparison Report
Physical Inventory Comparison Window
You can view the results of the comparison online on the Physical Inventory Comparison window. The Physical Inventory Comparison window displays the asset number, location, and number of units for each asset in your Oracle Assets production system, and the corresponding asset number in physical inventory, along with its location and number of units. If the location or number of units differs, the comparison highlights the differences in the comparison results. It also indicates when it cannot find a corresponding asset number in the production system, and when it finds duplicate assets.
Note: Assets with a status of New or Not Unique are not included on the Physical Inventory Comparison window.
To view the results of the Physical Inventory Comparison online:
-
Navigate to the Find Physical Inventory Comparison window.
-
Enter the name of the physical inventory to view the results for the entire physical inventory. If you want to narrow the search criteria, you can enter additional parameters, such as category or location.
-
Choose Find.
Physical Inventory Comparison Report
Similar to the Physical Inventory Comparison window, the Physical Inventory Comparison Report displays information on each asset in your production system, along with the corresponding asset number in physical inventory. This report displays all assets, including those with a status of New and Not Unique.
This report is a standard variable format report. You can run this report from Oracle Assets or from the Applications Desktop Integrator (ADI) Request Center. The Request Center allows you to manipulate data in the desktop application of your choice.
Related Topics
Request Center (Oracle Applications Desktop Integrator User Guide)
Physical Inventory Comparison Report
Reconciliation
After you finish running physical inventory and generating reports, you need to reconcile your physical inventory data with your Oracle Assets data.
To reconcile your physical inventory with stored asset information:
-
Analyze your reports to determine the assets that need to be reconciled.
-
Obtain proper approval to change assets that need to be reconciled.
-
Change the asset information by using the Asset Workbench or the Mass Change window.
Related Topics
Changing Financial and Depreciation Information
Missing Assets
When you are finished with reconciling your physical inventory, you can run the Physical Inventory Missing Assets Report to determine if there are any assets in your production system that could not be found during the physical inventory process.
This report is a standard variable format report. You can run this report from Oracle Assets or from the ADI Request Center. The Request Center allows you to manipulate data in the desktop application of your choice.
Related Topics
Request Center (Oracle Applications Desktop Integrator User Guide)
Physical Inventory Missing Assets Report
Purging Physical Inventory Data
After you close your physical inventory, you can purge the physical inventory data. Oracle Assets will not allow you to purge the data unless the physical inventory is closed. You close the physical inventory by entering an end date in the Physical Inventory window.
To purge physical inventory data:
-
Navigate to the Physical Inventory window.
-
Choose the Purge button.
Creating Physical Inventory Using Web ADI
Oracle Assets integrates with Web ADI to enable you to create physical inventory through the Physical Inventory Integrator. The Physical Inventory Integrator allows you to enter or load data into a spreadsheet using pre-defined mappings and layouts. Web ADI validates all required fields. If the Pre-Validate check box is checked, Web ADI validates both required and optional fields. After validating data, you can automatically upload your physical inventory to Oracle Assets.
To use Web ADI to create physical inventory, refer to Creating a Document in the Oracle Web ADI Implementation and Administration Guide.
In the Integrator page, you need to select an inventory. In the Layout page, you need to select one of the following layouts:
-
Physical Inventory – Default
-
Physical Inventory – Line Entry
-
Physical Inventory – Single Category
-
Physical Inventory – Single Location
-
Physical Inventory – Tag number entry
After creating your spreadsheet, you can upload the data into Oracle Assets. See: Uploading and Downloading Data from Spreadsheets in the Oracle Web ADI Implementation and Administration Guide.
Before running the Physical Inventory Upload, check the Run Comparison check box if you want to automatically run the Comparison report and the View Comparison Results check box if you want to view the comparison results.
Scheduling Asset Maintenance
Oracle Assets allows you to schedule repair and service events for your long-term capital assets, to help ensure you maintain your long-term assets in a timely manner. You can plan for maintenance to occur at appropriate times, such as seasonal downtime. You can also schedule maintenance to occur at specific intervals, for example, monthly. Using Oracle Assets to schedule your asset maintenance also allows you to record the maintenance history of assets, in addition to scheduling future maintenance events.
To schedule asset maintenance:
-
Navigate to the Schedule Maintenance Events window.
-
Enter the Start Date and End Date.
-
Enter the depreciation book containing the assets for which maintenance will be scheduled.
-
Optionally enter additional selection criteria, such as asset numbers, date placed in service, and category.
-
Enter event information, such as the Event name and Description of the event.
-
Choose Run to schedule maintenance events.
To view maintenance schedules:
-
Navigate to the Maintenance Details window.
-
Query the asset for the maintenance event you want to view.
-
Optionally enter changes.
-
Save your work.
To purge maintenance schedules:
-
Navigate to the Purge Maintenance Schedules window.
-
Enter the selection criteria to select the maintenance schedules that need to be purged, such as Schedule ID, Asset Number, or Maintenance Date.
-
Choose Purge.
Schedule Maintenance Events Window Reference
Schedule ID. The unique identification number assigned to the transaction.
Status. Status of the concurrent request (NEW, ERROR, or COMPLETED).
Maintenance Period Region
You can schedule maintenance events during a particular range of dates. For example, if you want to schedule maintenance yearly, you might enter a Start Date of January 1 and an End Date of December 31.
Start Date. Enter the date the maintenance event will begin.
End Date. Enter the date the maintenance event will end.
Selection Criteria Region
Book. Enter the depreciation book containing the asset for which you are scheduling maintenance. This field is required.
Currency. The currency of the depreciation book displays automatically when you enter the name of the depreciation book.
Asset Number. You can enter the asset number or a range of asset numbers for which you want to schedule maintenance events. This field is optional.
Date Placed in Service. Enter the date the asset was placed in service. This field is optional.
Category. Enter the category of the assets for which you want to schedule maintenance events. This field is optional.
Location. Enter the location of the assets for which you want to schedule maintenance events. This field is optional.
Asset Key. Enter the asset key of the asset for which you want to schedule maintenance events. This field is optional.
Events Region
Event. Use the list of values to select the name of the maintenance event, for example, tire rotation, or oil change. This field is required.
Description. Enter a description of the maintenance event. This field is required.
Frequency in Days. Enter the frequency (in days) at which the event should occur. For example, for a monthly service, you would enter 30. This field is required if no date is specified.
Date. Enter the date the service event will occur. This field is required if no frequency is specified.
Cost. Enter the cost per event. This field is optional.
Supplier Number. Enter the number of the supplier who will perform the maintenance. This field is optional.
Supplier Name. Enter the name of the supplier who will perform the maintenance. This field is optional.
Contact Number. Enter the contact number of the person responsible for the maintenance task.
Contact Name. Enter the name of the person responsible for the maintenance task.
Descriptive flexfield. Enter any detail information pertaining to each event to be scheduled.
Buttons
Run. Choose this button to schedule maintenance events.
Maintenance Details Window Reference
Use the Maintenance Details Window to query assets and review maintenance events that have been scheduled for those assets.
Selection Criteria Region
Use the Selection Criteria region to select the assets for which you want to view maintenance details.
Book. Enter the depreciation book containing the asset for which you want to view maintenance details.
Asset Number. You can enter the asset number as selection criteria for assets for which you want to view maintenance events. This field is optional.
Description. You can enter an asset description as selection criteria for assets for which you want to view maintenance events. This field is optional.
Tag Number. You can enter an asset tag number as selection criteria for assets for which you want to view maintenance events. This field is optional.
Category. You can enter the category of the assets for which you want to view maintenance events. This field is optional.
Serial Number. You can enter the serial number of the assets for which you want to view maintenance events. This field is optional.
Asset Key. You can enter the asset key of the assets for which you want to view maintenance events. This field is optional.
Events Region
This region displays details of the maintenance schedule you queried. You cannot create maintenance events here, but you can modify certain values in an existing event.
Event. The name of the maintenance event, for example, tire rotation, or oil change.
Description. The description of the maintenance event. This field is required.
Maintenance Due Date. The frequency (in days) at which the event should occur. You can update the maintenance due date in this window.
Status. The status of the event, either NEW, COMPLETED, or ERROR. You can update the status in this window.
Cost. The cost per event. You can update the cost in this window.
Supplier Number. The number of the supplier who will perform the maintenance. You can update the supplier number in this window.
Supplier Name. The name of the supplier who will perform the maintenance. You can update the supplier name in this window.
Contact Number. The contact number of the person responsible for the maintenance task. You can update the contact number in this window.
Contact Name. The name of the person responsible for the maintenance task. You can update the contact name in this window.
Purge Maintenance Schedules Window Reference
Use this window to specify the selection criteria for maintenance schedules that should be purged.
Book Name. Enter the name of the depreciation book. This field is optional.
Asset Number. Enter a range of assets for which maintenance schedules need to be purged. This field is optional.
Maintenance Date. Enter the range of maintenance dates for which maintenance schedules need to be purged. This field is optional.
Category. Enter the category of the assets for which you want to purge maintenance events. This field is optional.
Status. Enter the status of the assets for which you want to purge maintenance events. This field is optional.