Maintenance Technician Roles
Role based workbenches and pages supporting different types of maintenance tasks are described in this chapter.
This chapter covers the following topics:
- Overview
- Using the Technician Workbench
- Updating Work Orders
- Using the Transit Technician Workbench
- Using the Data Clerk Workbench
- Viewing Enigma Documents
- Viewing Operation Resources and Visit Details
- Maintenance Requirement Recording
- Finding Workorders
- Operations
- Creating Non-Routine Workorders
- Completing Work Orders and Operations
- Performing Part Removal/Install
- Changing Item and Serial Numbers Associated with Work Orders
- Viewing and Updating Material Requirements
- Viewing Assignments, Documents, and Resources
Overview
Maintenance technician role based functionality consists of workbenches and pages supporting different types of maintenance tasks for production technicians, transit technicians, and data entry clerks. This includes the following roles and user interfaces:
-
Heavy Maintenance and Engine Shop Technician
These pages focus on a technician working on medium to large sized maintenance visits, lasting for days and weeks, where technicians are assigned to specific work orders based on their skill set. You can identify the work order assigned, log in and log out, update quality plans, create transactions for part charges and dispositions, and automatically transact time performed on a job. See: Using the Technician Workbench
-
Line and Transit Maintenance Technician
These pages focus on a technician working on a small visit, either on the flight line, or between flights. These visits are simpler than a heavy maintenance visit, and last for a few hours rather then days. The visit tasks are usually for smaller inspections, quicker maintenance issues, and non routine handling. A technician is not necessarily assigned to specific work orders. See: Transit Technician Workbench
-
Data Entry Clerk
Data clerks do not perform the work on the equipment; the clerk is entering data after the work is performed work. These pages focus on records the clerk is entering for tasks performed by a technician during a shift. See: Using the Data Clerk Workbench
Using the Technician Workbench
The Technician Workbench is used by heavy maintenance and engine shop technicians to display work orders, and perform maintenance tasks for large jobs. Work orders are selected from assigned and unassigned lists. Assigned work orders are assigned to a specific technician; unassigned work orders are displayed based on resource associations. This workbench also enables you to:
-
View resource assignments and transactions
-
View and update visit details
-
View non routine orders
-
Update work orders by deferring maintenance requirements, changing parts, and collecting quality information
-
Print maintenance work cards
-
Recording maintenance requirements
-
Access task cards
Maintenance Work Card Printing
A template is provided for a maintenance work card enabling you to print, or create a file, of the details displayed in the Technician Workbench. This is designed as a hard copy of the work order for data entry. You can print a range of work orders—and use sorting options such as scheduled date, work order number, visit, or visit stage.
To view work orders in the Technician Workbench
-
Navigate to the Technician Workbench.
-
You can search for work order records by selecting search criteria in the applicable fields including Work Order Number, Work Order Status, Visit Number, and Start and End Dates. Select Go to display the results of your search.
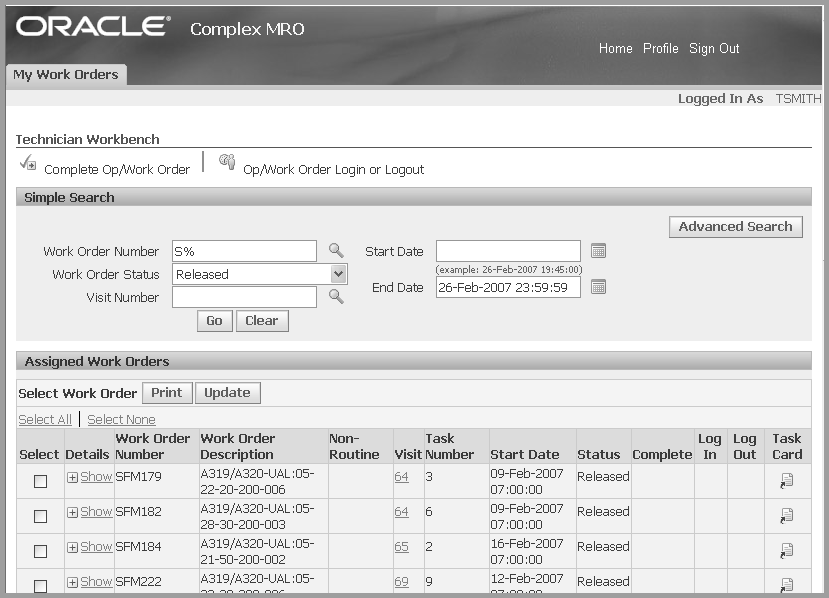
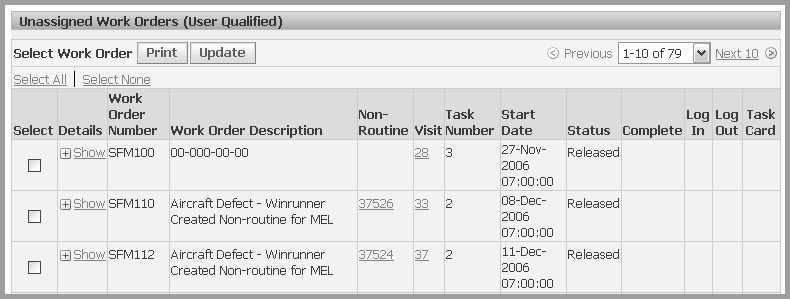
Information displays in the Assigned Work Orders and Unassigned Work Orders regions. You can view data in the following fields: Work Order Number and Description, Non-Routine request number, Visit number, Task Number, Start Date, Status, Complete flag, and Log In and Log Out indicator.
Integration with Enigma enables a technician to view and print associated Enigma documents related to a specific work order in Oracle CMRO. To identify and troubleshoot a defect, the technician can view the Fault Identification Manual (FIM) that is linked to Enigma’s interface.
Click on the Task Card icon for any work order to display the corresponding Aircraft Maintenance Manual (AMM). The AMM task cards are associated with a route in Oracle CMRO. These task cards include content from AMM, IPC, and WDM manuals. Oracle CMRO maintains the revision of the tasks and stores a PDF file as an attachment to the route.
-
To display or print a maintenance work card, select a work order and choose Print.
Maintenance work card printing provides printed or file information of the details displayed in the Technician Workbench. This provides a hard copy of the work order to give technicians before each shift.
-
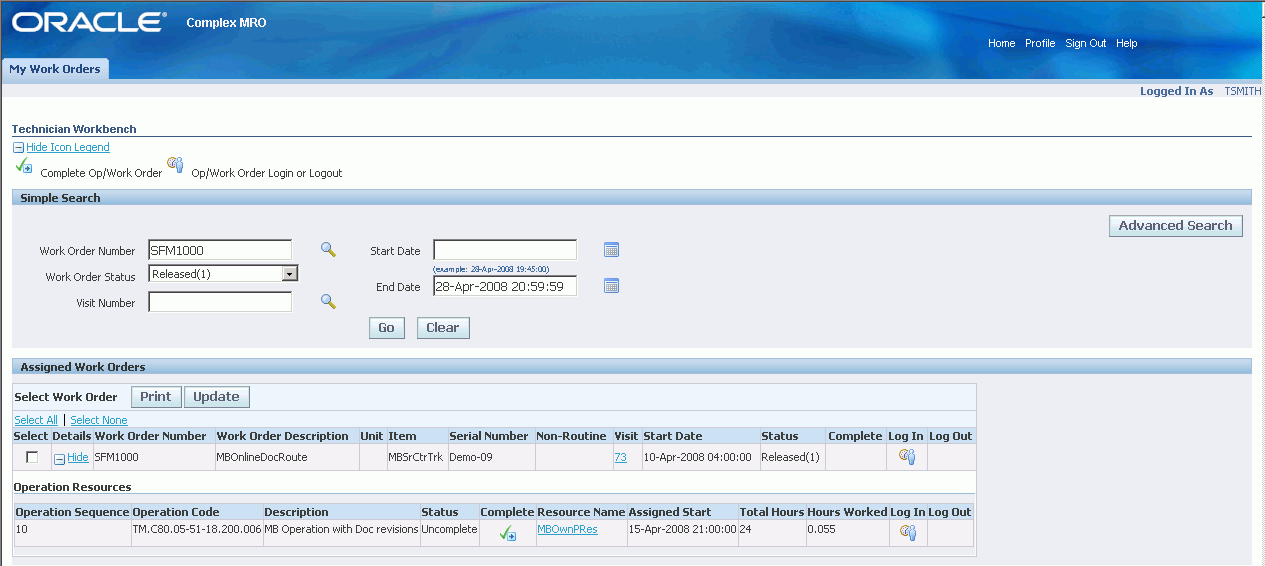
You can complete an operation from the Search page of the Technician Workbench. Expand the Show Details link for a work order and click the Complete icon for each operation to complete the operation.
-
You can perform the following actions:
-
Choose Update to display the Update Work Orders page, see: Updating Work Orders
-
View resource assignments and transactions, see: Viewing Operation Resources
-
View and update visit details, see: Viewing Operation Resources and Visit Details
-
View non routine orders, see: Creating Non-routine Workorders
-
Print maintenance work cards
-
Access task cards
-
Updating Work Orders
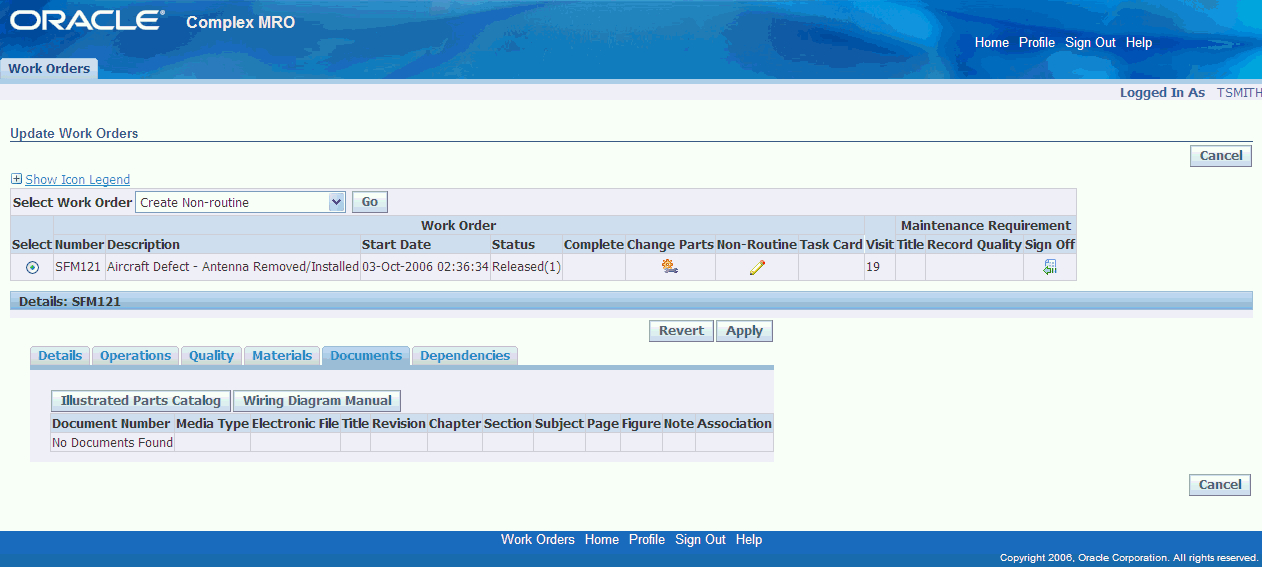
The Update Work Orders page displays the work order, and its associated operations and maintenance requirements. You can update the work order by performing a number of transactions, and view detail information in five tabbed regions. This page also displays a notes area for technicians to communicate between shift turnovers.
During the creation of work orders if operation resources are planned at a department level, the operation department defaults from the operation resource if the associated BOM resource is available in the Visit's Organization. See: Creating Oracle Complex Maintenance, Repair, and Overhaul Resources.
To update work orders
-
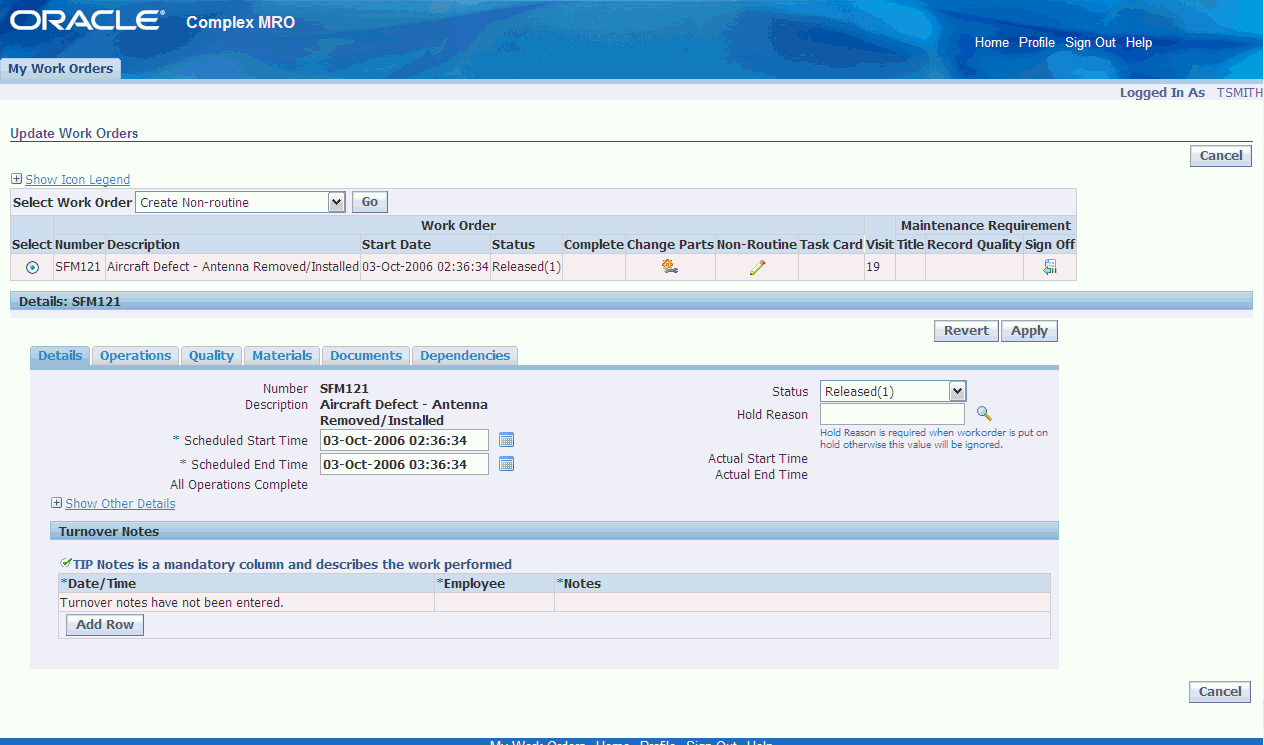
Select a work order and navigate to the Update Work Orders page.
This page enables you to access other pages to perform work order tasks. Select a task in the Select Work Order box, and choose Go to navigate to the appropriate page:
-
Create Non-routine, see: Creating Non-routine Workorders
and Creating a Non-Routine from an Existing Non-Routine Workorders.
-
Defer Maintenance Requirement, see: Deferring Maintenance Requirements
-
Print Work Card provides a file or printed maintenance work card of details of the Technician Workbench.
-
View/Create Dispositions, see: Item Disposition
.
-
-
In the Select Work Orders row, you can perform the following actions:
-
Change Parts enables you to navigate to the Unit Configuration Part Changes page, see: Performing Part Removal/Install
-
Update Non-Routine.
-
Task Card enables you to access Enigma associated documents. Click the Task Card icon to display Aircraft Maintenance Manual if the corresponding route of the workorder has an external document association.
-
Record Quality collection information, see Entering Quality Results, Oracle Quality User's Guide
-
Sign Off enables you to end maintenance requirement transactions, see: Maintenance Requirement Recording
In the Details region, there are tabbed areas to view work order information including: Details, Operations, Quality, Materials, Documents, and Dependancies.
-
-
Select Details to view a summary of work order details and turnover notes. Select Other Details to display more information on the selected work order.
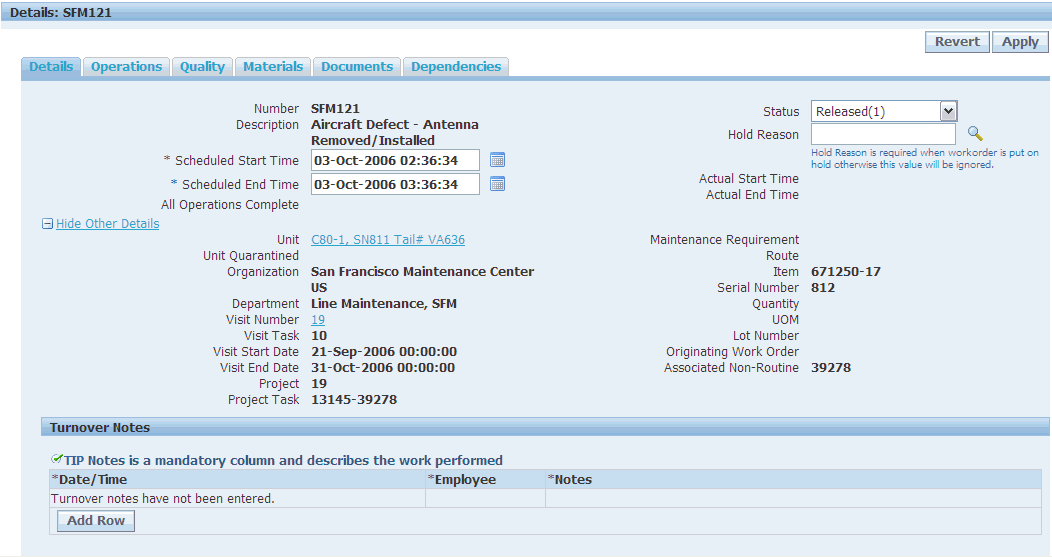
This region enables you to:
-
Update the status of the work order
-
Enter a reason when the status of the work order is On Hold or Parts Hold
-
Update Scheduled Start and End Time
-
Navigate to the View Unit Configuration page, see: Creating Unit Configuration
-
Navigate to the View Visit Details page, see:Viewing Operation Resources and Visit Details
-
Navigate to the View Maintenance Requirement pages, see: Viewing Maintenance Requirement Details
-
Navigate to the View Route page, see: Creating Maintenance Route Records
-
-
The Turnover Notes region displays date and time, employee, and a short description of the work performed. You can add additional notes for a specific date and time period.
-
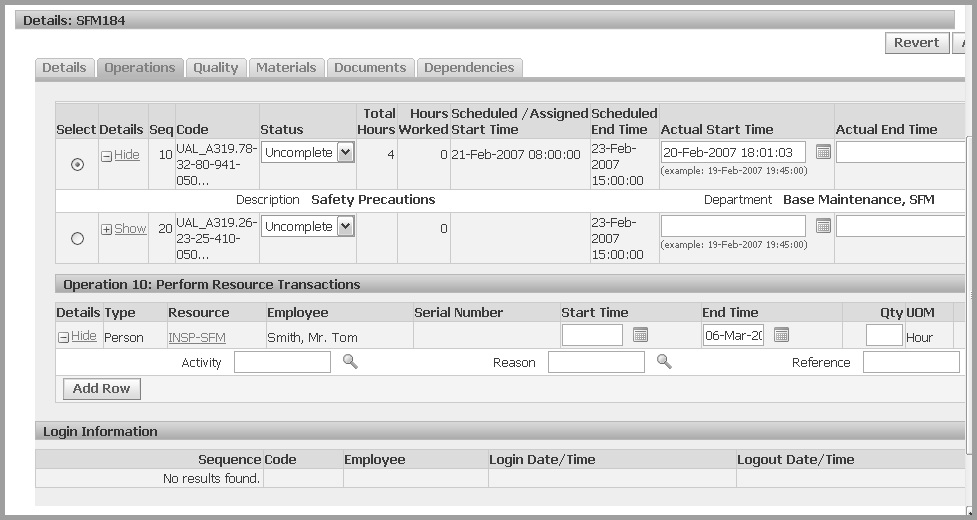
Select Operations to view work order operation details.
This region displays the operation status, hours worked, scheduled, and actual time worked.
-
Total Hours—for assigned work orders, this column represents the total required hours according to the assignment. For the unassigned work orders, this represents the sum of all the required hours for the work order.
-
Hours Worked— represents the amount of time technician is logged into the work order, plus the other time transacted for this work order.
In the Perform Resource Transactions region, you can record resource information for machine type resources.
-
-
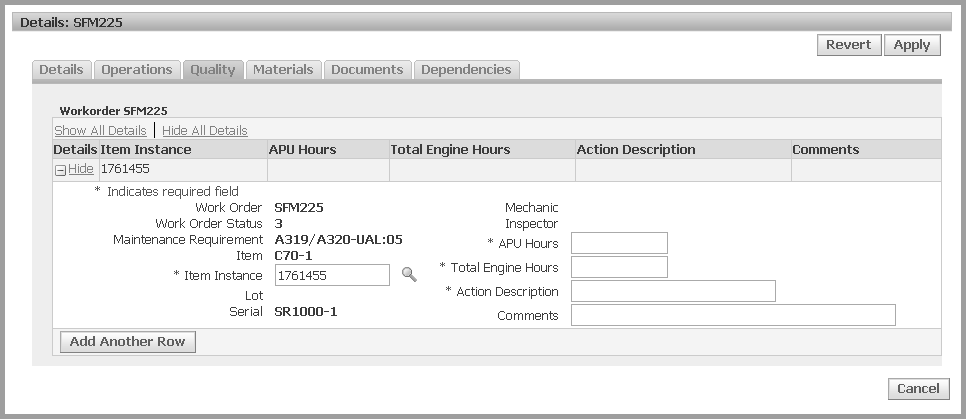
Select Quality to view and enter Quality collection plan information for this maintenance requirement.
This includes data for APU Hours, Total Engine Hours, Action Description, and Comments.
See: Entering Quality Results, Oracle Quality User's Guide
-
Select Material to view item information. This region displays operation sequence, scheduled and issued quantities, and required date. You can update the scheduled quantity and add new items to the work order.

-
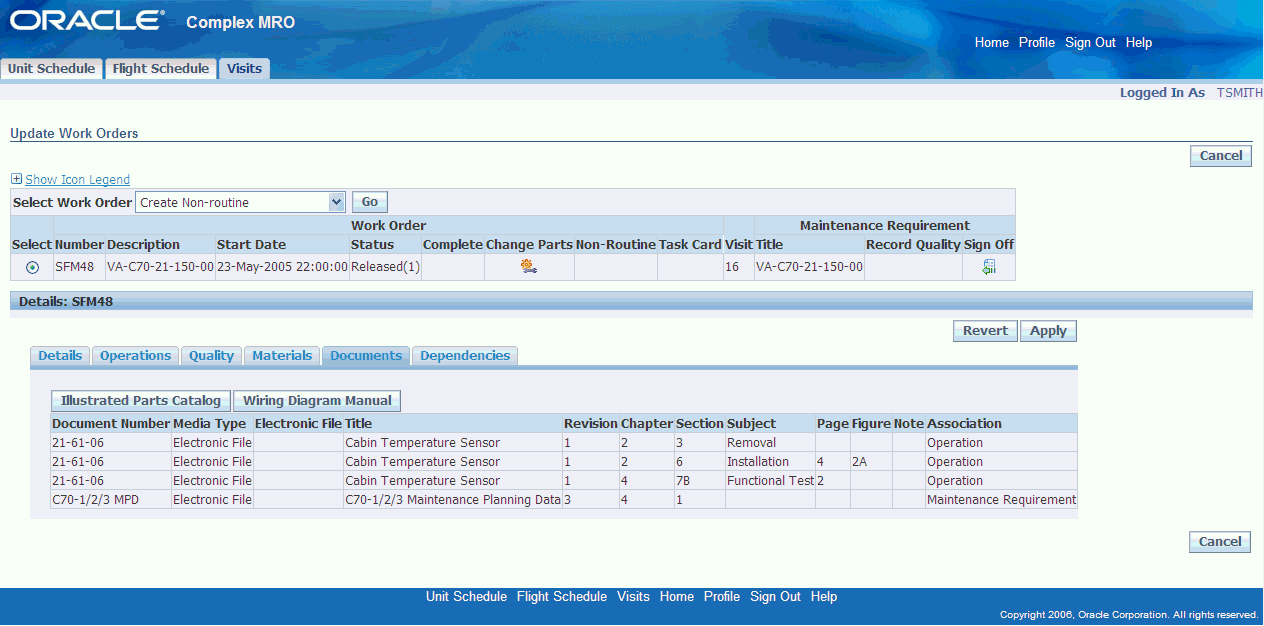
Select Documents to view any work order documents associated to the maintenance requirements, operations, product classification, or configuration items. You can access the Illustrated Parts Catalog and Wiring Diagram Manual from this region.
To enable these buttons you must set the following profile options to Yes:
-
AHL: Enigma IPC Documents associated
-
AHL: Enigma WDM Documents associated
Click the Illustrated Parts Catalog and Wiring Diagram Manual buttons to view the associated documents.
This page lists applicable document revision, chapter, section, subject, page, figure, and note. See: Attaching Documents to a Maintenance Requirement

-
-
The Dependancies region displays any scheduling dependencies for this work order including work order status, scheduling time and dates, non-routine, and outside processing orders.

-
Select Apply to save your work.
Using the Transit Technician Workbench
Transit maintenance technicians are working on smaller maintenance visits that last for a few hours rather then days.
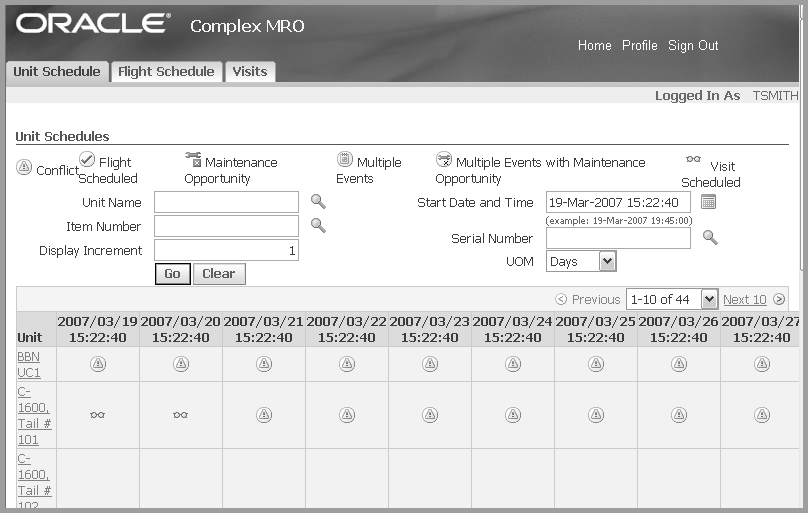
The workbench provides three tabbed regions:
-
Unit Schedule
This page displays the different flight segments for a tail number, and the scheduled visits or maintenance opportunities between flights. The unit schedules are displayed in context of a unit in increments of minutes, hours or days. You can also access conflict messages which show an overlap of events. See: Viewing Unit Schedule
-
Flight Schedule.
Flight schedules are imported into the application using an API, or can be created manually. See: Maintaining Flight Schedule
-
Visits
You can view flight details and identify where visits can be created. The Visit tabbed region enables you to search for visits, create new records, and update visit information. See: Creating Maintenance Visit Records
Enigma Integration enables a transit technician to view associated Enigma documents related to a maintenance work order.
To view associated Enigma documents:
-
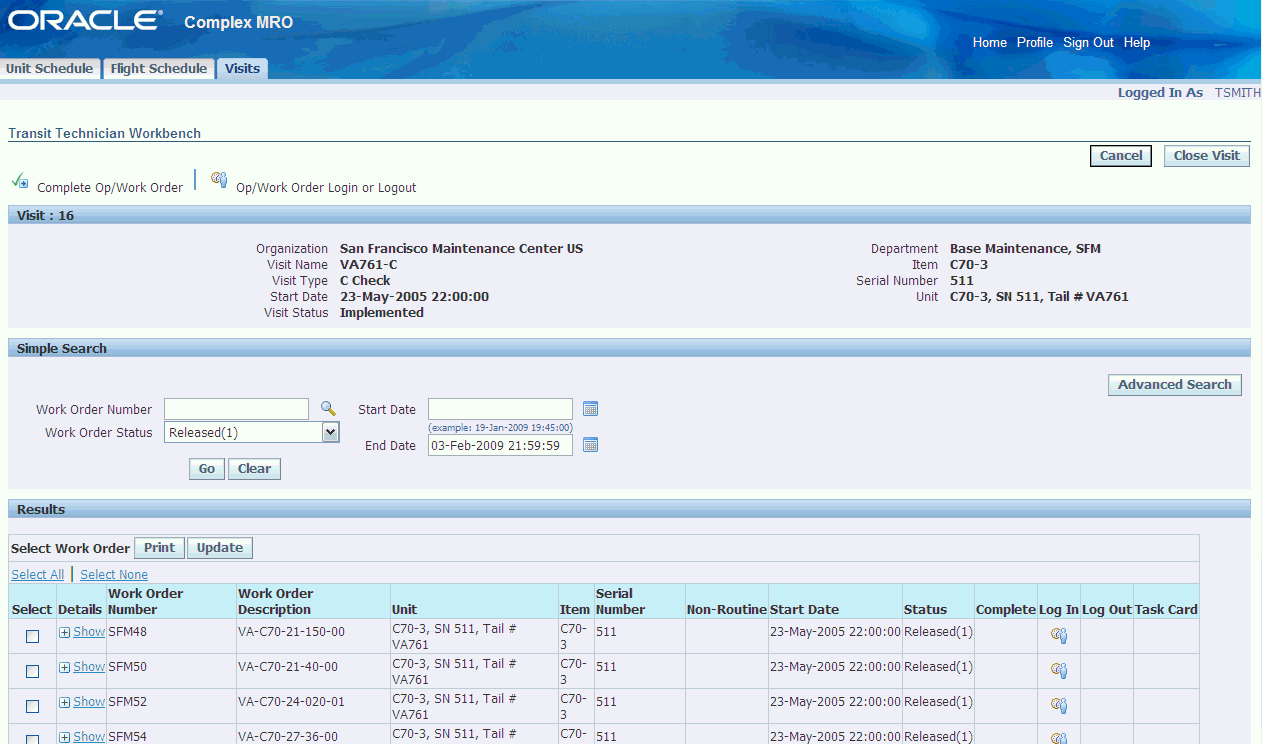
Click the Visits tab and search for the relevant work order.
-
The Results region displays the search result.
The Task Card column on the Results table is visible if the corresponding route of the work order has an external document association.
-
Click the Task Card icon for a work order to view the corresponding Aircraft Maintenance Manual (AMM).
Enigma Integration enables you to view any other work order documents associated to the maintenance requirements, operations, product classifications, or configuration items. You can access the Illustrated Parts Catalog and Wiring Diagram Manual from the Documents region in the Update Work Orders page.
Using the Data Clerk Workbench
The Data Clerk Workbench is used in environments where the shift work records are updated by data entry clerks. The work orders are not filtered per user, and the pages do not contain default information. Data clerks can search and record data for work orders that have been assigned to any technician; and can record job tasks, start and stop times, and completions.
To view work orders on the Data Clerk Workbench
-
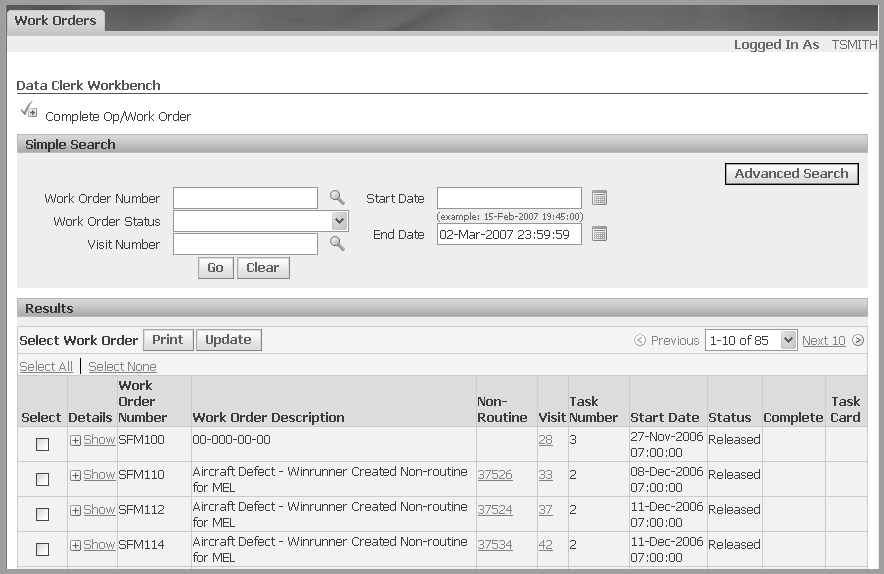
Navigate to the Data Clerk Workbench.
-
You can search for records by using the applicable values in the Search region including: Work Order Number, Work Order Status, Visit Number, and Start and End Date. Select Go to display the results of your search.
-
Select a work order to perform the following transactions:
-
Print Maintenance Work Cards
-
Update Work Orders, see: Updating Work Orders
-
View Operation Resources, see: Viewing Operation Resources and Visit Details
-
View Non-routine Work Orders, see: Creating Non-routine Workorders
-
View Visit Details, see: Viewing Operation Resources and Visit Details
-
View Enigma Documents, see: Viewing Enigma Documents
-
Viewing Enigma Documents
Enigma Integration enables a data clerk to view associated Enigma documents related to a maintenance work order. The Task Card column on the Results table of the Data Clerk Workbench is visible if the corresponding route of the work order has an external document association.
Click the Task Card icon for a work order to view the corresponding Aircraft Maintenance Manual (AMM).
Enigma Integration also enables you to view any other work order documents associated to the maintenance requirements, operations, product classifications, or configuration items. You can access the Illustrated Parts Catalog and Wiring Diagram Manual from the Documents region in the Update Work Orders page.
Viewing Operation Resources and Visit Details
Viewing and Updating Operation Resources
Operation resources are accessed from both the Technician and Data Clerk Workbenches by selecting the details for specific work orders. This page displays labor resources, and includes operation sequence, operation code, description, status, resource name, assigned start date and time, total hours and hours worked, and log in and log out data.
You can complete the operation in this page, and navigate to the View Resource Details page.
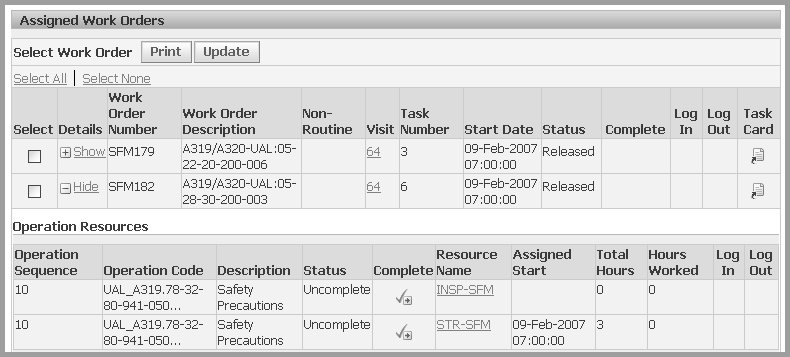
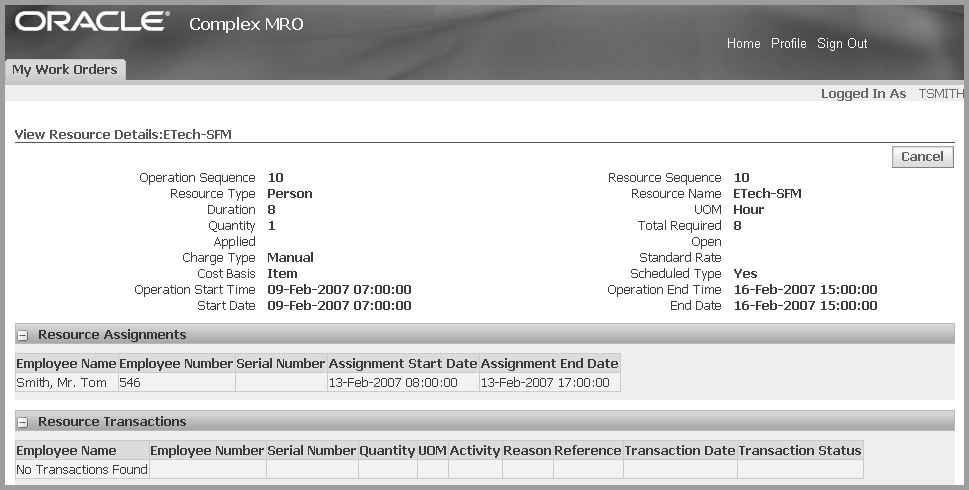
Select the Resource Name to navigate to the View Resource Detail page. This page displays the details on the particular resource, and includes regions for Resource Assignments and Resource Transactions.
See: Defining Resource Requirements for an Operation
Viewing Visit Details
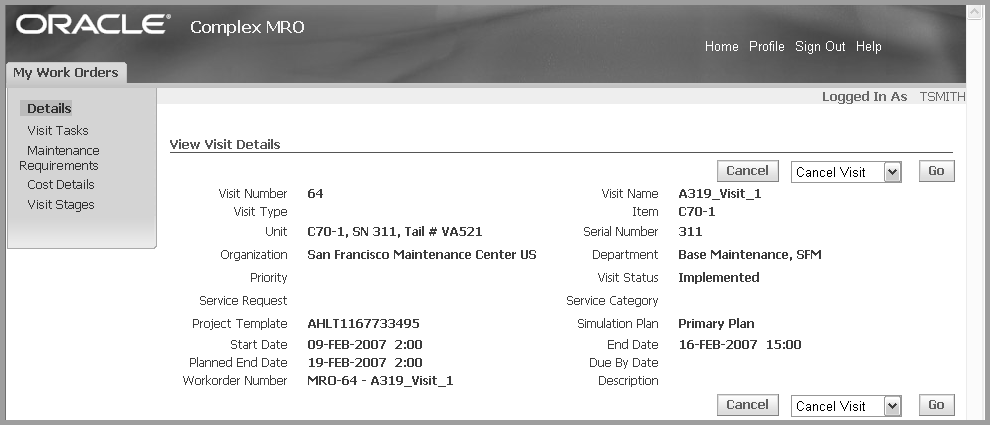
The View Visit Details page enable you to view maintenance visit information, and navigate to pages to create visit transactions. See: Creating Maintenance Visit Records
You can cancel or close this visit record, and navigate to the Cost Structure page. See: Visit Costing and Pricing
Maintenance Requirement Recording
You can initiate and stop the recording of maintenance requirement transactions in the maintenance technician workbenches. When all the work orders for a particular maintenance requirement are completed, and quality collection plan information is updated—you can sign off the maintenance requirement. All associated work orders for the maintenance requirement must be complete.
To stop maintenance requirement transactions
-
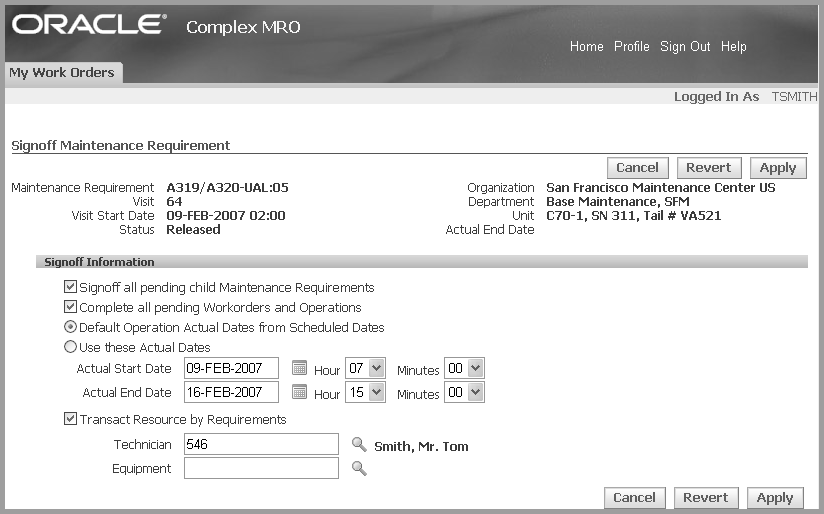
Select a work order and navigate to the Signoff Maintenance Requirement page.
Maintenance requirement and visit details display for this record.
-
In the Signoff Information region, enable the check boxes for the appropriate information including:
-
Signoff all pending child Maintenance Requirements
-
Complete all pending Workorders and Operations
-
-
Choose one of the date range values for signing off your requirements.
-
Default Operation Actual Dates from Scheduled Dates
-
Enter date and time information in the Use these Actual Dates region.
-
-
You have the option to select the Transact Resource by Requirements check box. You can then select another technician or select equipment for this record.
-
Select Apply to save your work.
Finding Workorders
-
Navigate to the Workorder Overview page.
-
Select applicable search criteria, and choose Go to display the results of your search.
You can use the following fields:
-
Organization
-
Department
-
Department Class
-
Serial Number
-
Item
-
Visit Number
-
Visit Name
-
Unit Name
-
Maintenance Requirement
-
Start Date
-
BOM Resource
-
Work Order Number
-
Work Order Description
-
Operation Code
-
Operation Description
-
Priority
-
Confirmed Failure
-
Work Order Status
-
Non-Routine Work Order
-
Resolution Code
-
End Date
-
Work Order Type
-
All Operations Completed
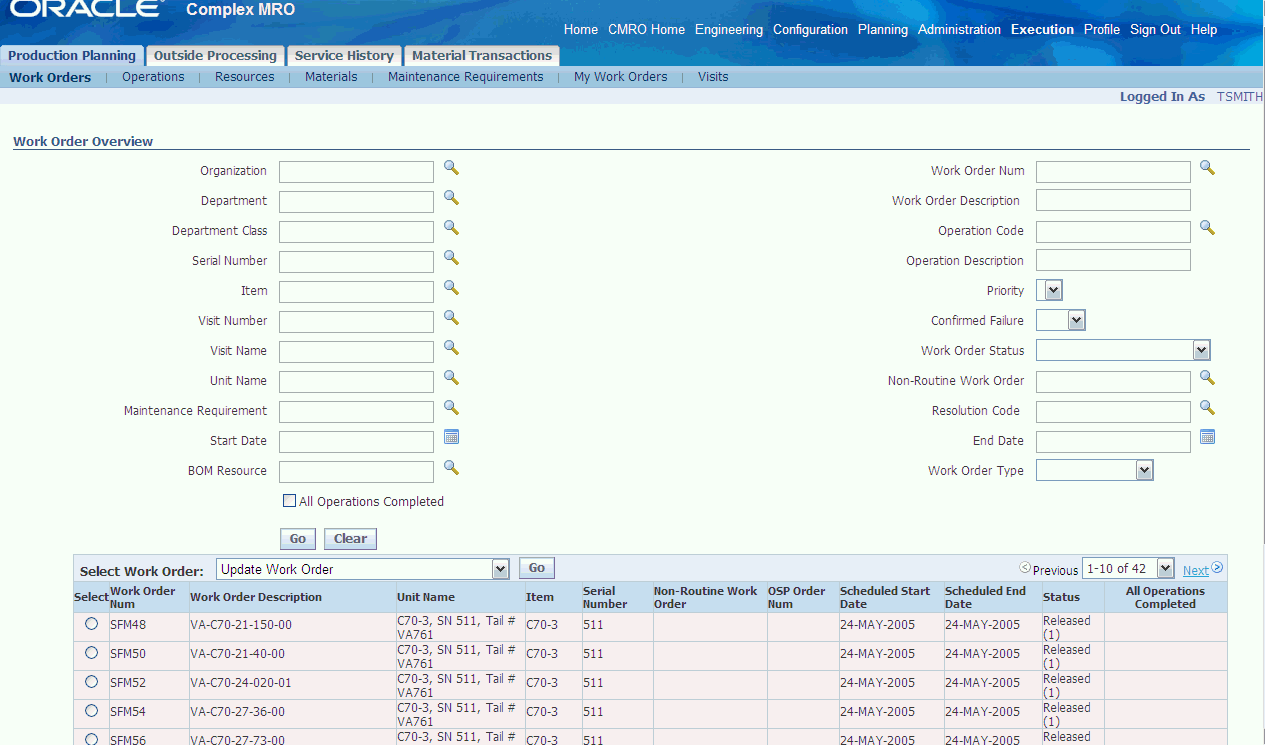
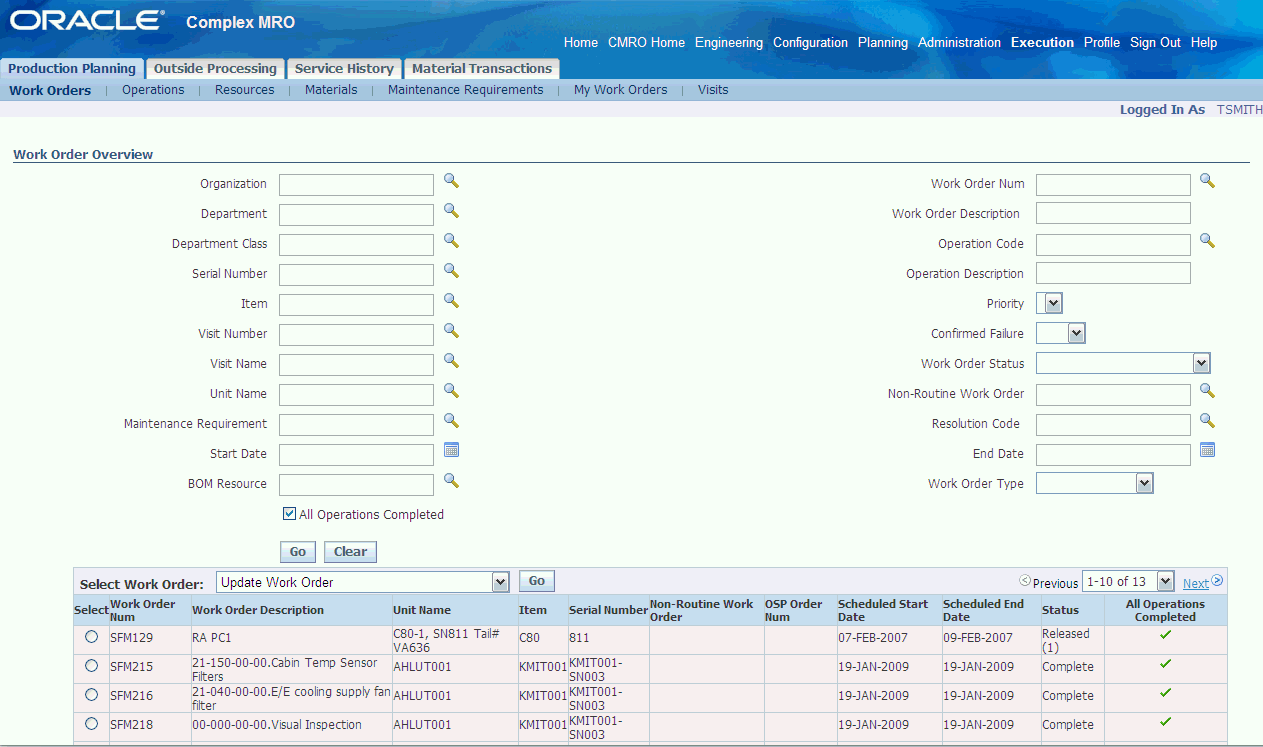
The All Operations Completed option enables you to limit the search results to work orders that are ready for sign off. This identifies only the work orders that have all of its operations in complete status. The completed work orders are displayed in the All Operations Complete column in the results region with a tick mark icon.
-
-
You can choose the following actions from the drop-down menu:
-
Update Workorder
-
Complete Workorder
-
Release Workorder
-
Defer/Cancel
-
Create Non-Routine Work Order
-
Update/View Non-Routine Work Order
-
Record Workorder QA Results
-
Record Maintenance Requirement QA Results
-
View Documents
-
View OSP
-
View Scheduling Hierarchy
-
Update Material Requirements
-
Update Resource Requirements
-
Perform Resource Assignments
-
Perform Resource Transactions
-
Release Visit Work Order
-
Release Maintenance Work Order
-
Cancel Work Order
-
Close Visit
-
Sign Off Maintenance Requirement
-
Operations
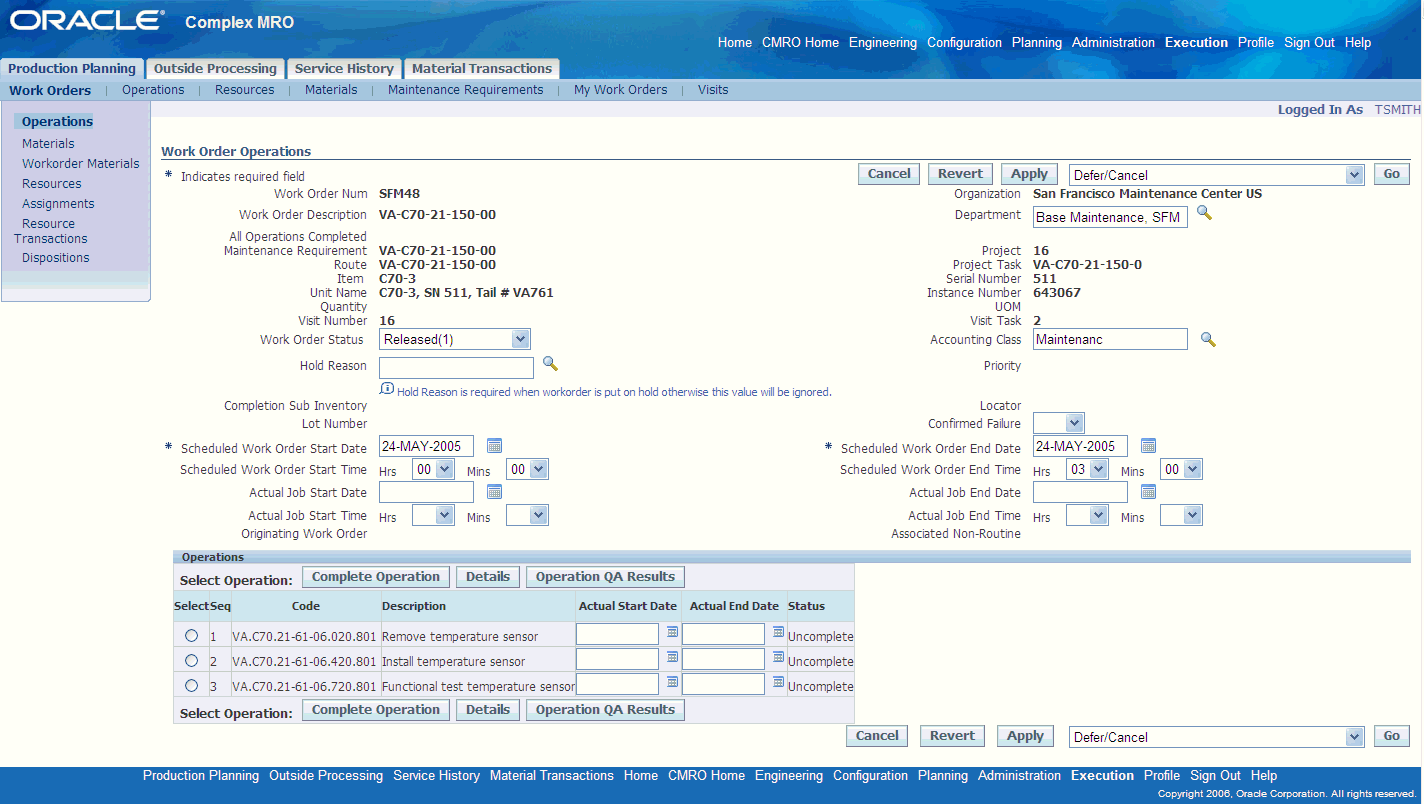
You can navigate to the Work Order Operation page by selecting a work order and choosing Update Work Order. This page enables you to perform the following options:
-
Defer/Cancel
-
Complete Work Order
-
Create Non-Routine Work Order
-
Update/View Non-Routine Work Order
-
Perform Part Removal/Install
-
Item/Serial Number Change
-
Record Work Order QA Results
-
Record Maintenance Requirement QA Results
-
Sign Off Maintenance Requirement
-
Release Visit Work Order
-
Release Maintenance Work Order
-
Cancel Work Order
-
Close Visit
A technician can now access the Unit Configuration page from the Work Order Operations page to update the Unit Configuration directly from the shop floor. These configuration updates are allowed for routes that have the Allow Unit Receipt Update option enabled at the time of creation.
When a Visit task is created for a Route that has Allow Unit Receipt Update option as Yes and a Work order is created for this task, you can choose the new option Update Unit Configuration from Actions drop down list.
You can use the Update Unit Configuration page to identify the condition of the items. This facilitates in the creation of reports used to evaluate the condition in the Edit Unit Configuration page.
To update Operations
-
Navigate to the Work Order Overview page.
-
Select a work order and choose Update Work Order. In the Work Order Operations page you can update the following fields:
-
Work Order Status
-
Hold Reason
Note: Hold Reason applies only when the work order is put on hold.
-
Scheduled Start and End Dates
-
Scheduled Start and End Time
-
Actual Start and End Dates
-
Actual Start and End Time
-
Department
-
Accounting Class
Note: This field allows you to change the WIP Accounting Class when updating a Work Order. You can select the appropriate Accounting Class from the list of values. This field becomes read-only if the work order is in status closed, complete, complete-no-charge, and canceled.
Note: This page shows an icon alongside the work order number that opens up a page showing current AMM manual section if Enigma Integration is applied.
-
-
Select Apply to save your work.
-
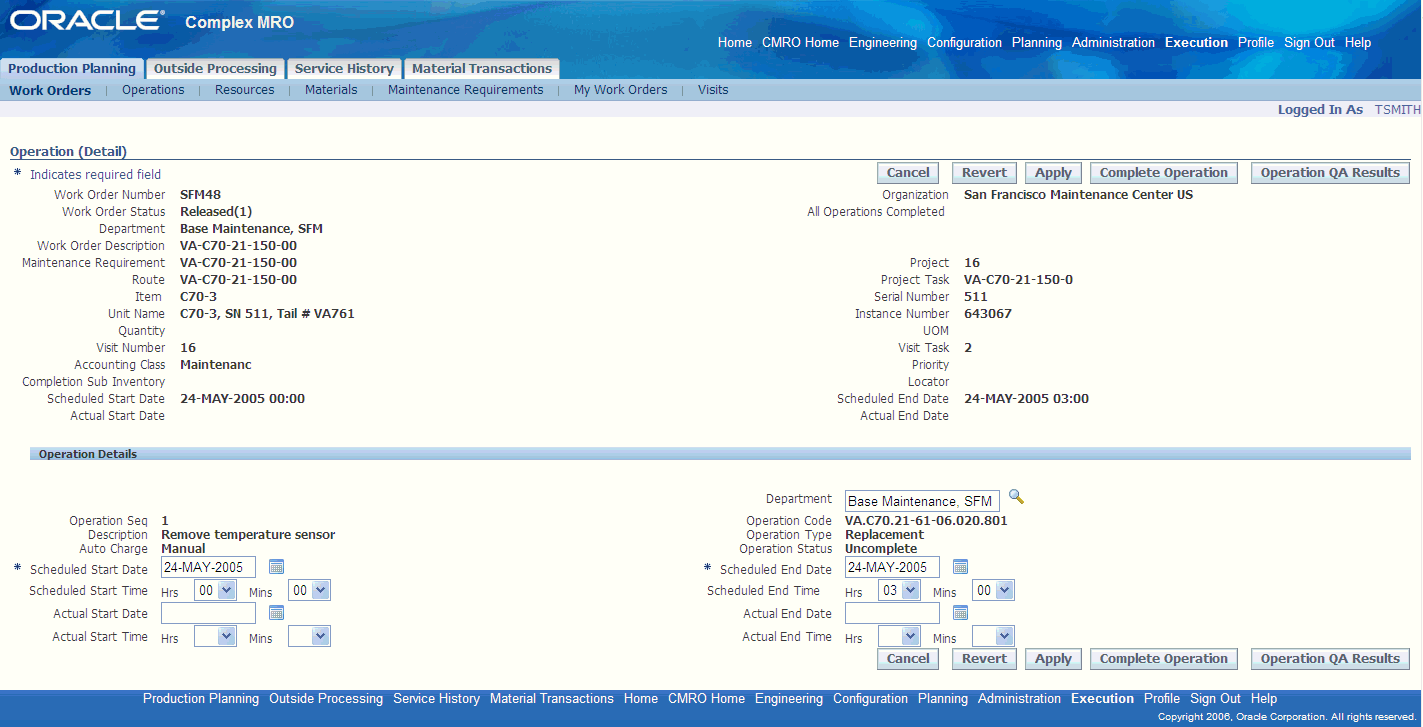
Navigate to the Operation (Detail) page .
-
You can update the following fields:
-
Department
-
Scheduled Start and End Dates
-
Schedule Start and End Times
-
Actual start and End Dates
-
Actual Start and End Times
-
-
Select Apply to save your work.
To enter Quality results for an operation
-
In the Work Order Operations page, choose Operation QA Results.
The Submit Quality Results page appears.
-
Enter your quality collection information. See: Entering Quality Results, Oracle Quality User's Guide
Creating Non-Routine Workorders
You can create non-routine work orders originating from other inspection/repair tasks or for problems discovered in the production floor when a work order is being executed. During this process a service request, an unassociated task and a work order are created.
To create a non-routine work order against an existing work order
-
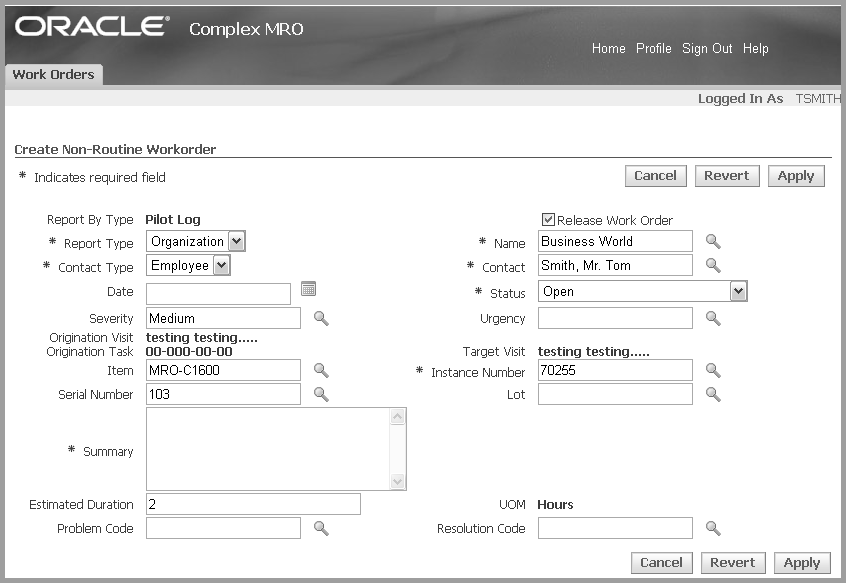
Navigate to the Create Non-Routine Workorder page.
-
Select information in the following fields to create the work order.
-
Report Type
-
Report By Type
-
Name
-
Contact Type and Contact
-
Date
-
Status
-
Severity
-
Urgency
-
Originating visit and Task
-
Target Visit
-
Part Number
-
Instance Number
-
Serial Number
-
Lot
-
Summary
-
Estimated Duration
-
Problem Code
-
Resolution Code
Note: You have the option of making the Resolution Code field mandatory. You can do this by setting the profile option, AHL: Enable Resolution Code to be Mandatory, to Yes. If the field is not made mandatory the users will not enter the value. Using Resolution Code as one of the parameters will enhance the results while searching for work orders.
-
-
Select Apply to save your work.
To view and update an existing non-routine work order
-
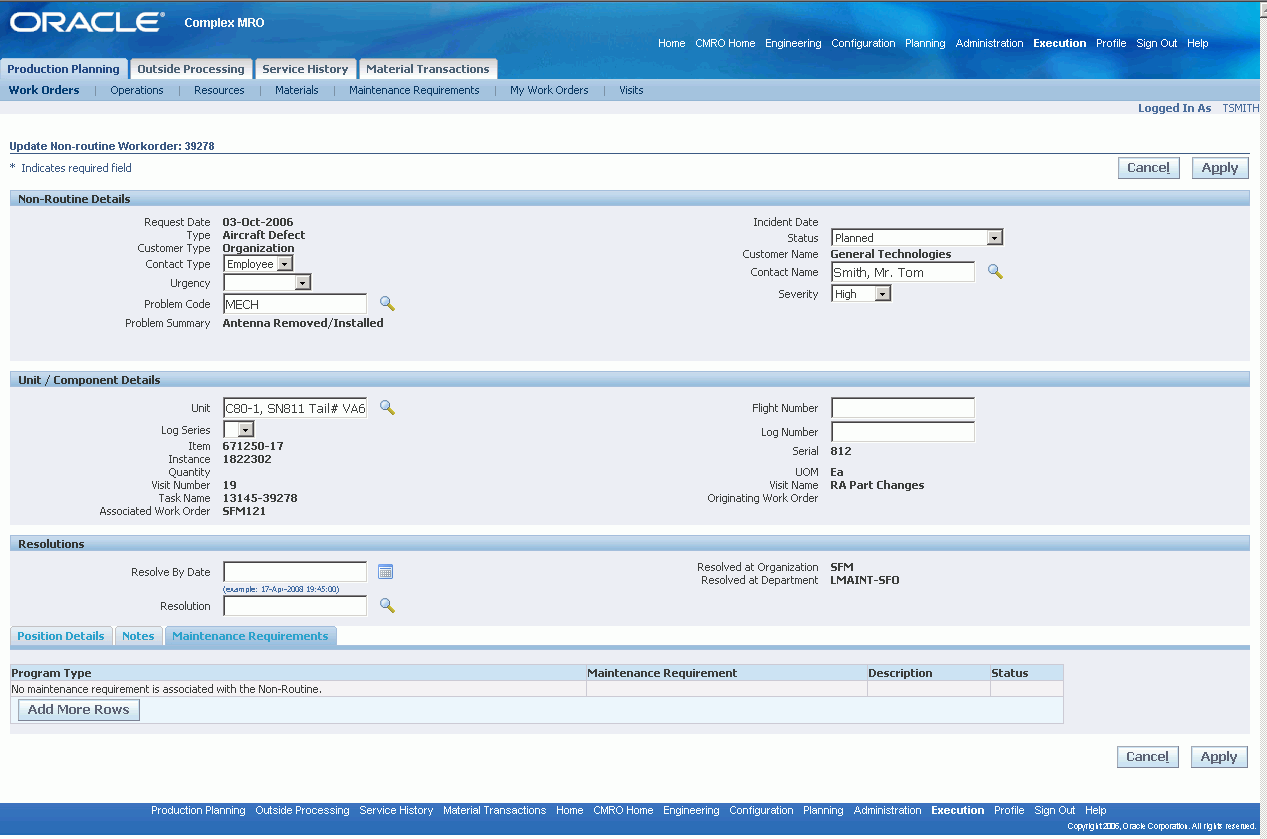
Select a workorder and navigate to the Update or View Non-Routine Workorder page.
-
You can update the applicable fields including: Contact Type, Contact, Status, Urgency, Problem Code, and Resolution Code.
Note: The Maintenance Requirements tab at the bottom of the page enables an engineer to add MRs to resolve the Non-Routine.
-
Select Apply to save your work.
To create a non-routine from an existing non-routine work order
Oracle CMRO enables you to create a Non-Routine from an existing Non-Routine. Administrators can now enable this functionality for a User or for a Responsibility by assigning the seeded user function, Allow creation of a Non-Routine originating from a Non-Routine. The corresponding function is AHL_ALLOW_CREATE_NR_FROM_NR to the menu associated to a responsibility.
This functionality is restricted in the seeded CMRO menus and responsibilities by default. You are not allowed to create a non-routine from another Non-Routine work order. If the mentioned function is added to the responsibility, you can create Non-Routine from he context of another Non-Routine work order, otherwise it gives the existing error message.
-
Navigate to the Work Order Overview page.
-
Query for a non-routine work order.
-
Select the work order and choose Create Non-Routine Work Order from the drop down menu.
This creates a new non-routine if the mentioned functionality is associated to the responsibility.
Completing Work Orders and Operations
Work orders can be completed with statuses of Draft, Unreleased, Parts Hold, Hold, or Pending QA.
If the work order is the final work order completed as part of a planned maintenance requirement, the completion also completes the maintenance requirement and updates the unit maintenance requirement.
To complete an operation
-
Select a work order and navigate to the Workorder Operations page.
-
Select the operation that you want to complete, and choose Complete Operation.
To complete a workorder
-
Navigate to the Workorder Overview page and choose Complete Workorder
Oracle Complex MRO provides integration with Oracle Quality pages to enter collection plan data. You can set up collection plans and enter quality data results for mandatory or optional collection plans. The Quality Collection plan must be set up and the inspection type associated with the Job Deferral Inspection Type profile option, or with the route header in Route Management, or to the Non-Routine Job Inspection profile option. See:
-
Overview of Collection Plans, Oracle Quality User's Guide
-
Creating Collection Plans, Oracle Quality User's Guide
-
Defining Collection Plan Elements, Oracle Quality User's Guide
-
Defining Collection Plan Element Actions, Oracle Quality User's Guide
-
Associating Transactions with Collection Plans, Oracle Quality User's Guide
Once you complete a work order in CMRO, the concurrent program, WIP Close Jobs (SRS), closes the work order in WIP. CMRO provides a concurrent program, Close Work Orders that identifies all such work orders closed in WIP but are not in closed status in CMRO.
You can run these two concurrent programs simultaneously so that after WIP concurrent manager closes work orders in WIP, system will start CMRO concurrent manager and will close those work orders in CMRO.
Signing Off Maintenance Requirements
When all the work orders for a particular maintenance requirement have been completed, you can sign off the maintenance requirement. You can associate a quality plan with a maintenance requirement.
All the work orders associated with the maintenance requirement must be complete, and all associated child maintenance requirements must also be signed off.
To sign off maintenance requirements
-
Navigate to the Workorder Overview page and select a record.
-
Choose Sign Off
You can also sign off maintenance requirements using the Workorder Operations or the Maintenance Requirement Workorders pages.
Performing Part Removal/Install
During installations, assemblies are mapped based on the position key, the position reference, sub-configuration, and item. If the position association is undeterminable, the part / subassembly is displayed as an extra. You can manually map the hierarchy to the correct positions. If a position reference has been modified in the higher assemblies master configuration, the position reference is automatically updated to reflect the correct installation position. In addition to the structure of the hierarchy being validated during the installation, the configuration rules are validated, ensuring that the assembly complies with the rules established in master configuration. Maintenance personnel have increased visibility into missing and extra items, and subassemblies.
You can assign the extra items and subassemblies to the appropriate sibling positions for which installation is allowed. Identifying parts that need to be installed or removed is easily accomplished through the use of the missing and extra icons. In addition to parts issued to a work order, any installed sibling identified as an extra item, which meets the installation criteria, will appear in the search results for an empty position.
During a part removal, if an instance is identified as unserviceable and a non-routine is created in released status, the removed part's location is set to the non-routine work order instead of the work order where it is removed.
To perform part removal and/or install
-
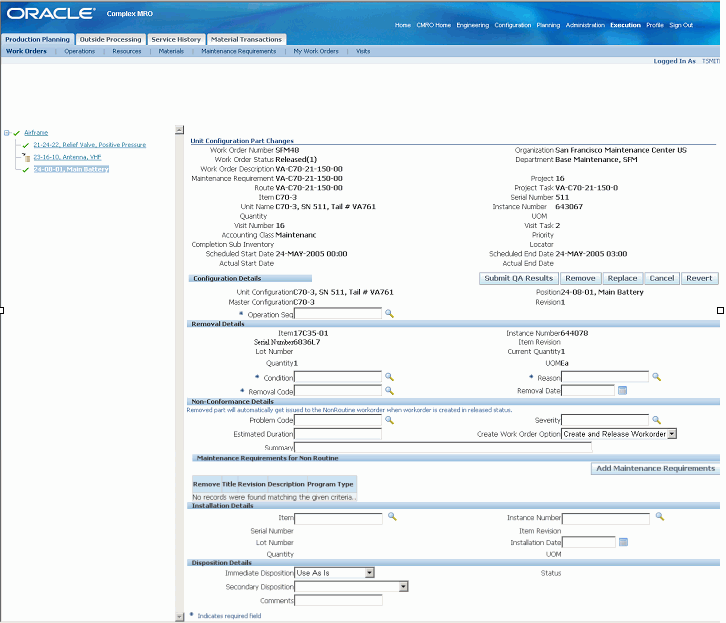
Select a record on the Workorder Operations page, and choose Perform Part Removal/Install . The Item Part Changes or Unit Configuration Part Changes page appears.
-
-
For the Unit Configuration Part Changes page, select the subconfiguration..
-
For the The Item Part Changes page, select the item.
-
-
Make any necessary changes in the following fields:
Field name Description Operation Seq Operation sequence number for the work order. Condition The condition of the part being removed. Subinventory The subinventory, if desired, to return the part. Locator The locator within the sub inventory, if locator controlled. Reason The reason for the part being removed. Removal Code The code associated with the part being removed. Removal Date The date the removal was performed. Problem Code The code associated with the problem being reported. Estimated Duration The time in hours that it is estimated to correct the service task. Severity The severity of the service difficulty, if the part is being removed in the unserviceable or MRB condition. Summary The summary of the service difficulty, if the part is being removed in the unserviceable or MRB condition. Part Number The part number of the Item being installed. Instance Number The Install Base Instance Number of the part being installed. Installation Date The date the part was installed. -
Select Remove to remove a part.
-
Select Install to add a position.
Note: A new option is introduced in the part removal process. You can remove a part as unserviceable without creating a non-routine. The Create Work Order Option, in the Non-Conformance Details region allows this functionality.
Changing Item and Serial Numbers Associated with Work Orders
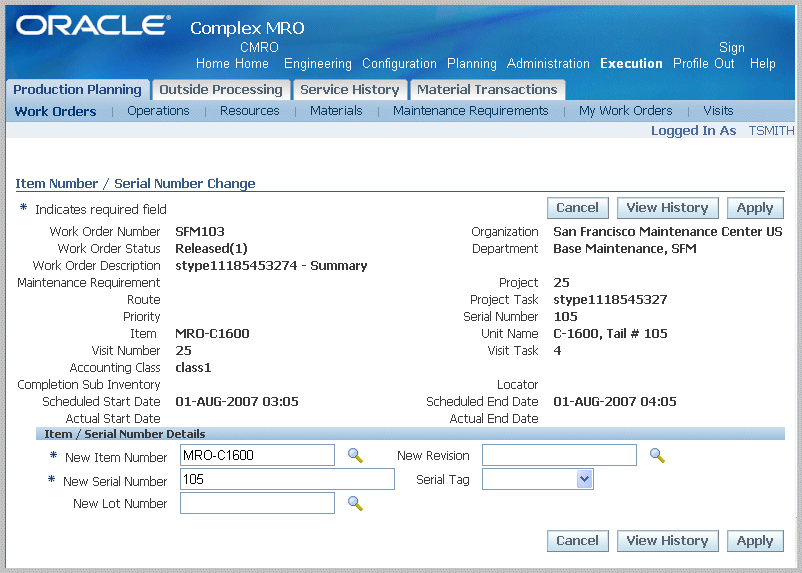
You can change both item numbers and serial numbers of a tracked configuration component, in the Item Number/Serial Number Change page. This process updates the applicable unit configuration, and the item instance.
To change item and serial numbers
-
Navigate to the Item Number/Serial Number Change page.
-
For changing items, select the applicable value in the New Item Number field. You can also select an applicable revision for the item.
-
For changing serial numbers, select the applicable value in the New Serial Number field. Optionally, you can also select a Serial Tag value.
-
For lot controlled items, you have the option to select a value in the New Lot Number field.
-
Select Apply to save your work.
Viewing and Updating Material Requirements
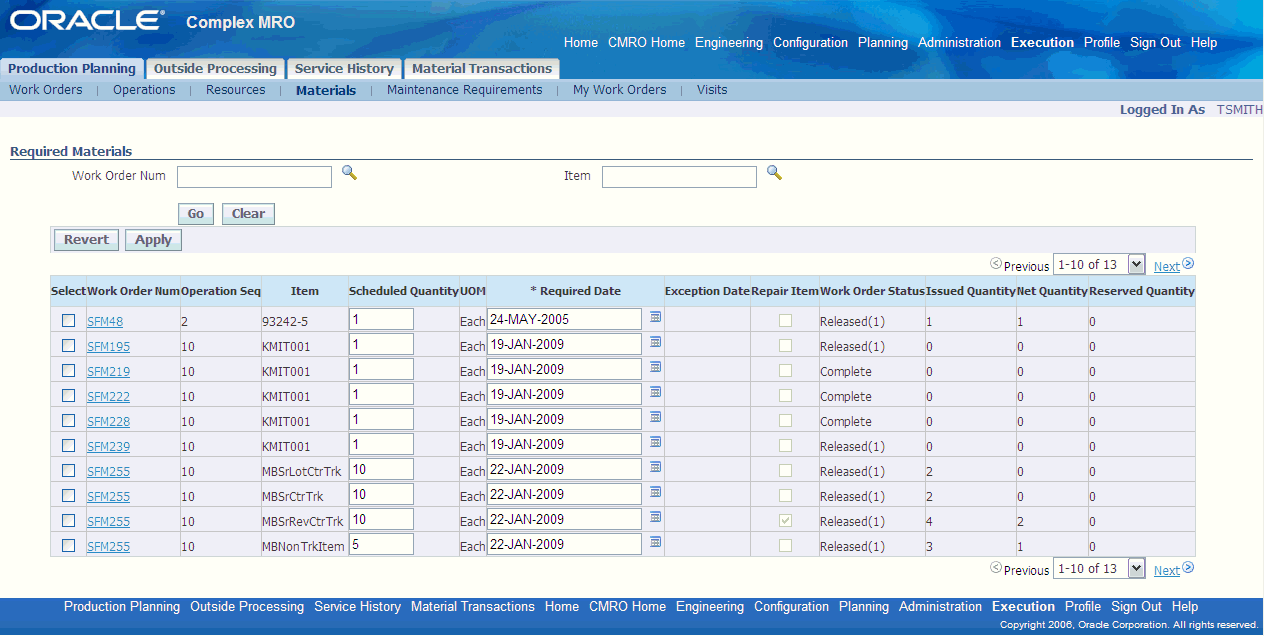
The Required Materials page provides an overview of all material requirements, across workorders. You can query for a workorder number and view material requirements for that particular workorder. Optionally, you can query for an item and view requirements against that item across all workorders. You can also update the quantity of item required and the date on which it is required.
Prerequisites
- A workorder with a status of Draft, Unreleased, Parts Hold, Hold, or Pending QA status must exist in the database. The WIP Mass Load Concurrent Program must be running. The operation must have a Uncomplete or Pending QA status.
To view material requirements
-
Navigate to the Workorder Overview page.
-
Select the Material tab. The Required Materials page appears.

-
To view material requirements across all workorders, click Go. Material requirements for all workorders and against all items appear in the Materials result table.
-
To view material requirements for a particular workorder number, enter information in the Workorder Number field and click Go. All requirements matching your search criterion appear in the Materials result table.
-
To view material requirements against a particular item, enter information in the Item field and click Go. All requirements matching your search criterion appear in the Materials result table.
-
To update the required quantity and/or the required date for a workorder, select the job number and enter information in the corresponding fields. Click Apply to save the changes.
-
To navigate to the Workorder Operations page, click the workorder number. The Workorder Operations page appears.
To update material requirements
-
Navigate to the Workorder Overview page.
-
Enter information in the fields for which you know the value then click Go. All workorders matching your search criteria appear in the Workorder List Results table.
-
Select the workorder number and choose Update Workorder from the drop-down menu. The Workorder Operations page appears.
-
Select Materials from the left-hand navigation bar. The Update Material Requirement page appears.
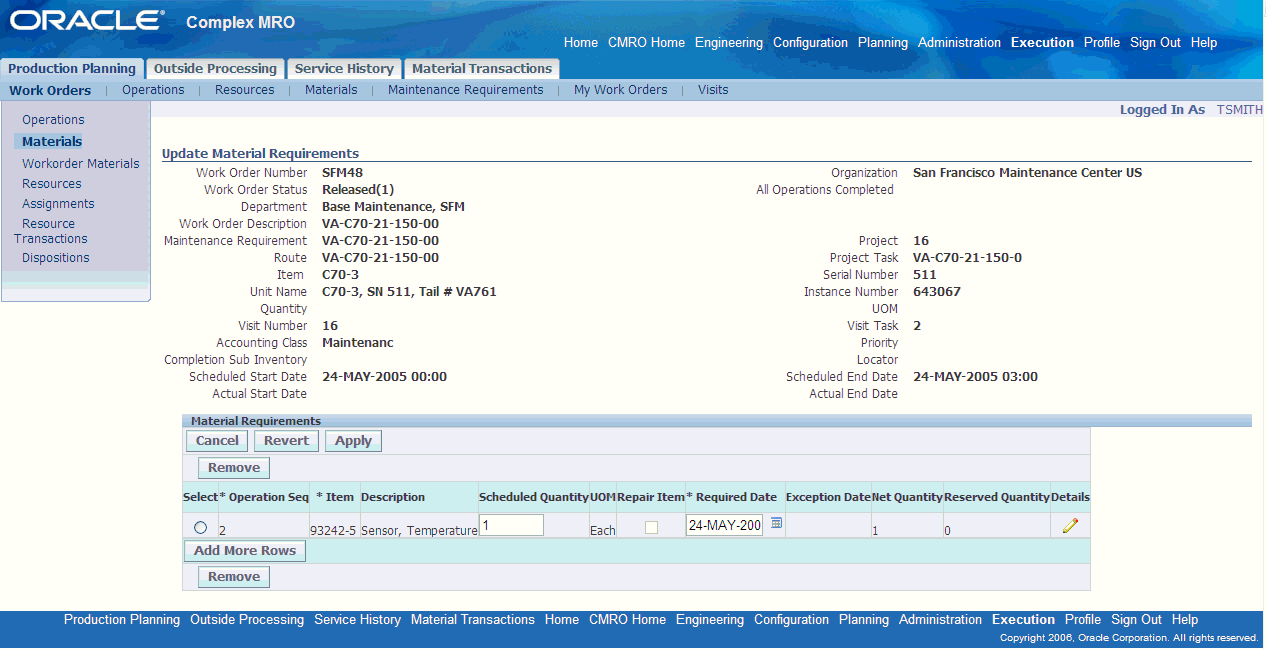
Use the information in the following table to update material requirements.
Field Name Description Operation Sequence The workorders operation sequence number. Item The Item Number for the requirement. Description The Description of the item defined. Required Quantity The quantity desired for the requirement. Scheduled Quantity The quantity scheduled by the Long Term Plan. UOM The unit of measure for the Item's quantity. Required Date The date on which the requirement is expected. Scheduled Date The date on which the quantity is scheduled by Long Term Plan. Issued Quantity The quantity issued to an operation (only for a work order in Released Status) -
You can then perform the following:
-
Select the Item, Required Quantity, and a Required Date and click Apply to save your changes.
-
Select the requirement and click Remove to remove the requirement.
-
Click Add More Rows to add additional requirements.
-
-
Click Cancel to cancel any changes.
Note: When changing an existing requirement defined in Route Management, the selection is limited to the alternates for the Item.
Viewing Assignments, Documents, and Resources
Viewing Employee Assignments
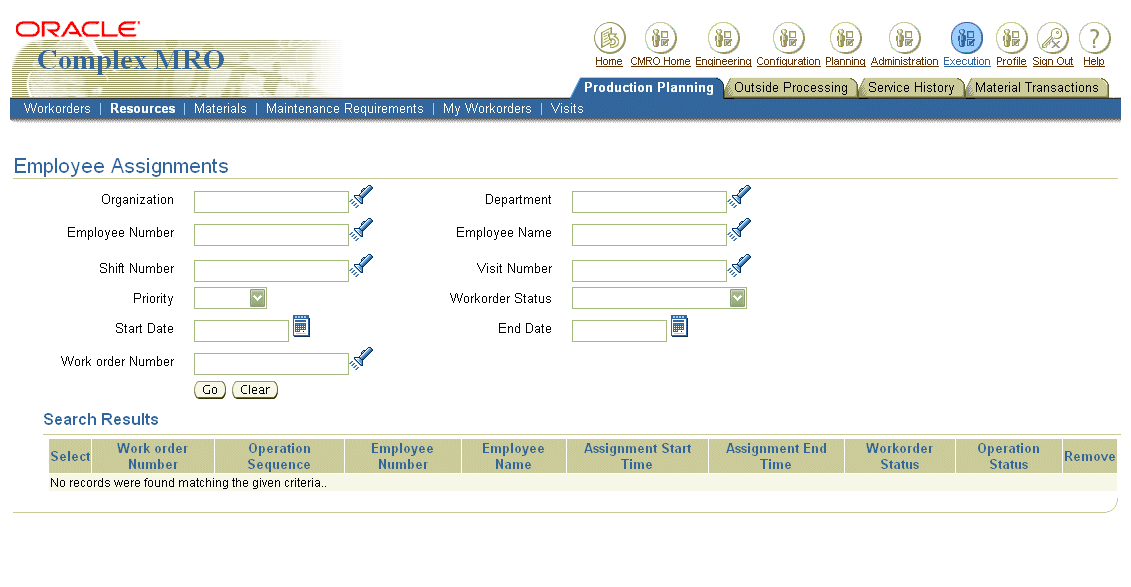
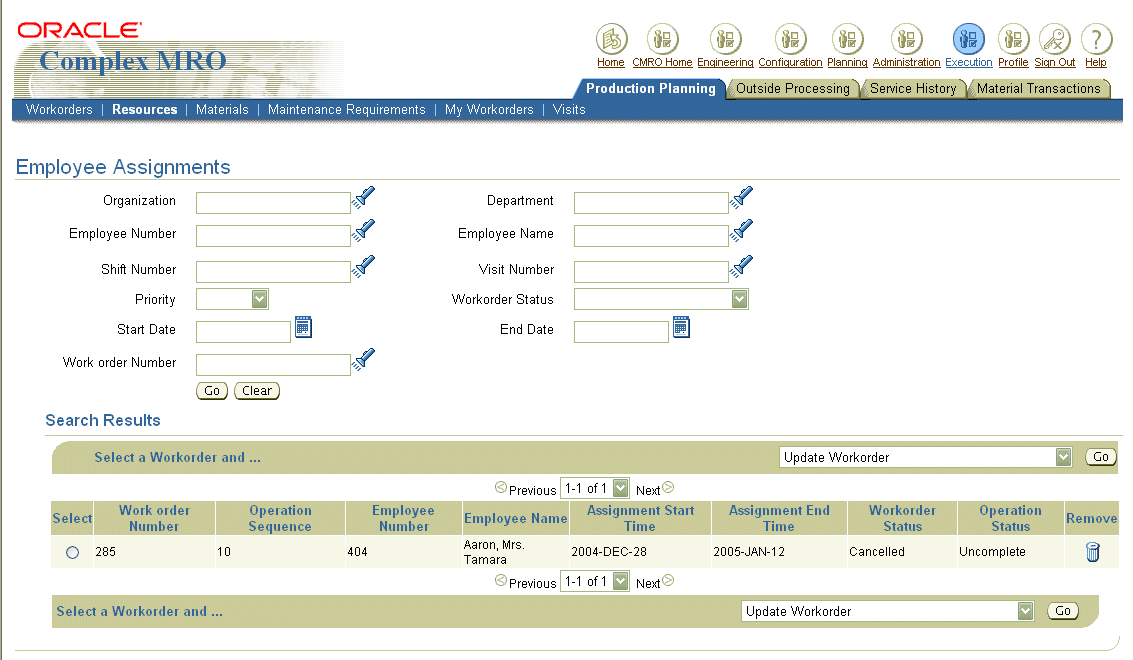
For a workorder or an associated operation, you can assign employee and machinery to the resource requirement. You can view these employee assignments, and perform all of the production functions applicable to the assignment and associated workorder, in the Search Employee Assignments page. You can search for employee assignments by the employee's name, number, the associated workorder job number, department, and other related criteria.
To view employee assignments
-
Navigate to the Workorder Overview page.
-
Select the Resources tab. The Employee Assignments page appears.
-
Enter information in the appropriate fields and select Go. All assignments matching your search criteria appear in the Results table.
-
You can select a workorder and perform the following actions, which are available as selections in a drop down menu:
-
Update Workorder
-
Resource Transactions
-
Perform Parts Change
-
View Documents
-
Complete Workorder
-
Complete Operation
-
Record Workorder QA Results
-
Record Operation QA Results
-
Sign Off Maintenance Requirements
-
Record Maintenance Requirement QA Results
-
View Resource Transactions
-
Create Service Requests
-
Viewing Documents
Documents may be associated with maintenance requirements, routes, and operations. You can view all the documents pertaining to work orders, workorder operations, and material requirements in the View Documents page.
To view documents associated with workorders
-
Navigate to the Workorder Overview page..
-
Enter information in the appropriate fields and select Go. All workorders matching your search criteria appear in the Workorder List Results table.
-
To view documents associated with a workorder's route, select the workorder and choose View Documents from the drop-down menu. The View Documents page appears, displaying the workorder details and the documents defined for the routes associated with the workorder.
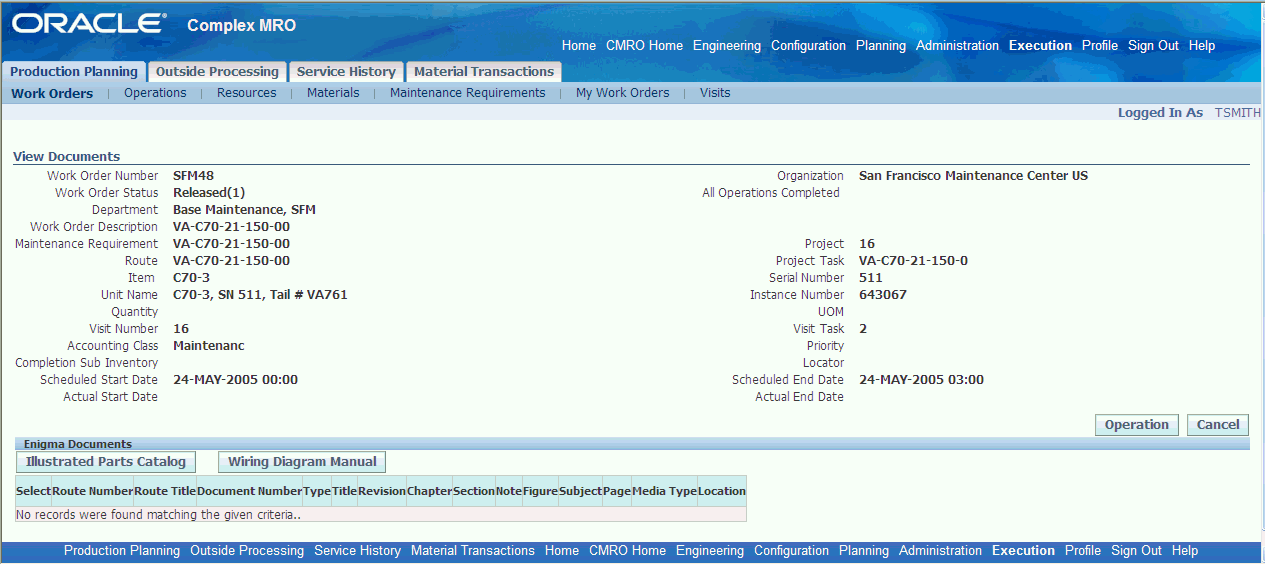
Enigma Integration displays buttons for viewing Wiring Diagram Manual (WDM) and Illustrated Parts Catalog (IPC) as applicable.
The following table provides information about fields in the View Documents page.
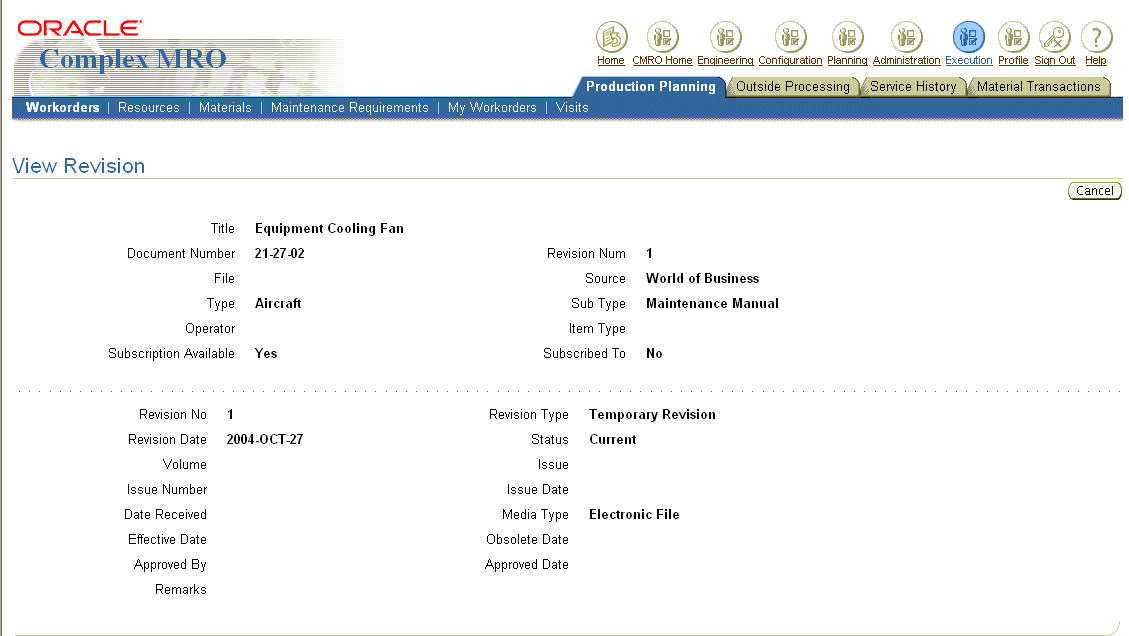
Description of fields in the View Documents page Field Name Description Route Number It is the user-assigned identifier for a maintenance route. Route Title It refers to the text description of the maintenance route. Document Number It contains a unique identifier, generated by the organization to identify a maintenance document. If you do not know the document number, enter the generic substitution meta character% in the field, and click on the LOV icon to launch the Select Doc Number page that displays all the document references in the database. Type Represents the major topic such as powerplant, fleet unit, and ground support equipment that is described by the document in question. Title Refers to the title of the maintenance document. Revision Is a field that holds a user-assigned document revision identifier. Chapter Refers to a specific chapter in the associated document. The value is defined by the user when the association is created. Section Refers to a specific section in the associated document. The value is defined by the user when the association is created. Note Refers to a specific note in the associated document. The value is defined by the user when the association is created. Figure Refers to a specific figure in the associated document. The value is defined by the user when the association is created. Subject Refers to a specific subject in the associated document. The value is defined by the user when the association is created. Page Refers to a specific page in the associated document. The value is defined by the user when the association is created. Select the document and click View Documents. You can view the details of the document in the View Revision page.
-
To view documents associated with the workorder's operations, click Operation.
-
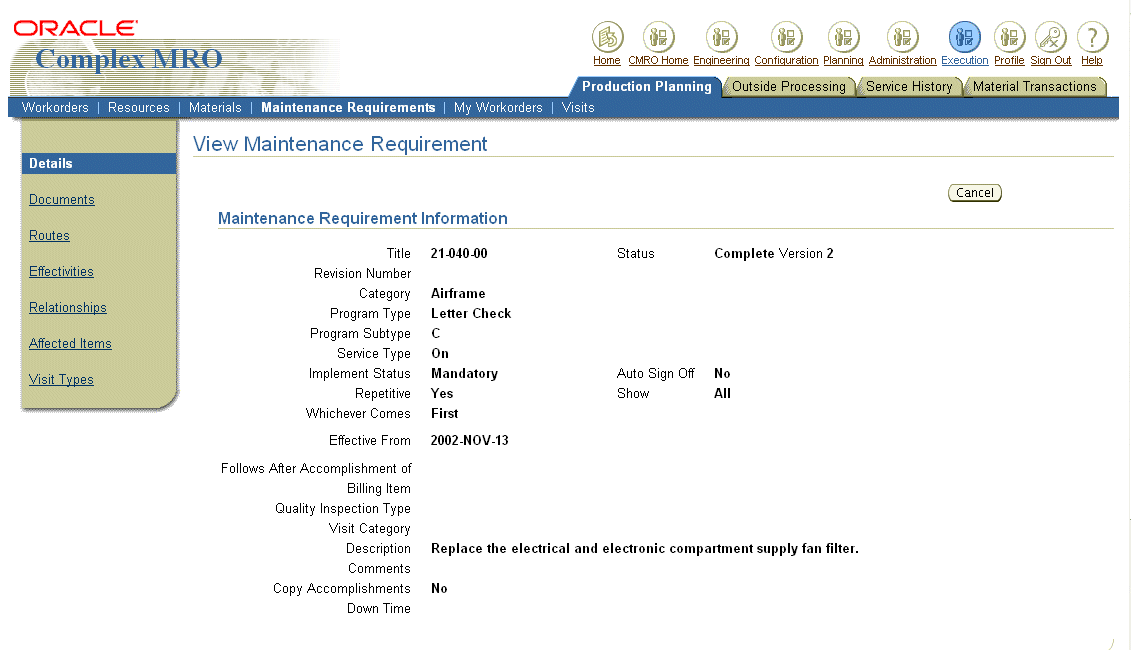
To view documents associated with maintenance requirements, select the Maintenance Requirement sub-tab under the Production Planning tab. The Search Maintenance Requirements page appears.
-
Enter your search criteria and click Go. The Maintenance Requirements matching your search criteria are displayed in the Maintenance Requirements Results table.
-
Click the Maintenance Requirement link to navigate to the View Maintenance Requirement page.
-
Click the Documents link in the side navigation menu. The View Attached Documents page appears, displaying the documents associated with the maintenance requirement.
Viewing Resource Requirements
A visit or workorder with associated resources must exist in the database in order to view resources.
To view resource requirements for a workorder
-
Find the workorder or operation you want to view dependencies for. See Finding Workorders.
-
Select the workorder, and choose Update Workorder from the drop-down menu. The Workorder Operations page appears displaying the relevant information for that workorder.
-
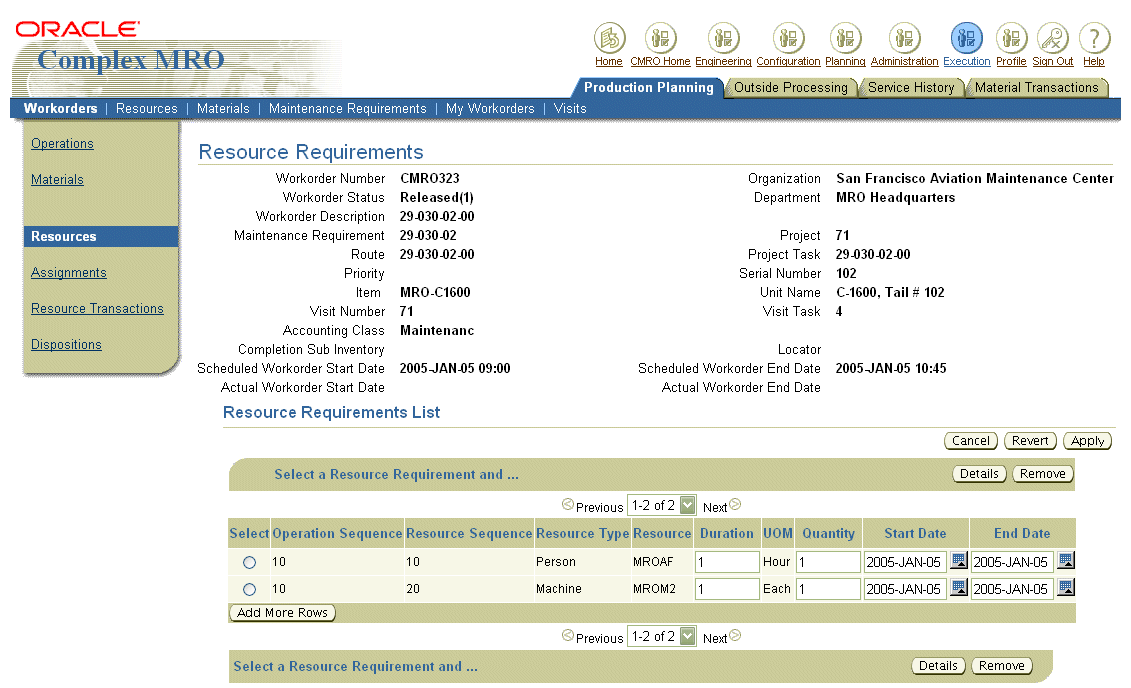
Select Resources from the left-hand navigation panel. The Resource Requirements page appears.
Resource Requirements page
