Managing Integrators
This chapter covers the following topics:
Managing Integrators
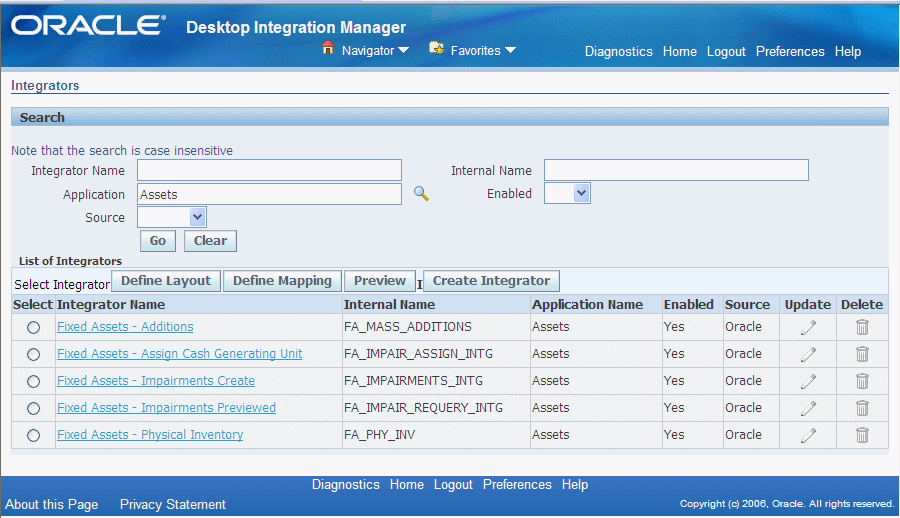
An integrator is a set of metadata that encapsulates all the information needed to integrate a particular Oracle E-Business Suite task with a desktop application. Use the Integrators page to view and manage the integrators defined for your Oracle E-Business Suite installation.
To manage integrators
-
Navigate to the Integrators page from the Oracle E-Business Suite Navigator by choosing either Desktop Integration Manager: Manage Integrators or a custom responsibility and menu path specified by your system administrator.
-
Search for the integrators you want to display. You can enter the following search criteria:
-
Integrator Name - Enter the display name of the integrator. You can enter a partial value to search for integrators whose names contain that value.
-
Internal Name - Enter the unique internal name of the integrator. You can enter a partial value to search for integrators whose names contain that value.
-
Application - Select the application that owns the integrator.
-
Enabled - Select Yes to search for integrators that are enabled or No to search for integrators that are disabled.
-
Source - Select Oracle to search for integrators seeded by Oracle E-Business Suite or Custom to search for custom integrators.
The search criteria fields are all case-insensitive.
Integrators Page
-
-
To view an integrator definition in read-only mode, choose the integrator name link for that integrator. See: Defining Integrators.
-
To update an integrator, choose the update icon for that integrator. See: Defining Integrators.
Note: You can only update custom integrators.
-
To delete an integrator, choose the delete icon for that integrator.
Note: You can only delete custom integrators.
-
To define a layout for an integrator, select the integrator and select the Define Layout button. See: Defining Layouts, Oracle Web Applications Desktop Integrator Implementation and Administration Guide.
-
To define a mapping for an integrator, select the integrator and select the Define Mapping button. See: Defining Mappings, Oracle Web Applications Desktop Integrator Implementation and Administration Guide.
-
To test how an integrator creates a desktop document, select the integrator and select the Preview button. Oracle Web Applications Desktop Integrator then displays the Create Document page flow, with the specified integrator selected, to let you finish creating the preview document. See: Creating a Spreadsheet, Oracle Web Applications Desktop Integrator Implementation and Administration Guide.
-
To define a new integrator, select the Create Integrator button. See: Defining Integrators.
Defining Integrators
Use the integrator definition wizard to create a new integrator, update an existing integrator, or view the definition for an existing integrator.
Note: You can only update custom integrators.
To define an integrator
-
Navigate to the integrator definition wizard by one of the following methods:
-
Choose the Create Integrator button in the Integrators page.
-
Choose the update icon in the Integrators page.
-
From the Oracle E-Business Suite Navigator, choose either Desktop Integration Manager: Create Integrator or a custom responsibility and menu path specified by your system administrator.
If you are updating an existing integrator, then the fields in the wizard are populated with previously defined information for the selected integrator.
-
-
In the first step of the wizard, define the basic properties of the integrator. See: To define integrator information.
-
If you want to use this integrator to upload data from a desktop document to Oracle E-Business Suite, define an interface for the integrator in the second step of the wizard. See: To define interfaces.
-
In the third step of the wizard, optionally define contents for the integrator. See: To define contents.
-
If you want to use this integrator to upload data from a desktop document to Oracle E-Business Suite, define the uploader for the integrator in the fourth step of the wizard. See: To define an uploader.
-
If you want to use this integrator to import uploaded data from Oracle E-Business Suite interface tables to application base tables, define the importer for the integrator in the fifth step of the wizard. See: To define an importer.
To view an integrator definition
-
Navigate to the integrator definition wizard by choosing the integrator name link in the Integrators page. The integrator definition appears in the wizard in read-only mode.
-
Use the Next and Back buttons to navigate among the pages of the wizard. For more information about the fields displayed in each page, see: To define integrator information, To define interfaces, To define contents, To define an uploader, and To define an importer.
-
Choose the Cancel button in the Integrator Information, Interfaces, Contents, Uploader, or Importer page to return to the Integrators page.
To define integrator information
Integrator Information Page
In the Enter Integrator Information region of the Integrator Information page, enter the display name of the integrator.
-
Enter a unique internal name for the integrator. The internal name can include only the following characters:
-
Uppercase letters from A through Z
-
Numerals from 0 through 9
-
The underscore character (_)
Oracle E-Business Suite Desktop Integration Framework uses the internal name of the integrator to generate internal names for the supporting objects associated with the integrator, such as interfaces, contents, layouts, and mappings.
Note: To preserve consistency, you cannot update the internal name of an existing integrator.
-
-
Select the application that owns the integrator.
Note: To preserve consistency, you cannot update the application of an existing integrator.
-
If you want to use this integrator only for exporting data from Oracle E-Business Suite to a desktop document, select the Reporting Only option. In this case the document serves as a report of the Oracle E-Business Suite data that can be viewed in the desktop application. If you want to use this integrator to upload data from a desktop document to Oracle E-Business Suite, do not select this option.
-
In the Enabled field, select Yes to enable this integrator or No to disable this integrator. If you disable an integrator, its definition remains available for reference, but you cannot use it to define layouts or mappings, create a document, or download or upload Oracle E-Business Suite data.
-
If you want your users to be able to select this integrator in the Create Document page flow within Oracle Web Applications Desktop Integrator, select the Display in Create Document Page option. If you will include the functionality to create documents within the functional page flow of your own application, then you do not need to select this option.
-
To specify parameters for the integrator, expand the Integrator Parameters region. See: Managing Parameters.
-
Select the server-side upload parameter list.
-
Select the document parameter list for use in the Create Document page flow in Oracle Web Applications Desktop Integrator.
-
Select the session parameter list.
-
The Security Rules region displays a list of form functions through which the integrator can be accessed. A user must have menu access to at least one of these functions in order to use this integrator, including creating a desktop document, using a list of values based on Oracle E-Business Suite data within the desktop document, and uploading data to Oracle E-Business Suite. To add a function to the list, select the function in the Function field and select the Add button. You can repeat this step to allow access through additional functions.
-
Select Next.
-
If you did not select the Reporting Only option, then the integrator definition wizard displays the Interfaces page. See: To define interfaces.
-
If you selected the Reporting Only option, then you do not need to define an interface. In this case the integrator definition wizard proceeds directly to the Contents page. See: To define contents.
-
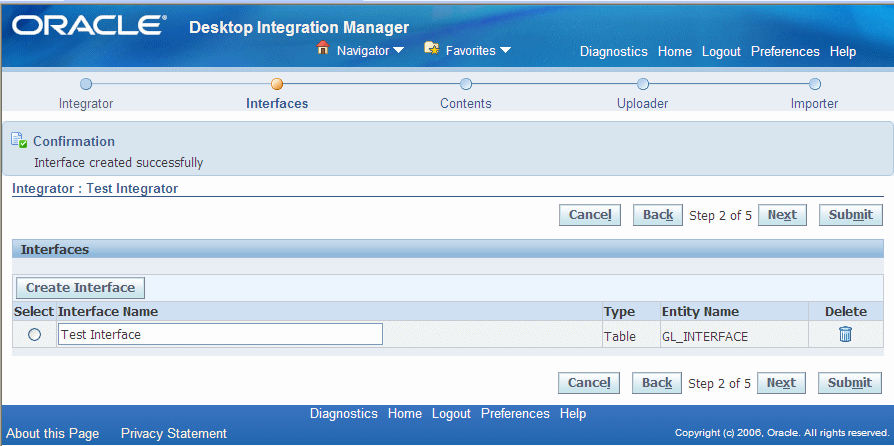
To define interfaces
An interface is a set of metadata that determines how the integrator uploads data from a desktop document to Oracle E-Business Suite. Use the Interfaces page of the integrator definition wizard to create and manage an interface.
Important: Oracle Web Applications Desktop Integrator currently supports only one interface per integrator. Consequently, when you define a custom integrator, you should create only one interface in the Interfaces page.
Note: If you selected the Reporting Only option while defining the integrator information, do not manually define an interface for the integrator. Oracle E-Business Suite Desktop Integration Framework automatically defines a default placeholder interface for reporting-only integrators.
Interfaces Page
-
If an interface is already defined for this integrator, the Interfaces page displays the list of interfaces.
-
To update the name of an interface, enter the new name in the Interface Name field.
-
To delete an interface, choose the delete icon for that interface.
-
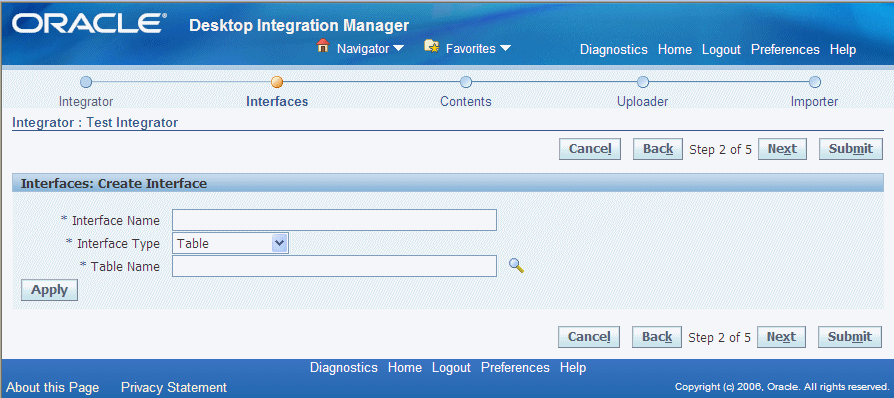
To create a new interface, select the Create Interface button. The Create Interface region appears.
If no interface has yet been defined for the integrator, then the Interfaces page displays the Create Interface region in place of the interfaces list.
Create Interface Region
-
-
In the Create Interface region, enter the interface name.
-
Select the interface type, either table, API - procedure, or API - function.
-
For a table interface, select the table name. Oracle E-Business Suite Desktop Integration Framework creates an interface attribute for each column in the table.
-
For a procedure interface, enter the package name and procedure name. Oracle E-Business Suite Desktop Integration Framework creates an interface attribute for each input argument in the procedure. You can also optionally specify whether the procedure returns an error message or an FND message code if it encounters an error.
-
For a function interface, enter the package name and function name. Oracle E-Business Suite Desktop Integration Framework creates an interface attribute for each input argument in the function. If the function returns more details about any error that it encounters, select the Returns Error Information option. You can also optionally specify whether the function returns an error message or an FND message code if it encounters an error.
-
Choose Apply.
-
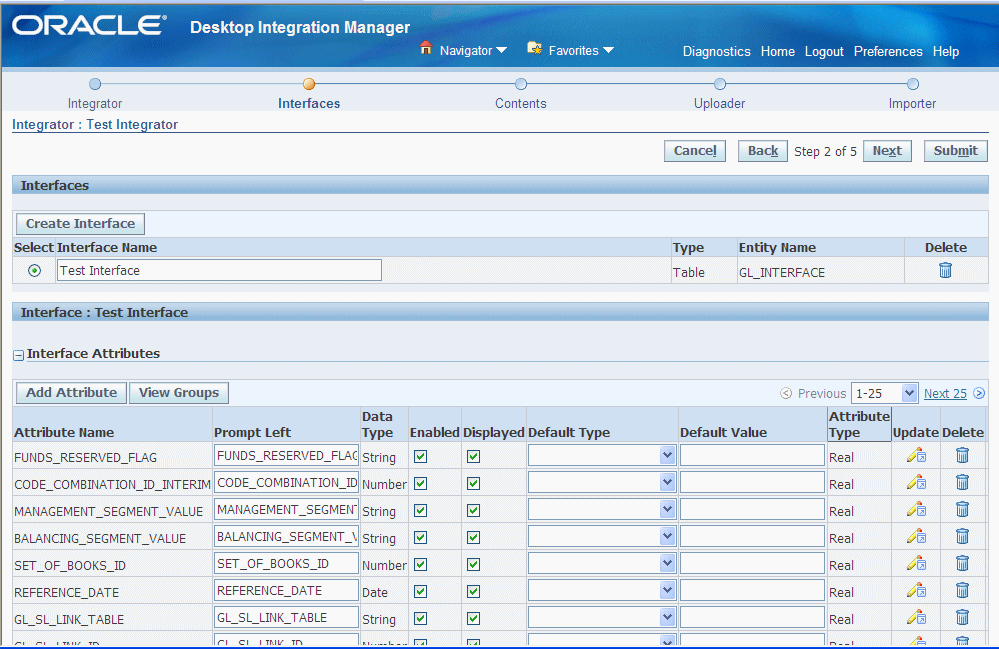
In the Interfaces page, select an interface in the list to display its details, including interface attributes.
Interfaces Page with Interface Attributes Region
-
For a procedure interface, you can optionally update whether the procedure returns an error message or an FND message code if it encounters an error.
-
For a function interface, you can optionally update whether the function returns more details about any error that it encounters and whether the function returns an error message or an FND message code if it encounters an error.
-
-
The Interface Attributes region initially displays the attributes that were automatically created for the interface based on the specified table columns or API arguments. These attributes are referred to as real interface attributes. To define an additional custom interface attribute that can appear in a layout, choose Add Attribute. See: To define an interface attribute.
Note: If you want to define an attribute group, you should define a custom attribute to use as the parent attribute for the group.
-
You can update some attribute details directly in the Interface Attributes region.
-
Enter a prompt to appear to the left of the attribute if it appears in the header region of a document. This prompt is also used as the display name of the attribute.
-
Select whether the attribute is enabled for use in a layout.
-
Select whether the attribute is available for display in a layout.
-
Optionally select the source type from which the default value for the attribute is derived, either Constant, Environment Variable, Parameter, Profile Option, SQL Query, or Lookup.
-
Enter a default value for the attribute corresponding to the selected type.
You can also choose the update icon for an attribute to update additional attribute details. See: To update an interface attribute.
-
-
To delete an interface attribute, choose the delete icon for that attribute.
-
If validation of one interface attribute depends on the value of another attribute, or if several attributes are validated the same way, you can associate those attributes with each other by defining an attribute group and perform validation for all attributes in the group together. To view and manage groups, choose View Groups. See: To manage interface attribute groups.
-
To proceed to the Contents page, select Next, or to save this integrator definition without defining contents or an uploader or importer, select Submit.
To define an interface attribute
Interface Attribute Definition Page
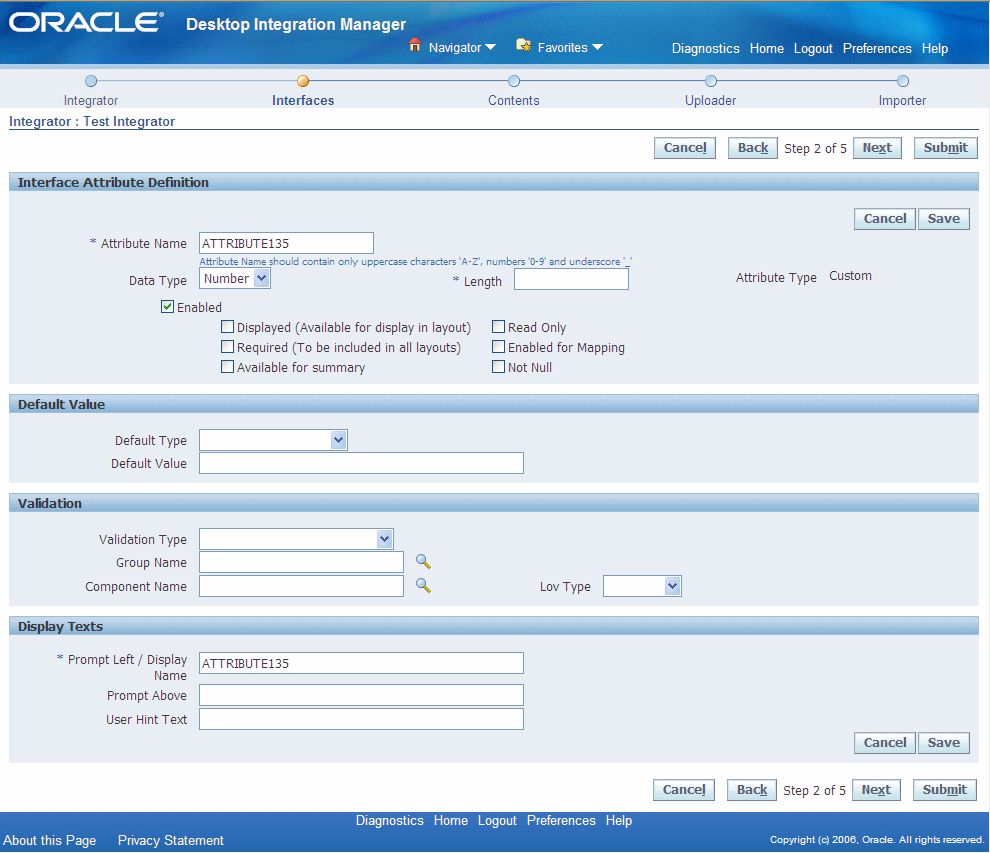
In the Interface Attribute Definition page, enter a unique internal name for the attribute. The name can include only the following characters:
-
Uppercase letters from A through Z
-
Numerals from 0 through 9
-
The underscore character (_)
-
-
Select the attribute data type, either number, string, or date.
-
Enter the size of the interface table column or the character length of the interface API parameter to which this attribute corresponds.
-
Select whether the attribute is enabled for use in a layout.
-
Select whether the attribute is available for display in a layout.
-
Select whether the attribute is required to be included in all layouts for this integrator.
-
Select whether the attribute can be summed to form a total value.
-
Select whether the attribute is read-only. A read-only attribute is placed in the context section of the desktop document and users cannot change its value.
-
Select whether the attribute is enabled for use in a mapping, to be mapped to a content column.
-
Select whether the interface table column or the interface API parameter to which this attribute corresponds must not be null.
-
Optionally select the source type from which the default value for the attribute is derived, either Constant, Environment Variable, Parameter, Profile Option, SQL Query, or Lookup.
Note: The default value for an attribute is not inserted into the document when the document is created. Instead, if no other value has been specified for the attribute, the default value is derived and inserted when the user performs an upload.
-
Enter a default value for the attribute corresponding to the selected type.
-
Select the validation type for the attribute, either Descriptive Flexfield, Descriptive Flexfield Context, Descriptive Flexfield Segment, Group, Java, Key Flexfield, Key Flexfield Segment, or Table. If you only want to validate the data type, length, and not null requirement for the attribute, then you can leave the validation type blank.
-
If the attribute should be validated as part of an attribute group, select the group name. See: To manage interface attribute groups.
-
If the attribute should use a list of values defined in a component, select the component name. See: Managing Components.
-
Select the type of list of values that the component uses, either None, Pop List for a predefined static set of values, or Standard for a dynamic set of values based on Oracle E-Business Suite data.
-
Enter a prompt to appear to the left of the attribute if it appears in the header region of a document. This prompt is also used as the display name of the attribute.
-
Optionally enter a prompt to appear above the attribute if it appears in the lines region of a document.
-
Optionally enter hint text to provide users further guidance on the attribute. The hint text appears between the header region and the lines region in the document.
-
Choose Save.
To update an interface attribute
Use the Interface Attribute Definition pop-up window to update attribute details that are not displayed in the Interfaces page.
Note: To preserve consistency, you cannot update the interface name, data type, length, or attribute type.
-
Select whether the attribute is required to be included in all layouts for this integrator.
-
Select whether the attribute can be summed to form a total value.
-
Select whether the attribute is read-only. A read-only attribute is placed in the context section of the desktop document and users cannot change its value.
-
Select whether the attribute is enabled for use in a mapping, to be mapped to a content column.
-
Select whether the interface table column or the interface API parameter to which this attribute corresponds must not be null.
-
Select the validation type for the attribute, either Descriptive Flexfield, Descriptive Flexfield Context, Descriptive Flexfield Segment, Group, Java, Key Flexfield, Key Flexfield Segment, or Table. If you only want to validate the data type, length, and not null requirement for the attribute, then you can leave the validation type blank.
-
If the attribute should be validated as part of an attribute group, select the group name. See: To manage interface attribute groups.
-
If the attribute should use a list of values defined in a component, select the component name. See: Managing Components.
-
Select the type of list of values that the component uses, either None, Pop List for a predefined static set of values, or Standard for a dynamic set of values based on Oracle E-Business Suite data.
-
Optionally enter a prompt to appear above the attribute if it appears in the lines region of a document.
-
Optionally enter hint text to provide users further guidance on the attribute. The hint text appears between the header region and the lines region in the document.
-
Choose Save.
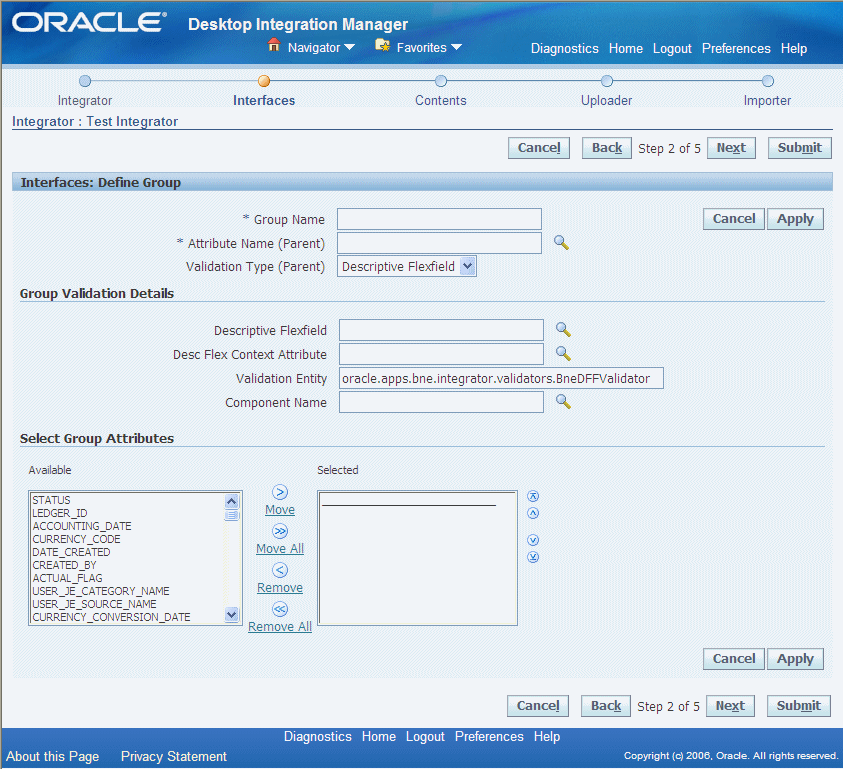
To manage interface attribute groups
The Interfaces: View Groups region displays a list of the interface attribute groups defined for this interface.
Interfaces: View Groups Region

To define a new group, choose Define Group.
Interfaces: Define Group Region
-
In the Interfaces: Define Group region, enter a unique name for the group.
-
Select the name of the attribute to use as the parent attribute for the group. The parent attribute should be a custom attribute that is not uploaded. Instead, it serves as a placeholder for validation for the group.
-
Select the validation type associated with the parent attribute, either Descriptive Flexfield, Group, Java, or Key Flexfield.
-
For descriptive flexfield validation, specify the following validation details.
-
Select the descriptive flexfield to use for validation.
-
Select the interface attribute that corresponds to the context for the descriptive flexfield
-
Enter the validation entity for the group. The default validation entity is oracle.apps.bne.integrator.validators.BneDFFValidator.
-
Select the component name that defines the list of values to use for validation. See: Managing Components.
-
-
For group validation or Java validation, specify the following validation details.
-
Enter the validation entity for the group.
-
Select the component name that defines the list of values to use for validation. See: Managing Components.
-
-
For key flexfield validation, specify the following validation details.
-
Select the key flexfield to use for validation.
-
Enter the validation entity for the group. The default validation entity is oracle.apps.bne.integrator.validators.BneKFFValidator.
-
Select Yes or No to indicate whether the key flexfield segment values should be concatenated.
-
Select the component name that defines the list of values to use for validation. See: Managing Components.
-
-
Select the attributes you want in the Available list and move them to the Selected list.
-
Choose Apply.
-
In the Interfaces: View Groups region, to display the attributes that belong to a group, choose Show in the Details column for the group.
-
To remove an attribute from the group, choose the Ungroup icon for the attribute in the group attributes list.
-
To add more attributes to the group, choose the Add to Group icon for the group in the list of groups.
-
After you finish managing interface attribute groups, choose Return to Interfaces.
To define contents
A content is a set of metadata that determines what data the integrator uses to populate the desktop document that it creates. Use the Contents page of the integrator definition wizard to manage and create contents.
-
For a reporting-only integrator, you must define at least one SQL query or Java content to specify the Oracle E-Business Suite data that the integrator downloads into the desktop document.
-
For an integrator that can upload data to Oracle E-Business Suite, you can optionally define SQL query or Java contents that download data from Oracle E-Business Suite into the document, or text file contents that populate the document with data from the specified text file. You can also choose not to define any contents to create a blank document. In this case users must enter all data into the document manually.
Contents Page
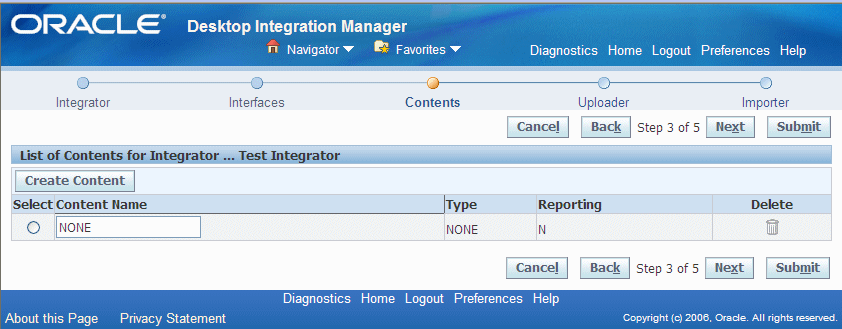
-
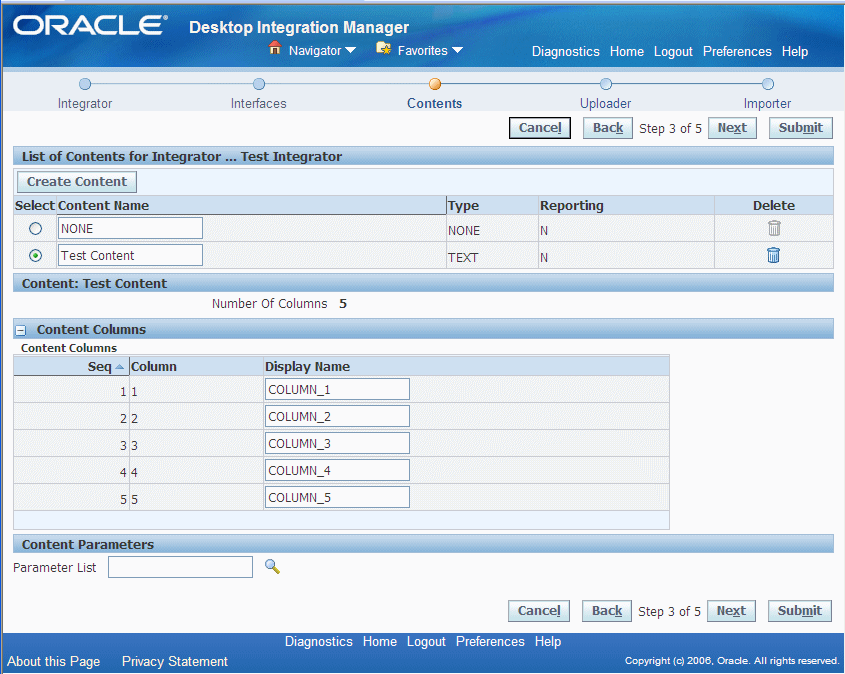
The Contents page displays the list of contents defined for the integrator.
-
To update the name of a content, enter the new name in the Content Name field.
-
To delete a content, choose the delete icon for that content.
-
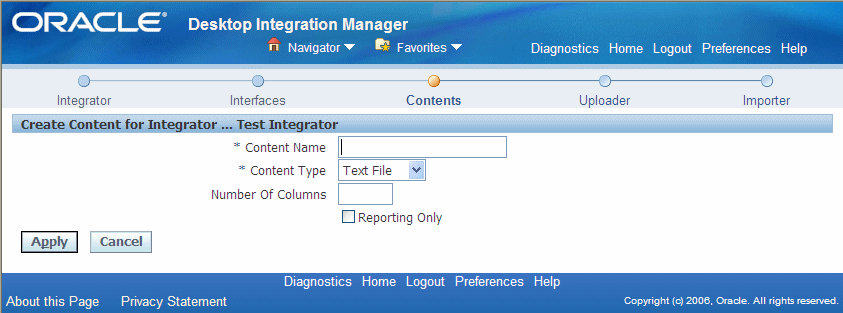
To create a new content, select the Create Content button. The Create Content for Integrator region appears.
Create Content for Integrator Region
-
-
In the Create Content for Integrator region, enter the content name.
-
Select the content type, either Java, SQL query, or text file.
-
For a Java content, enter the Java class that returns the Oracle E-Business Suite data you want to download, and the number of arguments for that Java class. Oracle E-Business Suite Desktop Integration Framework creates a content column for each argument. You can include logic in your Java class to perform additional processing on the downloaded data before inserting the data into the desktop document.
-
For a SQL query content, enter in the Query field the query code that selects the Oracle E-Business Suite data you want to download. Choose the Test Query button to validate the query syntax. Oracle E-Business Suite Desktop Integration Framework creates a content column for each column selected in the query.
-
For a text file content, enter the number of columns that the text file contains. Oracle E-Business Suite Desktop Integration Framework creates a content column for each column in the text file.
-
-
If you want to use this content only for downloading data from Oracle E-Business Suite to the desktop, select the Reporting Only option.
-
Choose Apply.
-
In the Contents page, select a content in the list to display its details including the content columns and parameter list.
-
Expand the Content Columns region to view the columns that were automatically created for the content. You can optionally update the display name for each column.
Contents Page with Content Columns Region
-
If the content requires additional parameters, select a parameter list in the Content Parameters region. See: Managing Parameters.
-
To proceed to the Uploader page, select Next, or to save this integrator definition without defining an uploader or importer, select Submit.
To define an uploader
An uploader is a set of metadata that determines what options are available to a user in the upload parameters window when the user uploads data from a desktop document to Oracle E-Business Suite. Use the Uploader page of the integrator definition wizard to create and manage the uploader for an integrator.
Note: If you selected the Reporting Only option for this integrator, then you do not need to define an uploader.
-
If an uploader has not yet been defined for the integrator, then the Uploader page displays the Create Uploader List region.
Create Uploader List Region

In the Uploader field, select the method by which to create the uploader.
-
None - Select this option if you do not want to use this integrator to upload data from a desktop document to Oracle E-Business Suite. In this case no uploader is created. To proceed to the Importer page, select Next, or to save this integrator definition without defining an importer, select Submit.
-
From Template - Use the standard template provided by Oracle E-Business Suite Desktop Integration Framework as the basis for the uploader definition. After selecting this option, choose the Create button to create the uploader.
-
Copy From Existing Definition - Use the definition of an existing uploader from another integrator as the basis for the uploader definition. After selecting this option, select the existing uploader definition that you want to copy. Then choose the Create button to create the uploader.
Note: You can copy an uploader definition only from another integrator that belongs to the same application as the integrator you are defining.
Uploader Page
-
-
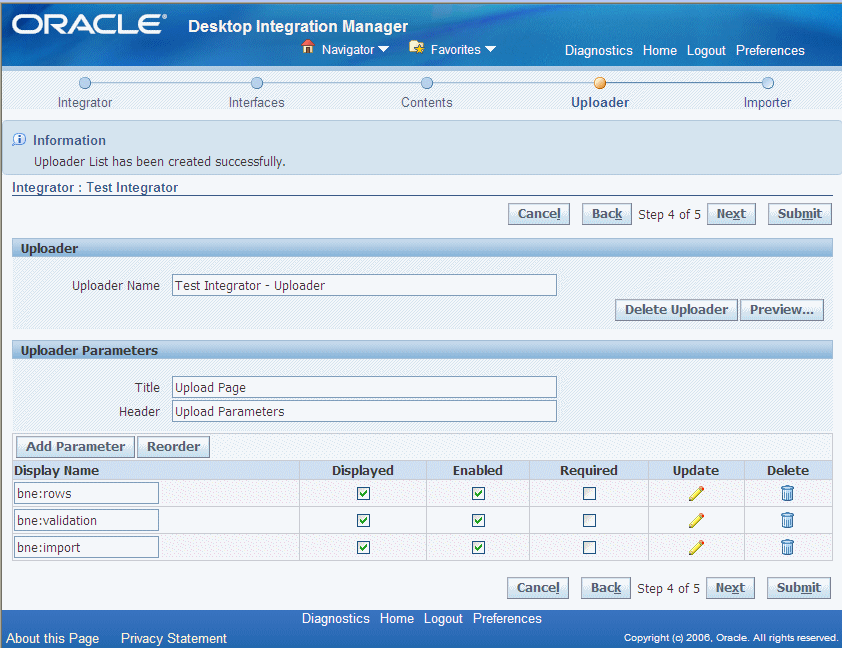
In the Uploader page, specify the display name of the uploader. The default name is <Integrator Name> - Uploader. You can optionally enter a different name.
-
To delete the existing uploader definition for the integrator, choose the Delete Uploader button. The Uploader page then displays the Create Uploader List region to let you either create a new uploader or proceed without defining an uploader.
-
To preview how the upload parameters window will be displayed to users based on the current uploader definition, choose the Preview button.
-
In the Uploader Parameters region, specify the title that should appear in the browser title bar of the upload parameters window. The default title is Upload Page. You can optionally enter a different title.
-
Specify the header that should appear within the upload parameters window. The default header is Upload Parameters. You can optionally enter a different header.
-
If you created this uploader using the standard template, then Oracle E-Business Suite Desktop Integration Framework automatically creates the following parameters:
-
Rows to Upload (bne:rows) - Determines whether to upload all rows in the spreadsheet, or only those rows marked with an upload flag. Oracle Web Applications Desktop Integrator marks all changed rows with an upload flag.
-
Validate Before Upload (bne:validation) - Determines whether to validate data before uploading the data to Oracle E-Business Suite.
-
Automatically Submit Import (bne:import) - Determines whether to submit an import process to move the uploaded data from Oracle E-Business Suite interface tables to base application tables automatically after the upload. If you include this parameter, then you should define an importer for this integrator to specify the import process that will be submitted.
If you created this uploader as a copy of an existing uploader definition, then Oracle E-Business Suite Desktop Integration Framework automatically creates copies of all the parameters defined for the existing uploader.
You can update or delete any of the automatically created parameters or define additional parameters as needed.
-
-
You can update some parameter details directly in the Uploader Parameters region.
-
Enter the display name for the parameter.
-
Select whether the parameter is displayed in the upload parameters window.
-
Select whether the parameter is enabled for users to enter a value in the upload parameters window.
-
Select whether users are required to enter a value for the parameter in the upload parameters window.
You can also choose the update icon for a parameter to update additional parameter details. See: To define an upload parameter.
-
-
To delete a parameter, choose the delete icon for that parameter.
-
To define a new upload parameter, choose the Add Parameter button. See: To define an upload parameter.
-
To change the order in which the parameters appear in the upload parameters window, choose the Reorder button. Select one or more parameters in the list, and use the arrow buttons to move those parameters to the desired position. Then choose Apply.
Note: You can only reorder parameters when the list contains two or more parameters.
-
To proceed to the Importer page, select Next, or to save this integrator definition without defining an importer, select Submit.
To define an upload parameter
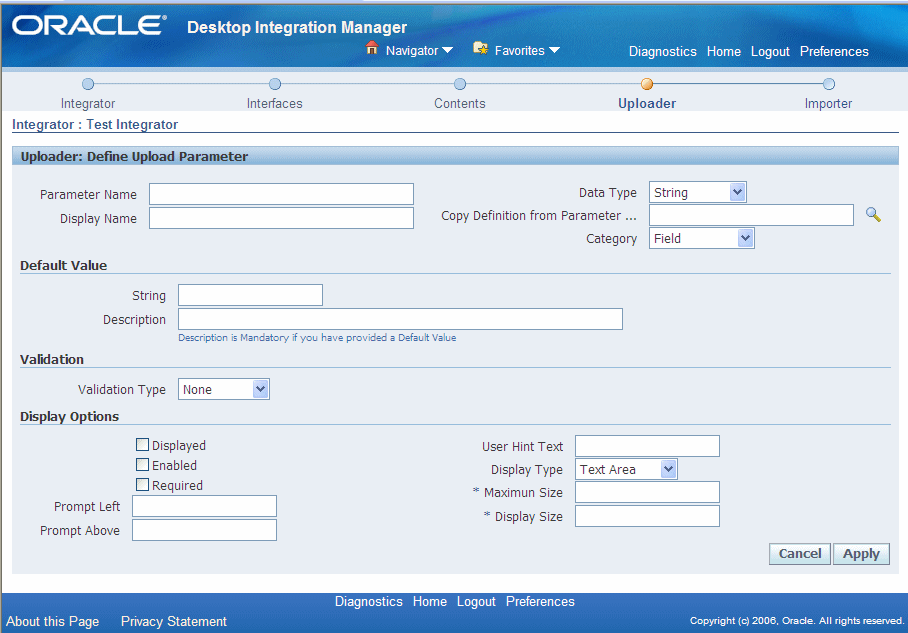
Uploader: Define Upload Parameter Page
-
In the Uploader: Define Upload Parameter page, optionally select an existing parameter definition to copy. The remaining fields in the page then display the values copied from that parameter. You can update these values as needed.
-
Enter the display name for the parameter.
-
Select the data type of the parameter: String, Number, Date, Boolean, or Key Flexfield.
-
Select the category to which the parameter belongs.
-
Miscellaneous
-
Position
-
Appearance
-
Behavior
-
Data
-
Field
-
-
Optionally enter a default value of the appropriate data type for the parameter.
-
For Boolean parameter, select either Yes or No as the default value.
-
For a key flexfield parameter, select the flexfield structure. The Default Value region displays the ID of the application to which the flexfield belongs and the numerical ID for the flexfield.
-
-
If you entered a default value, enter a description for that value.
-
Select the validation type for the parameter: None, Value Set, Fnd Lookup, or Bne Query.
-
Depending on the selected validation type, enter the value set, lookup type, or SQL query against which you want to validate the parameter value.
For a SQL query, select whether you want to use a simple or complex query.
-
For a simple query, you can enter the following common query details and let Oracle E-Business Suite Desktop Integration Framework generate the complete query syntax for you.
-
A list of one or more tables from which to select data, separated by commas
-
The ID column to select, and an alias for that column
-
The meaning column to select, and an alias for that column
-
The description column to select, and an alias for that column
-
A list of additional columns to select
-
A WHERE clause that specifies the conditions defining the data to select
-
A list of the columns by which the query results should be ordered
-
-
For a complex query, you must enter the complete query syntax yourself.
After entering the query, choose the Validate Query button to validate the query syntax.
-
-
Select whether the parameter is displayed in the upload parameters window.
-
Select whether the parameter is enabled for users to enter a value in the upload parameters window.
-
Select whether users are required to enter a value for the parameter in the upload parameters window.
-
Optionally enter a prompt to appear to the left of the parameter.
-
Optionally enter a prompt to appear above the parameter.
-
Optionally enter a hint to display to provide users further guidance on the parameter.
-
Select the display type for the parameter.
-
For a string parameter, you can select Check Box, Radio Button, List Box, Text Area, or Password.
-
For a number or date parameter, you can select Radio Button, List Box, Text Area, or Password.
-
For a Boolean parameter, you can select Check Box, Radio Button, List Box, or Text Area.
-
A key flexfield parameter must use the Text Area display type.
-
-
If you selected the display type Radio Button, select whether the radio buttons should be displayed in a vertical or horizontal style.
-
Enter the maximum size for the parameter value.
-
Enter the display size for the parameter value. The display size must be equal to or less than the maximum size.
-
Choose Apply.
To define an importer
An importer is a set of metadata that determines how Oracle Web Applications Desktop Integrator moves uploaded data from Oracle E-Business Suite interface tables to base application tables. Use the Importer page of the integrator definition wizard to define the importer for an integrator.
Ensure that you define the uploader for an integrator before defining an importer. Additionally, ensure that you define the Automatically Submit Import (bne:import) upload parameter within the uploader to enable the import process to be submitted automatically after the upload.
Note: If you selected the Reporting Only option for this integrator, then you do not need to define an uploader.
Importer Page: Importer Type
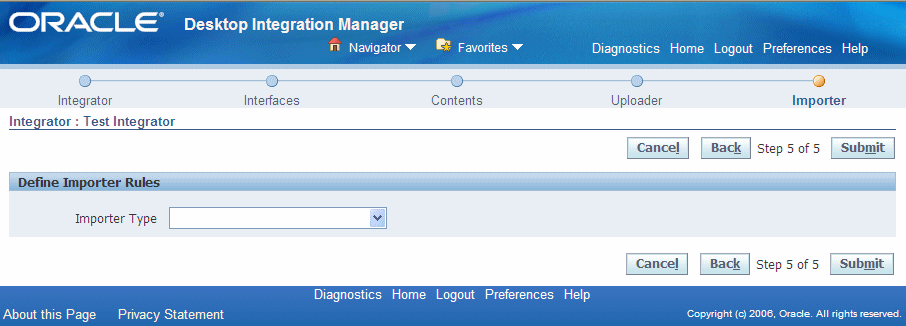
-
In the Importer page, select the importer type.
-
Asynchronous concurrent request - Oracle Web Applications Desktop Integrator submits the specified concurrent program after completing the upload and returns the concurrent request ID to the user, but does not wait for the import program to complete. This importer type reduces user wait time by deferring the import process, and gives system administrators more flexibility in load balancing the resources involved in importing data. However, users may need to verify later that the import completed successfully.
If you select this importer type, it is recommended that you define pre-import rules to validate the data at the time of upload. If the pre-validation fails, then Oracle Web Applications Desktop Integrator does not upload the data to the interface tables or invoke the import program, but returns an error message to the user instead.
-
Synchronous concurrent request - Oracle Web Applications Desktop Integrator submits the specified concurrent program after completing the upload, waits for the program to complete, and then returns the results to the user. This importer type gives users immediate feedback about the success of the import, but can increase the load on resources as well as user wait time.
-
PL/SQL API - Oracle Web Applications Desktop Integrator calls the specified API after completing the upload, waits for the API processing to complete, and then returns the results to the user. This importer type gives users immediate feedback about the success of the import and partly reduces user wait time by bypassing the concurrent processing queue. However, it can increase the load on resources.
Importer Page
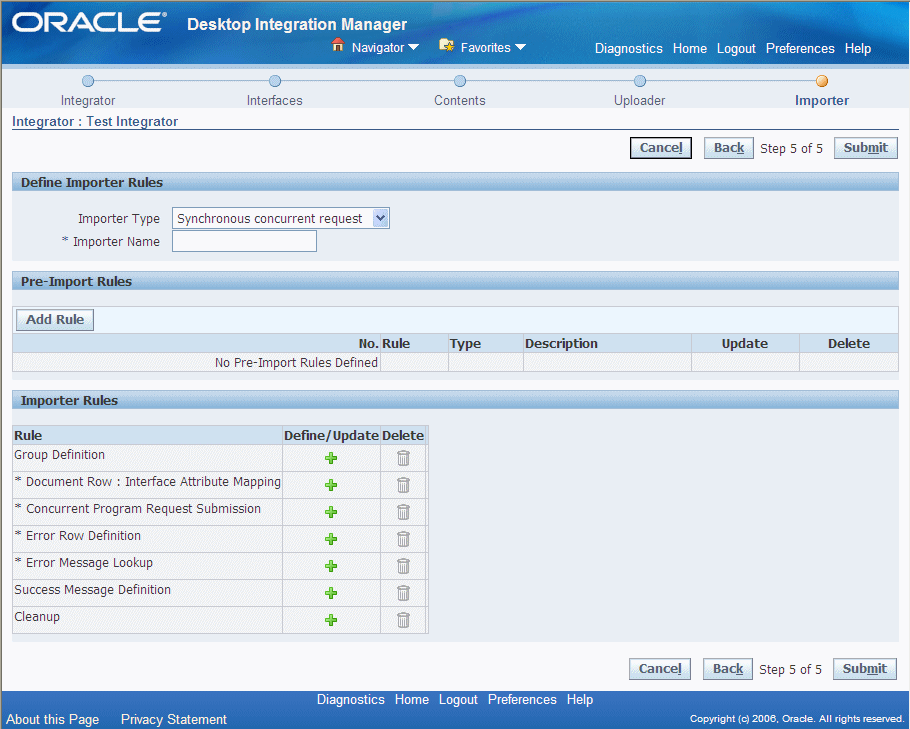
-
-
Enter a unique name for the importer.
-
If you want to perform validation or other processing before the import process, choose the Add Rule button in the Pre-Import Rules region. See: To define a pre-import rule.
-
To update a pre-import rule, choose the update icon for that rule. See: To define a pre-import rule.
-
To delete a rule, choose the delete icon for that rule.
-
The Importer Rules region displays a list of possible rule types for the import process itself, according to the importer type. An asterisk marks required rule types.
-
To define an importer rule, choose the define icon or update icon for that rule type.
-
Group Definition - Identifies records in the interface table that should be imported together as a group. All other importer rules, except group definition rules and document row - interface attribute mapping rules, are repeated for each group of records in the interface table. See: To define a group definition importer rule.
-
Document Row: Interface Attribute Mapping - Maps rows in the desktop spreadsheet to records in the interface table. This rule type is required for a synchronous concurrent request importer and optional for other importer types. See: To define a document row - interface attribute mapping importer rule.
-
Concurrent Program Request Submission - Specifies the concurrent program to perform the import. This rule type is available and required only for an asynchronous or synchronous concurrent request importer. See: To define a concurrent program request submission importer rule.
-
PL/SQL API call - Specifies the PL/SQL API to perform the import. This rule type is available and required only for a PL/SQL API importer. See: To define a PL/SQL API call importer rule.
-
Error Row Definition - Identifies records that were not imported successfully. This rule type is available and required only for a synchronous concurrent request or a PL/SQL API importer. See: To define an error row definition importer rule.
-
Error Message Lookup - Retrieves the error message to return to the user for records that were not imported successfully. This rule type is available and required only for a synchronous concurrent request or a PL/SQL API importer. See: To define an error message lookup importer rule.
-
Success Message Definition - Specifies a message to display to the user when the import process is submitted successfully. See: To define a success message definition importer rule.
-
Cleanup - Specifies cleanup processing to perform if errors occurred during any of the previous importer rules. See: To define a cleanup importer rule.
-
-
To delete a rule definition, choose the delete icon for that rule type. The rule type still appears in the list to let you create a new rule definition later if you choose.
-
-
To save the integrator definition, select Submit.
To define a pre-import rule
Use pre-import rules to specify validation or other processing that you want to perform on the data being uploaded before importing the data into application base tables. A pre-import rule can perform a SQL query, call a PL/SQL function or procedure, or retrieve the next value of a database sequence.
Importer Page: Pre-Import Rule
-
Enter a unique name for the pre-import rule.
-
Enter a description for the rule.
-
Select the rule type: SQL Query, PL/SQL API Function, PL/SQL API Procedure, or Sequence.
-
For a SQL query rule, enter the query. Choose the Test Query button to validate the query syntax.
-
For a PL/SQL function rule, enter the package name and function name, and specify whether the API returns an error message or an FND message code if it encounters an error.
-
For a PL/SQL procedure rule, enter the package name and procedure name, and specify whether the API returns an error message or an FND message code if it encounters an error.
-
For a sequence rule, enter the sequence name. You can optionally also enter a unique reference name by which subsequent rules can refer to this sequence.
-
For a SQL query, PL/SQL function, or PL/SQL procedure rule, choose Apply. Oracle E-Business Suite Desktop Integration Framework displays additional details depending on the rule type.
-
For a SQL query rule, the page displays a list of the columns selected by the query. You can optionally enter a unique reference name for each column by which subsequent rules can refer to the column.
The page also displays a list of the parameters used in the query.
-
You can optionally enter a unique reference name by which subsequent rules can refer to the parameter.
-
Select the data type for the parameter.
-
Specify the source from which the parameter value will be obtained: Environment Variables, Import, or Upload Parameters.
-
Specify the value based on the selected source. If the source is environment variables, enter the variable to use for the value, such as User ID, Application, Responsibility ID, or Language. If the source is Import, enter the interface attribute or reference parameter to use for the value. If the source is upload parameters, enter the upload parameter to use for the value.
-
-
For a PL/SQL function rule, if the function returns more details about any error that it encounters, select the Returns Error Information option.
-
For a PL/SQL function or procedure rule, specify whether the API returns an error message or an FND message code if it encounters an error.
-
For a PL/SQL function or procedure rule, the page displays a list of the parameters for the function or procedure.
-
If the parameter is used to retrieve an error message, select the Error Message check box.
-
Optionally enter a default value for the parameter.
-
Specify the source from which the parameter value will be obtained: Environment Variables, Import, or Upload Parameters.
-
Specify the value based on the selected source. If the source is environment variables, enter the variable to use for the value, such as User ID, Application, Responsibility ID, or Language. If the source is Import, enter the interface attribute or reference parameter to use for the value. If the source is upload parameters, enter the upload parameter to use for the value.
-
Optionally specify a parameter list to use for key-value lookups.
-
Optionally enter a SQL clause to modify the value, such as TO_CHAR().
-
-
Choose Apply.
Note: If you no longer require this rule definition, you can choose the Delete button to remove it.
To define a group definition importer rule
Use a group definition rule to identify records in the interface table that should be imported together as a group. All other importer rules, except group definition rules and document row - interface attribute mapping rules, are repeated for each group of records in the interface table. An asynchronous or synchronous concurrent request importer submits a separate concurrent request for each record group
To identify the records that form a group, specify one or more interface attributes that together serve as a unique key for the group. All records in the interface table that have the same values in those interface attributes are treated as part of the group.
Importer Page: Group Definition Rule
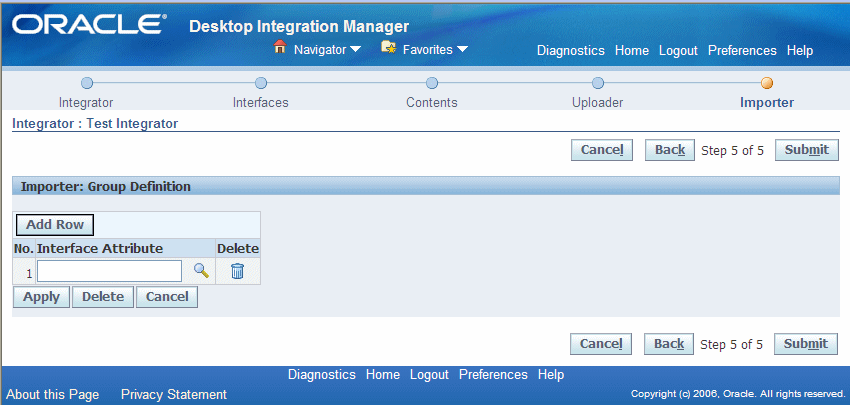
-
Choose the Add Row button.
-
Select an interface attribute to identify the records in the group.
-
Optionally repeat steps 1 and 2 to add further interface attributes to identify the records in the group. Each interface attribute you add narrows the group definition.
To remove an interface attribute from the group definition, choose the delete icon for that attribute.
-
Choose Apply.
Note: If you no longer require this rule definition, you can choose the Delete button to remove it.
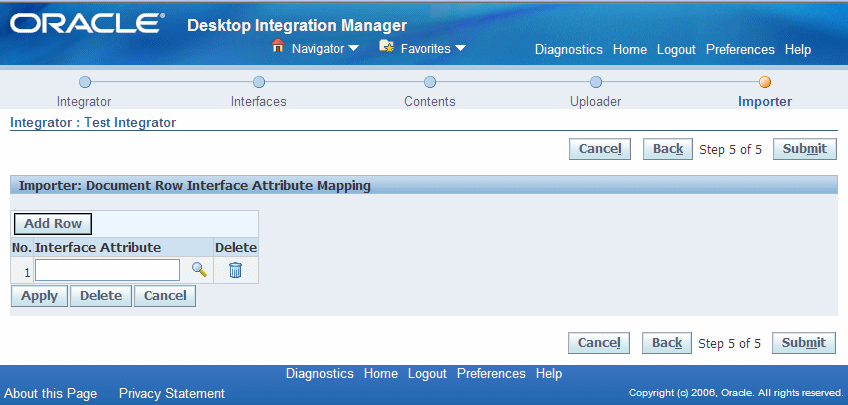
To define a document row: interface attribute mapping importer rule
Use a document row: interface attribute mapping rule to map rows in the desktop spreadsheet to records in the interface table. To define the mapping, specify one or more interface attributes that together serve as a unique key to match each spreadsheet row with the corresponding interface table record. In most cases the interface attributes that you specify should be the columns that make up the primary key of the interface table.
You can use this mapping to return individual error messages for any records that fail during import.
Note: If there are no columns in the interface table that can identify a one-to-one mapping between the spreadsheet rows and the interface table records, then you cannot report individual error messages for any failed records, only a general error message for the import process as a whole.
Importer Page: Document Row: Interface Attribute Mapping Rule
-
Choose the Add Row button.
-
Select an interface attribute by which to identify a record.
-
Repeat steps 1 and 2 to add further interface attributes as needed to identify a record uniquely.
To remove an interface attribute from the unique key, choose the delete icon for that attribute.
-
Choose Apply.
Note: If you no longer require this rule definition, you can choose the Delete button to remove it.
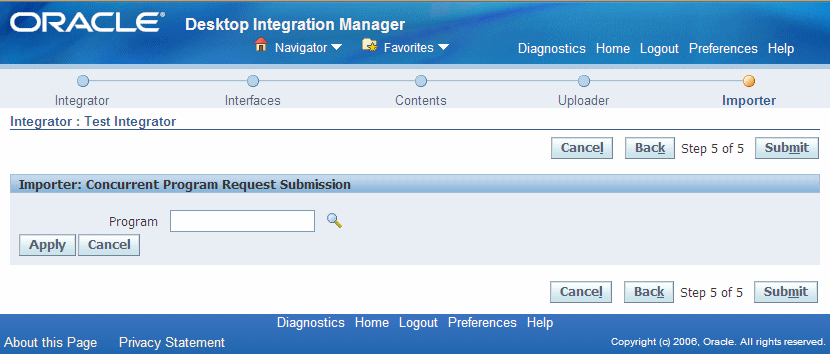
To define a concurrent program request submission importer rule
Use a concurrent program request submission rule to specify what concurrent program to submit to perform the import, as well as how to obtain the parameter values for the program.
Importer Page: Concurrent Program Request Submission Rule
-
Select the concurrent program to perform the import.
-
Choose Apply.
-
The page displays a list of the parameters for the program.
-
If the parameter is used to retrieve an error message, select the Error Message check box.
-
Optionally enter a default value for the parameter.
-
Specify the source from which the parameter value will be obtained: Environment Variables, Import, or Upload Parameters.
-
Specify the value based on the selected source. If the source is environment variables, enter the variable to use for the value, such as User ID, Application, Responsibility ID, or Language. If the source is Import, enter the interface attribute or reference parameter to use for the value. If the source is upload parameters, enter the upload parameter to use for the value.
-
Optionally specify a parameter list to use for key-value lookups.
-
Optionally enter a SQL clause to modify the value, such as TO_CHAR().
-
-
Choose Apply.
Note: If you no longer require this rule definition, you can choose the Delete button to remove it.
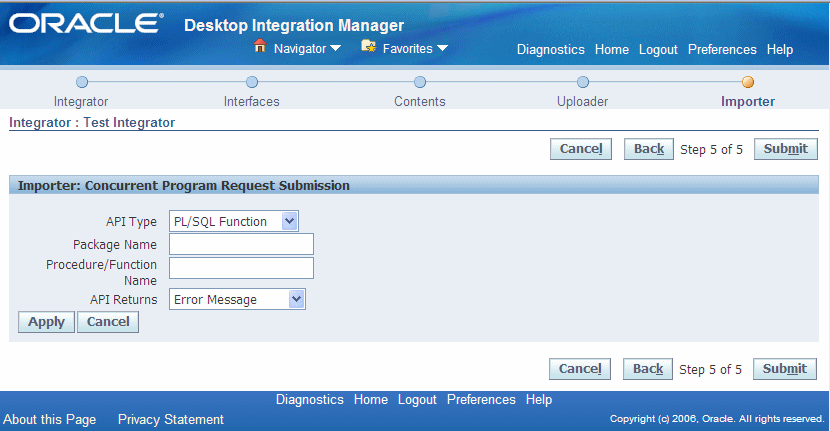
To define a PL/SQL API call importer rule
Use a PL/SQL API call rule to specify what PL/SQL API to call to perform the import, as well as how to obtain the parameter values for the API.
Importer Page: PL/SQL API Call Rule
-
Select the API type, either PL/SQL Function or PL/SQL Procedure.
-
For a PL/SQL function, enter the package name and function name, and specify whether the API returns an error message or an FND message code if it encounters an error.
-
For a PL/SQL procedure, enter the package name and procedure name, and specify whether the API returns an error message or an FND message code if it encounters an error.
-
Choose Apply. Oracle E-Business Suite Desktop Integration Framework displays additional details for the API.
-
For a PL/SQL function, if the function returns more details about any error that it encounters, select the Returns Error Information option.
-
Specify whether the API returns an error message or an FND message code if it encounters an error.
-
The page displays a list of the parameters for the function or procedure.
-
If the parameter is used to retrieve an error message, select the Error Message check box.
-
Optionally enter a default value for the parameter.
-
Specify the source from which the parameter value will be obtained: Environment Variables, Import, or Upload Parameters.
-
Specify the value based on the selected source. If the source is environment variables, enter the variable to use for the value, such as User ID, Application, Responsibility ID, or Language. If the source is Import, enter the interface attribute or reference parameter to use for the value. If the source is upload parameters, enter the upload parameter to use for the value.
-
Optionally specify a parameter list to use for key-value lookups.
-
Optionally enter a SQL clause to modify the value, such as TO_CHAR().
-
-
Choose Apply.
Note: If you no longer require this rule definition, you can choose the Delete button to remove it.
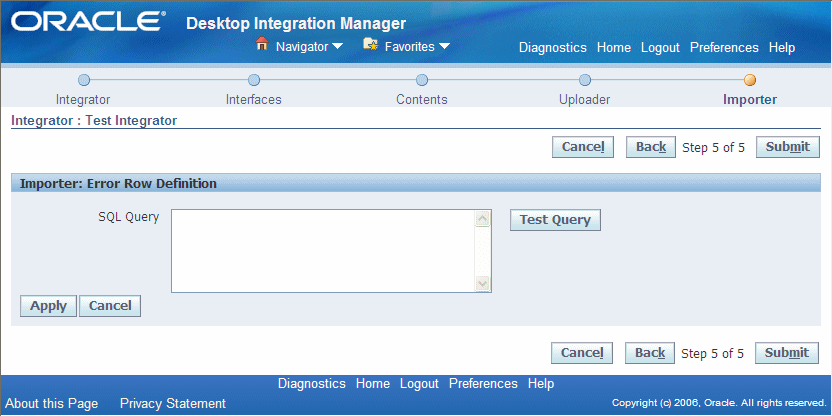
To define an error row definition importer rule
Use an error row definition rule to identify records that were not imported successfully. To identify the failed records, specify a SQL query that selects from the interface table. It is recommended to select all columns in the interface table by beginning the query with SELECT * to ensure that all necessary values are retrieved.
Importer Page: Error Row Definition Rule
-
Enter the SQL query to identify failed records in the interface table. Choose the Test Query button to validate the query syntax.
-
Choose Apply.
-
Oracle E-Business Suite Desktop Integration Framework displays a list of the columns selected by the query. You can optionally enter a unique reference name for each column by which subsequent rules can refer to the column.
The page also displays a list of the parameters used in the query.
-
You can optionally enter a unique reference name for the parameter by which subsequent rules can refer to the parameter.
-
Select the data type for the parameter.
-
Specify the source from which the parameter value will be obtained: Environment Variables, Import, or Upload Parameters.
-
Specify the value based on the selected source. If the source is environment variables, enter the variable to use for the value, such as User ID, Application, Responsibility ID, or Language. If the source is Import, enter the interface attribute or reference parameter to use for the value. If the source is upload parameters, enter the upload parameter to use for the value.
-
-
Choose Apply.
Note: If you no longer require this rule definition, you can choose the Delete button to remove it.
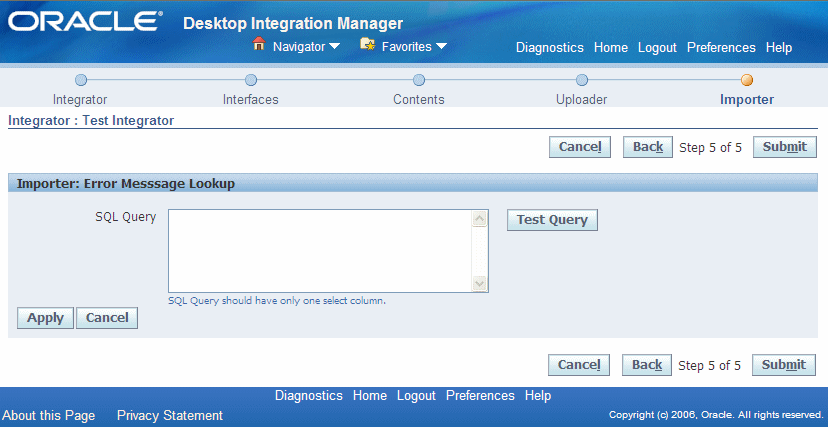
To define an error message lookup importer rule
Use an error message lookup rule to retrieve the error message to return to the user for records that were not imported successfully. Specify a SQL query that selects only one column, which should contain the error message. Oracle Web Applications Desktop Integrator runs the SQL query for each failed record in the interface table. You can reference the unique key defined in the document row - interface attribute mapping rule to match the individual failed records, with the spreadsheet rows, and use any error codes in the status column in the interface table for each record to retrieve the appropriate error message.
Importer Page: Error Message Lookup Rule
-
Enter the SQL query to retrieve the error message. Choose the Test Query button to validate the query syntax.
-
Choose Apply.
-
Oracle E-Business Suite Desktop Integration Framework displays a list of the parameters used in the query.
-
You can optionally enter a unique reference name for the parameter by which subsequent rules can refer to the parameter.
-
Select the data type for the parameter.
-
Specify the source from which the parameter value will be obtained: Environment Variables, Import, or Upload Parameters.
-
Specify the value based on the selected source. If the source is environment variables, enter the variable to use for the value, such as User ID, Application, Responsibility ID, or Language. If the source is Import, enter the interface attribute or reference parameter to use for the value. If the source is upload parameters, enter the upload parameter to use for the value.
-
-
Choose Apply.
Note: If you no longer require this rule definition, you can choose the Delete button to remove it.
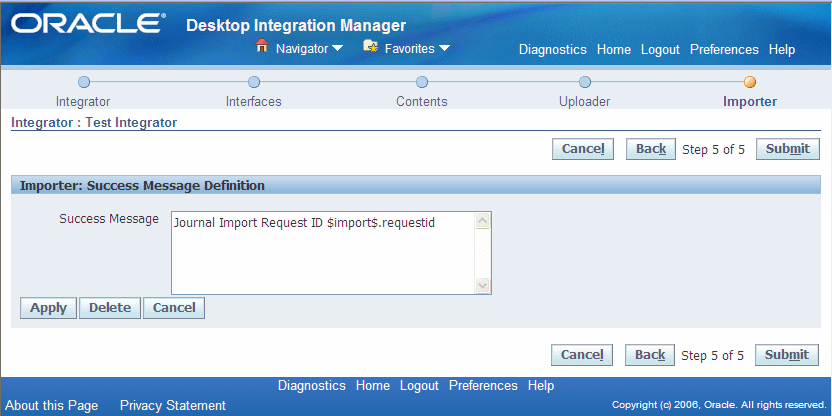
To define a success message definition importer rule
Use a success message definition rule to specify a message to display to the user when the import process is submitted successfully. For an asynchronous concurrent request importer, Oracle Web Applications Desktop Integrator returns the success message after the import program is submitted, without waiting for the program to complete. For a synchronous concurrent request or a PL/SQL API importer, Oracle Web Applications Desktop Integrator returns the success message only after the import process completes and all records have been imported without error.
Importer Page: Success Message Definition Rule
-
Enter the text of the success message. The default message is Journal Import Request ID $import$.requestid.
-
Choose Apply.
Note: If you no longer require this rule definition, you can choose the Delete button to remove it.
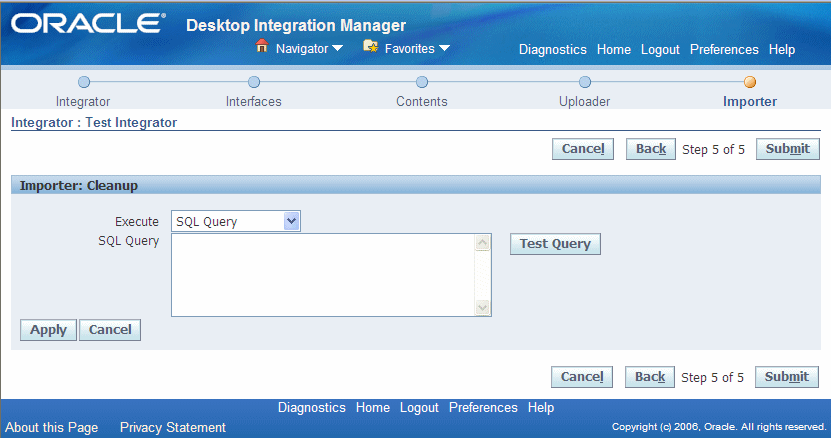
To define a cleanup importer rule
Use a cleanup rule to specify cleanup processing to perform if errors occurred during any of the previous importer rules.
Importer Page: Cleanup Rule
-
Select the type of cleanup processing to execute: SQL Query, PL/SQL Function, or PL/SQL Procedure.
-
For a SQL query, enter the query. Choose the Test Query button to validate the query syntax.
-
For a PL/SQL function, enter the package name and function name, and specify whether the API returns an error message or an FND message code if it encounters an error..
-
For a PL/SQL procedure, enter the package name and procedure name, and specify whether the API returns an error message or an FND message code if it encounters an error..
-
Choose Apply. Oracle E-Business Suite Desktop Integration Framework displays additional details depending on the processing type.
-
For a SQL query, the page displays a list of the columns selected by the query. You can optionally enter a unique reference name for each column by which subsequent rules can refer to the column.
The page also displays a list of the parameters used in the query.
-
You can optionally enter a unique reference name for the parameter by which subsequent rules can refer to the parameter.
-
Select the data type for the parameter.
-
Specify the source from which the parameter value will be obtained: Environment Variables, Import, or Upload Parameters.
-
Specify the value based on the selected source. If the source is environment variables, enter the variable to use for the value, such as User ID, Application, Responsibility ID, or Language. If the source is Import, enter the interface attribute or reference parameter to use for the value. If the source is upload parameters, enter the upload parameter to use for the value.
-
-
For a PL/SQL function, if the function returns more details about any error that it encounters, select the Returns Error Information option.
-
For a PL/SQL function or procedure, specify whether the API returns an error message or an FND message code if it encounters an error.
-
For a PL/SQL function or procedure, the page displays a list of the parameters for the function or procedure.
-
If the parameter is used to retrieve an error message, select the Error Message check box.
-
Optionally enter a default value for the parameter.
-
Specify the source from which the parameter value will be obtained: Environment Variables, Import, or Upload Parameters.
-
Specify the value based on the selected source. If the source is environment variables, enter the variable to use for the value, such as User ID, Application, Responsibility ID, or Language. If the source is Import, enter the interface attribute or reference parameter to use for the value. If the source is upload parameters, enter the upload parameter to use for the value.
-
Optionally specify a parameter list to use for key-value lookups.
-
Optionally enter a SQL clause to modify the value, such as TO_CHAR().
-
-
Choose Apply.
Note: If you no longer require this rule definition, you can choose the Delete button to remove it.