Stealth Mode Configuration
The stealth ADMIN interface is restricted to administration traffic over ports 3852 and 3953 only. Typically, this traffic is encrypted using SunScreen SKIP although it is also possible to use IKE. Either method requires the Screen and Administration Stations to have certificates. SunScreen supports:
-
Self-signed certificates (that is, Unsigned Diffie-Hellman [UDH] SKIP certificates and X.509 IKE certificates.)
-
Certificates signed by certification authority (CA).
See "Basic Encryption Configuration" in this manual and also the SunScreen 3.2 Administration Guide for more information on generating and using certificates.
Administrative access to the Screen is restricted to systems in a remote access rule using the SunScreen SKIP or IKE identity of that system for authentication. For SKIP, this remote access rule is configured as part of the Custom installation process. For IKE, you must explicitly configure this rule, see "Setting Up Remote Administration with IKE" for more information.
Prepare the Screen Machine
-
On the machine that will be the Screen, install the Solaris operating environment and configure a single interface to enable remote administration of the Screen from an Administration Station.
In this example, you would configure an interface named le0 with the IP address of 192.168.1.3.
The Screen is only able to resolve IP addresses using the administration interface. Since the Screen only needs to resolve the IP address of the Administration Station and any SNMP trap receivers, consider configuring /etc/nsswitch.conf only to use files for name resolution.
-
Install the recommended Solaris operating environment patches at this point, especially any Ethernet interface patches.
Set Up the Administration Station
-
On the Administration Station, install and configure the Administration Station software (For more details, see "Setting Up Remote Administration with SKIP" and "Setting Up Remote Administration with IKE".)
Install the Screen Software
-
On the Screen, install the SunScreen software as stealth mode.
-
Harden the Solaris operating environment (optional).
-
SKIP Only -- Add the Administration Station's certificate when prompted.
Finish the Administration Station
-
On the Administration Station, set up communication with the Screen.
See "Enable Communication Between the Administration Station and the Screen" for a SKIP example .
-
Reboot the Administration Station and the Screen.
Note -The Administration Station can only contact the Screen using the administration GUI or the command-line interface; you cannot use ping to test the connection to the Screen.
-
On the Administration Station, start a browser and connect to the Screen URL.
In this example you would by type:
http://192.168.1.3:3852
Finish the Screen
-
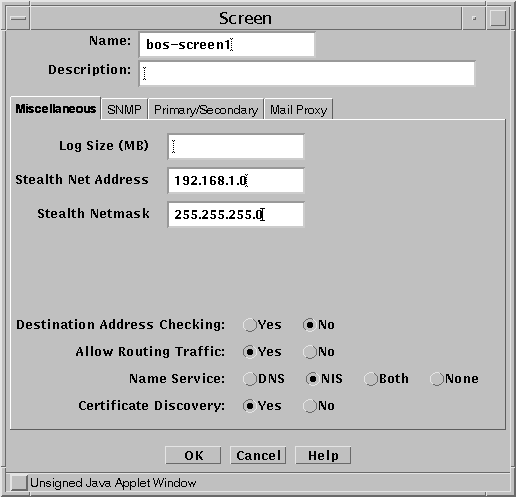
On the Screen, select the Screen object and define the network that the Screen partitions, as shown in Figure 4-2.
 Caution -
 Failure to do this step means the Screen will not work correctly.
Figure 4-2 Network Address Used in the Example

-
Define the address objects you need to construct your rules.
The network shown in this example requires the objects shown in the following table.
Table 4-1 Example Address Object DefinitionsName
TYPE
Details
bos-ten-net
Range
10.0.2.0 to 10.0.2.255
DMZ
Range
192.168.1.100 to 192.168.1.100
192.168.1-private
Range
192.168.1.2 to 192.168.1.99
192.168.1-public
Range
192.168.1.1 to 192.168.1.1
Internal
Group
Include: {bos-ten-net 192.168.1-private}
Exclude: {}
Internet
Group
Include: {*}
Exclude: {Internal DMZ }
hme0_grp
Group
Include: {DMZ}
Exclude: {}
hme1_grp
Group
Include: {Internal}
Exclude: {}
hme2_grp
Group
Include: {Internet}
Exclude: {}
The empty curly braces ({}) mean you exclude nothing. The last three objects are called the Interface Groups. These should contain all the IP addresses of all the hosts that can be reached from that interface. The Screen uses these groups to determine which interface to use when passing a packet.
Note -Be sure the address groups do not overlap.
-
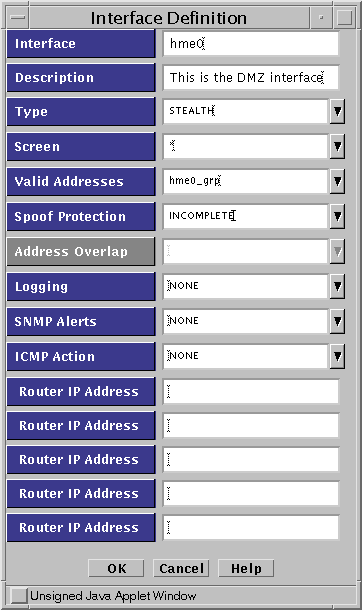
Define the stealth interfaces.
In this example, you would define hme0, hme1, and hme2 as stealth interfaces. The following figure is an example for hme0.
Figure 4-3 Stealth Interface Definitions

-
Define policy rules.
These are the same type of Packet Filtering, NAT, and Encryption rules as you would use on a routing Screen.
-
Save and activate the policy.
- © 2010, Oracle Corporation and/or its affiliates
