Chapter 5 Creating a VPN
Typically, companies use a virtual private network (VPN) when they have offices with networks in more than one location. Usually, those companies want to use an encrypted tunnel through public networks for a secure connection between their own locations or to connect securely with partners. This strategy avoids the need for dedicated lines or any changes to user applications.
You can use a Screen as a VPN gateway on behalf of systems or networks that reside behind the firewall. The Screen then encrypts and encapsulates all packets before they are sent over the Internet. The content of each packet remains private until it arrives at the remote location. Anyone capturing packets between locations will only see encrypted, unreadable packets.
A VPN also enables a site to conceal the details of its own network topology by encrypting the original packets (including their IP headers) and creating new IP headers using addresses specified by the VPN gateway (called tunnel addresses). When these packets arrive at the remote location, the new IP headers are removed. Then, once decryption takes place, the original headers are restored so the packets can reach their intended destination.
SunScreen provides two options for creating a VPN gateway: Use the ENCRYPT action on Packet Filtering rules, or VPN action after defining VPN rules.
-
Using the ENCRYPT action on Packet Filtering rules
In this scenario, you define the encrypted tunnel endpoints as part of a regular Packet Filtering rule. The tunnel endpoints typically are single systems although you can define multiple endpoints using Address ranges and groups. This method provides an easy way to accommodate requests for encrypted access between a few systems. The limitations of this method are:
-
Your rulebase can become very complicated if you add many separate encryption rules.
-
If the systems referenced by these rules change in anyway, you might have to edit each Packet Filtering rule to accommodate the changes.
-
Each Packet Filtering rule typically requires that you specify certificates for each system referenced by the rule. Certificate management can be a complex task if you are referencing more than a few systems.
This chapter provides two examples of a VPN created using Packet Filtering rule with the ENCRYPT action. In the first example, "Basic Encryption Scenario", a simple VPN exists between two systems, each behind a routing Screen, over the Internet . The second example, "Advanced Encryption Scenario", is a more elaborate scenario where one Screen is in stealth mode and the other is a routing mode Screen.
-
-
Using VPN Action After Defining VPN rules
VPN Rules are a convenience that allows you to easily define and reference a large number of systems or networks using a single VPN name. First, you create VPN rules which define your tunnel endpoints and give the definition for a VPN name. Then, you use the VPN name as part of a Packet Filtering rule. This method is particularly convenient where you are referencing groups of networks as opposed to groups of systems. Then, if the topographical details of a network changes, you only have to modify the related VPN rules and not the Packet Filtering rules. Since you only need one certificate for each VPN rule, certificate management is much easier.
"VPN Rules Scenario" is an example of a VPN using VPN rules. In this example, the Screens are running in routing mode.
Basic Encryption Scenario
This example shows how you would create an encrypted tunnel between two systems, each behind a routing Screen. Figure 5-1 shows a VPN connecting the San Francisco and Hong Kong segments of the network. In the diagram, an encrypted tunnel across the Internet exists between Screens sf-screen and hk-screen. The Screens encrypt and decrypt traffic on behalf of the systems behind them (sf-host1 and hk-host1 in this example).
Figure 5-1 San Francisco and Hong Kong Segments of the Sample Company Network
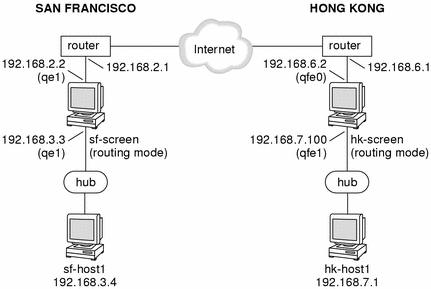
Basic Encryption Configuration
This example presumes you have installed both screens in routing mode. The Screens used in this example are called sf-screen and hk-screen.
Note -
The IKE portion of this example uses certificates but you could substitute IKE preshared keys if appropriate. See REFERENCE for an example of using preshared keys; the example uses a Screen and a Windows 2000 system but the Screen portion is the same.
Create Address Objects on Both Screens
See the SunScreen Administration Guide for more information on creating Address objects.
-
Define an Address object on each Screen for the other Screen
In this example, on sf-screen you would create an Address object to represent hk-screen and vice versa.
In this example, both Screens are routing Screens, so the addresses of these objects are the IP addresses of their interfaces nearest the Internet (192.168.6.2) for hk-screen and 192.168.2.2 for sf-screen.
-
Define Address objects on each Screen for the systems using encryption.
In this example, you would create Address objects named sf-host1 and hk-host1 on each Screen.
Create a Certificate Object for Each Screen
-
Creating a SKIP certificate - If you installed your Screen with Remote Administration, you already have a SKIP certificate. If not, see the following steps for details on creating SKIP Certificate objects.
-
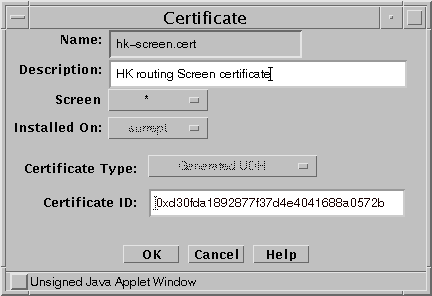
In the GUI Common Objects panel, select Certificate->Generate SKIP UDH. The Generate Certificate window appears.
-
Fill in the required fields and generate the certificate as shown in the following figure. For details on the screen fields , see the SunScreen Administrators Guide or the window online help.
Figure 5-2 SKIP Generate Certificate window
-
-
Creating an IKE certificate - use the following steps to generate an IKE Certificate object.
-
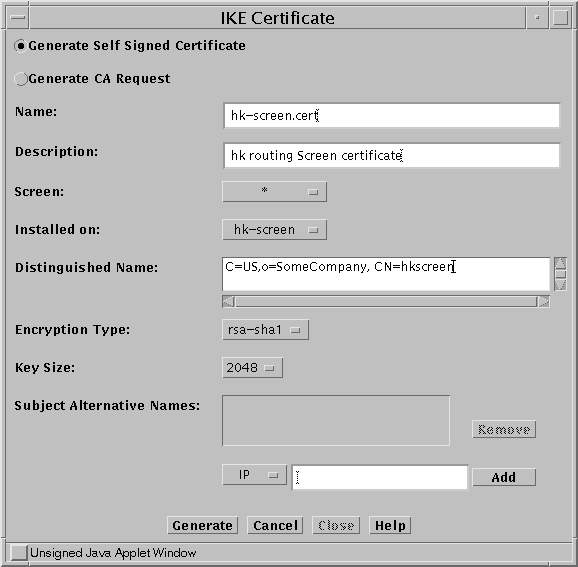
In the GUI Common Objects panel, select Certificate->Generate IKE certificate. The Generate Certificate window appears.
-
Fill in the required fields and generate the certificate as shown in the following figure. For details on the screen fields , see the SunScreen Administrators Guide or the window online help.
Figure 5-3 Generate IKE Certificate Window
-
-
(IKE Only) Export the IKE certificate.
-
In the GUI Common Objects panel, select Certificate, then click the Search button.
-
Select hk-screen.cert from the list of Certificate objects and click Edit
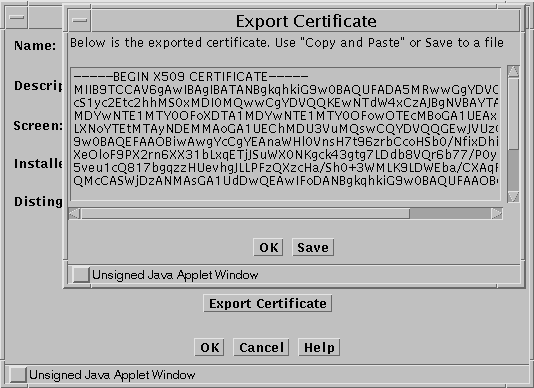
Figure 5-4 Export Certificate Window
-
When the Edit Certificate window appears, click Export Certificate
-
When the Export Certificate window appears, you have two choices:
-
Select the window contents and paste them into either a file or a mail message.
-
Save the contents into a file directly from this window. This method requires that you have a Java plug-in installed that supports local file operations.
-
-
Move the exported certificate file to the other Screen.
-
Install Each Screen's Certificate Object on the Other Screen.
-
Installing SKIP certificates
-
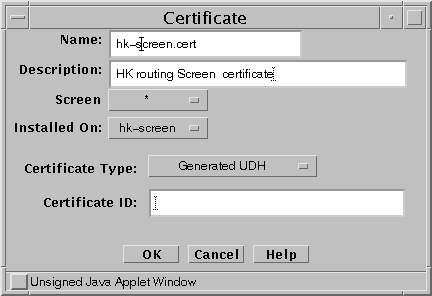
In the GUI Common Objects panel, select Certificate->Associate->SKIP Certificate. The Associate SKIP Certificate window appears.
-
Specify a name for the certificate and specify the certificate's MKID.
See
Note -Make sure that CDP is enabled on each Screen object.
Figure 5-5 Associate SKIP Certificate Window
-
-
Installing IKE certificates
-
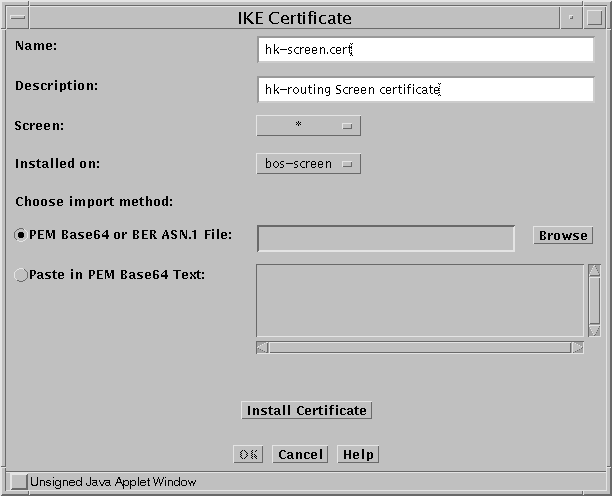
In the GUI Common Objects panel, select Certificate->Import IKE Certificate. The Import IKE Certificate window appears.
Figure 5-6 Import IKE Certificate Window
-
After filling in the Name field, you can either browse for the certificate file (requires Java plugin) or paste the file contents into the Screen.
-
When you have specified the file, click Install Certificate.
-
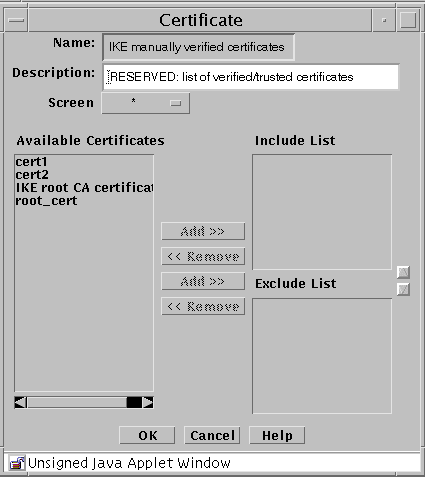
Add the new certificate to the appropriate verified IKE Certificates group.
There are reserved Certificate groups for trusted manually- generated ( IKE manually verified certificates) and CA-generated IKE (IKE root CA certificates) certificates. This example uses manually-generated IKE certificates so you would add the IKE certificate on each Screen to the IKE manually verified certificates group as shown in the following figure.
Figure 5-7 Adding IKE Certificate to Group
-
Create Packet Filtering Rules with the ENCRYPT action
On each Screen, add a Packet Filtering rule to encrypt traffic between the two Screens; Step 8 in the Advanced Encryption scenario shows you how to use the Rule Definition and Action Details windows. Note that one difference between the Advanced and Basic examples is that this Basic example does not use a tunnel address.
-
On each Screen, edit the active policy or create a new policy.
-
Click Add New Rule.
-
When the Rule Definition window appears, specify the Service, Source Address, Destination Address, and Action (ENCRYPT).
Go to the Action Details screen appropriate for the encryption method (SKIP or IKE).
-
When the Action Details window appears, choose the parameters that are appropriate for your encryption method (IKE or SKIP). These parameters must match on each Screen.
-
Specify the Source and Destination Certificates.
For example, the sf-screen certificate is the Source Certificate on sf-screen and the Destination Certificate on hk-screen.
-
For SKIP - Specify the Key, Data, and MAC algorithms.
Also, specify source and destination tunnel addresses if you are using them (for a Stealth Screen for example).
-
For IKE - Specify the ESP and/or the AH. Also specify the Encryption Algorithm, Hash Algorithm, and Oakley Group (also known as the DH Group). Specify the Authentication Method and make sure that it matches the certificate Encryption Type.
For example, if you selected rsa-sha1 or rsa-md5 as the certificate Encryption type the select RSA-SIGNATURES as the Authentication Method. Similarly, if you chose dsa-sha1 as the certificate Encryption type, use DSS-SIGNATURES as the Authentication Method.
-
For IKE -- On the Option tab specify Mode and related parameters.
Your choices are Tunnel or Transport mode. Tunnel mode encapsulates and encrypts the entire packet including the IP header for maximum security. Transport mode encapsulates and encrypts only the data portion of the IP packet resulting in smaller packets and potentially better throughput as the Screen is relieved of the overhead of decrypting the IP header.
-
-
When finished, click OK.
-
On each Screen, save and Activate the policy.
Note -SKIP Only - The Greenwich Mean Time (GMT as displayed by env TZ=GMT date) must be synchronized between SKIP peers. When Screens are located in different parts of the world, you should set the time for that part of the world. Also, set the TimeZone for that part of the world. That is, the local time that is corrected with the TimeZone must be the same on both machines. You can check the time using the date -u command.
Advanced Encryption Scenario
Figure 5-8 shows the Boston and Hong Kong segments of the network. In this example, a VPN will be configured between the Boston and Hong Kong offices. It shows tunnel addresses between the stealth Screen (bos-screen) and the routing Screen (hk-screen). SunScreen SKIP or IKE encrypts the entire original packet, including the IP header, and inserts a new IP header. The new IP header uses either the same addresses as the original packet or different (tunnel) addresses.
Figure 5-8 Boston and Hong Kong Segments

The hosts in Boston have non-routable addresses (10.0.2.20x in this example), so a tunnel address is used to hide these addresses. The stealth Screen in Boston (bos-screen1) has no IP addresses on its filtering interface so a tunnel address must be added to the 192.168.1.0 subnet. When the Screen in Hong Kong inserts a new IP header on packets destined for Boston, it uses this tunnel address on and routes the packet over the Internet to the Boston router. Although bos-screen does not have an IP address, it responds to ARPs from the Boston router for the tunnel address so the packets from hk-screen are passed to bos-screen. There, they are decrypted and, if the Packet Filtering Rules allow, are passed on to the Boston network.
Although the hosts in Hong Kong have routable addresses, a tunnel address is also used to hide the Hong Kong network topology. this example uses the IP address of the Screen network interface nearest the internet (192.168.6.2) as the tunnel address.
Encryption and decryption are done by both hk-screen and bos-screen. Thus, if some tool like snoop was used to show the packets on the Internet, only encrypted IP packets would appear (Protocol 57 for SKIP, Protocol 50 for ESP and 51 for AH in IPSec) with the tunnel address as the source and the destination. If someone ran snoop or some tool to capture packets on the inside of either Screen they would find the packets unencrypted and using their original IP addresses.
Advanced Encryption Configuration
Preliminary Steps
-
Install the SunScreen software on the Screens.
In this example, you would install bos-screen as a stealth Screen (see Chapter 4, Configuring a Stealth Mode Screen) and hk-screen as a routing Screen. See the SunScreen 3.2 Installation Guide for installation details.
-
Make sure both Screens have a local certificate of the same type (SKIP or IKE) and modulus. If they do not, generate a certificate.
In this example, both Screens were installed using remote administration, so the installation process generated SKIP certificates for them. The default name for this SKIP certificate is screenname.admin (For example: bos-screen.admin).
If you need to generate an IKE certificate for a Screen, see Step 2 in "Create a Certificate Object for Each Screen" for an example.
-
Set up an open policy on both Screens and confirm that they can communicate.
Configure the Stealth Mode Screen
In this example, the stealth Screen is bos-screen.
-
Define the tunnel address of the Screen .
This address is the IP address used to send packets over the Internet. The tunnel address should be on the local network (192.168.1.100 in this example). For this example, define an Address object on bos-screen called bos-tunnel and give it an IP address of 192.168.1.5.
-
Define an Address object for the other Screen in the VPN configuration .
In this example, hk-screen is a routing Screen, so the address of this object is the IP address of the interface nearest the Internet (192.168.6.2).
Note -Optionally, you can define a separate tunnel address for hk-screen as well.
-
Define Address objects for the networks behind both Screens.
This example uses Address objects called bos-net and hk-net.
-
Edit the Address GROUP object for the interface nearest the Internet and make sure that the definition contains the tunnel address object .
In this example, the interface nearest the internet is hme2. The Address GROUP object for that interface is hme2-grp. So, for this example, hme2-grp must contain bos-tunnel.
-
SKIP Only - Edit the Screen object and make sure that Certificate Discovery is selected.
-
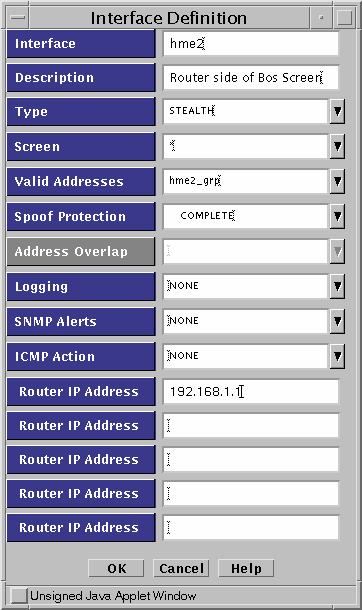
Edit the Interface object for the interface nearest the Internet (hme2.)
Fill in the Router IP Address field of the Interface definition for hme2 with the address of a default router on this network (192.168.1.1) for this example. See Figure 5-9. The stealth Screen is actually generating packets with a source IP address set to the tunnel address, but it has no routing table (because it is not a router) . Therefore, it needs to send the packets to a router that knows the location of hk-screen.
Figure 5-9 Interface Definition Screen
-
Add a Certificate object for the other Screen.
For this example, create a Certificate object hk-screen.cert.
-
Add a rule to encrypt the traffic between the two Screens.
Define an ENCRYPT rule as shown in Figure 5-10 to encrypt traffic between the two networks (bos-net and hk-net in this example.)
This example uses Common Services, but the actual services you use should reflect your own security policy.
Figure 5-10 Rule Definition Window
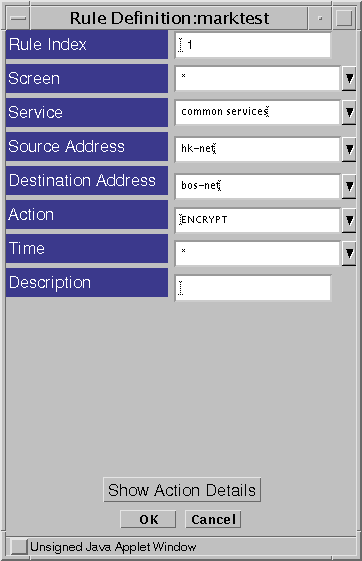
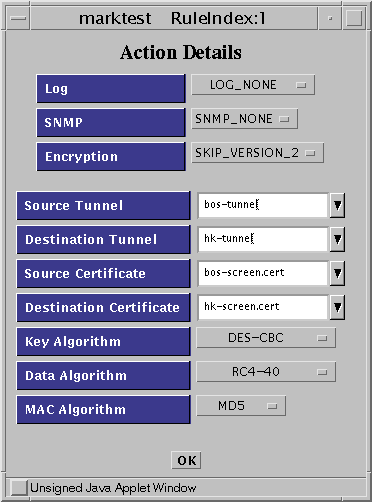
After selecting the ENCRYPT Action (or by clicking the Action Details button), the Action Details window appears. Figure 5-11 shows the default Action Details window which includes the parameters required to configure a SKIP tunnel.
Figure 5-11 Rule Index, Action Details Window (SKIP)
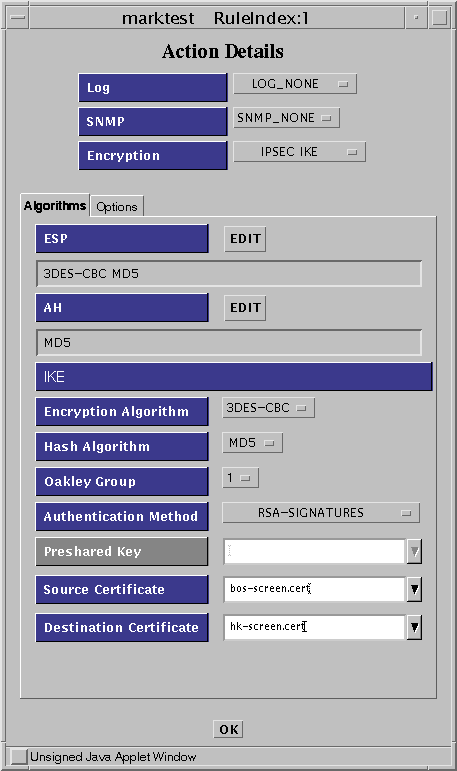
To reach the IKE Action Details windows, you must choose IPSEC IKE from the Encryption list.
Figure 5-12 Rule Index, Action Details Window (IKE Algorithms)
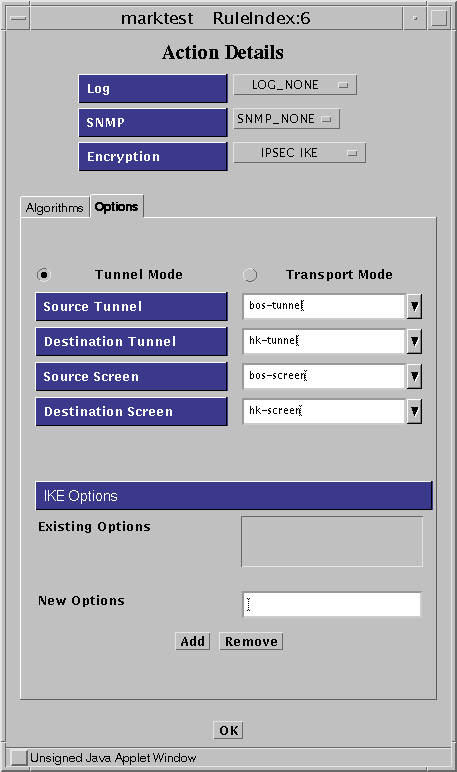
Click on the Options tab to specify the certificates for the screens and the tunnels.
Figure 5-13 Rule Index, Action Details Window (IKE Options)
After you enter all the required parameters, click OK to save the information. This action returns you to the Rule Definition window.
-
In the Rule Definition window, click OK to complete the addition of this rule.
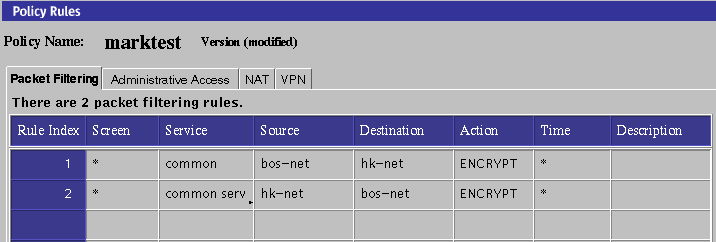
Figure 5-14 shows two ENCRYPT rules. The first rule lets you initiate encrypted connections from bos-net to hk-net establish connections from hk-net to bos-net, you need to add a second rule. Be sure to reverse the source and destination addresses and the certificates.
-
Save and activate the policy.
Figure 5-14 Encryption Configuration
Note -SKIP ONLY -- The Greenwich Mean Time (GMT) (as displayed by env TZ=GMT date) must be synchronized between SKIP peers. When Screens are located in different parts of the world, you should set the time for that part of the world. Also, set the TimeZone for that part of the world. That is, the local time that is corrected with the TimeZone must be the same on both machines. You can check the time using the date -u command.
Configure the Routing Screen
In this example, hk-screen is the name of the routing mode Screen.
-
Define an Address object for the other Screen in the configuration.
The other Screen (bos-screen) is a stealth Screen. Therefore, the address of this object is the tunnel address bos-tunnel. You have to create the same Address object here as exists on bos-screen.
-
Define Address objects for the networks behind both Screens.
In this example, the objects would be bos-net and hk-net.
-
SKIP ONLY -- Edit the Screen object and make sure that Certificate Discovery is selected.
-
Add the Certificate object for the other Screen.
Create an Certificate object called bos-screen.cert. See "Create a Certificate Object for Each Screen" for more information on creating certificates.
-
Add a rule to the configuration to encrypt the traffic between the two Screens.
Step 8 in the previous section shows the parameters used.
-
Save and activate the policy.
VPN Rules Scenario
Figure 5-15, shows a VPN connecting the San Francisco and Hong Kong segments of the network. In the diagram, an encrypted tunnel across the Internet exists between Screens sf-screen and hk-screen. The Screens encrypt and decrypt traffic on behalf of the systems behind them, for example sf-host1 and hk-host1.
Figure 5-15 San Francisco and Hong Kong Segments of the Sample Company Network
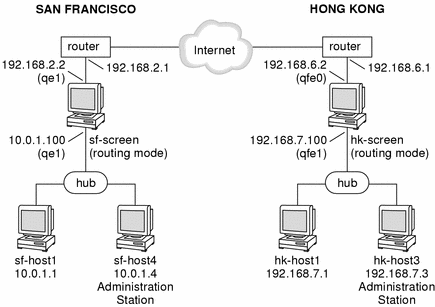
This network diagram does not really illustrate a scenario where using of VPN rules would enhance convenience. Typically, a scenario including VPN rules would contain a much more complex set of networks on either side. For the sake of brevity, this example only contains two gateways, each with two systems behind them. The steps to create a VPN using VPN rules however would be similar for a VPN with a large number of Gateways and systems.
Using VPN Rules
Configure the VPN
To configure a VPN like the preceding network example, use the following steps:
-
Install the SunScreen software on both Screens .
The two routing-mode Screens in this example are named sf-screen and hk-screen.
-
Add each Screen's certificate object to the other Screen
If the Screens were installed using the SunScreen Installer program, they should already have local SKIP certificates named sf-screen1.cert and hk-screen1.cert, generated when the Administration Stations were set up. If you are using a Screen that does not yet have a certificate, you need to manually generate a SKIP or IKE certificate using the Common Objects panel. See "Create a Certificate Object for Each Screen" in "Basic Encryption Configuration" for an example of creating certificates.
-
Ensure that each Screen includes Address objects for the other Screens and systems.
In this example, you would need to create the following Address objects:
-
hk-screen (should be address for outside IP address of this Screen)
-
sf-screen (should be address for outside IP address of this Screen)
-
hk-host1 (can be part of a group or range)
-
sf-host1 (can be part of a group or range)
-
-
Use the VPN Rules to add entries for the systems in your VPN.
Under Policy Rules, click the VPN tab and add entries for each host in your VPN. This example requires entries for sf-host1 and for hk-host1). Figure 5-16 (SKIP) and Figure 5-17 (IPSEC/IKE) show what the VPN rule definition dialog box might look like when adding the entry for sf-host1.
-
SKIP VPN Definition
Figure 5-16 SKIP VPN Definition Dialog Box
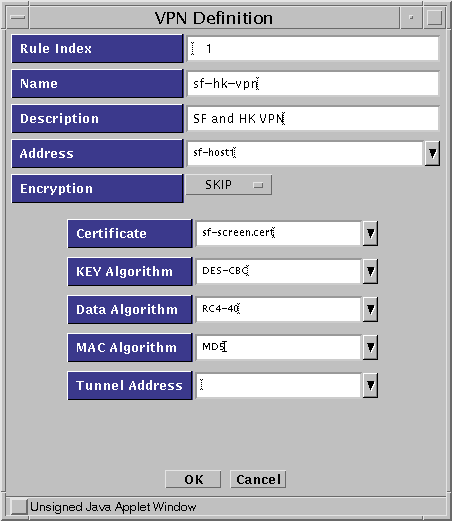
Note -In this example, the entry in the Address field (sf-host1) is a single system. Typically, this entry would be either an address group or an address range defining all the systems on the San Francisco side of the gateway which are going to use encryption.
-
IKE VPN definition
The Name, Address, Encryption, Algorithms, Oakley Group, Authentication Method and Certificate are required for each entry. You specify tunnel addresses on the Options tab.
Figure 5-17 IKE VPN Definition Dialog Box

Once you complete the VPN definitions for sf-host1 and hk-host1, the VPN tab (under the Policy Rules section of the administration GUI) should look like Figure 5-18. Note that the two entries contain the same name (sf-hk-vpn for this example).
Figure 5-18 VPN Tab, Under Policy Rules

Note -All entries associated with a particular VPN must have the same VPN name. The VPN name is referenced again when you create the packet filtering rules. They only accept a packet if both addresses in the IP header are associated with the same VPN.
-
-
Add a new Packet Filtering rule that uses the VPN name:
In this example, the following steps would occur on Screen sf-screen1.
Complete the information as needed, and select VPN as the action.
Note -Use an "*" for the source and destination addresses (at least for testing). This enables any packet that reaches this rule, and has both source and destination in the specified VPN, to be securely sent to the remote site.
-
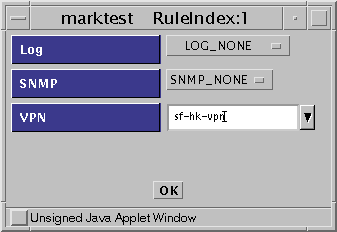
The Action Details window appears and prompts you to supply a VPN.
Enter the VPN name you created in Step 4 (sf-hk-vpn) as shown in the dialog window in Figure 5-19.
Figure 5-19 Initial Rule Index Dialog Box
-
Save and activate the policy.
-
Repeat Step 4, Step 5, and Step 7 on the other Screen (in this example hk-screen. )
-
Test the VPN Gateway.
You can easily test the configuration by creating a VPN packet-filtering rule that enables ICMP traffic to pass through the VPN, and then running a ping between protected hosts (sf-host1 and hk-host1.)
The following examples show the results of running snoop on the network in San Francisco, Hong Kong, and out on the Internet, the results would be as follows:
Inside either the San Francisco or Hong Kong Screen:
sf-host1 -> hk-host1   ICMP Echo request
hk-host1 -> sf-host1   ICMP Echo reply
Outside the Screen on the Internet:
sf-screen -> hk-screen IP D=192.168.6.2 S=192.168.2.2 ...
hk-screen -> sf-screen IP D=192.168.2.2 S=192.168.6.2 ...
- © 2010, Oracle Corporation and/or its affiliates
