Advanced Encryption Configuration
Preliminary Steps
-
Install the SunScreen software on the Screens.
In this example, you would install bos-screen as a stealth Screen (see Chapter 4, Configuring a Stealth Mode Screen) and hk-screen as a routing Screen. See the SunScreen 3.2 Installation Guide for installation details.
-
Make sure both Screens have a local certificate of the same type (SKIP or IKE) and modulus. If they do not, generate a certificate.
In this example, both Screens were installed using remote administration, so the installation process generated SKIP certificates for them. The default name for this SKIP certificate is screenname.admin (For example: bos-screen.admin).
If you need to generate an IKE certificate for a Screen, see Step 2 in "Create a Certificate Object for Each Screen" for an example.
-
Set up an open policy on both Screens and confirm that they can communicate.
Configure the Stealth Mode Screen
In this example, the stealth Screen is bos-screen.
-
Define the tunnel address of the Screen .
This address is the IP address used to send packets over the Internet. The tunnel address should be on the local network (192.168.1.100 in this example). For this example, define an Address object on bos-screen called bos-tunnel and give it an IP address of 192.168.1.5.
-
Define an Address object for the other Screen in the VPN configuration .
In this example, hk-screen is a routing Screen, so the address of this object is the IP address of the interface nearest the Internet (192.168.6.2).
Note -Optionally, you can define a separate tunnel address for hk-screen as well.
-
Define Address objects for the networks behind both Screens.
This example uses Address objects called bos-net and hk-net.
-
Edit the Address GROUP object for the interface nearest the Internet and make sure that the definition contains the tunnel address object .
In this example, the interface nearest the internet is hme2. The Address GROUP object for that interface is hme2-grp. So, for this example, hme2-grp must contain bos-tunnel.
-
SKIP Only - Edit the Screen object and make sure that Certificate Discovery is selected.
-
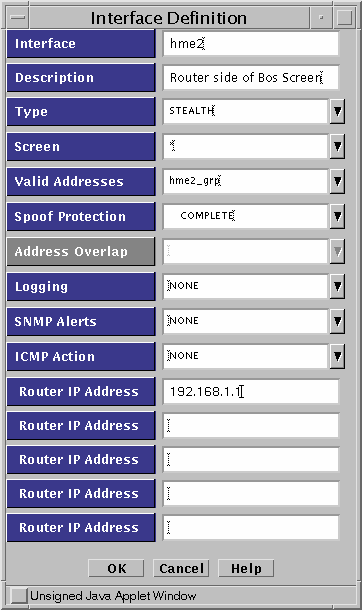
Edit the Interface object for the interface nearest the Internet (hme2.)
Fill in the Router IP Address field of the Interface definition for hme2 with the address of a default router on this network (192.168.1.1) for this example. See Figure 5-9. The stealth Screen is actually generating packets with a source IP address set to the tunnel address, but it has no routing table (because it is not a router) . Therefore, it needs to send the packets to a router that knows the location of hk-screen.
Figure 5-9 Interface Definition Screen
-
Add a Certificate object for the other Screen.
For this example, create a Certificate object hk-screen.cert.
-
Add a rule to encrypt the traffic between the two Screens.
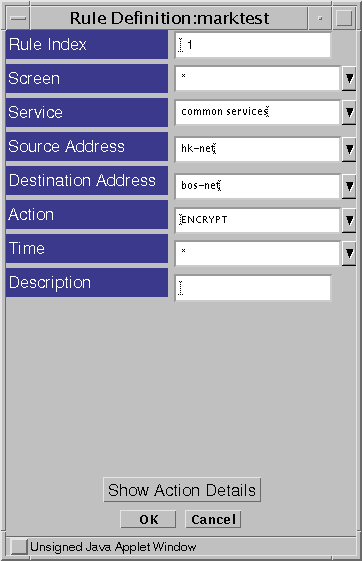
Define an ENCRYPT rule as shown in Figure 5-10 to encrypt traffic between the two networks (bos-net and hk-net in this example.)
This example uses Common Services, but the actual services you use should reflect your own security policy.
Figure 5-10 Rule Definition Window
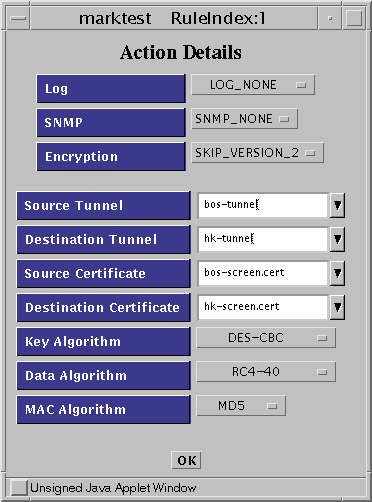
After selecting the ENCRYPT Action (or by clicking the Action Details button), the Action Details window appears. Figure 5-11 shows the default Action Details window which includes the parameters required to configure a SKIP tunnel.
Figure 5-11 Rule Index, Action Details Window (SKIP)
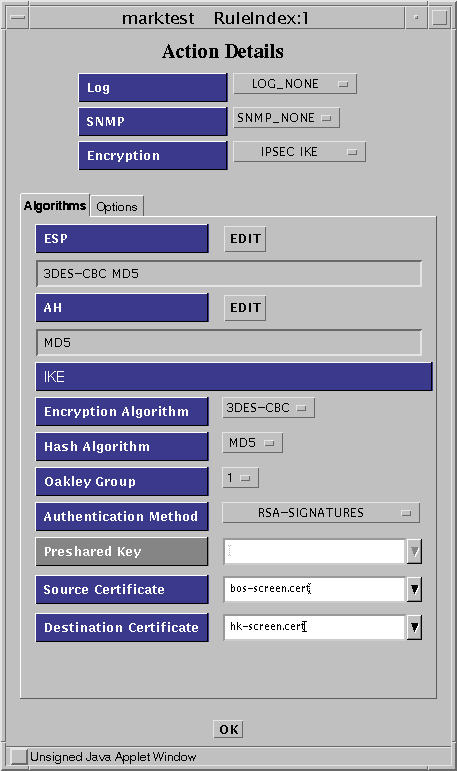
To reach the IKE Action Details windows, you must choose IPSEC IKE from the Encryption list.
Figure 5-12 Rule Index, Action Details Window (IKE Algorithms)
Click on the Options tab to specify the certificates for the screens and the tunnels.
Figure 5-13 Rule Index, Action Details Window (IKE Options)
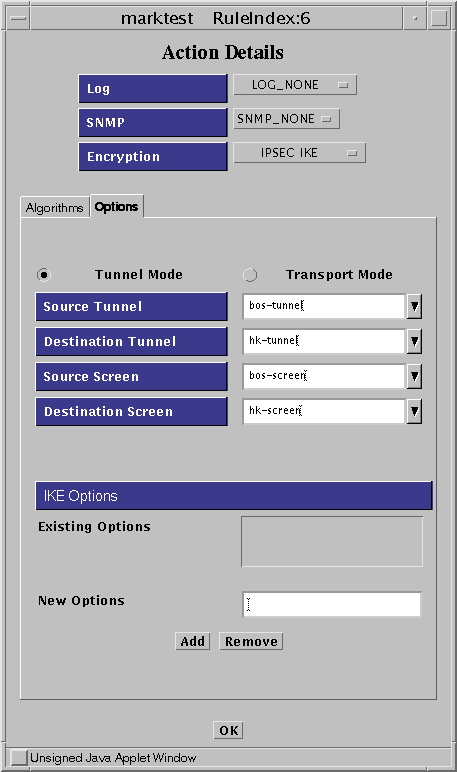
After you enter all the required parameters, click OK to save the information. This action returns you to the Rule Definition window.
-
In the Rule Definition window, click OK to complete the addition of this rule.
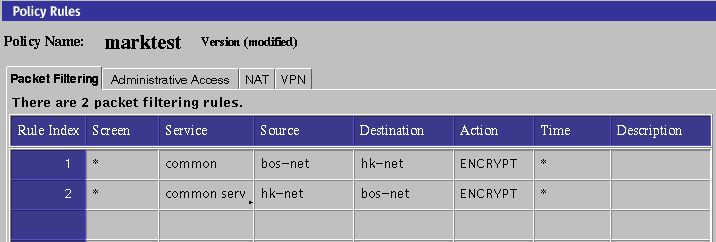
Figure 5-14 shows two ENCRYPT rules. The first rule lets you initiate encrypted connections from bos-net to hk-net establish connections from hk-net to bos-net, you need to add a second rule. Be sure to reverse the source and destination addresses and the certificates.
-
Save and activate the policy.
Figure 5-14 Encryption Configuration
Note -SKIP ONLY -- The Greenwich Mean Time (GMT) (as displayed by env TZ=GMT date) must be synchronized between SKIP peers. When Screens are located in different parts of the world, you should set the time for that part of the world. Also, set the TimeZone for that part of the world. That is, the local time that is corrected with the TimeZone must be the same on both machines. You can check the time using the date -u command.
Configure the Routing Screen
In this example, hk-screen is the name of the routing mode Screen.
-
Define an Address object for the other Screen in the configuration.
The other Screen (bos-screen) is a stealth Screen. Therefore, the address of this object is the tunnel address bos-tunnel. You have to create the same Address object here as exists on bos-screen.
-
Define Address objects for the networks behind both Screens.
In this example, the objects would be bos-net and hk-net.
-
SKIP ONLY -- Edit the Screen object and make sure that Certificate Discovery is selected.
-
Add the Certificate object for the other Screen.
Create an Certificate object called bos-screen.cert. See "Create a Certificate Object for Each Screen" for more information on creating certificates.
-
Add a rule to the configuration to encrypt the traffic between the two Screens.
Step 8 in the previous section shows the parameters used.
-
Save and activate the policy.
- © 2010, Oracle Corporation and/or its affiliates
