Customizing a Build
You can customize a build by changing make options, specifying a build mode, using makefile macros, or using environment variables. To customize a build, choose Build > Edit Target and choose a WorkShop target from the list. The Edit Target dialog box opens. After making your changes, click Build to rebuild the WorkShop target with your new settings.
Specifying Make Options
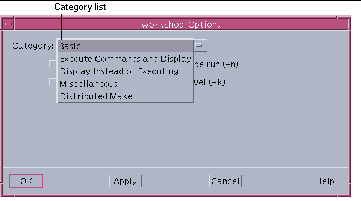
You can specify make options using the Options dialog box, shown in Figure 4-3.
Figure 4-3 Options Dialog Box

|
Category list |
Allows you to select a category of make options. |
|
OK button |
Applies the changes and closes the dialog box |
|
Apply button |
Applies the changes but leaves the dialog box open |
|
Cancel button |
Closes the dialog box without applying changes |
|
Help button |
Displays online help for the dialog box |
Table 4-1 describes the make options you can set using the dialog box.
Table 4-1 Options That You Can Set in the Options Dialog Box|
Category |
Option |
|---|---|
|
Basic |
Echo command lines but do not execute them (-n) |
|
|
When an error occurs, continue with dependency branches that do not depend on the target (-k). |
|
Execute Commands and Display |
Display reasons why make chooses to rebuild a target; make displays any and all dependencies that are newer. The make displays options are also read in from the MAKEFLAGS environment variable (-d). |
|
|
Display detailed information on the dependency check and processing (-ss). |
|
|
Display the text of the makefiles read in (-D). |
|
|
Display the text of the makefiles, make.rules file, the state file, and all hidden-dependency reports (-DD). |
|
|
Silent mode. Do not echo command lines before executing them. Equivalent to the special-function target .SILENT: (-s). |
|
Display instead of executing |
Print the complete set of macro definitions and target descriptions (-p). |
|
|
Report dependencies only, do not build them (-P). |
|
|
Question mode. make returns a zero or nonzero status code depending on whether or not the target file is up to date (-q). |
|
Miscellaneous |
Touch the target files (making them appear up to date) instead of performing their rules. This procedure can be dangerous when files are maintained by more than one person. When the .KEEP_STATE: target appears in the makefile, this option updates the state file just as if the rules had been performed (-t). |
|
|
Do not use the default rules in the default makefile /usr/share/lib/make/make.rules (-r). |
|
|
Let environment variables override macro definitions within makefiles (-e). |
|
|
Ignore error codes returned by commands. Equivalent to the special-function target .IGNORE: (-i). |
|
Distributed Make |
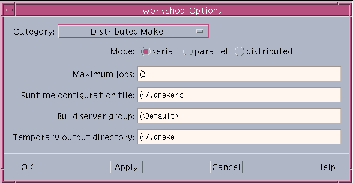
Mode: Choose the type of make process to run: serial, parallel, or distributed (see "Specifying a Build Mode") (-m). |
|
|
Maximum jobs: Specify the maximum numbers of jobs that are distributed to the build servers (-j). |
|
|
Runtime configuration file: Specify a runtime configuration file. |
|
|
Build server group: Specify the name of the server group to which jobs are distributed. |
|
|
Temporary output directory: Specify the name of the directory to which temporary output is to be written. |
To specify a make option:
-
Click Options to open the Options dialog box.
-
Select the options you want from the Options dialog box.
Click the Category list to select a category of make options. The Options dialog box gives you access to all the options to make and dmake. For information on the distributed make options, see "Specifying a Build Mode"."
-
Click Build to apply the options and start the build.
You can also specify make options through the Define New Target dialog box available from the New Target command in the Build menu.
Specifying a Build Mode
To change the default build mode of dmake from serial to parallel or distributed::
-
Click Options to open the Options dialog box.
-
Select the Distributed Make category from the Category list.
-
Click the build mode you want and fill in any required text boxes in the Options dialog box, as shown in Figure 4-4.
-
Click Build to set the options and start the build.
Figure 4-4 Options Dialog Box for Build Mode

Serial Mode
To build in serial mode, you simply click the serial radio button. There are no text boxes for you to fill in.
Parallel Mode
To build in parallel mode, click the parallel radio button. Then specify the maximum number of build jobs to be run in the Maximum jobs text box. If you do not specify a maximum number of jobs, dmake uses two as the default.
Distributed Mode
To build in distributed mode, click the distributed radio button. Then specify the maximum number of build jobs to be run in the Maximum jobs text box. If you do not specify a maximum number of jobs, dmake uses the sum of the jobs specified for the servers in the group.
If you choose not to use the default name and location provided in the Runtime configuration file text box, type the name or path of your .dmakerc file (see ".dmakerc File") in this text box.
If you do not type the name of a group in the Build server group text box, dmake uses the first group listed in the .dmakerc file. When running in distributed mode, dmake distributes jobs to the following groups in order of precedence):
-
The group specified on the command line as an argument to the -g option
-
The group specified by the DMAKE_GROUP makefile macro
-
The group specified by the DMAKE_GROUP environment variable
-
The first group specified in the runtime configuration file
If you do not choose to use the default name and location provided in the Temporary output directory text box, type the name of an output directory in this field.
For more information on distributed builds, see "Running a Distributed Build".
Using Makefile Macros
Makefile macros let you refer conveniently to files or command options that appear more than once in the description file. (For information on defining macros, see Appendix B, The make Utility and Makefiles.)
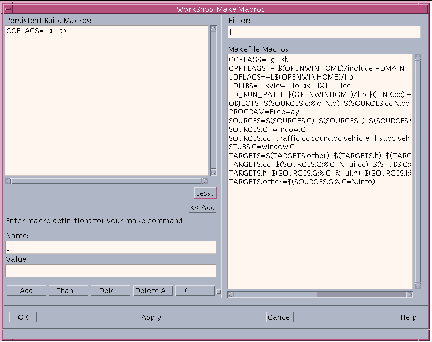
Using the Make Macros dialog box (see Figure 4-5), you can add makefile macros to or delete them from the Persistent Build Macros list in your WorkShop target, and then reassign values for makefile macros in the list. You can also add macros currently defined in the makefile to the list and override their values.
All macros in the Persistent Build Macros list are saved with your WorkSet.
To open the Make Macros dialog box, click Macros in the Edit Target dialog box.
Figure 4-5 Make Macros Dialog Box

|
Persistent Build Macros pane |
Lists macros that will be saved with your WorkSet |
|
More/Less button |
More opens the Filter text box and Makefile Macros list pane; the button toggles to Less, which closes the pane |
|
<<Add button |
Lets you add a macro in the Makefile Mactros list to the Persistent Build Macros list |
|
Name text box |
Lets you assign a name to a new macro or change the name of the selected macro on the Persistent Build Macros list |
|
Value text box |
Lets you assign a value to the macro named in the Name text box |
|
Add button |
Adds the macro defined in the Name and Value text boxes to the Persistent Build Macros list |
|
Change button |
Applies the values in the Name and Value text boxes to the selected macro on the Persistent Build Macros list |
|
Delete button |
Deletes the selected macro on the Persistent Build Macros list |
|
Delete All button |
Deletes all macros on the Persistent Build Macros list |
|
Clear button |
Clears the Name and Value text boxes |
|
Filter text box |
Lets you type a search pattern to filter the Makefile Macros list |
|
Makefile Macros list |
Lists the macros defined in the makefile in the current WorkSet |
|
OK button |
Applies the changes and closes the dialog box |
|
Apply button |
Applies the changes but leaves the dialog box open |
|
Cancel button |
Closes the dialog box without applying changes |
|
Help button |
Displays online help for the dialog box |
Adding a Macro
To add a macro to the Persistent Build Macros list:
-
Type the name of a macro in the Name text box.
-
Type a value for the macro in the Value text box.
If you make a mistake, click Clear to remove entries in the Name and Value text boxes.
-
Click Add to add the new macro to the list.
-
Repeat the previous three steps to add other macros.
-
Click OK to close the dialog box.
Deleting a Macro
To delete a macro from the Persistent Build Macros list:
-
Select a macro in the list.
-
Click Delete (Delete All removes all macros in the list).
-
Click OK to establish the change and close the dialog box.
Changing a Macro
To change the value of a macro in the Persistent Build Macros list::
-
Select a macro in the list.
-
Type a new value in the Value text box and click Change.
-
Click OK to establish the change and close the dialog box.
-
Click Build in the Edit Target dialog box to start the build with the new values.
Reviewing and Overriding Makefile Macros
A macro definition that appears in the Persistent Build Macros list overrides any macro with the same name that appears in the makefile.
To review the current macro definitions, click More to open the Makefile Macros list, which displays all the macros that are defined in the makefile associated with the build target. You can filter the list using the Filter text box.
To override the value of a makefile macro:
-
Select a macro in the Makefile Macros list.
-
Click <<Add to add the macro to the Persistent Build Macros list.
-
Type a new value in the Value text box and click Change.
-
Click OK to establish the change and close the dialog box.
The macro definition in the Persistent Build Macros list overrides the macro definition in the makefile, and is saved with your WorkSet.
-
Click Build in the Edit Target dialog box to start the build with the new values.
Using Environment Variables
You can specify environment variables for your build. When you start the build, setenv commands for these environment variables are prepended to the build command.
Using the Environment Variables dialog box, you can add environment variables to or delete them from the Persistent Environment Variables list in your WorkShop target, and reassign values for environment variables in the list.
All macros in the Persistent Environment Variables list are saved with your WorkSet.
Note -
The Persistent Environment Variables list for building your program is not the same as the Persistent Environment Variables list for running your program described in "Setting Environment Variables".
To open the Environment Variables dialog box, click Environment Variables in the Edit Target dialog box.
Adding an Environment Variable
To add an environment variable to the Persistent Environment Variables list::
-
Type the name of an environment variable in the Name text box.
-
Type a value for the variable in the Value text box.
If you make a mistake, click Clear to remove entries in the Name and Value text boxes.
-
Click Add to add the environment variable to the Persistent Environment Variables list.
-
Repeat the previous three steps to add other environment variables.
-
Click OK to close the dialog box.
Deleting an Environment Variable
To delete a variable from the Persistent Environment Variables list:
-
Select a variable from the list.
-
Click Delete (Delete All removes all environment variables in the list).
-
Click OK to establish the change and close the dialog box.
Changing the Value of an Environment Variable
To change the value of an environment variable in the Persistent Environment Variables list:
-
Select an environment variable in the list.
-
Type a new value in the Value text box and click Change.
-
Click OK to establish the change and close the dialog box.
-
Click Build to start the build with the new build environment.
Reviewing and Overriding Environment Variables
An environment variable definition that appears in the Persistent Environment Variables list overrides any environment variable with the same name that appears in the current WorkShop process environment.
To review the current WorkShop process environment variable definitions, click More to open the Current Environment list, which includes all the environment variables that are currently defined in the WorkShop process environment. You can filter the list using the Filter text box.
To override the value of an environment variable:
-
Select an environment variable in the Current Environment list.
-
Click <<Add to add the environment variable to the Persistent Environment Variables list.
-
Type a new value in the Value text box and click Change.
-
Click OK to establish the change and close the dialog box.
The environment variable definition in the Persistent Environment Variables list overrides the environment variable definition in the current WorkShop process environment, and is saved with your WorkSet.
-
Click Build in the Edit Target dialog box to start the build with the new values.
- © 2010, Oracle Corporation and/or its affiliates
