Chapter 4 Building Programs in Sun Workshop
Sun WorkShop provides you with the ability to run one build job at a time or several build jobs concurrently. This chapter shows you how to quickly build a single application, how to customize a build, and how to fix build errors using the Building window and the Sun WorkShop editor of your choice.
This chapter is organized into the following sections:
-
Exiting Building
Building a Sun WorkShop Target
When you build a program in Sun WorkShop, you are actually building a WorkShop target, which is an object derived from the following:
-
Build directory--The directory from which the build process is invoked and also the default directory for the makefile.
-
Build command--The command that invokes the make utility, which reads the makefile and builds the make targets.
-
Makefile--A file that contains entries that describe how to bring a make target up to date with respect to those files on which it depends (called dependencies). Since each dependency is a make target, it may have dependencies of its own. Targets and file dependencies and subdependencies form a tree structure that make traces when deciding whether or not to rebuild a make target.
-
Make target--An object that make knows how to build from the directions (rules) contained in a particular makefile. For example, a make target could be all or clean. Makefiles are generally designed so that the default target (the one you get when you do not specify a target) is the most commonly built target.
When a WorkShop target is built, it is added to the list of WorkShop targets in the Build menu and in the Edit Target command. When you begin a build, Sun WorkShop looks for the first target in the WorkShop target list and builds it.
For information on the make utility, makefiles, and make targets, see Appendix B, The make Utility and Makefiles."
Building Window
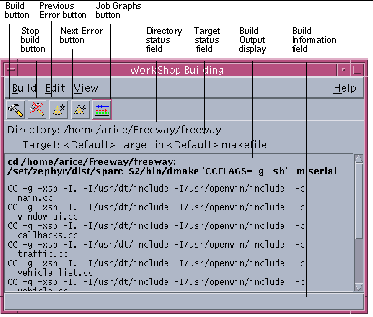
The Building window displays information on program compilation. You can open the window by choosing Build > Show Build Window in the Sun WorkShop main window or by starting a build operation.
From the Building window, you can:
-
Stop a build in progress
-
Edit build parameters
-
Save the build output to another file
-
View build errors
Figure 4-1 shows the Building window.
Figure 4-1 Building Window
|
Build menu |
Provides commands for common build operations |
|
Edit menu |
Provides commands to accumulate data and to clear the Build Output Display pane |
|
View menu |
Provides commands for navigating build errors in the Build Output Display pane and for viewing information on multiple build processes when running a distributed make |
|
Build button |
Begins a build of the current WorkShop target |
|
Stop Build button |
Stops the current build in progress |
|
Previous Error button |
Moves the cursor to the previous build error in the Build Output Display pane and shows that error location in the text editor |
|
Next Error button |
Moves the cursor to the next build error in the Build Output Display pane and shows that error location in the text editor |
|
Dmake Jobs Graph button |
Opens the Dmake Jobs Graph window |
|
Directory status field |
Displays the path name of the current build directory |
|
Target status field |
Displays the name of the current make target |
|
Build Output Display pane |
Displays output for the current build operation |
|
Build Information field |
Displays information about the current build |
Building a Program
You can begin a build without having to specify a build command, makefile, or target. Or you can specify one or all of these. You can also customize a build by specifying make options, specifying a build mode, overriding makefile macros, or editing environment variables (see "Customizing a Build").
Define New Target and Edit Target Dialog Boxes
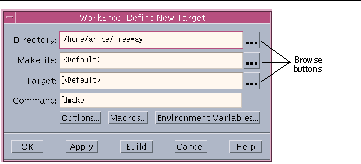
You specify build parameters using the Define New Target and Edit Target dialog boxes, which are basically identical. You use the Define New Target dialog box to specify a new WorkShop target and the Edit Target dialog box to modify an existing WorkShop target. Figure 4-2 shows the Define New Target dialog box.
Figure 4-2 Define New Target Dialog Box
|
Directory text box |
Lets you type a build directory path. You can also select a directory by clicking on the browse button. |
|
Makefile text box |
Lets you specify a makefile (the default file name is makefile or Makefile. You can also select a makefile by clicking on the browse button. |
|
Target text box |
Lets you specify a make target. You can also select a target by clicking on the browse button. |
|
Browse (..) buttons |
Let you display dialog boxes in which you can choose a build directory, makefile, or make target |
|
Command text box |
Lets you type a make command; the default command is dmake (described in "Running a Distributed Build"). |
|
Options button |
Opens the Make Options dialog box (see "Specifying Make Options"). The Make Options dialog box allows you to modify the parameters of a build using the options provided. |
|
Macros button |
Opens the Make Macros dialog box (see "Using Makefile Macros"), which allows you to add, change, or delete macros to be passed into the build. |
|
Environment Variables button |
Opens the Environment Variables dialog box (see "Using Environment Variables"), which allows you to add, change, or delete environment variables to be passed into the build. |
|
OK button |
Applies the build parameters and closes the dialog box. |
|
Apply button |
Applies the build parameters. |
|
Build button |
Applies the build parameters and builds the target. |
|
Cancel button |
Closes the dialog box without applying changes. |
|
Help button |
Displays online help for the dialog box. |
Building With Default Values
You can begin a build without having to specify a build command, makefile, or target. Sun WorkShop provides a default makefile name (makefile), a default make target, and a default make command, dmake (see "Running a Distributed Build"). All you need to supply is the path name for the build directory.
Default Makefile and Make Target
The Define New Target dialog box contains the value Default in the Makefile and Target text boxes. If you do not specify a particular makefile or make target, Sun WorkShop looks for a file named makefile in the build directory and uses the first make target in that makefile. However, if make finds an SCCS history file (s.makefile) that is newer than the file named makefile, Sun WorkShop uses the most recent version of s.makefile. If makefile does not exist, Sun WorkShop searches for a file named Makefile. Again, if an SCCS history file (s.Makefile) exists that is newer than Makefile, Sun WorkShop uses the most recent version of s.Makefile.
Using Default Values
To build a program using default build values:
-
Look in the Directory status field in the Building window to be sure you have the correct build directory set.
-
If the current build directory is correct, click the Build button, choose Build > Build in the Sun WorkShop main window or the Building window, or select a WorkShop target from the list at the bottom of the Build menu in either window.
-
If no build directory is displayed in the Directory status field or you want to change build directories, choose Build > New Target to open the Define New Target dialog box. Type the build path in the Directory text box.
You can also click the browse button to open a directory chooser. Choose a directory in the list and click OK to load it into the Directory text box. Then click Build at the bottom of the dialog box.
The build output is displayed in the Build Output display pane in the Building window. Click the Stop Build button in the Building window or choose Build > Stop Build to stop the build process.
Note -
The next time you open the Building window, the build directory is set to the last directory in which you ran a build job. You can see the path name in the Directory status field.
Building With Nondefault Values
If you have a makefile with a unique name, a certain make target, or a specific build command, specify it in the Define New Target dialog box or Edit Target dialog box by clicking on the appropriate browse button (see Figure 4-2). Each browse button displays a dialog box.
-
Type the name of the directory in which you want to build and click Apply to apply the change.
You can also select another directory from the Set Build Directory dialog box. If you have not specified a build directory, Sun WorkShop either tries to build in the directory currently displayed in the build directory field or, if no directory is displayed, displays an error message pop-up window.
-
Type the name of the makefile you want in the Makefile text box.
If you want to choose another makefile from the current build directory, type the name of the makefile in the Makefile text box, or choose a makefile from the list in the Set Makefile dialog box, and click OK.
You can run your build in a directory that is different from the one the makefile is in. Just specify the full path name of the makefile in the Makefile text box.
-
Type the name of the make target you want in the Target text box.
Type the name of the make target in the Target text box, or choose another make target in the current makefile in the Target Chooser dialog box, and click OK.
-
Type the name of the build command you want in the Command text box.
If the build command you specify is something other than make or dmake, you can specify the command and any of its arguments in the Command text box. The build command is formed by prepending setenv commands for any environment variables specified through the Environment Variables dialog box and by appending any of the make options specified through the Make Options and Make Macros dialog boxes.
Note -If the path to the build command is not in your PATH environment variable, you might have to specify the full command path.
-
Click Build in the dialog box to start a build with the settings you supplied.
The build output is displayed in the Build Output display pane in the Building window. Click the Stop Build button in the Building window or choose Build > Stop Build to stop the build process.
Collecting Build Output
Build output is cleared from the Build Output display pane each time you run a build job. You can keep the build output from previous builds by setting the Accumulate Output switch to on.
To collect build output, choose Edit > Accumulate Output.
The Accumulate Output command toggles the switch on and off. When a build is performed, output for that build is displayed below the output for the previous build. You can scroll through the pane to see the output for each build. To identify specific build jobs, each build output begins with the build path and the name of the build target.
To clear the build output log, choose Edit > Clear Results.
Saving Build Output
You can maintain a history of build output information for one or more build jobs by saving the output to a file.
To save build output:
-
Choose Build > Save Output As.
-
Choose or create a file in which to save the output using the Save Build Output dialog box.
The build output log is saved as a text file.
Modifying a WorkShop Target
To edit an existing WorkShop target, choose Build > Edit Target and choose a WorkShop target from the list. The Edit Target dialog box opens, displaying the current settings for the build directory, makefile, make target, and build command. Edit any of these fields, as described in "Building With Nondefault Values". Click Build to rebuild the WorkShop target with your new settings.
Removing a WorkShop Target
You can remove targets from the WorkShop target list and the Edit Target list in the Build menu.
To remove a target:
-
Choose Build > Remove targets from menu in either the Sun WorkShop main window or the Building window.
-
Select one or more targets from the list in the Remove targets from menu dialog box.
Hold down the Control key and click to select more than one target name.
-
Click OK.
Customizing a Build
You can customize a build by changing make options, specifying a build mode, using makefile macros, or using environment variables. To customize a build, choose Build > Edit Target and choose a WorkShop target from the list. The Edit Target dialog box opens. After making your changes, click Build to rebuild the WorkShop target with your new settings.
Specifying Make Options
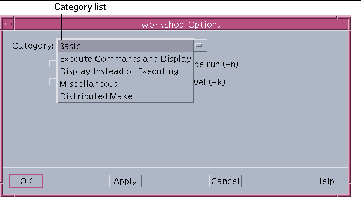
You can specify make options using the Options dialog box, shown in Figure 4-3.
Figure 4-3 Options Dialog Box
|
Category list |
Allows you to select a category of make options. |
|
OK button |
Applies the changes and closes the dialog box |
|
Apply button |
Applies the changes but leaves the dialog box open |
|
Cancel button |
Closes the dialog box without applying changes |
|
Help button |
Displays online help for the dialog box |
Table 4-1 describes the make options you can set using the dialog box.
Table 4-1 Options That You Can Set in the Options Dialog Box|
Category |
Option |
|---|---|
|
Basic |
Echo command lines but do not execute them (-n) |
|
|
When an error occurs, continue with dependency branches that do not depend on the target (-k). |
|
Execute Commands and Display |
Display reasons why make chooses to rebuild a target; make displays any and all dependencies that are newer. The make displays options are also read in from the MAKEFLAGS environment variable (-d). |
|
|
Display detailed information on the dependency check and processing (-ss). |
|
|
Display the text of the makefiles read in (-D). |
|
|
Display the text of the makefiles, make.rules file, the state file, and all hidden-dependency reports (-DD). |
|
|
Silent mode. Do not echo command lines before executing them. Equivalent to the special-function target .SILENT: (-s). |
|
Display instead of executing |
Print the complete set of macro definitions and target descriptions (-p). |
|
|
Report dependencies only, do not build them (-P). |
|
|
Question mode. make returns a zero or nonzero status code depending on whether or not the target file is up to date (-q). |
|
Miscellaneous |
Touch the target files (making them appear up to date) instead of performing their rules. This procedure can be dangerous when files are maintained by more than one person. When the .KEEP_STATE: target appears in the makefile, this option updates the state file just as if the rules had been performed (-t). |
|
|
Do not use the default rules in the default makefile /usr/share/lib/make/make.rules (-r). |
|
|
Let environment variables override macro definitions within makefiles (-e). |
|
|
Ignore error codes returned by commands. Equivalent to the special-function target .IGNORE: (-i). |
|
Distributed Make |
Mode: Choose the type of make process to run: serial, parallel, or distributed (see "Specifying a Build Mode") (-m). |
|
|
Maximum jobs: Specify the maximum numbers of jobs that are distributed to the build servers (-j). |
|
|
Runtime configuration file: Specify a runtime configuration file. |
|
|
Build server group: Specify the name of the server group to which jobs are distributed. |
|
|
Temporary output directory: Specify the name of the directory to which temporary output is to be written. |
To specify a make option:
-
Click Options to open the Options dialog box.
-
Select the options you want from the Options dialog box.
Click the Category list to select a category of make options. The Options dialog box gives you access to all the options to make and dmake. For information on the distributed make options, see "Specifying a Build Mode"."
-
Click Build to apply the options and start the build.
You can also specify make options through the Define New Target dialog box available from the New Target command in the Build menu.
Specifying a Build Mode
To change the default build mode of dmake from serial to parallel or distributed::
-
Click Options to open the Options dialog box.
-
Select the Distributed Make category from the Category list.
-
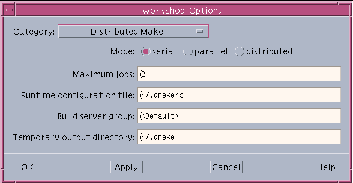
Click the build mode you want and fill in any required text boxes in the Options dialog box, as shown in Figure 4-4.
-
Click Build to set the options and start the build.
Figure 4-4 Options Dialog Box for Build Mode
Serial Mode
To build in serial mode, you simply click the serial radio button. There are no text boxes for you to fill in.
Parallel Mode
To build in parallel mode, click the parallel radio button. Then specify the maximum number of build jobs to be run in the Maximum jobs text box. If you do not specify a maximum number of jobs, dmake uses two as the default.
Distributed Mode
To build in distributed mode, click the distributed radio button. Then specify the maximum number of build jobs to be run in the Maximum jobs text box. If you do not specify a maximum number of jobs, dmake uses the sum of the jobs specified for the servers in the group.
If you choose not to use the default name and location provided in the Runtime configuration file text box, type the name or path of your .dmakerc file (see ".dmakerc File") in this text box.
If you do not type the name of a group in the Build server group text box, dmake uses the first group listed in the .dmakerc file. When running in distributed mode, dmake distributes jobs to the following groups in order of precedence):
-
The group specified on the command line as an argument to the -g option
-
The group specified by the DMAKE_GROUP makefile macro
-
The group specified by the DMAKE_GROUP environment variable
-
The first group specified in the runtime configuration file
If you do not choose to use the default name and location provided in the Temporary output directory text box, type the name of an output directory in this field.
For more information on distributed builds, see "Running a Distributed Build".
Using Makefile Macros
Makefile macros let you refer conveniently to files or command options that appear more than once in the description file. (For information on defining macros, see Appendix B, The make Utility and Makefiles.)
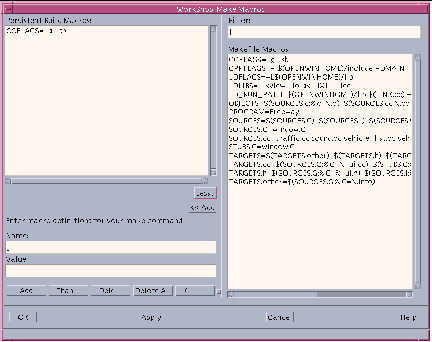
Using the Make Macros dialog box (see Figure 4-5), you can add makefile macros to or delete them from the Persistent Build Macros list in your WorkShop target, and then reassign values for makefile macros in the list. You can also add macros currently defined in the makefile to the list and override their values.
All macros in the Persistent Build Macros list are saved with your WorkSet.
To open the Make Macros dialog box, click Macros in the Edit Target dialog box.
Figure 4-5 Make Macros Dialog Box
|
Persistent Build Macros pane |
Lists macros that will be saved with your WorkSet |
|
More/Less button |
More opens the Filter text box and Makefile Macros list pane; the button toggles to Less, which closes the pane |
|
<<Add button |
Lets you add a macro in the Makefile Mactros list to the Persistent Build Macros list |
|
Name text box |
Lets you assign a name to a new macro or change the name of the selected macro on the Persistent Build Macros list |
|
Value text box |
Lets you assign a value to the macro named in the Name text box |
|
Add button |
Adds the macro defined in the Name and Value text boxes to the Persistent Build Macros list |
|
Change button |
Applies the values in the Name and Value text boxes to the selected macro on the Persistent Build Macros list |
|
Delete button |
Deletes the selected macro on the Persistent Build Macros list |
|
Delete All button |
Deletes all macros on the Persistent Build Macros list |
|
Clear button |
Clears the Name and Value text boxes |
|
Filter text box |
Lets you type a search pattern to filter the Makefile Macros list |
|
Makefile Macros list |
Lists the macros defined in the makefile in the current WorkSet |
|
OK button |
Applies the changes and closes the dialog box |
|
Apply button |
Applies the changes but leaves the dialog box open |
|
Cancel button |
Closes the dialog box without applying changes |
|
Help button |
Displays online help for the dialog box |
Adding a Macro
To add a macro to the Persistent Build Macros list:
-
Type the name of a macro in the Name text box.
-
Type a value for the macro in the Value text box.
If you make a mistake, click Clear to remove entries in the Name and Value text boxes.
-
Click Add to add the new macro to the list.
-
Repeat the previous three steps to add other macros.
-
Click OK to close the dialog box.
Deleting a Macro
To delete a macro from the Persistent Build Macros list:
-
Select a macro in the list.
-
Click Delete (Delete All removes all macros in the list).
-
Click OK to establish the change and close the dialog box.
Changing a Macro
To change the value of a macro in the Persistent Build Macros list::
-
Select a macro in the list.
-
Type a new value in the Value text box and click Change.
-
Click OK to establish the change and close the dialog box.
-
Click Build in the Edit Target dialog box to start the build with the new values.
Reviewing and Overriding Makefile Macros
A macro definition that appears in the Persistent Build Macros list overrides any macro with the same name that appears in the makefile.
To review the current macro definitions, click More to open the Makefile Macros list, which displays all the macros that are defined in the makefile associated with the build target. You can filter the list using the Filter text box.
To override the value of a makefile macro:
-
Select a macro in the Makefile Macros list.
-
Click <<Add to add the macro to the Persistent Build Macros list.
-
Type a new value in the Value text box and click Change.
-
Click OK to establish the change and close the dialog box.
The macro definition in the Persistent Build Macros list overrides the macro definition in the makefile, and is saved with your WorkSet.
-
Click Build in the Edit Target dialog box to start the build with the new values.
Using Environment Variables
You can specify environment variables for your build. When you start the build, setenv commands for these environment variables are prepended to the build command.
Using the Environment Variables dialog box, you can add environment variables to or delete them from the Persistent Environment Variables list in your WorkShop target, and reassign values for environment variables in the list.
All macros in the Persistent Environment Variables list are saved with your WorkSet.
Note -
The Persistent Environment Variables list for building your program is not the same as the Persistent Environment Variables list for running your program described in "Setting Environment Variables".
To open the Environment Variables dialog box, click Environment Variables in the Edit Target dialog box.
Adding an Environment Variable
To add an environment variable to the Persistent Environment Variables list::
-
Type the name of an environment variable in the Name text box.
-
Type a value for the variable in the Value text box.
If you make a mistake, click Clear to remove entries in the Name and Value text boxes.
-
Click Add to add the environment variable to the Persistent Environment Variables list.
-
Repeat the previous three steps to add other environment variables.
-
Click OK to close the dialog box.
Deleting an Environment Variable
To delete a variable from the Persistent Environment Variables list:
-
Select a variable from the list.
-
Click Delete (Delete All removes all environment variables in the list).
-
Click OK to establish the change and close the dialog box.
Changing the Value of an Environment Variable
To change the value of an environment variable in the Persistent Environment Variables list:
-
Select an environment variable in the list.
-
Type a new value in the Value text box and click Change.
-
Click OK to establish the change and close the dialog box.
-
Click Build to start the build with the new build environment.
Reviewing and Overriding Environment Variables
An environment variable definition that appears in the Persistent Environment Variables list overrides any environment variable with the same name that appears in the current WorkShop process environment.
To review the current WorkShop process environment variable definitions, click More to open the Current Environment list, which includes all the environment variables that are currently defined in the WorkShop process environment. You can filter the list using the Filter text box.
To override the value of an environment variable:
-
Select an environment variable in the Current Environment list.
-
Click <<Add to add the environment variable to the Persistent Environment Variables list.
-
Type a new value in the Value text box and click Change.
-
Click OK to establish the change and close the dialog box.
The environment variable definition in the Persistent Environment Variables list overrides the environment variable definition in the current WorkShop process environment, and is saved with your WorkSet.
-
Click Build in the Edit Target dialog box to start the build with the new values.
Fixing Build Errors
The process of fixing build errors is simplified by the integration of the text editor with the build process. When a build fails, the build errors are displayed in the Build Output display pane of the Building window, as shown in Figure 4-6. Build errors that have links to the source files containing the errors are highlighted and underscored. Unrecognized errors are displayed with the rest of the build output without highlighting or underscoring.
Note -
Do not run a build job and a fix (recompilation of edited source files) concurrently. The output for both jobs intermingles in the Build Output display pane in the Building window. It can be difficult to discern the output of one job from the other.
Figure 4-6 Build Errors in the Build Output Display Pane
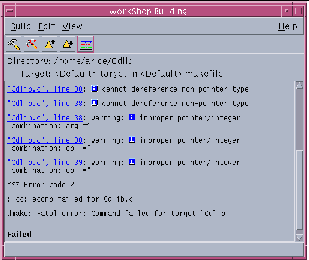
Each error line gives the name of the file containing the error, the line number on which the error occurs, and the error message.
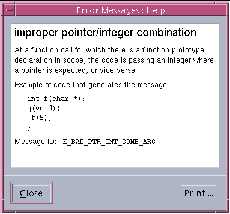
Error messages issued by the C compiler include an additional glyph (![]() ) in the build error message. Clicking on the glyph opens a pop-up window that defines the associated error message.
) in the build error message. Clicking on the glyph opens a pop-up window that defines the associated error message.
Figure 4-7 Error Message Pop-up Window
Note -
Only Sun compilers produce output that can be converted to hypertext links. If you use a build command that does not call Sun compilers, you will not have links to the source files from the build errors listed in the Building window.
Displaying the Source of an Error
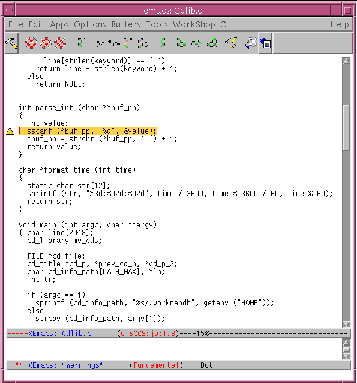
Clicking on the underscored error immediately starts a text editor that displays the source file containing the error. The source file is shown with the error line highlighted and an error glyph appears to the left of the line (see Figure 4-8).
Note -
By using the keyboard shortcuts F4 (next error) and Shift+F4 (previous error) to navigate through the build errors, you can keep focus on the text editor window.
Figure 4-8 Text Editor Window Displaying Source File With Error
Fixing an Error
The following steps show how you can use the Building window and the text editor to quickly fix build errors:
-
Click a highlighted error in the Build Output display pane.
The editor window opens, displaying the source file containing the error. You do not have to search for the line containing the error--the error line is highlighted in the editor and the cursor is already positioned at the line. The error message is repeated in the footer of the text editor.
-
In the text editor, make sure the source file can be edited.
If the file is under SCCS control, check it out using the appropriate menu commands in the text editor:
-
In the vi editor, choose Version > Checkout.
-
In the XEmacs editor, choose Tools > VC > Check out File file.
-
In the GNU Emacs editor, choose Tools > Version Control > Check Out.
-
-
Edit the source file containing the error.
-
In the Building window, click the Next Error button in the tool bar (or use the keyboard shortcut F4) to go to the location of the next build error in the text editor.
As you click Next Error, notice how each successive error in the build output is highlighted and how the corresponding source line in the text editor is also highlighted.
-
Save the edited file.
-
In the vi editor, choose File > Save.
-
In the XEmacs editor, choose File > Save file.
-
In the GNU Emacs editor, choose Files > Save buffer.
-
-
If the file is under SCCS control, check it in using the appropriate menu commands in the text editor:
-
In the vi editor, choose Version > Checkin.
-
In the XEmacs editor, choose Tools > VC > Check in File file.
-
In the GNU Emacs editor, choose Tools > Version Control > Check In.
-
-
Click the Build button in the text editor's tool bar to rebuild.
You can also build by clicking on the Build button in the Building window's tool bar or using the keyboard shortcut F3.
You can watch the Build Output display pane to follow the progress of the build.
Running a Distributed Build
Distributed Make (dmake) allows you to concurrently distribute the process of building large projects, consisting of many programs, over a number of workstations and, in the case of multiprocessor systems, over multiple CPUs. For a full description of Distributed Make, see Appendix C, Using the dmake Utility."
The default Sun WorkShop build command (dmake) provides three different build modes:
-
Serial mode - dmake executes one job at a time on the local host (similar to make)
-
Parallel mode - dmake executes multiple jobs concurrently on the local host
-
Distributed mode - dmake executes multiple jobs over several build servers
In distributed mode, you can concurrently distribute over several servers the process of building large projects that consist of many programs. dmake parses your makefiles, determines which targets can be built concurrently, and distributes the build for those targets over a number of build servers designated by you.
By default, dmake runs in serial mode. You can set it to run in parallel or distributed mode in the Options dialog box (see "Specifying Make Options").
Preparing for a Distributed Build
Before running a distributed build for the first time, you must create a configuration file that specifies which machines are to participate as dmake build servers. In addition, before a machine can be used as a build server, it must be configured to allows jobs to be distributed to it.
A build server should be of the same architecture and running the same operating system version as the dmake host. Be default, it is assumed that the path to the dmake executables is the same for the dmake host as it is for the build server. If it is not, you must customize the path attribute for that server (for further details see the dmake(1) man page).
.dmakerc File
The .dmakerc file is a runtime configuration file. You must set up a runtime configuration file to run a distributed build. The file contains groups (lists) of build servers and the number of jobs distributed to each build server. The dmake utility searches for this file on the dmake host to know where to distribute jobs. Generally, this file is in your home directory.
You may enclose the names of groups and hosts in the .dmakerc file in double quotes. Doing so allows more flexibility with respect to the character sequences that may be part of the group and host names. For example, if the name of a group starts with a digit it should be double-quoted:
| group "123_sparc" |
The dmake utility searches for a runtime configuration file in the following locations and in the following order:
-
The path name specified on the command line using the -c option
-
The path name specified with the DMAKE_RCFILE makefile macro
-
The path name specified with the DMAKE_RCFILE environment variable
-
$(HOME)&/.dmakerc
If dmake does not find a runtime configuration file, it distributes two jobs to the local host.
For information on setting up a runtime configuration file, see the dmake man page.
The following is a sample of a simple runtime configuration file where jupiter, venus, saturn, mercury, and pluto are listed as build servers:
# My machine. This entry causes dmake to distribute to it.
jupiter { jobs = 1 }
venus
# Manager's machine. She's usually at meetings.
mercury { jobs = 4 }
pluto
The following runtime configuration file contains groups:
earth                   { jobs = 2 }
mars                    { jobs = 3 }
group sunos4.x {
               host parasol
                host summer
}
group lab1 {
               host falcon    { jobs = 3 }
                host hawk
                host eagle      { jobs = 3 }
}
group lab2 {
               host heron
               host avocet    { jobs = 3 }
               host stilt     { jobs = 2 }
}
group labs {
               group lab1
                group lab2
}
group sunos5.x
                             group labs
                host jupiter
                host venus      [ jobs = 2 }
                host pluto      { jobs = 3 }
}
dmake.conf File
To set up a machine to be used as a build server, you must create a configuration file called /etc/opt/SPROdmake/dmake.conf file on the server's file system.. Without this file, dmake refuses to distribute jobs to that machine.
In the dmake.conf file, you specify the maximum number of jobs (from all users) that can run concurrently on that build server. In addition, you may specify the "nice" priority under which all dmake jobs should run. The following is an example of a dmake.conf file:
max_jobs: 8
nice_prio: 5
Examining Multiple Build Jobs
If you are running Distributed Make (dmake in any mode), you can use the Jobs Graph window to monitor the progress of the dmake run and to view the state of each build job.
The graph identifies each build server. Build jobs are graphed in clusters per server. The graph shows the length of time each build takes. Each job is indicated in the graph by a line. The appearance of the line indicates whether the build is in progress (series of dots), or whether it completed (solid green), or failed (solid red).
To open the Jobs Graph window from the Building window, click the Jobs Graph button (see Figure 4-1) or choose View > Dmake Jobs Graph.
You can select a segment of one of the jobs in the graph to see its build output in the Selected Job Output display at the bottom of the window.
Exiting Building
To kill the current build process and close all build windows, choose Build > Exit Building in the Building window.
If you want to close the building windows without killing the current build process, choose Build > Close.
- © 2010, Oracle Corporation and/or its affiliates
