

Note - This feature may or may not be available on your system, depending on your licensing agreement.
Dataviews are customized data property tables and can be created for one type of data from several different hosts, or different types of data from one host. An example of the first concept is a dataview that monitors CPU usage in group of hosts; an example of the second concept is a dataview that monitors disk space and CPU usage on one host.
The data required to create these tables is copied from different sources, including:
Dataviews are an excellent way of monitoring your group operations. Since these views are presented in a table, a variety of data can be easily compared. Also, these tables are created once and are automatically refreshed. Dataviews have all the features of module tables, except that cells are noneditable. Also, alarm status is correctly propagated. That is, cells that have triggered a critical alarm appear in red.

FIGURE 17-1 Tools Menu in the Console Window

FIGURE 17-2 Dataviews Manager Window
 |
To Open an Empty Dataview Window
|
| |
1. |
In the console window, choose Tools  Dataview Manager (FIGURE 17-1). Dataview Manager (FIGURE 17-1). |
| |
|
The Dataviews Manager Window is displayed (FIGURE 17-2). |
| |
2. |
Click the Create Button. |
| |
|
An empty Dataviews window is displayed. |
 |
To Create a Dataview
|
From the Details and Console windows, there are two options to create a dataview:
- Create a Dataview
- Copy to the Dataview Clipboard
Create a Dataview Option
From the Context Pop-up Menu
| |
1. |
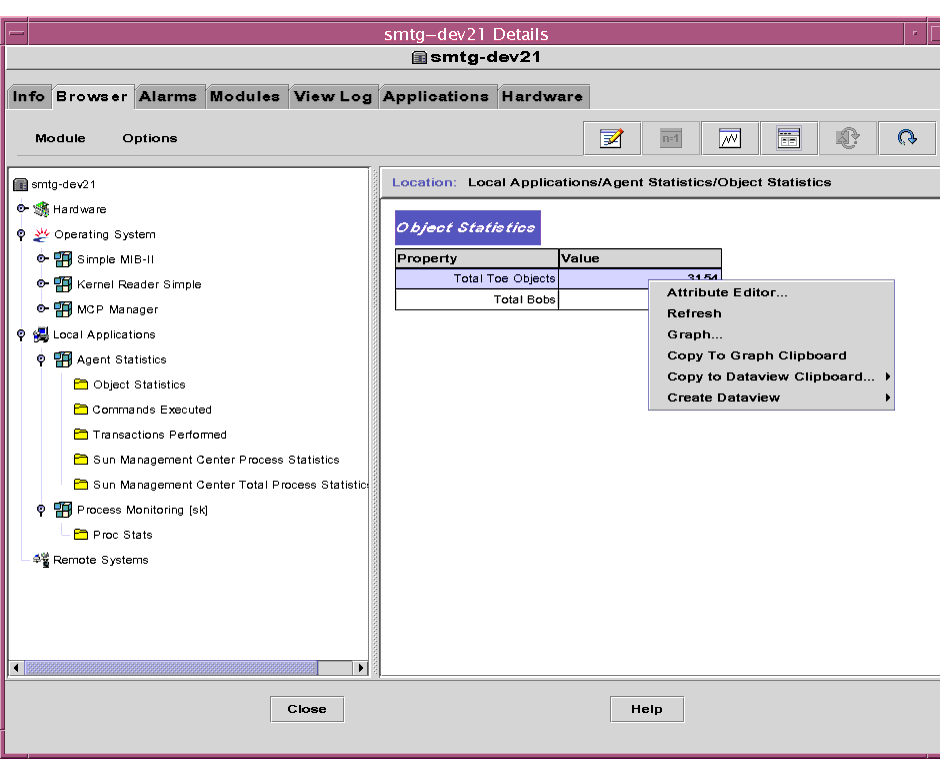
In the browser view, click the expansion/compression icon next to the items in the hierarchy (FIGURE 17-3) down to the desired data property. |
| |
2. |
On the data property, highlight a row or a cell and click the right mouse button. |
| |
3. |
Select Create Dataview (cell or row) from the context menu (FIGURE 17-3). |
| |
|
An automatically populated dataview window is displayed. |
From the Options Menu
| |
1. |
On the data property, highlight a row or a cell. |
| |
2. |
From the Options menu, select Create Dataview (cell or row). |
| |
|
An automatically populated dataview window is displayed. |
Copy to Dataview Clipboard Option
There are two locations from which you can create a dataview with this menu option:
- Details Window
- Console Window
Details Window
| |
1. |
Highlight a row or cell in a data property table. |
| |
2. |
Click the right mouse button and select Copy to Dataview Clipboard (cell or rows). |
| |
3. |
In the Details window, click on the Dataview icon. |
| |
|
An empty Dataview window is displayed. |
| |
4. |
Choose Edit  Paste from Clipboard. Paste from Clipboard. |
Console Window
| |
1. |
Highlight a row or cell in a data property table. |
| |
2. |
Click the right mouse button and select Copy to Dataview Clipboard (cell or rows). |
| |
3. |
In the Console window, choose Tools  Dataview Manager. Dataview Manager. |
| |
4. |
Click the Create button. |
| |
5. |
Choose Edit  Paste from Clipboard. Paste from Clipboard. |

FIGURE 17-3 Row-Context Menu in the Details Window
 |
To Open an Existing Dataview
|

FIGURE 17-4 Open Dataview Window
 |
From the Dataview Manager window (FIGURE 17-2), highlight the name of the
dataview you want to open and click the Open button.
|


 Dataview Manager (FIGURE 17-1).
 Paste from Clipboard.
 Dataview Manager.
 Paste from Clipboard.
