


Chapter 4 |
Discovery Manager |
You can use the Discovery Manager to populate administrative domains automatically. For example, automatically populating administrative domains is very useful if you have a large network. To add members manually with the Create Topology Object window, see Chapter 3.
The following topics are described in this chapter:
The Discovery Manager can find or "discover" hosts, routers, networks, and subnets (see "Overview of IP Addressing"). The Discovery Manager also discovers objects where a Sun Management Center agent is configured to a different server context (see "Sun Management Center Server Context").
The Discovery Manager can also find and group topology objects which are related; either to a single hardware platform/chassis or a group of cooperating hardware platform/chassis. This discovery and grouping allows convenient management of the related objects and is described in the add-on supplement for those machine architectures which have this grouping requirement.
Note - For additional information, refer to your supplement. The supplement contains important platform-specific information about discovering objects.
You can create one or more discovery requests. Each request runs as a separate process and populates the administrative domain with the objects that it has discovered.
You can also schedule requests to run periodically and look for new hosts.
To begin a Discovery Request, start the Discovery Requests Window.
 |
To Start the Discovery Requests Window |
Start the Discovery Requests window in one of two ways:
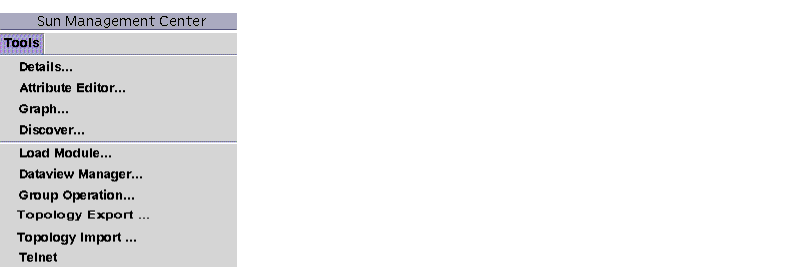
 Discover in the main console window (FIGURE 4-1).
The Discovery Requests window is displayed (FIGURE 4-2).

The Discovery Requests window displays information containing the fields in TABLE 4-1.
The Discovery Requests window has the buttons listed in TABLE 4-2.
TABLE 4-2 Discovery Requests Window Buttons Button
Description
Add
Click this button to create a new Discovery Request through the New Discovery Request window (FIGURE 4-2).
Modify
Select a Discovery Request and click this button to make changes.
Duplicate
Select a Discovery Request and click this button to create a copy of the request.
Delete
Select a Discovery Request and click this button to delete the request.
Start
Select a Discovery Request that is not running and is not scheduled to run at a different time, and click this button to start the request.
Stop
Select a Discovery Request that is running and click this button to stop the request.
Log
Select a Discovery Request and click this button to see a log of the results generated from the selected discovery request runs.
You can discover hosts by using the ping command or by using routing tables.
Note - Currently the Discovery feature is supported only for administrative domains and not for any subordinate groups. You can add requests only for an administrative domain.
Note - Read Appendix C before initiating a discovery request using routing tables. Appendix C explains the basic concepts of routing, network classes, and netmasks.
Note - For additional information, refer to your supplement. The supplement contains important platform-specific information about discovering objects.
| |
To Initiate a Discovery Request |
| 1. | Click the Add button in the Discovery Requests window. |
| The New Discover Request window is displayed (FIGURE 4-3). The Discover tab is highlighted by default. |
| 2. | (Optional) Type a new name for your discovery request in the Request Name field. |
| Multiple requests are listed in the Discovery Requests window, enabling you to select a request and edit the related search pattern. |
| 3. | In the Discover Using field, select the method that should be used for discovering the network (Ping or Routing Table). |
Note - Routing Table discovery requests require that you run an SNMP agent at port 161. This can be a Sun Management Center agent, snmpdx, or any SNMP agent provided by your network management package.
- For more information on routing tables, see Appendix C.
| 4. | Click the OK button to start the discovery process, or go to the other tabs in this window to customize your discovery request. See "Customizing Your Discovery Request". |
| When you start the discovery process: |
Note - Each discovery request is assigned a Request ID. This ID is an unique Sun Management Center internal identifier of the request. Therefore, the Request IDs are not in sequential order. The Request ID displays in the Request Details portion of the Discovery Requests Window.
Note - If a host is extremely busy, a discovery process that is gathering data for that host may time out. If a timeout occurs for a host that is a Sun Management Center agent, the host is reported as a ping host. If this happens, you may want to increase the SNMP timeout period. See ""Customizing Your Discovery Request"" for more information.
| 5. | If a Sun Management Center server or agent is incorrectly reported to be a ping host, create a new icon by re-running discovery with larger timeout and retry values. |
You can customize your new discovery request by clicking on one of the four tabs on the New Discover Request window. The tabs are labeled Discover, Preferences, Filters, and Scheduling. TABLE 4-3 summarizes the tabs and the options for these tabs. (If you want to change an existing Discovery Request, see "Modifying a Discovery Request").
| |
To Customize a Discovery Request |
You can specify limits for the New Discover Request window through the Preferences and Filters tabs. You can also schedule the new discovery request to run periodically through the Scheduling tab.
| 1. | Click the Preferences tab. |
| The New Discover Request Preferences window is displayed (FIGURE 4-4). |
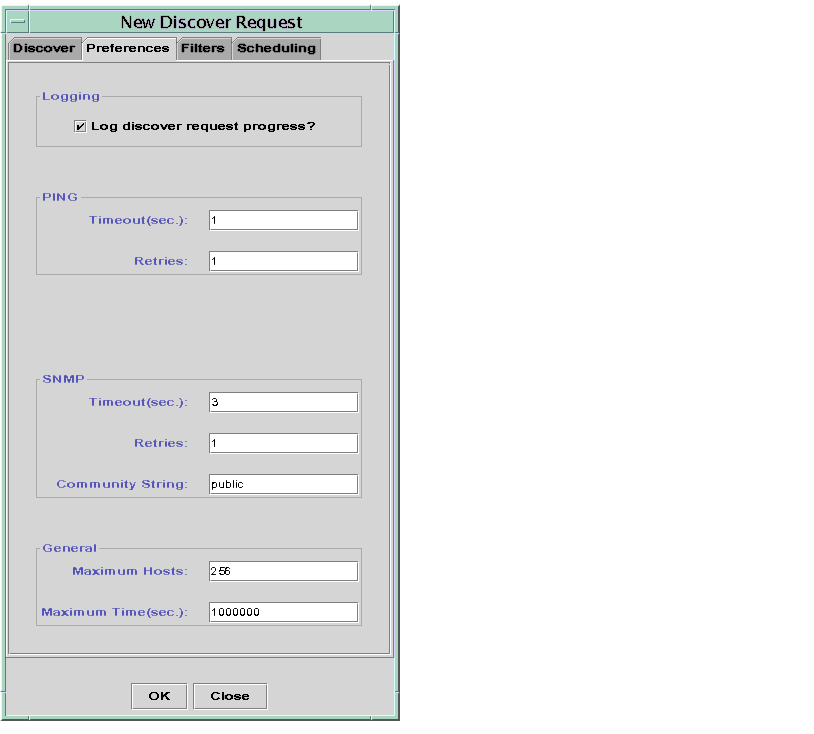
| 2. | Type your selections in the Logging, PING, SNMP, and General fields. |
TABLE 4-3 lists the variables in the New Discover Request Preferences window.
| 3. | Click the Filters tab. |
| The New Discover Request window is displayed (FIGURE 4-5). |
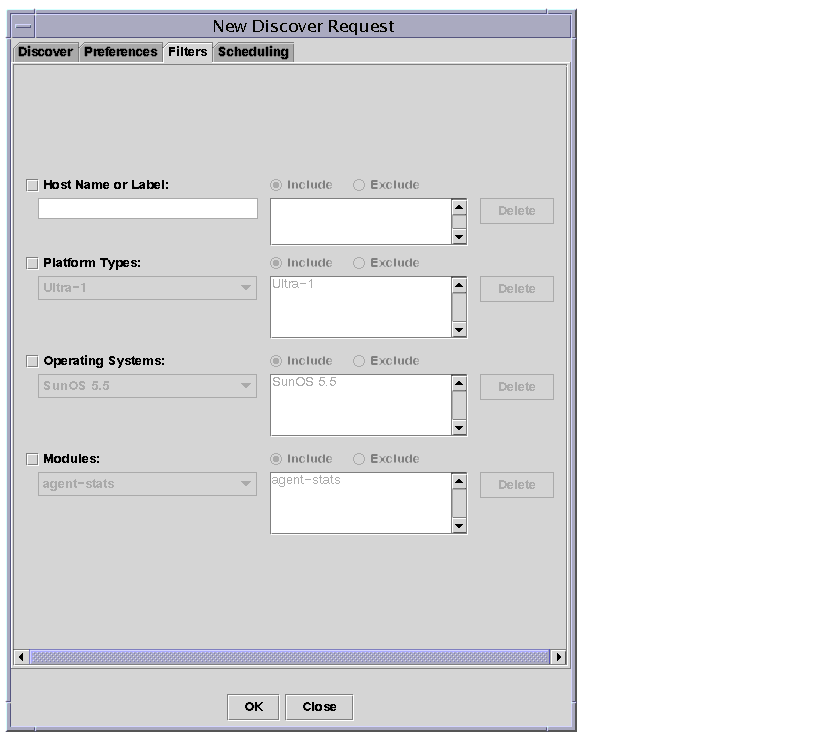
| 4. | Click a checkbox to include host names, operating system, platform type, or module in the filter process. |
| In TABLE 4-4, below, you will find a list of the buttons under the Filters tab.
|
By default, the options on this tab are greyed out. If the checkbox next to an option is checked, the buttons become activated. For example, if you check Modules, you can use the scrollable menu to highlight a loaded module. You can then choose whether you want to include or exclude this module in the filter, and then add it to the field next to the Add and Delete buttons.
| 5. | Once you have defined the filter, click the OK button to confirm your selection. |
You can now set filters in one of the following ways:
Note - If you use a filter, the discovery finds only hosts running the Sun Management Center agent.
| 6. | Click the Scheduling tab. |
| The New Discover Request Scheduling window is displayed (FIGURE 4-6). |

| 7. | If you want to schedule automatic discoveries, click the button for "Periodically discover new hosts?" and customize the settings in the Settings area of the window. |
| 8. | When you have finished your edits, click OK to save the new discovery request, or click Cancel to cancel your changes. |
| If you click OK and you have not selected Periodically discover new hosts in the Scheduling tab, a pop-up dialog is displayed, offering several choices for running the new discovery request. |
If your discovery request has already been scheduled, no confirmation dialog window will appear.
| 9. | Click Close to exit the window. |
If you have previously created a periodic discovery request, you can change the search patterns for that discovery request through the Discovery Requests window (FIGURE 4-2).
| |
To Modify a Discovery Request |
| 1. | Select Tools Discover in the main console window (FIGURE 4-1). |
The Discovery Requests window is displayed.
| 2. | Find and select the name of the discovery request you want to modify. |
| 3. | Click the Modify button. |
| The Edit Discover Request window is displayed. As confirmation, the top bar of the window displays the ID of the request and the Description field displays the name of the request. |
| 4. | Select the Discover, Preferences, Filters, and Scheduling tabs and in turn, change settings as needed. |
| 5. | Complete this procedure with one of the following actions: |
| If you click OK, a pop-up dialog is displayed, offering several choices for running the modified discovery request. |
| 6. | Exit from the window: |
If you have previously created a discovery request, you can start, stop, or delete it through the Discovery Requests window (FIGURE 4-2).
| |
To Start, Stop, or Delete a Discovery Request |
| 1. | Select Tools Discover in the main console window (FIGURE 4-1). |
The Discovery Requests window is displayed.
| 2. | Select the name of the discovery request you want to modify. |
| 3. | Click the Start, Stop, or Delete button to start, stop, or delete a request, respectively. |
