This chapter describes the following topics:
Use the Time Editor (FIGURE 10-1) to schedule monitoring activities. For example, you may want a particular module to be operational only during business hours. Or you may want to record the history of a monitored property only during peak activity.
You can use the Time Editor to set the schedule for a module, for alarms, for a refresh interval, and for history data collection.
Note - The schedule (set by the Time Editor) for a module overrides the schedule for alarms, refresh intervals, and history. If the module is not "on," the data properties are not monitored and the alarms, refresh, and history schedules are meaningless.
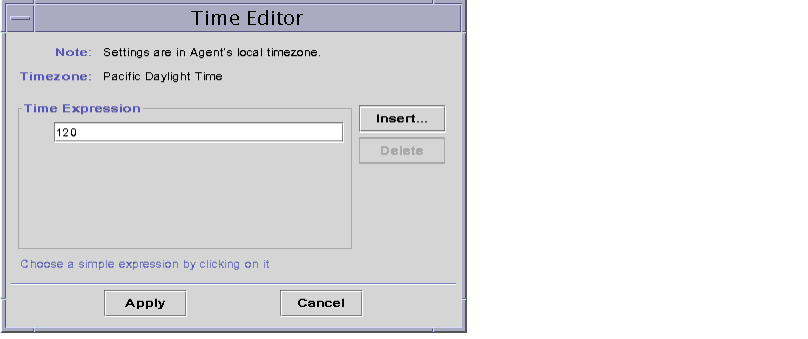
FIGURE 10-1 Time Editor
There are four basic types of Time Expressions:
- Cyclic - Periodic events
- Absolute - Starting at a particular time
- Comparison - Allowing events at specific times
- Cron - Allowing events at specified times using cron input format
These Time Expressions can be used separately or in combination.
Note - All four Time Expressions are valid for history sample and refresh intervals. However, only the comparison tab is valid for alarm and module schedules.
Combining Time Expressions
The following examples illustrate combining Time Expressions to set a history interval.
Note - Sampling for the history interval does not occur unless the module is also on (according to the module schedule).
 |
To Create a Time Expression Using the Cyclic and Comparison Tabs
|
Note - This procedure is also valid for a refresh interval.
| |
1. |
Click on the Advanced button in the History tab of the Attribute Editor for a data property. |
| |
2. |
If any value is in the Time Expression field, highlight the value and delete it by clicking the Delete button. |
| |
3. |
Click the Insert button. |
| |
|
The Time window is displayed with the Cyclic tab selected. |
| |
4. |
Determine the frequency for the history interval (FIGURE 10-2). |
| |
|
In this example, the history interval is set for every hour. That is, the software checks the System Load Average Over the Last 5 Minutes every hour. |
| |
a. |
Highlight the number field and click the up or down arrows until the number 1
is displayed.
|
| |
b. |
Highlight the units field and click the up or down arrows until hours is
displayed.
|
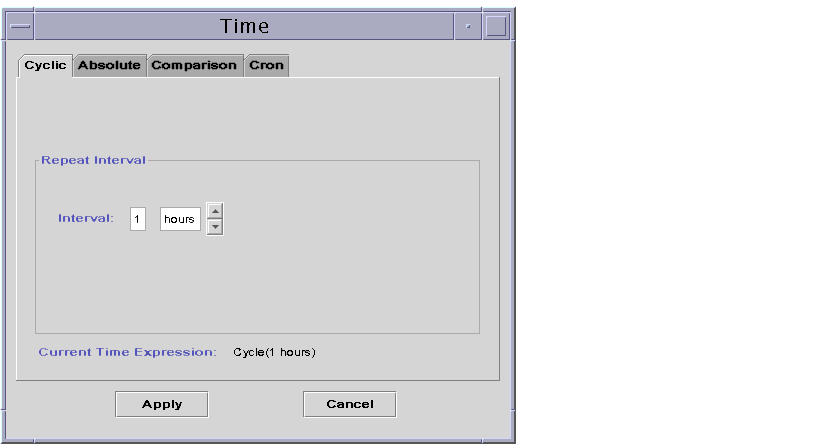
FIGURE 10-2 Setting a Cyclic Time of One Hour
| |
5. |
Click the Apply button. |
- Cycle(1 hours) is displayed in the Time Editor (FIGURE 10-3).

FIGURE 10-3 Time Editor With Cyclic Time of One Hour
| |
6. |
Click the Insert button. |
| |
|
The Time window is displayed with the Cyclic tab selected. |
| |
7. |
Click the Comparison tab. |
| |
|
The Time window is displayed with the Comparison tab selected. |
| |
8. |
Determine the start of the Time Range (Monday). |
| |
|
The time range determines the time period when the software checks the system load average every hour. The software does not check the system load average outside the time period specified by this window. In this example, the time range is from Monday to Friday, inclusive. |
| |
a. |
Select Day of week from the left pull-down menu.
|
| |
b. |
Select >= from the middle pull-down menu.
|
| |
c. |
Select Monday from the right pull-down menu.
|
- The time expression is displayed in the Current Time Expression field (FIGURE 10-4).
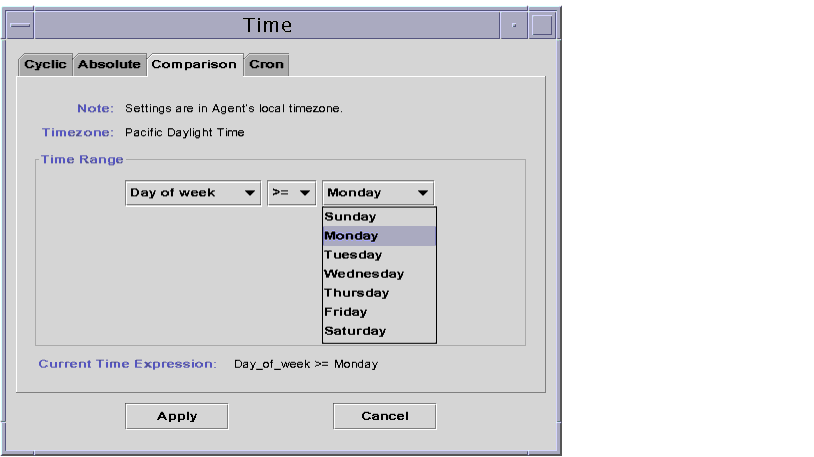
FIGURE 10-4 Setting the Start Range to Monday
| |
9. |
Click the Apply button. |
The Time Editor is updated. The Current Time Expression now reads Day_of_week>=Monday. However, the Time Editor also enables you to select the Or expression (FIGURE 10-5).
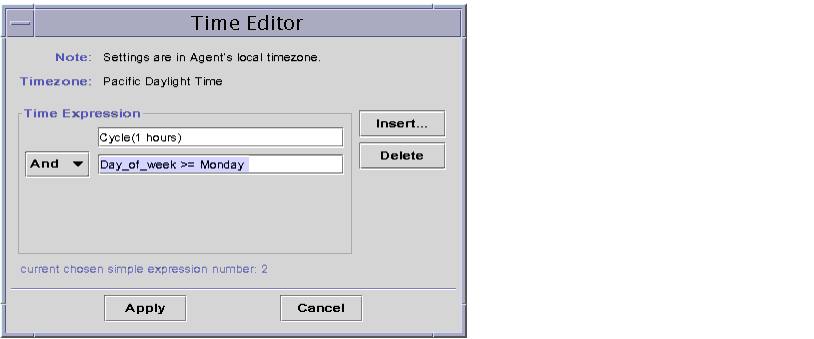
FIGURE 10-5 Time Editor Is Updated With a Start Range of Monday
| |
10. |
Determine the end of the Time Range by clicking the Insert button. |
| |
11. |
Click on the Comparison tab of the Time window. |
| |
|
The Time window is displayed with the Comparison tab selected. |
| |
12. |
Determine the end of the Time Range (Friday). |
| |
a. |
Select Day of week from the left pull-down menu.
|
| |
b. |
Select <= from the middle pull-down menu.
|
| |
c. |
Select Friday from the right pull-down menu.
|
- The Time expression is displayed in the Current Time Expression field (FIGURE 10-6).
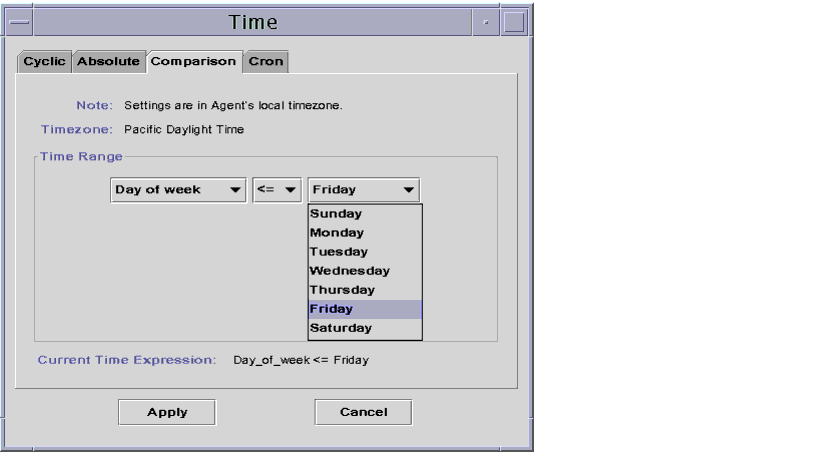
FIGURE 10-6 Setting the End Range to Friday
| |
13. |
Click the Apply button. |
| |
|
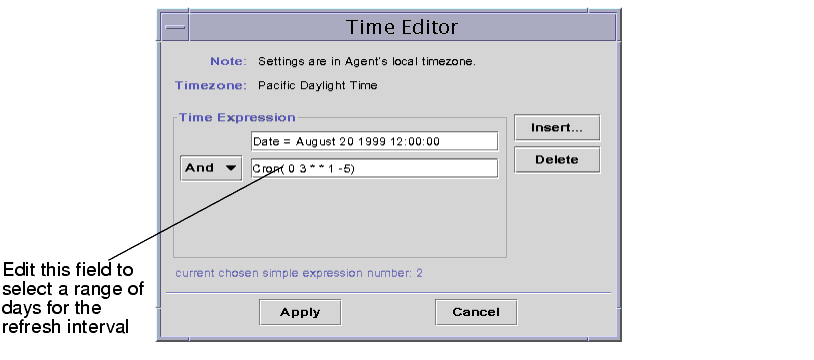
The Time Editor is updated. The Time Expression fields now read Cycle(1 hours) and Day_of_week>=Monday and Day_of_week<=Friday (FIGURE 10-7). |
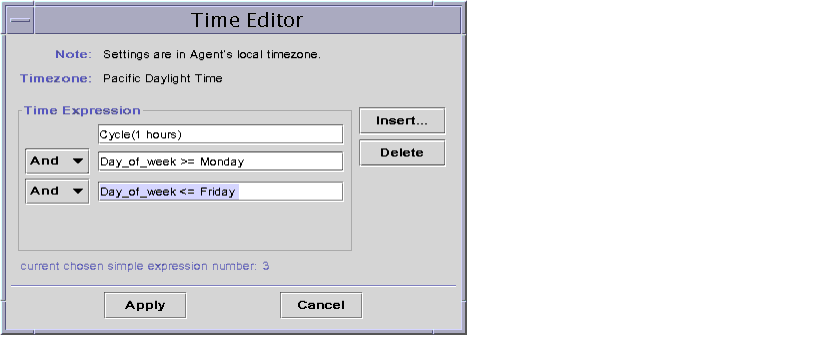
FIGURE 10-7 Time Editor Showing a Cycle Time of One Hour From Monday to Friday
| |
14. |
Click the Apply button. |
| |
|
The Sample Interval field in the Attribute Editor is updated. The software will check the system load average (over five minutes) at every hour, from 12:00 AM Monday to 12:00 AM Saturday morning. |
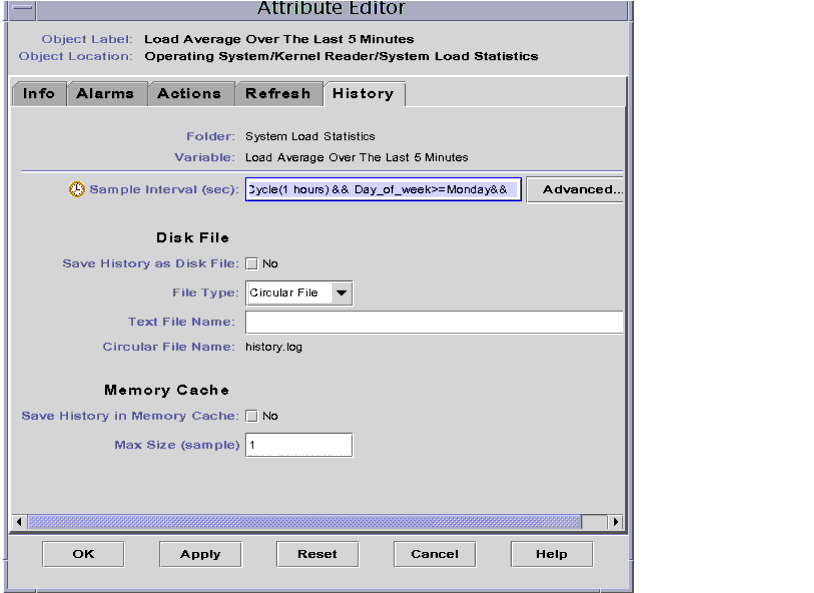
FIGURE 10-8 Updated History Attribute Editor Showing a Cycle Time of One Hour From
Monday to Friday
| |
To Create a Time Expression Using the Absolute and Cron Tabs
|
Note - This procedure is also valid for a refresh interval.
| |
1. |
Click on the Advanced button in the History tab of the Attribute Editor for a data property. |
| |
2. |
If any value is in the Time Expression field, highlight the value and delete it by clicking the Delete button. |
| |
3. |
Click the Insert button. |
| |
|
The Time window is displayed with the Cyclic tab selected. |
| |
4. |
Click the Absolute tab. |
| |
|
The Time window is displayed with the Absolute tab selected. |
| |
a. |
Highlight the hour, minute, and if desired, the seconds fields and click the up
or down arrow until the correct time is displayed.
|
| |
b. |
Highlight the month, date, and year fields and click the up or down arrow until
the correct date is displayed.
|
| |
|
The starting date and time are displayed in the Current Time Expression field. |
Note - Time is displayed using the 24-hour clock.
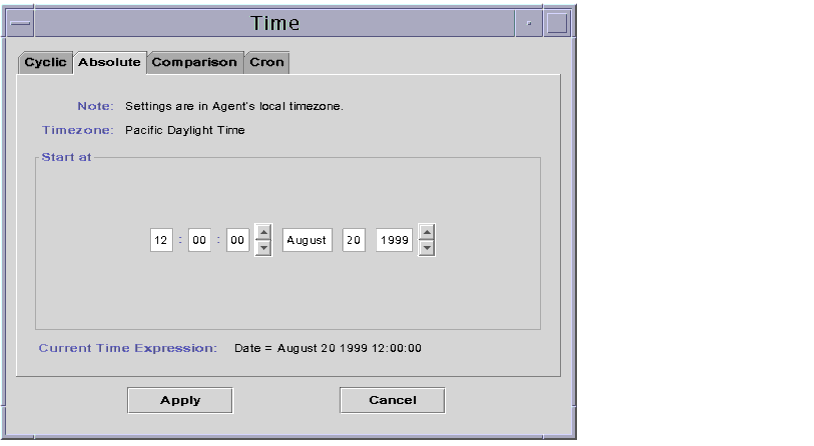
FIGURE 10-9 Starting Time of 12:00:00 PM on August 20, 1999
| |
6. |
Click the Apply button. |
| |
|
The starting date and time are displayed in the Time Editor (FIGURE 10-10). |
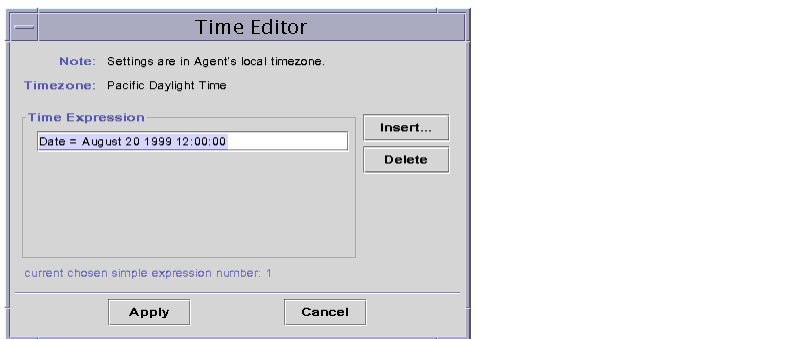
FIGURE 10-10 Time Editor With Starting Time of 12:00:00 PM August 20, 1999
| |
7. |
Click the Insert button. |
| |
|
The Time window is displayed with the Cron tab selected. |
| |
9. |
Select the time when the history interval is active. |
| |
|
The software does not check the system load average outside the time specified by this window. In this example, the condition is at 3:00 AM every Monday through Friday. |
| |
a. |
Select 0 from the Minute pull-down menu.
|
| |
b. |
Select 3rd from the hour pull-down menu.
|
- These first two pull-down menus set the time at 3:00 AM.
| |
c. |
Select Every from the Day of month pull-down menu.
|
| |
d. |
Select Every from the Month pull-down menu.
|
- These two pull-down menus set the date for every day.
| |
e. |
Select Monday from the final pull-down menu.
|
- The Current Time Expression field reads Cron(03**1). This expression states that the history window is only active at 3:00 AM every Monday (FIGURE 10-11).
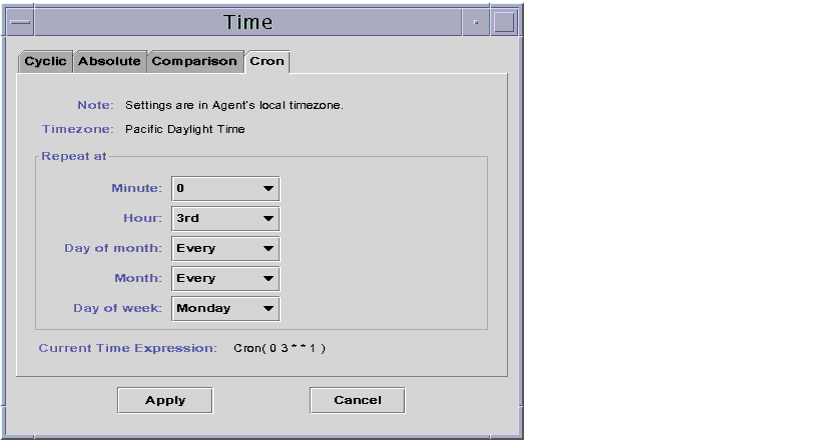
FIGURE 10-11 Cron Tab Selected With 3:00 AM Every Monday
| |
10. |
Click the Apply button. |
| |
|
The Time Editor is updated. The Time Expression now states Cron(03**1) (FIGURE 10-12). |
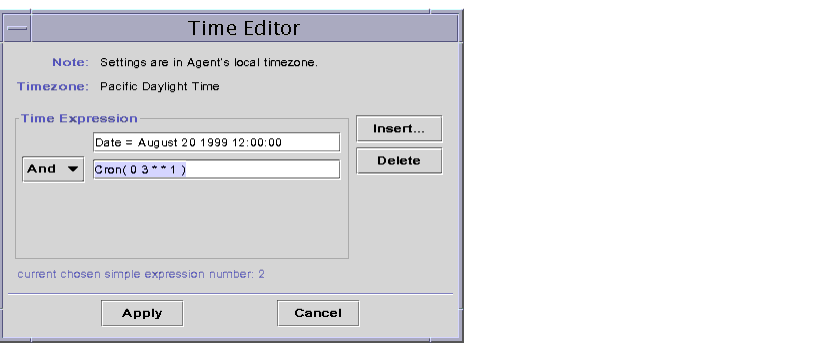
FIGURE 10-12 Time Editor Selected With Starting Date/Time 12:00:00 PM, August 20, 1999,
and History Interval Start Time of 3:00 AM Every Monday
| |
11. |
Place the cursor in the Cron field on the Time Editor screen. Backspace using the left arrow key until the cursor is between the ending parenthesis and the number 1. Type -5, so that the value in this field now reads Cron(03**1-5). |
| |
|
This expression states that the history interval is only active at 3:00 AM every Monday through Friday (FIGURE 10-13). |
FIGURE 10-13 Time Editor With Starting Date/Time of 12:00:00 PM, August 20, 1999 and
History Interval of 3:00 AM Every Monday Through Friday
| |
12. |
Click the Apply button. |
| |
|
The Time Editor is updated. In this example, the history window is active at 3:00 AM every Monday through Friday after the starting date and time of 12:00 PM August 20, 1999 (FIGURE 10-14). |

FIGURE 10-14 History Interval With Starting Time of 12:00 PM August 20, 1999 and 3:00
AM Every Monday Through Friday
| |
To Create an Alarm Schedule Using the Comparison Tab
|
Note - This procedure is also valid for a module schedule.
| |
1. |
Click on the Advanced button in the Alarms tab of the Attribute Editor for a data property. |
| |
2. |
If any value is in the Time Expression field, highlight the value and delete it by clicking the Delete button. |
| |
3. |
Click the Insert button. |
| |
|
The Time window is displayed with the Comparison tab selected. |
| |
4. |
Determine the start of the Time Range (9:00 AM). |
| |
|
The time range determines the time period when the software checks the system load average. The software does not check the system load average outside the time period specified by this window. In this example, the time range is from 9:00 AM to 5:00 PM every day. |
| |
a. |
Select Hour from the left pull-down menu.
|
| |
b. |
Select >= from the middle pull-down menu.
|
| |
c. |
Select 9 from the right pull-down menu.
|
- The Time expression Hour>=9 is displayed in the Current Time Expression field (FIGURE 10-15).
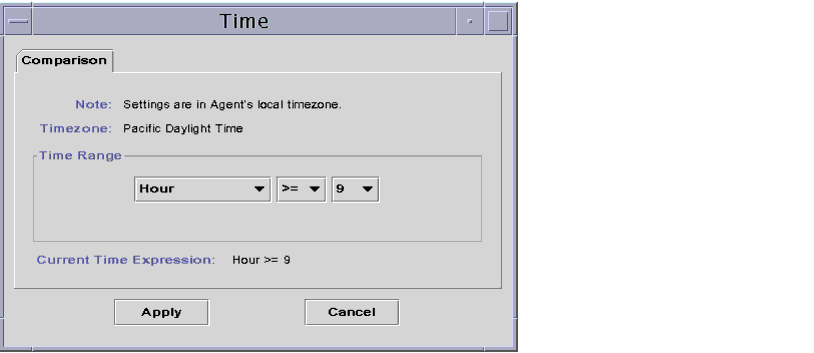
FIGURE 10-15 Comparison Tab With Greater Than or Equal to 9:00 AM
| |
5. |
Click the Apply button. |
The Time Editor is updated. The Current Time Expression now reads Hour>=9. In this example, both conditions should occur in the alarm window time range. However, the Time Editor also enables you to select the Or expression (FIGURE 10-16).
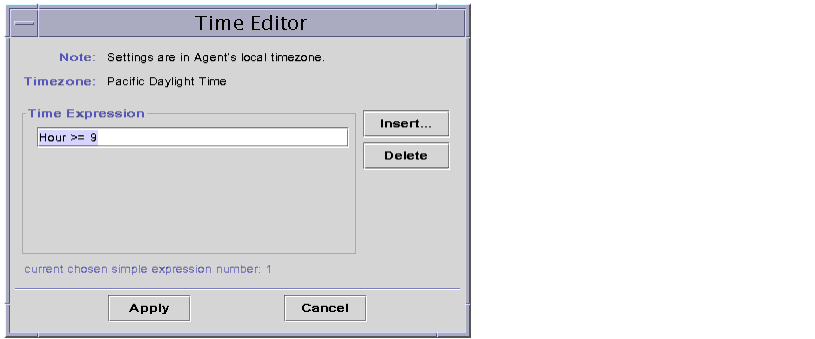
FIGURE 10-16 Time Editor With Greater Than or Equal to 9:00 AM
| |
6. |
Determine the end of the Time Range by clicking the Insert button. |
| |
|
The Time window is displayed with the Comparison tab selected. |
| |
7. |
Determine the end of the Time Range (Friday). |
| |
a. |
Select Hour from the left pull-down menu.
|
| |
b. |
Select <= from the middle pull-down menu.
|
| |
c. |
Select 17 from the right pull-down menu.
|
- The Time expression Hour<=17 is displayed in the Current Time Expression field (FIGURE 10-17).
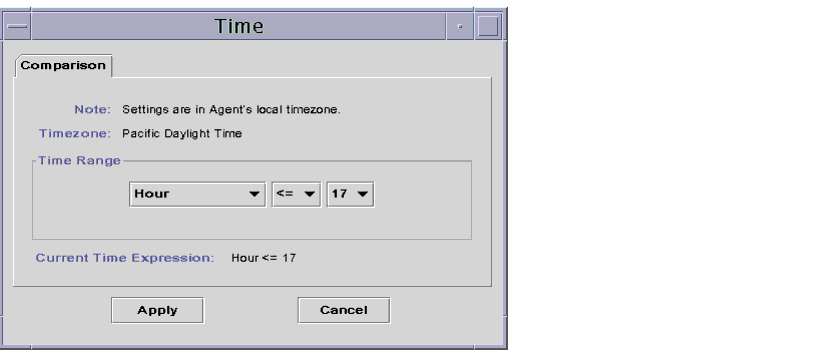
FIGURE 10-17 Comparison Tab With Less Than or Equal to 5:00 PM
| |
8. |
Click the Apply button. |
| |
|
The Time Editor is updated. The Time expression now reads Hour>=9 And Hour<=17 (FIGURE 10-18). |
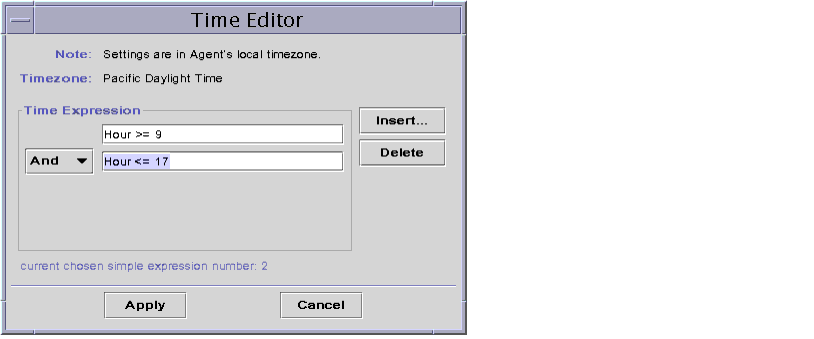
FIGURE 10-18 Time Editor With Time Interval Between 9:00 AM and 5:00 PM
| |
9. |
Click the Apply button. |
| |
|
The alarm window field in the Attribute Editor is updated. The software will check the system load average (over five minutes) from 9:00 AM Monday to 5:00 PM Friday (FIGURE 10-19). |

FIGURE 10-19 Alarms Attribute Editor With Alarm Window From 9:00 AM to 5:00 PM
Every Day
Copyright © 2000 Sun Microsystems, Inc. All Rights Reserved.