A P P E N D I X  B

Hardware Diagnostic Suite Console Reference

This appendix contains descriptions of the Hardware Diagnostic Suite console panels and controls.


Note - For step-by-step instructions on how to start and run the Hardware Diagnostic Suite, refer to Accessing Hardware Diagnostic Suite Through Sun Management Center, and Running a Hardware Diagnostic Suite Test Session.


Hardware Diagnostic Suite Console

You control the Hardware Diagnostic Suite application through the Hardware Diagnostic Suite console in the Sun Management Center Details window (FIGURE B-1). Each console panel button and control is described in the following section.

FIGURE B-1 Hardware Diagnostic Suite Console

Screen shot showing the location of various panels and controls.[ D ]

Hierarchical View Panel

The Hierarchical View panel (FIGURE B-2) displays the host and the devices connected to the host. In this panel you select devices for testing and view test results. The Hierarchical View panel only displays devices that are testable with the Hardware Diagnostic Suite application. Devices that are not testable, or for which there is no Hardware Diagnostic Suite test, are not displayed.

 FIGURE B-2 Hierarchical View (Expanded View)

Screen shot showing an expanded hierarchical view panel and selected devices.

Devices in the Hierarchical View Panel

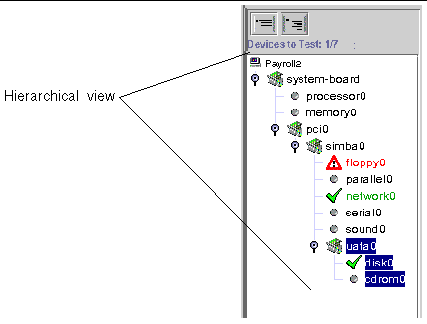
The Hierarchical View panel (FIGURE B-2 and FIGURE B-3) displays a graphical representation of the testable devices for host. The devices are displayed in groups according to their physical relationship to each other. For example, in FIGURE B-2 the diskette drive, parallel port, and so on are found in a group called simba0 because that is the interface to which they are attached. The group at the top of the window, the host, represents the whole system.

The Hierarchical View can be expanded and collapsed with the View buttons at the top of the Hierarchical View panel.

Device Selection

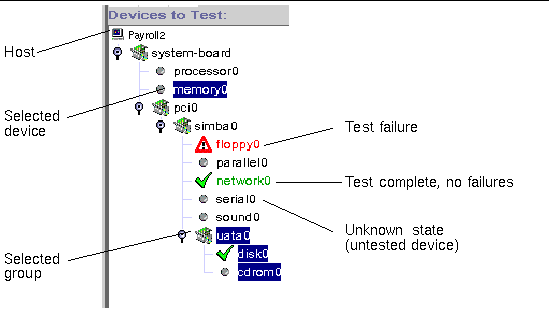
In the Hierarchical View panel you select (for testing) individual devices, entire device groups, or the entire host, by clicking on the name of the item. Multiple devices in different groups can be selected by holding the Shift or Control key while clicking on additional devices. When a device (or group) is selected, it is highlighted with a dark rectangle (FIGURE B-3).

If you click the device, information about that device is displayed in the Device Description panel.

Hierarchical View Indicators

As soon as the Hardware Diagnostic Suite test detects a successful or failing test on a device, the pass and fail condition is displayed in the Hierarchical View (FIGURE B-3). A condition indicator is displayed for each tested device (TABLE B-1).

 FIGURE B-3 Hierarchical View Panel Indicators

Screen shot showing examples of devices and their passed, failed, and unknown test status.


TABLE B-1 Hierarchical View Panel Indicators

Indicator

Name

Description


Host symbol


Host

Represents all testable devices on the system.


Board symbol


Board

Indicates a device group (a node that has other testable devices connected to it).


Node symbol


Node

Indicates if a particular node has hidden subnodes (horizontal bar), or if the subnodes are displayed (vertical bar).


Unknown test symbol

Device

Indicates an individual device node that is in an unknown state, usually because it has not been tested yet.


Successful test symbol


Test Pass

Indicates that at least one successful test pass was made.


Failed test symbol


Test Failure

Indicates that a test failure was detected.


Hierarchy View Panel Buttons

TABLE B-2 Hierarchy View Panel Button Descriptions

Icon

Name

Description

Collapse view button

Collapse View button

Collapses the view to show only the board level of devices under the host. Devices below this level are hidden from view.

Expanded view button

Expanded View button

Completely expands the list of devices in the Hierarchy View panel.


Device Description Panel

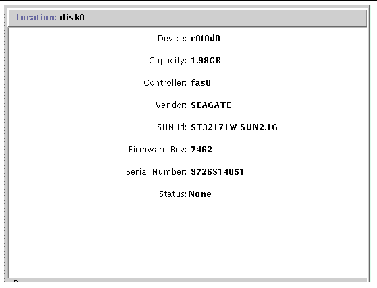
The Device Description panel displays information about each device as it is visited (click a device to visit it) in the Hierarchical View panel and tested while the Hardware Diagnostic Suite is running.

 FIGURE B-4 Device Description Panel

Screen shot of Device Description panel with a device's information displayed.

Progress Panel

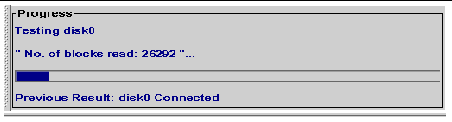
The Progress panel displays the following information:

  • Current test information - Indicates which device is under test, shows which subtest is currently running, and displays test messages.
  • Progress bar - Displays a graphical representation of the progress of the current test. For example, when the bar is half filled, the current test is half finished.
  • Previous Result - Indicates whether the previous test passed or failed.

 FIGURE B-5 Progress Panel

Screen shot of the Progress panel and messages from a test in progress.

Test Control Buttons

The Hardware Diagnostic Suite test control buttons are used to start, stop, and schedule test sessions as described in TABLE B-3.

TABLE B-3 Test Control Button Descriptions

Name

Description

Full Test button

Begins a test session. The tests that run are based on the selections made in the Hierarchy View. When testing begins, the Full Test button dims and the test session information is displayed in the Progress panel.

Stop Testing button

Stops the test session. The most recent test name and test results are displayed in the Progress panel.

Schedule button

Used to create, edit, or delete a scheduled test session. Instructions are displayed in the Device Description panel and scheduling controls are displayed in the Progress panel.

Quick Check button

Starts a test session that runs a brief test on all selected devices. The Quick Check tests attempt to communicate with each selected device to confirm connectivity. No functional device testing occurs.


Options and Logs Menus

The Options and Logs menus provide access to the Hardware Diagnostic Suite test controls and log files.

Options Menu

The Options menu provides access to the following controls:

  • Reset - Clears previous test results from the Hardware Diagnostic Suite display.
  • Suspend - Interrupts the current test session.
  • Resume - Resumes a test session that has been suspended.
  • Reprobe for Devices - Causes the Hardware Diagnostic Suite agent to interrogate the system for testable devices. All testable devices are displayed in the Hierarchical View.

Logs Menu

The Logs menu provides access to the following Hardware Diagnostic Suite log files:

  • View Information - Opens a window that displays the Hardware Diagnostic Suite information log. The information log contains informative messages about each Hardware Diagnostic Suite test session, such as start and stop times and pass and failure information.
  • View Errors - Opens a window that displays the Hardware Diagnostic Suite error log. The error log is a collection of date- and time-stamped error messages that occurred during previous Hardware Diagnostic Suite test sessions.

Sun Management Center Tab Selectors

The Sun Management Center tab selectors can be used to access Sun Management Center features. Three of these tabs are relevant to Hardware Diagnostic Suite:

Lower Controls

The two buttons in the lower portion of the Hardware Diagnostic Suite console are described in TABLE B-4.

TABLE B-4 Lower Control Button Descriptions

Name

Description

Close Button

Closes the Details window where the Hardware Diagnostic Suite is running.

Help Button

Accesses online help.


Schedule Panel

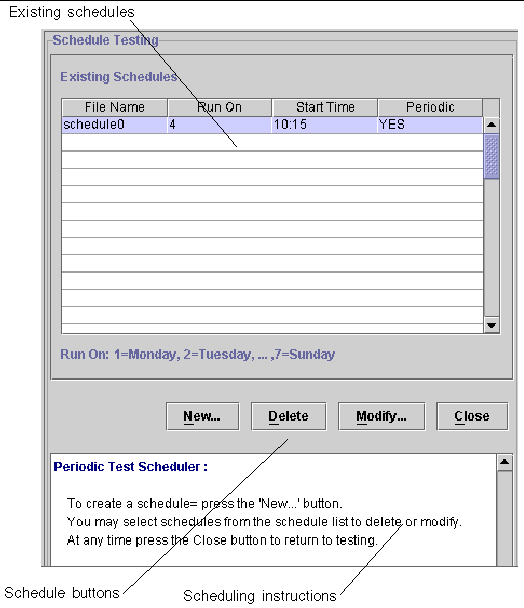
Access the Schedule panel (FIGURE B-6) by clicking on the Schedule button. In this panel you create, delete, and modify Hardware Diagnostic Suite test schedules. The functions of the Schedule panel are described in the following sections and step-by-step scheduling instructions are described in Scheduling a Test Session.

 FIGURE B-6 Hardware Diagnostic Suite Schedule Panel

Screen shot of the Schedule panel.[ D ]

Existing Schedules List

The Existing Schedules list (FIGURE B-6) displays a list of current schedules for this host. If nothing is shown in the list, there are no current Hardware Diagnostic Suite schedules.

The Existing Schedules list describes the schedules as follows:

  • File Name - The name of the schedule.
  • Run On - Indicates the days on which to run the scheduled test session.
  • Start Time - Indicates the time of day that the test session is scheduled to start.
  • Periodic - Indicates if the schedule is set up to run at regular intervals (Periodic=Yes), or if the schedule is set up to run one time (Periodic=No).

Schedule Panel Buttons

TABLE B-5 Schedule Panel Button Descriptions

Name

Description

New Button

Displays the Schedule Form.

Delete Button

Deletes the selected schedule.

Modify Button

Displays the Schedule Form for modifications.

Close Button

Closes the Schedule panel.


Schedule Form

Use the Schedule Form (FIGURE B-7) to create new Hardware Diagnostic Suite test session schedules and to modify existing Hardware Diagnostic Suite test session schedules. This form is displayed when the New or Modify buttons in the Schedule panel are selected. Each field of this form is described below.

 FIGURE B-7 Schedule Form

Screen shot showing the Schedule Form. Fields are test name, start time, run schedule, and configuration options.

File Name Field

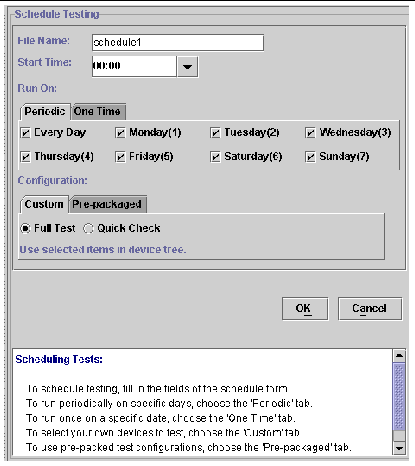
The File Name field specifies the name of the schedule that is being created or modified. Each Hardware Diagnostic Suite test session schedule name must be unique. A valid schedule name should be between one to 20 alpha-numeric characters. The only valid special character is the underscore (_).

Start Time

The Start Time field specifies the time when the scheduled test session begins.

Use the drop-down menu to select predefined start times that are available in
15-minute intervals, or type the specific time (based on a 12-hour clock) in the Start Time field. Select the appropriate AM or PM designation with the buttons provided.

Run On Field

The Run On field specifies the date for the scheduled test session. You can specify a date in two ways:

  • Periodic - Used when a scheduled test session runs periodically on specified days. A Periodic schedule remains in effect until it is modified or deleted.
  • One Time - Used when a scheduled test session runs one time. Specify the date using a mm/dd/yyyy format.

Configuration Field

The Configuration field specifies the test mode and the devices to test. Two methods are used to specify the test configuration information:

  • Custom - (FIGURE B-7) Provides buttons to select Full Test or Quick Check test modes. You must further define the schedule by selecting the devices to test in the Hierarchical View.
  • Pre-Packaged - Provides buttons to select pre-packaged test session schedules. These schedules are explained in TABLE B-6.
  • TABLE B-6 Pre-Packaged Schedule Configurations

    Name

    Description

    Connection Check

    Sets up a schedule to run Quick Check tests on all available devices.

    Functional Check

    Sets up a schedule to run Full tests on all available devices.

    Processor(s) Check

    Sets up a schedule that runs the Processor test (in Full Test mode) on all the processors in the system.

    Hard Disk Check

    Sets up a schedule that runs the Disk test (in Full Test mode) on all the disks in the system.

    Odd Disk Testing

    Sets up a schedule that runs the Disk test (in Full Test mode) on every other disk in the system, beginning with the first disk (as seen in the Hierarchical View). This test is useful when there are many disks in the system.

    Even Disk Testing

    Sets up a schedule that runs the Disk test (in Full test mode) on every other disk in the system beginning with the second disk (as see in the Hierarchical View). This test is useful when there are many disks in the system.


Schedule Form Buttons

TABLE B-7 Schedule Form Button Descriptions

Name

Description

OK Button

Applies all schedule information and closes the Schedule Form.

Cancel Button

Cancels any changed schedule information and closes the Schedule Form.