| C H A P T E R 3 |
|
Managing VSAM Files |
An important step in configuring a region to run your application is to define VSAM files. These files and their attributes are defined in the File Control Table (FCT) and in the VSAM file catalog. VSAM file attributes include:
Several of these attributes, such as the file organization, record format, record size, and alternate indexes, are structural and are determined by the application. Other attributes, such as automated recovery, spanned files, and the placement of the files on specific file systems for optimal performance, are optional and are determined by the operational needs of the host system. You must carefully consider and plan these configuration decisions.
This chapter provides information to assist you in making your configuration decisions, as well as instructions on populating the VSAM catalog and on managing the VSAM files and their attributes. It includes the following topics:
The structural attributes of a VSAM file are:
Sun MTP maintains VSAM data in one or more files. Each RRDS and ESDS file corresponds to a single physical file. Each KSDS and alternate index file corresponds to two to nine physical files. These files all have a specific structure that is used to reference the data.
For all file types, including the VSAM catalog, Sun MTP uses the same VSAM block size, with a default of 4096 bytes. When the record size exceeds a single block, the record must span multiple blocks. When a file spans multiple blocks, 4072 bytes are stored on the first block which points to the next block, and so on, up to a maximum of eight blocks. Only 4072 bytes of data are stored on a block, because 20 bytes of each block are used for housekeeping and 4 bytes are used to identify the length of the record and amount of the record in the current block. This is illustrated in the following figure for a data file that has variable length records, some of which are spanned.
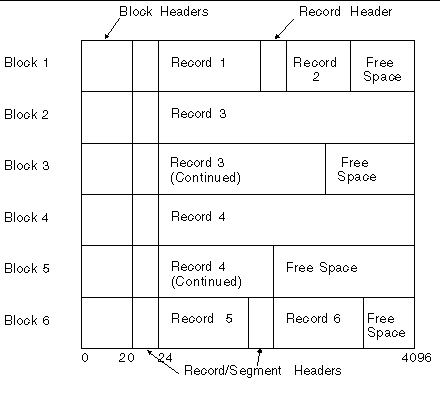
Before you create the VSAM catalog and populate it, calculate the size of your application's VSAM files. Use this information to choose a block size for the files and the catalog that optimizes performance. A larger VSAM block size can increase efficiency when records are larger than can fit on a single block. See Changing the VSAM Block Size of the Catalog, which explains how to increase the block size.
The following sections describe the different formulas for calculating VSAM file size based on the file type and VSAM block size.
RRDS files store their records in sequential order, and are a fixed record length. Blocks on the file are filled with records until the next record cannot fit; any remaining space on that block is then unused. You can locate the record number (RIDFLD) in the file by calculating the number of records that can fit on a block, determining which block contains that record number, and then calculating the record's offset within that block. If you know the total number of records, you can calculate the size of the RRDS file by using these formulas:
1. Number of records per block = (VSAM block size - 20) / (record length + 4)
any remainder is discarded
2. Total file size =
((total number of records)/(number of records per block), rounded up)*(VSAM block size)
Example: For an RRDS file with 4000 records that are 80 bytes in length, with a 4 Kbyte VSAM block size, calculate:
Number of records per block = (4096 - 20 = 4076) / (80 + 4 = 84) = 48
(discarding the remainder)
Total file size = (4000 / 48 = 84 (rounded up)) * 4096 = 344,064 bytes
ESDS files, like RRDS files, store their records in sequential order. ESDS files, however, may also have variable record lengths. This affects how to locate records as well as how to calculate the file size.
The calculations for ESDS files with fixed length records are identical to RRDS files because blocks on the file are filled with records until the next record cannot fit, and the remaining space on that block is left unused. Therefore, you can locate a record ID (RIDFLD) in the file by calculating the number of records that can fit on a block, determining which block contains that record ID, and then calculating the record's offset within that block. If you know the total number of records, you can also calculate the size of an ESDS file with fixed length records by using the same formulas as for RRDS files as described in RRDS Files.
Example: For an ESDS file with 4000 fixed length records that are 80 bytes in length, with a 4 Kbyte VSAM block size, calculate:
Number of records per block = (4096 - 20 = 4076) / (80 + 4 = 84) = 48
(discarding the remainder)
Total file size = (4000 / 48 = 84 (rounded up)) * 4096 = 344,064 bytes
The calculations for ESDS files with variable length records are different. Blocks on the file are filled with records through the last available byte in each block; if necessary, the last record on each block is split and the remainder of the record appears as the first record in the next sequential VSAM block. If you know the total number of records and the average record size, you can calculate the size of an ESDS file with variable length records by using the following formulas:
1. Number of records per block = (VSAM block size - 20) / (average record size + 4)
retaining the remainder
2. Total file size =
((total number of records)/(number of records per block), rounded up)*(VSAM block size)
Example: For an ESDS file with 4000 records that average 80 bytes in length, with a 4 Kbyte VSAM block size, calculate:
Number of records per block = (4096 - 20 = 4076) / (80 + 4 = 84) = 48.5238
Total file size = (4000 / 48.5238 = 83 (rounded up)) * 4096 = 339,968 bytes
KSDS files and alternate index files are more complex than RRDS and ESDS files. They each have a data file and an index file.
Made up of one or more data blocks that contain records. Within each data block, all records are sorted in primary key sequence. The data blocks are not, however, in physically sequential order. Instead, each block contains a next block number that points to the next block in primary key order. To find any specific record by key requires reading the index file.
Contains key pointers that are made up of the block number and the highest key on that block.
The index file starts with a single index block that contains key pointers to the data blocks in the data file. When the single index block is full of key pointers, it is split. The key pointers are moved with half going to one new index block and the remainder going to a second new block. The original block then has two key pointers pointing to these two new index blocks, thereby creating a two-level index.
When additional index blocks are required, they are added to the second index level, pointing to the data file until that index level fills up. When that happens, a third index level is created. This continues for as many index levels as required.
Each record in a KSDS file is preceded by a 4-byte record header followed by the record data. When the record is greater than the VSAM block size, minus 24 bytes, that record is considered a spanned record. Each spanned record always starts at the beginning of the data portion of a block. Each portion of that spanned record uses the entire data portion of as many blocks as are required to contain the entire record. The block containing the last portion of that record reserves any remaining unused space in that block; thus, a spanned record is isolated from any other records of the file on those data blocks. In other words, for all non-spanned records, blocks on the file are filled with records until the next record cannot fit; remaining space on that block is left unused. Therefore, it is important to determine whether to use spanned records or to specify a larger VSAM block size. Index file records are fixed-length records equal to the length of the key field, and are treated as non-spanned records.
The size of a KSDS data file can be calculated if you know the total number of spanned (if any) and non-spanned records, and the record size (if variable length, the average size), by using these formulas:
1. Non-spanned # of records per block = (VSAM block size - 20) / (record size + 4)
discarding the remainder
2. Total non-spanned # of blocks =
(total # of non-spanned records) / (non-spanned # of records per block)
3. Spanned # of blocks per record = (record size) / (VSAM block size - 24)
4. Total spanned # blocks = (total # of spanned records) * (spanned # of blocks per record)
5. Total file size =
((Total non-spanned # of blocks) + (Total spanned # blocks)) * (VSAM block size)
Example: For a KSDS data file with 40,000 records that average 80 bytes in length, with a 4 Kbyte VSAM block size, calculate:
Total non-spanned # of blocks = (4096 - 20 = 4076) / (80 + 4 = 84) = 48 (discarding the remainder)
Total non-spanned # of blocks = 40,000 / 48 = 834 (rounded up)
Total file size = 834 * 4096 = 3,416,064 bytes
The size of a KSDS index file can be also calculated if you know the total number of records and the key size for that KSDS data file, by using the following formulas:
1. Number of records per block = (VSAM block size - 20) / (key size + 4)
discarding the remainder
2. Number of coarse index levels = log (number of records per block) (total number of records) discarding the remainder
|
Note - The log operation is a standard function in spreadsheet packages. |
3. Total number of blocks = Sum, from i=1 to (# coarse index levels), (number of records per block)(i-1) + ((total number of records) / (number of records per block)), rounded up. Round up the result of ((total number of records)/(number of records per block)).
4. Total file size = (total number of blocks) * (VSAM block size)
Example: For a KSDS index file with 40,000 records with a key size of 20 bytes, with a 4 Kbyte VSAM block size, calculate:
Number of records per block = (4096 - 20 = 4076) / (20 + 4 = 24) = 169 (discarding the remainder)
Number of coarse index levels = log 169 (40,000) = 2 (discarding the remainder)
Total number of blocks =
(169) 0 + (169) 1 + (40,000 / 169), rounded up = 1 + 169 + 237 = 407
Total file size = 407 * 4096 = 1,667,072 bytes
An important step in configuring Sun MTP to run your application is to define VSAM files in the catalog. The catalog is a VSAM file with the logical name CATALOG, which consists of two physical files, CATALOG.dta and CATALOG.idx, representing the data and index portions.
The catalog is initialized at region startup. The first time you start a region, the catalog is created and is empty. You can maintain the catalog either from the File Manager or from the operating system environment using the kixexpcat and kiximpcat utilities and a text editor. You can also use a combination of these methods. For example, you can initially define some VSAM files in the catalog using the File Manager, then add or delete entries using the utilities and a text editor.
Before you start to define VSAM files in the catalog, make all the file name entries in the FCT. There is a one-to-one correlation between the file names in the FCT and those in the catalog. Refer to the Sun Mainframe Transaction Processing Software Configuration Guide for instructions on adding entries in the FCT.
The following terms are used to describe VSAM files:
|
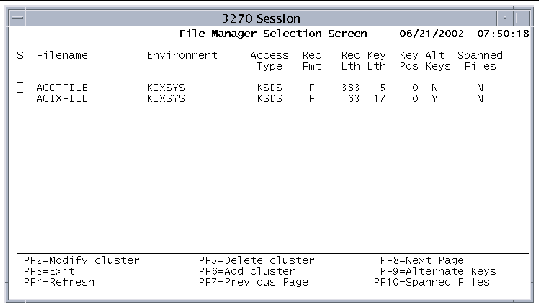
2. When the File Manager Selection screen shown in FIGURE 3-2 is displayed, press PF6.
If you are opening File Manager for the first time, the fields are empty.
 [ D ]
[ D ]
3. When the Add Cluster screen is displayed, define the file, making sure that the entries match the entries for this file in the FCT exactly.
Use the Tab key to move from field to field.
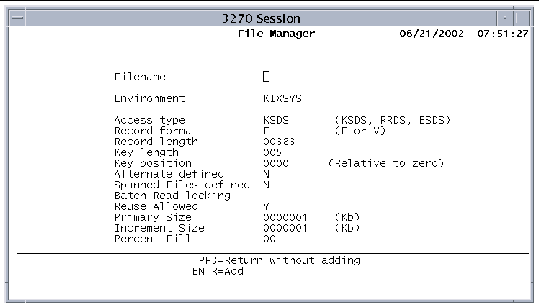
a. In the Filename field, type the dataset name you entered in the FCT.
b. In the Environment field, type the name of the environment variable that contains the directory for the file name in the Filename field.
c. In the Access type field, specify the VSAM file type, either: KSDS, ESDS, or RRDS.
d. In the Record format field, type F if the file contains fixed-length records, or V if the file contains variable-length records.
e. In the Record length field, specify the record length if the file contains fixed length records, or the maximum record length if the file contains variable length records.
The record length is a value from 1 to 32,767.
f. In the Key length field, type the length of the primary key by which records in a KSDS file are retrieved.
The key length is a value from 1 to 255 bytes.
g. In the Key position field, type the key position, which is the byte position within a record (relative to zero) where the primary key field begins.
The value cannot exceed the record length. Also, the key length plus the relative key position cannot exceed the record length.
h. The Alternate defined field indicates whether alternate keys exist for the VSAM file.
You cannot edit this field on this screen. To define alternate keys, see Adding Alternate Indexes to an Existing Cluster.
i. The Spanned files defined field indicates whether the file is spanned or not.
You cannot edit this field on this screen. To define spanned files, see To Define a Spanned File Using File Manager.
j. In the Batch Read-locking field, specify whether a record in this file will be locked if it is being read. Type either:
Y: Lock this record for a read during batch access.
N: Do not lock this record for a read during batch access.
See Defining Batch Read-locking for a File and refer to the Sun Mainframe Transaction Processing Software Developer's Guide for more information about VSAM RC (read consistency), which describes batch read-locking.
k. The Reuse Allowed field indicates if the file may be reused (scratched) during a unikixbld operation. Valid values are:
Y: Reuse is allowed for this file. Default.
N: Reuse is not allowed for this file.
Refer to the Sun Mainframe Transaction Processing Software Configuration Guide for information about using this option in a Sun MBM environment.
Refer to the Sun Mainframe Transaction Processing Software Reference Guide for the format and options of unikixbld.
l. The last three fields are not currently used; they will be supported in a future release. Accept the default values.
Primary Size: Specifies the initial size of the file in Kbytes when it is created. Default is 1.
Increment Size: Specifies the amount of space by which to grow the file in Kbytes when it runs out of space. Default is 1.
Percent Fill: Specifies the amount of free space to leave in each block when performing a unikixbld load or an open output operation. Default is zero.
4. Press Enter to add the cluster definition to the catalog and return to the File Manager Selection screen.
Additions do not appear until you press PF4 to refresh the screen.
If you do not want to add the definition, press PF3 to return to the File Manager Selection screen.
5. Press PF3 to save the entries in the catalog and exit the File Manager.
The Modify Cluster function of File Manager allows you to change the attributes of a selected cluster.
You cannot modify the name of the cluster. To change the name of a cluster, you must first delete the existing cluster definition, then add a new definition with the new name.
1. Open File Manager, either from the Development System main menu or by using the CFMS transaction.
2. When the File Manager Selection screen shown in FIGURE 3-2 is displayed, select a file by positioning the cursor in the selection field (S) to the left of the file name.
3. Press PF2 - Modify cluster.
4. Make your changes on the Modify Cluster screen, which has the same fields as those on the Add Cluster screen (FIGURE 3-3).
Use the Tab key to move to the fields you want to change.
5. To add, modify, or delete segments of a spanned file, press PF1 to display the Spanned File screen.
See Spanned Files for more information.
6. To add, modify, or delete alternate indexes associated with the cluster, press PF2 to go to the Alternate Index screen.
See Creating an Alternate Index for more information.
7. Press Enter to modify the cluster and then PF3 to return to the selection screen.
Press PF3 to return to the selection screen without modifying the file attributes.
When you modify the attributes of a cluster, no change is made to any data in the VSAM file. For example, if you modify the key length, the VSAM file still contains data that was built using the old key length.
1. Build a sequential file from the VSAM file (using Record Editor or unikixbld).
4. Delete the physical VSAM file(s) for the cluster.
6. Build a VSAM file from the sequential file (using Record Editor or unikixbld).
When you delete a cluster, you delete its definition from the VSAM catalog. You do not delete the physical file associated with this catalog entry.
1. Open File Manager, either from the Development System main menu or by using the CFMS transaction.
2. On the File Manager Selection screen, select a file to delete by positioning the cursor in the selection field (S) to the left of the file name.
3. Press PF5 to display the Delete Cluster screen.
4. Press Enter to delete the cluster.
Press PF3 to return to the File Manager selection screen without deleting the cluster.
Creating an alternate index for a KSDS dataset has many steps. This section divides the steps into logical procedures.
1. Open the File Manager, either from the Development System main menu or by using the CFMS transaction.
2. When the File Manager Selection screen is displayed, select a file cluster by moving the cursor to the selection field to the left of the file name.
3. Press PF2 to display the Modify Cluster screen.
|
Note - The PF9Alternate Keys function is only used to display alternate keys that are already defined for the file. |
4. On the Modify Cluster screen, press PF2 to display the Alternate Index screen.
5. On the Alternate Index screen, type the appropriate information on a blank line to define each alternate index.
a. In the Alternate index column, type the name of an alternate index path by which to retrieve records in a KSDS file.
This is the same as the file name in the FCT.
b. In the Keylen column, specify the length of the alternate key by which records in a KSDS file are retrieved when the corresponding path name is referenced.
c. In the Keypos column, specify the byte position within a record, relative to zero, where the alternate key field begins.
To modify the attributes of an alternate index, position the cursor on the line you want to change and type over the existing values.
To delete an alternate index, position the cursor on the line you want to delete and use the space bar to blank out the existing information.

6. Press Enter to apply your changes and return to the Modify Cluster screen.
Press PF3 to return to the previous screen without modifying the alternate index information.
7. Press PF3 to return to the File Manager Selection screen.
8. Press PF4 to refresh the screen and show your changes.
1. Start Table Manager from the Development System main menu or by using the CTBL transaction.
2. Select Standard Tables, then select the File Control Table (FCT).
3. Define the alternate index in the FCT.
The Alternate index specified in the File Manager - Alternate Index screen is the file name of the alternate index. The following figure shows that you must define the alternate index in the FCT with its associated cluster name.
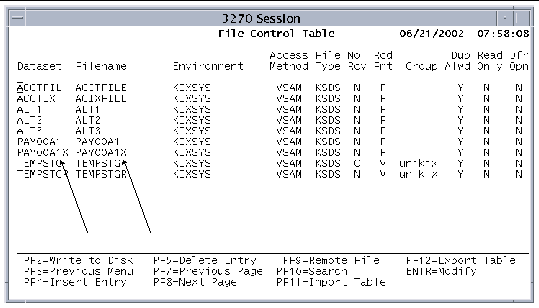
The arrows in the figure show a dataset named PAY00A1X and its alternate index PAY00A1X. The following program fragment shows how CICS commands reference the alternate index using this dataset name:
|
Note - The dataset name and file name do not have to be the same. |
4. Press PF2 to save the FCT and exit Table Manager.
5. Shut down and restart the region to initialize the files and alternate indexes defined in the File Manager and the FCT.
1. Start the Record Editor using either method:
2. Follow the procedure in Building a VSAM File to build the VSAM file and its alternate indexes.
If you have very large files, or have many clusters to create, you can use the unikixbld utility. Refer to the Sun Mainframe Transaction Processing Software Reference Guide and the Sun Mainframe Transaction Processing Software Developer's Guide for information about using unikixbld. CODE EXAMPLE 3-2 shows a unikixbld script file.
You can add one or more new alternate indexes to an existing cluster.
1. Perform the following procedures to define the alternate index or indexes in the File Manager and the FCT:
To Create a Catalog Entry With an Alternate Index
To Create an Alternate Index in the FCT
2. Create a sequential file from the VSAM cluster you are modifying. See Building a Sequential File.
4. Delete all the .dta and .idx files that relate to the VSAM cluster you are modifying.
If, for example, DATASET1 has a main index and two alternate indexes, type the following command:
5. Start the region to initialize the file and the alternate indexes defined in the File Manager and the FCT.
7. Recreate the VSAM file from the sequential file created in Step 2. See Building a VSAM File for the procedure.
The VSAM cluster now contains your new alternate index.
Spanned files are files that span multiple file systems. Sun MTP supports spanning of KSDS VSAM files, which can have up to eight segments.
|
Note - If the space available to one of the segments is smaller than the rest, the maximum file size is limited by that smaller size multiplied by the number of segments. |
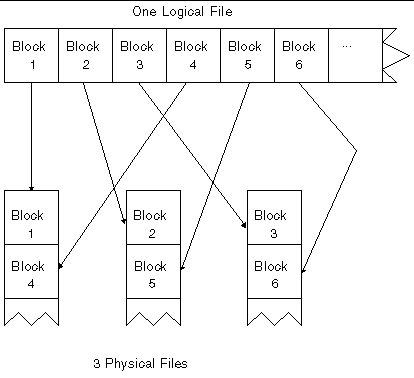
Sun MTP stripes the data written to the KSDS files using the block size configured at startup. Greater file access throughput results because access to records from transactions is not limited by the throughput of a single device.
Data is divided onto spanned files by block. The size of each block is defined at startup with the unikixmain -b option. You can define block sizes of 4, 8, 16, or 32 KBytes.
The blocks are written to the physical files sequentially with block 1 of the logical file written to segment 1, block 1. Block 2 of the logical file is written to segment 2, block 1. When a block is to be written, the block number is divided by the number of segments with the remainder +1 used as the file number, and the quotient +1 used as the block number in that file. This is shown graphically in FIGURE 3-6.
1. Open the File Manger either from the Development System main menu or by using the CFMS transaction.
2. Define the file's main segment using the Add Cluster function.
This main segment defines the location of the index file (.idx) and the first data segment (.dta). Subsequent data segments have the extensions .dt1 through .dt7. See Defining VSAM Files in the Catalog Using File Manager.
3. On the File Manager Selection screen, select the file to span and press PF2.
|
Note - To view the Spanned File Definition screen without making additions or changes, press PF10 on the File Manager Selection screen. |
4. On the Modify Cluster screen, press PF1 to display the Spanned File Definition screen.
The following information is displayed:
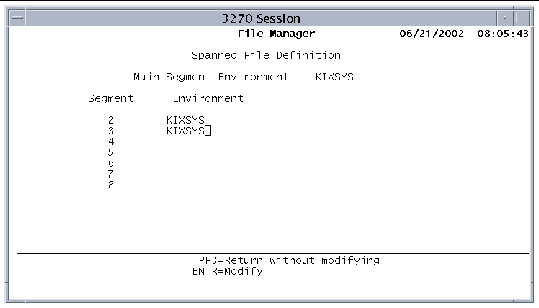
5. To add a segment, type the environment variable for that segment. To delete a segment, use the spacebar to blank out its environment definition.
6. Press Enter when you are done adding or modifying segments.
Press PF3 to return to the Modify Cluster screen without modifying any of the spanned file information.
7. Press Enter again to return to the File Manager Selection screen.
|
Note - Any changes you make to the segment definition are made only to the catalog, not to the actual data. |
Batch read-locking, or VSAM RC (read consistency), provides full data consistency when batch programs and online transactions are concurrently updating the same VSAM files. There are three ways to ensure read consistency. The first two do not require making any changes to application code. The third method requires application code changes and should be used if the region or file options do not satisfy your needs.
Sun MTP provides two utilities that help you manage a VSAM catalog without using File Manager:
|
Exports a VSAM catalog, $KIXSYS/CATALOG.dta and $KIXSYS/CATALOG.idx, to a single ASCII text file. This text file is formatted and you can edit it with any text editor. The kixexpcat utility space-fills character fields to the maximum number of characters listed in TABLE 3-1. |
|
Refer to the Sun Mainframe Transaction Processing Software Reference Guide for more information about these commands and their options.
You can create a VSAM catalog from an ASCII file similar to the one in CODE EXAMPLE 3-1. This file must conform to the format described in TABLE 3-1.
When you create or edit the catalog file, observe the following guidelines:
See To Maintain the VSAM Catalog Using Utilities.
|
Y: Lock VSAM records when a READ is issued for this file from batch. N: Do not lock VSAM records when a READ is issued for this file from batch. |
||
1. Using a text editor, create a text file and name it CATALOG.lst.
2. Type the records making sure to use commas to separate the fields.
Each record starts with one of the record types described in TABLE 3-1 and contains information associated with that record type.
3. Your ASCII file should look similar to the following:
5. Execute kiximpcat to import the ASCII file and create the catalog. For example:
This command imports the CATALOG.lst file located in the /tmp directory, creates the CATALOG.dta and CATALOG.idx files, and saves them in the $KIXSYS directory.
1. Shut down the region if it is running.
2. Export the VSAM catalog to the ASCII catalog file. For example:
3. Use any text editor to add or make changes to files.
4. Import the ASCII file into VSAM catalog format. For example:
5. In the FCT, make an entry for each new file you added to the catalog and edit the entries for any files you changed.
You can use the Table Manager to type the file definition in the FCT, or you can edit an exported FCT (fct.lst), then import it.
6. Start the region to use the new catalog.
When you create or modify the catalog, no validation is done between the FCT and the catalog. Therefore, you must make sure that the definition for each dataset in the catalog file exactly matches the definition for that same dataset in the FCT. If the data does not match, errors are displayed during startup.
The same physical file can have multiple dataset names defined in the FCT. The FCT configuration information in those dataset entries must match each other and agree with the configuration information in the catalog. The Read Only and Deferred Open fields, however, can differ.
For more information about the FCT, refer to the Sun Mainframe Transaction Processing Software Reference Guide.
Sun MTP provides a region-wide block size for its VSAM files. It supports 4, 8, 16, or 32 Kbyte block sizes, with a default size of 4 Kbytes. If your KSDS files have record lengths greater than 4 Kbytes, a larger block size might improve performance. It might also be more efficient for sequential batch operations.
The first time it starts, the region obtains the region-wide block size from the -b option of unikixmain. After the catalog is created, the block size is set automatically to equal the block size of the catalog.
To modify the system-wide block size, you must change the VSAM block size of the catalog.
1. Unload all the VSAM files in the catalog into sequential files.
You can use unikixbld or the process described in Building a Sequential File. Use unikixbld if you have more than a few files in the catalog.
3. In the $KIXSYS directory, at the command prompt, run the kixexpcat command to export the catalog to the ASCII file CATALOG.lst.
Refer to VSAM Catalog ASCII Format and the Sun Mainframe Transaction Processing Software Reference Guide for information about using kixexpcat.
4. Delete the following files:
5. Edit the ASCII catalog file to change the block size.
For example, in the first line, change 4K:
B,4K P,KIXDATA0 ,EFILE001 ,F,ESDS,00080,0000,0000,Y,Y,0000001,0000001,00 P,KIXDATA0 ,EFILE002 ,F,ESDS,00080,0000,0000,Y,Y,0000001,0000001,00 ... |
B,8K P,KIXDATA0 ,EFILE001 ,F,ESDS,00080,0000,0000,Y,Y,0000001,0000001,00 P,KIXDATA0 ,EFILE002 ,F,ESDS,00080,0000,0000,Y,Y,0000001,0000001,00 ... |
7. In the $KIXSYS directory, execute kiximpcat at the command prompt to recreate the catalog file, which must be named CATALOG.
Refer to the Sun Mainframe Transaction Processing Software Reference Guide.
9. Rebuild each VSAM file from its associated sequential file.
Use the process described in Building a VSAM File if you have only a few files. Otherwise, use the unikixbld utility to rebuild VSAM files. The following example shows a unikixbld script that rebuilds the VSAM files.
The Sun Mainframe Transaction Processing Software Reference Guide and the Sun Mainframe Transaction Processing Software Developer's Guide contain information about using unikixbld.
Sun MTP has features and utilities that enable you to easily manipulate VSAM files. They include:
The Data File Editor Menu is part of the Development System's Record Editor. It lists the datasets you defined in the VSAM catalog.
|
2. Display the Data File Editor shown in FIGURE 3-8:
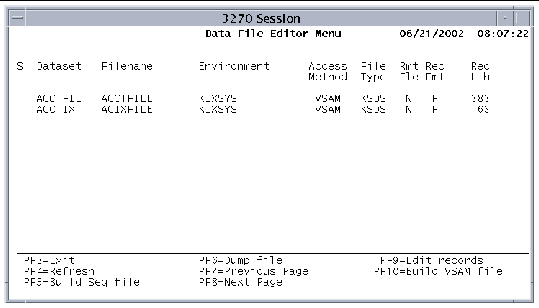
The Data File Editor Menu contains the following information:
The following keys are active on the Data File Editor Menu:
|
Returns to the Development System main menu or a blank transaction screen. |
|
|
Builds a sequential data file from a selected dataset. See Building a Sequential File. |
|
|
Dumps some or all records of a selected dataset to a disk file or to the system printer. The file is dumped in the form of a formatted report. See Dumping a VSAM Dataset. |
|
|
Opens the Record Editor, which allows you to add, modify and delete records in an existing dataset. See Chapter 5. |
|
|
Creates a VSAM dataset from a sequential data file. See Building a VSAM File. |
The Build VSAM File function builds a VSAM dataset from a sequential data file. The dataset you build must be defined in the VSAM catalog or it does not appear on the Data File Editor menu. If you are building a new dataset, the dataset is empty until you perform the build. If the dataset already exists, you are prompted to overwrite or append.
|
1. On the Data File Editor Menu, select a dataset and press PF10 to display the following screen.
When you first open this screen, the Input sequential Files and Fill % fields are blank; the Output dataset fields contain values from the Data File Editor menu. You cannot modify the Output dataset fields.
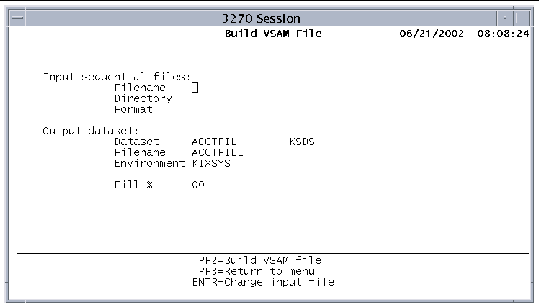
2. In the Filename field in the Input sequential Files area, type the name of the sequential file to use to build the VSAM dataset.
3. In the Directory field, type the name of the directory where the sequential file resides.
You can also enter an environment variable that represents the directory.
4. In the Format field, type the name of the record processing routine to use in the build process.
You must specify one of the following:
line, mfrcd, mfrcdv, record, recordv
The extension .in is appended to the end of the name in the Format field to determine the complete name of the processing routine. See Record Processing Routines for a description of the routines, which are located in $UNIKIX/bin/build. The format of the VSAM file is determined by its VSAM catalog configuration information.
5. In the Fill % field, type the percentage of free (empty) space to allocate on each VSAM block.
For example, 0% allocates no free space; 60% leaves each block 60% empty. Leaving extra space on a block reduces the number of block splits required to insert new information. If no empty space is left, every insert after a file rebuild causes a block split. If you want to change any of the entries you made, press Enter to move the cursor to the Filename field. Use the Tab key to move from field to field.
6. Press PF2 to build the VSAM file, or press PF3 to return to the Data File Editor Menu without building the file.
If the dataset you are building currently has data, you are prompted to delete the data (for a KSDS and RRDS dataset), or append the new data (for an ESDS dataset).
For a KSDS or RRDS dataset, press the Enter key at this prompt to delete records currently defined and to add records to the dataset from the input file. For an ESDS dataset, press the Enter key to append records to the dataset from the input file.
7. Press PF3 to return to the Data File Editor Menu.
8. Press PF3 to exit the Record Editor.
The input and output sequential files that are used during the VSAM database load and unload processing are handled by record processing routines. Each record processing routine handles one specific record format. There are two executables for each record format, one for input processing and a second for output processing. For example, for the recordv format:
The record processing routines are constructed with a loop that drives the loading process. For example, the sequential file input routine reads the input sequential file and presents the data to the Sun MTP load process. Upon successful return, the program returns to the top of the loop. See Customizing Record Processing Routines.
Five default record processing routines are delivered with Sun MTP: line, record, recordv, mfrcd, and mfrcdv. They are in the $UNIKIX/src/record directory. The first three are shown as examples only. The actual formats for line, record, and recordv are built-in for speed. However, you can modify these routines and rename them if you require a slightly different routine. The mfrcdv routine is built-in. It is not physically located in the record directory and it cannot be rebuilt.
The following table describes the processing routines and record formats.
You can use any of the routines to build sequential files or to move existing sequential files to the Sun MTP VSAM format.
The Build Sequential File function builds a sequential data file from a VSAM dataset.
|
1. On the Data File Editor menu, select a file by positioning the cursor in the Selection field next to the file.
2. Press PF5 to display the Build Sequential File screen.
The Input dataset fields contain file information from the Data File Editor menu. Your cursor is located on the first blank field.
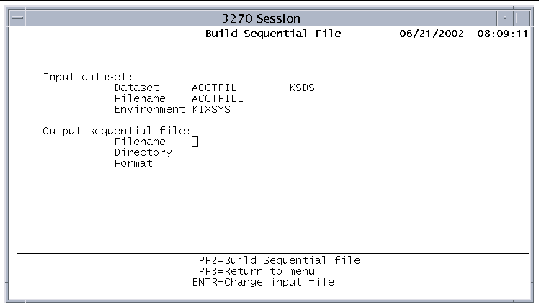
3. In the Output sequential file area Filename field, type the name of the sequential file to be built.
4. In the Directory field, type the name of the directory where the sequential file will be built.
You can also use an environment variable that represents the destination directory.
5. In the Format field, type the name of the record processing routine to use in the build process.
You must specify one of the following:
line, mfrcd, mfrcdv, record, recordv
The extension .out is appended to the end of the name in the Format field to determine the complete name of the processing routine. For a description of the routines, which are located in $UNIKIX/bin/build, see Record Processing Routines.
The following figure shows a completed Build Sequential File screen.

6. If you want to change any of the entries you made, press the Enter key to move the cursor to the Filename field.
Use the Tab key to move from field to field.
7. Press PF2 to build the file.
If the file already exists, the following message is displayed:
8. Press PF3 to return to the Data File Editor Menu.
The Dump File function dumps some or all the records of a VSAM dataset to a disk file or the system printer in the form of a formatted report. You can use the dump file to examine the data in a dataset.
|
1. Select a dataset on the Data File Editor menu and press PF6.
The Dump File screen contains the Dataset to be Dumped information from the Data File Editor menu.
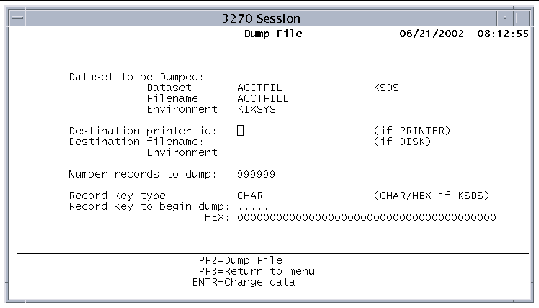
2. Type appropriate values in the fields.
TABLE 3-3 lists the field descriptions and acceptable values.
If you want to change any of the entries you made, press the Enter key to move the cursor to the first editable field. Use the Tab key to move from field to field.
3. Press PF2 to dump the file.
4. Press PF3 to return to the Data File Editor Menu.
The following table describes the Dump File screen fields.
The following function keys are active on the Dump File screen:
|
The kixfile utility allows you to allocate and deallocate VSAM datasets while a region is running. During region initialization, all VSAM datasets are opened, except those that are tagged in the FCT for deferred open. You must use kixfile from batch shell scripts to close, manipulate, and open VSAM files.
You might need to access VSAM files for a variety of reasons:
Refer to the Sun Mainframe Transaction Processing Software Reference Guide for a description of the kixfile utility and its options.
The unikixbld utility allows you to perform a variety of tasks on VSAM files while the region is operating. You must use unikixbld from batch shell scripts.
Refer to the Sun Mainframe Transaction Processing Software Reference Guide for more information.
To ensure VSAM file integrity, use a combination of the software's built-in recovery facilities and accepted administrative procedures.
If configured, built-in recovery facilities take effect after a transaction abort, a deadlock, or a system crash.
Maintaining backups of datasets ensures that you can restore a file from a known good copy in the event of a disaster. You might need to restore a VSAM file if you experience any of the following events:
Always make sure that you have a valid copy of your datasets. If you must go back to this copy, make sure that the data is current enough to meet your needs. For example, if you create a backup every night, make sure that returning to last night's file in the middle of a business day is good enough to meet your needs. If it is not, you need to create backup copies more frequently, or implement another backup method to keep current.
To ensure a valid backup copy of a dataset, all update activity must be terminated and all the VSAM blocks must be written out to disk. You can only guarantee this if the region is down or if the dataset is closed, locked, or set to a read-only state.
Close the dataset with the command:
Or, lock the dataset exclusively in your batch shell script that contains the backup commands using the command:
Or, make the dataset read-only with the command:
You can then back up the dataset in a manner you choose. If you are backing up a KSDS file, you must back up both the .dta and .idx files that make up the dataset.
Example: Use the cp command to back up a KSDS file named TEST1. Change to the directory containing TEST1 and type the following commands:
To go back to the last known good copy of a dataset, the region must be shut down or the dataset must be closed. You can then restore the dataset in the manner you choose.
Example: Building on the example in the previous section, use the following commands to restore a copy of the dataset:
The software uses multiple files to implement the VSAM data storage method.
Activity counts are used to maintain integrity. Each file header has an activity count that is incremented each time the region opens and closes the file. While the file is open, the activity count is incremented, then set to its negative-valued complement. When the file is closed, the activity count is reset to its positive complement. When the region opens the VSAM file, all components of that file must have equal activity counts. This means the index and data components of the primary file and all alternate index files must have the same activity counts. If the file is spanned, each segment must have that same activity count.
If the activity count of one component of a file is not consistent with the other components, the file cannot be opened. The opening of the file is bypassed to allow time to determine why the activity counts are inconsistent and to either override or correct the error. Activity counts may be inconsistent if all components of a file were not restored from the same backup.
Use the kixverify utility to display and modify activity counts. Refer to the Sun Mainframe Transaction Processing Software Reference Guide for information about kixverify.
If you suspect that a dataset is corrupted, use kixvalfle with the -ik options on a closed dataset to check its integrity. Capture the output in a file in case technical support staff need it for problem analysis. kixvalfle checks the validity of the links between blocks in the data file. If the file is a KSDS or alternate index file, the links between the blocks of the index file are also checked.
If kixvalfle reports no errors, your dataset is not corrupted and no further action is necessary. However, if a significant proportion of the file contains free blocks, you might want to reorganize it. See Reorganizing a Dataset.
If kixvalfle reports errors, you must perform corrective actions on the dataset. The error message types dictate the appropriate actions.
The unikixbld options to rebuild index files are as follows:
Refer to the Sun Mainframe Transaction Processing Software Reference Guide for descriptions of kixvalfle and unikixbld.
Refer also to the Sun Mainframe Transaction Processing Software Troubleshooting and Tuning Guide.
To understand why reorganizing a dataset may sometimes be desirable, you must understand the physical block organization for VSAM's KSDS files. VSAM stores KSDS records in ascending order based on the values of their keys. The logical records are in ascending order within a VSAM block, and the blocks are chained together, but not necessarily in physical sequence.
Example: Block 1 is chained to block 7, which is chained to block 3, etc. Block 1 has the group of logical records with the lowest key values, and within Block 1, these records are in ascending sequence. Block 7 has the group of logical records which are the next ones in ascending sequence, then Block 3, etc.
As logical records are deleted, the blocks may become empty (no logical records are present). These empty blocks are marked as free and are not returned to the operating system. These free blocks are then reused when new records are inserted into the dataset. If no free blocks are available, a new block is requested from the operating system.
Reorganizing datasets reclaims free disk space and may improve disk access, but this depends on the fragmentation level of the dataset and your file system at file creation time, file update time, and file reorganization time. It can also depend on your operating system and the type of disk controllers you use. Physical disk access behavior is difficult to predict and it changes over the life of the dataset.
|
1. Execute the kixfile command to make the dataset read-only:
2. Use the unikixbld utility to write the output to a sequential file:
3. Use unikixbld to restore the contents from the sequential file:
unikixbld provides an option to specify the fill percentage. The command used in Step 3 results in the default fill percentage of 0, which means all blocks contain as many logical records as can fit. This is a good choice if you know that new records inserted in the future will have keys with values higher than your present set. However, if you expect new records to be inserted into existing VSAM blocks, it makes sense to leave space for these insertions. Use the fill percentage option to specify the amount of space.
Use the kixsalvage utility to salvage a dataset. kixsalvage attempts to extract all of the logical records from the file, but file damage sometimes results in the loss of data. Carefully examine the output from kixsalvage and determine if it is better to go back to your last backed-up copy.
|
1. Close the dataset or shut down the region.
2. Type the kixsalvage command to generate a new dataset.
Use the -c option to generate a dataset in the COBOL variable record format that can be sorted with the COBOL SORT verb.
If you omit the -c option, kixsalvage generates a recordv format file that you can sort with an external sort utility.
3. Use unikixbld from a batch script to initialize the corrupted dataset and reload the contents from the sorted file that you just created.
Refer to the Sun Mainframe Transaction Processing Software Reference Guide for a description of the kixsalvage utility and to the Sun Mainframe Transaction Processing Software Troubleshooting and Tuning Guide.
Sun MTP has built-in recovery facilities for VSAM files. To take advantage of these facilities, you must configure recovery in the VSAM Configuration Table (VCT). Refer to the Sun Mainframe Transaction Processing Software Configuration Guide for procedures for configuring recovery. You must also specify recovery at the individual file level in the FCT.
In addition to recovery for databases, the software supports recovery for temporary storage queues, transient data queues (TDQs), and asynchronous transaction starts (ATI requests). The TEMPSTGR file is used for both temporary storage queue and ATI recovery. The software provides configuration parameters for both in the Temporary Storage Table (TST). The Intrapartition Destination Control Table (DCT) controls the recovery for TDQs. Refer to the Sun Mainframe Transaction Processing Software Reference Guide for information about the TST and DCT.
There are two types of recovery processing:
Occurs when a transaction aborts. Any database updates that were performed by the transaction are backed out so that the failed transaction does not affect the database. This is called dynamic transaction back-out.
Other transactions cannot access updated records until the updating transaction terminates successfully. This prevents the contamination of the database by data from failed transactions getting passed to successful transactions prior to the abort.
See Recovering From a Transaction Abort.
Occurs after a system crash caused by a hardware problem, a software problem in any of the Sun MTP components or the operating system. This is referred to as emergency restart/recovery.
See Recovering From a System Crash.
When recovery is not enabled, the actions described above do not take place and the application environment will be chaotic. A transaction abort, system crash, or region crash may make your database invalid. Even if none of these occur, applications can read in-process updates of other transactions. The application designer must understand these inconsistencies and plan for them.
Other recovery issues to consider when designing your application are:
|
Note - The term record refers to one of the logical records in a VSAM database file. The size of a logical record may be greater than the VSAM block size. |
Dynamic transaction back-out is used to roll back database updates when a transaction fails.
When a record is written to the database, a copy of the original record is written to the recovery file. This copy, called the before image, identifies the transaction that created it. Marker records indicating the start and end of each transaction that updates the database, as well as any syncpoints, are also written to the recovery file. The recovery file is a circular file, meaning that when the file reaches a predefined maximum size, records are reused starting from the beginning. Sun MTP also stores offsets into the recovery file for each record written to the database, in memory.
When a transaction aborts, the software reads each offset in the recovery file for each record associated with the transaction. Each before image associated with the failed transaction is restored to the database. At this point, all the records that were updated by the failed transaction are backed out and the state of the database is the same as it was before the transaction was executed.
After the recovery file back-outs are complete, the software rolls back all updates that the failed transaction made to Temporary Storage for queues that are defined as recoverable in the TST. It also rolls back updates to intrapartition transient data and all recoverable asynchronous START requests that the failed transaction may have issued. Asynchronous START requests are recoverable if they specify a recoverable queue in the REQID parameter. However, such requests do not get scheduled until the transaction issues a syncpoint or completes successfully. This ensures that all updates made by a failed transaction to recoverable resources (VSAM files, temporary storage, intrapartition transient data, and asynchronous STARTs) are rolled back during dynamic transaction back-out.
Although the system may pause for a moment while the transaction back-out takes place, other transactions in the system are not affected.
After a system crash, start the region in the normal way. If the VCT was configured with recovery in effect, the recovery procedure described in this section occurs.
The region's Recovery Server backs out the database updates of any transactions that were incomplete at the time of a system crash. If header file information in the recovery file indicates that the system did not end normally, the Recovery Server restores the before images to the database just as it does with a single-transaction abort. However, it backs out all the transactions that were in progress at the time the last record of the recovery file was written. The effect is the same as doing an individual back-out for each transaction that did not complete successfully.
|
Note - If any transient data queues are flagged as recoverable, Sun MTP uses the standard KSDS recovery mechanism described above to recover these VSAM files. |
After Sun MTP completes the recovery file back-outs, it begins recovery of any Temporary Storage queues and ATI transactions (asynchronous STARTs). It uses the TEMPSTGR file to store recovery data for both the Temporary Storage queues and the ATI transactions.
Sun MTP reads the TEMPSTGR file sequentially. When it encounters temporary storage records, it creates Temporary Storage Blocks just as in the dynamic transaction back-out. If it finds a start record, it rebuilds the Asynchronous Start Queue (ATI transactions). As it encounters each start record, it creates an Asynchronous Start Queue entry and sends a message to the start processor to schedule the asynchronous START.
If a system crash occurs while recovery is in effect, recovery must still be in effect when the system is restarted to perform recovery. If you do not want to have the recovery performed, it is not enough to just turn off the recovery flag in the VCT:
A deadlock occurs when two or more transactions are each waiting for a resource that is currently owned by one of the transactions. Because each transaction is waiting for one of the other transactions to release a needed resource, the transactions remain hung unless intervention occurs.
The simplest deadlock involves two transactions and two resources. For example:
The resources are the type defined in the ENQ command or VSAM records.
Sun MTP contains special logic to detect deadlock conditions. When it detects a deadlock, it forces one of the transactions to abend. The transaction that abends is the last transaction to enter the group; that is, the one whose request, when added to the others already outstanding, results in the deadlock. When this type of abend occurs, it does not mean that the particular transaction that abended has a design error. It means that the transactions involved in the deadlock, when taken as a group, have a design error.
A conversational transaction is one in which dialog with the user (typically a SEND/RECEIVE sequence) is carried on while the transaction is active. This differs from a pseudo-conversational transaction in which there is no interaction with the user during the course of the transaction. Typically, a pseudo-conversational transaction ends with a SEND followed by a RETURN TRANSID. While the user types in a response, the transaction is not active. When the user presses Enter or a PF key, a new instance of the transaction specified by the TRANSID is initiated.
Using the Sun MTP recovery capability has important design implications for conversational transactions:
You can prevent these problems by avoiding conversational transactions entirely, or, in the case of systems that are already written conversationally, by adding a SYNCPOINT command just prior to any RECEIVE command occurring at a point where a record could be held.
The region manages the database integrity of VSAM applications, and the database integrity of applications that use third-party RDBMS products is managed by the RDBMS software.
Sun MTP uses a recovery file to store before images of database records. The recovery file provides a rollback capability in the event of an abort. The before image data is not retained beyond a database commitment or rollback. Each third-party RDBMS has its own log files that provide both database rollback and roll forward capabilities. The configuration and usage of the RDBMS log files is explained in the RDBMS documentation.
The application designer manages database integrity within a particular application implicitly or explicitly. Implicit database actions occur at various points in the execution of an application:
Sun MTP automatically handles the implicit commitment or rollback of a VSAM database and the RDBMS software manages the implicit commitment or rollback of an RDBMS transaction through a user module.
The database administrator must prepare the user module, then bind it with the Transaction Server (unikixtran) and the Batch Processor (unikixvsam). The user module must be developed in consultation with the application designer to guarantee the consistency of the application. For information about developing user modules, see Chapter 11.
An application program can request a database commit explicitly. The request is normally a call to the SYNCPOINT function. Here, all RDBMS software that was incorporated into the transaction processor is called to commit its changes to the appropriate database and mark its log file that the transaction has successfully completed.
An RDBMS application may commit database updates using the COMMIT WORK SQL statement, or may remove database changes using the ROLLBACK WORK SQL statement. In either case, the operation is only executed on behalf of the data managed by that particular RDBMS. Use this method of explicitly requesting a commitment where there is just one RDBMS in use by the application. Otherwise, inconsistent application databases can result.
There are several constraints on an application that accesses more than one database:
To avoid these problems, use a phased approach so that only one database manager is updated at any one time.
Example: In phase one, an application accesses a VSAM database for update and an Oracle® database in read-only mode, then issues a SYNCPOINT.
In phase two, the application accesses the Oracle database in update mode. If phase two does not successfully commit, it is not possible to automatically back out the changes made to the VSAM database in phase one. However, the application logic could handle backing out the changes.
When the need for application throughput outweighs the need for recovery from a system crash or transaction abort, use the software's VSAM file and journal caching facilities to defer physical file writes. The file system cache schedules these physical writes based on its cache flush operation rules.
It is the responsibility of the system administrator to implement a policy to ensure that adequate backups of VSAM files on the system are performed daily or more frequently. This may mean that additional kixfile or UNIX sync commands are required to ensure that updates contained in cache for VSAM files and journals are physically written as needed.
Sun MTP automatically caches the non-recoverable Temporary Storage file, TEMPSTG, as well as non-recoverable Transient Data files. Because these files are re-initialized each time the region is started, their data is not needed after a region or system crash. Similarly, certain customer application files, such as user journals, may still be usable after a system failure if only the last few written blocks are lost.
You can specify file caching for VSAM files and journal files in the FCT and Journal Control Table (JCT), respectively, as well as dynamically specify file caching for VSAM files with the kixfile utility.
|
1. Open Table Manager by typing the CTBL transaction on a blank transaction screen.
2. Press PF4 to select Standard Tables.
4. Identify the file for which to cache writes, and type a C in the No Rcv column.
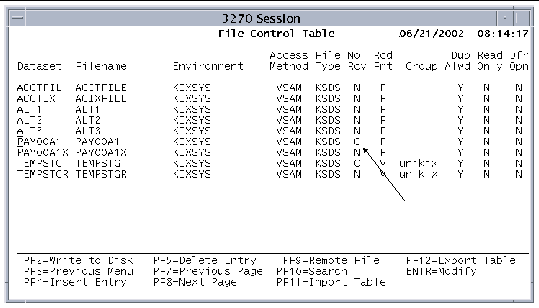
5. Repeat Step 4 for each file to cache.
6. Press PF2 to save the changes to disk.
8. Shut down and restart the region so your changes takes effect.
|
1. Open Table Manager by typing the CTBL transaction on a blank transaction screen.
2. Press PF5 to select Extended Tables.
4. Identify the journal file for which to cache writes and type a C in the Opt column.
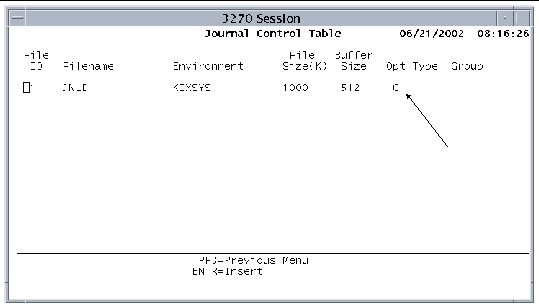
5. Repeat Step 4 for each journal file to cache.
6. Press PF2 to save the changes to disk.
8. Shut down and restart the region so your changes takes effect.
Use the -rC option of the kixfile utility, in combination with another appropriate option (e.g., -fN, open), to dynamically change the status of a file so that writes to it are cached. You must run kixfile from a shell script as a batch job while a region is running.
kixfile {({-f|-o|-b|-l|-d} Y|N [-r Y|N|C])|[-p]} dataset-name
Refer to the Sun Mainframe Transaction Processing Software Reference Guide for a description of all the kixfile options.
Example: To enable caching of writes on a recoverable VSAM file, PRODDATA, submit a batch shell script with the following commands:
To restore the attributes of PRODDATA, that is, to disable caching, submit a batch shell script with the following commands:
Copyright © 2004, Sun Microsystems, Inc. All rights reserved.