| C H A P T E R 11 |
|
Configuring Sun MTP for Remote Clients |
This chapter describes how to configure your region to work with different types of clients. It includes the following topics:
For information about using other clients, refer to the following documents:
|
1. Ensure that the UNIKIX and KIXSYS environment variables are set.
2. Modify and save the unikixrc.cfg file as described in To Configure unikixCommMgr.
If you have more than one region supporting TN3270 or TN3270E connections, each region must have its own unikixrc.cfg file containing a unique port number.
The main server starts the Communications Manager, which starts unikixtnemux, the TN3270 server process.
4. From the TN3270 client, connect to the region, specifying the host and the port number.
The port number must match the port number in the unikixrc.cfg file.
With TN3270E, clients can specify an LU name for terminals and printers, associating printer and terminal sessions with predefined terminal IDs:
Communications Manager (unikixCommMgr) is automatically started by unikixmain. On startup, unikixmain reads a configuration file called $KIXSYS/unikixrc.cfg. The unikixrc.cfg file contains information about the TN3270 Server that unikixCommMgr must start. Each region that supports TN3270 clients must have its own unikixrc.cfg file.
1. Copy the unikixrc file from the $UNIKIX/lib directory to the $KIXSYS directory of the region you are configuring.
2. Edit the TNServer* entries. TABLE 11-1 describes each entry.
When modifying the unikixrc.cfg file, the following syntax rules apply:
The following example shows the TNServer* entries:
3. Save the file as unikixrc.cfg.
You can define any of the following items in the unikixrc.cfg file for the TN3270 server. If you do not specify a value, the default value is used.
If the TNServer*UserLogin keyword is set to False and you want to display the Sun MTP copyright screen when clients connect, you must comment out the TNServer*DefaultTransaction keyword; for example:
Sun MTP supports 3270 SNA devices using the following components:
One unikixtrin process supports all 3270 clients.
The 3270 client initiator can run on the same host as Sun MTP, which is the preferred method, or it can run on the host that is running the TPS SNA server. A 3270 client initiator supports only one SNA server; only one 3270 client initiator should be connected per Sun MTP region.
This section shows two configuration scenarios and describes the configuration files required to run the TPS PU4/5 server with a Sun MTP region.
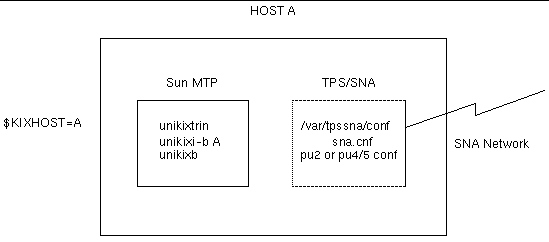
FIGURE 11-1 shows a configuration where Sun MTP and the SNA server coexist on the same host.

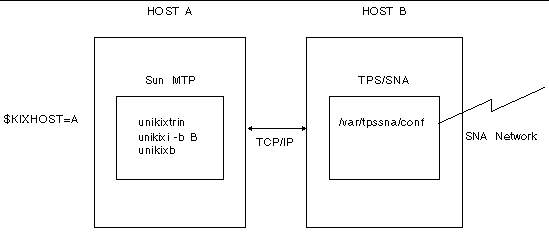
The following figure shows a two-host configuration where the Sun MTP region is on Host A and the TPS SNA server is on Host B.

The configuration files shown in the following figures must be located in the SNA server's /var/tpssna/conf directory. You must have an sna.cnf file. Your site's configuration will dictate the need for any other configuration files.
If your TPS server is connected to a PU2 device, customize the sna.cnf.pu2 file shown in the following example, rename it to sna.cnf, and save it to the /var/tpssna/conf directory. Make sure your SSCPPORT entry is 8100.
# Sample sna.cnf for PU2 # NOTE: SSCPPORT must be set to 8100 # cpname=IBMLAN.ORBITCP SSCPPORT=8100 |
Depending on your site's requirements, include either an autologin configuration file or a listener configuration file in the /var/tpssna/conf directory.
The configuration file shown in the following example is required if terminals will be logged in to the region automatically.
The configuration file in CODE EXAMPLE 11-3 is required if your PU2 device listens for connections from 3270 terminals.
The SNA configuration file in the following code example supports PU4/5 connection to the mainframe. If your TPS Server is connected to a mainframe, customize this file for your site, rename it to sna.cnf, and save it to the /var/tpssna/conf directory. Make sure your SSCPPORT entry is 8100 as shown in CODE EXAMPLE 11-4.
Depending on your site's requirements, include either an SDLC configuration file or an Ethernet configuration file in the /var/tpssna/conf directory.
CODE EXAMPLE 11-5 shows a PU4/5 configuration file for an environment where the TPS Server has an Ethernet connection to a mainframe.
If you want to use autologin for terminals or printers, you must add the following lines to the configuration files shown in CODE EXAMPLE 11-5:
The fully qualified name in the RMTSSCP statement must be the fully qualified name of the SSCP that controls the LU that is to be connected to. The SUBAREA specifies the subarea address of that SSCP.
The RMTRESC entry specifies an LU name that is controlled by the preceding RMTSSCP statement. It can be a wildcard name. There can be more than one RMTRESC statement.
|
Note - RMTRESC will usually be set to RMTRESC=*, which indicates that all autolog requests will be sent to the SSCP specified by the RMTSSCP statement. |
This section describes how to configure your region to support remote 3270 devices. The term 3270 devices refers to the family of 327x devices supported by Sun MTP.
1. Install the TPS SNA server software.
Refer to the documentation that accompanies the package.
Samples of the configuration files that must be located in the /var/tpssna/conf directory are shown in Configuring the TPS PU4/5 Server.
2. Set the KIXHOST environment variable in the Sun MTP host and Client Initiator systems.
In the client initiator system, it specifies the host executing the Sun MTP region. At the host running the Sun MTP region, it specifies itself and notifies the region to expect 3270 clients.
3. Determine the port number on which unikixi will connect. Make sure that it does not conflict with other applications. It is recommended that you assign a port number greater than 5000.
If all terminals are autoinstalled, skip to Step 16.
4. Using a local client or TN3270 client, display the Standard Tables menu by typing CTBL on a blank transaction screen, then pressing PF4.
5. Open the TCT by pressing PF8, then press PF9 to display the 3270 Devices screen.
To predefine a device, such as a printer, that will be logged on automatically, you must insert an entry in the region's TCT. These entries are known as predefined TCTs.
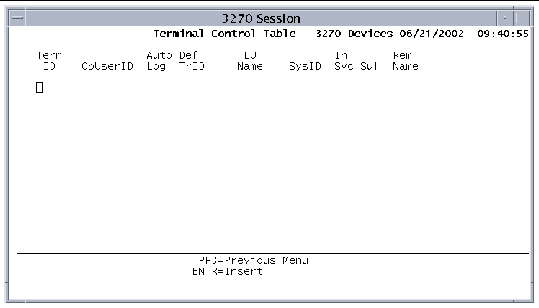
6. On the 3270 Devices screen, press PF4 to display the Insert screen shown in FIGURE 11-3.

7. The following fields are required for autologin:
a. In the Term ID field, type the 4-character terminal identifier as known to the application.
b. Type Y in the Auto Log field or leave blank to automatically log in this terminal (or printer) when the 3270 client initiator is enabled.
c. In the LU Name field, type the 8-character name of the terminal as known to the SNA network.
LU names are configured when the SNA server is installed with the PU4/5 package. Refer to the PU4/5 documentation for more information about assigning LU names.
Terminals that must have a specific Term ID, such as printers, must be identified in this field.
8. The remaining fields are optional:
a. In the OpUser ID field, type the 8-character value that matches the Sign-On Table (SNT) entry.
b. If you supply a transaction identifier in the Default TranID field, it overrides any transaction identifier entered on the terminal.
c. If the SysID field is blank or matches the SysID configured in the SIT, Sun MTP uses the local system. If you type a different value, the terminal is considered remote. The remote system must also be defined as a system entry in the TCT.
d. The In Svc field is ignored for 3270 connections.
e. In the Suf field, type the suffix added to all 7-character mapsets used for BMS mapping requests.
You can use this field for alternate screen sizes or national language support.
f. In the RmtNam field, type the terminal identifier as it is known on the remote system.
Use this field if two terminals with the same terminal ID on different remote systems are both routing transactions to Sun MTP. Define one of the terminals as having a remote name as defined on the remote system and a unique terminal ID.
9. Press Enter to insert the entry and return to the 3270 Devices screen.
10. If you are autologging a terminal or printer from a remote system, you must also specify the terminal's port number:
a. Select the terminal identifier on the main screen.
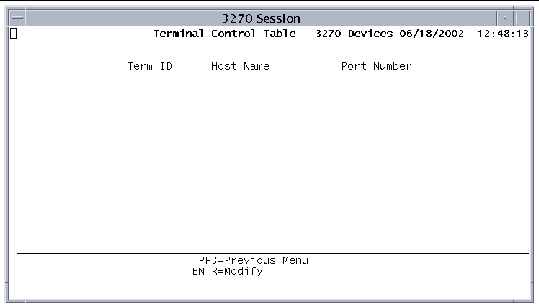
b. Press PF9 on the 3270 Devices screen to display the Host & Port screen.
 [ D ]
[ D ]
11. Type the appropriate information in the following fields:
|
Note - The Term ID field contains the Term ID value on the main screen. |
a. In the Host field, type the name of the host from which the 3270 client initiator is running.
If this field is blank, Sun MTP substitutes the name of the host on which the region is executing.
b. In the Port Number field, type a port number or name, up to 16 characters.
This port number must be specified with the -o option to unikixi. It is the port number on which the 3270 client initiator will listen for messages from unikixtstrt to attempt auto-logins.
12. Press Enter to insert the values and return to the 3270 Devices screen.
13. Press PF3 to return to the TCT menu.
14. Press PF2 to save your changes to disk.
15. Exit the Table Manager and shut down the region.
16. Start the region with the -s option to unikixmain (kixstart), which starts unikixtrin, the transaction initiator server, and specifies the port to listen on for 3270 devices.
17. Start the 3270 client initiator process, unikixi, with the -s option and any other options you require. The -s option must specify the same port number as you specified in the -s option to unikixmain.
You must also specify the -o option to unikixi, if you supplied a port number in the TCT in Step 11.
After you start the region with the appropriate options, 3270 clients function as follows:
1. The 3270 client initiator runs in the background waiting for Sun MTP to request a connection to a 3270 device or for a 3270 device to request a connection to Sun MTP. 3270 terminals can be logged on automatically when the 3270 client initiator is started or manually by the users.
2. Users initiate the manual login sequence at a 3270 terminal. When Sun MTP and the SNA server are properly configured and executing, terminals attached to the 3274 controllers that are connected to the server display a login screen. This login screen usually contains the names of the available applications.
3. To log in, the user enters the name of the desired application. If either the client initiator for the application or the region are not executing, the terminal displays an error message when the user attempts to log in.
4. After the user requests to log in, the 3270 client, unikixb, starts and displays the Sun MTP copyright screen.
5. Any transmission from the terminal at this point causes the initial default transaction, CPLT, to be submitted to the region. The user input is discarded; CPLT clears the screen and positions the cursor to the home position.
6. The user can now enter transactions.
7. When the terminal logs out, the VTAM or TPS login screen is displayed.
The unikixi -u and -s options and the KIXHOST environment variable provide the link between the SNA server application name and the host and Sun MTP application being run.
Refer to the Sun Mainframe Transaction Processing Software Reference Guide for a description of the unikixi options.
The following table shows the ECI/EPI clients that Sun MTP supports.
Refer to the documentation for the ECI/EPI client you are using for information about configuration and on writing ECI/EPI client applications.
|
1. Perform any required configuration tasks on the client system.
2. Stop the region if it is running.
3. Set the KIXMAXIST environment variable in the region setup file, which specifies the number of ECI/EPI clients that can autoinstall in the region.
4. Configure your ISC connection.
5. Restart the region so that your communication server also starts.
Your system is now ready to accept ECI/EPI clients.
A Sun MTP ECI/EPI client or CICS client can autoinstall into Sun MTP; no entry in the TCT-System Entries table is required to define the remote partner connection.
Use the KIXMAXIST environment variable to specify the maximum number of system entries allowed to autoinstall into the region. See TABLE 2-1 for additional information about $KIXMAXIST.
Before a region can accept communications from socket clients, you must start the socket listener process, unikixsock.
|
1. Specify a port number or well-known name using the -p option of the unikixmain command.
You must use a unique port number or name.
|
Note - Assigning a port numbers of 5000 or greater usually avoids a conflict. |
The Sun Mainframe Transaction Processing Software Developer's Guide describes the user application programs that set up the socket and send and receive transactions. Also refer to the Sun Mainframe Transaction Processing Software Administrator's Guide for information about customizing the socket user exit program.
Client applications can communicate with Sun MTP regions using SSL. The listening server process, unikixssl, listens on a pre-defined port for incoming requests. The unikixssl process routes requests through the unikixsock listener process, which must be running in your region.
|
1. Determine the listening port for the TCP/IP socket listener process, unikixsock.
You will need to use the -p port-number option to unikixmain when starting the region to start the unikixsock listener process.
2. Determine the listening port for the SSL listener process, unikixssl.
3. Install the Network Security Services (NSS) and the Netscape Portable Runtime (NSPR) software.
Refer to the Sun Mainframe Transaction Processing Software Installation Guide for information about downloading the software.
4. Set up the certificate databases.
5. Create or update the unikixrc.cfg file with the SSL entries.
6. Ensure that the location of the NSS and NSPR libraries are specified in the LD_LIBRARY_PATH environment variable in your region's setup file.
7. Add the $UNIKIX/lib directory to the LD_LIBRARY_PATH environment variable so that unikixssl can access the SSL user exit library (libkxsslxit.so).
When you set up Sun MTP, you must specify the certificate database directory where the SSL server certificate and the list of trusted certificate authorities are stored. For information about setting up the database directory, refer to the NSS SSL Reference document, specifically the "Setting Up the Certificate and Key Databases" section in Chapter 2, Getting Started with SSL. Also refer to the sample setup script $UNIKIX/src/socket/sslsetup, which shows how to set up the certificate database used in the SSL example.
Communications Manager (unikixCommMgr) is automatically started by unikixmain. It reads a configuration file on startup called $KIXSYS/unikixrc.cfg. The unikixrc.cfg file contains information about the SSL server, unikixssl, which is started by unikixCommMgr. Each region that supports an SSL server must have its own unikixrc.cfg file.
1. Copy the unikixrc file from the $UNIKIX/lib directory to the $KIXSYS directory of the region you are configuring.
2. Edit the SslServer* entries and save the file as unikixrc.cfg.
TABLE 11-3 describes each entry.
When modifying the unikixrc.cfg file, the following syntax rules apply:
|
Note - All the cipher suites default to False (disabled). You must enable at least one cipher suite (set to True) or all client requests are rejected. |
1. Make sure you have the appropriate values in the unikixrc.cfg file.
2. Source your region environment.
Make sure that the LD_LIBRARY_PATH environment variable contains the location of the NSS and NSPR libraries and $UNIKIX/lib.
Refer to the Sun Mainframe Transaction Processing Software Reference Guide for information about the -h option.
Refer to the Sun Mainframe Transaction Processing Software Developer's Guide for information about using SSL.
MQSeries Messaging and Queueing is an optional product. For a description of how to use MQSeries, refer to the Sun Mainframe Transaction Processing Software Developer's Guide and the MQSeries documentation.
Communications Manager (unikixCommMgr) is automatically started by unikixmain, which reads a configuration file on startup called $KIXSYS/unikixrc.cfg. The unikixrc.cfg file contains information about the MQSeries server, unikixqm, which unikixCommMgr starts. Each region that supports MQSeries must have its own unikixrc.cfg file.
|
1. Copy the unikixrc file from the $UNIKIX/lib directory to the $KIXSYS directory of the region you are configuring.
2. Edit the MQServer* entries and save the file as unikixrc.cfg.
TABLE 11-4 describes each entry.
When modifying the unikixrc.cfg file, the following syntax rules apply:
The following example shows the MQServer* entries:
3. Save the file as unikixrc.cfg.
You can define any of the following items in the unikixrc.cfg file for MQSeries connections. If you do not specify a value, the default value is used.
|
Save Sun MTP debugging information to a file. The values are True or False (default). Not implemented. |
Copyright © 2004, Sun Microsystems, Inc. All rights reserved.