Setting Up a Server to Operate as an IP Router
In this example, Server A has Solstice X.25 installed. This lets it route TCP/IP traffic and provide a connection to the X.25 PSDN for any machine attached to the same LAN. The other machines on the LAN do not need to run X.25 themselves in order to connect to remote devices across the WAN.
Figure 8-5 Setting Up a Server to Operate as an IP Router

Note -
A machine does not need to have X.25 configured on its LAN interface in order to be able to act as a router between a LAN and a WAN. IP will handle sending traffic to the router. X.25 is needed to provide the logical connection to the WAN.
To make a configuration like this, you need to:
-
Configure the link between the server and the WAN.
-
Configure the logical channel ranges, and any other optional parameters, used by the PSDN.
-
Configure the values used for routing IP.
Configuring the WAN Link
First, configure the link between the server and the WAN. This example uses a High Speed Interface.
-
Bring up the Link Editor window.
From the Edit menu, select Add. Select Tymnet from the template list.
-
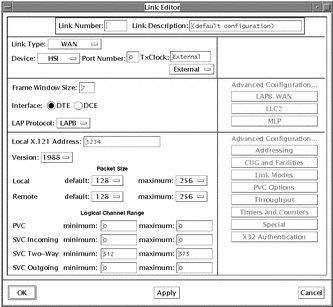
Change the other values as shown in the snapshot below.
Refer to "x25tool Overview" for help if you do not know how to change the values.
Figure 8-6 Configuring a Link Between the Server and the WAN

-
Adjust the logical channel ranges to match those used by the PSDN.
Enter the values assigned by your PSDN. In the example, there are 63 two way SVCs, numbered from 512 to 575, inclusively. Since there are no PVCs, or one way SVCs, these fields are left as 0.
-
Click on OK to apply the changes and dismiss the window.
Configuring Parameters
Once you have created the link, you may also need to configure other packet layer and LAPB layer parameters. To access them, from the Link Editor window, select LAPB, => WAN. Which values you need to change depends on the PSDN you are attaching to, and on your own configuration. For more information, see Chapter 7, Parameter Reference.
Configuring IP Routing
Now you are ready to set up the values that will be used for routing IP.
-
Pull down the Services menu and choose IP => IP Interface. The IP Interface Configuration window appears.
-
Enter the information about the IP network that this router will attach to.
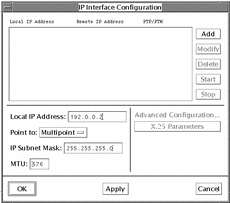
Click on the Add button. The snapshot below summarizes the changes you need to make for this example configuration:
Figure 8-7 Configuring the IP Routing

You always need to specify the local IP address. You should also specify the IP subnet mask. To use the network default, leave the subnet mask field blank.
Once you have made the changes, click on Apply. In most instances, the default settings are sufficient, but if you need to change the default X.25 parameters, click on Modify, then click on the X.25 Parameters button to access the X.25 Configuration for IP Interface window.
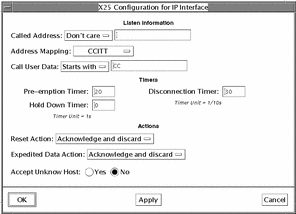
The snapshot below summarizes the changes you need to make for this example configuration:
Figure 8-8 Configuring the X.25 Parameters for the IP Interface

Unless you are connecting to the Defense Data Network (DDN), specify CCITT address mapping.
To restrict access and so add a measure of security, you can choose not to accept calls from unknown hosts. A host is unknown if its address is not included in the Remote Host to X.25 Address Map. Refer to "IP Interface Configuration".
The Listen Information is useful if the machine you are configuring has more than one address. You can use it to restrict which address(es) will respond.
You can also filter incoming calls based on their Call User Data. Take care not to delete the initial CC if you are using this parameter--this specifies that calls are for IP. Without the initial CC, calls will fail. Refer to "IP Interface Configuration" for more detail.
-
Configure information mapping remote IP addresses to remote X.25 addresses.
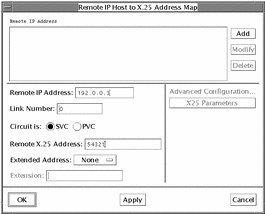
Pull down the Services menu and choose IP => IP Mapping. The Remote IP Host to X.25 Address Map window appears. The snapshot below summarizes the information you need to add. Again, you can keep most of the default values:
Figure 8-9 Information Mapping of Remote IP Addresses to Remote X.25 Address.

You can enter a host name which has been defined in /etc/hosts in place of the remote IP address.
-
Click on OK to save the changes and to dismiss the window.
-
Start X.25 by pulling down the Network menu and clicking on Start X.25.
To check that the configuration works, try to ping the remote machine or to rlogin.
- © 2010, Oracle Corporation and/or its affiliates
