Complete Contents
Chapter 1 Getting Started With Netscape Messaging Server
Chapter 2 Configuring IMAP and POP Services
Chapter 3 Configuring SMTP Services
Chapter 4 Managing Mail Users and Mailing Lists
Chapter 5 Managing the Message Store
Chapter 6 Security and Access Control
Chapter 7 Working With SMTP Plugins
Chapter 8 Filtering Unsolicited Bulk Email
Chapter 9 Message Routing
Chapter 10 Monitoring and Maintaining Your Server
Chapter 11 Logging and Log Analysis
Appendix A Command Line Utilities
Appendix B Program Delivery
Appendix C sendmail Migration and Compatibility
Appendix D SNMP MIB
Glossary
Messaging Server Administrator's Guide: Managing the Message Store
Previous Next Contents Index Bookshelf


Chapter 5 Managing the Message Store

This chapter describes the message store and the message store administration interface. This chapter contains the following sections:


Overview
The message store contains the user mailboxes for a particular Messaging Server instance. The size of the message store increases as the number of mailboxes, folders, and log files increase. You can control the size of the store by specifying limits on the size of mailboxes (disk quotas) and by setting aging policies for messages in the store.

As you add more users to your system, your disk storage requirements increase. Depending on the number of users your server supports, the message store might require one physical disk or multiple physical disks. If you have a very large user base, you might have multiple Messaging Server instances, each responsible for a particular message store.

To manage the message store, Netscape Messaging Server provides a set of command-line utilities in addition to the Netscape Console interface. Table 5.1 describes these command-line utilities. For information about using these utilities, see Performing Maintenance and Recovery Procedures and Appendix A, Command-line Utilities.

Table 5.1 Message store command-line utilities

Utility
Description
hashdir
Identifies the directory that contains the message store for a particular user.
mboxutil
Lists, creates, deletes, renames, or moves mailboxes.
quota
Reports quota usage.
readership
Collects readership information on mailboxes.
reconstruct
Reconstructs mailboxes that have been damaged or corrupted.
stored
Performs background and daily tasks, expunges, and erases messages stored on disk.

Netscape Messaging Server also provides utilities to help you upgrade from a 3.x server to a 4.x server. For details about the upgrade process, see the server installation documentation.


Message Store Architecture
Figure 5.1 shows the message store architecture for a server instance. The message store is designed to provide fast searching of the store directories for improved server performance. The store directories are described in Table 5.2.

Figure 5.1 Message store architecture

For example, a sample directory path might be:

server-root/msg-instance/store/partition/primary/=user/53/53/=mack1/00

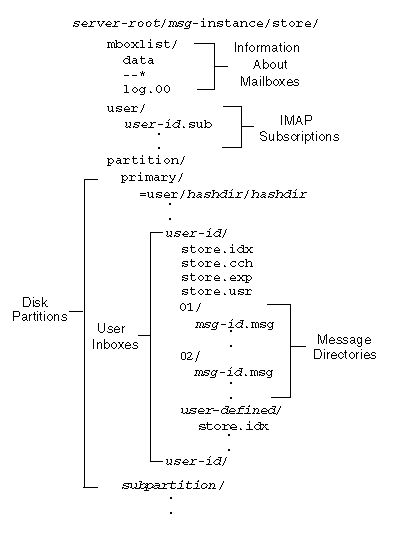
Table 5.2 Message store directories

Location
Content/Description
server-root/msg-instance/store/
Top-level directory of the message store. Contains the mboxlist, user, and partition subdirectories.
/store/mboxlist/
Contains the data and database support file directories. The mboxlist directory organizes data (found in other directories) so that it can be searched very quickly.
/store/mboxlist/data/
Contains information about quotas, quota usage, ACLs for the Messaging Server, and a copy of some of the information in store.idx. There is one entry for each account on the server.
The data file is a Berkeley DB file.

/store/user/
Contains information about the IMAP folders to which each user subscribes. Information for each user is stored in a file called user-id.sub. These files are stored in a hash structure for fast searching. To find the directory that contains a particular user's files, use the hashdir utility.
/store/partition/
Contains the default primary partition and any subpartitions you define.
/subpartition/=user/
Contains all the user mailboxes in the subdirectory of the partition. The mailboxes are stored in a hash structure for fast searching. To find the directory that contains a particular user's mailbox, use the hashdir utility.
/=user/hashdir/hashdir/
user-id
/

The top-level mail folder for the user whose ID is user-id. Messages are delivered to this mail folder.
/user-id/folder-name
A user-defined folder.
/user-id/store.idx
An index that provides the following information about mail stored in the /user-id/ directory: number of messages, disk quota used by this folder, the time the index was last appended, and pointers to the store.cch file for each message. The index also includes a backup copy of mboxlist information for each user and a backup copy of quota information for each user.
/user-id/store.cch
A cache file for frequently requested message information. The file contains variable-length information for each message including caches of some headers and the MIME structure of messages.
Note: The authenticated sender information in this file can be lost by running the reconstruct utility.
/user-id/store.exp
Contains a list of messages that will soon expire.
/user-id/store.usr
Contains a list of all messages that each user has seen, including information about the last time the user accessed the folder and which messages were deleted.
/user-id/nn/
A hash directory that contains messages in the format msg-id.msg; nn can be a number from 01 to nn.


How Messages Are Erased from the Store
Messages are erased in three stages:

  1. Delete. An IMAP or POP client marks the message to be deleted. (IMAP clients use the /deleted flag; POP clients use the DELE command.) At this point, the client can restore the message by removing the "deleted" marking.
  2. Expunge. A client, or the aging policies you have specified, expunges messages that have been marked deleted from the mailbox. (IMAP clients use the EXPUNGE command. POP clients use the QUIT command.) Once messages are expunged, the client can no longer restore them, but they are still stored on disk. (A second POP or IMAP client with an existing connection to the same mailbox may still be able to fetch the messages.)
  3. Cleanup. The stored utility erases from the disk any messages that have been expunged for at least one hour.

Specifying Administrator Access
Message store administrators can view and monitor user mailboxes and specify access control for the store.

To specify administrator access to the store:

  1. In the Messaging Server console, select the Configuration tab.
  2. Open the Message Store folder.
  3. The message store configuration tabs appear in the right pane.

  4. Click Administrator.
  5. The Administrator form appears.

From this form, you can perform the following tasks:

Adding an Administrator

To add an administrator entry:

  1. Go to the Administrator form.
  2. The form contains a list of any existing administrator IDs.

  3. Click the Add button beside the Administrator UID window.
  4. In the Administrator UID field, type the user ID of the administrator you want to add.
  5. The user ID you type must be known to the Netscape Directory Server.

  6. Click OK to add the administrator ID to the list displayed on the Administrator form.
  7. Click Save on the Administrator form to save the newly modified Administrator list.
Modifying an Administrator Entry

To modify an existing entry in the message store Administrator UID list:

  1. Go to the Administrator form.
  2. Click the Edit button beside the Administrator UID window.
  3. Enter your changes to the Administrator UID field.
  4. Click OK to submit your changes and dismiss the Edit Administrator window.
  5. Click Save on the Administrator form to submit and preserve the modified Administrator list.
Deleting an Administrator Entry

To delete an entry from the message store Administrator UID list:

  1. Go to the Administrator form.
  2. Select an item in the Administrator UID list.
  3. Click Delete to delete the item.
  4. Click Save to submit and preserve your changes to the Administrator list.

Configuring User Disk Quotas
You can specify disk quotas to control disk space usage. Disk quotas allow you to limit users to a fixed mailbox size. If disk space is limited, you might want to set user disk quotas.

If the size of a user's mailbox exceeds the specified limit, messages destined for the mailbox remain in the message queue until one of the following occurs: (1) The size no longer exceeds the limit, at which time the server delivers the message to the mailbox. (2) The message has been in the queue longer than the specified grace period and the user is still over quota, at which time the server bounces the message. Disk space becomes available when a user deletes and expunges messages or when the server deletes messages according to the maintenance policies you have established.

You can set disk quotas for individual users by using the Users and Groups interface. You can set default disk quotas for all users by choosing the Message Store Quota tab.

  1. In the Messaging Server console, select the Configuration tab.
  2. Open the Message Store folder.
  3. The message store configuration tabs appear in the right pane.

  4. Click Quota.
  5. The Quota form appears.

From this form, you can perform the following tasks:

Specifying a Default User Disk Quota

The default disk quota applies to all users who do not already have individual disk quotas set for them. A quota set for an individual user overrides the default quota.

  1. Go to the Message Store Quota form.
  2. Select one of the following options:
  3. Click Save.
Specifying a Quota Threshold

You can send a warning message to users before they reach their disk quota by specifying a quota threshold. When a user's disk usage exceeds the specified threshold, the server sends a warning message to the user.

For IMAP users whose clients support the IMAP ALERT mechanism, the message is displayed on the user's screen each time the user makes an IMAP connection (a message is also written to the IMAP log). For POP users and for IMAP users whose client does not support the IMAP ALERT mechanism, a message is stored in the user's inbox.

To specify a quota threshold:

  1. Go to the Message Store Quota form.
  2. In the "Quota warning threshold" field, enter a number for the warning threshold.
  3. This number represents a percentage of the allowed quota. For example, if you specify 90%, the user is warned after using 90% of the allowed disk quota. The default is 90%. To turn off this feature, enter 100%.

  4. Click Save.
Defining a Quota Warning Message

You can define the message that will be sent to users who have exceeded their disk quota as follows. Messages are sent to the user's mailbox.

  1. Go to the Message Store Quota form.
  2. From the pull-down menu, choose the language you want to use.
  3. Type the message you want to send in the message text field below the Threshold field.
  4. Click Save.
Setting a Grace Period

If a user mailbox exceeds the disk quota, the grace period you specify determines how long messages will be held in the SMTP queue before the server starts bouncing the messages. Messages will remain in the queue until one of the following occurs: (1) The mailbox no longer exceeds the quota, at which time the server will deliver the message to the mailbox; (2) The message has remained in the queue longer than the specified grace period, at which time the server will bounce the message.

To set a grace period for how long messages are held in the queue:

  1. Go to the Message Store Quota form.
  2. In the "Over quota grace period" field, enter a number.
  3. From the pulldown menu, specify Day(s) or Hour(s).
  4. Click Save.

Configuring Message Store Partitions
All user mailboxes are stored by default in the /store/partition/directory. The partition directory is a logical directory that might contain a single subpartition or multiple subpartitions. The subpartitions might map to a single physical drive or to multiple physical drives. At start-up time, the partition directory contains one subpartition called the primary partition.

You can add partitions to the partition directory as necessary. For example, you might want to partition a single disk to organize your users as follows:

As disk storage requirements increase, you might want to map these partitions to different physical disk drives.

You should limit the number of mailboxes on any one disk. Distributing mailboxes across disks improves message delivery time (although it does not necessarily change the SMTP accept rate). The number of mailboxes you allocate per disk depends on the disk capacity and the amount of disk space allocated to each user. For example, you can allocate more mailboxes per disk if you allocate less disk space per user.

If your message store requires multiple disks, you can use RAID (Redundant Array of Inexpensive Disks) technology to ease management of multiple disks. With RAID technology, you can spread data across a series of disks but the disks appear as one logical volume so disk management is simplified. You might also want to use RAID technology for redundancy purposes; that is, to duplicate the store for failure recovery purposes.

To add a partition to the store, do the following:

  1. In the Messaging Server console, select the Configuration tab.
  2. Open the Message Store folder.
  3. The message store configuration tabs appear in the right pane.

  4. Click Partition. The Message Store Partition form appears.
  5. Click the Add button.
  6. Enter the Partition nickname.
  7. The name you enter must be an alphanumeric name and must use lowercase letters.

    The partition nickname allows you to map users to a logical partition name regardless of the physical path. When setting up user accounts and specifying the message store for a user, you can use the partition nickname.

  8. Enter the Partition path.
  9. This is the absolute pathname for the specified partition. The partition will be created at this location. The user ID used to run the server must have permission to write to this location, in order to create and manage the partition.

  10. To specify this as the default partition, click the selection box labeled Make This the Default Partition.
  11. Click OK to submit this partition configuration entry and dismiss the window.
  12. Click Save to submit and preserve the current Partition list.
Important: After adding a partition, you must stop then restart the server to refresh the configuration information.

Note: To improve disk access, the message store and the message queue should reside on separate disks.


Specifying Aging Policies
Aging policies are another way to control disk usage on your server. You can control how long messages are stored in one or more mailboxes. If you have limited disk space, you might want to set aging policies for the store. If you set aging policies, you should educate your users about these policies because the server will not send a warning message before it starts deleting messages from the store.

You can create aging rules based on the following criteria:

If you specify more than one rule for a mailbox, all expiration rules will apply, but the most restrictive rule takes precedence. For example, assume two rules apply to a single mailbox. The first rule allows 1000 messages; the second rule allows 500 messages. When expiration occurs, the server will delete messages from the mailbox until 500 remain. For another example, if the first rule allows a message size of 100,000 bytes for 3 days and the second rule allows a message size of 1000 bytes for 12 days, the resulting union of rules allows a message size of 1000 bytes for 3 days. The server will delete messages over 1000 bytes that have been in the mailbox over 3 days. If you want to ensure that a specific rule is the only rule for a particular mailbox or set of mailboxes, use the Exclusive parameter.

To create a new rule:

  1. In the Messaging Server console, select the Configuration tab.
  2. Open the Message Store folder.
  3. The message store configuration tabs appear in the right pane.

  4. Click Aging. The Message Store Aging form appears.
  5. Click Add to go to the Add Rule window.
  6. Enter a name for the new rule.
  7. Specify the target folders for which this rule applies.
  8. You can enter a pathname, filename, or partial string. You can use IMAP wildcards as follows:

    * Match any character.
    % Match any character except a slash character.

    The new rule applies only to folders matching the pattern you specify.

  9. If this rule is to be the only rule applied to the target folders, click the Exclusive selection box.
  10. If you want to create a rule based on folder size, do the following:
  11. When the specified folder size is exceeded, the server removes the oldest messages until this size is no longer exceeded.

  12. If you want to create a rule based on message age, in the "Number of days" field, specify a number to indicate how long messages should remain in the folder.
  13. If you want to create a rule based on message size:
  14. After the grace period, the server deletes messages that exceed the maximum size.

  15. Click OK to add the new rule to the Aging Rule list and dismiss the Add window.
  16. Click Save to submit and preserve the current Aging Rule list.

Performing Maintenance and Recovery Procedures
This section provides information about the utilities you use to perform maintenance and recovery tasks for the message store. You should always read your postmaster mail for warnings and alerts that the server might send. You should also monitor the log files for information about how the server is performing.

You can configure the server error handler so that error messages about disk quota are sent to the postmaster account and to the log file. For more information about configuring the error handler, see Chapter 3, Configuring SMTP Services. For more information about log files, see Chapter 11, Logging and Log Analysis.

Using the stored Utility

The stored utility performs the following monitoring and maintenance tasks for the server. This utility automatically performs cleanup and expiration operations once a day.

Table 5.3 lists the stored syntax options. For more information, see Appendix A, Command-line Utilities.

Table 5.3 stored syntax options

Option
Description
-c
Performs one cleanup pass to erase expunged messages. Runs once, then exits. The -c option is a one-time operation, so you do not need to specify the -1 option.
-d
Run as daemon. Performs system checks and activates alarms, deadlock detection, and database repair.
-h hour
Run once each day to perform cleanup and expiration operations. The hour value designates the hour of the day that stored is to automatically run. Specify hour in 24 hour format. For example 23 means 11pm. You do not need to use the -1 option when using -h.
-1
Run once, then exit.
-n
Run in trial mode only. Does not actually expire or cleanup messages. Runs once, then exits.
-v
Verbose output.
-v -v
More verbose output.

You can set up stored to perform an additional cleanup and expiration operation at a specified hour. For example, to run stored as a daemon once a day at 9:00 p.m., use the following command:

stored -d -h 21

Occasionally, you might need to restart the stored utility; for example, if the mailbox list database becomes corrupted. To restart stored, use the following commands at the command line:

/etc/NscpMsg stop store
/etc/NscpMsg start store

If any server daemon crashes, you should restart all daemons including stored.

Managing Mailboxes

The mailboxes in the message store are stored in a hash structure for fast searching. Consequently, to find the directory that contains a particular user's mailbox, use the hashdir utility as follows:

hashdir userid

You use the mboxutil command to perform typical maintenance tasks on mailboxes. These tasks include the following:

Table 5.4 lists the mboxutil syntax options. For more information on using the mboxutil command, see Appendix A, Command-line Utilities.

Table 5.4 mboxutil options

Option
Description
-c mailbox
Creates the specified mailbox.
-d mailbox
Deletes the specified mailbox.
-l
Lists all of the mailboxes on a server.
-p pattern
When used in conjunction with the -l option, lists only those mailboxes with names that begin with the letters specified by pattern. You can use IMAP wildcards.
-r oldname newname
[partition]

Renames the mailbox from oldname to newname. To move a folder from one partition to another, specify the new partition with the partition option.
-x
When used in conjunction with the -l option, shows the path and access control for a mailbox.

You must specify mailbox names in the following format: user/userid/mailbox, where userid it the user that owns the mailbox and mailbox is the name of the mailbox. For example, the following command creates a mailbox named INBOX for the user whose user ID is crowe:

mboxutil -c user/crowe/INBOX

Repairing Mailboxes and the Mailboxes Database

If one or more mailboxes becomes corrupt, you can use the reconstruct utility to rebuild the mailboxes or the mailboxes database, and repair any inconsistencies. Table 5.5 lists the syntax options for the reconstruct utility. For more information about using the reconstruct command, see Appendix A, Command-line Utilities.

Table 5.5 reconstruct options

Option
Description
-m
Performs a high-level consistency check and repair of the mailboxes database. This option assumes that stored is running. This option examines every mailbox it finds in the spool area, adding or removing entries from the mailboxes database as appropriate. The utility prints a message to the standard output file whenever it adds or removes an entry from the database.You can run this option while other server processes are running.
-p partition
Specifies a partition name. You can use this option on the first usage of reconstruct.
-q
Fixes any inconsistencies in the quota subsystem, such as mailboxes with the wrong quota root or quota roots with the wrong quota usage reported.
-r [mailbox]
Performs a consistency check and repairs the partition area of the specified mailbox or mailboxes. The -r option also repairs all sub-mailboxes within the specified mailbox. If you specify -r with no mailbox argument, the utility repairs the spool areas of all mailboxes within the database. You can run this option while other server processes are running.

To perform a high-level consistency check and repair of the mailboxes database, use the -m option.

reconstruct -m 

For example, you should use the -m option when:

To rebuild mailboxes, use the -r option. For example, to rebuild the spool area for the mailboxes belonging to the user daphne, use the following command:

reconstruct -r user/daphne

Depending on the size of your message store, you should try to avoid using the -r option to rebuild the spool area for all mailboxes listed in the mailbox database. Running the -r option can take a very long time for large message stores. A better method for failure recovery might be to use multiple disks for the store. If one disk goes down, the entire store does not. If a disk become corrupt, you need only rebuild a portion of the store by using the -p option as follows:

reconstruct -p subpartition

Monitoring Disk Space

You can monitor disk space by configuring the following alarm attributes. You configure these attributes by using the configutil utility. You can specify how often the system should monitor disk space and under what circumstances the system should send a warning.

alarm.diskavailmsgalarmstatinterval

alarm.diskavail.msgalarmthreshold
alarm.diskavail.msgalarmwarninginterval
For example, if you want the system to monitor disk space every 600 seconds, specify the following command:

configutil -o alarm.diskavail.msgalarmstatinterval -v 600

If you want to receive a warning whenever available disk space falls below 20 %, specify the following command:

configutil -o alarm.diskavail.msgalarmthreshold -v 20

For more information about setting alarm attributes, see Appendix A, Command-line Utilities.

Monitoring Disk Quota Usage

You can monitor disk quota usage by using the quota utility. The quota generates a report that lists defined quotas and limits, and provides information on quota usage. For more information on the quota utility, see Appendix A, Command-line Utilities.

Backing Up and Restoring the Message Store

For information about backing up the message store and restoring the message store, contact your Netscape technical support person.


Interface Reference: Message Store Configuration
This section describes the Messaging Server interface elements that allow you to configure the server's message store services. You access these elements through Netscape Console; see Managing Servers With Netscape Console for information on using Netscape Console to manage the Messaging Server and other Netscape servers.


Administrator Tab
You use the form accessed through the Message Store Administrator tab to view the list of message store administrators and to add entries to this list. For more information, see also: Specifying Administrator Access.

Administrator UID list. This area displays the list of administrators for this message store.

Add. Click this button to go to the Add Administrator window. This window enables you to add administrators to the list.

Edit. Click this button to go to the Edit Administrator window. This window enables you to edit the selected entry in the Administrator UID list.

Save. Click this button to save the current administrator list.

Reset. Click this button to return the list contents to the last saved version.

Help. Click this button to go to the Online Help window for this topic.


Add/Edit Administrator Window
The Add Administrator and Edit Administrator windows are identical. These windows enable you to add or edit an entry in the message store administrator list.

Administrator UID. In this field, enter the user ID of the Administrator you want to add to the message store administrator list. This must be a valid user ID known to the Directory Server.

OK. Click this button to submit your entry and dismiss the window and return to the Administrator form.

Cancel. Click this button to dismiss the window without submitting your entry information.

Help. Click this button to go to the Online Help window for this topic.


Quota Tab
You use the form accessed through the Message Store Quota tab to define default user disk quotas for the message store. For more information, see also:

Default user disk quota. This is the amount of storage to be allotted to a user if no disk quota is specified for that user. You can specify either:

Quota warning threshold. In this field, type a number to specify the percentage of disk quota usage which, when exceeded by a user, generates a warning message by the server.

Message to send to the user when quota is exceeded. In this field, enter the contents of the warning message to be sent when a user's disk quota is exceeded.

Over quota grace period. In this field, type a number to indicate how long the messaging server will hold messages in the queue for users who have exceeded their disk quota. From the pulldown menu, choose days or hours.

Save. Click this button to submit and preserve the current disk quota specifications.

Reset. Click this button to return the list contents to the last saved version.

Help. Click this button to go to the Online Help window for this topic.


Partition Tab
You use the form accessed through the Partition tab to view message store partition information, and to add, edit, and delete partition entries. For more information, see also: Configuring Message Store Partitions.

List of partitions. This area lists disk partition information for the message store. This includes the following fields:

Add. Click this button to go to the Add Partition window. This window enables you to add a partition. See Add/Edit Partition Window.

Edit. Click this button to go to the Edit Partition window. This window enables you to edit information about a partition.

Delete. Click this button to delete a partition you've highlighted in the partition list.

Save. Click this button to submit and preserve the current partition list.

Reset. Click this button to return the partition list to the last saved version.

Help. Click this button to get online help for this topic.


Add/Edit Partition Window
The Add Partition and Edit Partition windows are identical. These windows enable you to add or edit a partition entry in the partition list on the Partition form. For more information, see also: Configuring Message Store Partitions

Partition nickname. This is the name you want to assign to the partition.

Partition path. This is the absolute pathname for the specified partition. The partition will be created at this location. The userID used to run the Server must have permission to write to this location, in order to create and manage the partition.

Make this the default partition. Click this box to configure this partition as the default.

OK. Click this button to submit this partition entry and dismiss the window.

Cancel. Click this button to dismiss the window without submitting the partition information.

Help. Click this button to go to the Online Help for this topic.


Aging Tab
The form you access through the Aging tab lists the aging policy for retaining and removing messages from target folders. This form also enables you to define, add, edit, and delete aging rules. For more information, see also: Specifying Aging Policies.

Message store aging rules list. This area lists the aging rules for the message store. The table includes the following fields:

Add. Click this button to go to the Add/Edit Rule window. This window enables you to define an aging rule for the message store.

Edit. Click this button to go to the Add/Edit Rule window. This window enables you to edit a defined aging rule.

Delete. Click this button to delete a rule you've selected in the rules list.

Save. Click this button to submit and preserve the current aging rules list.

Reset. Click this button to return the list contents to the previously saved version.

Help. Click this button to get online help for this topic.


Add/Edit Rule Window
The Add Rule and Edit Rule windows are identical. These windows enable you to define or edit an aging rule entry, and to specify matching patterns for determining rule targets.

Name. Enter the name for the Aging Rule in this field. This is a name you can assign for convenience purposes; it is not used by the Messaging Server.

Apply to folders matching the following pattern. Enter a pathname, filename, or partial string to be used as the criteria for determining rule targets.

Exclusive. Click this selection box to specify that this rule is to be the only rule applied to the target folders.

Message count. In this field, type the maximum number of messages which will be retained in a folder before the oldest messages are removed.

Folder size. In this field, type the maximum size for the target folder. From the pulldown menu, choose MByte(s) or KByte(s). When the specified folder size is exceeded, the oldest messages are removed until this size is no longer exceeded.

Number of days. In this field, type the number of days allowed for retaining messages in a target folder. After the specified retention period has elapsed for a given message in a target folder, the message is removed.

Message size limit. In this field, type the maximum allowed size for messages stored in a target folder. From the pulldown menu, choose MBytes or KBytes.

Grace period. In this field, type a number to indicate the number of days oversized messages are allowed to remain in the folder before being deleted.

OK. Click OK to add the new rule to the rules list and dismiss the window.

Cancel. Click cancel to dismiss the window without submitting the new rule.

Help. Click Help to get online help for this topic.


© Copyright 1998 Netscape Communications Corporation