4.2.2 What to Do
-
Prepare the system to receive the new disk drive.
The hot-plug installation procedure involves software commands for preparing the system prior to installing the disk drive. See your Sun Enterprise 220R Server Owner's Guide.
-
If you are not hot-plugging the disk drive, halt the operating system and turn off system power.
-
Push the disk drive latch to the right to release the disk drive handle.

-
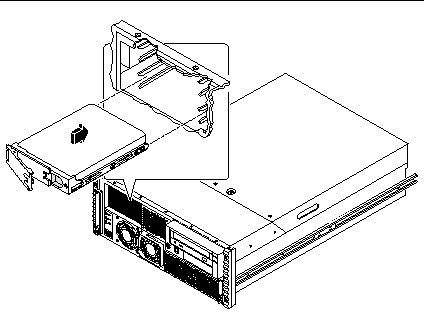
Align the disk drive to its drive bay.
Orient the drive so that the drive handle's hinge is on the left side of the drive bay.
Note -If you are reinstalling a drive that you previously removed, be sure to reinstall the drive in the same bay from which it was removed.
-
Holding the drive by its handle, fit the drive into the guide rails at the left and right of the drive bay.
-
Slide the drive into the bay until it lightly contacts the backplane.
-
Press carefully on the center of the drive and watch as the handle begins to close.
The drive handle begins to close as the drive engages its backplane connector.
-
Press the handle firmly toward the drive until the latch closes, securing the drive in the bay.
-
Close and lock the system doors.
Turn the keyswitch to the Locked position. This locks the system front doors, preventing access to the power supply(s) and to the disk drive(s).
-
If you are performing a hot-plug installation, complete the software part of the installation procedure.
For further information, see your Sun Enterprise 220R Server Owner's Guide.
- © 2010, Oracle Corporation and/or its affiliates
