How to Install the SSP Paddle Card
Video Demonstration
Figure 6-17

Click on the icon above for a video demonstration.
Click here for Appendix E, Video Player Help.
What to Do
-
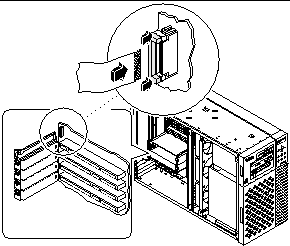
Connect the SSP data cable to the main logic board at connector J4201.
-
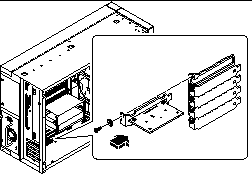
Insert the SSP card into the SSP rear panel opening.
The SSP paddle card mounts in the top slot opening in the system's rear panel.
Figure 6-19

-
Secure the SSP card faceplate to the rear panel with the Phillips screw you removed earlier.
Use a magnetized screwdriver, if possible, to prevent the screw from falling into the system chassis.
-
Reconnect any external cables to the SSP card's external connectors.
What Next
Complete the following task to reassemble the system:
When you are ready to restart the system, be sure to run POST and OpenBoot Diagnostic tests to verify that the system functions correctly with the new parts you have just installed. For additional information, see Chapter 12, Diagnostics and Troubleshooting.
- © 2010, Oracle Corporation and/or its affiliates

