What to Do
-
Prepare the system to receive the new disk drive.
The hot-plug installation procedure involves software commands for preparing the system prior to installing the disk drive. See "About Internal Disk Drives".
Note -If the server is set up without a local graphics console, terminal, or monitor, you need to set up one of these options in order to issue software commands. See "How to Attach an Alphanumeric Terminal", or "How to Configure a Local Graphics Console".
-
If you are not hot-plugging the disk drive, halt the operating system and turn off system power.
-
Unlock the disk access door and swing it open.
-
Attach the antistatic wrist strap to a metal surface inside the system chassis.
-
Release the drive handle on the disk drive.
Use your thumb and forefinger to pinch the drive latch sideways to open it.
-
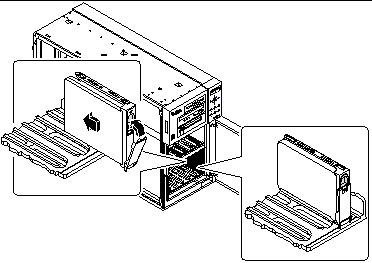
Align the disk drive to its drive bay.
Orient the drive so the drive handle's hinge faces the bottom of the drive bay (the left side of the bay in a rackmount configuration).
Note -If you are replacing a drive that you removed previously, be sure to install the drive in the same drive bay as the one you removed.
Figure 7-10

-
Holding the drive by its handle, fit the drive into the guide rails at the top and bottom of the drive bay.
-
Slide the drive into the bay until it barely contacts the backplane.
-
Press carefully on the center of the drive and watch as the handle begins to close.
The drive handle begins to close as the drive engages its backplane connector.
-
Press the handle toward the drive until the latch closes, securing the drive in place.
-
Close the disk access door and lock it if necessary.
-
If you are performing a hot-plug installation, complete the software part of the installation procedure.
- © 2010, Oracle Corporation and/or its affiliates
