Chapter 4 Managing Servers and Server Groups
This chapter provides conceptual and procedural information about N1 System Manager server management and server group management.
The N1 System Manager enables you to perform the server maintenance tasks described in the following sections:
Introduction to Server and Group Management
The N1 System Manager enables you to manage hundreds of heterogeneous servers by using one interface. The N1–ok shell provides a simple command set with which to identify, manage, provision, and reprovision servers.
You can use the discover command to initiate the management of provisionable servers. The server discovery process creates a Discovery job in the N1 System Manager. The Discovery job uses the management IP address and default security credentials to identify each physical server. You can view the job results to track the discovery process.
After successful completion of the Discovery job, a server is identified by its management name. The server's management name is initially set to the server's management IP address. You can rename discovered servers at any time.
You can create groups of discovered, or provisionable, servers according to the make and model for aggregate installation of firmware updates. Then, you can create functional groups for the aggregate installation of operating systems, or OS profiles, and OS updates. Provisionable servers can belong to more than one server group, so you can create new server groups for aggregate maintenance tasks, as needed.
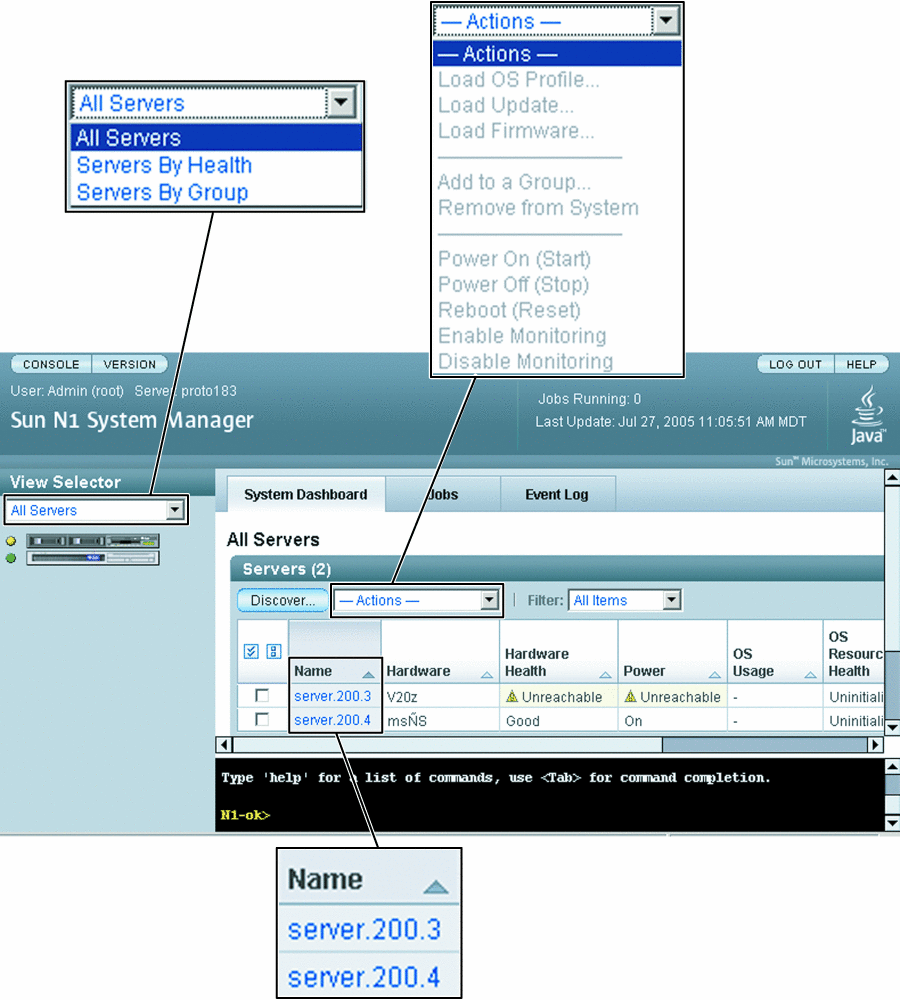
The sections in this chapter describe the prerequisites and instructions for performing server and server group maintenance tasks. You will use the View Selector menu, the Actions menu, and server name links to perform the operations that are described in these sections.
The following graphic shows the View Selector menu, the Actions menu, and the server name links.
Figure 4–1 Menus and Links in the Browser Interface
Identifying Servers and Server States
This section describes the information that the N1 System Manager reports for each server when you issue the show server all and show group commands.
-
Name – The server or server group name. Server name is initially set to the management IP address. For instructions on how to change this name, see Modifying Server and Server Group Information.
-
Hardware – Describes the type of managed server. See the Sun System Handbook documentation for your provisionable server.
-
Hardware Health – The status for attributes such as memory, processor information, and Network Interface Card (NIC) information.
-
OS Usage – If an OS profile is loaded, the OS name appears here.
-
OS Resource Health – If an OS profile is loaded, the OS state appears here.
-
Jobs – If a job is in progress or has completed on the server, the job ID appears here.
Server Power States
Server power is indicated by the following states:
-
On – The server is powered on and running.
-
Standby – The server is powered off but still responsive to commands, for example, start.
-
Unknown – The server is not returning any power status information.
-
Unreachable – The server cannot be contacted for power status information.
Hardware Health States
Server hardware health is indicated by the following states:
-
Good – The server hardware is working properly.
-
Unreachable – The server cannot be contacted for information about the status of hardware health. This state is most often caused by a network problem.
-
Warning Failure – A potential or impending fault condition has been detected on the server. Take action to prevent the problem from becoming more serious. See Monitoring Threshold Values for information about viewing and tuning hardware sensor threshold values.
-
Critical Failure – A fault condition has occurred on the server. Corrective action is required.
-
Nonrecoverable Failure – The server has completely failed. Recovery is not possible.
-
Unknown – The server is not returning any hardware health status.
-
Offline – The server is not managed.
Supported Server Actions
The following aggregate server actions are supported:
-
Starting, stopping, and resetting server power
-
Listing and refreshing server data
-
Loading servers with OS profiles, updates, and firmware. See Chapter 3, Provisioning Operating Systems, OS Updates, and Firmware Updates
-
Enabling and disabling server monitoring, See Chapter 5, Monitoring Your Servers
-
Adding servers to server groups. SeeCreating and Maintaining Server Groups.
-
Removing servers from the N1 System Manager
Listing and Viewing Servers and Server Groups
This section describes the following tasks:
Listing Servers and Server Groups
To list servers, use the View Selector menu. Alternatively, use the show command with the server keyword and the all subcommand to list all servers in the N1 System Manager.
As the following graphic shows, you can use the View Selector menu or the show server command to list servers.
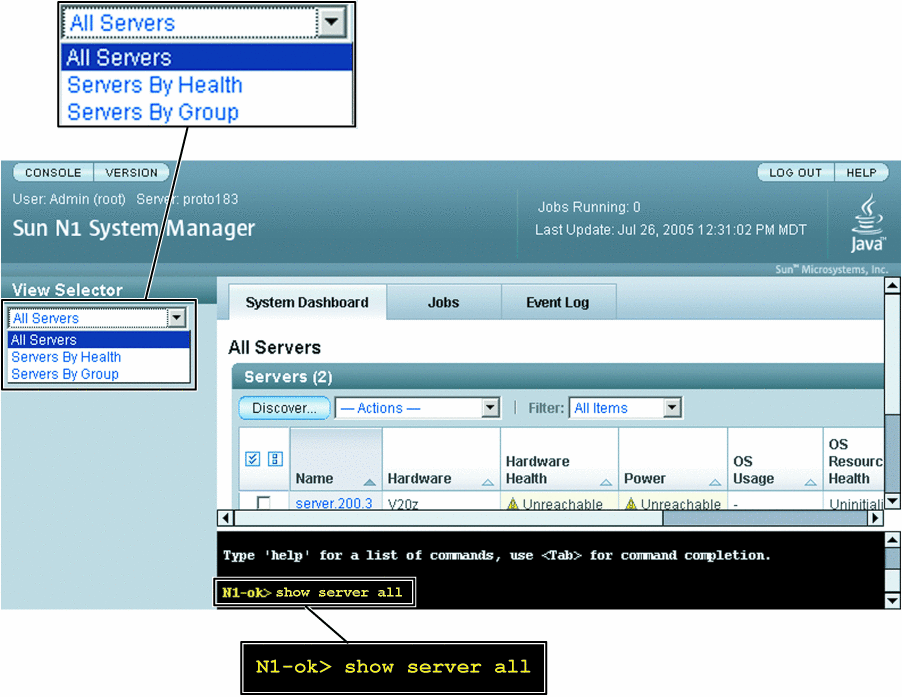
 To List Servers
and Server Groups
This procedure describes how to list servers and server groups by using the browser interface. The example that follows the procedure provides a command-line equivalent.
Steps
-
Log in to the N1 System Manager.
See To Access the N1 System Manager Browser Interface for details.
-
Navigate to the table that contains the server or the server group by performing one of the following actions:
Example 4–1 Listing Servers Through the Command Line
The following example shows how to view all servers in the system by using the show command.
N1-ok> show server all |
A list of all servers in the system appears. See show server in Sun N1 System Manager 1.1 Command Line Reference Manual for details.
Example 4–2 Listing Groups Through the Command Line
N1-ok> show group all |
A list of all server groups in the system appears. See show group in Sun N1 System Manager 1.1 Command Line Reference Manual for details.
 To View
Failed Servers
This procedure describes how to view failed servers using the browser interface. The example following the procedure provides a command-line equivalent.
The following graphic shows how to use the View Selector menu to list servers by heath state. Alternatively, use the health subcommand and an appropriate health state to filter the list of servers by health state. For example:
N1-ok> show server health health |
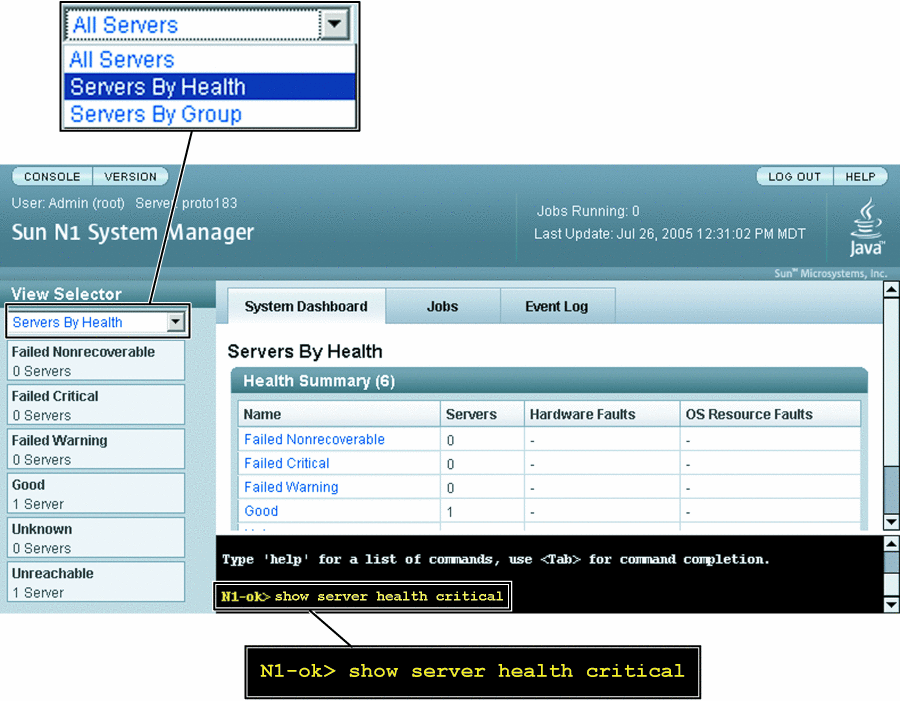
Steps
-
Log in to the N1 System Manager.
See To Access the N1 System Manager Browser Interface for details.
-
Choose Servers By Health from the View Selector menu.
The Health Summary table appears.
Note –You cannot perform any actions on servers from the Health Summary table.
-
Select the fault state that you want to view.
The available fault states are:
-
Failed Nonrecoverable
-
Failed Critical
-
Failed Warning
-
Unreachable
-
Unknown
The list of servers in the selected state appears. See Hardware Health States for a description of fault states.
-
Example 4–3 Viewing Failed Critical Servers Through the Command Line
The following example shows how to view servers that have a health status of critical.
N1-ok> show server health critical Name Hardware Hardware Health Power OS Usage OS Resource Health 10.0.0.26 V20z Failed Critical On Solaris Unknown |
See Also
For descriptions of the icons and various failure levels that are shown on the Servers By Health page, see Hardware Health States. For descriptions of monitoring thresholds, see Hardware Sensor Attributes.
Viewing Server Details and Group Members
To view detailed server information and group members, use the show command with the server or group keyword. For syntax and parameter details, type help show server or help show group at the N1–ok command line. Server information is also provided on the Server Details page in the browser interface.
 To View Server Details
and Server Group Members
This procedure describes how to view server details and server group members by using the browser interface. The example that follows the procedure provides a command-line equivalent.
Steps
-
Log in to the N1 System Manager.
See To Access the N1 System Manager Browser Interface for details.
-
Navigate to the table that contains the server or the server group by performing one of the following actions:
-
Select the server or the server group that you want to view.
The Server Details page or the Servers By Group page appears.
Example 4–4 Viewing Server Details Through the Command Line
The following example shows how to view the server details by using the show command.
N1-ok> show server server1 |
Detailed server information appears. See show server in Sun N1 System Manager 1.1 Command Line Reference Manual for details.
Example 4–5 Viewing Server Group Members Through the Command Line
The following example shows how to view the list of servers in a server group by using the show command.
N1-ok> show group devgroup |
The list of servers in the group appears. See show group in Sun N1 System Manager 1.1 Command Line Reference Manual for details.
Modifying Server and Server Group Information
This section describes the following tasks:
The following graphic illustrates how to rename servers and server groups by using the Server Details page. Alternatively, use the set command with the server or group keyword and the name subcommand. For syntax and parameter details, type help set server or help set group at the N1–ok command line.
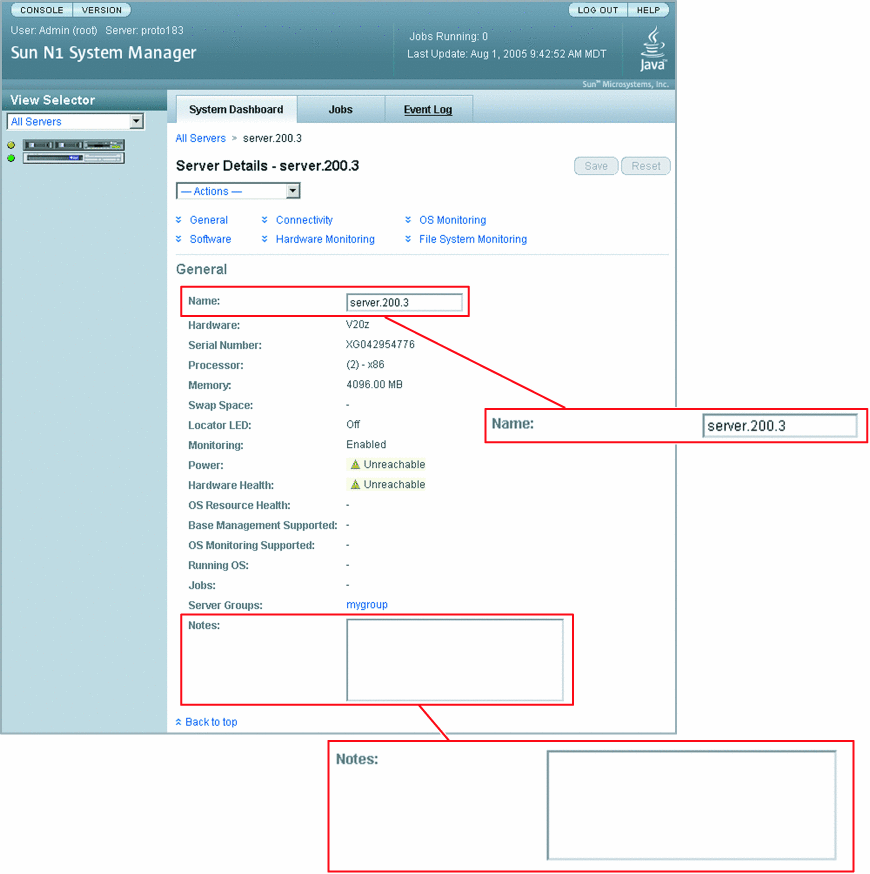
Renaming a Server or a Server Group
Servers are identified by the management IP address that is specified during discovery. This name is also referred to as the management name in documentation. You might want to rename a server with the DNS host name or track the host name by adding it to the server notes. Server and server group names must be unique and may include letters A through Z, digits 0 through 9, hyphens, and underscore characters.
 To Rename
a Server or a Server Group
This procedure describes how to rename a server or a server group by using the browser interface. The example that follows the procedure provides a command-line equivalent.
Steps
-
Log in to the N1 System Manager.
See To Access the N1 System Manager Browser Interface for details.
-
Choose All Servers from the View Selector menu.
The Servers table appears.
-
Select the server name that you want to change.
The Server Details page appears.
-
Type the new name into the Name entry field.
Server names must be unique and may include letters A through Z, digits 0 through 9, hyphens, and underscores.
The Save button on the right side of the page is enabled.
-
Click the Save button to apply the new name.
The Servers table appears with the renamed server.
Example 4–6 Renaming a Server Through the Command Line
The following example shows how to change a server name by using the set command.
N1-ok> set server 192.168.12.1 name=svr4rck7 |
The server name is changed to svr4rck7. See set server in Sun N1 System Manager 1.1 Command Line Reference Manual for details.
Example 4–7 Renaming a Group Through the Command Line
The following example shows how to change a server group name by using the set command.
N1-ok> set group devgroup name=labgroup |
The group name is changed to labgroup. See set group in Sun N1 System Manager 1.1 Command Line Reference Manual for details.
Adding a Server Note
Consider saving the following types of data as a server note:
-
Physical location such as rack, slot, building, and geographic region
-
DNS host name
-
Provisioning parameters and the network configuration information that is set for the OS profile installation
-
Internal asset tracking identifiers
To add server notes, use the set command with the server keyword and the note subcommand. For syntax and parameter details, type help set server at the N1–ok command line or refer to set server in Sun N1 System Manager 1.1 Command Line Reference Manual.
 To Add a Server
Note
This procedure describes how to add a server note by using the browser interface. The example that follows the procedure provides a command-line equivalent.
Steps
-
Log in to the N1 System Manager.
See To Access the N1 System Manager Browser Interface for details.
-
Choose All Servers from the View Selector menu.
The Servers table appears.
-
Select the name of the server.
The Server Details page appears.
-
Scroll down to the Notes entry field.
The Notes entry field appears at the bottom of the General section.
-
Type new data into the Notes field.
The Save button is enabled.
-
To apply your changes, click the Save button.
The new data is saved.
Example 4–8 Adding a Server Note Through the Command Line
The following example shows how to view any existing notes by using the show command.
N1-ok> show server server1 |
The output shows any existing notes.
The following example shows how to add a server note by using the set command.
N1-ok> set server server1 note="loaded with S10" |
The note is added to the server information. See set server in Sun N1 System Manager 1.1 Command Line Reference Manual for details.
Starting, Stopping, and Resetting Servers and Server Groups
This section describes the following activities:
Starting Servers and Server Groups
Use the start command with the server or group keyword to power on a server or a server group. If boot PROMS are configured, the servers boot. You may also use the Actions menu on the Servers By Group page to initiate the start operation. The Actions menu is shown in the following graphic.
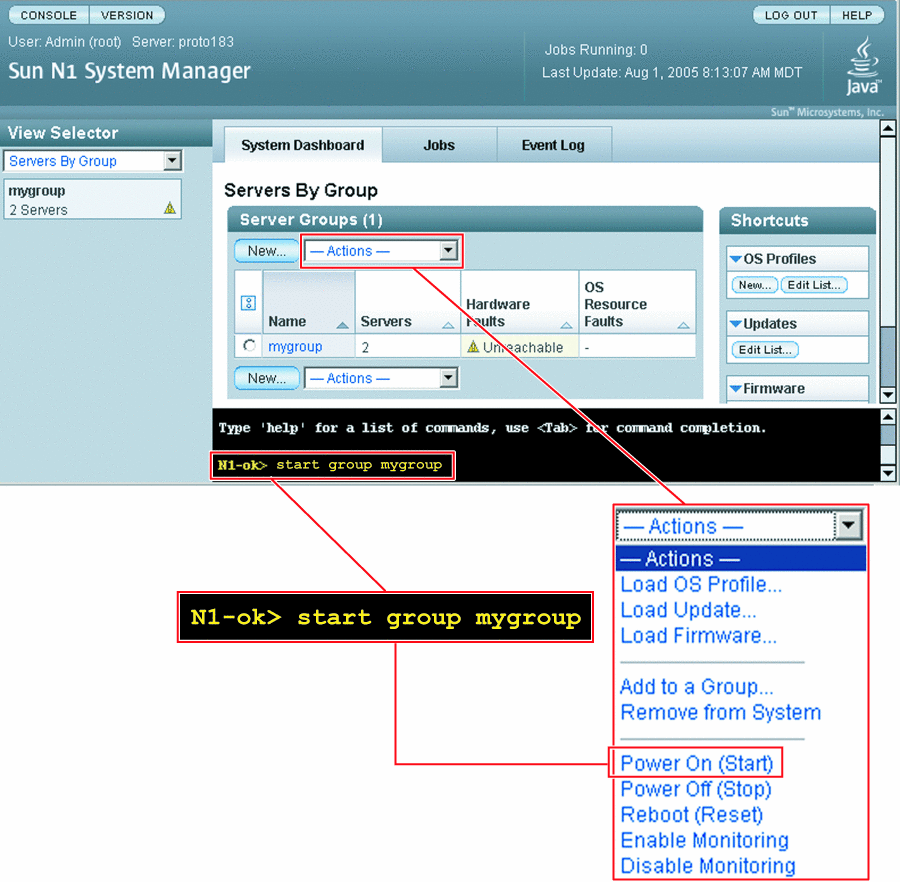
For syntax and parameter details, type help start server or help start group at the N1–ok command line.
 To Power On
and Boot a Server or a Server Group
Steps
-
Log in to the N1 System Manager.
See To Access the N1 System Manager Command Line for details.
-
Type one of the following commands:
N1-ok> start server server
The server is powered on and, if boot PROMs are configured, the server boots. See start server in Sun N1 System Manager 1.1 Command Line Reference Manual for syntax details.
N1-ok> start group group
The server group is powered on and, if boot PROMs are configured, the servers in the group boot. Job completion takes longer for large server groups. See start group in Sun N1 System Manager 1.1 Command Line Reference Manual for syntax details.
Example 4–9 Starting a Server From the Network
The following command-line example shows how to boot a server from the network.
N1-ok> start server 10.5.7.2 netboot=true |
Example 4–10 Starting a Server Group from the Network
The following command-line example shows how to boot a server group from the network.
N1-ok> start group dev netboot=true |
Stopping Servers and Server Groups
To shut down and power off a server or group, use the stop command with the server or group keyword. Stopping a server or server group will initiate graceful shutdown of the operating systems and subsequent power off of the physical servers. If servers do not have an OS installed or do not shutdown, you can use the force subcommand to power off the server group.
The following graphic shows how to stop a group by using the Actions menu on the Servers By Group page, or by issuing the stop group command.
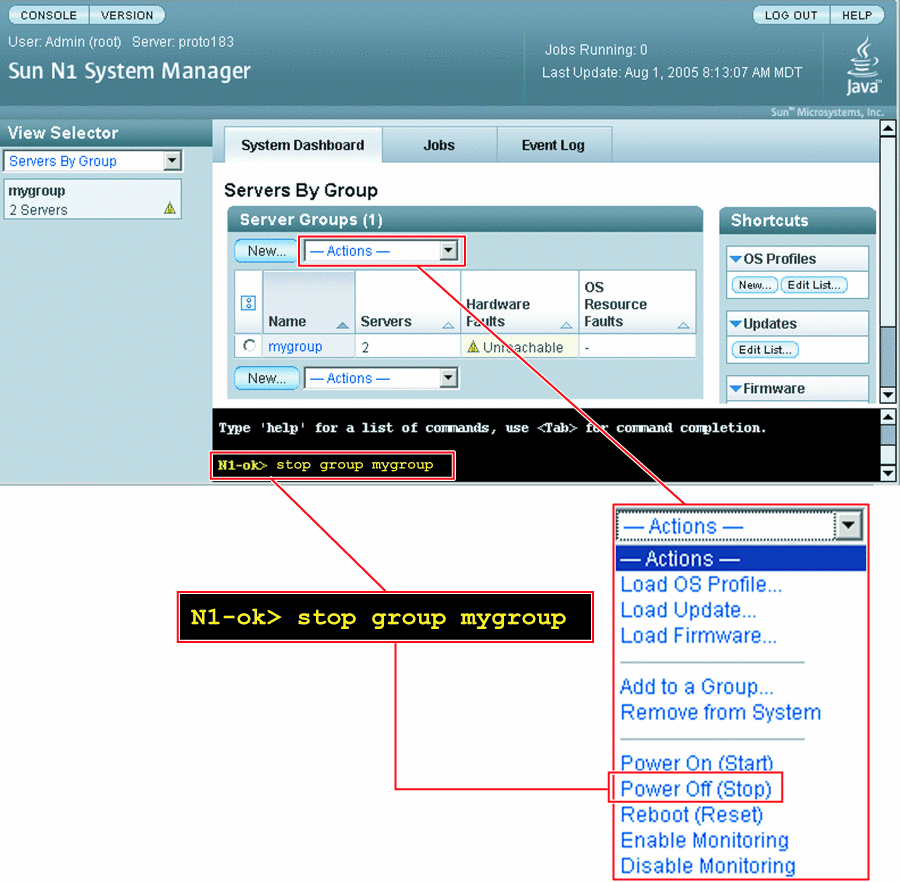
For syntax and parameter details, type help stop server or help stop group at the N1–ok command line.
 To Shut Down
and Power Off a Server or a Server Group
Steps
-
Log in to the N1 System Manager.
See To Access the N1 System Manager Command Line for details.
-
Type one of the following commands:
N1-ok> stop server server
The server is stopped. See stop server in Sun N1 System Manager 1.1 Command Line Reference Manual for syntax details.
N1-ok> stop group group
The server group is stopped. See stop group in Sun N1 System Manager 1.1 Command Line Reference Manual for syntax details.
Example 4–11 Forcing Power Off of a Server
The following command-line example shows how to force shutdown of the OS.
N1-ok> stop server 10.0.7.2 Could not stop server "10.0.7.2". N1-ok> stop server 10.0.7.2 force=true Server 10.0.7.2 powered off. |
Example 4–12 Forcing Power Off of a Server Group
The following command-line example shows how to force shutdown of the OS for a server group.
N1-ok> stop group dev Could not stop group "dev". N1-ok> stop group dev force=true Group dev powered off. |
Troubleshooting
If you use the force option, run one of the following file system check commands on the service processor when the server reboots.
-
Run fsck for UNIX®
-
Run reiserfsck or e2fsck for Linux
To find out how to run the fsck command on a provisioned server, see Issuing Remote Commands on Servers and Server Groups.
Resetting Servers and Server Groups
To initiate graceful shutdown of the operating system followed by power off of the physical server or server group, use the reset command with the server or group keyword. Then, the servers are powered on and, if boot PROMs are configured, the servers reboot. If servers do not have an OS installed or do not shutdown, you can use the force subcommand to reboot the server or server group.
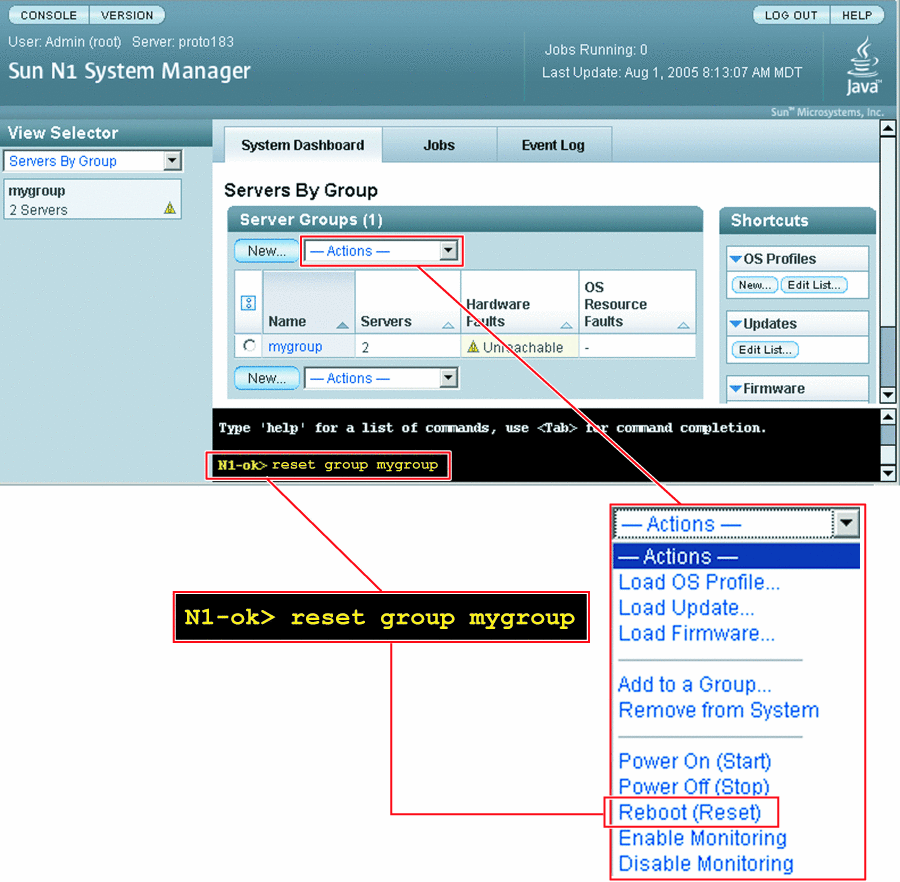
For syntax and parameter details, type help reset server or help reset group at the N1–ok command line.
 To Reboot
a Server or a Server Group
Steps
-
Log in to the N1 System Manager.
See To Access the N1 System Manager Command Line for details.
-
Type one of the following commands:
N1-ok> reset server server [force=true]
The server is rebooted. See reset server in Sun N1 System Manager 1.1 Command Line Reference Manual for details.
N1-ok> reset group group [force=true]
The servers in the group reboot. See reset group in Sun N1 System Manager 1.1 Command Line Reference Manual for details.
Example 4–13 Forcing Reset of a Server
The following command-line example shows how to force reset of the OS.
N1-ok> reset server 10.5.7.2 force=true |
Example 4–14 Forcing Reset of a Server Group
If the OS does not gracefully shut down, use the following command-line example to force reset of the operating systems for the servers in the group.
N1-ok> reset group dev force=true |
Example 4–15 Rebooting a Server From the Network
The following command-line example shows how to reboot a server from the network.
N1-ok> reset server 10.5.7.2 netboot=true |
Example 4–16 Rebooting a Server Group from the Network
The following command-line example shows how to reboot a server group from the network.
N1-ok> reset group dev netboot=true |
Troubleshooting
If you use one of the above force commands, run one of the following file system check commands on the service processor when the server reboots.
-
Run fsck for UNIX®
-
Run reiserfsck or e2fsck for Linux
To find out how to run the fsck command on provisioned servers, see Issuing Remote Commands on Servers and Server Groups for instructions.
Issuing Remote Commands on Servers and Server Groups
This section describes how to issue remote commands on servers and server groups.
To issue a remote command on a server or server group, use the start command with the server or group keyword and the command subcommand. For syntax and parameter details, type help start server or help start group at the N1–ok command line.
 To
Issue Remote Commands on a Server or a Server
Group
This procedure describes how to issue a remote command. A remote command is a UNIX® command that is sent to a provisioned server to be run on that provisioned server.
Before You Begin
You must add the OS monitoring feature before you can issue remote commands on servers or server groups. See To Add the OS Monitoring Feature.
Steps
-
Log in to the N1 System Manager.
See To Access the N1 System Manager Command Line for details.
-
Type one of the following commands:
N1-ok> start server server command "command"
The remote command is issued on the server. See start server in Sun N1 System Manager 1.1 Command Line Reference Manual for details.
N1-ok> start group group command "command"
The remote command is issued on the group. See start group in Sun N1 System Manager 1.1 Command Line Reference Manual for details.
-
View the Remote Command job.
N1-ok> show job job
The Remote Command output appears in the Results section.
Example 4–17 Issuing a Remote Command on a Server
The following command-line example shows how to issue a remote command on a server by using the start command.
N1-ok> start server hdco25 command "/bin/ls -l /" Job "23" started. |
The following command-line example shows how view the results of the remote command by using the show command.
N1-ok> show job 23 Job ID: 23 Date: 2005-02-15T08:31:20-0700 Type: Remote Command Status: Completed Owner: root Errors: 0 Warnings: 0 Step 1: Type: 103 Description: native procedure /bin/sh /opt/sun/n1gc/bin/remotecmd.sh :[RCMD_KEY] Start: 2005-02-15T08:31:22-0700 Completion: 2005-02-15T08:31:26-0700 Result: Complete Exception: No Data Available . . . Result : Server: hdco25 Status: 0 Message: Command executed successfully. Command: /bin/ls -l / Standard Output: total 321 lrwxrwxrwx 1 root root 9 Feb 11 13:21 bin -> ./usr/bin drwxr-xr-x 4 root sys 512 Feb 11 13:25 boot drwxr-xr-x 3 root sys 512 Feb 11 14:27 cr drwxr-xr-x 15 root sys 4096 Feb 11 14:09 dev drwxr-xr-x 5 root sys 512 Feb 11 14:06 devices drwxr-xr-x 58 root root 4096 Feb 14 12:36 etc drwxr-xr-x 2 root sys 512 Feb 11 13:46 export dr-xr-xr-x 1 root root 1 Feb 11 14:11 home drwxr-xr-x 12 root sys 512 Feb 11 13:25 kernel lrwxrwxrwx 1 root root 9 Feb 11 13:21 lib -> ./usr/lib |
Example 4–18 Issuing a Remote Command With a Timeout
Timeouts are measured in seconds. The default timeout is two hours. If you want to turn the timeout off, type a value of zero into the command. The following example shows how to issue a remote command with a timeout that is set to 20 seconds.
N1-ok> start server hdco25 command "/root/sleep.sh 60" timeout 20 Job "10" started. |
The following command-line example shows how view the results of the remote command by using the show command.
N1-ok> show job 10 Job ID: 10 Date: 2005-02-15T16:46:45-0700 Type: Remote Command Status: Completed Owner: root Errors: 0 Warnings: 0 Step 1: Type: 103 Description: native procedure /bin/sh /opt/sun/n1gc/bin/remotecmd.sh :[RCMD_KEY] Start: 2005-02-15T16:46:48-0700 Completion: 2005-02-15T16:47:10-0700 Result: Complete Exception: No Data Available . . . Result : Server: hdco25 Status: -2 Message: Command running on hdco25 did not finish within the specified time limit of 20 seconds. Command: /root/sleep.sh 60 Standard Output: Sleeping for 60 seconds... |
Example 4–19 Issuing a Remote Command on a Server Group
The following command-line example shows how to issue a remote command on a server group by using the start command.
N1-ok> start group g1 command "/bin/ls -l /" Job "24" started. |
The following command-line example shows how view the results of the remote command by using the show command.
N1-ok> show job 24 Job ID: 24 Date: 2005-02-15T08:31:20-0700 Type: Remote Command Status: Completed Owner: root Errors: 0 Warnings: 0 Step 1: Type: 103 Description: native procedure /bin/sh /opt/sun/n1gc/bin/remotecmd.sh :[RCMD_KEY] Start: 2005-02-15T08:31:22-0700 Completion: 2005-02-15T08:31:26-0700 Result: Complete Exception: No Data Available . . . Result : Server: server1 Status: 0 Message: Command executed successfully. Command: /bin/ls -l / Standard Output: total 321 lrwxrwxrwx 1 root root 9 Feb 11 13:21 bin -> ./usr/bin drwxr-xr-x 4 root sys 512 Feb 11 13:25 boot drwxr-xr-x 3 root sys 512 Feb 11 14:27 cr drwxr-xr-x 15 root sys 4096 Feb 11 14:09 dev drwxr-xr-x 5 root sys 512 Feb 11 14:06 devices drwxr-xr-x 58 root root 4096 Feb 14 12:36 etc drwxr-xr-x 2 root sys 512 Feb 11 13:46 export dr-xr-xr-x 1 root root 1 Feb 11 14:11 home drwxr-xr-x 12 root sys 512 Feb 11 13:25 kernel lrwxrwxrwx 1 root root 9 Feb 11 13:21 lib -> ./usr/lib Server: server2 Status: 0 Message: Command executed successfully. Command: /bin/ls -l / Standard Output: total 321 lrwxrwxrwx 1 root root 9 Feb 11 13:21 bin -> ./usr/bin drwxr-xr-x 4 root sys 512 Feb 11 13:25 boot drwxr-xr-x 3 root sys 512 Feb 11 14:27 cr drwxr-xr-x 15 root sys 4096 Feb 11 14:09 dev drwxr-xr-x 5 root sys 512 Feb 11 14:06 devices drwxr-xr-x 58 root root 4096 Feb 14 12:36 etc drwxr-xr-x 2 root sys 512 Feb 11 13:46 export dr-xr-xr-x 1 root root 1 Feb 11 14:11 home drwxr-xr-x 12 root sys 512 Feb 11 13:25 kernel lrwxrwxrwx 1 root root 9 Feb 11 13:21 lib -> ./usr/lib |
See Also
Connecting to the Serial Console for a Server
This section describes how to open the serial console for a server.
To remotely access the serial console for a server, use the connect command with the server keyword.
Note –
The Command Line pane in the browser interface does not support this operation. You must use n1sh shell to access the connect command.
You can also perform this operation from the browser interface's Server Details page.
 To Open a
Server's Serial Console
This procedure describes how to remotely access the serial console of provisionable servers. This feature is particularly useful for performing diagnosis before and during the OS installation and during the server power cycle.
The terminal emulator applet that is used by the browser interface for the serial console feature does not provide a certificate-based authentication of the applet. The applet also requires that you enable SSHv1 for the management server. For certificate-based authentication or to avoid enabling SSHv1, use the serial console feature by running the connect command from the n1sh shell.
For most hardware platforms, the first user to log in is given read-and-write privileges on the serial console. Subsequent user sessions are in read-only mode. Sun Fire X4100 and X4200 servers do not support read-only mode, so subsequent user session requests fail.
When the escape sequence is issued, the connection closes and a disconnect from server-name message appears in the output. If another user has the console and you are in read-only mode, you are logged in to the console when the other user disconnects. When you click the Close button on the Serial Console window, the connection is closed.
The following list shows the supported serial console escape sequences:
-
ALOM – #.
-
Sun Enterprise X4100, X4200 – ESC (
-
Sun Fire V20z and V40z – ^Ec.
For HTTP connections, standard 128-bit SSL encryption is used for transport, authentication is password based, and a security session is used for each subsequent operation.
Note –
If another user is logged in to the serial console for the server, you are logged in with read-only privileges. If another user has logged in to the physical serial console on a SPARC server, you are logged in with read-only privileges. The physical serial console is separate from the one that is available from the ALOM port.
Steps
-
Choose All Servers from the View Selector menu.
The Servers table appears.
-
Select the server for which you want to open a serial console.
The Server Details page appears.
-
Choose Open Serial Console from the Actions menu.
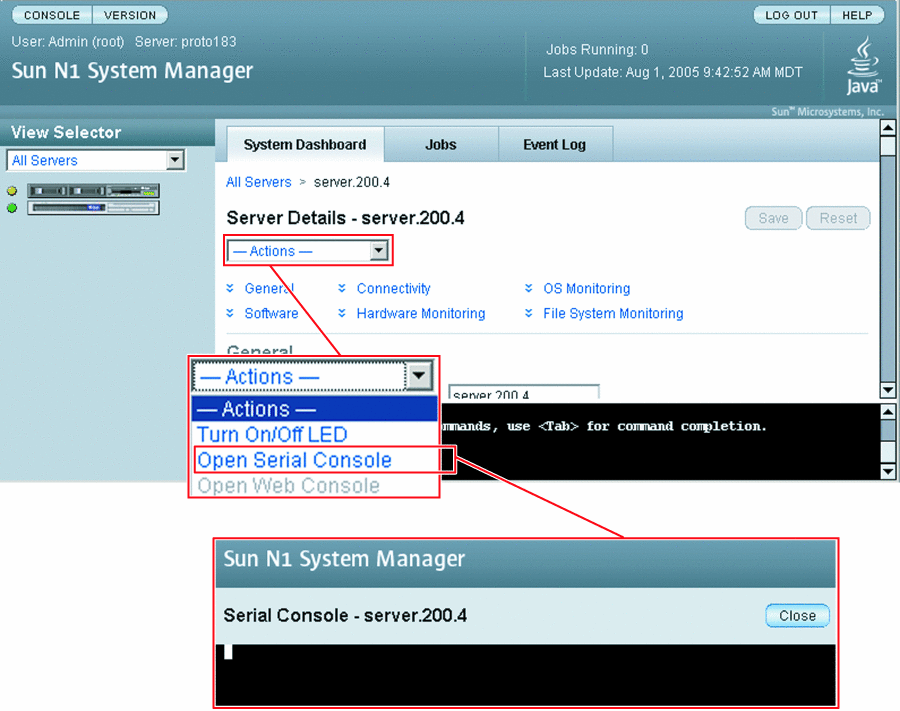
The management server redirects output of the provisionable server's serial console to the terminal emulator applet that is running in the browser interface.
The serial emulator appears and takes you either to the root prompt or a read-only prompt.
Note –If a server is powered off, the console still connects, but no output appears until the server is powered on.
Example 4–20 Connecting to the Serial Console Through the Command Line
When in serial console mode, the n1sh shell sends all user input to the remote serial console. The N1 System Manager neither blocks nor supplements the platform-specific exit-control sequence. Note that the connect command is not implemented in the browser interface's Command Line pane. The connect command may only be run from the n1sh shell.
This example shows how to connect to the serial console as a root user. However, any user role with the ServerConsole privilege may issue the connect command.
% ssh -l root server1.central:6789 password: Copyright (c) 2005 Sun Microsystems, Inc. All rights reserved Use is subject to license terms. N1-ok> connect server server1 |
Troubleshooting
If the Open Serial Console menu item does not appear, SSHv1 is not enabled. To enable SSHv1, use the n1smconfig utility. SeeTo Configure the Sun N1 System Manager System in Sun N1 System Manager 1.1 Installation and Configuration Guide.
See Also
After you have opened the serial console, you can view the detailed output during an OS deployment or a power cycle. For instructions, see Deploying OS Profiles and To Reboot a Server or a Server Group.
Refreshing and Finding Servers and Server Groups
This section describes the following tasks:
Refreshing Server and Server Group Data
To update server and server group data, use the set command with the server or group keyword and the refresh subcommand. This command updates the following data:
-
Hardware health information including power status, memory, processor information and NIC information
-
Firmware information
-
OS resource usage, such as CPU and filesystem usage, if an OS is loaded
-
OS update information if an OS update is loaded
 To Refresh
Data for a Server or a Server Group
Steps
-
Log in to the N1 System Manager.
See To Access the N1 System Manager Command Line for details.
-
Type one of the following commands:
N1-ok> set server server refresh
The server data is updated. See set server in Sun N1 System Manager 1.1 Command Line Reference Manual for details.
N1-ok> set group group refresh
The server group data is updated. See set group in Sun N1 System Manager 1.1 Command Line Reference Manual for details.
Note –Refresh job completion will be longer for server groups.
Finding a Server in a Rack
To illuminate the server's LED locator light, use the set command with the server keyword and the locator subcommand. For syntax and parameter details, type help set server at the N1–ok command line.
 To Find a Server
in a Rack
This procedure describes how to illuminate the LED locator light on a physical server.
Steps
-
Log in to the N1 System Manager.
See To Access the N1 System Manager Command Line for details.
-
Type the following command:
N1-ok> set server server locator=true
The LED locator light on the physical server illuminates. See set server in Sun N1 System Manager 1.1 Command Line Reference Manual for details.
Deleting Servers and Server Groups
To remove a server or group from the N1 System Manager, use the delete command with the server or group keyword.
For syntax and parameter details, type help delete server or help delete group at the N1–ok command line.
 To Delete
a Server or a Server Group
Steps
-
Log in to the N1 System Manager.
See To Access the N1 System Manager Command Line for details.
-
Type one of the following commands:
N1-ok> delete server server
The server is deleted from the N1 System Manager. See delete server in Sun N1 System Manager 1.1 Command Line Reference Manual for details.
N1-ok> delete group group
The group is deleted from the N1 System Manager. This command will not remove servers from the N1 System Manager. See delete group in Sun N1 System Manager 1.1 Command Line Reference Manual for details.
- © 2010, Oracle Corporation and/or its affiliates
