| Solstice Enterprise Manager 4.1 Customizing Guide |
Using the Event Logs Tool
The Event Logs tool enables you to create, modify, and delete log objects.
This chapter describes the following topics:
- Section 5.1 Log Process Overview
- Section 5.2 Starting the Event Logs Tool
- Section 5.3 Using the Event Logs Tool
- Section 5.4 Defining the CMIS Filter
- Section 5.5 Sample CMIS Filters
- Section 5.6 Event Logs Tool Configuration File
5.1 Log Process Overview
A log object is a software entity that collects records of event notifications. Agents create event notifications when they detect a change in the state of a managed resource. When a notification arrives at the Solstice Enterprise Manager (Solstice EM) Management Information Server (MIS), a record of the notification is appended to a log object if the notification passes a log filter (called a discriminator construct), or is discarded.
Note – Log objects are also called "logs" and the terms "log" and "log object" are used interchangeably in this chapter.
You can browse log records at any time using the Log Entries tool. (The Log Entries can be invoked by selecting Actions \xd4 Log Entries, or by double-clicking on Event Logs.)
An MIS can have any number of log objects. As shipped with Solstice EM, the MIS has a single log object, AlarmLog, which is visible when you invoke the Event Logs tool. The default discriminator for AlarmLog ensures that records are logged for SNMP trap notifications (alarms forwarded from remote SNM managers by Cooperative Consoles), Nerve Center alarms, and OSI standard alarms. By default all event notifications are logged to AlarmLog other than the following notifications, which are explicitly excluded:
- attributeValueChange
- objectCreation
- objectDeletion
- stateChange
This default log object may be sufficient for your needs. However, Event Logs tool makes it easy to create new log objects as and when required.
A discriminator construct is a CMIS filter that determines whether a log record is created under a log object. A log record is defined for each event notification. This mapping from event notification to log record is stored in the MIS at subsystemID="EM-MIS"/listname="event2ObjectClass" in attribute evr2oclist.
Each notification has an attribute describing its notification type. Common notification types are shown in TABLE 5-5, but the set is open-ended, requiring only that each new type have a registered OID. For information on adding new, user-defined event types to the MIS is discussed in Chapter 6 of Management Information Server (MIS) Guide.
See Section 5.4 Defining the CMIS Filter, for detailed information about log filters.
Every notification the MIS receives is passed to each log object that has been created. Each log object then applies its own log filter to decide whether to keep a record of the notification or ignore it.
5.1.1 Attributes of a Log
Each log object has the attributes shown in the following table. Some attributes can be modified. All of these attributes are accessible through the Event Logs tool.
A notification record is logged only if all the following criteria are met:
- The notification is acceptable to the log object's discriminator.
- The log object has the capacity to receive the record or permits overwriting.
- The log object is unlocked.
If a notification is acceptable to the log filters of several log objects, it is recorded in each of them.
Note – Creating multiple logs with overlapping criteria has the potential for storing duplicate copies of notifications. For example, if you create a log, SNMPLog, to record enterpriseSpecificTrap notifications, you would be storing duplicate copies of enterprise-specific traps since these are, by default, logged to AlarmLog. You could avoid this duplication, in this case, if you were to add enterpriseSpecificTrap to the event types excluded from the AlarmLog.
5.1.2 Log Records Generated by Nerve Center Request Actions
Nerve Center requests are based on templates that are written in Request Condition Language (RCL). Among the functions available in RCL are alarm(), alarmStr(), and alarmOi(), which generate a Nerve Center alarm. When a running Nerve Center request invokes any of those functions, the default AlarmLog log object creates log records to record the alarms. The RCL alarm-logging functions are described in Chapter 22. In the Event Logs tool, you can modify the log filter for the default log object to filter out these alarms. Alternatively, you can, for example, create a new log object that accepts only Nerve Center alarms.
5.2 Starting the Event Logs Tool
The Event Logs tool may be started by:
- Selecting the Event Logs tool icon in the Network Tools window
- Selecting Tools \xd4 Event Logs in other Solstice EM tools (for example, the Network Views or Log Entries)
- Entering the following command from the command line:
Note – You must source /opt/SUNWconn/bin/emenv.csh before running the command.
If you start the Event Logs tool from the command line, and you are a non-root user, you might receive a Login window, depending upon whether or not password authentication is turned on. To proceed, enter your password and click OK. Your access to the Event Logs tool functions depends on the permissions granted to you through Access Control. For more information about password authentication and granting permissions.
The optional parameters of the em_logmgr command are described in the following table.
Before starting, the Event Logs tool looks for the.em_logmgr.cf configuration file in your home directory. If this file is not found, the default Event Logs tool properties are used. The format of the configuration file is described in Event Logs Tool Configuration File."
5.3 Using the Event Logs Tool
Before using Event Logs tool, decide on the types of event notifications you want to log. To create a new log object, use the Event Logs tool to name the log object and fill in the modifiable attributes described in TABLE 5-1.
All of the log attributes are simple, except for the log filter. Specify the log filter using the ASN.1 syntax for a CMIS Filter. The easiest way to create a log filter is to copy a construct from an existing log and paste it into the log filter field in the Event Logs tool's Log Creation window, where you can modify the construct to suit your needs.
Log filters are discussed in detail, with examples presented, in Section 5.4 Defining the CMIS Filter.
5.3.1 Accessing Logs on a Remote MIS
The Event Logs tool can be used to create or modify logs on the local MIS or a remote MIS.

To Display Logs on a Specified Remote MIS
- Select File \xd4 Customize Tools menu to retrieve the Properties window, shown in the following figure, which is used to choose the locations from which the log objects are to be read.
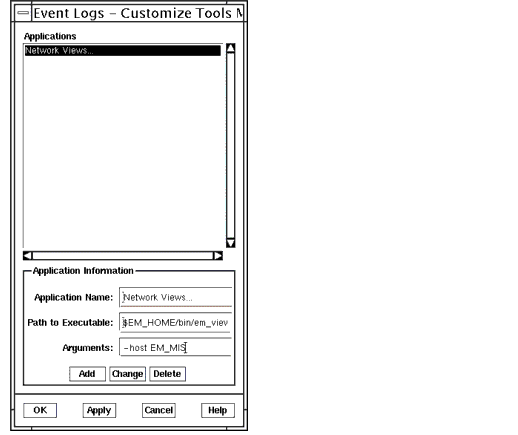
FIGURE 5-1 Customize Tools Menu
- Specify the name of a remote MIS, which will be shown as an additional FDN in the Available FDNs list. The logs from the specified MIS will also be available for you to see.
- Specify the location(s) from which the Event Logs tool will read the log objects by selecting it in the Available FDNs list and clicking on the display.
Once you specify the location(s), click either OK or Apply at the bottom of the window, and the log object information will be displayed in the Event Logs tool table.

To Create a New Log
1. Select Actions \xd4 Create Log from the Event Logs window.2. Click Create.
- Fields in this window allow you to select the following log attributes:
- Enter the name of the MIS on which you are creating the log object in the MIS field. To create a log object on a remote MIS, you must first connect to that MIS by using the MIS Connections. For more information, refer to Chapter 6 in Management Information Server (MIS) Guide.
- Enter the name of the log object in the Log Name field.
- Enter the maximum log size (in octets) in the Maximum Size field. An entry of 0 indicates no limit to the log size. Such an entry poses the obvious danger of overwhelming your storage space.
- Select either On or Off for the Event Capture parameter. This parameter determines whether the log object can be written to (on) or not (off). Most often, you leave this parameter in its default, on state. Select locked to prevent writing to the log object.
- Select either On or Off for the WrapWhenFull parameter. This parameter determines what the Event Logs tool does when the log object reaches the maximum (maxLogSize) size. In the on state, the log object wraps around to the beginning of the file and overwrites existing log records. When turned off, no new records will be created for this log object.
In the example in the following figure, a new log called SNMLog is being created to log SunNet Manager event notifications (snmAlarmEvents).
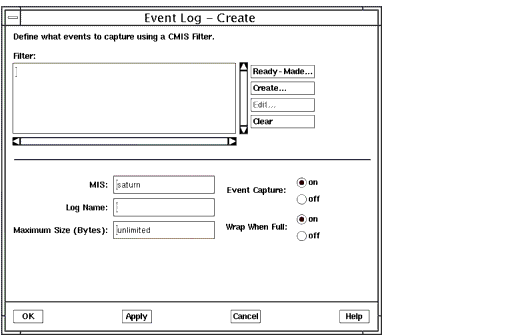
FIGURE 5-2 Creating a New Log3. To define the log filter, click Create to invoke the CMIS Filter window.
- A log filter is a Common Management Information Service (CMIS) filter. A notification is appended to a log object only if it passes the log's CMIS filter. A CMIS filter defines a test that evaluates to either true or false for each notification tested. (Refer to Section 5.4 Defining the CMIS Filter, for detailed information about creating log filters.) The `item', `and', `not', and `or' buttons are used to add components to the CMIS filter. In the following figure, the Item button has been selected. This invokes the CMIS Filter Item window, as shown. In this example, a simple discriminator that selects all and only SNM events is the goal. Thus, the equality operator has been selected and snmAlarmEvent is entered as the target attribute value. Clicking OK adds the item to the CMIS Filter window.
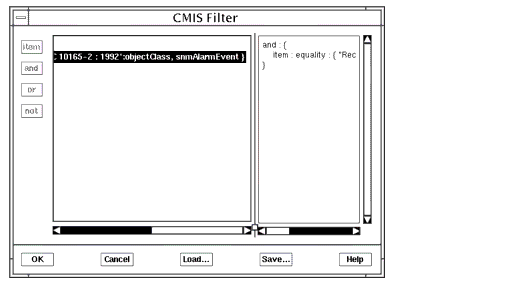
FIGURE 5-3 Defining a Discriminator to Log SNM Events4. Click OK in the CMIS Filter window to add the log filter to the Create Log window.5. Enter the Log Name and click OK or Apply in the Create Log window to add the new log to the MIS.

To Delete a Log
1. To delete a log, select the log object (one or more) from the main window.2. Select Actions \xd4 Delete to remove the selected log object(s) from the MIS.
- Deleting a log object also deletes its corresponding log record. You will be prompted to confirm your action before the log object and its corresponding log record are deleted.

To Modify a Log's Properties
1. To modify the properties of a log (such as the maximum size), select the log object from the main window.2. Select Actions \xd4 Properties to modify or view the properties information about the selected log object(s).
- This will bring up the Event Logs-Properties window, for that particular Log Object, allowing you to modify the selected log object as necessary. If multiple log objects are selected, then the Log Object window will display only the properties for the first log object selected.
- To modify the log filter for the selected log, click Edit.
- The CMIS Filter window will be displayed. In the example in the following figure, the default AlarmLog discriminator is being modified to exclude enterpriseSpecificTrap notifications.
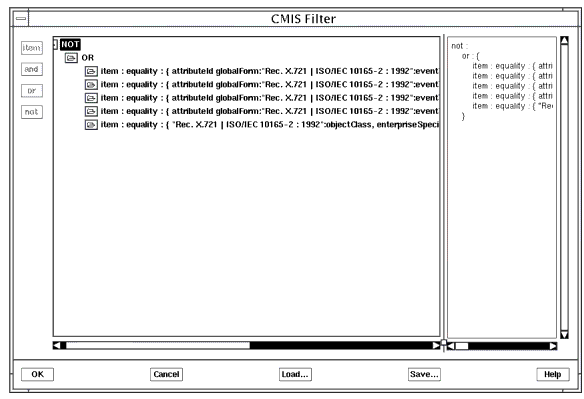
FIGURE 5-4 Modifying a Log's log filter

To Export Logs to a File
- Select File \xd4 Export to a File to save the log records to a file. This brings up a file selection window from which you can do one of the following:
- Select the path and file name to which you want to save the log records.
- Enter the path and file name of the file in the Selection field.
The records are stored in the historical log format specified in Chapter 6 of Management Information Server (MIS) Guide.
This option is grayed out unless one or more of the log objects in the main window is selected.
5.3.2 Importing Logs from a File into the Event Logs Tool
You can import log records from other log files, such as the Alarm Log, into the Event Logs tool.

To Import Logs
1. Select File \xd4 Import from the Event Logs window to read exported log records.
- The log records in the file you want to import into the Event Logs window must be in the MIS.
2. Select the desired file from the list or enter the name of the file in the Selection field.
- The log record will be imported into the Event Logs window.
The file must be in the historical log format specified in the Chapter 6 of Management Information Server (MIS) Guide.
Note – em_imex does not create a deleted Log.
5.3.3 Configuring Display of Log Properties
The View Properties window is used to configure the way in which log objects are displayed in the Event Logs tool main window.
- Select View \xd4 Column Headings in the Event Logs window to open the Event Logs - Column Headings window, shown in the following figure.
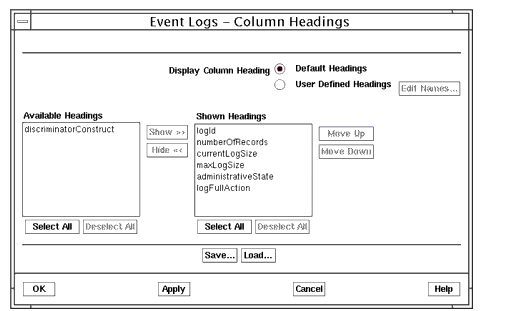
FIGURE 5-5 Viewing Log Objects in the Column Headings Window5.3.4 Adding Tools to the Event Logs Menu
You can add other tools to the Event Logs window's Tools menu.
1. To add another tool, select File \xd4 Customize Tools Menu from the Event Logs window's Tools menu.
- This displays the Customize Tools window.
2. Select the Tool you would like to add to the Event Logs menu.3. Click Add, then OK or Apply to complete your addition.
- If you click OK, you dismiss the window. If you click Apply, the window remains and you can add more tools by repeating Step 2 and Step 3.
- The Tool Name field is the name that is added to the Tools menu.
- In the example in the following figure, clicking Add and then OK or Apply will add the Network Views to the Event Logs window's Tools menu.
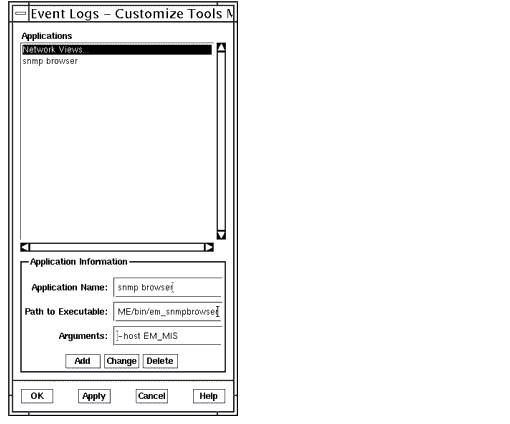
FIGURE 5-6 Customize Tools Menu Window5.4 Defining the CMIS Filter
A log filter is an expression used to decide which notification types will be accepted by a particular log object. The general rules for such an expression are contained in the ASN.1 definition of a CMIS filter, in ISO 9595.1
Within a log filter, a single test is called an item. Within an item, a relationship is written with the comparison operator preceding a pair of curly braces, which enclose an operand. The following is the general form:
item : <operator> : {
<operand>
}
The term item is one of four keywords that can be used to specify the format of a CMIS filter. These format specifiers can be item, and, or, or not. The following table defines these terms.
TABLE 5-3 Format Specifier Definitions item A single FilterItem that is a choice of a test for equality, less than or equal, greater than or equal, substring matching, or presence in. These filter words are described in TABLE 5-4. and The logical AND of a set of CMIS filters. or The logical OR of a set of CMIS filters. not The negation of the sense of one CMIS filter.
The <operator> in the preceding example is the word in a given filter item. The following table defines the operators.
The <operand> is an attribute, which, in GDMO terms, is a name-value pair. So, we can further refine the general form as:
item : <operator> : {
<name_string>,
<value_string> }
Using the and or format specifier, you can build nested filters. These are of the form:
{item : <operator> : { <name_stringA>, <value_stringA> },item : <operator> : { <name_stringB>, <value_stringB> }}As an example of a filter used as a log filter, to test whether the subject of an event notification is a test, the expression might be:
item : equality : {objectClass, test }In the preceding example, objectClass (the attribute name) and test (the attribute value) combine to form a single attribute, against which an event notification will be tested for equality.
Use the format specifier and, defined in TABLE 5-3, to perform a logical AND on two filter items. For example, to test whether the subject of notification is a test and the severity of the notification is minor, specify the following:
and : { item : equality : {objectClass, test },item : equality : {perceivedSeverity, minor }}Multiple items are separated by a comma (last character in first line above).
5.4.1 A CMIS Filter That Accepts Notifications of a Specific Type
The following example tests the notification type in an incoming event notification. The OID { 2 9 3 2 7 14 } specifies an event notification. The notification type is identified by the OID { 2 9 3 2 10 <x> }:
item : equality : { globalForm : {2 9 3 2 7 14 }, { 2 9
3 2 10 x}}
In this expression, substitute one of the values 1 through 15 for <x> from the list of notification types shown in the following table.
Note – Within a log filter, you can express OIDs in text, rather than numeric form.
In addition to the OSI-standard notifications shown in the above table, the alarmLog object accepts alarms of type nerveCenterAlarm, the OID for which is: 1.3.6.1.4.1.42.2.2.2.8.3.111.
5.4.2 CMIS Filter with Multiple ANDs
The following example is a sample log filter that uses the and format specifier to combine three filter items.
The effect of the preceding construct is as follows: If there is an event of the log object type attributeValueChange to minerva, log that event.
5.4.3 A CMIS Filter That Accepts All Notifications
The following exploits the fact that and over an empty set is the identity element for and, namely 1. This produces a log filter that accepts all notifications:
and : { }This example should never be used in actual practice, because you will likely overwhelm your machine resources in logging data.
5.4.4 A CMIS Filter That Accepts No Notifications
The corresponding identity element for or yields a log filter that accepts nothing:
or : { }As with the and example, this construct is shown for tutorial purposes only, and is not intended for use in actual practice.
5.5 Sample CMIS Filters
The following subsections present the log filters you can enter in the Event Logs tool's Log Creation to create log objects that collect log records for given event notifications.
To complete the creation of a log object, in addition to the log filter, you must fill in values for maxLogSize, logFullAction, administrativeState, and operationalState. The choices of these values depend on your specific needs. The value for maxLogSize depends on your logging requirements and your storage resources.
5.5.1 Creation of an Object Instance
To create a log object that logs notifications reporting the creation of object instances, use the following log filter:
{attributeId globalForm : "Rec. X.721 | ISO/IEC 10165-2 : 1992" :eventType,attributeValue globalForm : "Rec. X.721 | ISO/IEC 10165-2 : 1992" :objectCreation}5.5.2 Deletion of an Object Instance
To create a log object that logs notifications reporting the deletion of object instances, use the following log filter:
{attributeId globalForm : "Rec. X.721 | ISO/IEC 10165-2 : 1992" :eventType,attributeValue globalForm : "Rec. X.721 | ISO/IEC 10165-2 : 1992" :objectDeletion}5.5.3 Attribute Value Change of an Object Instance
To create a log object that logs notifications reporting attribute value changes of object instances, use the following log filter:
{attributeId globalForm : "Rec. X.721 | ISO/IEC 10165-2 : 1992" :eventType,attributeValue globalForm : "Rec. X.721 | ISO/IEC 10165-2 : 1992" :attributeValueChange}5.5.4 State Changes Received From Agent
To create a log object that logs notifications reporting the state changes received from agents, use the following log filter:
{{{{{{{5.6 Event Logs Tool Configuration File
Upon starting, the Event Logs tool looks for the.em_logmgr.cf configuration file in your home directory; otherwise, it looks for it in the $EM_HOME/config directory. (The file names are the same in the config directory except for the absence of the initial dot.) If the configuration file is not found, the Event Logs tool uses the default properties.
The alphanumeric characters in each line of the configuration file must begin at the left edge. Each statement must be on a separate line.
The configuration file has the following format:
CODE EXAMPLE 5-2 Event Logs Tool Configuration File
The information in this file corresponds to the Properties and View Properties windows. Although this file shouldn't be modified manually, you might want to change the width field, which determines the width of the cells in the table.
1 ISO/IEC 9595. Information technology - Open systems interconnection - Common Management information Service definition. 1991.
|
Sun Microsystems, Inc. Copyright information. All rights reserved. |
Doc Set | Contents | Previous | Next | Index |