Tape and CD-ROM Drives
Use and Maintenance
Refer to the documentation that came with your device for information on use and maintenance.
Removing/Replacing a Tape or CD-ROM Drive
-
Remove the front bezel.
-
Grasp the front bezel on both sides near the center.
Place your thumbs on top of the front bezel and place your other fingers at the slight indentations under the front bezel for leverage.
-
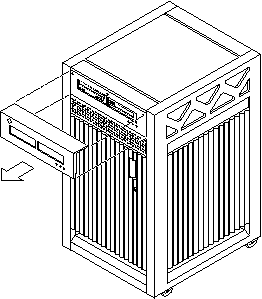
Pull the front bezel straight out toward you and set it aside. See Figure 8-2.
Figure 8-2 Front Bezel

-
-
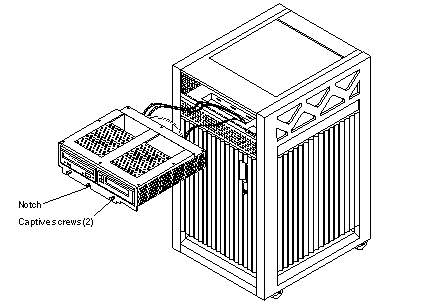
Loosen the bottom two captive screws that secure the media tray to the chassis tray. See Figure 8-3.
-
Use a screwdriver in the notch at the bottom center of the tray to assist in separating the media tray from the rear slip connectors, and pull out the tray containing the devices. See Figure 8-3.
Figure 8-3 Media Tray Removal and Replacement

-
To access the devices in the media tray, turn the tray over and place it upside down on top of the E3500 cabinet.
To remove/replace an existing device, perform Step 5. To install a tape drive for the first time, proceed to Step 6.
-
To replace a CD-ROM or a tape drive:
-
Loosen the four screws securing the drive to the media tray.
-
Disconnect the drive data and power connector from the socket in the media tray, and slide the drive out of the tray.
-
Set the replacement drive SCSI address to 6 for a CD-ROM drive, to 5 for a tape drive.
-
Slide the replacement drive into the media tray. Use the four screws removed in Step 5a to secure the drive; tighten the four screws.
-
Connect the data and power connector on the drive into the socket in the media tray.
-
-
To install a tape drive for the first time:
-
Remove the filler mechanism by loosening the captive screws and then removing the unit.
-
Set the SCSI address on the tape drive to 5.
-
Slide the drive into the media tray and secure the drive to the tray using the four screws removed in Step 6b.
-
Connect the data and power connector on the drive into the socket in the media tray.
-
To complete the installation, reverse Step 1 through Step 4.
-
- © 2010, Oracle Corporation and/or its affiliates
