Chapter 2 Configuring Solstice PPP using pppinit
This chapter tells you how to create a basic configuration using the script pppinit(1M), and how to add user accounts for incoming connections using admintool(1M).
About pppinit
The script pppinit helps you create a basic configuration of IP point-to-point connections over synchronous and asynchronous PPP links. It requests information about your network, and enters this information in the configuration files for Solstice PPP (ppp.conf and link.conf).
You should run pppinit when you configure Solstice PPP for the first time. To create more complex configurations, including IP point-to-multipoint configurations, edit the configuration files to add the relevant information. See Chapter 4, Editing the Configuration Files for detailed instructions.
Adding Hosts for Solstice PPP
Before running pppinit, edit the file /etc/hosts to enter the source and destination addresses used for synchronous PPP links.
For example:
127.0.0.1 localhost 129.xxx.xxx.32 epic loghost 129.xxx.xxx.117 epic-ppp 129.xxx.xxx.119 odyssey-ppp 129.xxx.xxx.01 olympus-ppp |
This step is necessary because Solstice PPP is started before the naming service (NIS/NIS+) when the machine is rebooted, so it reads the host information from the local files.
If you configure your machine to accept incoming asynchronous connections, you also need to create user accounts for each remote host. See "Adding User Accounts for Incoming Connections" for detailed instructions.
Using pppinit
Running pppinit overwrites any existing configuration. Ideally, you should use pppinit to configure Solstice PPP for the first time only, and then edit the configuration files thereafter. See Chapter 4, Editing the Configuration Files for details of the keywords contained in the configuration files for Solstice PPP.
To create a configuration of IP point-to-point connections over synchronous and asynchronous PPP links:
-
Log in as root, or become superuser.
-
Start pppinit. Note that this will overwrite any previous configurations.
prompt# /usr/bin/pppinit
-
Select a synchronous or an asynchronous link for configuration.
Type 1 or 2 to configure asynchronous links. Type 3 to configure synchronous links. Type W to exit from the script immediately, without saving any changes.
Welcome to the Solstice PPP 3.0 configuration script

	[1] - Asynchronous client.
	[2] - Asynchronous client/server.
	[3] - Synchronous.
	[W] - Exit Without saving

		Choice:
Configuring Synchronous Links
To configure synchronous links you must define one or more synchronous devices, and the IP interfaces that will be associated with them.
Configuring Synchronous Devices
-
Enter the Unix device name of the serial port for this link.
The two on-board serial ports are named zsh0 (port A) and zsh1 (port B). High speed interface ports have names of the form hihn.
Unix device for serial interface (zsh0, hih0, ...): zsh0
-
Specify the type of clocking for the port.
Choose Internal, if the system baud rate provides clocking, or External if the clock is provided by some other device. You can also specify your own clocking parameters for the transmit (txc) and receive (rxc) clocks.
	Type of clocking for this port
	 [1] - Internal (loopback=no txc=baud rxc=rxc)
	 [2] - External (loopback=no txc=txc  rxc=rxc)
	 [3] - Specify own clocking parameters

		Your choice [1]:
-
Specify the line speed, if required.
If you chose internal clocking in the previous step, you must also specify the line speed for the device. The default value 19200 is the optimum line speed for the on-board serial interfaces (zshn). .
Line speed [19200]:
-
Confirm the configuration of your synchronous device.
The script displays the choices you selected. Type y to add this device to the configuration file.
	sync_device	syncdev0
	unix_device	zsh0
	line_speed	19200
	tx_clock	baud
	rx_clock	rxc

Ok to add this entry? [y]: y
Configuring IP Interfaces for Synchronous Devices
-
Enter the local IP address.
Enter a hostname that appears in the file /etc/hosts on your machine, or enter an IP address using dot notation. Press Return to accept the default hostname.
Local IP address [papyrus]: 129.xxx.xxx.11
-
Enter the remote IP address.
Enter a hostname that appears in the file /etc/hosts on your machine, or enter an IP address using dot notation.
Remote IP address: epic
-
Enter the Maximum Transmission Unit (MTU).
By default, the MTU is set to 1500, which is the optimum value for Ethernet connections, and is sufficient in most cases. Enter a new value for the MTU (between 60 and 8232), or press Return to accept the default.
IP Maximum Transmission Unit (MTU) [1500]:
-
Enter the names of the synchronous devices that the interface will use.
The script displays a list of all the synchronous devices that you defined earlier. If you associate several devices with a single synchronous interface, you enable load-sharing for this link.
Select synchronous interfaces for ipdptp0
Choose between:

	  zsh0              zsh1

Enter a comma separated list :
	  zsh0,zsh1
-
Confirm the configuration of your IP interface.
The script displays the choices you selected. Type y to add this device to the configuration file.
ifconfig ipdptp0 plumb
ifconfig ipdptp0 papyrus epic mtu 1500 netmask 255.255.255.0 up

sync_path
		ip_interfaceipdptp0
		unix_devicezsh0

sync_path
		ip_interfaceipdptp0
		unix_devicezsh1

Ok to add this configuration [y]? y
Configuring Asynchronous Links
To configure an asynchronous link you must define one or more asynchronous devices (modems), the IP interfaces that will be associated with them, and any remote hosts to which you will be able to initiate connections.
Configuring Asynchronous Devices
-
Specify the type of modem connected to your machine.
The script displays a list of the modems described in the modem database file /etc/opt/SUNWconn/ppp/modems. You can add other modem descriptions to this file.
Select one modem from your database
There are 11 modems available:
	 [0]	- Null Modem
	 [1]	- BocaModem V.34 DataFax
	 [2]	- AT&T DataPort Express
	 [3]	- Standard hayes
	 [4]	- Cardinal V.34/V.FC 28.8 data/fax
	 [5]	- SupraFaxModem 288
	 [6]	- Hayes Accura 144B
	 [7]	- Hayes Accura 288V.FC
	 [8]	- Practical 14400 V32bis
	 [9]	- USRobotics Sporter 14400
	 [10]	- USRobotics Sporter 288

Modem type (+/- to scroll the list): 1
-
Specify the Unix device for the port to which the modem is connected.
List of unix devices available: [ ttya ttyb ]
Unix device for serial interface [ttya]:
-
Specify the line speed for the connection between the modem and the machine.
For optimum performance, the line speed should be as high as possible. The default value should be used in most cases.
Line speed [38400]:
-
Specify the type of calls that this modem will be used for.
You can use the modem to initiate calls to remote hosts (dial only), to accept calls from remote hosts (answer only), or to both initiate and accept calls (both).
What type of calls will this modem be used for:
	 [1] - Dial only
	 [2] - Answer only
	 [3] - Both
	Choice (default 1): 3
-
Confirm the configuration of your modem.
The script displays the choices you selected. Type y to add this device to the configuration file.
dialup_device pppdev0
		unix_devicettya
		line_speed38400
		modemBocaModem V.34 DataFax
		call_setupboth

Ok to add this entry [y]? y
-
Repeat the previous steps until you have configured all the asynchronous devices attached to your machine.
Configuring Modem Pools (optional)
If you define two or more asynchronous devices, you can configure a modem pool. The link manager will choose a modem from the pool to call the remote host.
-
Indicate if you want to configure a modem pool.
Do you want to set up modem pools? [n] y
-
Specify the devices included in the modem pool.
The script displays a list of the devices you defined earlier. Enter a list of devices separated by commas or spaces.
Choose between:

	  pppdev0       pppdev1

Enter a comma separated list to define the pool:
	  pppdev0, pppdev1
-
Confirm the configuration of your modem pool.
The script displays the choices you selected. Type y to add this device to the configuration file.
pool_device pool0
		pppdev0    pppdev1

Confirm to add this entry [y]: y
Configuring Remote Hosts for Dialing
Note -
If you configured your modems to accept calls initiated by remote hosts only, you do not need to enter any remote host information.
-
Enter the name of the remote host.
This is the name that will be used to identify the remote host for outgoing calls. You can choose any text string as the name of a remote host.
Name of the remote host: odyssey
-
Enter the telephone number that will be used to initiate calls to this remote host.
Phone number for this host: 1234567890
-
Enter the name of file that contains the CHAT (or connect) script used to initiate calls to this remote host.
The CHAT script defines the dialog used to login the remote host, including the login id and the login password sent by the local host. This dialog is dependent on the operating system running on the remote host.
Filename of the chat script: odyssey.chat
If the file you specify does not exist, the script can create a template file for making Unix connections in the directory /etc/opt/SUNWconn/ppp/script. You may need to edit this template if you are connecting to a remote host running another operating system.
The file you specified does not exist. This script can create
a template file, with default parameters for connecting
to Unix systems. Do you want to do this now? [y] y
Enter the login id that your machine will send to the remote host to initiate a call. There must be a corresponding user account created on the remote host. The login id must be eight characters or less.
Login id sent to odyssey (up to 8 characters): ppp0
Enter the password that your machine will send with the login id. Type it again to confirm. The password you type is not displayed on the screen.
Password:
Re-enter Password:
-
Indicate if you want to use a specific modem for making calls to this remote host.
Type n if you have only one modem, or if you want to be able to use any modem to call this remote host. If you type y in response to this question, the script will list the modems and modem pools you configured earlier. Enter the name of the modem or modem pool you want to use to call this remote host.
Do you want to set a specific pool or modem for this host [n]:
-
Confirm the configuration of your remote host.
The script displays the choices you selected. Type y to add this host to the configuration file.
remote_host	 epic
		phone_number1234567890
		chat_scriptodyssey.chat

Ok to add this entry [y]? y
-
Repeat the previous steps until you have defined all the remote hosts to which your machine will initiate calls.
Configuring IP Interfaces to Answer Calls
Note -
If you configured your modems to initiate outgoing calls only (dial only), you cannot configure IP interfaces to answer calls.
-
Indicate that you want to set up an IP interface to accept incoming calls.
By default, IP interfaces are assigned names of the form ipdptpn.
IP information for ipdptp1

Do you want to use this interface to accept calls
initiated by a remote host [y]? y
-
Enter the local IP address for this interface.
Enter a hostname that appears in the file /etc/hosts on your machine, or enter an IP address using dot notation. Press Return to accept the default hostname.
Local IP address information
		Enter an IP host that is listed in your hosts map
		or an IP address with internet dot notation

		Local IP address [papyrus]: 129.xxx.xxx.11
-
Enter the remote IP address for this interface.
Enter a hostname that appears in the file /etc/hosts on your machine, or enter an IP address using dot notation.
Remote IP address information
		Enter an IP host that is listed in your hosts map
		or an IP address with internet notation

		Remote IP address: odyssey
-
Enter the IP netmask for this interface.
IP netmask for this interface [255.255.255.0]:
-
Enter the Maximum Transmission Unit (MTU).
By default, the MTU is set to 1500 bytes, which is the optimum value for Ethernet connections, and is sufficient in most cases. Enter a new value for the MTU (between 60 and 8232), or Press Return to accept the default.
IP Maximum Transmission Unit (MTU) [1500]:
-
Enter the login id that you expect to receive from the remote host associated with this interface.
You must create a user account on your machine that corresponds to this login id. The login id must be eight characters or less.
To accept calls using this interface, you must specify the login
id you expect to receive from the remote host. You must also create
a user account that associates this login id with a valid password.
Login id expected from remote host: od-login
Configuring IP Interfaces to Dial Calls
Note -
If you configured your modems to accept incoming calls only (answer only), you cannot configure IP interfaces to dial calls.
-
Indicate that you want to set up an IP interface to initiate calls to remote hosts.
Do you want to use this interface to initiate
calls to a remote host [y]? y
-
Enter the name of the remote host you want to be able to call.
The script displays a list of the remote hosts you defined earlier. Enter the name of one of these hosts.
Remote host for this interface: odyssey
-
Specify the timeout for calls to this remote host.
By default, the connection will timeout after 120 seconds of inactivity.
inactivity_timeout [120]: 60
Enabling Dynamic IP Address Allocation
Note -
If you configured your modems to initiate outgoing calls only (dial only), you are given an opportunity to enable dynamic IP address allocation.
-
Indicate that you want to use dynamic IP address allocation.
IP information for ipdptp0
Do you want to use dynamic IP allocation [y]? y
-
Enter the IP netmask for this interface.
IP netmask for this interface [255.255.255.0]:
-
Enter the name of the remote host you want to be able to call.
The script displays a list of the remote hosts you defined earlier. Enter the name of one of these hosts.
Remote host for this interface: odyssey
-
Specify the timeout for calls to this remote host.
By default, the connection will timeout after 120 seconds of inactivity.
inactivity_timeout [120]: 60
Saving your Configuration
You can either exit from pppinit without saving the configuration, or you can save the configuration to file.
Welcome to the Solstice PPP 3.0 configuration script [1] - Asynchronous client [2] - Asynchronous client/server [3] - Synchronous [W] - Exit Without saving [E] - Exit and Save |
If you type E (Exit and Save), the configuration is saved to file. You are given an opportunity to send the modem configuration command contained in the file /etc/opt/SUNWconn/ppp/modems directly to the modem.
 pppinit can set and save the configuration for all server
 modems according the modem database
        Do you want to do it now [y]?
|
Adding User Accounts for Incoming Connections
If you configure your modem to accept incoming calls, you must create a user account for each remote host. If your machine will initiate calls only, you can omit this step.
-
Log in as root, or become superuser.
-
prompt# /usr/bin/admintool &
-
Select User Account Manager, as shown in Figure 2-1.
Figure 2-1 Starting the User Account Manager

-
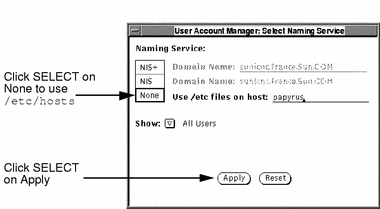
Select None as the Naming Service (Use /etc/hosts and /etc/passwd on local machine), as shown in Figure 2-2. Click SELECT on Apply to display a list of the current user accounts.
Figure 2-2 Selecting the Naming Service

-
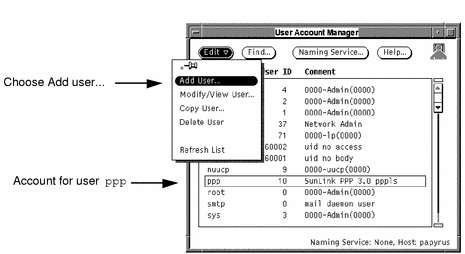
Choose Add user... from the Edit menu, as shown in Figure 2-3.
Note that a default account for the user ppp has been added automatically, but that you still need to set a password.
Figure 2-3 Adding a New User Account

-
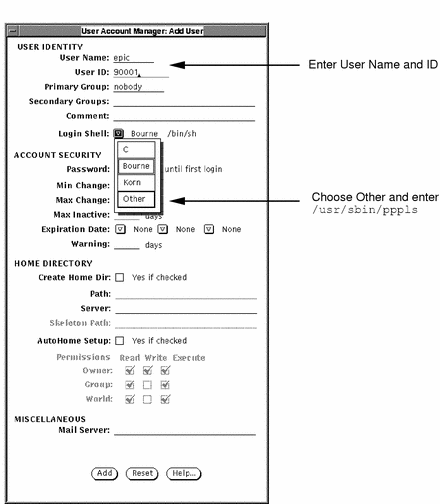
Enter a User Name, a User ID, and Login Shell for this account.
The User Name must be the same as the PPP login id assigned to the remote client, and the Login Shell must be /usr/sbin/pppls.
Figure 2-4 Entering Account Information

-
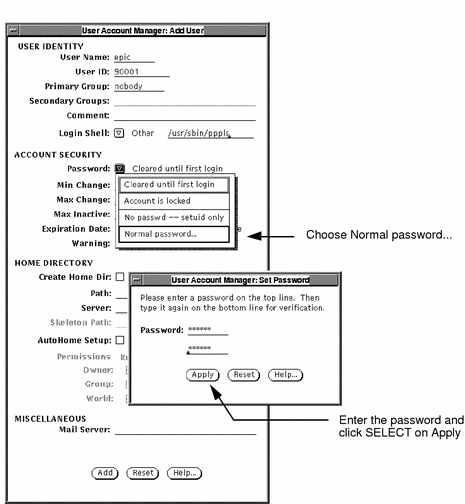
Enter the password expected from the client when it logs in, as shown in Figure 2-5.
Figure 2-5 Adding a User Password

-
Click SELECT on Add to add the user to the list of accounts.
Continue adding accounts until there is an account for each client.
- © 2010, Oracle Corporation and/or its affiliates
